


spring aop的应用这里就不讲了,自己百度
我们先看aop是什么时候被调用的,即使用了aop的bean的BeanPostProcessor的实现方法postProcessBeforeInitialization什么时候被调用的(我们都知道bean的什么周期有个扩展点就是BeanPostProcessor)
refresh方法--》finishBeanFactoryInitialization(beanFactory)
--》beanFactory.preInstantiateSingletons();--》getBean(beanName)
----》doGetBean---》createBean---》doCreateBean
protected Object doCreateBean(String beanName, RootBeanDefinition mbd, @Nullable Object[] args)
			throws BeanCreationException {

		// Instantiate the bean.
		BeanWrapper instanceWrapper = null;
		if (mbd.isSingleton()) {
			instanceWrapper = this.factoryBeanInstanceCache.remove(beanName);
		}
		if (instanceWrapper == null) {
			//实例化对象(这里获取到的是原生对象)
			instanceWrapper = createBeanInstance(beanName, mbd, args);
		}
		Object bean = instanceWrapper.getWrappedInstance();
		Class<?> beanType = instanceWrapper.getWrappedClass();
//省略部分代码。。。。。

		// Initialize the bean instance.
		Object exposedObject = bean;
		try {
			populateBean(beanName, mbd, instanceWrapper);
			//完成调用BeanPostProcessor的实现方法postProcessBeforeInitialization
			exposedObject = initializeBean(beanName, exposedObject, mbd);
		}
//省略部分代码。。。。。
}
我们继续进入initializeBean--》applyBeanPostProcessorsAfterInitialization
@Override
	public Object applyBeanPostProcessorsAfterInitialization(Object existingBean, String beanName)
			throws BeansException {

		Object result = existingBean;
		//遍历所以的BeanPostProcessor
		for (BeanPostProcessor processor : getBeanPostProcessors()) {
			//如果使用了AOP,则会在这里调用其实现方法(即代理的增强逻辑)
			Object current = processor.postProcessAfterInitialization(result, beanName);
			if (current == null) {
				return result;
			}
			result = current;
		}
//此时返回代理对象
		return result;
	}
此时我们知道spring中bean的aop是什么时候被代理的,而还不知道springaop是怎么在BeanPostProcessor扩展点进行代理的?
我们进入
postProcessAfterInitialization方法----》找到其实现类AbstractAutoProxyCreator:
---》wrapIfNecessary:
//部分代码
// Create proxy if we have advice.
		Object[] specificInterceptors = getAdvicesAndAdvisorsForBean(bean.getClass(), beanName, null);
		if (specificInterceptors != DO_NOT_PROXY) {
			this.advisedBeans.put(cacheKey, Boolean.TRUE);
			//获取代理对象
			Object proxy = createProxy(
					bean.getClass(), beanName, specificInterceptors, new SingletonTargetSource(bean));
			this.proxyTypes.put(cacheKey, proxy.getClass());
			return proxy;
		}
我们继续进去这个createProxy方法:
protected Object createProxy(Class<?> beanClass, @Nullable String beanName,
			@Nullable Object[] specificInterceptors, TargetSource targetSource) {

		if (this.beanFactory instanceof ConfigurableListableBeanFactory) {
			AutoProxyUtils.exposeTargetClass((ConfigurableListableBeanFactory) this.beanFactory, beanName, beanClass);
		}

		//创建一个代理工厂
		ProxyFactory proxyFactory = new ProxyFactory();
		proxyFactory.copyFrom(this);

		if (proxyFactory.isProxyTargetClass()) {

			// Explicit handling of JDK proxy targets (for introduction advice scenarios)
			if (Proxy.isProxyClass(beanClass)) {
				// Must allow for introductions; can't just set interfaces to the proxy's interfaces only.
				for (Class<?> ifc : beanClass.getInterfaces()) {
					proxyFactory.addInterface(ifc);
				}
			}
		}
		else {
			// No proxyTargetClass flag enforced, let's apply our default checks...
			if (shouldProxyTargetClass(beanClass, beanName)) {
				proxyFactory.setProxyTargetClass(true);
			}
			else {
				evaluateProxyInterfaces(beanClass, proxyFactory);
			}
		}

		Advisor[] advisors = buildAdvisors(beanName, specificInterceptors);
		proxyFactory.addAdvisors(advisors);
		//设置目标对象(即原生对象)
		proxyFactory.setTargetSource(targetSource);
		customizeProxyFactory(proxyFactory);

		proxyFactory.setFrozen(this.freezeProxy);
		if (advisorsPreFiltered()) {
			proxyFactory.setPreFiltered(true);
		}

		//通过工厂获取代理对象(这里的工厂会通过上面的一些配置,选择要使用jdk动态代理还是cglib动态代理)
		return proxyFactory.getProxy(getProxyClassLoader());
	}

	/**
我们进去getProxy方法---》createAopProxy().getProxy(classLoader)
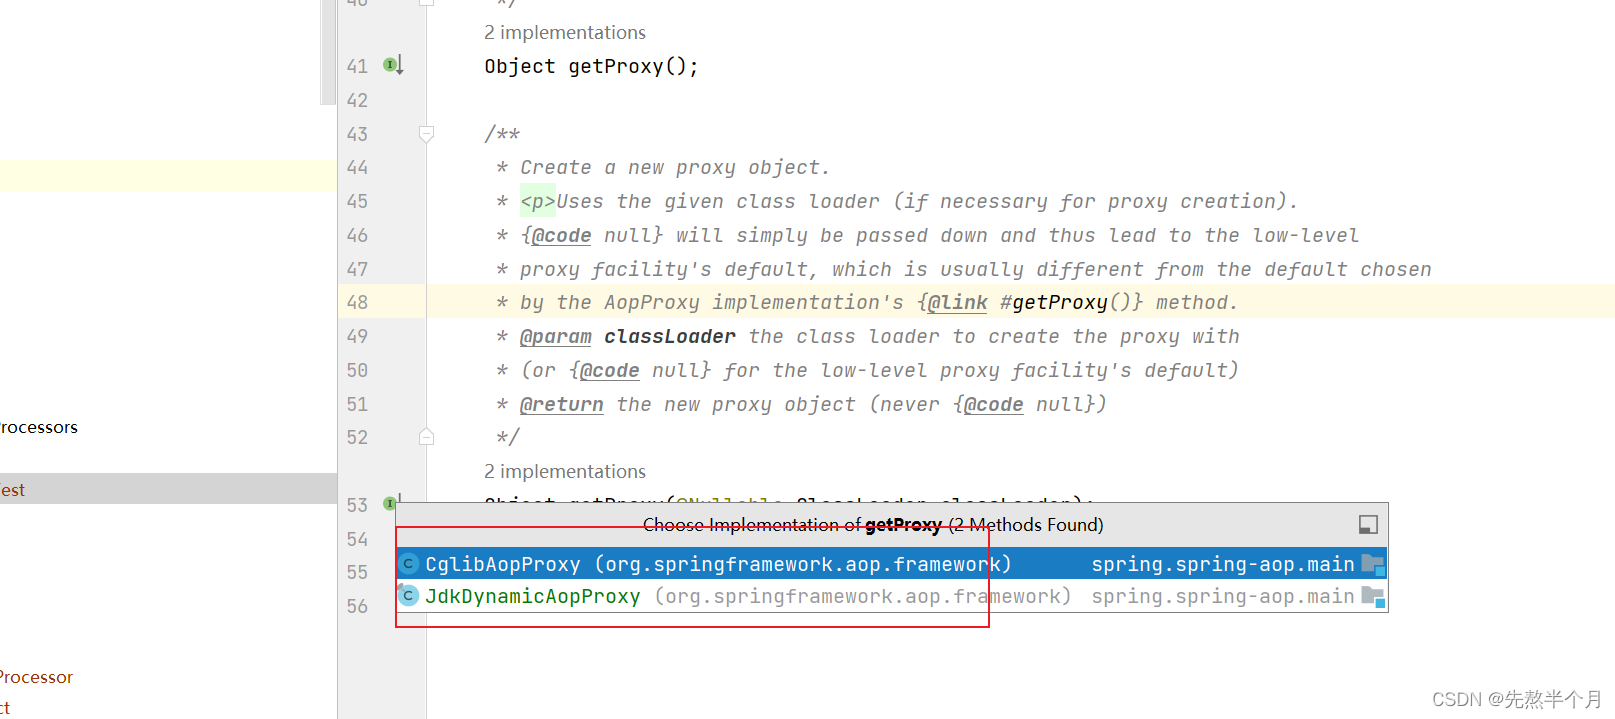
可以看到,这就有两个实现类,一个是cglib动态代理、一个是jdk动态代理。

此时我们再回到源码,我们不看getProxy,而是看createAopProxy怎么返回对应的实现类的。
public Object getProxy(@Nullable ClassLoader classLoader) {
   return createAopProxy().getProxy(classLoader);
}
createAopProxy---》getAopProxyFactory().createAopProxy(this);
最后进入
DefaultAopProxyFactory类的createAopProxy方法:
@Override
	public AopProxy createAopProxy(AdvisedSupport config) throws AopConfigException {
		// isOptimize:  是否对代理进行优化
		// isProxyTargetClass:  值为true,使用CGLIB代理,默认false
		/**
		 * hasNoUserSuppliedProxyInterfaces:
		 * 	   1:接口是不是满足,如果长度为0;也就是接口为空,返回false
		 *	   2:如果接口类型不是SpringProxy类型的,也返回flase
		 */
		//所以配置了@EnableAspectJAutoProxy(proxyTargetClass = true) || (没有实现接口 ||接口类型不是SpringProxy类型)走这个分支
		if (config.isOptimize() || config.isProxyTargetClass() || hasNoUserSuppliedProxyInterfaces(config)) {
			Class<?> targetClass = config.getTargetClass();
			if (targetClass == null) {
				throw new AopConfigException("TargetSource cannot determine target class: " +
						"Either an interface or a target is required for proxy creation.");
			}
			//目标对象是否是接口等,一般不成立
			if (targetClass.isInterface() || Proxy.isProxyClass(targetClass)) {
				return new JdkDynamicAopProxy(config);
			}
			//使用cglib代理
			return new ObjenesisCglibAopProxy(config);
		}
		else {
			//其他情况(即没有配置强制使用cglib或实现了接口的)直接使用jdk
			return new JdkDynamicAopProxy(config);
		}
	}
这里得出如何选用cglib和jdk动态代理:
1、如果目标对象实现了接口,则使用jdk动态代理。但可配置强制使用cglib
2、其他情况使用cglib
1、JDK动态代理只提供接口的代理,不支持类的代理,jdk会在运行时为目标类生成一个 $proxy*.class,该代理类是实现了目标类接口的一个类,并且会实现接口所有的方法增强代码,调用时, 通过先去调用处理类进行增强,再通过反射的方式进行调用目标方法,从而实现AOP
2、如果代理类 没有实现接口,那么spring AOP会选择使用CGLIB来动态代理目标类,CGLIB的底层是通过ASM在运行时动态的生成目标类的一个子类,(还有其他相关的多个类,主要是为了增强调用时的效率),并且会重写父类所有的方法增强代码,调用时会先通过代理类进行增强,再直接调用父类对应的方法进行调用目标方法,从而实现AOP
注意:springboot2.x中对aop源码进行修改,默认使用的是cglib,且强制配置参数无效,具体看:
【惊人】Spring5 AOP 默认使用Cglib? 从现象到源码深度分析_spring5.0+cglib_HD243608836的博客-CSDN博客
我们不急着看其他的,我们可以来手动模拟这个过程
接口:
public interface AopService {

	public void m();

	default public String m1(Integer i) {

		return "m1";
	}
}
实现类:
@Component("b")
public class BAopServiceImpl implements AopService {
	@Override
	public void m() {
		System.out.println("b -BAopServiceImpl");
	}
}
模拟的通知:
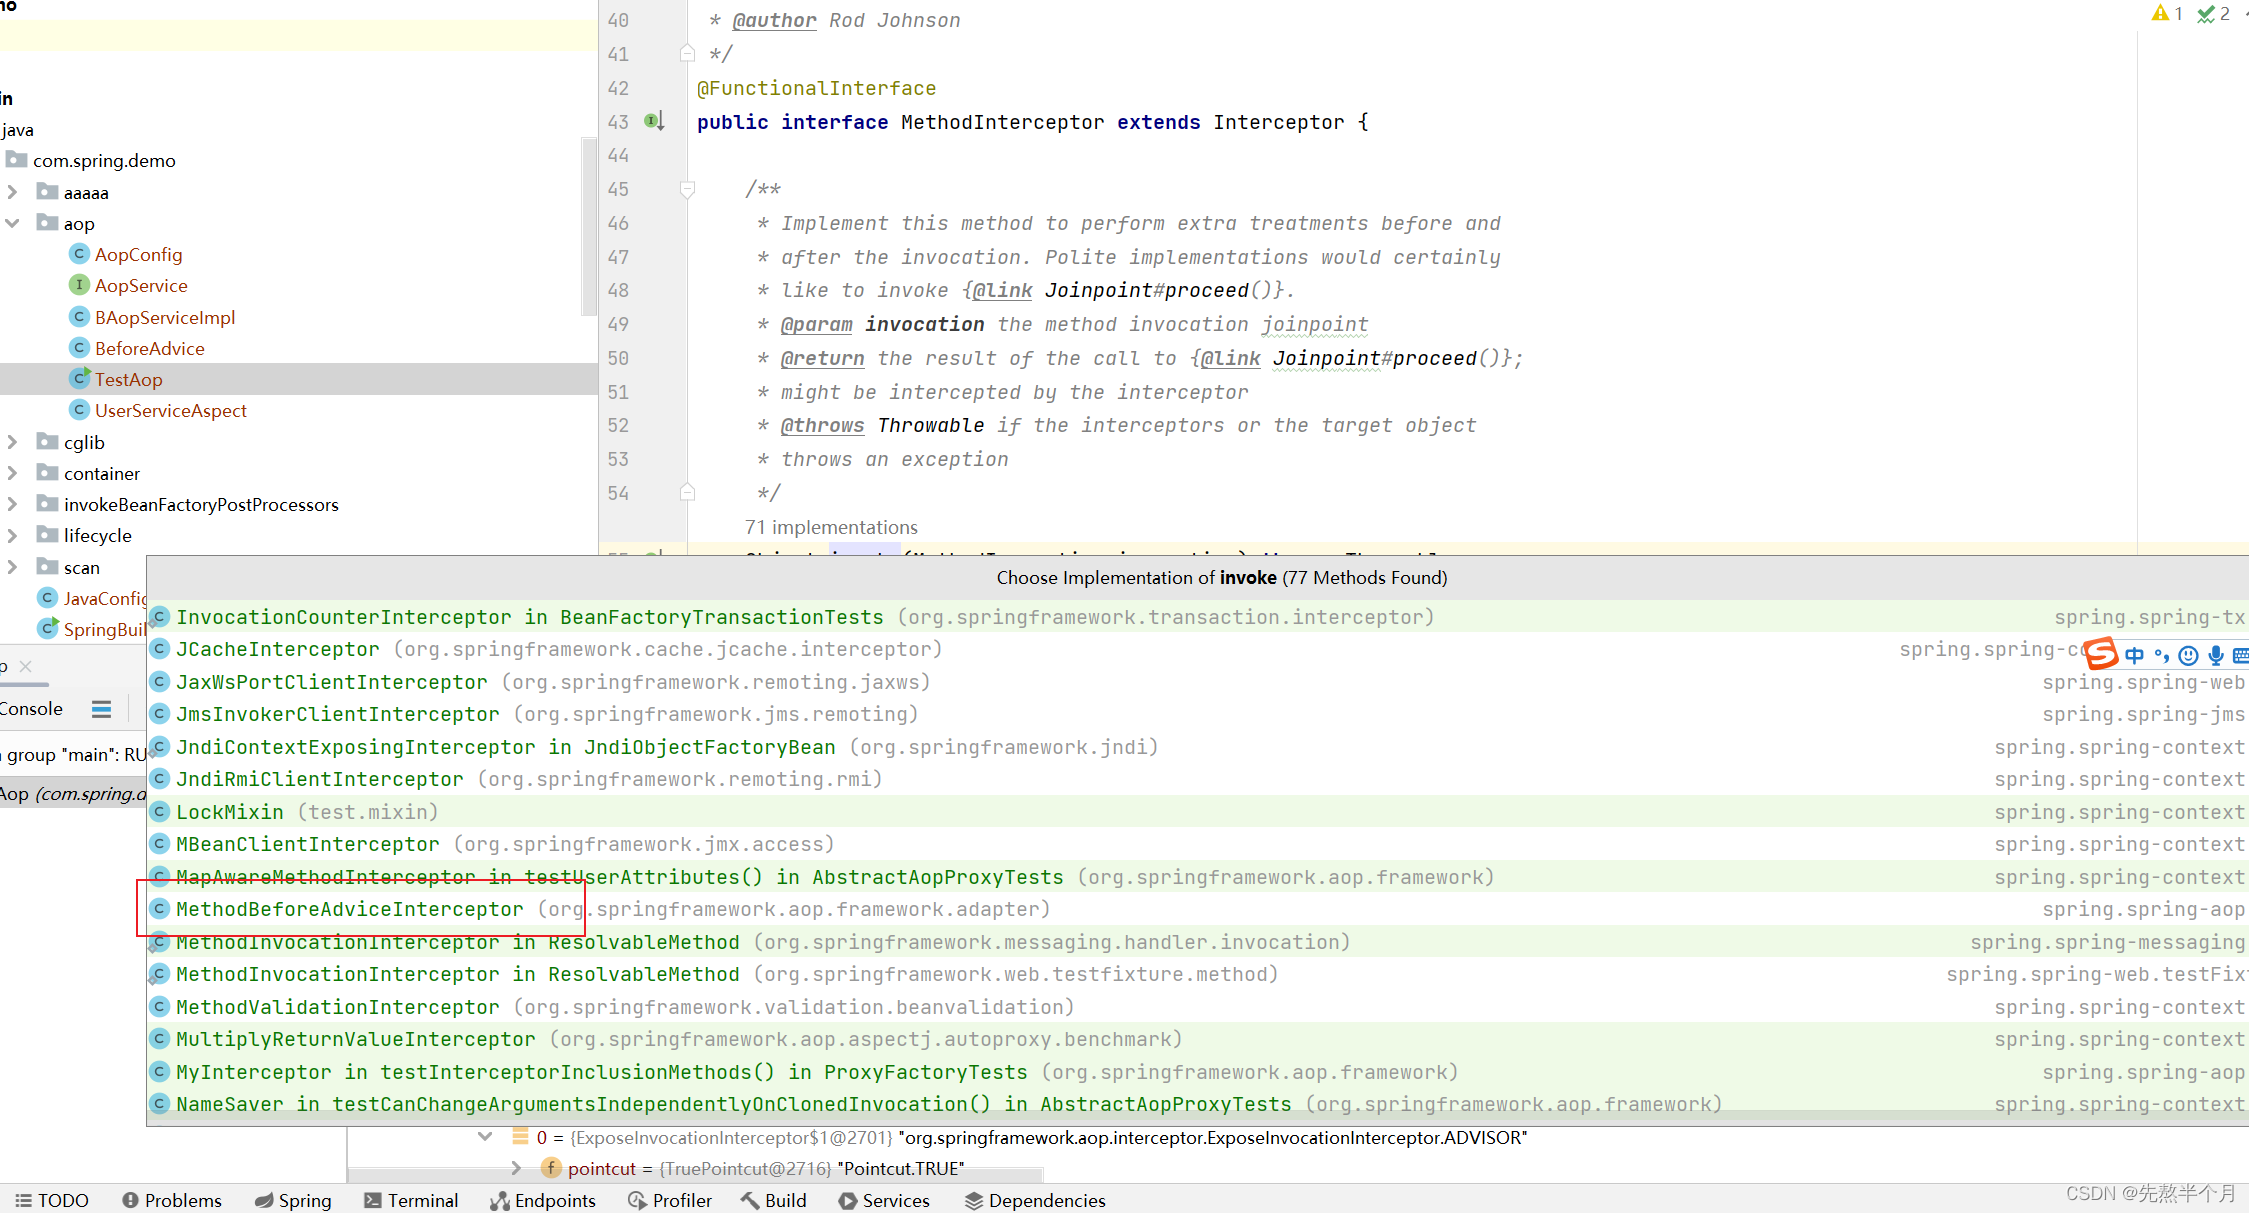
public class BeforeAdvice implements MethodInterceptor {
	//为什么需要穿这个对象MethodInvocation
	//为了执行链上的下一个增强器
	@Override
	public Object invoke(MethodInvocation invocation) throws Throwable {

		System.out.println("  aop------before advice");
		return invocation.proceed(); //放行
	}
}
测试类:
public class TestAop {


	public static void main(String[] args) {
		ProxyFactory pf = new ProxyFactory();
       //给工厂设置一个接口,这样工厂会知道要基于接口代理,这样工厂就会使用jdk动态代理
		pf.setInterfaces(AopService.class);
		pf.addAdvice(new BeforeAdvice());
		pf.setTarget(new BAopServiceImpl());
		//pf.setProxyTargetClass(true);//配置为true则强制使用cglib,
		AopService service = (AopService) pf.getProxy();
		//通知是怎么执行的
		//目标对象的m方法怎么调用的?
		service.m();
	}
}
我们debug看看获取的对象是使用什么代理:
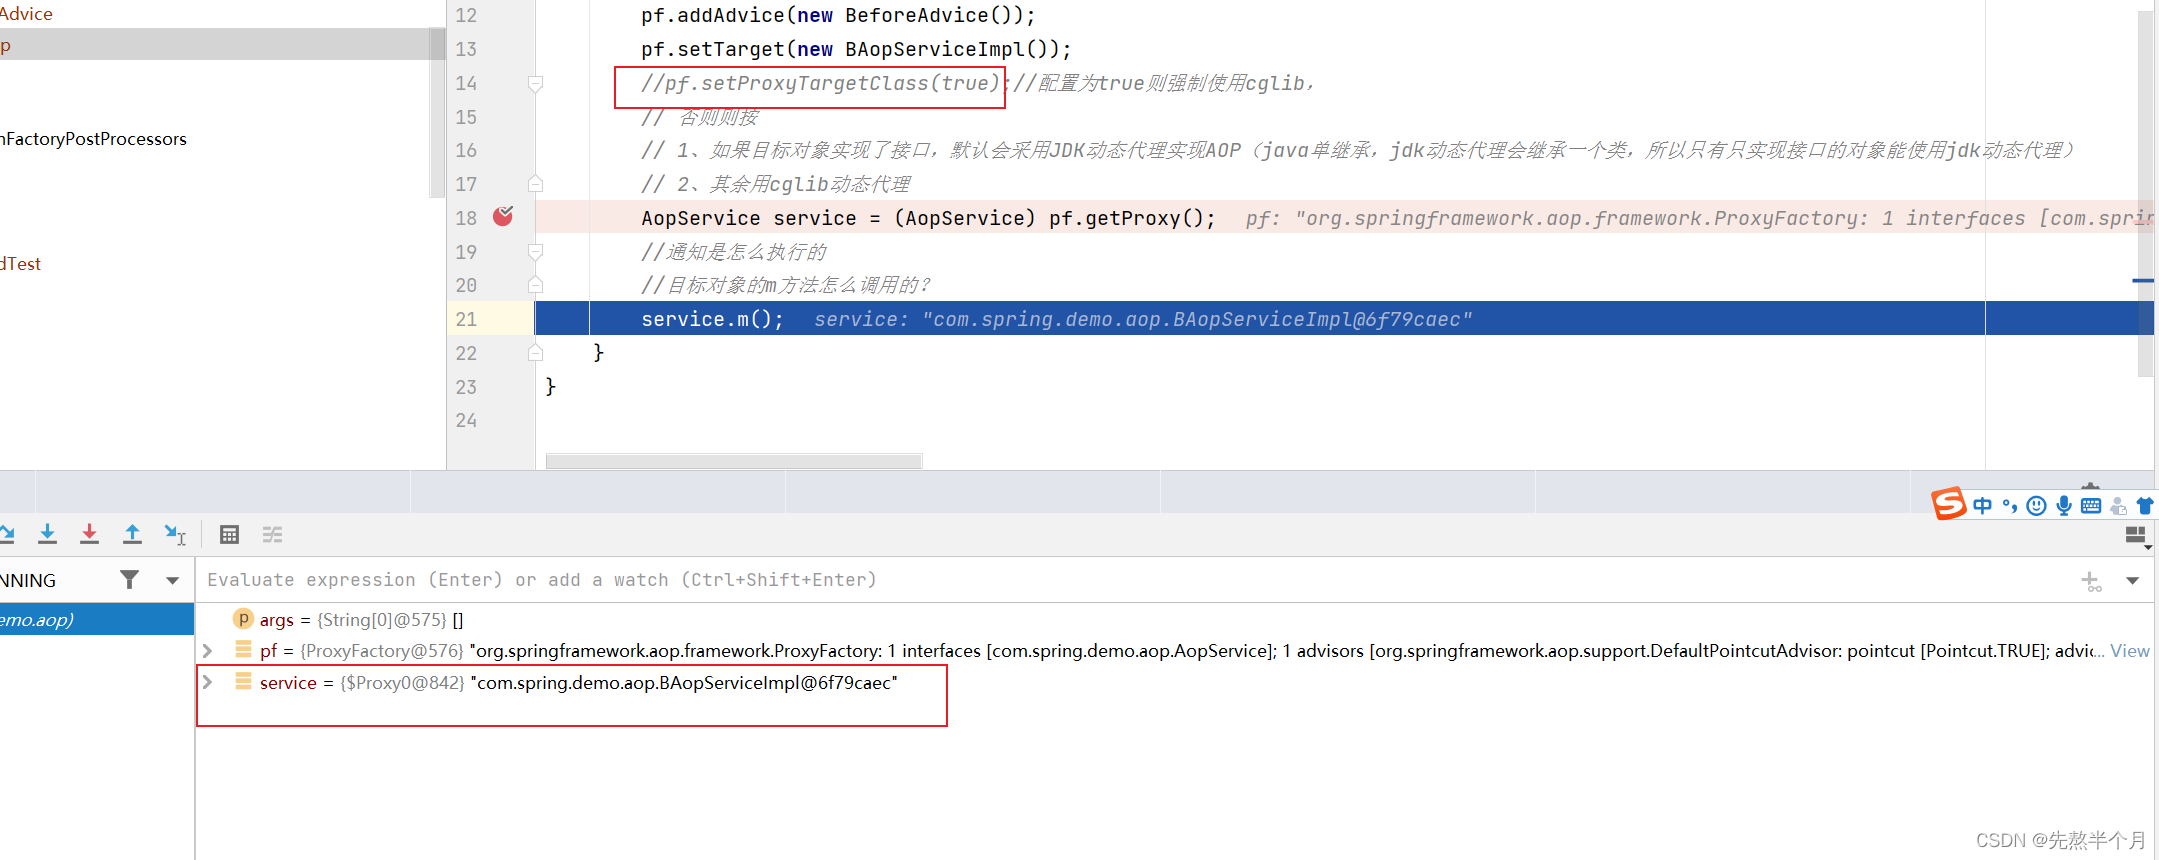
此时使用的是jdk,然后我们把这个注释放开再次debug:
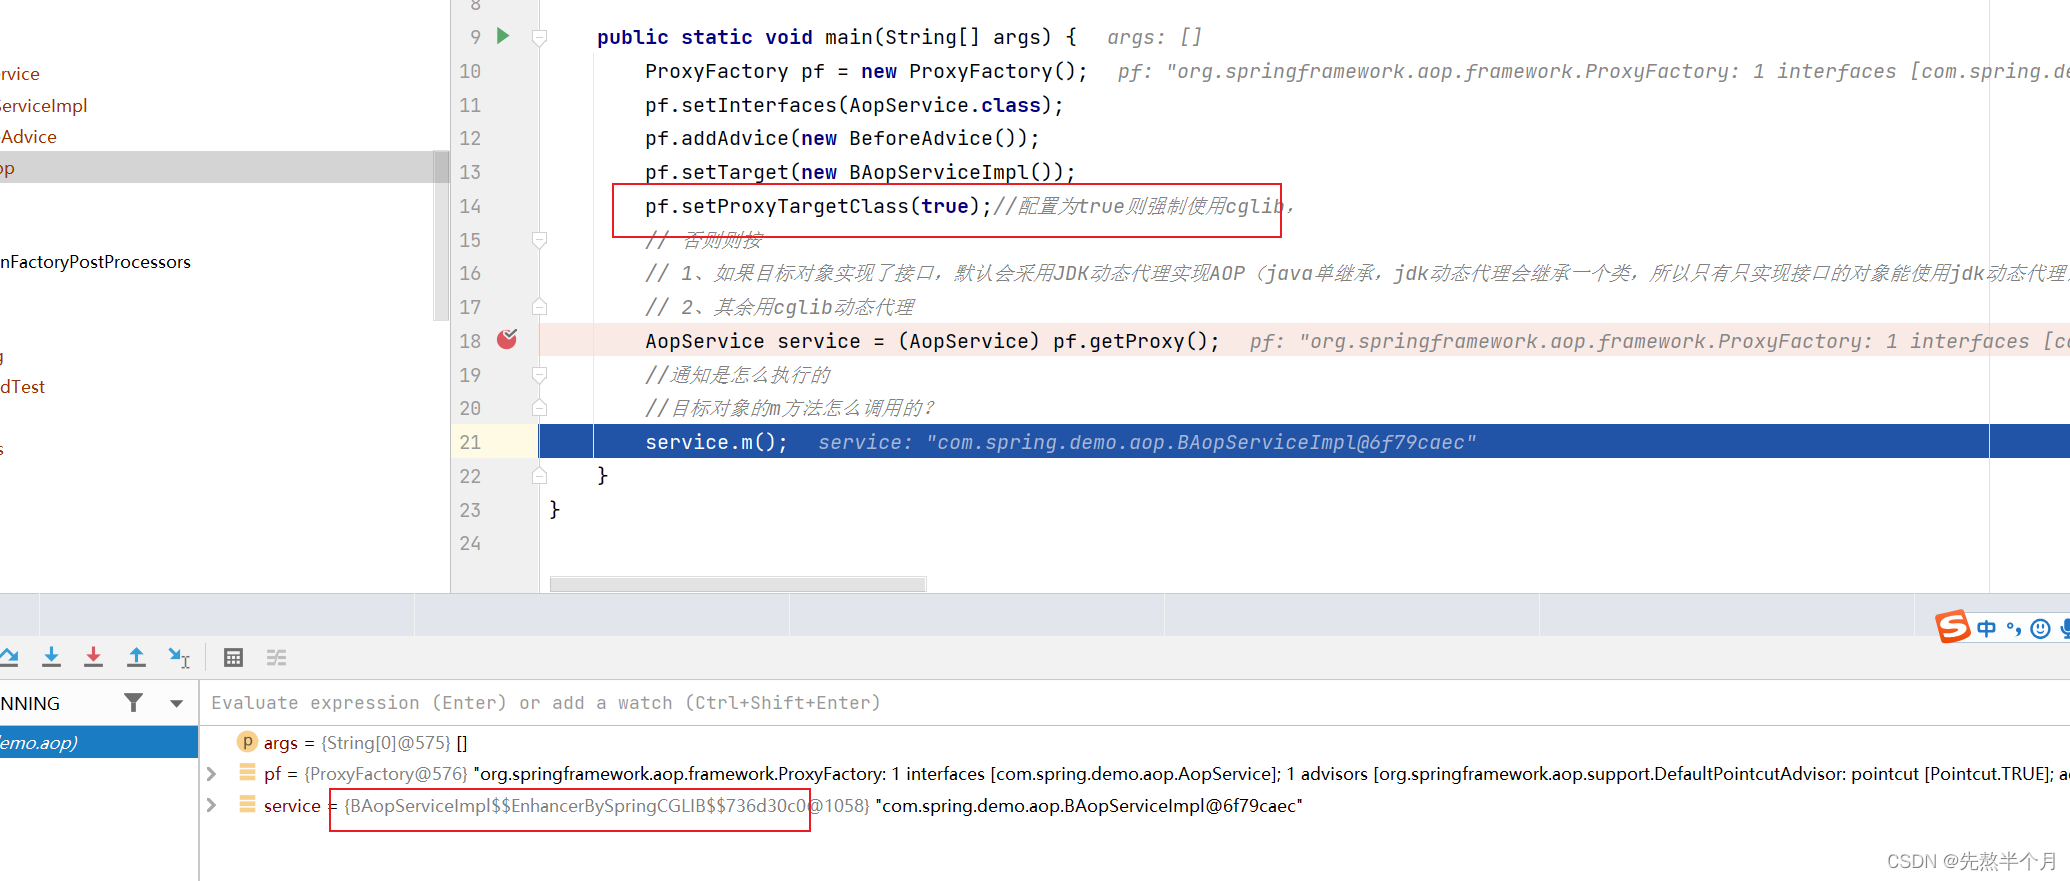
此时则使用cglib动态代理(即使你使用pf.setInterfaces(AopService.class)告诉代理工厂实现了接口,但是pf.setProxyTargetClass(true)的优先级是大于前者的)
我们再次修改实现类,让他去随便继承一个类,然后把强制使用cglib+配置接口注释掉
public class TestAop {


	public static void main(String[] args) {
		ProxyFactory pf = new ProxyFactory();
       //给工厂设置一个接口,这样工厂就会使用jdk动态代理
		//pf.setInterfaces(AopService.class);
		pf.addAdvice(new BeforeAdvice());
		pf.setTarget(new BAopServiceImpl());
		//pf.setProxyTargetClass(true);//配置为true则强制使用cglib,
		AopService service = (AopService) pf.getProxy();
		//通知是怎么执行的
		//目标对象的m方法怎么调用的?
		service.m();
	}
}
@Component("b")
public class BAopServiceImpl extends JavaConfig implements AopService {
	@Override
	public void m() {
		System.out.println("b -BAopServiceImpl");
	}
}
运行后会发现不管有没有继承了其他类都会只使用cgtlib动态代理,因为我们并没有让代理工厂感知到目标对象要基于接口进行代理,所以会一直使用cglib。
那么到此我们知道,如果要使用jdk动态代理要让代理工厂知道要基于接口代理。
我们继续往里面看,先看jdk动态代理类JdkDynamicAopProxy的部分代码:
    //代理工厂
	private final AdvisedSupport advised;

public JdkDynamicAopProxy(AdvisedSupport config) throws AopConfigException {
		Assert.notNull(config, "AdvisedSupport must not be null");
		if (config.getAdvisors().length == 0 && config.getTargetSource() == AdvisedSupport.EMPTY_TARGET_SOURCE) {
			throw new AopConfigException("No advisors and no TargetSource specified");
		}
		this.advised = config;
	}
进去到getProxy方法():
@Override
	public Object getProxy(@Nullable ClassLoader classLoader) {
		if (logger.isTraceEnabled()) {
			logger.trace("Creating JDK dynamic proxy: " + this.advised.getTargetSource());
		}
		//获取到代理接口
		Class<?>[] proxiedInterfaces = AopProxyUtils.completeProxiedInterfaces(this.advised, true);
		findDefinedEqualsAndHashCodeMethods(proxiedInterfaces);
        //获取代理对象
		return Proxy.newProxyInstance(classLoader, proxiedInterfaces, this);
	}
这里获取的接口就是目标对象实现的接口(也就是我们前面说的让工厂对象感知到的接口)
----------------------------------
到这里我们已经知道spring是怎么去选择代理方式的,现在我们看看aop是怎么进行通知?
我们以jdk动态代理为例子进行说明:
我们以JdkDynamicAopProxy类的invoke方法为入口:
@Override
	@Nullable
	public Object invoke(Object proxy, Method method, Object[] args) throws Throwable {
		Object oldProxy = null;
		boolean setProxyContext = false;

		//获取到目标对象的包裹对象
		TargetSource targetSource = this.advised.targetSource;
		Object target = null;

	//省略部分代码。。。。。
			Object retVal;

			if (this.advised.exposeProxy) {
				// Make invocation available if necessary.
				oldProxy = AopContext.setCurrentProxy(proxy);
				setProxyContext = true;
			}

			// Get as late as possible to minimize the time we "own" the target,
			// in case it comes from a pool.
			//获取目标对象
			target = targetSource.getTarget();
			Class<?> targetClass = (target != null ? target.getClass() : null);
	//省略部分代码。。。。。

			// Get the interception chain for this method.
			//获取代理工厂中的增强器(即通知)
			List<Object> chain = this.advised.getInterceptorsAndDynamicInterceptionAdvice(method, targetClass);

			// Check whether we have any advice. If we don't, we can fallback on direct
			// reflective invocation of the target, and avoid creating a MethodInvocation.
			if (chain.isEmpty()) {
				// We can skip creating a MethodInvocation: just invoke the target directly
				// Note that the final invoker must be an InvokerInterceptor so we know it does
				// nothing but a reflective operation on the target, and no hot swapping or fancy proxying.
				Object[] argsToUse = AopProxyUtils.adaptArgumentsIfNecessary(method, args);
				retVal = AopUtils.invokeJoinpointUsingReflection(target, method, argsToUse);
			}
			else {
				//new一个MethodInvocation对象,存在代理工厂、目标对象、目标方法、参数、通知等
				// We need to create a method invocation...
				MethodInvocation invocation =
						new ReflectiveMethodInvocation(proxy, target, method, args, targetClass, chain);
				// Proceed to the joinpoint through the interceptor chain.
				//执行
				retVal = invocation.proceed();
			}

	//省略部分代码。。。。。


	}
我们继续进入proceed()方法:

进入该类的实现方法:
@Override
	@Nullable
	public Object proceed() throws Throwable {
		// We start with an index of -1 and increment early.
		//判断链上还有没有通知或者增强器(currentInterceptorIndex默认为-1,每执行一次则加1)
//interceptorsAndDynamicMethodMatchers.size()表示有多少个通知
		if (this.currentInterceptorIndex == this.interceptorsAndDynamicMethodMatchers.size() - 1) {
			//如果没有通知了,则执行目标对象的目标方法
			return invokeJoinpoint();
		}

//每调用一次proceed方法会+1(用来控制执行完执行链上的通知)
		Object interceptorOrInterceptionAdvice =
				this.interceptorsAndDynamicMethodMatchers.get(++this.currentInterceptorIndex);
		if (interceptorOrInterceptionAdvice instanceof InterceptorAndDynamicMethodMatcher) {
			// Evaluate dynamic method matcher here: static part will already have
			// been evaluated and found to match.
			InterceptorAndDynamicMethodMatcher dm =
					(InterceptorAndDynamicMethodMatcher) interceptorOrInterceptionAdvice;
			Class<?> targetClass = (this.targetClass != null ? this.targetClass : this.method.getDeclaringClass());
			if (dm.methodMatcher.matches(this.method, targetClass, this.arguments)) {
				return dm.interceptor.invoke(this);
			}
			else {
				// Dynamic matching failed.
				// Skip this interceptor and invoke the next in the chain.
				return proceed();
			}
		}
		else {
			//执行通知(增强逻辑)
			//然后在对应实现类中会递归调用proceed()方法执行下一个通知/目标对象方法
			// It's an interceptor, so we just invoke it: The pointcut will have
			// been evaluated statically before this object was constructed.
			return ((MethodInterceptor) interceptorOrInterceptionAdvice).invoke(this);
		}
	}
可以看到,如果执行链上还有通知会先走执行通知的分支,等到通知走完才会去执行目标对象的目标方法。
那么此时我们是否有个疑问,假设我们设置了两个通知,一个before、一个after,那么正确的执行顺序应该是before通知--》目标方法--》after通知,而我们这里看到的代码不是先执行完通知再执行目标方法吗?这是怎么回事?
我们可以先去看看进去invoke方法中:
((MethodInterceptor) interceptorOrInterceptionAdvice).invoke(this)
此时是个接口,我们先看before通知的实现:
	@Override
	public Object invoke(MethodInvocation mi) throws Throwable {
		//1、先调用通知增强逻辑
		this.advice.before(mi.getMethod(), mi.getArguments(), mi.getThis());
		//2、递归调用下一个通知/目标方法
		return mi.proceed();
	}
可以看到before先调用通知增强逻辑,然后重新递归调用proceed方法,此时到proceed方法后由于我们又有一个after通知,所以还会走执行通知的分支,那么我们此时进去after通知的实现方法看看:

@Override
	public Object invoke(MethodInvocation mi) throws Throwable {
		try {
			//1、先递归回去调用proceed方法
			return mi.proceed();
		}
		finally {
			//2、再执行通知
			invokeAdviceMethod(getJoinPointMatch(), null, null);
		}
	}
这里就可以发现了,after和before是相反的,他是先递归调用proceed方法,然后由于没有其他通知了,就会调用目标方法,最后再去调用after的通知。
所以最终的执行顺序为before通知--》目标方法--》after通知。
-----------------------------------------------------------------------------
BeanPostProcessor:看下一篇文章
aaaaa


 5823
5823


 被折叠的 条评论
为什么被折叠?
被折叠的 条评论
为什么被折叠?
 到【灌水乐园】发言


