


uniapp添加水印,防坑专栏
一、拍照选单张添加水印
如果是单张水印的话,相信大家处理起来就不会那么麻烦且问题,问题来源往往是需求的变更,单张水印有些场景满足不了,单张水印的教程大家可以参考别人的博客:单张水印教程
二、从图库选多张添加水印
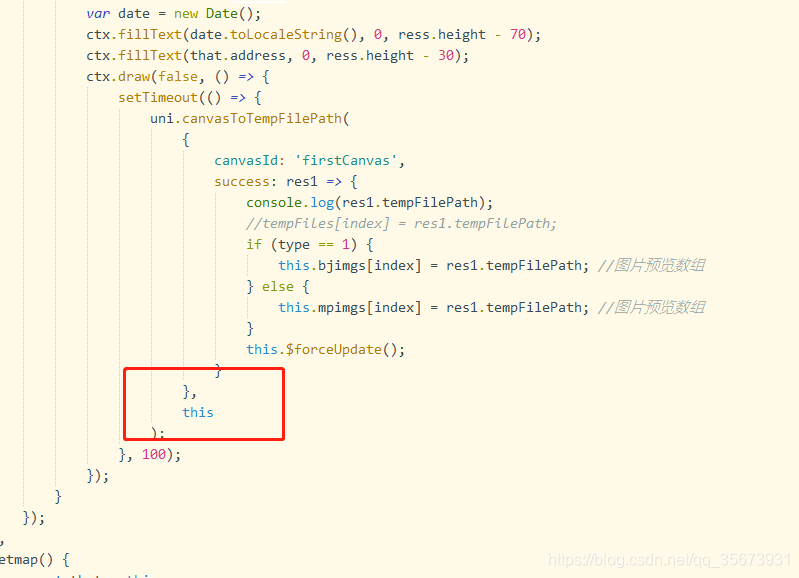
如果还是循环调用单张水印的方法就会出问题,应为绘画那步是异步的,所以有可能你绘画第二张时它还是停留第一张,所以这里我们需要加同步处理;
	write(tfile) {
			const that = this;
			return new Promise(resolve => {
				uni.getImageInfo({
					src: tfile,
					success: ress => {
						console.log('ss' + tfile);
						that.w = ress.width + 'px';
						that.h = ress.height + 'px';

						ctx.clearRect(0, 0, ress.width, ress.height);
						var userinfo = uni.getStorageSync('user');
						//拍照处理
						if (that.sourceTypeIndex == 0) {
							let textToHeight = ress.height * 0.8;
							//将图片src放到cancas内,宽高为图片大小
							ctx.drawImage(tfile, 0, 0, ress.width, ress.height); //绘制图片大小
							ctx.fillStyle = '#7e7977';
							ctx.fillRect(0, ress.height - 100, ress.width * 0.8, 100); //绘制矩形大小
							ctx.globalAlpha = 0.9; //设置透明值
							ctx.fillStyle = '#ffaa00';

							let textToWidth = ress.width * 0.5;
							console.log(that.address + '位置');
							ctx.fillRect(0, ress.height - 160, ress.width * 0.4, 60); //绘制矩形大小
							ctx.fillStyle = '#550000';
							//ctx.fillStyle = '#7e7977';
							ctx.setFontSize(25);
							ctx.fillText(userinfo.userName+'-现场作业拍照打卡', 0, ress.height - 120);

							ctx.setFillStyle('#ffffff');
							var date=new Date();
							ctx.fillText(date.toLocaleString(), 0, ress.height - 70);
							ctx.fillText(that.address, 0, ress.height - 30);
						} else {
							let textToHeight = ress.height * 0.8;
							//将图片src放到cancas内,宽高为图片大小
							ctx.drawImage(tfile, 0, 0, ress.width, ress.height); //绘制图片大小
							ctx.fillStyle = '#7e7977';
							ctx.fillRect(0, ress.height - 80, ress.width * 0.8, 80); //绘制矩形大小
							ctx.globalAlpha = 0.9; //设置透明值

							ctx.fillStyle = '#ffaa00';

							ctx.fillRect(0, ress.height - 140, ress.width * 0.4, 60); //绘制矩形大小
							ctx.fillStyle = '#550000';
							ctx.setFontSize(22);

							let textToWidth = ress.width * 0.5;
							console.log(that.address + '位置');
							ctx.fillText(userinfo.userName+'-现场作业拍照上传', 0, ress.height - 100);
							ctx.setFillStyle('#ffffff');
							ctx.fillText('图片来源于相册', 0, ress.height - 30);
						}
						resolve();
					}
				});
			});
		},
		draw() {
			return new Promise(resolve => {
				ctx.draw(false, () => {
					setTimeout(() => {
						uni.canvasToTempFilePath({
							canvasId: 'firstCanvas',
							success: res1 => {
								console.log(res1.tempFilePath);
								//tempFiles[index] = res1.tempFilePath;
								uni.uploadFile({
									url: getApp().globalData.config.url + '/business/applyFile/upload', //仅为示例,非真实的接口地址
									filePath: res1.tempFilePath,
									fileType: 'image',
									name: 'file',
									header: {
										Authorization: 'Bearer ' + uni.getStorageSync('token')
									},
									formData: {
										// file: JSON.stringify(res.tempFiles[0]) ,
										applyType: 'MAINTENANCE',
										targetType: 1,
										listType: 1
									},
									success: uploadFileRes => {
										console.log(JSON.parse(uploadFileRes.data).data);
										const file = JSON.parse(uploadFileRes.data).data; //返回当前文件对象
										this.fileList.push(file.fileId);
										this.imageList.push({ path: res1.tempFilePath, id: file.fileId, fileName: file.fileName }); //预览
										resolve();
										console.log('ok');
										//index++;
									}
								});
							}
						});
					}, 1000);
				});
			});
		},
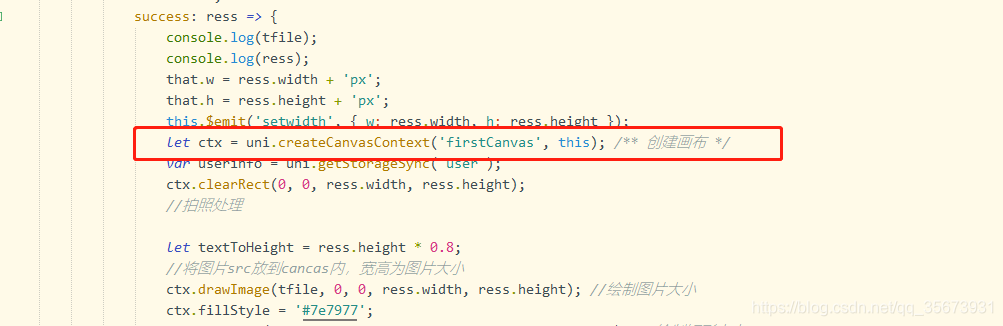
三、再组件中写添加写添加水印方法
需要在绘画方法加this参数,参考官方给出的答案:创建 canvas 绘图上下文(指定 canvasId)。在自定义组件下,第二个参数传入组件实例this,以操作组件内 组件
Tip: 需要指定 canvasId,该绘图上下文只作用于对应的
四、自定义水印相机组件拍照(位置信息+当前时间)
不同于第一项,这里其实是2个不同的需求,第一项拍照和从图库中选择添加水印的方式是一样的都是操作后添加水印,它是调的手机自带相机进行处理的,自定义水印相机是拍即有,而要做到则需要使用原生camera组件,自己写样式。大概原理就是点击拍照后将camera组件隐藏讲添加水印的图片放在image标签展示出来,每次调用相机我还会验证位置信息和相机权限是否授权,有人说每次点拍照进行授权验证不是会拉低打开相机速度,为啥不放在加载页面,我加载和点击都放了,防止用户授权后关闭
水印相机组件
<template>
	<view class="camera" style="height: 100%;">
		<view style="position: absolute;top: -999999px;"><canvas :style="{
       width: w, height: h }" canvas-id="firstCanvas"></canvas></view>
		<image id="camera" v-if="showimg" style="width: 100%;height: 1500rpx;display: block;" :src="src"></image>
		<camera v-if="showcamera" :device-position="taketype" flash="off" @error="error" style="width: 100%; height: 150
最低0.47元/天 解锁文章


 1万+
1万+

 被折叠的 条评论
为什么被折叠?
被折叠的 条评论
为什么被折叠?
 到【灌水乐园】发言


