


超全超细的Spring学习笔记
Spring简介
Spring 是一个开源框架,是一个分层的 JavaEE 一站式框架。
所谓一站式框架是指 Spring 有 JavaEE 开发的每一层解决方案。
- WEB层:SpringMVC
- Service层:Spring的Bean管理,声明式事务
- DAO层:Spring的JDBC模板,ORM模板
优点:
- IOC:方便解耦合
- AOP:对程序进行扩展
- 轻量级框架
- 方便与其他框架整合
Spring使用
Spring开发包解压后的目录介绍:
- docs: Spring 开发规范和API
- libs: Spring jar 包和源代码
- schema: Spring 配置文件的约束
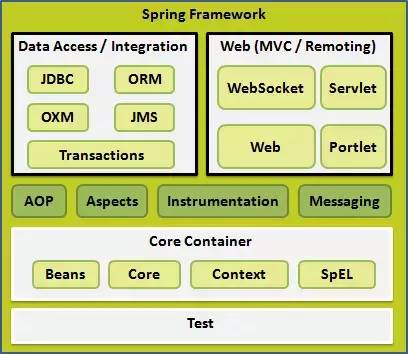
DataAccess 用于数据访问,WEB 用于页面显示,核心容器也就是IOC部分。
控制反转(IOC)
控制反转(Inversion of Control)是指将对象的创建权反转(交给)Spring。
使用IOC就需要导入IOC相关的包,也就是上图中核心容器中的几个包:beans,context,core,expression四个包。
实现原理
传统方式创建对象
UserDao userDao = new UserDao();
若进一步面向接口编程的话,可以多态:
UserDao userDao = new UserDaoImpl();
这种方式的缺点是接口和实现类高耦合,切换底层实现类时,需要修改源代码。程序设计应该满足OCP元祖,在尽量不修改程序源代码的基础上对程序进行扩展。
此时,学过设计模式的同学可能会想到用工厂模式对接口及其实现类进行解耦,我们使用工厂模式:
class BeanFactory{

    public static UserDAO getUserDAO(){

        return new UserDAOImpl();
    }
}
此种方式虽然在接口和实现类之间没有耦合,但是接口和工厂之间存在耦合。
使用工厂+反射+配置文件的方式,实现解耦,这也是 Spring 框架 IOC 的底层实现。
//xml配置文件
//<bean id="userDAO" class="xxx.UserDAOImpl"></bean>
class BeanFactory{

    public static Object getBean(String id){

        //解析XML
        //反射
        Class clazz=Class.forName();
        return clazz.newInstance();
    }
}
IOC与传统方式的比较
获取对象方式:传统通过 new 关键字主动创建一个对象。
IOC 方式中,将对象的生命周期交给 Spring 管理,直接从 Spring 获取对象。也就是控制反转————将控制权从自己手中交到了 Spring 手中
IOC XML 开发
在 docs 文件中包含了 xsd-configuration.hmtl 文件。其中定义了 beans schema。
<beans xmlns="http://www.springframework.org/schema/beans"
    xmlns:xsi="http://www.w3.org/2001/XMLSchema-instance"
    xsi:schemaLocation="
http://www.springframework.org/schema/beans
http://www.springframework.org/schema/beans/spring-beans.xsd"
    //在此配置bean
    <bean id="userService" class="x.y.UserServiceImpl">
    </bean>
</beans>
调用类:
ApplicationContext applicationContext = new ClassPathXmlApplicationContext("applicationContext.xml");
UserService userService = (UserService)applicationContext.getBean("userService");
userService.save();
Bean标签配置
告诉spring创建对象
声明bean,就是告诉spring要创建某个类的对象
id:对象的自定义名称,唯一值,不能出现特殊字符。spring通过这个名称找到对象
class:类的全限定名称(不能是接口,因为spring是反射机制创建类,必须使用类)
spring就完成SomeService someService = new SomeServiceImpl();
spring是把创建好的对象放入到map中,spring框架有一个map存放对象的
springMap.put(id的值,对象);
例如:springMap.put("someService",new SomeServiceImpl());
一个bean标签声明一个对象
生命周期
- init-method: bean被初始化的时候执行的方法
- destroy-method: bean被销毁的时候执行的方法
作用范围
scope:bean的作用范围,有如下几种,常用的是前两种
- singleton: 默认使用单例模式创建
- prototype: 多例
- request: 在web项目中,spring 创建类后,将其存入到 request 范围中
- session: 在web项目中,spring 创建类后,将其存入到 session 范围中
- globalsession: 在web项目中,必须用在 porlet 环境
Spring工厂类
-
BeanFactory: 老版本的工厂类,在调用
getBean()方法时,才会生成类的实例。 -
ApplicationContext: 在加载配置文件的时候,就会将 Spring 管理的类都实例化。有两个实现类:
-
- ClassPathXmlApplicationContext: 加载类路径下的配置文件
- FileSystemXmlApplicationContext: 加载磁盘下的配置文件
IOC和DI
DI 指依赖注入,其前提是必须有 IOC 的环境,Spring 管理这个类的时候将类的依赖的属性注入进来。
例如,在UserServiceImpl.java中:
public class UserServiceImpl implements UserService{

  private String name;
  public void setName(String name){

    this.name=name;
  }
  public void save(){

    System.out.println("save "+name);
  }
}
在配置文件中:
<beans xmlns="http://www.springframework.org/schema/beans"
    xmlns:xsi="http://www.w3.org/2001/XMLSchema-instance"
    xsi:schemaLocation="
     http://www.springframework.org/schema/beans
     http://www.springframework.org/schema/beans/spring-beans.xsd"
    <bean id="userService" class="spring.demo1.UserServiceImpl">
    <!--配置依赖的属性-->
    <property name="name" value="tony"/>
    </bean>
</beans>
测试代码:
@Test
public void demo2(){

  //创建Spring工厂
  ApplicationContext applicationContext=
  new ClassPathXmlApplicationContext("applicationContext.xml");

  UserService userService=
  (UserService)applicationContext.getBean("userService");

  userService.save();
}
运行结果:
save tony
可以看到,在配置文件中配置的属性,在 Spring 管理该类的时候将其依赖的属性成功进行了设置。如果不使用依赖注入,则无法使用接口,只能使用实现类来进行设置,因为接口中没有该属性。
普通类型(简单类型)的set注入
在Spring中规定,Java的基本数据类型和String类型都是简单类型
set注入(设置注入):spring调用类的set方法,可以在set方法中完成属性赋值
简单类型的set注入:
<bean id="xx" class="xx">
    <property name="属性名字" value="此属性的值"/>
    一个property只能给一个属性赋值
</bean>
我们以Student类为例
在Student.java中:
public class Student {

    private String name;
    private int age;

    private School school;

    public void setName(String name) {

        this.name = name;
    }

    public void setAge(int age) {

        this.age = age;
    }

    public void setSchool(School school) {

        this.school = school;
    }

    @Override
    public String toString() {

        return "Student{" +
                "name='" + name + '\'' +
                ", age=" + age +
                ", school=" + school +
                '}';
    }
}
在applicationContext.xml文件中:
<bean id="myStudent" class="com.jiawen.package1.Student">
    <property name="name" value="lisi"/>
    <property name="age" value="20"/>
</bean>
测试:
@Test
public void test01(){

    String config = "package1/applicationContext.xml";
    ApplicationContext applicationContext = new ClassPathXmlApplicationContext(config);

    Student myStudent = (Student) applicationContext.getBean("myStudent");
    System.out.println(myStudent);
}
运行结果:
Student{name='lisi', age=20}
引用类型的set注入
引用类型的set注入:spring调用类的set方法
<bean id="xxx" class="xxxx">
    <property name="属性名称" ref="bean的id(对象的名称)"/>
</bean>
以学校和学生为例
在School.java中:
public class School {

    private String name;
    private String address;

    public void setName(String name) {

        this.name = name;
    }

    public void setAddress(String address) {

        this.address = address;
    }

    @Override
    public String toString() {

        return "School{" +
                "name='" + name + '\'' +
                ", address='" + address + '\'' +
                '}';
    }
}
在Student.java中:
public class Student {

    private String name;
    private int age;

    private School school;

    public void setName(String name) {

        this.name = name;
    }

    public void setAge(int age) {

        this.age = age;
    }

    public void setSchool(School school) {

        this.school = school;
    }

    @Override
    public String toString() {

        return "Student{" +
                "name='" + name + '\'' +
                ", age=" + age +
                ", school=" + school +
                '}';
    }
}
在applicationContext.xml中:
<bean id="myStudent" class="com.jiawen.package2.Student">
        <property name="name" value="lisi"/>
        <property name="age" value="22"/>
        <property name="school" ref="mySchool"/>
    </bean>

<!--    声明school对象-->
    <bean id="mySchool" class="com.jiawen.package2.School">
        <property name="name" value="bj"/>
        <property name="address" value="hdq"/>
     </bean>
运行结果:
Student{name='lisi', age=22, school=School{name='bj', address='hdq'}}
构造注入
构造注入:spring调用类的有参构造方法,在创建对象的同时,在构造方法中属性赋值
构造注入使用
<constructor-arg>标签
<constructor-arg>标签:一个<constructor-arg>表示构造方法的一个参数
<constructor-arg>标签属性: name:表示构造方法的形参名
index:构造方法参数的位置,参数从左往右位置是0、1、2…的顺序
value:构造方法的形参类型是简单类型的,使用value
ref:构造那个方法的形参类型是引用类型的,使用ref
以学校和学生为例
在School.java中:
public class School {

    private String name;
    private String address;

    public void setName(String name) {

        this.name = name;
    }

    public void setAddress(String address) {

        this.address = address;
    }

    @Override
    public String toString() {

        return "School{" +
                "name='" + name + '\'' +
                ", address='" + address + '\'' +
                '}';
    }
}
在Student.java中:
public class Student {

    private String name;
    private int age;

    private School school;

    public Student() {

    }

    public Student(String name, int age, School school) {

        this.name = name;
        this.age = age;
        this.school = school;
    }

    public void setName(String name) {

        this.name = name;
    }

    public void setAge(int age) {

        this.age = age;
    }

    public void setSchool(School school) {

        this.school = school;
    }

    @Override
    public String toString() {

        return "Student{" +
                "name='" + name + '\'' +
                ", age=" + age +
                ", school=" + school +
                '}';
    }
}
在applicationContext.xml中:
<bean id="myStudent" class="com.jiawen.package3.Student">
    <constructor-arg name="name" value="zhangsan"/>
    <constructor-arg name="age" value="20"/>
    <constructor-arg name="school" ref="mySchool"/>
</bean>

<bean id="mySchool" class="com.jiawen.package3.School">
    <property name="name" value="bj"/>
    <property name="address" value="bjhd"/>
</bean>
测试:
@Test
public void test03(){

    String config = "package3/applicationContext.xml";
    ApplicationContext applicationContext = new ClassPathXmlApplicationContext(config);
    Student myStudent = (Student) applicationContext.getBean("myStudent");
    System.out.println(myStudent);
}
运行结果:
Student{name='zhangsan', age=20, school=School{name='bj', address='bjhd'}}
引用类型的自动注入
引用类型的自动注入:spring框架根据某些规则可以给引用类型赋值
使用规则:byName,byType
byName(按名称注入)
byName(按名称注入):Java类中引用类型的属性名和spring容器中(配置文件)的id名称一样,且数据类型是一样的
这样的容器中的bean,spring能够赋值给引用类型
语法:
<bean id="xx" class="xx" autowire="byName">
	简单类型属性赋值
</bean>
以学校和学生为例
在School.java中:
public class School {

    private String name;
    private String address;

    public void setName(String name) {

        this.name = name;
    }

    public void setAddress(String address) {

        this.address = address;
    }

    @Override
    public String toString() {

        return "School{" +
                "name='" + name + '\'' +
                ", address='" + address + '\'' +
                '}';
    }
}
在Student.java中:
public class Student {

    private String name;
    private int age;

    private School school;

    public Student() {

    }

    public Student(String name, int age, School school) {

        this.name = name;
        this.age = age;
        this.school = school;
    }

    public void setName(String name) {

        this.name = name;
    }

    public void setAge(int age) {

        this.age = age;
    }

    public void setSchool(School school) {

        this.school = school;
    }

    @Override
    public String toString() {

        return "Student{" +
                "name='" + name + '\'' +
                ", age=" + age +
                ", school=" + school +
                '}';
    }
}
在applicationContext.xml中:
<bean id="myStudent" class="com.jiawen.package4.Student" autowire="byName">
    <property name="name" value="lisi"/>
    <property name="age" value="22"/>
</bean>

<bean id="school" class="com.jiawen.package4.School" autowire="byName">
    <property name="name" value="bj"/>
    <property name="address" value="bjhd"/>
</bean>
测试:
@Test
public void test04(){

    String config = "package4/applicationContext.xml";
    ApplicationContext applicationContext = new ClassPathXmlApplicationContext(config);
    Student myStudent = (Student) applicationContext.getBean("myStudent");
    System.out.println
最低0.47元/天 解锁文章


 1434
1434


 被折叠的 条评论
为什么被折叠?
被折叠的 条评论
为什么被折叠?
 到【灌水乐园】发言


