


1 产品对比
1.1 Spring Security
Spring 技术栈的组成部分。
通过提供完整可扩展的认证和授权支持保护你的应用程序。
https://spring.io/projects/spring-security
SpringSecurity 特点:
- 和 Spring 无缝整合。
- 全面的权限控制。
- 专门为 Web 开发而设计。
- 旧版本不能脱离 Web 环境使用。
- 新版本对整个框架进行了分层抽取,分成了核心模块和 Web 模块。单独引入核心模块就可以脱离Web 环境。
- 重量级。
1.2 Shiro
Apache 旗下的轻量级权限控制框架。
特点:
- 轻量级。Shiro 主张的理念是把复杂的事情变简单。针对对性能有更高要求的互联网应用有更好表现。
- 通用性。
- 好处:不局限于 Web 环境,可以脱离 Web 环境使用。
- 缺陷:在 Web 环境下一些特定的需求需要手动编写代码定制。
Spring Security 是 Spring 家族中的一个安全管理框架,实际上,在 Spring Boot 出现之前,Spring Security 就已经发展了多年了,但是使用的并不多,安全管理这个领域,一直是 Shiro 的天下。
相对于 Shiro,在 SSM 中整合 Spring Security 都是比较麻烦的操作,所以,Spring Security 虽然功能比 Shiro 强大,但是使用反而没有 Shiro 多(Shiro 虽然功能没有 Spring Security 多,但是对于大部分项目而言,Shiro 也够用了)。
自从有了 Spring Boot 之后,Spring Boot 对于 Spring Security 提供了自动化配置方案,可以使用更少的配置来使用 Spring Security。因此,一般来说,常见的安全管理技术栈的组合是这样的:
• SSM + Shiro
• Spring Boot/Spring Cloud + Spring Security
以上只是一个推荐的组合而已,如果单纯从技术上来说,无论怎么组合,都是可以运行的。
2 spring-security 入门
2.1 快速入门案例
        <dependency>
            <groupId>org.springframework.boot</groupId>
            <artifactId>spring-boot-starter-security</artifactId>
        </dependency>
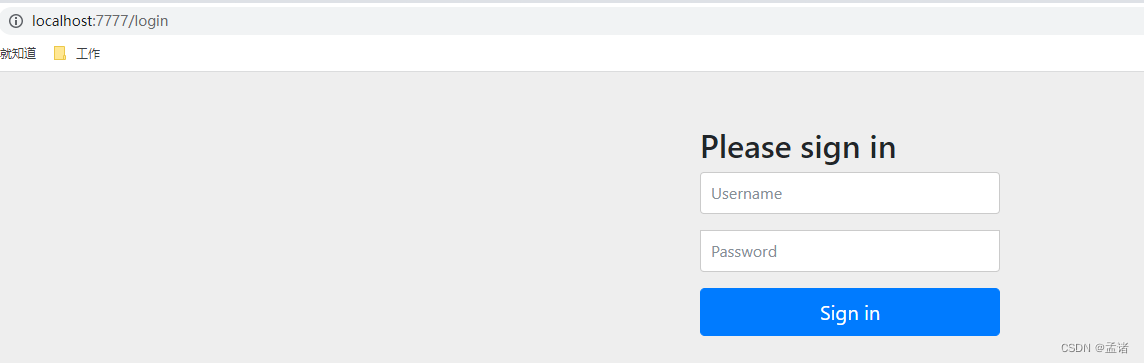
项目启动,默认用户名:user,密码打印在控制台
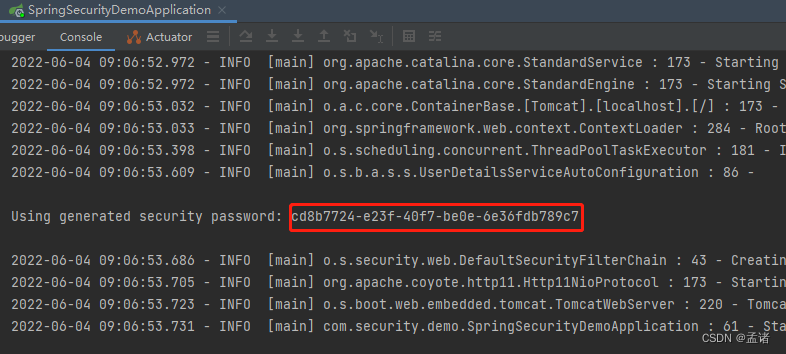
访问 localhost:7777 即可登录
2.2 权限管理中的相关概念
- 主体:英文单词:principal,使用系统的用户或设备或从其他系统远程登录的用户等等。简单说就是谁使用系统谁就是主体。
- 认证:英文单词:authentication,权限管理系统确认一个主体的身份,允许主体进入系统。简单说就是“主体”证明自己是谁。笼统的认为就是以前所做的登录操作。
- 授权:英文单词:authorization,将操作系统的“权力”“授予”“主体”,这样主体就具备了操作系统中特定功能的能力。所以简单来说,授权就是给用户分配权限。
2.3 自定义认证
2.3.1 创建用户查询 service
@Service
public class UserServiceImpl implements UserDetailsService {

    @Resource
    private PasswordEncoder passwordEncoder;

    @Override
    public UserDetails loadUserByUsername(String username) throws UsernameNotFoundException {
        // 实际开发中需要从 DB 查询,这里暂时写死
        return new User("xiaoming", passwordEncoder.encode("123456"), Collections.emptyList());
    }
}
2.3.2 创建配置类
@Configuration
public class SecurityConfig extends WebSecurityConfigurerAdapter {

	@Resource
    private UserDetailsService userDetailsService;

    @Bean
    public PasswordEncoder passwordEncoder() {
        return new BCryptPasswordEncoder();
    }

    @Override
    public void configure(AuthenticationManagerBuilder auth) throws Exception {
        auth.userDetailsService(userDetailsService)     // 配置 userDetailService
                .passwordEncoder(passwordEncoder());    // 配置密码加密工具
    }
这样在登录页输入 xiaoming/123456 即可完成认证
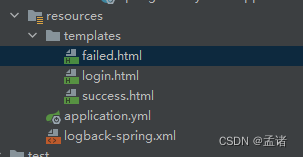
2.4 自定义跳转页面
引入前端依赖框架
        <dependency>
            <groupId>org.springframework.boot</groupId>
            <artifactId>spring-boot-starter-thymeleaf</artifactId>
        </dependency>
2.4.1 跳转配置
    @Override
    protected void configure(HttpSecurity http) throws Exception {
        // 配置认证
        http.formLogin()
                .loginPage("/index")                // 配置哪个 url 为登录页面
                .loginProcessingUrl("/login")       // 设置哪个是登录的 url。
                .successForwardUrl("/success")      // 登录成功之后跳转到哪个 url
                .failureForwardUrl("/failed");        // 登录失败之后跳转到哪个 url

        http.authorizeRequests()
                .antMatchers("/index")              //表示配置请求路径
                .permitAll()                        // 指定 URL 无需保护。
                .anyRequest()                       // 其他请求
                .authenticated();                   //需要认证
        // 关闭 csrf
        http.csrf().disable();
    }
2.4.2 跳转 Controller
@Controller
public class IndexController {

    @GetMapping("/index")
    public String index() {
        return "login";
    }

    @PostMapping("/success")
    public String success() {
        return "success";
    }

    @PostMapping("/failed")
    public String failed() {
        return "failed";
    }
}
2.4.3 登陆测试
配置好跳转页面进行测试即可,登陆成功跳转到 success,登录失败跳转到 failed
2.5 访问控制
2.5.1 开启注解认证功能
启动类添加
@EnableGlobalMethodSecurity(securedEnabled = true, prePostEnabled = true)
2.5.2 用户分配角色、权限
UserServiceImpl 修改
    @Override
    public UserDetails loadUserByUsername(String username) throws UsernameNotFoundException {
        // 实际开发中需要从 DB 查询,这里暂时写死。
        List<GrantedAuthority> authorityList;
        if ("right".equals(username)) {
            // 如果是 right 登陆分配 right 权限
            authorityList = AuthorityUtils.commaSeparatedStringToAuthorityList("right");
        } else if ("admin".equals(username)) {
            // 如果是 admin 登陆分配 admin 角色
            authorityList = AuthorityUtils.commaSeparatedStringToAuthorityList("ROLE_admin");
        } else if ("super".equals(username)) {
            // 如果是 super 登陆分配 super 角色
            authorityList = AuthorityUtils.commaSeparatedStringToAuthorityList("ROLE_super");
        } else {
            // 其他用户登陆不分配角色
            authorityList = Collections.emptyList();
        }
        return new User(username, passwordEncoder.encode("123456"), authorityList);
    }
2.5.3 配置 403 页面
    @GetMapping("/forbidden")
    public String forbidden() {
        return "forbidden";
    }

    // 自定义403 页面
    http.exceptionHandling().accessDeniedPage("/forbidden");
2.5.4 配置资源控制
@Override
public void configure(WebSecurity web) throws Exception {
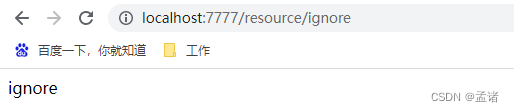
// 和 /resource/ignore 有关的页面未认证即可访问
web.ignoring().antMatchers("/resource/ignore/**");
}
ignore 资源不用认证即可访问;
hello 资源经过认证才能访问;
admin 资源拥有 super 或 admin 角色才能访问;
super 资源拥有 super 角色才能访问
    @GetMapping("/hello")
    public String hello() {
        return "hello";
    }

    @GetMapping("/admin")
    @Secured({"ROLE_super", "ROLE_admin"})
    public String admin() {
        return "admin";
    }

    @GetMapping("/super")
    @Secured({"ROLE_super"})
    public String supper() {
        return "super";
    }

    @GetMapping("/right")
    @PreAuthorize("hasAnyAuthority('right')")
    public String right() {
        return "right";
    }

    @GetMapping("/ignore")
    public String ignore() {
        return "ignore";
    }
2.5.5 访问控制
- 不登录直接访问
http://localhost:7777/resource/ignore 可以访问成功
访问其他页面会跳转到登陆页面 - 登陆普通用户
可以访问 /resource/ignore 和 /resource/hello,不能访问 /resource/admin、/resource/super 和 /resource/right - 登陆 admin 用户
可以访问 /resource/ignore、/resource/hello 和 /resource/admin,不能访问 /resource/super 和 /resource/right - 登陆 super 用户,不能访问 /resource/right,其他页面都能访问
- 登录 right 用户,可以访问 /resource/right、/resource/ignore 和 /resource/hello,其他页面不能访问
2.5.6 最佳实践
实际项目中通常采用基于权限的控制方式,将用户拥有的角色转换为权限来控制
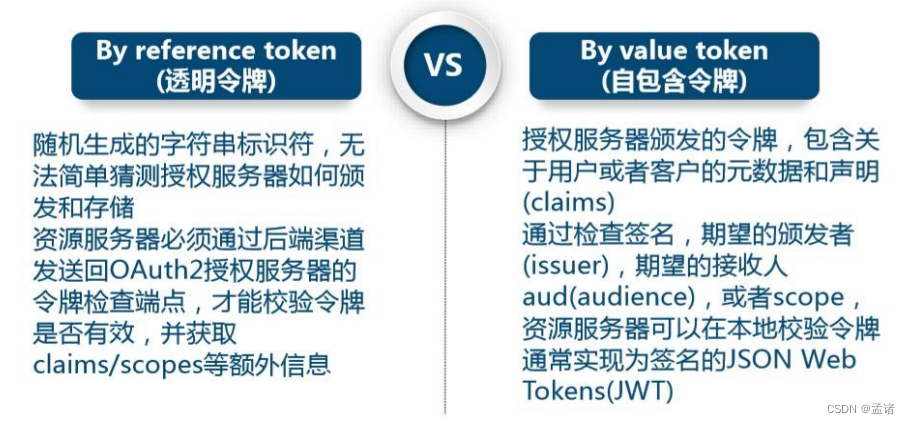
2.6 token 认证授权
用户根据用户名密码认证成功,然后获取当前用户角色的一系列权限值,并以用户名为 key,权限列表为 value 的形式存入 redis 缓存中,根据用户名相关信息生成 token 返回,浏览器将 token 记录到 cookie 中,每次调用 api 接口都默认将 token 携带到 header 请求头中,Spring-security 解析 header 头获取 token 信息,解析 token 获取当前用户名,根据用户名就可以从 redis 中获取权限列表,这 Spring-security 就能够判断当前请求是否有权限访问
2.6.1 token 类型
2.6.2 JWT 简介
一个 JWT 看起来如下图
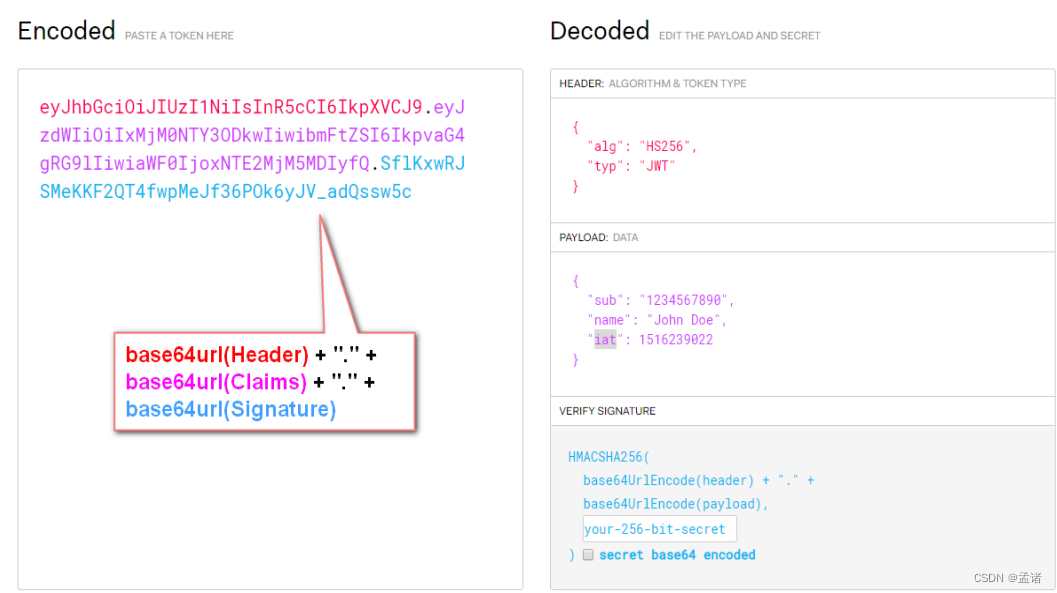
该对象为一个很长的字符串,字符之间通过"."分隔符分为三个子串。
每一个子串表示了一个功能块,总共有以下三个部分:JWT 头、有效载荷和签名
- JWT 头:JWT 头部分是一个描述 JWT 元数据的 JSON 对象,通常如下所示。
{
"alg": "HS256",
"typ": "JWT"
}
在上面的代码中,alg 属性表示签名使用的算法,默认为 HMAC SHA256(写为 HS256);
typ 属性表示令牌的类型,JWT 令牌统一写为 JWT。
最后,使用 Base64 URL 算法将上述JSON 对象转换为字符串保存。
- 有效载荷
有效载荷部分,是 JWT 的主体内容部分,也是一个 JSON 对象,包含需要传递的数据。 JWT 指定七个默认字段供选择。
iss:发行人
exp:到期时间
sub:主题
aud:用户
nbf:在此之前不可用
iat:发布时间
jti:JWT ID 用于标识该 JWT
除以上默认字段外,我们还可以自定义私有字段,如下例:
{
"sub": "1234567890",
"name": "Helen",
"admin": true
}
请注意,默认情况下 JWT 是未加密的,任何人都可以解读其内容,因此不要构建隐私信息字段,存放保密信息,以防止信息泄露。JSON 对象也使用 Base64 URL 算法转换为字符串保存。
- 签名哈希
签名哈希部分是对上面两部分数据签名,通过指定的算法生成哈希,以确保数据不会被篡改。
首先,需要指定一个密码(secret)。该密码仅仅为保存在服务器中,并且不能向用户公开。然后,使用标头中指定的签名算法(默认情况下为 HMAC SHA256)根据以下公式生成签名。HMACSHA256(base64UrlEncode(header) + “.” + base64UrlEncode(claims), secret)
在计算出签名哈希后,JWT 头,有效载荷和签名哈希的三个部分组合成一个字符串,每个部分用"."分隔,就构成整个 JWT 对象。
2.6.3 JWT token 认证案例
maven 依赖
        <dependency>
            <groupId>io.jsonwebtoken</groupId>
            <artifactId>jjwt</artifactId>
            <version>0.9.1</version>
        </dependency>
TokenManager:
@Component
public class TokenManager {

    private final String tokenSignKey = "123456";

    public String createToken(String username) {
        // token 有效期1天
        long tokenExpiration = 24 * 60 * 60 * 1000;
        return Jwts.builder().setSubject(username)
                .setExpiration(new Date(System.currentTimeMillis() + tokenExpiration))
                .signWith(SignatureAlgorithm.HS512, tokenSignKey)
                .compressWith(CompressionCodecs.GZIP).compact();
    }

    public String getUserFromToken(String token) {
        return Jwts.parser()
                .setSigningKey(tokenSignKey)
                .parseClaimsJws(token)
                .getBody()
                .getSubject();
    }
}
token登陆过滤器:
public class TokenLoginFilter extends UsernamePasswordAuthenticationFilter {
    private final TokenManager tokenManager;
    private final RedisTemplate redisTemplate;

    public TokenLoginFilter(AuthenticationManager authenticationManager, TokenManager tokenManager, RedisTemplate redisTemplate) {
        super.setAuthenticationManager(authenticationManager);
        this.tokenManager = tokenManager;
        this.redisTemplate = redisTemplate;
        this.setPostOnly(false);
        this.setRequiresAuthenticationRequestMatcher(new AntPathRequestMatcher("/login", "POST"));
    }

    /**
     * 登录成功
     */
    @Override
    protected void successfulAuthentication(HttpServletRequest req, HttpServletResponse res, FilterChain chain, Authentication auth) throws IOException {
        User user = (User) auth.getPrincipal();
        // 权限集合存到 redis
        redisTemplate.opsForValue().set("right:" + user.getUsername(), user.getAuthorities().stream()
                .map(GrantedAuthority::getAuthority)
                .collect(Collectors.toList()));
        // 生成 token 并返回
        String token = tokenManager.createToken(user.getUsername());
        ResponseUtil.write(res, Result.SUCCESS, token);
    }

    /**
     * 登录失败
     */
    @Override
    protected void unsuccessfulAuthentication(HttpServletRequest request, HttpServletResponse response, AuthenticationException e) throws IOException {
        ResponseUtil.write(response, Result.INVALID_PRINCIPAL);
    }
}
token 认证过滤器
public class TokenAuthenticationFilter extends BasicAuthenticationFilter {
    private TokenManager tokenManager;
    private RedisTemplate redisTemplate;

    public TokenAuthenticationFilter(AuthenticationManager authenticationManager,
                                     AuthenticationEntryPoint authenticationEntryPoint,
                                     TokenManager tokenManager,
                                     RedisTemplate redisTemplate) {
        super(authenticationManager, authenticationEntryPoint);
        this.tokenManager = tokenManager;
        this.redisTemplate = redisTemplate;
    }

    @Override
    protected void doFilterInternal(HttpServletRequest req, HttpServletResponse res, FilterChain chain) throws IOException, ServletException {
        SecurityContextHolder.getContext().setAuthentication(getAuthentication(req));
        chain.doFilter(req, res);
    }

    private UsernamePasswordAuthenticationToken getAuthentication(HttpServletRequest request) {
        // token 置于 header 里
        String token = request.getHeader("token");
        if (StrUtil.isBlank(token)) {
            return null;
        }
        String userName = tokenManager.getUserFromToken(token);
        if (StrUtil.isBlank(userName)) {
            return null;
        }
        List<String> permissionValueList = (List<String>) redisTemplate.opsForValue().get("right:" + userName);
        // 添加权限
        Collection<GrantedAuthority> authorities = new ArrayList<>();
        if (CollectionUtil.isNotEmpty(permissionValueList)) {
            for (String permissionValue : permissionValueList) {
                if (StrUtil.isBlank(permissionValue)) {
                    continue;
                }
                SimpleGrantedAuthority authority = new SimpleGrantedAuthority(permissionValue);
                authorities.add(authority);
            }
        }
        return new UsernamePasswordAuthenticationToken(userName, token, authorities);
    }
}
用户登出处理器
@Slf4j
@Component
public class TokenLogoutHandler implements LogoutHandler {

    @Resource
    private TokenManager tokenManager;

    @Resource
    private RedisTemplate redisTemplate;

    @Override
    public void logout(HttpServletRequest request, HttpServletResponse response, Authentication authentication) {
    	// 清空认证信息
        SecurityContextHolder.getContext().setAuthentication(null);
        String token = request.getHeader("token");
        if (token != null) {
            //清空当前用户缓存中的权限数据
            String userName = tokenManager.getUserFromToken(token);
            log.info("user logout:{}", userName);
            redisTemplate.delete("right:" + userName);
        }
        try {
            ResponseUtil.write(response, Result.SUCCESS);
        } catch (IOException e) {
            e.printStackTrace();
        }
    }
}
用户未认证提示信息
public class UnauthorizedEntryPoint implements AuthenticationEntryPoint {
    @Override
    public void commence(HttpServletRequest request, HttpServletResponse response, AuthenticationException authException) throws IOException {
        // 回复错误信息
        ResponseUtil.write(response, Result.UNAUTHORIZED);
    }
}
用户无权限提示信息
public class JsonAccessDeniedHandler implements AccessDeniedHandler {
    @Override
    public void handle(HttpServletRequest httpServletRequest, HttpServletResponse response, AccessDeniedException e) throws IOException, ServletException {
        ResponseUtil.write(response, Result.FORBIDDEN);
    }
}
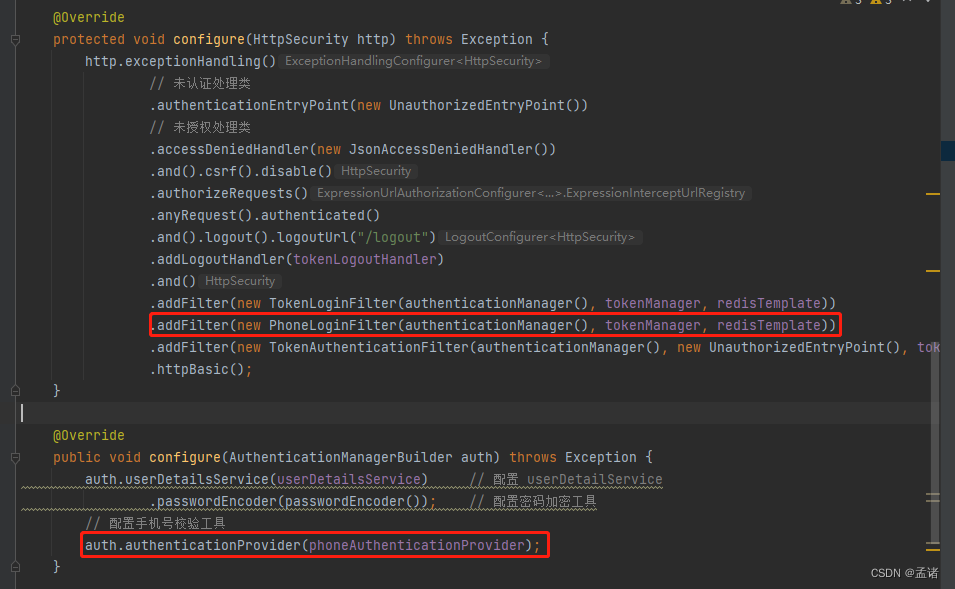
配置修改
    @Override
    protected void configure(HttpSecurity http) throws Exception {
        http.exceptionHandling()
                // 未认证处理类
                .authenticationEntryPoint(new UnauthorizedEntryPoint())
                // 未授权处理类
                .accessDeniedHandler(new JsonAccessDeniedHandler())
                .and().csrf().disable()
                .authorizeRequests()
                .anyRequest().authenticated()
                .and().logout().logoutUrl("/logout")
                .addLogoutHandler(tokenLogoutHandler)
                .and()
                .addFilter(new TokenLoginFilter(authenticationManager(), tokenManager, redisTemplate))
                .addFilter(new TokenAuthenticationFilter(authenticationManager(), new UnauthorizedEntryPoint(), tokenManager, redisTemplate))
                .httpBasic();
    }
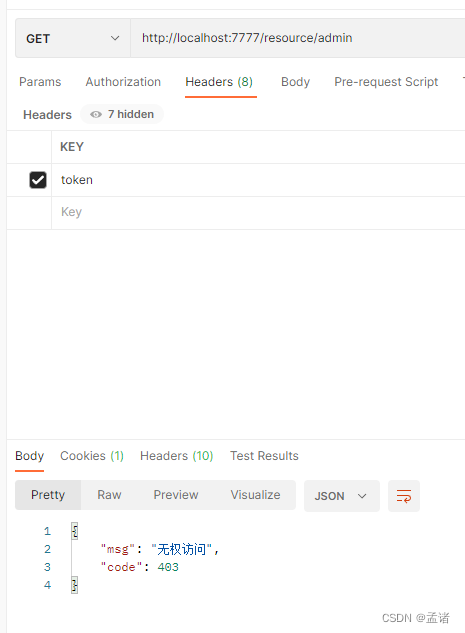
测试:
直接访问资源:
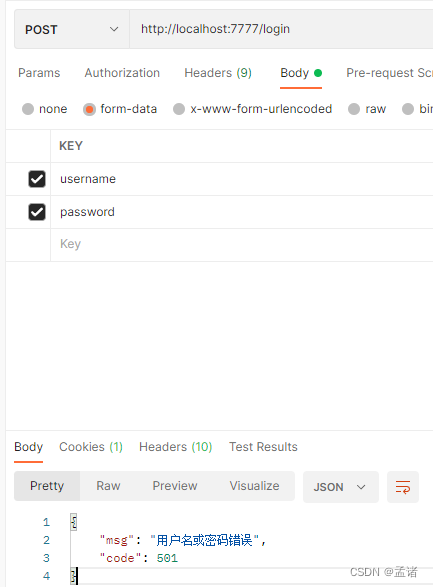
输入错误的用户名密码:
输入正确的用户名密码:
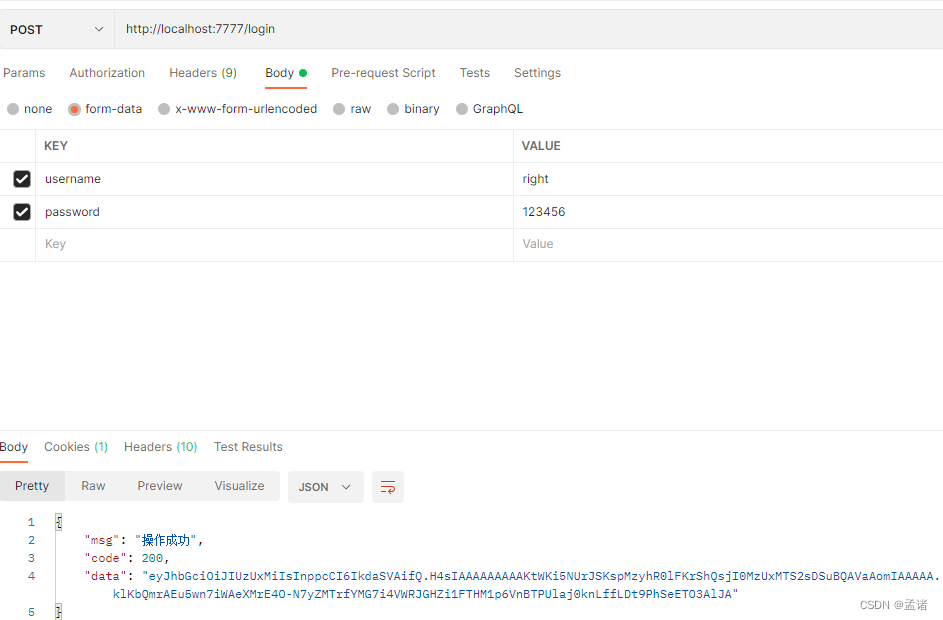
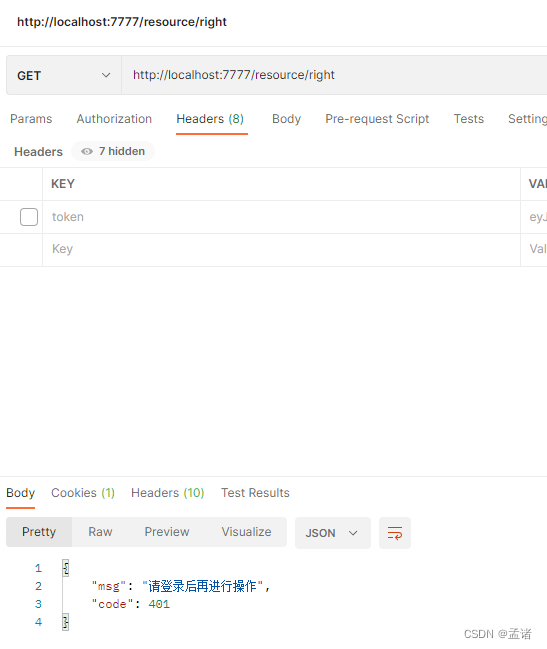
携带 token 请求资源:
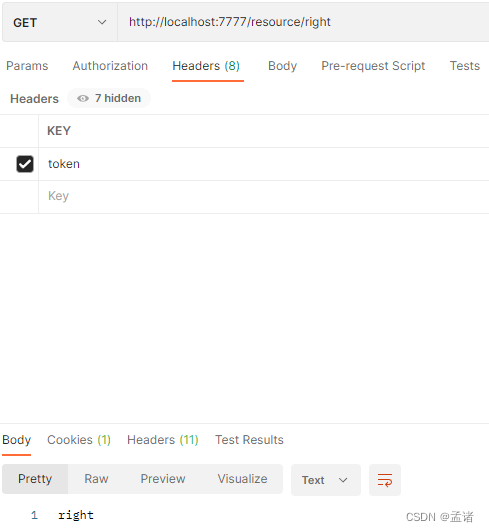
请求未授权的资源
2.7 短信验证码登录
手机号验证码登陆可以抽象为一种用户名密码登录方式,只不过有了自定义的登录地址、传参名称
2.7.1 短信验证码过滤器
public class PhoneLoginFilter extends TokenLoginFilter {

    public PhoneLoginFilter(AuthenticationManager authenticationManager, TokenManager tokenManager, RedisTemplate redisTemplate) {
        super(authenticationManager, tokenManager, redisTemplate);
        super.setUsernameParameter("phone");
        super.setPasswordParameter("code");
        this.setRequiresAuthenticationRequestMatcher(new AntPathRequestMatcher("/phone-login", "POST"));
    }

    @Override
    public Authentication attemptAuthentication(HttpServletRequest request, HttpServletResponse response) throws AuthenticationException {
        String username = obtainUsername(request);
        String password = obtainPassword(request);

        if (username == null) {
            username = "";
        }

        if (password == null) {
            password = "";
        }

        username = username.trim();

        PhoneAuthenticationToken authRequest = new PhoneAuthenticationToken(username, password, Collections.emptyList());
        return this.getAuthenticationManager().authenticate(authRequest);
    }

    /**
     * 登录失败
     */
    @Override
    protected void unsuccessfulAuthentication(HttpServletRequest request, HttpServletResponse response, AuthenticationException e) throws IOException {
        ResponseUtil.write(response, Result.INVALID_CODE);
    }
}
2.7.2 短信验证码 token
public class PhoneAuthenticationToken extends UsernamePasswordAuthenticationToken {

    public PhoneAuthenticationToken(String phone, String code, Collection<? extends GrantedAuthority> authorities) {
        super(new User(phone, code, authorities), code, authorities);
        setAuthenticated(false);
    }
}
2.7.3 短信验证码校验处理工具
@Slf4j
@Component
public class PhoneAuthenticationProvider implements AuthenticationProvider {

    @Override
    public Authentication authenticate(Authentication authentication) throws AuthenticationException {
        // 获取手机号和验证码
        String phone = authentication.getName();
        String rawCode = authentication.getCredentials().toString();
        // 实际开发中需要校验用户信息和验证码是否正确,这里省略
        if (!"123456".equals(rawCode)) {
            throw new BadCredentialsException("invalid code");
        }
        // 返回经过认证的 Authentication,
        PhoneAuthenticationToken result = new PhoneAuthenticationToken(phone, rawCode, AuthorityUtils.commaSeparatedStringToAuthorityList("right"));
        result.setDetails(authentication.getDetails());
        return result;
    }

    @Override
    public boolean supports(Class<?> authentication) {
        return PhoneAuthenticationToken.class.isAssignableFrom(authentication);
    }
}
2.7.4 配置类修改
2.7.5 登录测试
错误的手机号验证码:
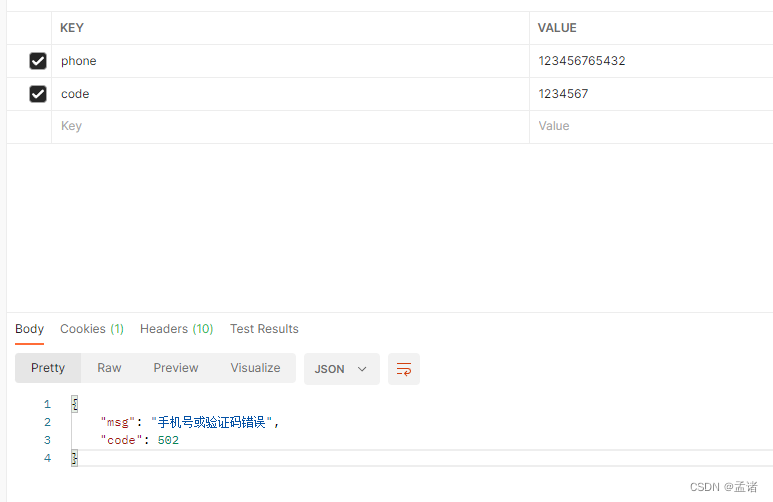
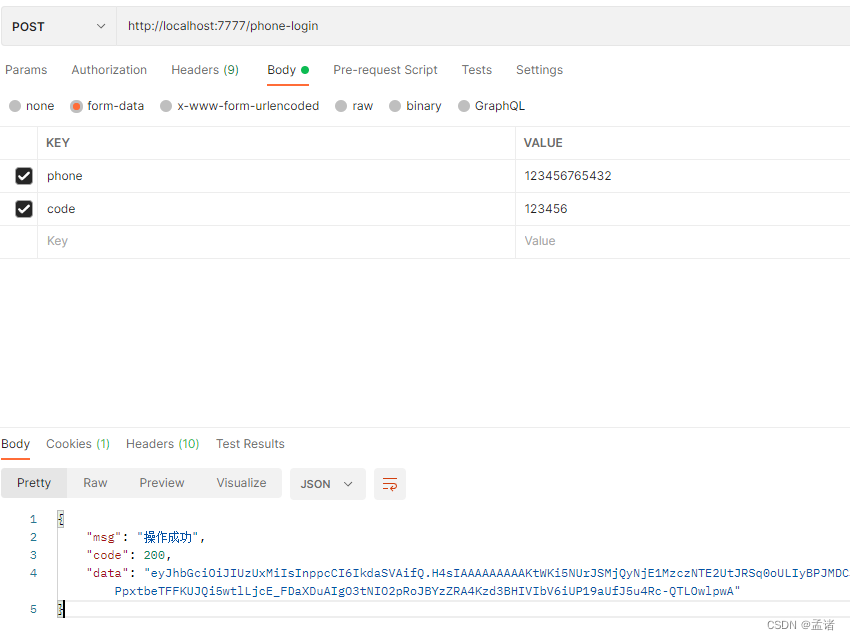
正确的手机号验证码
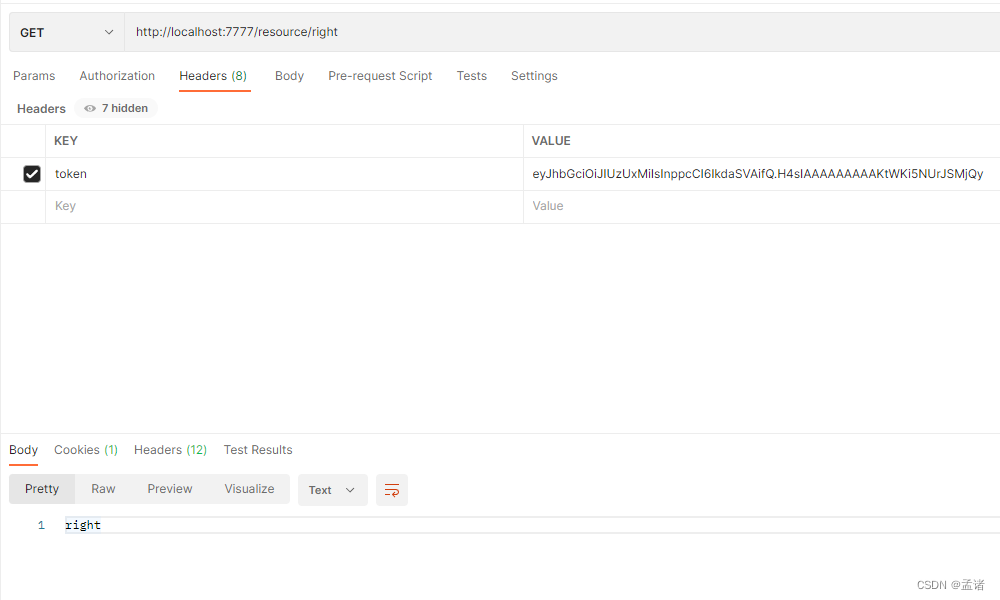
访问有权限的资源
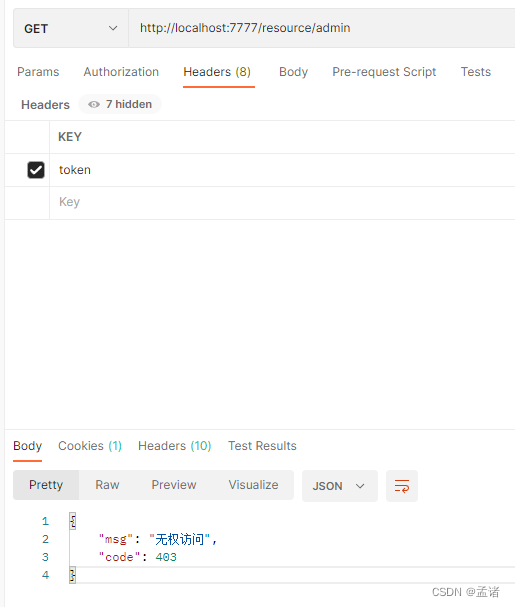
访问无权限的资源
2.8 源码解析
2.8.1 SpringSecurity 的过滤器介绍
- WebAsyncManagerIntegrationFilter:将 Security 上下文与 Spring Web 中用于处理异步请求映射的 WebAsyncManager 进行集成。
- SecurityContextPersistenceFilter:在每次请求处理之前将该请求相关的安全上下文信息加载到 SecurityContextHolder 中,然后在该次请求处理完成之后,将 SecurityContextHolder 中关于这次请求的信息存储到一个“仓储”中,然后将 SecurityContextHolder 中的信息清除,例如在 Session 中维护一个用户的安全信息就是这个过滤器处理的。
- HeaderWriterFilter:用于将头信息加入响应中。
- CsrfFilter:用于处理跨站请求伪造。
- LogoutFilter:用于处理退出登录。
- UsernamePasswordAuthenticationFilter:用于处理基于表单的登录请求,从表单中获取用户名和密码。默认情况下处理来自 /login 的请求。从表单中获取用户名和密码时,默认使用的表单 name 值为 username 和 password,这两个值可以通过设置这个过滤器的 usernameParameter 和 passwordParameter 两个参数的值进行修改。
- DefaultLoginPageGeneratingFilter:如果没有配置登录页面,那系统初始化时就会配置这个过滤器,并且用于在需要进行登录时生成一个登录表单页面。
- BasicAuthenticationFilter:检测和处理 http basic 认证。
- RequestCacheAwareFilter:用来处理请求的缓存。
- SecurityContextHolderAwareRequestFilter:主要是包装请求对象 request。
- AnonymousAuthenticationFilter:检测 SecurityContextHolder 中是否存在 Authentication 对象,如果不存在为其提供一个匿名 Authentication。
- SessionManagementFilter:管理 session 的过滤器
- ExceptionTranslationFilter:处理 AccessDeniedException 和 AuthenticationException 异常。
- FilterSecurityInterceptor:可以看做过滤器链的出口。
- RememberMeAuthenticationFilter:当用户没有登录而直接访问资源时, 从 cookie 里找出用户的信息,如果 Spring Security 能够识别出用户提供的 remember me cookie, 用户将不必填写用户名和密码, 而是直接登录进入系统,该过滤器默认不开启。
2.8.2 认证流程
认证流程主要通过 UsernamePasswordAuthenticationFilter 来实现的,构造方法如下
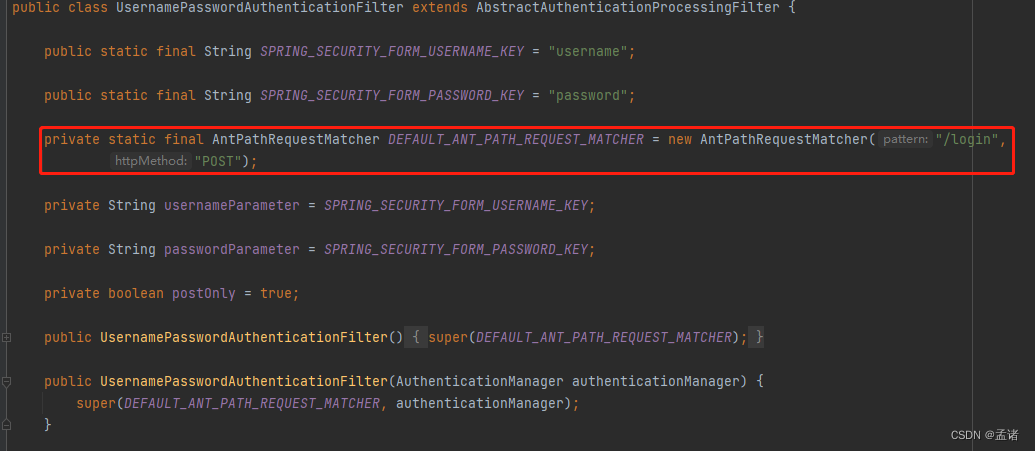
该 matcher 的作用是拦截 POST /login 请求,所以系统登录请求是 /login
具体认证流程代码:
	@Override
	public Authentication attemptAuthentication(HttpServletRequest request, HttpServletResponse response)
			throws AuthenticationException {
		if (this.postOnly && !request.getMethod().equals("POST")) {
			throw new AuthenticationServiceException("Authentication method not supported: " + request.getMethod());
		}
		// 解析出用户名密码
		String username = obtainUsername(request);
		username = (username != null) ? username.trim() : "";
		String password = obtainPassword(request);
		password = (password != null) ? password : "";
		// 拼接 token
		UsernamePasswordAuthenticationToken authRequest = UsernamePasswordAuthenticationToken.unauthenticated(username, password);
		// Allow subclasses to set the "details" property
		setDetails(request, authRequest);
		// 认证
		return this.getAuthenticationManager().authenticate(authRequest);
	}
进入 org.springframework.security.authentication.ProviderManager#authenticate
ProviderManager 逻辑比较简单,其内部持有了一个 List<AuthenticationProvider> providers 集合,来对传入的 token 进行解析
	@Override
	public Authentication authenticate(Authentication authentication) throws AuthenticationException {
		Class<? extends Authentication> toTest = authentication.getClass();
		AuthenticationException lastException = null;
		AuthenticationException parentException = null;
		Authentication result = null;
		Authentication parentResult = null;
		int currentPosition = 0;
		int size = this.providers.size();
		for (AuthenticationProvider provider : getProviders()) {
			// 每个 provider 解析不同类型的 token,如果不是该 provider 负责的则直接跳过
			if (!provider.supports(toTest)) {
				continue;
			}
			if (logger.isTraceEnabled()) {
				logger.trace(LogMessage.format("Authenticating request with %s (%d/%d)",
						provider.getClass().getSimpleName(), ++currentPosition, size));
			}
			try {
				result = provider.authenticate(authentication);
				if (result != null) {
					copyDetails(authentication, result);
					break;
				}
			}
			catch (AccountStatusException | InternalAuthenticationServiceException ex) {
				prepareException(ex, authentication);
				// SEC-546: Avoid polling additional providers if auth failure is due to
				// invalid account status
				throw ex;
			}
			catch (AuthenticationException ex) {
				lastException = ex;
			}
		}
	}
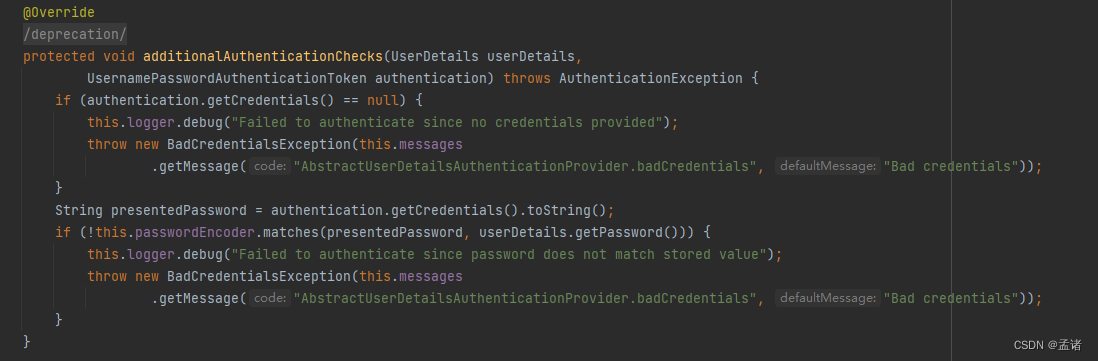
进入org.springframework.security.authentication.dao.AbstractUserDetailsAuthenticationProvider#authenticate
该 provider 中根据 userDetailService 获取用户,和前端传的用户名密码做比对,完成比对后返回认证信息,至此认证完成
	@Override
	public Authentication authenticate(Authentication authentication) throws AuthenticationException {
		Assert.isInstanceOf(UsernamePasswordAuthenticationToken.class, authentication,
				() -> this.messages.getMessage("AbstractUserDetailsAuthenticationProvider.onlySupports",
						"Only UsernamePasswordAuthenticationToken is supported"));
		String username = determineUsername(authentication);
		boolean cacheWasUsed = true;
		UserDetails user = this.userCache.getUserFromCache(username);
		if (user == null) {
			cacheWasUsed = false;
			try {
				// 用 userDetailsService 根据用户名获取用户信息
				user = retrieveUser(username, (UsernamePasswordAuthenticationToken) authentication);
			}
			catch (UsernameNotFoundException ex) {
				this.logger.debug("Failed to find user '" + username + "'");
				if (!this.hideUserNotFoundExceptions) {
					throw ex;
				}
				throw new BadCredentialsException(this.messages
						.getMessage("AbstractUserDetailsAuthenticationProvider.badCredentials", "Bad credentials"));
			}
			Assert.notNull(user, "retrieveUser returned null - a violation of the interface contract");
		}
		try {
			this.preAuthenticationChecks.check(user);
			// 用户名密码校验
			additionalAuthenticationChecks(user, (UsernamePasswordAuthenticationToken) authentication);
		}
		catch (AuthenticationException ex) {
			if (!cacheWasUsed) {
				throw ex;
			}
			// There was a problem, so try again after checking
			// we're using latest data (i.e. not from the cache)
			cacheWasUsed = false;
			user = retrieveUser(username, (UsernamePasswordAuthenticationToken) authentication);
			this.preAuthenticationChecks.check(user);
			additionalAuthenticationChecks(user, (UsernamePasswordAuthenticationToken) authentication);
		}
		this.postAuthenticationChecks.check(user);
		if (!cacheWasUsed) {
			this.userCache.putUserInCache(user);
		}
		Object principalToReturn = user;
		if (this.forcePrincipalAsString) {
			principalToReturn = user.getUsername();
		}
		return createSuccessAuthentication(principalToReturn, authentication, user);
	}
看源码总结流程如下:
- UsernamePasswordAuthenticationFilter 拦截登录请求,将前端传的用户名密码封装成 UsernamePasswordAuthenticationToken 交给 ProviderManager 认证
- ProviderManager 持有一个 List<AuthenticationProvider> 集合,每个 provider 支持一种 token 的认证,其中 UsernamePasswordAuthenticationToken 会交给 AbstractUserDetailsAuthenticationProvider 认证
- AbstractUserDetailsAuthenticationProvider 根据 token 中的 username 通过 userDetailService 获取用户真正信息,然后进行密码匹配。
- 匹配通过返回认证信息,认证完成。匹配失败抛异常
2.8.3 权限访问流程
权限访问流程主要通过 FilterSecurityInterceptor 来实现的
	public void invoke(FilterInvocation filterInvocation) throws IOException, ServletException {
		if (isApplied(filterInvocation) && this.observeOncePerRequest) {
			// filter already applied to this request and user wants us to observe
			// once-per-request handling, so don't re-do security checking
			filterInvocation.getChain().doFilter(filterInvocation.getRequest(), filterInvocation.getResponse());
			return;
		}
		// first time this request being called, so perform security checking
		if (filterInvocation.getRequest() != null && this.observeOncePerRequest) {
			filterInvocation.getRequest().setAttribute(FILTER_APPLIED, Boolean.TRUE);
		}
		// 根据资源配置判断该请求是否有权限访问
		InterceptorStatusToken token = super.beforeInvocation(filterInvocation);
		try {
			filterInvocation.getChain().doFilter(filterInvocation.getRequest(), filterInvocation.getResponse());
		}
		finally {
			super.finallyInvocation(token);
		}
		super.afterInvocation(token, null);
	}
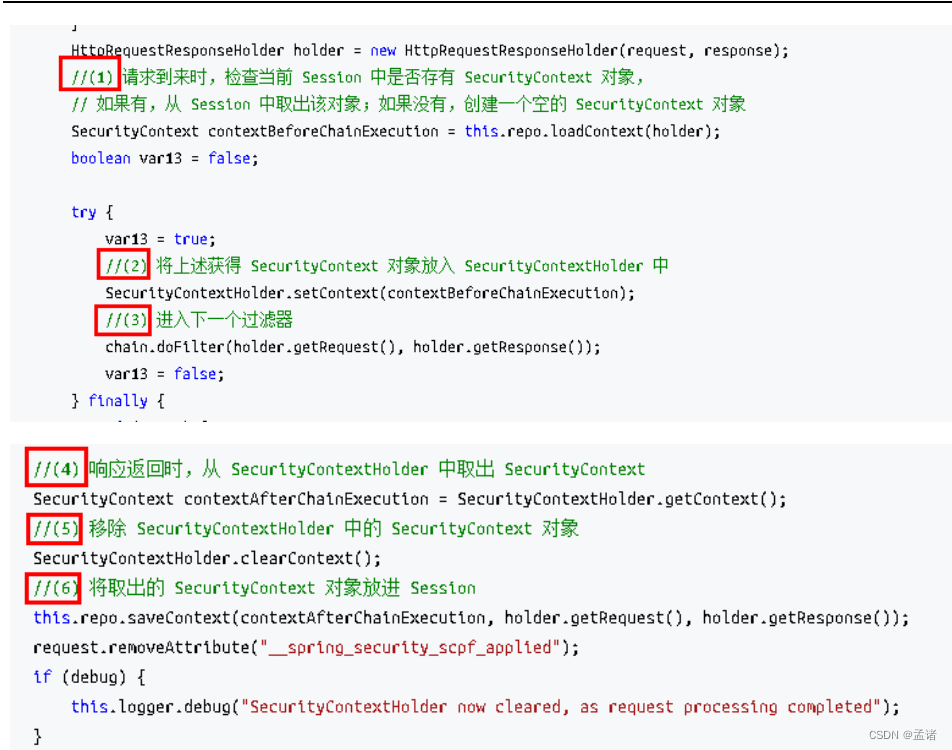
2.8.4 请求间共享认证信息
一般认证成功后的用户信息是通过 Session 在多个请求之间共享,那么 Spring Security 中是如何实现将已认证的用户信息对象 Authentication 与 Session 绑定的进行具体分析。
在前面讲解授权后有以下代码
SecurityContextHolder.getContext().setAuthentication(getAuthentication(req));
查 看 SecurityContextHolder 类 , 该 类 其 实 是 对 ThreadLocal 的 封 装 , 存储 SecurityContext 对象
SecurityContextPersistenceFilter 过滤器的位置在所有过滤器的最前面,请求到来先进它,响应返回最后一个通过它,所以在该过滤器中处理已认证的用户信息对象 Authentication 与 Session 绑定。认证成功的响应通过 SecurityContextPersistenceFilter 过滤器时,会从SecurityContextHolder 中取出封装了已认证用户信息对象 Authentication 的 SecurityContext,放进 Session 中。当请求再次到来时,请求首先经过该过滤器,该过滤器会判断当前请求的 Session 是否存有 SecurityContext 对象,如果有则将该对象取出再次放入 SecurityContextHolder 中,之后该请求所在的线程获得认证用户信息,后续的资源访
问不需要进行身份认证;当响应再次返回时,该过滤器同样从 SecurityContextHolder 取 SecurityContext 对象,放入 Session 中。具体源码如下:


 5080
5080


 被折叠的 条评论
为什么被折叠?
被折叠的 条评论
为什么被折叠?
 到【灌水乐园】发言


