


一、前言
Spring Boot 是由 Pivotal 团队提供的全新框架,其设计目的是用来简化新 Spring 应用的初始搭建以及开发过程。该框架使用了特定的方式来进行配置,从而使开发人员不再需要定义样板化的配置。
本系列以快速入门为主,可当作工具小手册阅读
二、环境搭建
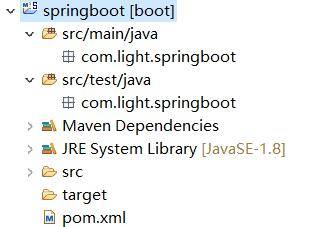
创建一个 maven 工程,目录结构如下图:
# 2.1 添加依赖
创建 maven 工程,在 pom.xml 文件中添加如下依赖:
<!-- 定义公共资源版本 --><parent><groupId>org.springframework.boot</groupId><artifactId>spring-boot-starter-parent</artifactId><version>1.5.6.RELEASE</version><relativePath /></parent><properties><project.build.sourceEncoding>UTF-8</project.build.sourceEncoding><project.reporting.outputEncoding>UTF-8</project.reporting.outputEncoding><java.version>1.8</java.version></properties><dependencies><!-- 上边引入 parent,因此 下边无需指定版本 --><!-- 包含 mvc,aop 等jar资源 --><dependency><groupId>org.springframework.boot</groupId><artifactId>spring-boot-starter-web</artifactId></dependency></dependencies><build><plugins><plugin><groupId>org.springframework.boot</groupId><artifactId>spring-boot-maven-plugin</artifactId></plugin></plugins></build>
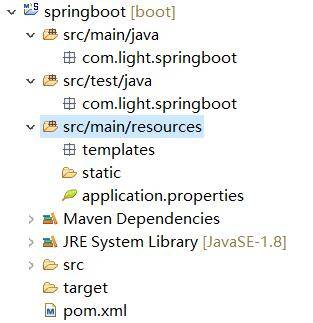
# 2.2 创建目录和配置文件
创建 src/main/resources 源文件目录,并在该目录下创建 application.properties 文件、static 和 templates 的文件夹。
application.properties:用于配置项目运行所需的配置数据。
static:用于存放静态资源,如:css、js、图片等。
templates:用于存放模板文件。
目录结构如下:
# 2.3 创建启动类
在 com.light.springboot 包下创建启动类,如下:
/**该注解指定项目为springboot,由此类当作程序入口自动装配 web 依赖的环境**/@SpringBootApplicationpublic class SpringbootApplication {public static void main(String[] args) {SpringApplication.run(SpringbootApplication.class, args);}}
# 2.4 案例演示
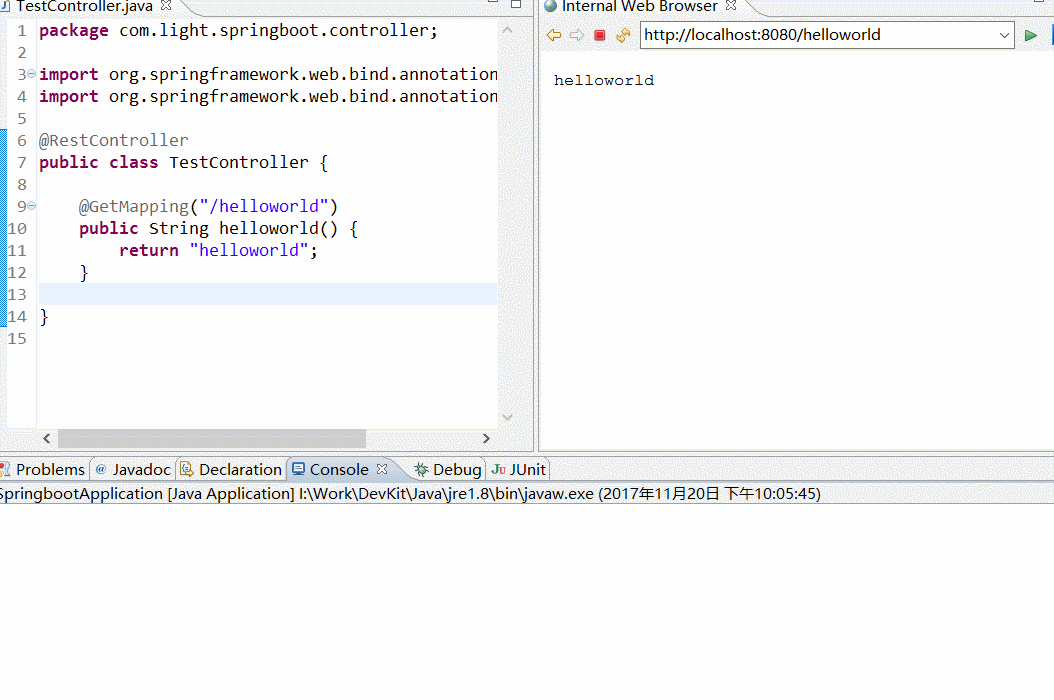
创建 com.light.springboot.controller 包,在该包下创建一个 Controller 类,如下:
@RestControllerpublic class TestController {@GetMapping("/helloworld")public String helloworld() {return "helloworld";}}
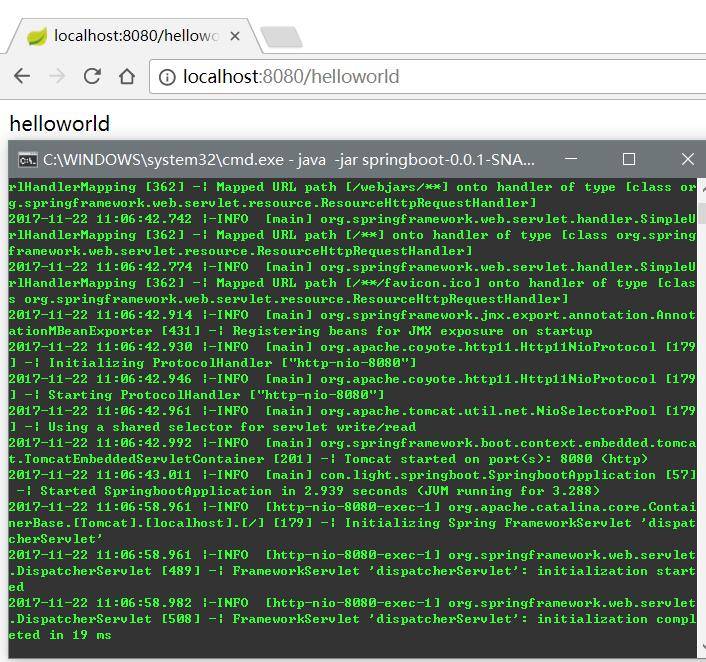
在 SpringbootApplication 文件中右键 Run as -> Java Application。当看到 “Tomcat started on port(s): 8080 (http)” 字样说明启动成功。
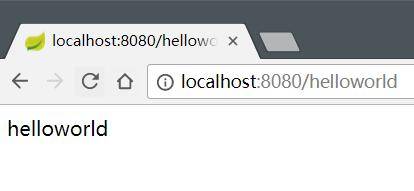
打开浏览器访问 http://localhost:8080/helloworld,结果如下:
读者可以使用 STS 开发工具,里边集成了插件,可以直接创建 Spingboot 项目,它会自动生成必要的目录结构。
三、热部署
当我们修改文件和创建文件时,都需要重新启动项目。这样频繁的操作很浪费时间,配置热部署可以让项目自动加载变化的文件,省去的手动操作。
在 pom.xml 文件中添加如下配置:
<!-- 热部署 --><dependency><groupId>org.springframework.boot</groupId><artifactId>spring-boot-devtools</artifactId><optional>true</optional><scope>true</scope></dependency>
<build><plugins><plugin><groupId>org.springframework.boot</groupId><artifactId>spring-boot-maven-plugin</artifactId><configuration><!-- 没有该配置,devtools 不生效 --><fork>true</fork></configuration></plugin></plugins></build>
配置好 pom.xml 文件后,我们启动项目,随便创建/修改一个文件并保存,会发现控制台打印 springboot 重新加载文件的信息。
演示图如下:
四、多环境切换
application.properties 是 springboot 在运行中所需要的配置信息。
当我们在开发阶段,使用自己的机器开发,测试的时候需要用的测试服务器测试,上线时使用正式环境的服务器。
这三种环境需要的配置信息都不一样,当我们切换环境运行项目时,需要手动的修改多出配置信息,非常容易出错。
为了解决上述问题,springboot 提供多环境配置的机制,让开发者非常容易的根据需求而切换不同的配置环境。
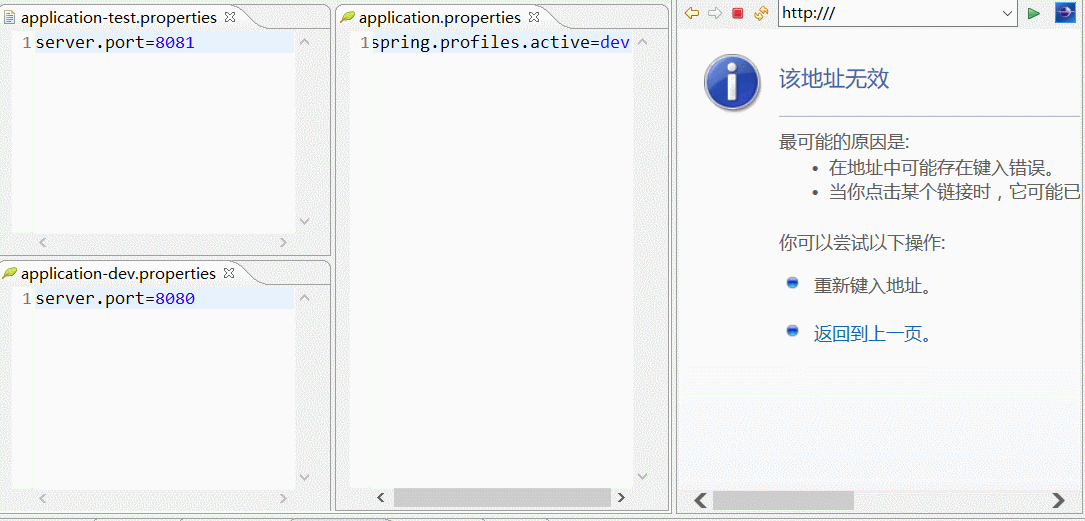
在 src/main/resources 目录下创建三个配置文件:
application-dev.properties:用于开发环境application-test.properties:用于测试环境application-prod.properties:用于生产环境
我们可以在这个三个配置文件中设置不同的信息,application.properties 配置公共的信息。
在 application.properties 中配置:
spring.profiles.active=dev
表示激活 application-dev.properties 文件配置, springboot 会加载使用 application.properties 和 application-dev.properties 配置文件的信息。
同理,可将 spring.profiles.active 的值修改成 test 或 prod 达到切换环境的目的。
演示图如下:
切换项目启动的环境不仅对读取配置文件信息有效,也可以对 Bean 有效。
当我们需要对不同环境使用不同的 Bean 时,可以通过 @Profile 注解进行区分,如下:
@Configurationpublic class BeanConfiguration {@Bean@Profile("dev")public Runnable test1() {System.out.println("开发环境使用的 Bean");return () -> {};}@Bean@Profile("test")public Runnable test2() {System.out.println("测试环境使用的 Bean");return () -> {};}@Bean@Profile("pro")public Runnable test3() {System.out.println("生成环境使用的 Bean");return () -> {};}}
当启动项目后,Spring 会根据 spring.profiles.active 的值实例化对应的 Bean。
五、配置日志
# 5.1 配置 logback(官方推荐使用)
# 5.1.1 配置日志文件
spring boot 默认会加载 classpath:logback-spring.xml 或者 classpath:logback-spring.groovy。
如需要自定义文件名称,在 application.properties 中配置 logging.config 选项即可。
在 src/main/resources 下创建 logback-spring.xml 文件,内容如下:
<?xml version="1.0" encoding="UTF-8"?><configuration><!-- 文件输出格式 --><property name="PATTERN" value="%-12(%d{yyyy-MM-dd HH:mm:ss.SSS}) |-%-5level [%thread] %c [%L] -| %msg%n" /><!-- test文件路径 --><property name="TEST_FILE_PATH" value="d:/test.log" /><!-- pro文件路径 --><property name="PRO_FILE_PATH" value="/opt/test/log" /><!-- 开发环境 --><springProfile name="dev"><appender name="CONSOLE" class="ch.qos.logback.core.ConsoleAppender"><encoder><pattern>${PATTERN}</pattern></encoder></appender><logger name="com.light.springboot" level="debug" /><root level="info"><appender-ref ref="CONSOLE" /></root></springProfile><!-- 测试环境 --><springProfile name="test"><!-- 每天产生一个文件 --><appender name="TEST-FILE" class="ch.qos.logback.core.rolling.RollingFileAppender"><!-- 文件路径 --><file>${TEST_FILE_PATH}</file><rollingPolicy class="ch.qos.logback.core.rolling.TimeBasedRollingPolicy"><!-- 文件名称 --><fileNamePattern>${TEST_FILE_PATH}/info.%d{yyyy-MM-dd}.log</fileNamePattern><!-- 文件最大保存历史数量 --><MaxHistory>100</MaxHistory></rollingPolicy><layout class="ch.qos.logback.classic.PatternLayout"><pattern>${PATTERN}</pattern></layout></appender><logger name="com.light.springboot" level="debug" /><root level="info"><appender-ref ref="TEST-FILE" /></root></springProfile><!-- 生产环境 --><springProfile name="prod"><appender name="PROD_FILE" class="ch.qos.logback.core.rolling.RollingFileAppender"><file>${PRO_FILE_PATH}</file><rollingPolicy class="ch.qos.logback.core.rolling.TimeBasedRollingPolicy"><fileNamePattern>${PRO_FILE_PATH}/warn.%d{yyyy-MM-dd}.log</fileNamePattern><MaxHistory>100</MaxHistory></rollingPolicy><layout class="ch.qos.logback.classic.PatternLayout"><pattern>${PATTERN}</pattern></layout></appender><root level="warn"><appender-ref ref="PROD_FILE" /></root></springProfile></configuration>
其中,springProfile 标签的 name 属性对应 application.properties 中的 spring.profiles.active 的配置。
即 spring.profiles.active 的值可以看作是日志配置文件中对应的 springProfile 是否生效的开关。
# 5.2 配置 log4j2
# 5.2.1 添加依赖
<dependency><groupId>org.springframework.boot</groupId><artifactId>spring-boot-starter-log4j2</artifactId></dependency><dependency><groupId>org.springframework.boot</groupId><artifactId>spring-boot-starter-web</artifactId><exclusions><exclusion><groupId>org.springframework.boot</groupId><artifactId>spring-boot-starter-logging</artifactId></exclusion></exclusions></dependency>
# 5.2.2 配置日志文件
spring boot 默认会加载 classpath:log4j2.xml 或者 classpath:log4j2-spring.xml。
如需要自定义文件名称,在 application.properties 中配置 logging.config 选项即可。
log4j2.xml 文件内容如下:
<?xml version="1.0" encoding="utf-8"?><configuration><properties><!-- 文件输出格式 --><property name="PATTERN">%d{yyyy-MM-dd HH:mm:ss.SSS} |-%-5level [%thread] %c [%L] -| %msg%n</property></properties><appenders><Console name="CONSOLE" target="system_out"><PatternLayout pattern="${PATTERN}" /></Console></appenders><loggers><logger name="com.light.springboot" level="debug" /><root level="info"><appenderref ref="CONSOLE" /></root></loggers></configuration>
log4j2 不能像 logback 那样在一个文件中设置多个环境的配置数据,只能命名 3 个不同名的日志文件,分别在 application-dev,application-test 和 application-prod 中配置 logging.config 选项。
除了在日志配置文件中设置参数之外,还可以在 application-*.properties 中设置,日志相关的配置:
logging.config # 日志配置文件路径,如 classpath:logback-spring.xmllogging.exception-conversion-word # 记录异常时使用的转换词logging.file # 记录日志的文件名称,如:test.loglogging.level.* # 日志映射,如:logging.level.root=WARN,logging.level.org.springframework.web=DEBUGlogging.path # 记录日志的文件路径,如:d:/logging.pattern.console # 向控制台输出的日志格式,只支持默认的 logback 设置。logging.pattern.file # 向记录日志文件输出的日志格式,只支持默认的 logback 设置。logging.pattern.level # 用于呈现日志级别的格式,只支持默认的 logback 设置。logging.register-shutdown-hook # 初始化时为日志系统注册一个关闭钩子
六、注解介绍
下面列出 Spring Boot 开发中常用的注解:
@Configuration # 作用于类上,相当于一个 xml 配置文件@Bean # 作用于方法上,相当于 xml 配置中的 <bean>@SpringBootApplication # Spring Boot的核心注解,是一个组合注解,用于启动类上@EnableAutoConfiguration # 启用自动配置,允许加载第三方 Jar 包的配置@ComponentScan # 默认扫描 @SpringBootApplication 所在类的同级目录以及它的子目录@PropertySource # 加载 properties 文件@Value # 将配置文件的属性注入到 Bean 中特定的成员变量@EnableConfigurationProperties # 开启一个特性,让配置文件的属性可以注入到 Bean 中,与 @ConfigurationProperties 结合使用@ConfigurationProperties # 关联配置文件中的属性到 Bean 中@Import # 加载指定 Class 文件,其生命周期被 Spring 管理@ImportResource # 加载 xml 文件
传统项目下使用的注解,此处就不再累述。
七、读取配置文件
# 7.1 属性装配
有两种方式:使用 @Value 注解和 Environment 对象。
在 application.properties 中添加:
ds.userName=rootds.password=tigerds.url=jdbc:mysql://localhost:3306/testds.driverClassName=com.mysql.jdbc.Driver
以上是自定义的配置。
创建一个配置类,如下:
@Configurationpublic class WebConfig {@Value("${ds.userName}")private String userName;@Autowiredprivate Environment environment;public void show() {System.out.println("ds.userName:" + this.userName);System.out.println("ds.password:" + this.environment.getProperty("ds.password"));}}
通过 @Value 获取 config.userName 配置;通过 environment 获取 config.password 配置。
测试:
@SpringBootApplicationpublic class SpringbootApplication {public static void main(String[] args) {ConfigurableApplicationContext context = SpringApplication.run(SpringbootApplication.class, args);context.getBean(WebConfig.class).show();}}
打印结果:
userName:rootpassword:tiger
# 7.2 对象装配
创建一个封装类:
@Component@ConfigurationProperties(prefix="ds")public class DataSourceProperties {private String url;private String driverClassName;private String userName;private String password;public void show() {System.out.println("ds.url=" + this.url);System.out.println("ds.driverClassName=" + this.driverClassName);System.out.println("ds.userName=" + this.userName);System.out.println("ds.password=" +this.password);}}
此处省略 setter 和 getter 方法。
测试:
@SpringBootApplicationpublic class SpringbootApplication {public static void main(String[] args) {ConfigurableApplicationContext context = SpringApplication.run(SpringbootApplication.class, args);context.getBean(DataSourceProperties.class).show();}}
打印结果:
ds.url=jdbc:mysql://localhost:3306/testds.driverClassName=com.mysql.jdbc.Driverds.userName=rootds.password=tiger
八、自动配置
在上文的例子中,我们其实就使用到自动配置了,在此小结中再举例说明,加深印象。
现有 2 个项目,一个 Maven 项目 和 Spring Boot 项目。
Spring Boot 项目引入 Maven 项目并使用 Maven 项目中写好的类。
# 8.1 编码
Maven 项目中的代码:
public class Cache {private Map<String,Object> map = new HashMap<String,Object>();public void set(String key,String value) {this.map.put(key,value);}public Object get(String key) {return this.map.get(key);}}@Configurationpublic class CacheConfirguration {@Beanpublic Cache createCacheObj() {return new Cache();}}
Spring Boot 项目引入 Maven 项目:
pom.xml 文件:
<dependency><groupId>com.light</groupId><artifactId>cache</artifactId><version>0.0.1-SNAPSHOT</version></dependency>
测试:
@SpringBootApplicationpublic class SpringbootApplication extends SpringBootServletInitializer {@Overrideprotected SpringApplicationBuilder configure(SpringApplicationBuilder application) {return application.sources(SpringbootApplication.class);}public static void main(String[] args) {ConfigurableApplicationContext context = SpringApplication.run(SpringbootApplication.class, args);CacheConfirguration conf = context.getBean(CacheConfirguration.class);System.out.println(conf);Cache Cache = context.getBean(Cache.class);System.out.println(Cache);}}
打印结果:
Caused by: org.springframework.beans.factory.NoSuchBeanDefinitionException: No qualifying bean of type 'com.light.cache.Cache' available
从结果我们可知 Spring Boot 并不会自动配置第三方 jar 资源文件。
因为 @SpringBootApplication 注解包含 @ComponentScan 注解,项目启动时 Spring 只扫描与 SpringbootApplication 类同目录和子目录下的类文件,引入第三方 jar 文件无法被扫描,因此不能被 Spring 容器管理。
# 8.2 解决方案
方式一:
在启动类 SpringbootApplication 上添加 @Import(CacheConfirguration.class)。
方式二:
在 Maven 项目的 src/main/resources 目录下创建 META-INF 文件夹,在该文件夹下再创建 spring.factories 文件,内容如下:
org.springframework.boot.autoconfigure.EnableAutoConfiguration=\com.light.cache.CacheConfirguration
启动项目,结果如下:

九、条件配置
需要装配的类:
public interface EncodingConvertor {}public class UTF8EncodingConvertor implements EncodingConvertor {}public class GBKEncodingConvertor implements EncodingConvertor {}
配置类:
@Configurationpublic class EncodingConvertorConfiguration {@Beanpublic EncodingConvertor createUTF8EncodingConvertor() {return new UTF8EncodingConvertor();}@Beanpublic EncodingConvertor createGBKEncodingConvertor() {return new GBKEncodingConvertor();}}
测试:
@SpringBootApplicationpublic class SpringbootApplication extends SpringBootServletInitializer {@Overrideprotected SpringApplicationBuilder configure(SpringApplicationBuilder application) {return application.sources(SpringbootApplication.class);}public static void main(String[] args) {ConfigurableApplicationContext context = SpringApplication.run(SpringbootApplication.class, args);Map<String, EncodingConvertor> map = context.getBeansOfType(EncodingConvertor.class);System.out.println(map);}}
打印结果:
{createUTF8EncodingConvertor=com.light.springboot.config.UTF8EncodingConvertor@4c889f9d, createGBKEncodingConvertor=com.light.springboot.config.GBKEncodingConvertor@26f067d9}
从结果看出,Spring 帮我们装配了 2 个 Bean。
当我们需要根据系统环境的字符集选择性的装配其中一个 Bean 时,需要结合 @Conditional 注解 和 Condition 接口使用。如下:
创建条件类:
public class UTF8Condition implements Condition {@Overridepublic boolean matches(ConditionContext context, AnnotatedTypeMetadata metadata) {String encoding = System.getProperty("file.encoding");if (encoding != null) {return "utf-8".equals(encoding.toLowerCase());}return false;}}public class GBKCondition implements Condition {@Overridepublic boolean matches(ConditionContext context, AnnotatedTypeMetadata metadata) {String encoding = System.getProperty("file.encoding");if (encoding != null) {return "gbk".equals(encoding.toLowerCase());}return false;}}
Condition 用于判断是否进行装配,需要实现 matches 方法。当方法返回 true 时表示需要装配,否则反之。
修改配置类:
@Configurationpublic class EncodingConvertorConfiguration {@Bean@Conditional(UTF8Condition.class)public EncodingConvertor createUTF8EncodingConvertor() {return new UTF8EncodingConvertor();}@Bean@Conditional(GBKCondition.class)public EncodingConvertor createGBKEncodingConvertor() {return new GBKEncodingConvertor();}}
在对应的 Bean 上添加 @Conditional 注解。
测试:
@SpringBootApplicationpublic class SpringbootApplication extends SpringBootServletInitializer {@Overrideprotected SpringApplicationBuilder configure(SpringApplicationBuilder application) {return application.sources(SpringbootApplication.class);}public static void main(String[] args) {ConfigurableApplicationContext context = SpringApplication.run(SpringbootApplication.class, args);System.out.println(System.getProperty("file.encoding"));Map<String, EncodingConvertor> map = context.getBeansOfType(EncodingConvertor.class);System.out.println(map);}}
打印结果:
UTF-8{createUTF8EncodingConvertor=com.light.springboot.config.UTF8EncodingConvertor@24701bc1}
除了 @Conditional 之外,Spring Boot 还提供了其他注解进行条件装配:
@ConditionalOnBean # 当指定 Bean 存在时进行装配@ConditionalOnMissingBean # 当指定 Bean 不存在时进行装配@ConditionalOnClass # 当指定 Class 在 classpath 中时进行装配@ConditionalOnMissingClass # 当指定 Class 不在 classpath 中时进行装配@ConditionalOnExpression # 根据 SpEL 表达式进行装配@ConditionalOnJava # 根据 JVM 版本进行装配@ConditionalOnJndi # 根据 JNDI 进行装配@ConditionalOnWebApplication # 当上下文是 WebApplication 时进行装配@ConditionalOnNotWebApplication # 当上下文不是 WebApplication 时进行装配@ConditionalOnProperty # 当指定的属性名的值为指定的值时进行装配@ConditionalOnResource # 当指定的资源在 classpath 中时进行装配@ConditionalOnCloudPlatform #@ConditionalOnSingleCandidate #
十、打包运行
打包的形式有两种:jar 和 war。
# 10.1 打包成可执行的 jar 包
默认情况下,通过 maven 执行 package 命令后,会生成 jar 包,且该 jar 包会内置了 tomcat 容器,因此我们可以通过 java -jar 就可以运行项目,如下图:
# 10.2 打包成部署的 war 包
让 SpringbootApplication 类继承 SpringBootServletInitializer 并重写 configure 方法,如下:
@SpringBootApplicationpublic class SpringbootApplication extends SpringBootServletInitializer {@Overrideprotected SpringApplicationBuilder configure(SpringApplicationBuilder application) {return application.sources(SpringbootApplication.class);}public static void main(String[] args) {SpringApplication.run(SpringbootApplication.class, args);}}
修改 pom.xml 文件,将 jar 改成 war,如下:
<packaging>war</packaging>
移除内置 tomcat:
<dependency><groupId>org.springframework.boot</groupId><artifactId>spring-boot-starter-web</artifactId><exclusions><exclusion><groupId>org.springframework.boot</groupId><artifactId>spring-boot-starter-tomcat</artifactId></exclusion></exclusions></dependency><!-- Servlet API --><dependency><groupId>javax.servlet</groupId><artifactId>javax.servlet-api</artifactId><version>3.1.0</version><scope>provided</scope></dependency>
打包成功后,将 war 包部署到 tomcat 容器中运行即可。


 253
253


 被折叠的 条评论
为什么被折叠?
被折叠的 条评论
为什么被折叠?
 到【灌水乐园】发言


