


近期热推文章:
1、springBoot对接kafka,批量、并发、异步获取消息,并动态、批量插入库表;
2、SpringBoot用线程池ThreadPoolTaskExecutor异步处理百万级数据;
4、基于Redis实现关注、取关、共同关注及消息推送(含源码)
5、SpringBoot整合多数据源,并支持动态新增与切换(详细教程)
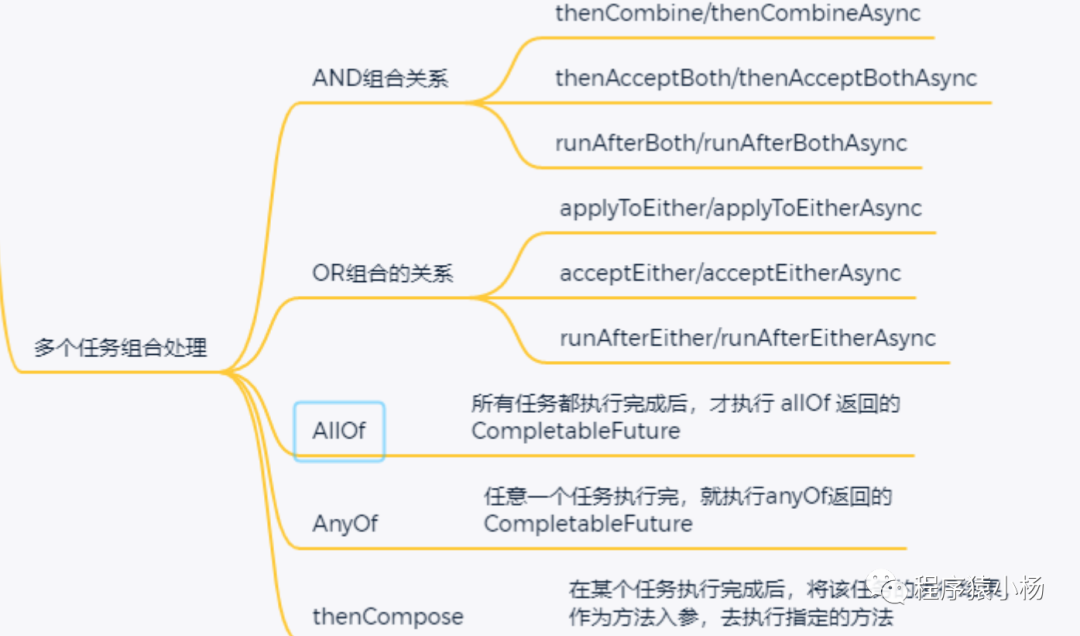
一、多任务组合回调
备注:源码获取方式在文底。
1.1、AND组合关系
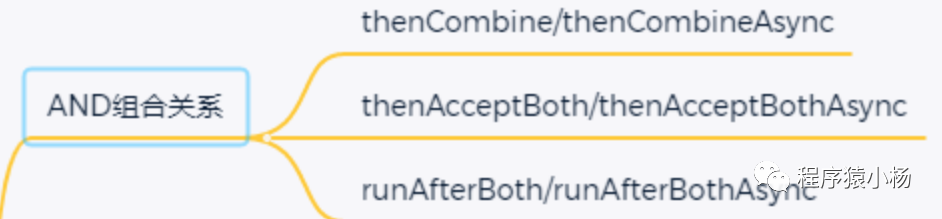
thenCombine / thenAcceptBoth / runAfterBoth都表示:将两个CompletableFuture组合起来,只有这两个都正常执行完了,才会执行某个任务。也即:当任务一和任务二都完成再执行任务三(异步任务)。
区别在于:
1、runAfterBoth:不会把执行结果当做方法入参,且没有返回值。
2、thenAcceptBoth:会将两个任务的执行结果作为方法入参,传递到指定方法中,且无返回值。
3、thenCombine:会将两个任务的执行结果作为方法入参,传递到指定方法中,且有返回值。
代码案例:
/*** 功能描述:多任务组合回调:AND组合关系* @MethodName: testCompleteAnd* @MethodParam: []* @Return: void* @Author: yyalin* @CreateDate: 2023/10/11 17:30*/public void testCompleteAnd() throws ExecutionException, InterruptedException {//创建线程池ExecutorService executorService = Executors.newFixedThreadPool(10);long startTime = System.currentTimeMillis();//1、使用自定义线程池,开启异步任务01CompletableFuture<Integer> supplyAsyncRes01=CompletableFuture.supplyAsync(()->{int res=1;try {//执行任务1 开始执行任务01,当前线程为:12log.info("开始执行任务01,当前线程为:"+Thread.currentThread().getId());//执行具体的事务Thread.sleep(600);res+=1; //模拟加1} catch (InterruptedException e) {e.printStackTrace();}//返回结果return res;},executorService);//2、使用自定义线程池,开启异步任务02CompletableFuture<Integer> supplyAsyncRes02=CompletableFuture.supplyAsync(()->{int res=1;try {//执行任务02 开始执行任务02,当前线程为:13log.info("开始执行任务02,当前线程为:"+Thread.currentThread().getId());//执行具体的事务Thread.sleep(600);res+=2; //模拟加2} catch (InterruptedException e) {e.printStackTrace();}//返回结果return res;});//3、任务02:将任务1与任务2开始任务组合CompletableFuture<Integer> thenCombineAsyncRes=supplyAsyncRes01.thenCombineAsync(supplyAsyncRes02,(res01, res02)->{//始执行任务03,当前线程为:14log.info("开始执行任务03,当前线程为:"+Thread.currentThread().getId());log.info("任务01返回值:"+res01);log.info("任务02返回值:"+res02);//任务组合返回值 可以拿到任务01和任务02的返回结果进行相关操作,然后统一返回结果return res01+res02;},executorService);//4、最终返回结果log.info("最终返回结果为:"+thenCombineAsyncRes.get());log.info("总共用时" + (System.currentTimeMillis() - startTime) + "ms");}
运行结果:

1.2、OR组合关系
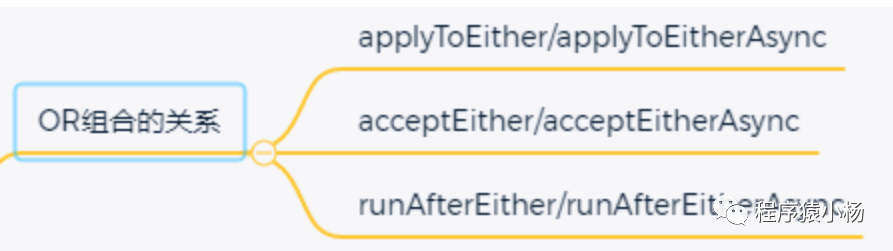
将两个CompletableFuture组合起来,只要其中一个执行完了,就会执行某个任务。(两个任务,只要有一个任务完成,就执行任务三)
区别在于:
1、runAfterEither:不会把执行结果当做方法入参,且没有返回值。
2、acceptEither: 会将已经执行完成的任务,作为方法入参,传递到指定方法中,且无返回值。
3、applyToEither:会将已经执行完成的任务,作为方法入参,传递到指定方法中,且有返回值。(个人推荐)
参考代码:
/*** 功能描述:OR组合关系* @MethodName: testCompleteOr* @MethodParam: []* @Return: void* @Author: yyalin* @CreateDate: 2023/10/11 18:14*/public void testCompleteOr(){//创建线程池ExecutorService executorService = Executors.newFixedThreadPool(10);long startTime = System.currentTimeMillis();//1、使用自定义线程池,开启异步任务01CompletableFuture<Integer> supplyAsyncRes01=CompletableFuture.supplyAsync(()->{int res=1;try {//执行任务1 开始执行任务01,当前线程为:12log.info("开始执行任务01,当前线程为:"+Thread.currentThread().getId());//执行具体的事务Thread.sleep(600);res+=2; //模拟加1} catch (InterruptedException e) {e.printStackTrace();}//返回结果return res;},executorService);//2、使用自定义线程池,开启异步任务02CompletableFuture<Integer> supplyAsyncRes02=CompletableFuture.supplyAsync(()->{int res=1;try {//执行任务02 开始执行任务02,当前线程为:13log.info("开始执行任务02,当前线程为:"+Thread.currentThread().getId());//执行具体的事务Thread.sleep(600);res+=3; //模拟加2} catch (InterruptedException e) {e.printStackTrace();}//返回结果return res;},executorService);//3、任务组合orsupplyAsyncRes01.acceptEitherAsync(supplyAsyncRes02,(res)->{try {log.info("开始执行任务03,当前线程为:"+Thread.currentThread().getId());//执行具体的事务Thread.sleep(600);log.info("上一个任务返回值:"+res);log.info("总共用时" + (System.currentTimeMillis() - startTime) + "ms");} catch (InterruptedException e) {e.printStackTrace();}},executorService);}
返回结果:

若将异步任务02中的Thread.sleep(600)改为300,将输出的结果为:

从结果中不难对比发现,任务03的参数是任务01和任务02中执行最快的返回结果。
注意:若把核心线程数量改为1,会是什么样的呢?
ExecutorService executorService = Executors.newFixedThreadPool(1);运行结果:

从上面看出,改为1就变成单线程执行了。
1.3、多任务组合(allOf\anyOf)
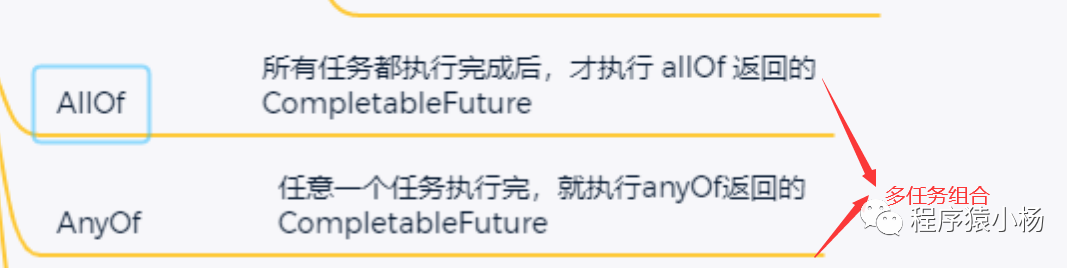
1.allOf:等待所有任务都执行完成后,才会执行 allOf 返回的CompletableFuture。如果任意一个任务异常,allOf的CompletableFuture,执行get方法,会抛出异常。(等待所有任务完成才会执行)
2.anyOf:任意一个任务执行完,就执行anyOf返回的CompletableFuture。如果执行的任务异常,anyOf的CompletableFuture,执行get方法,会抛出异常。(只要有一个任务完成)
参考案例:
public void testAllOfOrAnyOf() throws ExecutionException, InterruptedException {//创建线程池ExecutorService executorService = Executors.newFixedThreadPool(10);long startTime = System.currentTimeMillis();//1、使用自定义线程池,开启异步任务01CompletableFuture<Integer> supplyAsyncRes01=CompletableFuture.supplyAsync(()->{int res=1;try {//执行任务1 开始执行任务01,当前线程为:12log.info("开始执行任务01,当前线程为:"+Thread.currentThread().getId());//执行具体的事务Thread.sleep(600);res+=3; //模拟加1} catch (InterruptedException e) {e.printStackTrace();}//返回结果return res;},executorService);//2、使用自定义线程池,开启异步任务02CompletableFuture<Integer> supplyAsyncRes02=CompletableFuture.supplyAsync(()->{int res=1;try {//执行任务02 开始执行任务02,当前线程为:13log.info("开始执行任务02,当前线程为:"+Thread.currentThread().getId());//执行具体的事务Thread.sleep(600);res+=4; //模拟加2} catch (InterruptedException e) {e.printStackTrace();}//返回结果return res;},executorService);//3、使用自定义线程池,开启异步任务03CompletableFuture<Integer> supplyAsyncRes03=CompletableFuture.supplyAsync(()->{int res=1;try {//执行任务02 开始执行任务02,当前线程为:13log.info("开始执行任务03,当前线程为:"+Thread.currentThread().getId());//执行具体的事务Thread.sleep(600);res+=5; //模拟加2} catch (InterruptedException e) {e.printStackTrace();}//返回结果return res;},executorService);//4、开始任务组合CompletableFuture<Void> allOfRes=CompletableFuture.allOf(supplyAsyncRes01,supplyAsyncRes02,supplyAsyncRes03);//等待所有任务完成log.info("所有任务执行完成,组合后返回结果为:"+allOfRes.get());//获取所有任务的返回结果log.info("任务01返回值:"+supplyAsyncRes01.get());log.info("任务02返回值:"+supplyAsyncRes02.get());log.info("任务03返回值:"+supplyAsyncRes03.get());log.info("总共用时" + (System.currentTimeMillis() - startTime) + "ms");}
结果返回:
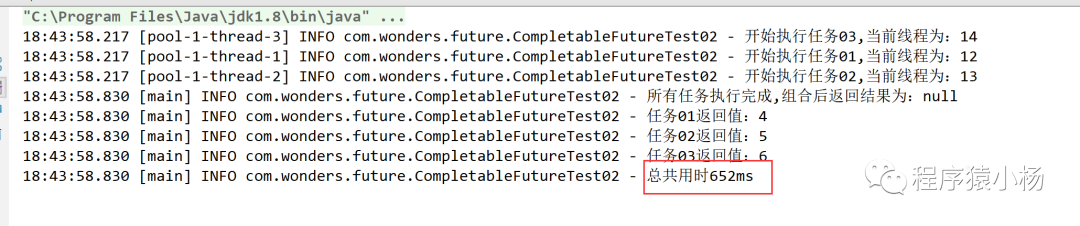
从结果中看出:等待所有任务都执行完成后,才会执行 allOf 返回的CompletableFuture。
同理anyOf,只需要调整代码:
CompletableFuture<Object> allOfRes=CompletableFuture.anyOf(supplyAsyncRes01,supplyAsyncRes02,supplyAsyncRes03);运行结果:

1.4、thenCompose
thenCompose方法会在某个任务执行完成后,将该任务的执行结果,作为方法入参,去执行指定的方法。该方法会返回一个新的CompletableFuture实例。
1、如果该CompletableFuture实例的result不为null,则返回一个基于该result新的CompletableFuture实例;
2、如果该CompletableFuture实例为null,然后就执行这个新任务。
代码案例:
/*** 功能描述:thenCompose* @MethodName: testThenCompose* @MethodParam: []* @Return: void* @Author: yyalin* @CreateDate: 2023/10/12 9:38*/public void testThenCompose() throws ExecutionException, InterruptedException {CompletableFuture<String> res01=CompletableFuture.completedFuture("任务01");ExecutorService executor = Executors.newSingleThreadExecutor();//第二个任务 在某个任务执行完成后,将该任务的执行结果,作为方法入参,去执行指定的方法,// 该方法会返回一个新的CompletableFuture实例。CompletableFuture<String> futureRes =CompletableFuture.supplyAsync(()-> "第二个任务02",executor).thenComposeAsync(data->{log.info("data数据为:"+data);return res01;},executor);log.info("最终返回:"+futureRes.get());executor.shutdown();}
结果:

二、使用注意点
CompletableFuture 使异步编程更加便利的、代码更加优雅的同时,也要关注使用的一些注意点。

2.1、Future需要获取返回值,才能获取异常信息
代码案例:
/*** 功能描述:使用注意点* @MethodName: testFuture* @MethodParam: []* @Return: void* @Author: yyalin* @CreateDate: 2023/10/12 9:54*/public void testFuture() throws ExecutionException, InterruptedException {//自定义线程池ExecutorService executorService = new ThreadPoolExecutor(5,10,5L,TimeUnit.SECONDS,new ArrayBlockingQueue<>(10));//创建任务CompletableFuture<Void> res01=CompletableFuture.supplyAsync(()->{int sum=1/0;return "分母不能为0";},executorService).thenAccept((res)->{ //3、异常捕获log.info("系统出现异常,需要处理:"+res);});log.info("返回结果:"+res01.get());}
输出结果:

Future需要获取返回值(res01.get()),才能获取到异常信息。如果不加 get()/join()方法,看不到异常信息。使用的时候,注意一下,考虑是否加try…catch…或者使用exceptionally方法。
若改成exceptionally方法,无需get或join也可以捕获异常信息:
CompletableFuture<String> res01=CompletableFuture.supplyAsync(()->{int sum=1/0;return "分母不能为0";},executorService).exceptionally((throwable)->{ //3、异常捕获log.info("系统出现异常,需要处理:"+throwable.getMessage());return "00";});// log.info("返回结果:"+res01.get());
结果:
![]()
2.2、CompletableFuture的get()方法是阻塞的
CompletableFuture的get()方法是阻塞的,如果使用它来获取异步调用的返回值,需要添加超时时间。
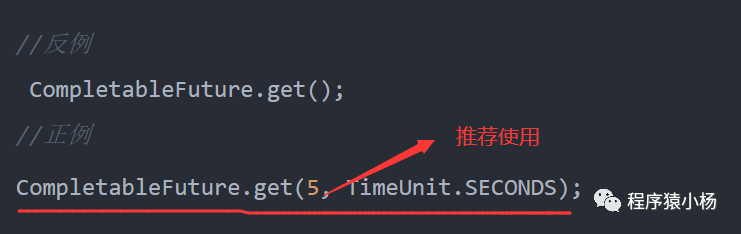
推荐使用:
log.info("返回结果:"+res01.get(5,TimeUnit.SECONDS));2.3、建议使用自定义线程池,不要使用默认的
CompletableFuture代码中使用了默认的线程池,处理的线程个数是电脑CPU核数-1。在大量请求过来的时候,处理逻辑复杂的话,响应会很慢。一般建议使用自定义线程池,优化线程池配置参数。
参考案例:
//自定义线程池ExecutorService executorService = new ThreadPoolExecutor(5,10,5L,TimeUnit.SECONDS,new ArrayBlockingQueue<>(10));
但是如果线程池拒绝策略是DiscardPolicy或者DiscardOldestPolicy,当线程池饱和时,会直接丢弃任务,不会抛弃异常。因此建议,CompletableFuture线程池策略最好使用AbortPolicy,然后耗时的异步线程,做好线程池隔离。
/*** 参数信息:* int corePoolSize 核心线程大小* int maximumPoolSize 线程池最大容量大小* long keepAliveTime 线程空闲时,线程存活的时间* TimeUnit unit 时间单位* BlockingQueue<Runnable> workQueue 任务队列。一个阻塞队列* AbortPolicy(默认):直接抛弃*/ThreadPoolExecutor pool = new ThreadPoolExecutor(4,4,0L,TimeUnit.MILLISECONDS,new LinkedBlockingDeque<>(10),new ThreadPoolExecutor.AbortPolicy());
说明:
AbortPolicy(默认):直接抛弃
CallerRunsPolicy:用调用者的线程执行任务
DiscardOldestPolicy:抛弃队列中最久的任务
DiscardPolicy:抛弃当前任务。
三、源码获取方式
更多优秀文章,请关注个人微信公众号或搜索“程序猿小杨”查阅。然后回复:源码,可以获取对应的源码,开箱即可使用。

如果大家对相关文章感兴趣,可以关注微信公众号"程序猿小杨",会持续更新优秀文章!欢迎大家 分享、收藏、点赞、在看,您的支持就是我坚持下去的最大动力!谢谢!

参考网站:
https://blog.csdn.net/ThinkWon/article/details/123390393
https://mp.weixin.qq.com/s/shjANruBk6VL492JaWLTEg


 257
257


 被折叠的 条评论
为什么被折叠?
被折叠的 条评论
为什么被折叠?
 到【灌水乐园】发言


