


文章目录
1. Servlet
1.1 概念:
server applet, 运行在服务器端的小程序
- Servlet就是一个接口,定义了Java类被浏览器访问到(tomcat识别)的规则。
- 将来我们自定义一个类,实现Servlet接口,复写方法。
1.2 快速入门:
step1: 创建JavaEE项目:
点击New->project/Module->JavaEnterprise

配置Tomcat, 并选择Web Application

step2: 定义一个类,实现Servlet接口
public class ServletDemo01 implements Servlet
step3: 实现接口中的抽象方法
package com.uesct.web.servlet;
import javax.servlet.*;
import java.io.IOException;

public class ServletDemo01 implements Servlet{
    public void init(ServletConfig servletConfig) throws ServletException {

    }
    public ServletConfig getServletConfig() {
        return null;
    }
    //提供服务的方法
    public void service(ServletRequest servletRequest, ServletResponse servletResponse) throws ServletException, IOException {
        System.out.println("hello, servlet");
    }

    public String getServletInfo() {
        return null;
    }

    public void destroy() {

    }
}
step4: 配置Servlet
在web.xml中配置:
<!--配置servlet-->
<servlet>
    <servlet-name>demo1</servlet-name>            <servletclass>com.uestc.web.servlet.Servlet_demo1</servlet-class>
</servlet>

<servlet-mapping>
      <servlet-name>demo1</servlet-name>
      <url-pattern>/demo1</url-pattern>
</servlet-mapping>
step5: 启动tomcat服务器


多个项目如何部署呢?
step1: Deployment 设置中war exploded


step2: 在浏览器里分别根据虚拟路径+映射的url进行不同项目的访问


1.3 Servlet的执行原理
1、当服务器接受到客户端浏览器的请求后,会解析请求URL路径,获取访问的Servlet的资源路径
2、查找web.xml文件,是否有对应的<url-pattern>标签体内容。
3、如果有,则在找到对应的<servlet-class>全类名
4、omcat`会将字节码文件加载进内存,并且创建其对象
5、调用其方法

1.4 Servlet中的生命周期方法:
1.41 init方法
被创建:执行init方法,只执行一次
public void init(ServletConfig servletConfig) throws ServletException
Servlet什么时候被创建?
默认情况下,第一次被访问时,Servlet被创建,但我们可以配置执行Servlet的创建时机
在<servlet>标签下配置
1、第一次被访问时,创建
 <load-on-startup>的值为负数
2、在服务器启动时,创建
<load-on-startup>的值为0或正整数
Servlet是单例的
Servlet的
init方法,只执行一次,说明一个Servlet在内存中只存在一个对象,Servlet是单例的
问题:多个用户同时访问时,可能存在线程安全问题。
解决:尽量不要在Servlet中定义成员变量。即使定义了成员变量,也不要对修改值
1.42 service方法
每次访问Servlet时,
service方法都会被调用一次。
提供服务:执行service方法,执行多次
public void service(ServletRequest servletRequest, ServletResponse servletResponse) throws ServletException, IOException
1.43 destroy方法
被销毁:执行
destroy方法,只执行一次
- Servlet被销毁时执行。服务器关闭时,Servlet被销毁
- 只有服务器正常关闭时,才会执行
destroy方法。 - destroy方法在Servlet被销毁之前执行,一般用于释放资源
1.5 Servlet3.0:
支持注解配置。可以不需要
web.xml了
步骤:
1、创建JavaEE项目,选择Servlet的版本3.0以上,可以不创建web.xml
2、定义一个类,实现Servlet接口
3、复写方法
4、在类上使用@WebServlet注解,进行配置@WebServlet("资源路径")
@WebServlet(urlpatterns="/demo")
或者
@WebServlet(value="/demo")
或者省略value
@WebServlet("/demo")
@WebServlet注解
@Target({ElementType.TYPE})
			@Retention(RetentionPolicy.RUNTIME)
			@Documented
			public @interface WebServlet {
			    String name() default "";//相当于<Servlet-name>

			    String[] value() default {};//代表urlPatterns()属性配置

			    String[] urlPatterns() default {};//相当于<url-pattern>

			    int loadOnStartup() default -1;//相当于<load-on-startup>

			    WebInitParam[] initParams() default {};

			    boolean asyncSupported() default false;

			    String smallIcon() default "";

			    String largeIcon() default "";

			    String description() default "";

			    String displayName() default "";
			}
使用示例:
新建web项目,注意不勾选Create web.xml


1.6 IDEA与tomcat的相关配置
1、IDEA会为每一个tomcat部署的项目单独建立一份配置文件
查看控制台的Log:
Using CATALINA_BASE: "C:\Users\LiuFei\.IntelliJIdea2017.3\system\tomcat\_servlet01"

2、工作空间项目和 tomcat部署的web项目
- tomcat真正访问的是
tomcat部署的web项目,tomcat部署的web项目对应着工作空间项目的web目录下的所有资源 WEB-INF目录下的资源不能被浏览器直接访问。
3、断点调试:使用"小虫子"启动 dubug 启动
1.7 Servlet的体系结构
Servlet -- 接口
	|
GenericServlet -- 抽象类
	|
HttpServlet  -- 抽象类
1.71 GenericServlet
GenericServlet:将Servlet接口中其他的方法做了默认空实现,只将service()方法作为抽象
将来定义Servlet类时,可以继承GenericServlet,实现service()方法即可.

1.72 HttpServlet:
HttpServlet对http协议的一种封装,简化操作

1、定义类继承HttpServlet
2、复写doGet/doPost方法
@WebServlet("/demo1")
public class ServletDemo01 extends HttpServlet {
    @Override
    protected void doGet(HttpServletRequest req, HttpServletResponse resp) throws ServletException, IOException {
        System.out.println("doGet....");
    }
    @Override
    protected void doPost(HttpServletRequest req, HttpServletResponse resp) throws ServletException, IOException {
        System.out.println("doPost...");
    }
}
1.8 Servlet相关配置
urlpartten:Servlet访问路径: 一个Servlet可以定义多个访问路径
@WebServlet({"/d1","/d2","/d3"})

路径定义规则:
1、/xxx:路径匹配
2、 /xxx/xxx:多层路径,目录结构
3、*.do:扩展名匹配
2. HTTP协议
2.1 简介:
概念:
Hyper Text Transfer Protocol 超文本传输协议
传输协议:
定义了,客户端和服务器端通信时,发送数据的格式
特点:
1、基于TCP/IP的高级协议
2、默认端口号:80
3、基于请求/响应模型的:一次请求对应一次响应
4、无状态的:每次请求之间相互独立,不能交互数据
历史版本:
1.0:每一次请求响应都会建立新的连接1.1:复用连接
2.2 Request
2.21 请求消息数据格式:
字符串格式:
POST /login.html HTTP/1.1
Host: localhost
User-Agent: Mozilla/5.0 (Windows NT 6.1; Win64; x64; rv:60.0) Gecko/20100101 Firefox/60.0
Accept: text/html,application/xhtml+xml,application/xml;q=0.9;q=0.8
Accept-Language: zh-CN,zh;q=0.8,zh-TW;q=0.7,zh-HK;q=0.5,en-US;q=0.3,en;q=0.2
Accept-Encoding: gzip, deflate
Referer: http://localhost/login.html
Connection: keep-alive
Upgrade-Insecure-Requests: 1

username=zhangsan
1、请求行
请求方式 请求url 请求协议/版本
GET /login.html HTTP/1.1
请求方式: HTTP协议有7中请求方式,常用的有2种:GET 和POST
GET:
- 请求参数在请求行中,在
url后。- 请求的
url长度有限制的- 不太安全
POST:
- 请求参数在请求体中
- 请求的
url长度没有限制的- 相对安全
2、请求头:
客户端浏览器告诉服务器一些信息
请求头名称: 请求头值
常见的请求头:
User-Agent:浏览器告诉服务器,我访问你使用的浏览器版本信息。可以在服务器端获取该头的信息,解决浏览器的兼容性问题
Referer:http://localhost/login.html`
告诉服务器,我(当前请求)从哪里来?
作用: 1. 防盗链:2. 统计工作:

3、请求空行
空行,就是用于分割
POST请求的请求头和请求体的。
4、请求体(正文):
封装POST请求消息的请求参数的
2.22 Request对象
2.221 request对象和response对象的原理:
1、request和response对象是由服务器创建的,我们来使用它们
2、request对象是来获取请求消息,response对象是来设置响应消息

request对象继承体系结构
ServletRequest		--	接口
   	|	继承
   HttpServletRequest	-- 接口
   	|	实现
   org.apache.catalina.connector.RequestFacade 类(tomcat)
2.222 request功能:
1、获取请求消息数据
2、获取请求行数据
GET /day14/demo1?name=zhangsan HTTP/1.1
方法:
(1)获取请求方式 :GET
String getMethod()
(2)获取虚拟目录:/day14
String getContextPath()
(3)获取Servlet路径: /demo1
String getServletPath()
(4)获取get方式请求参数:name=zhangsan
String getQueryString()
(5)获取请求URI:/day14/demo1
 String getRequestURI(): /day14/demo1
 StringBuffer getRequestURL() :http://localhost/day14/demo1
URL:统一资源定位符 : http://localhost/day14/demo1 中华人民共和国
URI:统一资源标识符 : /day14/demo1 共和国
(6)获取协议及版本:HTTP/1.1
String getProtocol()
(7)获取客户机的IP地址:
String getRemoteAddr()
示例:
package com.uestc.web.servlet02;
import javax.servlet.ServletException;
import javax.servlet.annotation.WebServlet;
import javax.servlet.http.HttpServlet;
import javax.servlet.http.HttpServletRequest;
import javax.servlet.http.HttpServletResponse;
import java.io.IOException;

@WebServlet({"/demo"})
public class ServletDemo01 extends HttpServlet {
    @Override
    protected void doGet(HttpServletRequest req, HttpServletResponse resp) throws ServletException, IOException {
        //1. 获取请求方式 :`GET`
        String method=req.getMethod();
        System.out.println(method);

        //2. 获取虚拟目录:`/day14`
        String contextPath=req.getContextPath();
        System.out.println(contextPath);

        //获取Servlet路径: `/demo1`
        String Servletpath=req.getServletPath();
        System.out.println(Servletpath);

        //获取请求参数
        String queryString=req.getQueryString();
        System.out.println(queryString);

        //获取URI
        String uri=req.getRequestURI();
        System.out.println(uri);

        //获取URI
        StringBuffer url=req.getRequestURL();
        System.out.println(url.toString());

        //获取协议版本
        String protocal=req.getProtocol();
        System.out.println(protocal);

        //获取ip
        String remoteAddr=req.getRemoteAddr();
        System.out.println(remoteAddr);
    }

    @Override
    protected void doPost(HttpServletRequest req, HttpServletResponse resp) throws ServletException, IOException {
        System.out.println("doPost...");
    }

}

3、获取请求头数据
方法:
1.String getHeader(String name):通过请求头的名称获取请求头的值
2.Enumeration<String> getHeaderNames():获取所有的请求头名称
示例1: 打印所有的请求头的名称以及对于的值
package com.uestc.web.servlet02;
import javax.servlet.ServletException;
import javax.servlet.annotation.WebServlet;
import javax.servlet.http.HttpServlet;
import javax.servlet.http.HttpServletRequest;
import javax.servlet.http.HttpServletResponse;
import java.io.IOException;
import java.util.Enumeration;

@WebServlet({"/demo01"})
public class ServletDemo01 extends HttpServlet {

    @Override
    protected void doGet(HttpServletRequest req, HttpServletResponse resp) throws ServletException, IOException {
        //演示获取请求头数据
        //1.获取所有请求头名称
        Enumeration<String> headerNames= req.getHeaderNames();
        //2.遍历
        while(headerNames.hasMoreElements()){
            String name=headerNames.nextElement();
            //根据名称来获取请求头的值
            String value=req.getHeader(name);
            System.out.println(name+"--"+value);
        }
    }

    @Override
    protected void doPost(HttpServletRequest req, HttpServletResponse resp) throws ServletException, IOException {
        System.out.println("doPost...");
    }

}

示例2:
@WebServlet({"/demo01"})
public class ServletDemo01 extends HttpServlet {

    @Override
    protected void doGet(HttpServletRequest req, HttpServletResponse resp) throws ServletException, IOException {
        //演示获取use-agent
        String user_agent=req.getHeader("user-agent");
        System.out.println(user_agent);
        if(user_agent.contains("Chrome")){
            System.out.println("谷歌。。");
        }else if(user_agent.contains("IE")){
            System.out.println("IE。。");
        }

    }
    @Override
    protected void doPost(HttpServletRequest req, HttpServletResponse resp) throws ServletException, IOException {
        System.out.println("doPost...");
    }

}
4、获取请求体数据:
请求体:只有POST请求方式,才有请求体,在请求体中封装了POST请求的请求参数
步骤:
(1)获取流对象
 BufferedReader getReader():获取字符输入流,只能操作字符数据
 ServletInputStream getInputStream():获取字节输入流,可以操作所有类型数据,在文件上传知识点后讲解
(2)再从流对象中拿数据
使用示例:
step1:创建regist.html
<!DOCTYPE html>
<html lang="en">
<head>
    <meta charset="UTF-8">
    <title>注册页面</title>
</head>
<body>
    <form action="/servlet02/requestDemo01" method="post">
        <input type="text" placeholder="请输入用户名" name="username"><br>
        <input type="text" placeholder="请输出密码" name="password"><br>
        <input type="submit" type="注册">


    </form>
</body>
</html>
step2: 然后创建RequestDemo01.java文件
@WebServlet("/requestDemo01")
public class RequestDemo01 extends HttpServlet{

    @Override
    protected void doGet(HttpServletRequest req, HttpServletResponse resp) throws ServletException, IOException {
        super.doGet(req, resp);
    }

    @Override
    protected void doPost(HttpServletRequest req, HttpServletResponse resp) throws ServletException, IOException {
        //获取请求消息题体--请求参数
        //1.获取字符流
        BufferedReader br=req.getReader();
        //2.读取数据
        String line=null;
        while((line=br.readLine())!=null){
            System.out.println(line);
        }
    }
}
step3: 启动tomcat服务器,在浏览区中访问http://localhost:8080/servlet02/regist.html


5、获取请求参数通用方式:
不论get还是post请求方式都可以使用下列方法来获取请求参数
(1)String getParameter(String name):根据参数名称获取参数值 username=zs&password=123
示例:
@WebServlet("/requestDemo01")
public class RequestDemo01 extends HttpServlet{

    @Override
    protected void doGet(HttpServletRequest req, HttpServletResponse resp) throws ServletException, IOException {
        //get 获取请求参数
        //根据参数的名称获取参数值
        String username=req.getParameter("username");
        System.out.println("get");
        System.out.println(username);
    }

    @Override
    protected void doPost(HttpServletRequest req, HttpServletResponse resp) throws ServletException, IOException {
       //post 获取请求参数
        //根据参数的名称获取参数值
        String username=req.getParameter("username");
        System.out.println("post");
        System.out.println(username);
    }
}


(2)String[] getParameterValues(String name):根据参数名称获取参数值的数组 hobby=xx&hobby=game
示例:
//servlet类
@WebServlet("/requestDemo01")
public class RequestDemo01 extends HttpServlet{
    @Override
    protected void doPost(HttpServletRequest req, HttpServletResponse resp) throws ServletException, IOException {
       //post 获取请求参数
        //根据参数名称获取参数值的数组
        String [] hobbies=req.getParameterValues("hobby");
        for(String hobby:hobbies){
            System.out.println(hobby);
        }
    }
}
 <!-- regist.html-->
 <!DOCTYPE html>
 <html lang="en">
 <head>
     <meta charset="UTF-8">
     <title>注册页面</title>
 </head>
 <body>
     <form action="/servlet02/requestDemo01" method="post">
         <input type="text" placeholder="请输入用户名" name="username"><br>
         <input type="text" placeholder="请输出密码" name="password"><br>
         <input type="checkbox" name="hobby" value="game">游戏
         <input type="checkbox" name="hobby" value="study">学习
         <input type="submit" type="注册">

     </form>
 </body>
 </html>


(3) Enumeration<String> getParameterNames():获取所有请求的参数名称
示例:
@WebServlet("/requestDemo01")
public class RequestDemo01 extends HttpServlet{
    @Override
    protected void doPost(HttpServletRequest req, HttpServletResponse resp) throws ServletException, IOException {
       //post 获取请求参数
        //根据参数名称获取参数值的数组
       Enumeration<String> parameterNames=req.getParameterNames();
       while(parameterNames.hasMoreElements()){
           String name=parameterNames.nextElement();
           System.out.println(name);
           String value=req.getParameter(name);
           System.out.println(value);
           System.out.println("---------------------------");
       }
    }


(4)Map<String,String[]> getParameterMap():获取所有参数的map集合
示例:
@WebServlet("/requestDemo01")
public class RequestDemo01 extends HttpServlet{
    @Override
    protected void doPost(HttpServletRequest req, HttpServletResponse resp) throws ServletException, IOException {
       //post 获取请求参数
        //根据参数名称获取参数值的数组
       Map<String, String []> map=req.getParameterMap();
       Set<String> set=map.keySet();
       for(String name:set){
           String [] values=map.get(name);
           System.out.println(name);
           for(String value:values){
               System.out.println(value);
           }
           System.out.println("--------------");
       }
    }
}


中文乱码问题:
get方式:tomcat8已经将get方式乱码问题解决了post方式:会乱码
解决:在获取参数前,设置request的编码`request.setCharacterEncoding("utf-8");
6、请求转发:
一种在服务器内部的资源跳转方式
步骤:
1、通过request对象获取请求转发器对象:RequestDispatcher
getRequestDispatcher(String path)
2、使用RequestDispatcher对象来进行转发:
forward(ServletRequest request, ServletResponse response)
特点:
(1)浏览器地址栏路径不发生变化
(2)只能转发到当前服务器内部资源中。
(3)转发是一次请求
示例:
新建RequestDemo02.java
@WebServlet("/requestDemo02")
public class RequestDemo02 extends HttpServlet {

    @Override
    protected void doPost(HttpServletRequest req, HttpServletResponse resp) throws ServletException, IOException {

    }
    @Override
    protected void doGet(HttpServletRequest req, HttpServletResponse resp) throws ServletException, IOException {
        System.out.println("访问了requestDemo02...");
//        RequestDispatcher requestDispatcher= req.getRequestDispatcher("/requestDemo01");
//        requestDispatcher.forward(req,resp);
        req.getRequestDispatcher("/requestDemo01").forward(req,resp);
    }

}

7、共享数据:
域对象:
一个有作用范围的对象,可以在范围内共享数据
request域:
代表一次请求的范围,一般用于请求转发的多个资源中共享数据
方法:
1、void setAttribute(String name,Object obj):存储数据
2、Object getAttitude(String name):通过键获取值
3、void removeAttribute(String name):通过键移除键值对
4、ServletContext getServletContext() 获取ServletContext:
示例:
@WebServlet("/requestDemo02")
public class RequestDemo02 extends HttpServlet {

    @Override
    protected void doPost(HttpServletRequest req, HttpServletResponse resp) throws ServletException, IOException {

    }
    @Override
    protected void doGet(HttpServletRequest req, HttpServletResponse resp) throws ServletException, IOException {
        System.out.println("访问了requestDemo02...");

        //存储数据到Request域中
        req.setAttribute("msg","hello");

        req.getRequestDispatcher("/requestDemo01").forward(req,resp);
    }

}
@WebServlet("/requestDemo01")
public class RequestDemo01 extends HttpServlet{
    @Override
    protected void doPost(HttpServletRequest req, HttpServletResponse resp) throws ServletException, IOException {

    }

    @Override
    protected void doGet(HttpServletRequest req, HttpServletResponse resp) throws ServletException, IOException {
        System.out.println("访问了requestDemo01...");
        Object msg=req.getAttribute("msg");
        System.out.println(msg);
    }
}

2.23 案例:用户登录
需求:
1、编写login.html登录页面:username& password两个输入框
2、使用Druid数据库连接池技术,操作mysql数据库中user表
3、使用JdbcTemplate技术封装JDBC
4、登录成功跳转到SuccessServlet: 展示:登录成功!用户名,欢迎您
5、登录失败跳转到FailServlet展示:登录失败,用户名或密码错误
开发步骤:
1、创建项目,导入html页面,配置文件,jar包

导入jar包之后需要Add as Library


2、创建数据库环境
CREATE DATABASE day14;
USE day14;
CREATE TABLE USER(
    id INT PRIMARY KEY AUTO_INCREMENT,
    username VARCHAR(32) UNIQUE NOT NULL,
    password VARCHAR(32) NOT NULL
);

3、创建包com.uestc.domin,创建类User
package com.uestc.domin;

/**
 * 用户的实体类
 */
public class User {
    private int id;
    private String username;
    private String password;

    public int getId() {
        return id;
    }

    public void setId(int id) {
        this.id = id;
    }

    public String getUsername() {
        return username;
    }

    public void setUsername(String username) {
        this.username = username;
    }

    public String getPassword() {
        return password;
    }

    public void setPassword(String password) {
        this.password = password;
    }

    @Override
    public String toString() {
        return "User{" +
                "id=" + id +
                ", username='" + username + '\'' +
                ", password='" + password + '\'' +
                '}';
    }
}
4、创建包com.uestc.util,编写工具类JDBCUtils`
package com.uestc.util;

import com.alibaba.druid.pool.DruidDataSource;
import com.alibaba.druid.pool.DruidDataSourceFactory;

import javax.sql.DataSource;
import java.io.IOException;
import java.io.InputStream;
import java.util.Properties;

/**
 * JDBC工具类,使用Durid连接池
 */
public class JDBCUtils {
    private static DataSource ds;

    static {

        try {
            //1.加载配置文件
            Properties pro=new Properties();
            //使用classLoader加载配置文件,获取字节输入流
            InputStream is=JDBCUtils.class.getClassLoader().getResourceAsStream("druid.properties");
            pro.load(is);
            //2.初始化连接池对象
            ds=DruidDataSourceFactory.createDataSource(pro);

        } catch (IOException e) {
            e.printStackTrace();
        } catch (Exception e) {
            e.printStackTrace();
        }

    }
    /**
     * 获取连接池对象
     */
    public static DataSource getDataSource(){
        return ds;
    }

    /**
     * 获取连接Connection对象
     */
}
5、创建包com.uestc.dao,创建类UserDao,提供login方法
package com.uestc.dao;

import com.uestc.domin.User;
import com.uestc.util.JDBCUtils;
import org.springframework.jdbc.core.BeanPropertyRowMapper;
import org.springframework.jdbc.core.JdbcTemplate;

/**
 *操作数据库中User表的类
 */
public class UserDao {

    //生命JDBCTemplate对象共用
    private JdbcTemplate template=new JdbcTemplate(JDBCUtils.getDataSource());
    /**
     * 登陆方法
     * @param loginUser 只有用户名和密码
     * @return user包含用户全部数据
     */
    public User login(User loginUser){
        //1.编写sql
        String sql="select * from user where username=? and password=?";
        //2.调用query方法
        User user=template.queryForObject(sql,
                new BeanPropertyRowMapper<User>(User.class),
                loginUser.getUsername(),loginUser.getPassword());
        return user;
    }

}
6、单元测试login方法,新建包com.uestc.test , 创建UserDaoTest类
package com.uestc.test;
import com.uestc.dao.UserDao;
import com.uestc.domin.User;
import org.junit.Test;
public class UserDaoTest {
@Test
public void testLogin(){
User loginUser=new User();
loginUser.setUsername("liufei");
loginUser.setPassword("123456");

UserDao dao=new UserDao();
User user=dao.login(loginUser);

System.out.println(user);
}
}
7、编写cn.uestc.web.servlet.LoginServlet类
package com.uestc.web.servlet;

import com.uestc.dao.UserDao;
import com.uestc.domin.User;

import javax.servlet.ServletException;
import javax.servlet.annotation.WebServlet;
import javax.servlet.http.HttpServlet;
import javax.servlet.http.HttpServletRequest;
import javax.servlet.http.HttpServletResponse;
import java.io.IOException;

@WebServlet("/loginServlet")
public class LoginServlet extends HttpServlet{
    @Override
    protected void doGet(HttpServletRequest req, HttpServletResponse resp) throws ServletException, IOException {
        //1.设置编码
        req.setCharacterEncoding("utf-8");
        //2.获取请求参数
        String username=req.getParameter("username");
        String password=req.getParameter("password");
        //3.封装user对象
        User loginUser=new User();
        loginUser.setUsername(username);
        loginUser.setPassword(password);
        //4.调用UserDao的login的方法
        UserDao dao=new UserDao();
        User user=dao.login(loginUser);

        //5.判断user
        if(user==null){
            //登录失败
            req.getRequestDispatcher("/failServlet").forward(req,resp);
        }else{
            //登录成功
            //存储数据
            req.setAttribute("user",user);
            //转发
            req.getRequestDispatcher("/successServlet").forward(req,resp);
        }
    }

    @Override
    protected void doPost(HttpServletRequest req, HttpServletResponse resp) throws ServletException, IOException {
        this.doGet(req,resp);
    }
}
8、编写FailServlet和SuccessServlet类
//FailServlet类
package com.uestc.web.servlet;
import javax.servlet.ServletException;
import javax.servlet.annotation.WebServlet;
import javax.servlet.http.HttpServlet;
import javax.servlet.http.HttpServletRequest;
import javax.servlet.http.HttpServletResponse;
import java.io.IOException;

@WebServlet("/failServlet")
public class FailedServlet extends HttpServlet{
    @Override
    protected void doPost(HttpServletRequest req, HttpServletResponse resp) throws ServletException, IOException {
        //给页面写一句话

        //设置编码
        resp.setContentType("text/html;charset=utf-8");

        //输出
        resp.getWriter().write("登录失败, 用户名或密码错误");
    }

    @Override
    protected void doGet(HttpServletRequest req, HttpServletResponse resp) throws ServletException, IOException {
        super.doPost(req, resp);
    }
}
//SuccessServlet类
package com.uestc.web.servlet;
import com.uestc.domin.User;
import javax.servlet.ServletException;
import javax.servlet.annotation.WebServlet;
import javax.servlet.http.HttpServlet;
import javax.servlet.http.HttpServletRequest;
import javax.servlet.http.HttpServletResponse;
import java.io.IOException;

@WebServlet("/successServlet")
public class SuccessServlet extends HttpServlet{
    @Override
    protected void doPost(HttpServletRequest req, HttpServletResponse resp) throws ServletException, IOException {
        //给页面写一句话
        //获取request域中共享的user对象
        User user=(User)req.getAttribute("user");
        if(user!=null){
            //设置编码
            resp.setContentType("text/html;charset=utf-8");

            //输出
            resp.getWriter().write("登录成功!"+user.getUsername()+"欢迎您!");
        }

    }

    @Override
    protected void doGet(HttpServletRequest req, HttpServletResponse resp) throws ServletException, IOException {
        super.doPost(req, resp);
    }
}
9、login.html中form表单的action路径的写法
虚拟目录+Servlet的资源路径

示例:


10、BeanUtils工具类,简化数据封装
首先导入beanUtils的jar包

然后使用beanUtils
2.24 BeanUtils工具类
BeanUtils用于封装JavaBean的
JavaBean:标准的Java类, 用于封装数据
1、类必须被public修饰
2、必须提供空参的构造器
3、成员变量必须使用private修饰
4、提供公共setter和getter方法
注意的成员变量和属性的区别:
属性:setter和getter方法截取后的产物
例如:getUsername() --> Username–> username
有时候属性和成员变量不相同
方法:
1.setProperty()
2.getProperty()
3.populate(Object obj , Map map):将map集合的键值对信息,封装到对应的JavaBean对象中
示例:


2.3 Response
响应消息:服务器端发送给客户端的数据
2.31 响应消息的数据格式
字符串格式:
#响应字符串格式
HTTP/1.1 200 OK
Content-Type: text/html;charset=UTF-8
Content-Length: 101
Date: Wed, 06 Jun 2018 07:08:42 GMT
<html>
    <head>
        <title>$Title$</title>
    </head>
    <body>
        hello , response
    </body>
</html>
1、响应行
协议/版本 响应状态码 状态码描述
响应状态码:
服务器告诉客户端浏览器本次请求和响应的一个状态。
状态码都是3位数字
状态码分类:
(1)
1xx:服务器就收客户端消息,但没有接受完成,等待一段时间后,发送1xx多状态码
(2)2xx:成功。代表:200`(3)
3xx:重定向。代表:302(重定向),304(访问缓存)
(4)4xx:客户端错误。
404(请求路径没有对应的资源)405:请求方式没有对应的doXxx方法(5)
5xx:服务器端错误。代表:500(服务器内部出现异常)
2、响应头:
头名称: 值
常见的响应头:
头名称:
Content-Type:服务器告诉客户端本次响应体数据格式以及编码格式Content-disposition:服务器告诉客户端以什么格式打开响应体数据值:
in-line: 默认值,在当前页面内打开attachment;filename=xxx:以附件形式打开响应体。文件下载
3、响应空行
4、 响应体:
传输的数据
2.32 Response对象
功能:
设置响应消息
1、设置响应行
HTTP/1.1 200 ok
设置状态码:
setStatus(int sc)
2、设置响应头:
setHeader(String name, String value)
3、设置响应体:
使用步骤:
1、获取输出流
字符输出流:PrintWriter getWriter()
字节输出流:ServletOutputStream getOutputStream()
2、使用输出流,将数据输出到客户端浏览器
2.33 案例:
需求:
1、完成重定向
2、服务器输出字符数据到浏览器
3、服务器输出字节数据到浏览器
4、验证码
一、完成重定向
重定向:资源跳转的方式

代码实现:
//1. 设置状态码为302
response.setStatus(302);
//2.设置响应头location
response.setHeader("location","/servlet03/responseDemo02");
1、创建ResponseDemo01 Servlet类
package com.uestc.web.servlet;

import com.sun.org.apache.xpath.internal.SourceTree;

import javax.servlet.ServletException;
import javax.servlet.annotation.WebServlet;
import javax.servlet.http.HttpServlet;
import javax.servlet.http.HttpServletRequest;
import javax.servlet.http.HttpServletResponse;
import java.io.IOException;

/**
 * 重定向
 * 访问/responseDemo01,会自动跳转到/responseDemo02
 */
@WebServlet("/responseDemo01")
public class ResponseDemo01 extends HttpServlet {
    @Override
    protected void doPost(HttpServletRequest req, HttpServletResponse resp) throws ServletException, IOException {
        System.out.println("responseDemo01启动。。。");
        //1.设置状态码302
        resp.setStatus(302);
        //设置响应头location
        resp.setHeader("location","/servlet03/responseDemo02");

    }
    @Override
    protected void doGet(HttpServletRequest req, HttpServletResponse resp) throws ServletException, IOException {
        this.doPost(req, resp);
    }
}
2、创建ResponseDemo02 Servlet类
package com.uestc.web.servlet;

import javax.servlet.ServletException;
import javax.servlet.annotation.WebServlet;
import javax.servlet.http.HttpServlet;
import javax.servlet.http.HttpServletRequest;
import javax.servlet.http.HttpServletResponse;
import java.io.IOException;
@WebServlet("/responseDemo02")
public class ResponseDemo02 extends HttpServlet {

    @Override
    protected void doPost(HttpServletRequest req, HttpServletResponse resp) throws ServletException, IOException {
        System.out.println("responseDemo02启动。。。");
    }

    @Override
    protected void doGet(HttpServletRequest req, HttpServletResponse resp) throws ServletException, IOException {
        this.doPost(req, resp);
    }
}

简单的重定向方法:
response.sendRedirect("/day15/responseDemo2");
forward 和 redirect 区别
重定向的特点: redirect
1、地址栏发生变化
2、重定向可以访问其他站点(服务器)的资源
3、重定向是两次请求。不能使用request对象来共享数据
转发的特点:forward
1、转发地址栏路径不变
2、转发只能访问当前服务器下的资源
3、转发是一次请求,可以使用request对象来共享数据
路径写法:
1、相对路径:通过相对路径不可以确定唯一资源
不以
/开头,以.开头路径,如:./index.html
规则:找到当前资源和目标资源之间的相对位置关系
./:当前目录../:后退一级目录
2、绝对路径:通过绝对路径可以确定唯一资源
如:http://localhost/day15/responseDemo2 /day15/responseDemo2
以/开头的路径
规则:判断定义的路径是给谁用的?判断请求将来从哪儿发出
- 给客户端浏览器使用:需要加
虚拟目录(项目的访问路径)
建议:虚拟目录动态获取:request.getContextPath()
如<a>,<form>重定向…- 给服务器使用:不需要加虚拟目录
二、服务器输出字符数据到浏览器
步骤:
1、 获取字符输出流
2.、输出数据
示例:
package com.uestc.web.servlet;

import javax.servlet.ServletException;
import javax.servlet.annotation.WebServlet;
import javax.servlet.http.HttpServlet;
import javax.servlet.http.HttpServletRequest;
import javax.servlet.http.HttpServletResponse;
import java.io.IOException;
import java.io.PrintWriter;
@WebServlet("/responseDemo03")
public class ResponseDemo03 extends HttpServlet {
    @Override
    protected void doPost(HttpServletRequest req, HttpServletResponse resp) throws ServletException, IOException {
        //1.获取字符输出流
        PrintWriter pw=resp.getWriter();
        //2.输出数据
        pw.write("<h1>hello response</h2>");
    }

    @Override
    protected void doGet(HttpServletRequest req, HttpServletResponse resp) throws ServletException, IOException {
        this.doPost(req,resp);
    }
}

乱码问题:
 1、
1、PrintWriter pw = response.getWriter();获取的流的默认编码是ISO-8859-1
2、设置该流的默认编码
3、告诉浏览器响应体使用的编码
package com.uestc.web.servlet;
import javax.servlet.ServletException;
import javax.servlet.annotation.WebServlet;
import javax.servlet.http.HttpServlet;
import javax.servlet.http.HttpServletRequest;
import javax.servlet.http.HttpServletResponse;
import java.io.IOException;
import java.io.PrintWriter;
@WebServlet("/responseDemo03")
public class ResponseDemo03 extends HttpServlet {
 @Override
 protected void doPost(HttpServletRequest req, HttpServletResponse resp) throws ServletException, IOException {
     //获取流对象之前,设置流的默认编码:ISO-8859-1 设置为:GBK
     //resp.setCharacterEncoding("utf-8");
     //告诉浏览器,服务器发送的消息体数据的编码,建议浏览器使用该编码解码
     //resp.setHeader("content-type", "text/html;charset=utf-8");
     //简单的形式,设置编码
     resp.setContentType("text/html;charset=utf-8");
     //1.获取字符输出流
     PrintWriter pw=resp.getWriter();
     //2.输出数据
     pw.write("<h1>您好啊, response</h2>");
 }
 @Override
 protected void doGet(HttpServletRequest req, HttpServletResponse resp) throws ServletException, IOException {
     this.doPost(req,resp);
 }
}
三、服务器输出字节数据到浏览器
步骤:
1、获取字节输出流
2、输出数据
package com.uestc.web.servlet;
import javax.servlet.Servlet;
import javax.servlet.ServletException;
import javax.servlet.ServletOutputStream;
import javax.servlet.annotation.WebServlet;
import javax.servlet.http.HttpServlet;
import javax.servlet.http.HttpServletRequest;
import javax.servlet.http.HttpServletResponse;
import java.io.IOException;
@WebServlet("/responseDemo04")
public class ResponseDemo04 extends HttpServlet {
    @Override
    protected void doPost(HttpServletRequest req, HttpServletResponse resp) throws ServletException, IOException {
         resp.setContentType("text/html;charset=utf-8");
        //1.获取字节输出流
        ServletOutputStream sos=resp.getOutputStream();

        //2.输出数据
        sos.write("你好".getBytes("utf-8"));
    }
    @Override
    protected void doGet(HttpServletRequest req, HttpServletResponse resp) throws ServletException, IOException {
        this.doPost(req,resp);
    }
}
四、验证码
1、本质:图片
2、目的:防止恶意表单注册
package com.uestc.web.servlet;
import javax.imageio.ImageIO;
import javax.servlet.ServletException;
import javax.servlet.annotation.WebServlet;
import javax.servlet.http.HttpServlet;
import javax.servlet.http.HttpServletRequest;
import javax.servlet.http.HttpServletResponse;
import java.awt.*;
import java.awt.image.BufferedImage;
import java.io.IOException;
import java.util.Random;
@WebServlet("/checkCode")
public class CheckCodeServlet extends HttpServlet {
    @Override
    protected void doPost(HttpServletRequest req, HttpServletResponse resp) throws ServletException, IOException {
        int width=100;
        int height=50;
        //1.创建对象,在内存中的图片(验证码图片对象)
        BufferedImage image=new BufferedImage(width,height,BufferedImage.TYPE_INT_RGB);
        //2.美化图片
        //2.1 背景填充
        //获取画笔对象
        Graphics g=image.getGraphics();
        //设置画笔颜色
        g.setColor(Color.PINK);
        //填充颜色
        g.fillRect(0,0,width,height);

        //2.2 画边框
        g.setColor(Color.BLUE);
        g.drawRect(0,0,width-1,height-1);

        String str="ABCDEFGHIJKLMNOPQRSTUVWXYZabcdefghijklmnopqrstuvwxyz0123456789";
        //生成随机角标
        Random rd=new Random();
        for(int i=0;i<4;i++){
            int index=rd.nextInt(str.length());
            //获取字符
            char ch=str.charAt(index);
            //2.3 写验证码
            g.drawString(ch+"",(width/5)*(i+1),25);
        }

        //2.4 画干扰线
        //生成随机坐标点

        for(int i=0;i<5;i++){
            int x1=rd.nextInt(width);
            int y1=rd.nextInt(height);

            int x2=rd.nextInt(width);
            int y2=rd.nextInt(height);
            g.drawLine(x1,y1,x2,y2);
        }

        //3.将图片输出到页面展示
        ImageIO.write(image,"jpg",resp.getOutputStream());
    }

    @Override
    protected void doGet(HttpServletRequest req, HttpServletResponse resp) throws ServletException, IOException {
        this.doPost(req,resp);
    }
}

2.5 ServletConfig对象
Servlet 程序的配置信息类:
- Servlet 程序和ServletConfig 对象都是由Tomcat 负责创建,我们负责使用。
- Servlet 程序默认是第一次访问的时候创建,ServletConfig 是每个Servlet 程序创建时,就创建一个对应的ServletConfig 对象。
ServletConfig 类的三大作用
1、可以获取Servlet 程序的别名servlet-name 的值
2、获取初始化参数init-param
3、获取ServletContext 对象
使用示例:
step1:web.xml 中的配置:
<!-- servlet 标签给Tomcat 配置Servlet 程序-->
<servlet>
	<!--servlet-name 标签Servlet 程序起一个别名(一般是类名) -->
	<servlet-name>HelloServlet</servlet-name>
	<!--servlet-class 是Servlet 程序的全类名-->
	<servlet-class>com.atguigu.servlet.HelloServlet</servlet-class>
	<!--init-param 是初始化参数-->
	<init-param>
		<!--param-name是参数名-->
		<param-name>username</param-name>
		<!--param-value是参数值-->
		<param-value>root</param-value>
	</init-param>
	<!--init-param 是初始化参数-->
	<init-param>
		<!--是参数名-->
		<param-name>url</param-name>
		<!--是参数值-->
		<param-value>jdbc:mysql://localhost:3306/test</param-value>
	</init-param>
</servlet>
<!--servlet-mapping 标签给servlet 程序配置访问地址-->
<servlet-mapping>
	<!--servlet-name 标签的作用是告诉服务器,我当前配置的地址给哪个Servlet 程序使用-->
	<servlet-name>HelloServlet</servlet-name>
	<!--url-pattern 标签配置访问地址<br/>
	/ 斜杠在服务器解析的时候,表示地址为:http://ip:port/工程路径<br/>
	/hello 表示地址为:http://ip:port/工程路径/hello <br/>
	-->
	<url-pattern>/hello</url-pattern>
</servlet-mapping>
step2: Servlet代码
@Override
public void init(ServletConfig servletConfig) throws ServletException {
	System.out.println("2 init 初始化方法");
	// 1、可以获取Servlet 程序的别名servlet-name 的值
	System.out.println("HelloServlet 程序的别名是:" + servletConfig.getServletName());
	// 2、获取初始化参数init-param
	System.out.println("初始化参数username 的值是;" + servletConfig.getInitParameter("username"));
	System.out.println("初始化参数url 的值是;" + servletConfig.getInitParameter("url"));
	// 3、获取ServletContext 对象
	System.out.println(servletConfig.getServletContext());
}
2.6 ServletContext对象
2.61 概念:
- 代表整个web应用,可以和程序的容器(服务器)来通信
- 服务器会为每一个工程创建一个对象,这个对象就是ServletContext对象。这个对象全局唯一,而且工程内部的所有servlet都共享这个对象。所以叫全局应用程序共享对象。

2.62 获取:
1、通过session对象获取
request.getsession().getServletContext();
2、通过HttpServlet获取
this.getServletContext();
3、通过ServletConfig对象获取
getServletConfig().getServletContext();
示例:
@WebServlet("/servletContextDemo1")
public class ServletContextDemo1 extends HttpServlet {
    @Override
    protected void doPost(HttpServletRequest req, HttpServletResponse resp) throws ServletException, IOException {
        //通过request对象获取
        ServletContext context1=req.getServletContext();
        //通过HttpServlet获取
        ServletContext context2=this.getServletContext();
        System.out.println(context1);
        System.out.println(context2);
        System.out.println(context1.equals(context2));
    }

    @Override
    protected void doGet(HttpServletRequest req, HttpServletResponse resp) throws ServletException, IOException {
        this.doPost(req,resp);
    }
}

2.63 功能:
1、获取MIME类型:
MIME类型:在互联网通信过程中定义的一种文件数据类型
格式: 大类型/小类型 text/html image/jpeg
获取:
String getMimeType(String file)
示例:
@WebServlet("/servletContextDemo1")
public class ServletContextDemo1 extends HttpServlet {
    @Override
    protected void doPost(HttpServletRequest req, HttpServletResponse resp) throws ServletException, IOException {
        ServletContext context=this.getServletContext();
        String fileName="a.jpg";
        String minType=context.getMimeType(fileName);
        System.out.println(minType);
    }

    @Override
    protected void doGet(HttpServletRequest req, HttpServletResponse resp) throws ServletException, IOException {
        this.doPost(req,resp);
    }
}

2、域对象:共享数据
ServletContext对象可以被称之为域对象。
域对象是什么呢?
域对象可以简单理解成⼀个容器【类似于Map集合】
实现Servlet之间通讯就要⽤到ServletContext的setAttribute(String name,Object obj)⽅法,第⼀个参数是关键字,第⼆个参数是你要存储的对象
1. setAttribute(String name,Object value)
2. getAttribute(String name)
3. removeAttribute(String name)
ServletContext对象范围:所有用户所有请求的数据
示例:
1、新建servletContextDemo1.java,通过ServletContext域对象赋值
@WebServlet("/servletContextDemo1)
public class ServletContextDemo2 extends HttpServlet {
    @Override
    protected void doPost(HttpServletRequest req, HttpServletResponse resp) throws ServletException, IOException {
          this.getServletContext().setAttribute("msg","hello");
    }

    @Override
    protected void doGet(HttpServletRequest req, HttpServletResponse resp) throws ServletException, IOException {
        this.doPost(req,resp);
    }
}
2、新建servletContextDemo2.java,获取ServletContext域对象的值
@WebServlet("/servletContextDemo2")
public class ServletContextDemo2 extends HttpServlet {
    @Override
    protected void doPost(HttpServletRequest req, HttpServletResponse resp) throws ServletException, IOException {
        ServletContext context=this.getServletContext();
        String msg=(String)context.getAttribute("msg");
        System.out.println(msg);
    }

    @Override
    protected void doGet(HttpServletRequest req, HttpServletResponse resp) throws ServletException, IOException {
        this.doPost(req,resp);
    }
}
3、获取文件的真实(服务器)路径
方法:
String getRealPath(String path)
示例: 想要获取文件的真实路径(区别与工作空间的目录)

@WebServlet("/servletContextDemo3")
public class ServletContextDemo03 extends HttpServlet {
    @Override
    protected void doPost(HttpServletRequest req, HttpServletResponse resp) throws ServletException, IOException {
        ServletContext context=this.getServletContext();
        String path0=context.getRealPath("/a.txt");//web目录下资源访问
        System.out.println(path0);

        String path1=context.getRealPath("/WEB-INF/b.txt");//WEB-INF目录下资源访问
        System.out.println(path1);

        String path2=context.getRealPath("/WEB-INF/classes/c.txt");
        System.out.println(path2);
    }

    @Override
    protected void doGet(HttpServletRequest req, HttpServletResponse resp) throws ServletException, IOException {
        this.doPost(req,resp);
    }
}


2.7 案例 文件下载
需求
1、页面显示超链接
2、点击超链接后弹出下载提示框
3、完成图片文件下载
分析:
1、超链接指向的资源如果能够被浏览器解析,则在浏览器中展示,如果不能解析,则弹出下载提示框。不满足需求
2、任何资源都必须弹出下载提示框
3、使用响应头设置资源的打开方式:content-disposition:attachment;filename=xxx
步骤
1、定义页面,编辑超链接href属性,指向Servlet,传递资源名称filenam
2、定义Servlet
3、获取文件名称
4、使用字节输入流加载文件进内存
5、指定response的响应头:content-disposition:attachment;filename=xxx
6、将数据写出到response输出流
示例代码:
package com.uestc.web.download;

import javax.servlet.ServletContext;
import javax.servlet.ServletException;
import javax.servlet.ServletOutputStream;
import javax.servlet.annotation.WebServlet;
import javax.servlet.http.HttpServlet;
import javax.servlet.http.HttpServletRequest;
import javax.servlet.http.HttpServletResponse;
import java.io.FileInputStream;
import java.io.IOException;
@WebServlet("/downloadServlet")
public class DownloadServlet extends HttpServlet {
    @Override
    protected void doPost(HttpServletRequest req, HttpServletResponse resp) throws ServletException, IOException {
        //1.获取请求参数,文件名称
        String filename=req.getParameter("filename");
        //2.使用字节输入流加载文件进内存
        //2.1 找到文件服务器路径
        ServletContext context=this.getServletContext();
        String realpath=context.getRealPath("/img/"+filename);
        //2.2 用字节流关联
        FileInputStream fis=new FileInputStream(realpath);

        //3.设置response的响应头
        //3.1设置相应头类型:contend-type
        //获取文件的mimeType
        String minType=context.getMimeType(filename);
        resp.setHeader("content-type",minType);
        //3.2 设置相应头的打开方式:contend-disposition
        resp.setHeader("content-disposition","attachment;filename="+filename);
        //4.将输入流的数据写出到输出流中
        ServletOutputStream sos=resp.getOutputStream();
        byte [] buff=new byte[1024*8];
        int len=0;
        while ((len=fis.read(buff))!=-1){
            sos.write(buff,0,len);
        }
    }

    @Override
    protected void doGet(HttpServletRequest req, HttpServletResponse resp) throws ServletException, IOException {
        this.doPost(req,resp);
    }
}

中文乱码问题
解决思路:
1、获取客户端使用的浏览器版本信息
2、根据不同的版本信息,设置filename的编码方式不同
步骤:
1、新建utils工具类:
package com.uestc.web.utils;
import sun.misc.BASE64Encoder;
import java.io.UnsupportedEncodingException;
import java.net.URLEncoder;

public class DownLoadUtils {

      public static String getFileName(String agent, String filename) throws UnsupportedEncodingException {
          if (agent.contains("MSIE")) {
              // IE浏览器
              filename = URLEncoder.encode(filename, "utf-8");
              filename = filename.replace("+", " ");
          } else if (agent.contains("Firefox")) {
              // 火狐浏览器
              BASE64Encoder base64Encoder = new BASE64Encoder();
              filename = "=?utf-8?B?" + base64Encoder.encode(filename.getBytes("utf-8")) + "?=";
          } else {
              // 其它浏览器
              filename = URLEncoder.encode(filename, "utf-8");
          }
          return filename;
      }
  }
2、解决乱码问题
 package com.uestc.web.download;
 import com.uestc.web.utils.DownLoadUtils;
 import javax.servlet.ServletContext;
 import javax.servlet.ServletException;
 import javax.servlet.ServletOutputStream;
 import javax.servlet.annotation.WebServlet;
 import javax.servlet.http.HttpServlet;
 import javax.servlet.http.HttpServletRequest;
 import javax.servlet.http.HttpServletResponse;
 import java.io.FileInputStream;
 import java.io.IOException;
  @WebServlet("/downloadServlet")
  public class DownloadServlet extends HttpServlet {
      @Override
      protected void doPost(HttpServletRequest req, HttpServletResponse resp) throws ServletException, IOException {
          //1.获取请求参数,文件名称
          String filename=req.getParameter("filename");
          //2.使用字节输入流加载文件进内存
          //2.1 找到文件服务器路径
          ServletContext context=this.getServletContext();
          String realpath=context.getRealPath("/img/"+filename);
          //2.2 用字节流关联
          FileInputStream fis=new FileInputStream(realpath);

          //3.设置response的响应头
          //3.1设置相应头类型:contend-type
          //获取文件的mimeType
          String minType=context.getMimeType(filename);
          resp.setHeader("content-type",minType);
          //解决中文文件名问题
          //1.获取user-agent请求头
          String agent=req.getHeader("user-agent");
          //2.使用工具类方法编码文件名即可
          filename=DownLoadUtils.getFileName(agent,filename);

          //3.2 设置相应头的打开方式:contend-disposition
          resp.setHeader("content-disposition","attachment;filename="+filename);

          //4.将输入流的数据写出到输出流中
          ServletOutputStream sos=resp.getOutputStream();
          byte [] buff=new byte[1024*8];
          int len=0;
          while ((len=fis.read(buff))!=-1){
              sos.write(buff,0,len);
          }
      }

      @Override
      protected void doGet(HttpServletRequest req, HttpServletResponse resp) throws ServletException, IOException {
          this.doPost(req,resp);
      }
  }
3. 会话技术
3.1 简介:
概念:
会话:一次会话中包含多次请求和响应。
一次会话:
浏览器第一次给服务器资源发送请求,会话建立,直到有一方断开为止
功能:
在一次会话的范围内的多次请求间,共享数据
方式:
1、客户端会话技术:Cookie
2、服务器端会话技术:Session
3.2 Cookie
概念:
客户端会话技术,将数据保存到客户端
3.21 快速入门
使用步骤:
1、创建Cookie对象,绑定数据
new Cookie(String name, String value)
2、发送Cookie对象
response.addCookie(Cookie cookie)
3、获取Cookie,拿到数据
Cookie[] request.getCookies()
示例:
step1: 创建CookieDemo1类
@WebServlet("/cookieDemo1")
public class CookieDemo1 extends HttpServlet {
    @Override
    protected void doPost(HttpServletRequest req, HttpServletResponse resp) throws ServletException, IOException {
        //1.创建Cookies对象
        Cookie cookie=new Cookie("msg","hello");

        //2.发送Cookies对象
        resp.addCookie(cookie);
    }

    @Override
    protected void doGet(HttpServletRequest req, HttpServletResponse resp) throws ServletException, IOException {
        this.doPost(req,resp);
    }
}
step2: 创建CookieDemo2类
@WebServlet("/cookieDemo2")
public class CookieDemo2 extends HttpServlet {
    @Override
    protected void doPost(HttpServletRequest req, HttpServletResponse resp) throws ServletException, IOException {
        //3.获取Cookie
        Cookie [] cs=req.getCookies();
        if(cs!=null){
            for(Cookie c:cs){
                String name=c.getName();
                String value=c.getValue();
                System.out.println(name+":"+value);
            }
        }
    }

    @Override
    protected void doGet(HttpServletRequest req, HttpServletResponse resp) throws ServletException, IOException {
        this.doPost(req,resp);
    }
}
step3: 启动服务器,分别访问http://localhost:8080/servlet_cookie/cookieDemo和http://localhost:8080/servlet_cookie/cookieDemo2

3.22 实现原理
基于响应头set-cookie和请求头cookie实现

3.3 cookie的细节
1、一次可不可以发送多个cookie?
可以创建多个Cookie对象,使用response调用多次addCookie方法发送cookie即可
示例:
@WebServlet("/cookieDemo1")
public class CookieDemo1 extends HttpServlet {
    @Override
    protected void doPost(HttpServletRequest req, HttpServletResponse resp) throws ServletException, IOException {
        //1.创建Cookies对象
        Cookie cookie1=new Cookie("msg","hello");
        Cookie cookie2=new Cookie("name","zhangsan");
        //2.发送Cookies对象
        resp.addCookie(cookie1);
        resp.addCookie(cookie2);
    }

    @Override
    protected void doGet(HttpServletRequest req, HttpServletResponse resp) throws ServletException, IOException {
        this.doPost(req,resp);
    }
}

2、cookie在浏览器中保存多长时间?
(1)默认情况下,当浏览器关闭后,Cookie数据被销毁
(2)持久化存储:setMaxAge(int seconds)
- 正数:将Cookie数据写到硬盘的文件中, 持久化存储。并指定cookie存活时间,时间到后,cookie文件自动失效
- 负数:默认值
- 零:删除
cookie信息
示例:
@WebServlet("/cookieDemo1")
public class CookieDemo1 extends HttpServlet {
    @Override
    protected void doPost(HttpServletRequest req, HttpServletResponse resp) throws ServletException, IOException {
        //1.创建Cookies对象
        Cookie cookie1=new Cookie("msg","hello");
        //2.设置Cookie存活时间
        cookie1.setMaxAge(30);//将cookie持久化到硬盘,30秒后会自动删除cookie文件
        //3.发送Cookies对象
        resp.addCookie(cookie1);

    }

    @Override
    protected void doGet(HttpServletRequest req, HttpServletResponse resp) throws ServletException, IOException {
        this.doPost(req,resp);
    }
}
3、cookie能不能存中文?
- 在tomcat 8 之前 cookie中不能直接存储中文数据,需要将中文数据转码:一般采用URL编码(%E3)
- 在tomcat 8 之后,cookie支持中文数据。特殊字符还是不支持,建议使用URL编码存储,URL解码解析
4、cookie共享问题?
(1)假设在一个tomcat服务器中,部署了多个web项目,那么在这些web项目中cookie能不能共享?
默认情况下cookie不能共享
但可以使用 setPath(String path) 设置cookie的获取范围。
- 默认情况下,设置当前的虚拟目录
- 如果要共享,则可以将
path设置为"/"
(2)不同的tomcat服务器间cookie共享问题?
setDomain(String path):如果设置一级域名相同,那么多个服务器之间cookie可以共享
例如:setDomain(".baidu.com"),那么tieba.baidu.com和news.baidu.com中cookie可以共享
5、Cookie的特点和作用
特点:
- cookie存储数据在客户端浏览器
- 浏览器对于单个cookie 的大小有限制(
4kb) 以及 对同一个域名下的cookie数量也有限制(20个)作用:
- cookie一般用于存出少量的不太敏感的数据
- 在不登录的情况下,完成服务器对客户端的身份识别
3.4 案例:记住上一次访问时间
需求:
1、访问一个Servlet,如果是第一次访问,则提示:您好,欢迎您首次访问
2、如果不是第一次访问,则提示:欢迎回来,您上次访问时间为:显示时间字符串
 分析:
分析:
1、可以采用Cookie来完成
2、在服务器中的Servlet判断是否有一个名为lastTime的cookie
有:不是第一次访问
- 响应数据:欢迎回来,您上次访问时间为:2018年6月10日11:50:20
- 写回Cookie:lastTime=2018年6月10日11:50:01
没有:是第一次访问
- 响应数据:您好,欢迎您首次访问
- 写回Cookie:lastTime=2018年6月10日11:50:01
代码实现:
@WebServlet("/cookieTest")
public class CookieTest extends HttpServlet {
    @Override
    protected void doPost(HttpServletRequest req, HttpServletResponse resp) throws ServletException, IOException {

        //设置响应的消息体的数据格式以及编码
        resp.setContentType("text/html;charset=utf-8");
        //服务器查看是否有lastTime的cookie字段
        //1.获取所有cookie
        Cookie [] cookies=req.getCookies();
        boolean flag=false;
        //2.遍历cookie数组
        if(cookies!=null && cookies.length>0){
            for(Cookie c:cookies){
                //3.获取cookie的名称
                String name=c.getName();
                if(name.equals("lastTime")){
                    flag=true;
                    //有该Cookie,不是第一次访问

                    //响应消息:欢迎回来,您上次访问时间为:2018年6月10日11:50:20
                    String value=c.getValue();
                    //url解码
                    value= URLDecoder.decode(value,"utf-8");
                    resp.getWriter().write("<h1>欢迎回来,您上次访问时间为:"+value+"</h1>");

                    //设置Cookies的value
                    //获取当前时间的字符串,重新设置cookie的值,重新发送
                    Date date=new Date();
                    SimpleDateFormat sdf=new SimpleDateFormat("yyyy年MM月dd日 HH:mm:ss");
                    String str_date=sdf.format(date);
                    System.out.println("编码前"+str_date);
                    //url编码
                    str_date= URLEncoder.encode(str_date,"utf-8");
                    System.out.println("编码后"+str_date);
                    c.setValue(str_date);
                    //设置cookie的存活时间
                    c.setMaxAge(50);
                    resp.addCookie(c);
                    break;
                }
            }
        }
        if(!flag || cookies.length==0 || cookies==null){
            Date date=new Date();
            SimpleDateFormat sdf=new SimpleDateFormat("yyyy年MM月dd日 HH:mm:ss");
            String str_date=sdf.format(date);
            System.out.println("编码前"+str_date);
            //url编码
            str_date= URLEncoder.encode(str_date,"utf-8");
            System.out.println("编码后"+str_date);
            Cookie cookie=new Cookie("lastTime",str_date);
            //设置cookie的存活时间
            cookie.setMaxAge(50);
            resp.addCookie(cookie);
            resp.getWriter().write("<h1>您好,欢迎您首次访问</h1>");
        }
    }

    @Override
    protected void doGet(HttpServletRequest req, HttpServletResponse resp) throws ServletException, IOException {
        this.doPost(req,resp);
    }
}
启动服务器


3.3 Session
概念:
服务器端会话技术,在一次会话的多次请求间共享数据,将数据保存在服务器端的对象中:HttpSession
3.31 快速入门:
1、获取HttpSession对象:
HttpSession session = request.getSession();
2、使用HttpSession对象:
Object getAttribute(String name)
void   setAttribute(String name, Object value)
void   removeAttribute(String name)
示例:
step1: 创建SessionDemo1类
@WebServlet("/sessionDemo1")
public class SessionDemo1 extends HttpServlet {
    @Override
    protected void doPost(HttpServletRequest req, HttpServletResponse resp) throws ServletException, IOException {
        //使用sessiong共享数据

        //1.获取session对象
        HttpSession session=req.getSession();
        //2.存储数据
        session.setAttribute("msg","hello session");
    }

    @Override
    protected void doGet(HttpServletRequest req, HttpServletResponse resp) throws ServletException, IOException {
        this.doPost(req,resp);
    }
}
step2:创建SessionDemo2类
@WebServlet("/sessionDemo2")
public class SessionDemo2 extends HttpServlet {
    @Override
    protected void doPost(HttpServletRequest req, HttpServletResponse resp) throws ServletException, IOException {
        //使用sessiong获取数据

        //1.获取session对象
        HttpSession session=req.getSession();
        //2.存储数据
        Object msg=session.getAttribute("msg");
        System.out.println(msg);
    }

    @Override
    protected void doGet(HttpServletRequest req, HttpServletResponse resp) throws ServletException, IOException {
        this.doPost(req,resp);
    }
}
分别访问http://localhost:8080/servlet_session/sessionDemo1
和http://localhost:8080/servlet_session/sessionDemo2

3.32 原理
Session的实现是依赖于Cookie的。

3.33 细节:
1、当客户端关闭后,服务器不关闭,两次获取session是否为同一个?
默认情况下: 不是。
如果需要相同,则可以创建Cookie,键为JSESSIONID,设置最大存活时间,让cookie持久化保存。
Cookie c = new Cookie("JSESSIONID",session.getId());
c.setMaxAge(60*60);
response.addCookie(c);
2、客户端不关闭,服务器关闭后,两次获取的session是同一个吗?
不是同一个,但是要确保数据不丢失。tomcat自动完成以下工作
- session的钝化: 在服务器正常关闭之前,将session对象系列化到硬盘上
- session的活化: 服务器启动后,将session文件转化为内存中的session对象即可。
3、session什么时候被销毁?
(1)服务器关闭
(2)session对象调用invalidate()
(3)session默认失效时间 30分钟
选择性配置修改<session-config> <session-timeout>30</session-timeout> </session-config>
session的特点
1、session用于存储一次会话的多次请求的数据,存在服务器端
2、session可以存储任意类型,任意大小的数据
session与Cookie的区别:
1、session存储数据在服务器端,Cookie在客户端
2、session没有数据大小限制,Cookie有
3、session数据安全,Cookie相对于不安全
3.4 案例:验证码
案例需求:
1、访问带有验证码的登录页面
login.jsp
2、用户输入用户名,密码以及验证码。
- 如果用户名和密码输入有误,跳转登录页面,提示:用户名或密码错误
- 如果验证码输入有误,跳转登录页面,提示:验证码错误
- 如果全部输入正确,则跳转到主页success.jsp,显示:用户名,欢迎您

代码实现
step1: 新建login.jsp
<%--
  Created by IntelliJ IDEA.
  User: Liu Fei
  Date: 2020/11/3
  Time: 11:48
  To change this template use File | Settings | File Templates.
--%>
<%@ page contentType="text/html;charset=UTF-8" language="java" %>
<html>
<head>
    <title>login</title>
    <script>
        window.onload=function() {
            document.getElementById("img").onclick=function(){
                this.src="/servlet_test03/checkCodeServlet?time="+new Date().getTime();
            }
        }
    </script>
    <style>
        div{
            color:red;
        }
    </style>

</head>
<body>
    <form action="/servlet_test03//loginServlet" method="post">
        <table>
            <tr>
                <td>用户名</td>
                <td><input type="text" name="username"></td>
            </tr>

            <tr>
                <td>密码</td>
                <td><input type="password" name="password"></td>
            </tr>

            <tr>
                <td>验证码</td>
                <td><input type="text" name="checkCode"></td>
            </tr>

            <tr>
                <td colspan="2"><img id="img" src="/servlet_test03//checkCodeServlet"></td>
            </tr>

            <tr>
                <td colspan="2"><input type="submit" value="登录"></td>
            </tr>

        </table>

    </form>

    <div><%=request.getAttribute("cc_error")==null?"":request.getAttribute("cc_error")%></div>
    <div><%=request.getAttribute("login_error")==null?"":request.getAttribute("login_error")%></div>
</body>
</html>
step2: 创建success.jsp
<%--
  Created by IntelliJ IDEA.
  User: Liu Fei
  Date: 2020/11/3
  Time: 14:42
  To change this template use File | Settings | File Templates.
--%>
<%@ page contentType="text/html;charset=UTF-8" language="java" %>
<html>
<head>
    <title>Title</title>
</head>
<body>
<h1><%=request.getSession().getAttribute("username")%>,欢迎您</h1>
</body>
</html>
step2: 新建LoginServlet类
@WebServlet("/loginServlet")
public class LoginServlet extends HttpServlet{
    @Override
    protected void doPost(HttpServletRequest req, HttpServletResponse resp) throws ServletException, IOException {
        //1.设置request编码
        req.setCharacterEncoding("utf-8");
        //2.获取request参数
        String username=req.getParameter("username");
        String password=req.getParameter("password");
        String checkCode=req.getParameter("checkCode");
        //3.先获取生成的验证码
        HttpSession session=req.getSession();
        String cheackCode_session=(String)session.getAttribute("checkCode_session");
        session.removeAttribute("checkCode_session");
        if(cheackCode_session!=null && cheackCode_session.equalsIgnoreCase(checkCode)){
            //忽略大小写比较
            //如果验证码一致,那么需要再判断用户名和密码是否一致
            if("liufei".equals(username) && "123456".equals(password)){
                //登录成功
                //存储信息,用户信息
                session.setAttribute("username",username);

                //重定向到success.jsp
                resp.sendRedirect(req.getContextPath()+"/success.jsp");
            }else{
                //登录失败
                //存储提示信息到request
                req.setAttribute("login_error","用户名或密码错误");
                //转发到登录界面
                req.getRequestDispatcher("/login.jsp").forward(req,resp);
            }
        }else{
            //如果验证码不一致
            //提示:验证码错误,并跳转登录界面
            //存储提示信息到request
            req.setAttribute("cc_error","验证码错误");
            //转发到登录界面
            req.getRequestDispatcher("/login.jsp").forward(req,resp);
        }

    }

    @Override
    protected void doGet(HttpServletRequest req, HttpServletResponse resp) throws ServletException, IOException {
        this.doPost(req,resp);
    }
}
step3: 新建CheckCodeServlet类
@WebServlet("/checkCodeServlet")
public class CheckCodeServlet extends HttpServlet {
    @Override
    protected void doPost(HttpServletRequest req, HttpServletResponse resp) throws ServletException, IOException {
        int width=100;
        int height=50;
        //1.创建对象,在内存中的图片(验证码图片对象)
        BufferedImage image=new BufferedImage(width,height,BufferedImage.TYPE_INT_RGB);
        //2.美化图片
        //2.1 背景填充
        //获取画笔对象
        Graphics g=image.getGraphics();
        //设置画笔颜色
        g.setColor(Color.PINK);
        //填充颜色
        g.fillRect(0,0,width,height);

        //2.2 画边框
        g.setColor(Color.BLUE);
        g.drawRect(0,0,width-1,height-1);

        String str="ABCDEFGHIJKLMNOPQRSTUVWXYZabcdefghijklmnopqrstuvwxyz0123456789";
        //生成随机角标
        Random rd=new Random();
        StringBuilder sb=new StringBuilder();
        for(int i=0;i<4;i++){
            int index=rd.nextInt(str.length());
            //获取字符
            char ch=str.charAt(index);
            sb.append(ch);
            //2.3 写验证码
            g.drawString(ch+"",(width/5)*(i+1),25);
        }
        String checkCode_session=sb.toString();
        //将验证码存入Session
        req.getSession().setAttribute("checkCode_session",checkCode_session);
        //2.4 画干扰线
        //生成随机坐标点
        g.setColor(Color.GREEN);
        for(int i=0;i<5;i++){
            int x1=rd.nextInt(width);
            int y1=rd.nextInt(height);

            int x2=rd.nextInt(width);
            int y2=rd.nextInt(height);
            g.drawLine(x1,y1,x2,y2);
        }

        //3.将图片输出到页面展示
        ImageIO.write(image,"jpg",resp.getOutputStream());
    }
    @Override
    protected void doGet(HttpServletRequest req, HttpServletResponse resp) throws ServletException, IOException {
        this.doPost(req,resp);
    }

}

效果展示:


4. JSP入门学习
4.1 简介:
概念:
Java Server Pages: java服务器端页面
可以理解为:一个特殊的页面,其中既可以指定定义html标签,又可以定义java代码
用于简化书写!!!
原理:
JSP本质上就是一个Servlet

4.2 JSP的脚本:
JSP定义Java代码的方式
1、<% 代码 %>:定义的java代码,在service方法中。service方法中可以定义什么,该脚本中就可以定义什么。
2、 <%! 代码 %>:定义的java代码,在jsp转换后的java类的成员位置。
3、<%= 代码 %>:定义的java代码,会输出到页面上。输出语句中可以定义什么,该脚本中就可以定义什么。
4.3 JSP的内置对象:
在jsp页面中不需要获取和创建,可以直接使用的对象
jsp一共有9个内置对象。
1、request
2、response
3、out:字符输出流对象。可以将数据输出到页面上。和response.getWriter()类似
response.getWriter()和out.write()的区别:
- 在tomcat服务器真正给客户端做出响应之前,会先找response缓冲区数据,再找out缓冲区数据。
- response.getWriter()数据输出永远在out.write()之前
4.4 案例:改造Cookie案例
<%@ page import="java.net.URLDecoder" %>
<%@ page import="java.util.Date" %>
<%@ page import="java.text.SimpleDateFormat" %>
<%@ page import="java.net.URLEncoder" %><%--
  Created by IntelliJ IDEA.
  User: Liu Fei
  Date: 2020/11/2
  Time: 19:16
  To change this template use File | Settings | File Templates.
--%>
<%@ page contentType="text/html;charset=UTF-8" language="java" %>
<html>
<head>
    <title>uestc</title>
</head>
<body>
<%
    //设置响应的消息体的数据格式以及编码
    response.setContentType("text/html;charset=utf-8");
    //服务器查看是否有lastTime的cookie字段
    //1.获取所有cookie
    Cookie [] cookies=request.getCookies();
    boolean flag=false;
    //2.遍历cookie数组
    if(cookies!=null && cookies.length>0){
        for(Cookie c:cookies){
            //3.获取cookie的名称
            String name=c.getName();
            if(name.equals("lastTime")){
                flag=true;
                //有该Cookie,不是第一次访问
                //响应消息:欢迎回来,您上次访问时间为:2018年6月10日11:50:20
                String value=c.getValue();
                //url解码
                value= URLDecoder.decode(value,"utf-8");
%>
              <h1>欢迎回来,您上次访问时间为:<%=value%></h1>
<%
                //设置Cookies的value
                //获取当前时间的字符串,重新设置cookie的值,重新发送
                Date date=new Date();
                SimpleDateFormat sdf=new SimpleDateFormat("yyyy年MM月dd日 HH:mm:ss");
                String str_date=sdf.format(date);
                System.out.println("编码前"+str_date);
                //url编码
                str_date= URLEncoder.encode(str_date,"utf-8");
                System.out.println("编码后"+str_date);
                c.setValue(str_date);
                //设置cookie的存活时间
                c.setMaxAge(5000);
                response.addCookie(c);
                break;
            }
        }
    }
    if(!flag || cookies.length==0 || cookies==null){
        Date date=new Date();
        SimpleDateFormat sdf=new SimpleDateFormat("yyyy年MM月dd日 HH:mm:ss");
        String str_date=sdf.format(date);
        System.out.println("编码前"+str_date);
        //url编码
        str_date= URLEncoder.encode(str_date,"utf-8");
        System.out.println("编码后"+str_date);
        Cookie cookie=new Cookie("lastTime",str_date);
        //设置cookie的存活时间
        cookie.setMaxAge(5000);
        response.addCookie(cookie);
        str_date=URLDecoder.decode(str_date,"utf-8");
%>
        <h1>您好,欢迎您首次访问 "</h1>;
<%
    }
%>
</body>
</html>
4.5 指令
作用:
用于配置JSP页面,导入资源文件
格式:
<%@ 指令名称 属性名1=属性值1 属性名2=属性值2 ... %>
分类:
1、page: 配置JSP页面的
1、
contentType:等同于response.setContentType()
- 设置响应体的
mime类型以及字符集- 设置当前
jsp页面的编码(只能是高级的IDE才能生效,如果使用低级工具,则需要设置pageEncoding属性设置当前页面的字符集)2、
import:导包
3、errorPage:当前页面发生异常后,会自动跳转到指定的错误页面
4、isErrorPage:标识当前也是是否是错误页面。
true:是,可以使用内置对象exceptionfalse:否。默认值。不可以使用内置对象exception
<%@ page contentType="text/html;charset=UTF-8" language="java" errorPage="500.jsp" %>
2、include
页面包含的。导入页面的资源文件
<%@include file="top.jsp"%>
3、taglib
导入资源
<%@ taglib prefix="c" uri="http://java.sun.com/jsp/jstl/core" %>
<!--prefix:前缀,自定义的-->
4.6 注释
1、 html注释:
<!--只能注释html代码片段 -->
2、 jsp注释:推荐使用
<%--可以注释所有 --%>
4.7 内置对象
在jsp页面中不需要创建,直接使用的对象
一共有9个:
变量名 真实类型 作用
pageContextPageContext 当前页面共享数据,还可以获取其他八个内置对象requestHttpServletRequest 一次请求访问的多个资源(转发)sessionHttpSession 一次会话的多个请求间applicationServletContext 所有用户间共享数据responseHttpServletResponse 响应对象pageObject 当前页面(Servlet)的对象 thisoutJspWriter 输出对象,数据输出到页面上configServletConfig Servlet的配置对象exceptionThrowable 异常对象
5. MVC 开发模式
5.1 jsp演变历史
- 早期只有servlet,只能使用response输出标签数据,非常麻烦
- 后来又jsp,简化了Servlet的开发,如果过度使用jsp,在jsp中即写大量的java代码,有写html表,造成难于维护,难于分工协作
- 再后来,java的web开发,借鉴mvc开发模式,使得程序的设计更加合理性
5.2 MVC
-
M:
Model,模型:JavaBean- 完成具体的业务操作,如:查询数据库,封装对象
-
V:
View,视图:JSP- 展示数据
-
C:
Controller,控制器:Servlet- 获取用户的输入
- 调用模型
- 将数据交给视图进行展示

优缺点:
	1. 优点:
   - 耦合性低,方便维护,可以利于分工协作
   - 重用性高
	2.  缺点:
         	1. 使得项目架构变得复杂,对开发人员要求高
6. EL表达式
6.1 简介
概念:
Expression Language 表达式语言
作用:
替换和简化jsp页面中java代码的编写
语法:
${表达式}
注意:
jsp默认支持el表达式的。如果要忽略el表达式
- 设置jsp中
page指令中:isELIgnored="true"忽略当前jsp页面中所有的el表达式 \${表达式}:忽略当前这个el表达式
6.4 运算:
运算符:
-
算数运算符:
+ - * /(div) %(mod) -
比较运算符:
> < >= <= == != -
逻辑运算符:
&&(and) ||(or) !(not) -
空运算符:
empty- 功能:用于判断字符串、集合、数组对象是否为
null或者长度是否为0 ${empty list}:判断字符串、集合、数组对象是否为null或者长度为0${not empty str}:表示判断字符串、集合、数组对象是否不为null并且长度>0
示例:
<%--
  Created by IntelliJ IDEA.
  User: Liu Fei
  Date: 2020/11/3
  Time: 16:19
  To change this template use File | Settings | File Templates.
--%>
<%@ page contentType="text/html;charset=UTF-8" language="java" %>
<html>
<head>
    <title>Title</title>
</head>
<body>
    <h3>算术运算符</h3>
    ${3+4}<br>
    ${3/4}<br>
    ${3 div 4}<br>
    ${3 % 4}<br>
    ${3 mod 4}<br>
    <h3>比较运算符</h3>
    ${3==4}<br>
    <h3>逻辑运算符</h3>
    ${3>4 && 3<4}<br>
    ${3>4 and 3<4}<br>
</body>
</html>
效果展示:

- 功能:用于判断字符串、集合、数组对象是否为
6.5 获取值
el表达式只能从域对象中获取值
6.51 ${域名称.键名}
从指定域中获取指定键的值
域名称:
pageScope --> pageContext
requestScope --> request
sessionScope --> session
applicationScope --> application(ServletContext)
示例: 在request域中存储了name=张三 ,使用${requestScope.name}进行获取
<%--
  Created by IntelliJ IDEA.
  User: Liu Fei
  Date: 2020/11/3
  Time: 16:19
  To change this template use File | Settings | File Templates.
--%>
<%@ page contentType="text/html;charset=UTF-8" language="java" %>
<html>
<head>
    <title>Title</title>
</head>
<body>
   <%
        request.setAttribute("name","张三");
        session.setAttribute("age","23");
   %>

   <h3>获取值</h3>
    ${requestScope.name}
    ${sessionScope.age}
</body>
</html>

6.52 ${键名}
表示依次从最小的域中查找是否有该键对应的值,直到找到为止。
示例:
<%--
  Created by IntelliJ IDEA.
  User: Liu Fei
  Date: 2020/11/3
  Time: 16:19
  To change this template use File | Settings | File Templates.
--%>
<%@ page contentType="text/html;charset=UTF-8" language="java" %>
<html>
<head>
    <title>Title</title>
</head>
<body>
   <%
        request.setAttribute("name","张三");
        session.setAttribute("name","23");
   %>
   <h3>获取值</h3>
    ${name}
</body>
</html>

6.53 获取对象、List集合、Map集合的值
1、对象: ${域名称.键名.属性名}
本质上会去调用对象的getter方法
示例:
创建JavaBean对象
package com.uestc.domain;
import java.text.SimpleDateFormat;
import java.util.Date;
public class User {
    private String name;
    private int age;
    private Date birthday;

    public String getName() {
        return name;
    }

    /**
     * 逻辑视图
     * @return
     */
    public String getBitStr(){
        if(birthday!=null){
            //格式化日期对象
            SimpleDateFormat sdf=new SimpleDateFormat("yyyy-MM-dd HH:mm:ss");
            //返回字符串即可
            return sdf.format(birthday);
        }else{
            return "";
        }
    }
    public void setName(String name) {
        this.name = name;
    }
    public int getAge() {
        return age;
    }

    public void setAge(int age) {
        this.age = age;
    }

    public Date getBirthday() {
        return birthday;
    }
    public void setBirthday(Date birthday) {
        this.birthday = birthday;
    }
}
创建el.jsp
<%--
  Created by IntelliJ IDEA.
  User: Liu Fei
  Date: 2020/11/3
  Time: 17:08
  To change this template use File | Settings | File Templates.
--%>
<%@ page contentType="text/html;charset=UTF-8" language="java" %>
<%@ page import="com.uestc.domain.User" %>
<%@ page import="java.util.Date" %>
<html>
<head>
    <title>Title</title>
</head>
<body>
    <%
        User user=new User();
        user.setName("张三");
        user.setAge(23);
        user.setBirthday(new Date());
        request.setAttribute("user",user);
    %>
    <h3>使用el获取对象中的值</h3>
    ${requestScope.user}<br>

<%-- 通过的是对象的属性来获取
    setter或getter方法,去掉set或者get,在将剩余部分首字母变为小写
    setName --> Name -->name

--%>
    ${requestScope.user.name}<br>
    ${requestScope.user.age}<br>
    ${requestScope.user.bitStr}<br>
    ${requestScope.user.birthday.month}<br>
</body>
</html>
效果展示:

2、List集合:${域名称.键名[索引]}
示例:
<%--
  Created by IntelliJ IDEA.
  User: Liu Fei
  Date: 2020/11/3
  Time: 17:08
  To change this template use File | Settings | File Templates.
--%>
<%@ page contentType="text/html;charset=UTF-8" language="java" %>
<%@ page import="com.uestc.domain.User" %>
<%@ page import="java.util.Date" %>
<%@ page import="java.util.List" %>
<%@ page import="java.util.ArrayList" %>
<html>
<head>
    <title>Title</title>
</head>
<body>
    <%
        User user=new User();
        user.setName("张三");
        user.setAge(11);
        user.setBirthday(new Date());
        List list=new ArrayList();
        list.add(1);
        list.add(2);
        list.add(3);
        list.add(user);
        request.setAttribute("list",list);
    %>
    <h3>el获取list的值</h3>
    ${list}<br>
    ${list[0]}<br>
    ${list[1]}<br>
    ${list[2]}<br>
    ${list[3]}<br>
    ${list[3].name}<br>
    ${list[3].age}<br>
    ${list[3].bitStr}<br>
</body>
</html>
显示效果:

3、Map集合:
-
${域名称.键名.key名称}
-
${域名称.键名[“key名称”]}
<%--
  Created by IntelliJ IDEA.
  User: Liu Fei
  Date: 2020/11/3
  Time: 17:08
  To change this template use File | Settings | File Templates.
--%>
<%@ page contentType="text/html;charset=UTF-8" language="java" %>
<%@ page import="com.uestc.domain.User" %>
<%@ page import="java.util.*" %>
<html>
<head>
    <title>Title</title>
</head>
<body>
    <%
        User user=new User();
        user.setName("张三");
        user.setAge(11);
        user.setBirthday(new Date());
        Map map=new HashMap();
        map.put("sname","李四");
        map.put("gender","男");
        map.put("user",user);
        request.setAttribute("map",map);
    %>
    <h3>el获取map的值</h3>
    ${map.gender}<br>
    ${map["gender"]}<br>
    ${map.sname}<br>
    ${map["sname"]}<br>
    ${map.user.name}
</body>
</html>
效果展示:

6.6 隐式对象
el表达式中有11个隐式对象
-
pageContext:获取
jsp其他八个内置对象${pageContext.request.contextPath}:动态获取虚拟目录JSTL
7. JSTL
7.1 简介
概念:
JavaServer Pages Tag Library JSP标准标签库
是由Apache组织提供的开源的免费的jsp标签 <标签>
作用:
用于简化和替换jsp页面上的java代码
7.2 使用步骤
-
导入
jstl相关jar包 -
引入标签库:
taglib指令:<%@ taglib %> -
使用标签
示例:
1、导入jstl相关jar

2、 引入标签库:taglib指令: <%@ taglib %>
<%@ taglib prefix="c" uri="http://java.sun.com/jsp/jstl/core" %>
7.4 常用的JSTL标签
7.41 if:
相当于java代码的
if语句
属性:test 必须属性,接受boolean表达式
- 如果表达式为
true,则显示if标签体内容,如果为false,则不显示标签体内容 - 一般情况下,
test属性值会结合el表达式一起使用
注意:
* c:if标签没有`else`情况,想要else情况,则可以在定义一个`c:if`标签
示例:
<%@ page import="java.util.ArrayList" %>
<%@ page import="java.util.List" %><%--
  Created by IntelliJ IDEA.
  User: Liu Fei
  Date: 2020/11/3
  Time: 22:27
  To change this template use File | Settings | File Templates.
--%>
<%@ page contentType="text/html;charset=UTF-8" language="java" %>
<%@ taglib prefix="c" uri="http://java.sun.com/jsp/jstl/core" %>
<html>
<head>
    <title>Title</title>
</head>
<body>
    <%
        //判断request域中的一个list集合是否为null,如果不为null则显示遍历集合
        List list=new ArrayList();
        list.add("aaa");
        request.setAttribute("list",list);

        request.setAttribute("number",3);
    %>
    <c:if test="${not empty list}">
        遍历集合
    </c:if>
    <br>
    <c:if test="${number %2 !=0}">
        ${number}为奇数
    </c:if>
    <c:if test="${number %2==0}">
        ${number}为偶数
    </c:if>
</body>
</html>

7.42 choose:
相当于java代码的
switch语句
- 使用choose标签声明 相当于switch声明
- 使用when标签做判断 相当于case
- 使用otherwise标签做其他情况的声明 相当于default
示例:
<%--
  Created by IntelliJ IDEA.
  User: Liu Fei
  Date: 2020/11/3
  Time: 23:38
  To change this template use File | Settings | File Templates.
--%>
<%@ page contentType="text/html;charset=UTF-8" language="java" %>
<%@taglib prefix="c" uri="http://java.sun.com/jsp/jstl/core" %>
<html>
<head>
    <title>choose标签</title>
</head>
<body>
    <%--完成数字编号对应星期几的案例
        1. 使用choose标签声明                  相当于switch声明
        2. 使用when标签做判断                  相当于case
        3. 使用otherwise标签做其他情况的声明    	相当于default
    --%>
    <%
        request.setAttribute("number",3);
    %>
    <c:choose>
        <c:when test="${number==1}">星期一</c:when>
        <c:when test="${number==2}">星期二</c:when>
        <c:when test="${number==3}">星期三</c:when>
        <c:when test="${number==4}">星期四</c:when>
        <c:when test="${number==5}">星期五</c:when>
        <c:when test="${number==6}">星期六</c:when>
        <c:when test="${number==7}">星期日</c:when>
        <c:otherwise>数字有误</c:otherwise>
    </c:choose>
</body>
</html>
7.43 foreach
相当于java代码的
for语句
1.完成重复的操作
for(int i=0;i<10;i++){}
属性:
begin:开始值end:结束值var:临时变量step:步长varStatus:循环状态对象index:容器中元素的索引,从0开始count:循环次数,从1开始
示例:
<%--
  Created by IntelliJ IDEA.
  User: Liu Fei
  Date: 2020/11/3
  Time: 23:52
  To change this template use File | Settings | File Templates.
--%>
<%@ page contentType="text/html;charset=UTF-8" language="java" %>
<%@ taglib prefix="c" uri="http://java.sun.com/jsp/jstl/core" %>
<html>
<head>
    <title>Title</title>
</head>
<body>
    <c:forEach begin="1" end="10" var="i" step="2" varStatus="s">
        ${i} ${s.index} ${s.count}<br>
    </c:forEach>
</body>
</html>
效果展示:

-
遍历容器
 List<User> list;
 for(User u:list){}
示例:
<%@ page import="java.util.ArrayList" %>
<%@ page import="java.util.List" %><%--
  Created by IntelliJ IDEA.
  User: Liu Fei
  Date: 2020/11/3
  Time: 23:52
  To change this template use File | Settings | File Templates.
--%>
<%@ page contentType="text/html;charset=UTF-8" language="java" %>
<%@ taglib prefix="c" uri="http://java.sun.com/jsp/jstl/core" %>
<html>
<head>
    <title>Title</title>
</head>
<body>
    <%
        List list=new ArrayList();
        list.add("aaa");
        list.add("bbb");
        list.add("ccc");
        request.setAttribute("list",list);
    %>
    <c:forEach items="${list}" var="i" varStatus="s">
        ${i} ${s.index} ${s.count}<br>
    </c:forEach>
</body>
</html>
效果展示:

需求:在request域中有一个存有User对象的List集合。需要使用jstl+el将list集合数据展示到jsp页面的表格table中

7.5 小练习
需求:在request域中有一个存有User对象的List集合。需要使用jstl+el将list集合数据展示到jsp页面的表格table中\
- 新建
User类
package com.uestc.domain;

import java.text.SimpleDateFormat;
import java.util.Date;

public class User {
    private String name;
    private int age;
    private Date birthday;

    public User(String name, int age, Date birthday) {
        this.name = name;
        this.age = age;
        this.birthday = birthday;
    }
    public User(){

    }
    /**
     * 逻辑视图
     * @return
     */
    public String getBitStr(){
        if(birthday!=null){
            //格式化日期对象
            SimpleDateFormat sdf=new SimpleDateFormat("yyyy-MM-dd HH:mm:ss");
            //返回字符串即可
            return sdf.format(birthday);
        }else{
            return "";
        }
    }
    public String getName() {
        return name;
    }
    public void setName(String name) {
        this.name = name;
    }
    public int getAge() {
        return age;
    }
    public void setAge(int age) {
        this.age = age;
    }
    public Date getBirthday() {
        return birthday;
    }
    public void setBirthday(Date birthday) {
        this.birthday = birthday;
    }
}
- 新建
jstl_test.jsp
<%@ page import="java.util.ArrayList" %>
<%@ page import="java.util.List" %><%--
  Created by IntelliJ IDEA.
  User: Liu Fei
  Date: 2020/11/4
  Time: 0:21
  To change this template use File | Settings | File Templates.
--%>
<%@ page contentType="text/html;charset=UTF-8" language="java" %>
<%@ page import="com.uestc.domain.User" %>
<%@ page import="java.util.Date" %>
<%@ taglib prefix="" uri="http://java.sun.com/jsp/jstl/core" %>
<%@ taglib prefix="c" uri="http://java.sun.com/jsp/jstl/core" %>
<html>
<head>
    <title>Title</title>
</head>
<body>
    <%
        List list=new ArrayList();
        list.add(new User("张三",23,new Date()));
        list.add(new User("李四",24,new Date()));
        list.add(new User("王五",26,new Date()));
        request.setAttribute("list",list);
    %>
    <table border="1" width="500" align="left">
        <tr>
            <th>编号</th>
            <th>姓名</th>
            <th>年龄</th>
            <th>生日</th>
        </tr>
        <%--数据行
        偶数行呈现
        --%>
        <c:forEach items="${list}" var="user" varStatus="s">
            <c:if test="${s.count %2==0}">
                <tr bgcolor="#a9aW9a9">
                    <td>${s.count}</td>
                    <td>${user.name}</td>
                    <td>${user.age}</td>
                    <td>${user.bitStr}</td>
                </tr>
            </c:if>
            <c:if test="${s.count %2!=0}">
                <tr bgcolor="#f0ffff">
                    <td>${s.count}</td>
                    <td>${user.name}</td>
                    <td>${user.age}</td>
                    <td>${user.bitStr}</td>
                </tr>
            </c:if>
        </c:forEach>
    </table>
</body>
</html>
- 效果展示

8. 三层架构:软件设计架构
- 界面层(表示层):用户看的得界面。用户可以通过界面上的组件和服务器进行交互
- 业务逻辑层:处理业务逻辑的。
- 数据访问层:操作数据存储文件。

9. 案例:用户信息列表展示
9.1 需求
用户信息的增删改查操作
9.2 准备工作
技术选型:
Servlet+JSP+MySQL+JDBCTemplate+Duird+BeanUtils+tomcat
数据库设计
create database day17; -- 创建数据库
use day17; 			   -- 使用数据库
create table user(   -- 创建表
	id int primary key auto_increment,
	name varchar(20) not null,
	gender varchar(5),
	age int,
	address varchar(32),
	qq	varchar(20),
	email varchar(50)
);
9.3 环境搭建
-
创建数据库环境

-
创建项目,导入需要的
jar包
-
将前端静态页面复制到web目录下


9.4 综合练习
简单功能
-
列表查询
-
登录
-
添加
-
删除
-
修改
复杂功能
-
删除选中
-
分页查询
好处:
- 减轻服务器内存的开销
- 提升用户体验
-
复杂条件查询
9.41 列表查询功能

项目目录:

-
新建
list.jsp查询页面<%@ page contentType="text/html;charset=UTF-8" language="java" %> <%@taglib prefix="c" uri="http://java.sun.com/jsp/jstl/core" %> <!DOCTYPE html> <!-- 网页使用的语言 --> <html lang="zh-CN"> <head> <!-- 指定字符集 --> <meta charset="utf-8"> <!-- 使用Edge最新的浏览器的渲染方式 --> <meta http-equiv="X-UA-Compatible" content="IE=edge"> <!-- viewport视口:网页可以根据设置的宽度自动进行适配,在浏览器的内部虚拟一个容器,容器的宽度与设备的宽度相同。 width: 默认宽度与设备的宽度相同 initial-scale: 初始的缩放比,为1:1 --> <meta name="viewport" content="width=device-width, initial-scale=1"> <!-- 上述3个meta标签*必须*放在最前面,任何其他内容都*必须*跟随其后! --> <title>用户信息管理系统</title> <!-- 1. 导入CSS的全局样式 --> <link href="css/bootstrap.min.css" rel="stylesheet"> <!-- 2. jQuery导入,建议使用1.9以上的版本 --> <script src="js/jquery-2.1.0.min.js"></script> <!-- 3. 导入bootstrap的js文件 --> <script src="js/bootstrap.min.js"></script> <style type="text/css"> td, th { text-align: center; } </style> </head> <body> <div class="container"> <h3 style="text-align: center">用户信息列表</h3> <div style="float: left;"> <form class="form-inline"> <div class="form-group"> <label for="exampleInputName2">姓名</label> <input type="text" class="form-control" id="exampleInputName2" > </div> <div class="form-group"> <label for="exampleInputName3">籍贯</label> <input type="text" class="form-control" id="exampleInputName3" > </div> <div class="form-group"> <label for="exampleInputEmail2">邮箱</label> <input type="email" class="form-control" id="exampleInputEmail2" > </div> <button type="submit" class="btn btn-default">查询</button> </form> </div> <div style="float: right;margin: 5px;"> <a class="btn btn-primary" href="add.html">添加联系人</a> <a class="btn btn-primary" href="add.html">删除选中</a> </div> <table border="1" class="table table-bordered table-hover"> <tr class="success"> <th><input type="checkbox"></th> <th>编号</th> <th>姓名</th> <th>性别</th> <th>年龄</th> <th>籍贯</th> <th>QQ</th> <th>邮箱</th> <th>操作</th> </tr> <c:forEach items="${users}" var="user" varStatus="s"> <tr> <td><input type="checkbox"></td> <td>${s.count}</td> <td>${user.name}</td> <td>${user.gender}</td> <td>${user.age}</td> <td>${user.address}</td> <td>${user.qq}</td> <td>${user.email}</td> <td><a class="btn btn-default btn-sm" href="update.html">修改</a> <a class="btn btn-default btn-sm" href="">删除</a></td> </tr> </c:forEach> </table> <div> <nav aria-label="Page navigation"> <ul class="pagination"> <li> <a href="#" aria-label="Previous"> <span aria-hidden="true">«</span> </a> </li> <li><a href="#">1</a></li> <li><a href="#">2</a></li> <li><a href="#">3</a></li> <li><a href="#">4</a></li> <li><a href="#">5</a></li> <li> <a href="#" aria-label="Next"> <span aria-hidden="true">»</span> </a> </li> <span style="font-size: 25px;margin-left: 5px;"> 共16条记录,共4页 </span> </ul> </nav> </div> </div> </body> </html> -
新建
User类package com.uestc.dao; public class User { private int id; private String name; private String gender; private int age; private String address; private String qq; private String emil; public int getId() { return id; } public void setId(int id) { this.id = id; } public String getName() { return name; } public void setName(String name) { this.name = name; } public String getGender() { return gender; } public void setGender(String gender) { this.gender = gender; } public int getAge() { return age; } public void setAge(int age) { this.age = age; } public String getAddress() { return address; } public void setAddress(String address) { this.address = address; } public String getQq() { return qq; } public void setQq(String qq) { this.qq = qq; } public String getEmil() { return emil; } public void setEmil(String emil) { this.emil = emil; } @Override public String toString() { return "User{" + "id=" + id + ", name='" + name + '\'' + ", gender='" + gender + '\'' + ", age=" + age + ", address='" + address + '\'' + ", qq='" + qq + '\'' + ", emil='" + emil + '\'' + '}'; } } -
新建
JDBCUtils类package com.uestc.utils; import com.alibaba.druid.pool.DruidDataSourceFactory; import javax.sql.DataSource; import javax.xml.crypto.Data; import java.io.IOException; import java.io.InputStream; import java.sql.Connection; import java.sql.SQLException; import java.util.Properties; /** * JDBC工具类 使用Durid连接池 */ public class JDBCUtils { private static DataSource ds ; static { try { //1.加载配置文件 Properties pro = new Properties(); //使用ClassLoader加载配置文件,获取字节输入流 InputStream is = JDBCUtils.class.getClassLoader().getResourceAsStream("druid.properties"); pro.load(is); //2.初始化连接池对象 ds = DruidDataSourceFactory.createDataSource(pro); } catch (IOException e) { e.printStackTrace(); } catch (Exception e) { e.printStackTrace(); } } /** * 获取连接池对象 */ public static DataSource getDataSource(){ return ds; } /** * 获取连接Connection对象 */ public static Connection getConnection() throws SQLException { return ds.getConnection(); } } -
新建
UserDao接口以及对应的实现类UserDaoImpl//UserDao package com.uestc.dao; import java.util.List; /** * 用户操作的DAO */ public interface UserDao { public List<User> findAll(); }//UserDaoImpl package com.uestc.dao.impl; import com.uestc.dao.User; import com.uestc.dao.UserDao; import com.uestc.utils.JDBCUtils; import org.springframework.jdbc.core.BeanPropertyRowMapper; import org.springframework.jdbc.core.JdbcTemplate; import java.util.List; public class UserDaoImpl implements UserDao { private JdbcTemplate template=new JdbcTemplate(JDBCUtils.getDataSource()); @Override public List<User> findAll() { //使用JDBC完成查询 //1.定义sql String sql="select * from user"; List<User> list= template.query(sql,new BeanPropertyRowMapper<User>(User.class)); return list; } } -
新建
UserService接口以及对应的实现类UserServiceImpl//UserService package com.uestc.service; import com.uestc.dao.User; import java.util.List; /** * 用户管理的业务接口 */ public interface UserService { /** * 查询所有用户信息 * @return */ public List<User> findAll(); }//UserServiceImpl package com.uestc.service.impl; import com.uestc.dao.User; import com.uestc.dao.UserDao; import com.uestc.dao.impl.UserDaoImpl; import com.uestc.service.UserService; import java.util.List; public class UserServiceImpl implements UserService{ private UserDao dao=new UserDaoImpl(); @Override public List<User> findAll() { //调用dao完成查询 return dao.findAll(); } } -
新建
UserListServlet类package com.uestc.web.servlet; import com.uestc.dao.User; import com.uestc.service.UserService; import com.uestc.service.impl.UserServiceImpl; import javax.servlet.ServletException; import javax.servlet.annotation.WebServlet; import javax.servlet.http.HttpServlet; import javax.servlet.http.HttpServletRequest; import javax.servlet.http.HttpServletResponse; import java.io.IOException; import java.util.List; @WebServlet("/userListServlet") public class UserListServlet extends HttpServlet { @Override protected void doPost(HttpServletRequest req, HttpServletResponse resp) throws ServletException, IOException { //调用UserService完成查询 UserService service=new UserServiceImpl(); List<User> users=service.findAll(); //将list存入request域 req.setAttribute("users",users); //转发到jsp页面 req.getRequestDispatcher("/list.jsp").forward(req,resp); } @Override protected void doGet(HttpServletRequest req, HttpServletResponse resp) throws ServletException, IOException { this.doPost(req,resp); } }效果展示:


9.42 登录功能
-
建立登录界面
login.jsp和 登录成功跳转界面index.jsp//login.jsp <%@ page contentType="text/html;charset=UTF-8" language="java" %> <!DOCTYPE html> <html lang="zh-CN"> <head> <meta charset="utf-8"/> <meta http-equiv="X-UA-Compatible" content="IE=edge"/> <meta name="viewport" content="width=device-width, initial-scale=1"/> <title>管理员登录</title> <!-- 1. 导入CSS的全局样式 --> <link href="css/bootstrap.min.css" rel="stylesheet"> <!-- 2. jQuery导入,建议使用1.9以上的版本 --> <script src="js/jquery-2.1.0.min.js"></script> <!-- 3. 导入bootstrap的js文件 --> <script src="js/bootstrap.min.js"></script> <script type="text/javascript"> function refreshCode() { //1.获取验证码的图片对象 var vcode=document.getElementById("vcode"); //2.设置src属性,加时间戳 vcode.src="${pageContext.request.contextPath}/checkCodeServlet?time="+new Date().getTime(); } </script> </head> <body> <div class="container" style="width: 400px;"> <h3 style="text-align: center;">管理员登录</h3> <form action="${pageContext.request.contextPath}/loginServlet" method="post"> <div class="form-group"> <label for="user">用户名:</label> <input type="text" name="username" class="form-control" id="user" placeholder="请输入用户名"/> </div> <div class="form-group"> <label for="password">密码:</label> <input type="password" name="password" class="form-control" id="password" placeholder="请输入密码"/> </div> <div class="form-inline"> <label for="vcode">验证码:</label> <input type="text" name="verifycode" class="form-control" id="verifycode" placeholder="请输入验证码" style="width: 120px;"/> <a href="javascript:refreshCode()"> <img src="${pageContext.request.contextPath}/checkCodeServlet" title="看不清点击刷新" id="vcode"/> </a> </div> <hr/> <div class="form-group" style="text-align: center;"> <input class="btn btn btn-primary" type="submit" value="登录"> </div> </form> <!-- 出错显示的信息框 --> <div class="alert alert-warning alert-dismissible" role="alert"> <button type="button" class="close" data-dismiss="alert" > <span>×</span></button> <strong>${requestScope.login_msg}</strong> </div> </div> </body> </html>//index.jsp <%-- Created by IntelliJ IDEA. User: Liu Fei Date: 2020/11/5 Time: 10:01 To change this template use File | Settings | File Templates. --%> <%@ page contentType="text/html;charset=UTF-8" language="java" %> <%@taglib prefix="c" uri="http://java.sun.com/jsp/jstl/core" %> <!DOCTYPE html> <html lang="zh-CN"> <head> <meta charset="utf-8"/> <meta http-equiv="X-UA-Compatible" content="IE=edge"/> <meta name="viewport" content="width=device-width, initial-scale=1"/> <title>首页</title> <!-- 1. 导入CSS的全局样式 --> <link href="css/bootstrap.min.css" rel="stylesheet"> <!-- 2. jQuery导入,建议使用1.9以上的版本 --> <script src="js/jquery-2.1.0.min.js"></script> <!-- 3. 导入bootstrap的js文件 --> <script src="js/bootstrap.min.js"></script> <script type="text/javascript"> </script> </head> <body> <div>${login_user.name},欢迎您 </div> <div align="center"> <a>${requestScope.user}</a> <a href="${pageContext.request.contextPath}/userListServlet" style="text-decoration:none;font-size:33px">查询所有用户信息</a> </div> </body> </html> -
新建
LoginServlet和CheckCodeServlet@WebServlet("/loginServlet") public class LoginServlet extends HttpServlet { @Override protected void doPost(HttpServletRequest req, HttpServletResponse resp) throws ServletException, IOException { //1.设置编码 req.setCharacterEncoding("utf-8"); //2.获取数据 //2.1 获取用户填写的验证码 String verifycode=req.getParameter("verifycode"); Map<String,String[]> map=req.getParameterMap(); //3.验证码校验 HttpSession session=req.getSession(); String checkCode_session=(String)session.getAttribute("CHECKCODE_SERVER"); session.removeAttribute("CHECKCODE_SERVER");//确保验证码的一次性 if(verifycode.equalsIgnoreCase(checkCode_session)){ //验证码正确 //4.封装User对象 User user=new User(); try { BeanUtils.populate(user,map); } catch (IllegalAccessException e) { e.printStackTrace(); } catch (InvocationTargetException e) { e.printStackTrace(); } //5.调用service查询 UserService service=new UserServiceImpl(); User loginUser=service.login(user); if(loginUser==null){ //查找失败 //提示信息 req.setAttribute("login_msg","用户名或者密码错误"); req.getRequestDispatcher("/login.jsp").forward(req,resp); }else{ //登录成功 //将用户存入session session.setAttribute("login_user",loginUser); //跳转页面 resp.sendRedirect(req.getContextPath()+"/index.jsp"); } //6.判断是否登录成功 }else{ //验证码不一致 //提示信息 req.setAttribute("login_msg","验证码错误"); //跳转登录页面 req.getRequestDispatcher("/login.jsp").forward(req,resp); } } @Override protected void doGet(HttpServletRequest req, HttpServletResponse resp) throws ServletException, IOException { this.doPost(req,resp); } }package com.uestc.web.servlet; import java.awt.Color; import java.awt.Font; import java.awt.Graphics; import java.awt.image.BufferedImage; import java.io.IOException; import java.util.Random; import javax.imageio.ImageIO; import javax.servlet.ServletException; import javax.servlet.annotation.WebServlet; import javax.servlet.http.HttpServlet; import javax.servlet.http.HttpServletRequest; import javax.servlet.http.HttpServletResponse; /** * 验证码 */ @WebServlet("/checkCodeServlet") public class CheckCodeServlet extends HttpServlet { public void doGet(HttpServletRequest request, HttpServletResponse response)throws ServletException, IOException { //服务器通知浏览器不要缓存 response.setHeader("pragma","no-cache"); response.setHeader("cache-control","no-cache"); response.setHeader("expires","0"); //在内存中创建一个长80,宽30的图片,默认黑色背景 //参数一:长 //参数二:宽 //参数三:颜色 int width = 80; int height = 30; BufferedImage image = new BufferedImage(width,height,BufferedImage.TYPE_INT_RGB); //获取画笔 Graphics g = image.getGraphics(); //设置画笔颜色为灰色 g.setColor(Color.GRAY); //填充图片 g.fillRect(0,0, width,height); //产生4个随机验证码,12Ey String checkCode = getCheckCode(); //将验证码放入HttpSession中 request.getSession().setAttribute("CHECKCODE_SERVER",checkCode); //设置画笔颜色为黄色 g.setColor(Color.YELLOW); //设置字体的小大 g.setFont(new Font("黑体",Font.BOLD,24)); //向图片上写入验证码 g.drawString(checkCode,15,25); //将内存中的图片输出到浏览器 //参数一:图片对象 //参数二:图片的格式,如PNG,JPG,GIF //参数三:图片输出到哪里去 ImageIO.write(image,"PNG",response.getOutputStream()); } /** * 产生4位随机字符串 */ private String getCheckCode() { String base = "0123456789ABCDEFGabcdefg"; int size = base.length(); Random r = new Random(); StringBuffer sb = new StringBuffer(); for(int i=1;i<=4;i++){ //产生0到size-1的随机值 int index = r.nextInt(size); //在base字符串中获取下标为index的字符 char c = base.charAt(index); //将c放入到StringBuffer中去 sb.append(c); } return sb.toString(); } public void doPost(HttpServletRequest request, HttpServletResponse response) throws ServletException, IOException { this.doGet(request,response); } }效果展示:


9.43 添加功能

-
创建
add.jsp创建添加联系人页面<%@ page contentType="text/html;charset=UTF-8" language="java" %> <!-- HTML5文档--> <!DOCTYPE html> <!-- 网页使用的语言 --> <html lang="zh-CN"> <head> <!-- 指定字符集 --> <meta charset="utf-8"> <!-- 使用Edge最新的浏览器的渲染方式 --> <meta http-equiv="X-UA-Compatible" content="IE=edge"> <!-- viewport视口:网页可以根据设置的宽度自动进行适配,在浏览器的内部虚拟一个容器,容器的宽度与设备的宽度相同。 width: 默认宽度与设备的宽度相同 initial-scale: 初始的缩放比,为1:1 --> <meta name="viewport" content="width=device-width, initial-scale=1"> <!-- 上述3个meta标签*必须*放在最前面,任何其他内容都*必须*跟随其后! --> <title>添加用户</title> <!-- 1. 导入CSS的全局样式 --> <link href="css/bootstrap.min.css" rel="stylesheet"> <!-- 2. jQuery导入,建议使用1.9以上的版本 --> <script src="js/jquery-2.1.0.min.js"></script> <!-- 3. 导入bootstrap的js文件 --> <script src="js/bootstrap.min.js"></script> </head> <body> <div class="container"> <center><h3>添加联系人页面</h3></center> <form action="${pageContext.request.contextPath}/addUserServlet" method="post"> <div class="form-group"> <label for="name">姓名:</label> <input type="text" class="form-control" id="name" name="name" placeholder="请输入姓名"> </div> <div class="form-group"> <label>性别:</label> <input type="radio" name="gender" value="男" checked="checked"/>男 <input type="radio" name="gender" value="女"/>女 </div> <div class="form-group"> <label for="age">年龄:</label> <input type="text" class="form-control" id="age" name="age" placeholder="请输入年龄"> </div> <div class="form-group"> <label for="address">籍贯:</label> <select name="address" class="form-control" id="jiguan"> <option value="广东">广东</option> <option value="广西">广西</option> <option value="湖南">湖南</option> </select> </div> <div class="form-group"> <label for="qq">QQ:</label> <input type="text" class="form-control" name="qq" placeholder="请输入QQ号码"/> </div> <div class="form-group"> <label for="email">Email:</label> <input type="text" class="form-control" name="email" placeholder="请输入邮箱地址"/> </div> <div class="form-group" style="text-align: center"> <input class="btn btn-primary" type="submit" value="提交" /> <input class="btn btn-default" type="reset" value="重置" /> <input class="btn btn-default" type="button" value="返回" /> </div> </form> </div> </body> </html>并修改
list.jsp中添加联系人按钮的超链接使其指向add.jsp页面[外链图片转存失败,源站可能有防盗链机制,建议将图片保存下来直接上传(img-miZNWd9x-1616748924631)(C:\Users\Liu Fei\AppData\Roaming\Typora\typora-user-images\image-20201109172004690.png)]
-
新建
AddUserServlet@WebServlet("/addUserServlet") public class AddUserServlet extends HttpServlet { @Override protected void doPost(HttpServletRequest req, HttpServletResponse resp) throws ServletException, IOException { //1.设置编码 req.setCharacterEncoding("utf-8"); //2.获取参数 Map<String,String[]> map=req.getParameterMap(); //3.封装对象 User user=new User(); try { BeanUtils.populate(user, map); } catch (IllegalAccessException e) { e.printStackTrace(); } catch (InvocationTargetException e) { e.printStackTrace(); } //4.调用service保存 UserService service=new UserServiceImpl(); service.addUser(user); //5.跳转到UserListServlet resp.sendRedirect(req.getContextPath()+"/userListServlet"); } @Override protected void doGet(HttpServletRequest req, HttpServletResponse resp) throws ServletException, IOException { this.doPost(req,resp); } } -
在
Service和UserDao中添加add()方法Service://UserService /** * 用户管理的业务接口 */ public interface UserService { /** * 查询所有用户信息 * @return */ public List<User> findAll(); /** * 登录方法 * @param loginUser * @return */ public User login(User loginUser); /** * 保存User * @param user */ public void addUser(User user); }//UserServiceImpl public class UserServiceImpl implements UserService{ private UserDao dao=new UserDaoImpl(); @Override public List<User> findAll() { //调用dao完成查询 return dao.findAll(); } @Override public void addUser(User user) { dao.add(user); } @Override public User login(User loginUser) { return dao.findUserByUsernameAndPassWord(loginUser.getUsername(),loginUser.getPassword()); } }Dao:package com.uestc.dao; import java.util.List; /** * 用户操作的DAO */ public interface UserDao { public List<User> findAll(); public User findUserByUsernameAndPassWord(String userName, String password); public void add(User user); }package com.uestc.dao.impl; public class UserDaoImpl implements UserDao { private JdbcTemplate template=new JdbcTemplate(JDBCUtils.getDataSource()); @Override public List<User> findAll() { //使用JDBC完成查询 //1.定义sql String sql="select * from user"; List<User> list= template.query(sql,new BeanPropertyRowMapper<User>(User.class)); return list; } @Override public User findUserByUsernameAndPassWord(String username, String password) { try{ String sql="select * from user where username=? and password = ?"; User user=template.queryForObject(sql, new BeanPropertyRowMapper<User>(User.class),username,password); return user; }catch (Exception e){ e.printStackTrace(); return null; } } @Override public void add(User user) { //定义sql String sql="insert into user value(null,?,?,?,?,?,?,null,null)"; //执行sql template.update(sql,user.getName(),user.getGender(),user.getAge(),user.getAddress(),user.getQq(),user.getEmail()); } }效果展示

9.44 删除功能

-
修改
list.jsp中删除选项使其指向deleteUserServlet,并将需要删除的id传入参数中
-
创建
DeleteUserServlet@WebServlet("/deleteUserServlet") public class DeleteUserServlet extends HttpServlet { @Override protected void doPost(HttpServletRequest req, HttpServletResponse resp) throws ServletException, IOException { //1.设置编码 req.setCharacterEncoding("utf-8"); //2.获取参数id String id=req.getParameter("id"); //3.调用service删除 UserService serive=new UserServiceImpl(); serive.deleteUser(id); //4.跳转查询所有的servlet resp.sendRedirect(req.getContextPath()+"/userListServlet"); } @Override protected void doGet(HttpServletRequest req, HttpServletResponse resp) throws ServletException, IOException { this.doPost(req,resp); } } -
在
Service和UserDao中添加delete()方法Service:package com.uestc.service; /** * 用户管理的业务接口 */ public interface UserService { /** * 查询所有用户信息 * @return */ public List<User> findAll(); /** * 登录方法 * @param loginUser * @return */ public User login(User loginUser); /** * 保存User * @param user */ public void addUser(User user); /** * 删除user * @param id */ public void deleteUser(String id); }package com.uestc.service.impl; public class UserServiceImpl implements UserService{ private UserDao dao=new UserDaoImpl(); @Override public List<User> findAll() { //调用dao完成查询 return dao.findAll(); } @Override public void addUser(User user) { dao.add(user); } @Override public void deleteUser(String id) { dao.delete(Integer.valueOf(id)); } @Override public User login(User loginUser) { return dao.findUserByUsernameAndPassWord(loginUser.getUsername(),loginUser.getPassword()); } }DAO:package com.uestc.dao; /** * 用户操作的DAO */ public interface UserDao { public List<User> findAll(); public User findUserByUsernameAndPassWord(String userName, String password); public void add(User user); public void delete(int id); }package com.uestc.dao.impl; public class UserDaoImpl implements UserDao { private JdbcTemplate template=new JdbcTemplate(JDBCUtils.getDataSource()); @Override public List<User> findAll() { //使用JDBC完成查询 //1.定义sql String sql="select * from user"; List<User> list= template.query(sql,new BeanPropertyRowMapper<User>(User.class)); return list; } @Override public User findUserByUsernameAndPassWord(String username, String password) { try{ String sql="select * from user where username=? and password = ?"; User user=template.queryForObject(sql, new BeanPropertyRowMapper<User>(User.class),username,password); return user; }catch (Exception e){ e.printStackTrace(); return null; } } @Override public void add(User user) { //定义sql String sql="insert into user value(null,?,?,?,?,?,?,null,null)"; //执行sql template.update(sql,user.getName(),user.getGender(),user.getAge(),user.getAddress(),user.getQq(),user.getEmail()); } @Override public void delete(int id) { //定义sql String sql="delete from user where id=?"; //执行sql template.update(sql,id); } }效果展示:

**问题:**为了防止误删,需要添加提醒


<!--list.jsp-->
<%@ page contentType="text/html;charset=UTF-8" language="java" %>
<%@taglib prefix="c" uri="http://java.sun.com/jsp/jstl/core" %>
<!DOCTYPE html>
<!-- 网页使用的语言 -->
<html lang="zh-CN">
<head>
<!-- 指定字符集 -->
<meta charset="utf-8">
<!-- 使用Edge最新的浏览器的渲染方式 -->
<meta http-equiv="X-UA-Compatible" content="IE=edge">
<!-- viewport视口:网页可以根据设置的宽度自动进行适配,在浏览器的内部虚拟一个容器,容器的宽度与设备的宽度相同。
width: 默认宽度与设备的宽度相同
initial-scale: 初始的缩放比,为1:1 -->
<meta name="viewport" content="width=device-width, initial-scale=1">
<!-- 上述3个meta标签*必须*放在最前面,任何其他内容都*必须*跟随其后! -->
<title>用户信息管理系统</title>
<!-- 1. 导入CSS的全局样式 -->
<link href="css/bootstrap.min.css" rel="stylesheet">
<!-- 2. jQuery导入,建议使用1.9以上的版本 -->
<script src="js/jquery-2.1.0.min.js"></script>
<!-- 3. 导入bootstrap的js文件 -->
<script src="js/bootstrap.min.js"></script>
<style type="text/css">
td, th {
text-align: center;
}
</style>
<script>
function deleteUser(id) {
//用户安全提示
if(confirm("您确定删除么?")){
//访问路径
location.href="${pageContext.request.contextPath}/deleteUserServlet?id="+id;
}
}
</script>
</head>
<body>
<div class="container">
<h3 style="text-align: center">用户信息列表</h3>
<div style="float: left;">
<form class="form-inline">
<div class="form-group">
<label for="exampleInputName2">姓名</label>
<input type="text" class="form-control" id="exampleInputName2" >
</div>
<div class="form-group">
<label for="exampleInputName3">籍贯</label>
<input type="text" class="form-control" id="exampleInputName3" >
</div>
<div class="form-group">
<label for="exampleInputEmail2">邮箱</label>
<input type="email" class="form-control" id="exampleInputEmail2" >
</div>
<button type="submit" class="btn btn-default">查询</button>
</form>
</div>
<div style="float: right;margin: 5px;">
<a class="btn btn-primary" href="${pageContext.request.contextPath}/add.jsp">添加联系人</a>
<a class="btn btn-primary" href="add.html">删除选中</a>
</div>
<table border="1" class="table table-bordered table-hover">
<tr class="success">
<th><input type="checkbox"></th>
<th>编号</th>
<th>姓名</th>
<th>性别</th>
<th>年龄</th>
<th>籍贯</th>
<th>QQ</th>
<th>邮箱</th>
<th>操作</th>
</tr>
<c:forEach items="${users}" var="user" varStatus="s">
<tr>
<td><input type="checkbox"></td>
<td>${s.count}</td>
<td>${user.name}</td>
<td>${user.gender}</td>
<td>${user.age}</td>
<td>${user.address}</td>
<td>${user.qq}</td>
<td>${user.email}</td>
<td><a class="btn btn-default btn-sm" href="update.html">修改</a>
<a class="btn btn-default btn-sm" href="javascript:deleteUser(${user.id})">删除</a></td>
</tr>
</c:forEach>
</table>
<div>
<nav aria-label="Page navigation">
<ul class="pagination">
<li>
<a href="#" aria-label="Previous">
<span aria-hidden="true">«</span>
</a>
</li>
<li><a href="#">1</a></li>
<li><a href="#">2</a></li>
<li><a href="#">3</a></li>
<li><a href="#">4</a></li>
<li><a href="#">5</a></li>
<li>
<a href="#" aria-label="Next">
<span aria-hidden="true">»</span>
</a>
</li>
<span style="font-size: 25px;margin-left: 5px;">
共16条记录,共4页
</span>
</ul>
</nav>
</div>
</div>
</body>
</html>

9.45 修改功能

-
修改
list.jsp中修改使其指向findUserServlet

-
新建
FindUserServlet目的:是先根据
id获取user,然后再update.jsp中回显原有的user信息package com.uestc.web.servlet; @WebServlet("/findUserServlet") public class FindUserServlet extends HttpServlet { @Override protected void doPost(HttpServletRequest req, HttpServletResponse resp) throws ServletException, IOException { UserService service=new UserServiceImpl(); //1.获取id String id=req.getParameter("id"); //2.根据id查找user User user=service.findUserById(id); //3.将user信息存入request域中 req.setAttribute("user",user); //3.跳转update.jsp req.getRequestDispatcher("/update.jsp").forward(req,resp); } @Override protected void doGet(HttpServletRequest req, HttpServletResponse resp) throws ServletException, IOException { this.doPost(req,resp); } } -
新建
update.jsp注意:
-
在
FindUserServlet中已经将查到的User中的信息保存在request域中, 我们只需要通过el和jstl表达式获取 -
将
action指向UpdateServlet -
创建隐藏域,传递
id
<%@ page contentType="text/html;charset=UTF-8" language="java" %> <%@ taglib prefix="c" uri="http://java.sun.com/jsp/jstl/core"%> <!DOCTYPE html> <!-- 网页使用的语言 --> <html lang="zh-CN"> <head> <!-- 指定字符集 --> <meta charset="utf-8"> <meta http-equiv="X-UA-Compatible" content="IE=edge"> <meta name="viewport" content="width=device-width, initial-scale=1"> <title>修改用户</title> <link href="css/bootstrap.min.css" rel="stylesheet"> <script src="js/jquery-2.1.0.min.js"></script> <script src="js/bootstrap.min.js"></script> </head> <body> <div class="container" style="width: 400px;"> <h3 style="text-align: center;">修改联系人</h3> <form action="${pageContext.request.contextPath}/updateServlet" method="post"> <!--隐藏域提交id--> <input type="hidden" name="id" value="${user.id}"> <div class="form-group"> <label for="name">姓名:</label> <input type="text" class="form-control" id="name" name="name" value="${user.name}" readonly="readonly" /> </div> <div class="form-group"> <label>性别:</label> <c:if test="${user.gender=='男'}"> <input type="radio" name="gender" value="男" checked />男 <input type="radio" name="gender" value="女" />女 </c:if> <c:if test="${user.gender=='女'}"> <input type="radio" name="gender" value="男" />男 <input type="radio" name="gender" value="女" checked />女 </c:if> </div> <div class="form-group"> <label for="age">年龄:</label> <input type="text" class="form-control" id="age" name="age" value="${user.age}" /> </div> <div class="form-group"> <label for="address">籍贯:</label> <select name="address" class="form-control" > <c:if test="${user.address=='安徽'}"> <option value="安徽" selected>安徽</option> <option value="广西">广西</option> <option value="湖南">湖南</option> </c:if> <c:if test="${user.address=='广东'}"> <option value="安徽" >安徽</option> <option value="广东" selected>广东</option> <option value="湖南">湖南</option> </c:if> <c:if test="${user.address=='湖南'}"> <option value="安徽" >安徽</option> <option value="广东">广东</option> <option value="湖南" selected>湖南</option> </c:if> </select> </div> <div class="form-group"> <label for="qq">QQ:</label> <input type="text" class="form-control" name="qq" value="${user.qq}"/> </div> <div class="form-group"> <label for="email">Email:</label> <input type="text" class="form-control" name="email" value="${user.email}" /> </div> <div class="form-group" style="text-align: center"> <input class="btn btn-primary" type="submit" value="提交" /> <input class="btn btn-default" type="reset" value="重置" /> <input class="btn btn-default" type="button" value="返回"/> </div> </form> </div> </body> </html> -
-
新建
UpdateServletpackage com.uestc.web.servlet; import com.uestc.dao.User; import com.uestc.service.UserService; import com.uestc.service.impl.UserServiceImpl; import org.apache.commons.beanutils.BeanUtils; import javax.servlet.ServletException; import javax.servlet.annotation.WebServlet; import javax.servlet.http.HttpServlet; import javax.servlet.http.HttpServletRequest; import javax.servlet.http.HttpServletResponse; import java.io.IOException; import java.lang.reflect.InvocationTargetException; import java.util.Map; @WebServlet("/updateServlet") public class UpdateServlet extends HttpServlet{ @Override protected void doPost(HttpServletRequest req, HttpServletResponse resp) throws ServletException, IOException { //1.设置编码 req.setCharacterEncoding("utf-8"); //2.获取表单参数 Map<String,String[]> map=req.getParameterMap(); System.out.println(map.get("id")); //3.封装user对象 User user=new User(); try { BeanUtils.populate(user,map); } catch (IllegalAccessException e) { e.printStackTrace(); } catch (InvocationTargetException e) { e.printStackTrace(); } //4.调用service的update方法; UserService service=new UserServiceImpl(); service.updateUser(user); //5.跳转到查询所有 resp.sendRedirect(req.getContextPath()+"/userListServlet"); } @Override protected void doGet(HttpServletRequest req, HttpServletResponse resp) throws ServletException, IOException { this.doPost(req,resp); } } -
在
Userservice及其实现类UserserviceImpl中添加update方法package com.uestc.service; import com.uestc.dao.User; import java.util.List; /** * 用户管理的业务接口 */ public interface UserService { /** * 查询所有用户信息 * @return */ public List<User> findAll(); /** * 登录方法 * @param loginUser * @return */ public User login(User loginUser); /** * 保存User * @param user */ public void addUser(User user); /** * 删除User * @param id */ public void deleteUser(String id); /** * 根据id查找用户 * @param id * @return */ public User findUserById(String id); /** * 更新User * @param user */ public void updateUser(User user); }package com.uestc.service.impl; import com.uestc.dao.User; import com.uestc.dao.UserDao; import com.uestc.dao.impl.UserDaoImpl; import com.uestc.service.UserService; import java.util.List; public class UserServiceImpl implements UserService{ private UserDao dao=new UserDaoImpl(); @Override public List<User> findAll() { //调用dao完成查询 return dao.findAll(); } @Override public void addUser(User user) { dao.add(user); } @Override public void deleteUser(String id) { dao.delete(Integer.valueOf(id)); } @Override public User findUserById(String id) { return dao.findUserById(Integer.valueOf(id)); } @Override public void updateUser(User user) { dao.update(user); } @Override public User login(User loginUser) { return dao.findUserByUsernameAndPassWord(loginUser.getUsername(),loginUser.getPassword()); } } -
在
UserDao及其实现类UserDaoImpl中添加update方法package com.uestc.dao; import java.util.List; /** * 用户操作的DAO */ public interface UserDao { public List<User> findAll(); public User findUserByUsernameAndPassWord(String userName, String password); public void add(User user); public void delete(int id); public User findUserById(int id); public void update(User user); }package com.uestc.dao.impl; public class UserDaoImpl implements UserDao { private JdbcTemplate template=new JdbcTemplate(JDBCUtils.getDataSource()); @Override public List<User> findAll() { //使用JDBC完成查询 //1.定义sql String sql="select * from user"; List<User> list= template.query(sql,new BeanPropertyRowMapper<User>(User.class)); return list; } @Override public User findUserByUsernameAndPassWord(String username, String password) { try{ String sql="select * from user where username=? and password = ?"; User user=template.queryForObject(sql, new BeanPropertyRowMapper<User>(User.class),username,password); return user; }catch (Exception e){ e.printStackTrace(); return null; } } @Override public void add(User user) { //定义sql String sql="insert into user value(null,?,?,?,?,?,?,null,null)"; //执行sql template.update(sql,user.getName(),user.getGender(),user.getAge(),user.getAddress(),user.getQq(),user.getEmail()); } @Override public void delete(int id) { //定义sql String sql="delete from user where id=?"; //执行sql template.update(sql,id); } @Override public void update(User user) { String sql = "update user set name = ?,gender = ? ,age = ? , address = ? , qq = ?, email = ? where id = ?"; template.update(sql, user.getName(), user.getGender(), user.getAge(), user.getAddress(), user.getQq(), user.getEmail(), user.getId()); } @Override public User findUserById(int id) { //定义sql String sql="select * from user where id=?"; //执行sql try { User user=template.queryForObject(sql,new BeanPropertyRowMapper<User>(User.class),id); return user; } catch (DataAccessException e) { e.printStackTrace(); return null; } } }
效果展示:*


9.46 删除选中功能

-
完成
全选功能
首先需要用
form包裹table,并为每个选中按钮添加id
然后通过
javascript来给删除选中按钮绑定单击事件[外链图片转存失败,源站可能有防盗链机制,建议将图片保存下来直接上传(img-6uyLd5ia-1616748924644)(C:\Users\Liu Fei\AppData\Roaming\Typora\typora-user-images\image-20201112100143949.png)]

<%@ page contentType="text/html;charset=UTF-8" language="java" %> <%@taglib prefix="c" uri="http://java.sun.com/jsp/jstl/core" %> <!DOCTYPE html> <!-- 网页使用的语言 --> <html lang="zh-CN"> <head> <!-- 指定字符集 --> <meta charset="utf-8"> <!-- 使用Edge最新的浏览器的渲染方式 --> <meta http-equiv="X-UA-Compatible" content="IE=edge"> <!-- viewport视口:网页可以根据设置的宽度自动进行适配,在浏览器的内部虚拟一个容器,容器的宽度与设备的宽度相同。 width: 默认宽度与设备的宽度相同 initial-scale: 初始的缩放比,为1:1 --> <meta name="viewport" content="width=device-width, initial-scale=1"> <!-- 上述3个meta标签*必须*放在最前面,任何其他内容都*必须*跟随其后! --> <title>用户信息管理系统</title> <!-- 1. 导入CSS的全局样式 --> <link href="css/bootstrap.min.css" rel="stylesheet"> <!-- 2. jQuery导入,建议使用1.9以上的版本 --> <script src="js/jquery-2.1.0.min.js"></script> <!-- 3. 导入bootstrap的js文件 --> <script src="js/bootstrap.min.js"></script> <style type="text/css"> td, th { text-align: center; } </style> <script> function deleteUser(id) { //用户安全提示 if(confirm("您确定删除么?")){ //访问路径 location.href="${pageContext.request.contextPath}/deleteUserServlet?id="+id; } } window.οnlοad=function() { //给删除选中按钮添加单击事件 document.getElementById("delSelected").οnclick=function(){ //表单提交 document.getElementById("form").submit(); } //全选功能 //获取第一个cb document.getElementById("firstCb").οnclick= function(){ //获取下面列表中所有的cb var cbs= document.getElementsByName("uid"); //遍历 for(var i=0;i< cbs.length;i++){ //4.设置这些cbs[i]的状态=firstCb.checked //cbs[i].checked=this.checked; cbs[i].checked = this.checked; } } } </script> </head> <body> <div class="container"> <h3 style="text-align: center">用户信息列表</h3> <div style="float: left;"> <form class="form-inline"> <div class="form-group"> <label for="exampleInputName2">姓名</label> <input type="text" class="form-control" id="exampleInputName2" > </div> <div class="form-group"> <label for="exampleInputName3">籍贯</label> <input type="text" class="form-control" id="exampleInputName3" > </div> <div class="form-group"> <label for="exampleInputEmail2">邮箱</label> <input type="email" class="form-control" id="exampleInputEmail2" > </div> <button type="submit" class="btn btn-default">查询</button> </form> </div> <div style="float: right;margin: 5px;"> <a class="btn btn-primary" href="${pageContext.request.contextPath}/add.jsp">添加联系人</a> <a class="btn btn-primary" href="javascript:void(0);" id="delSelected">删除选中</a> </div> <form id="form" action="${pageContext.request.contextPath}/delSelectServlet" method="post"> <table border="1" class="table table-bordered table-hover"> <tr class="success"> <th><input type="checkbox" id="firstCb"></th> <th>编号</th> <th>姓名</th> <th>性别</th> <th>年龄</th> <th>籍贯</th> <th>QQ</th> <th>邮箱</th> <th>操作</th> </tr> <c:forEach items="${users}" var="user" varStatus="s"> <tr> <td><input type="checkbox" name="uid" value="${user.id}"></td> <td>${s.count}</td> <td>${user.name}</td> <td>${user.gender}</td> <td>${user.age}</td> <td>${user.address}</td> <td>${user.qq}</td> <td>${user.email}</td> <td><a class="btn btn-default btn-sm" href="${pageContext.request.contextPath}/findUserServlet?id=${user.id}">修改</a> <a class="btn btn-default btn-sm" href="javascript:deleteUser(${user.id})">删除</a></td> </tr> </c:forEach> </table> </form> <div> <nav aria-label="Page navigation"> <ul class="pagination"> <li> <a href="#" aria-label="Previous"> <span aria-hidden="true">«</span> </a> </li> <li><a href="#">1</a></li> <li><a href="#">2</a></li> <li><a href="#">3</a></li> <li><a href="#">4</a></li> <li><a href="#">5</a></li> <li> <a href="#" aria-label="Next"> <span aria-hidden="true">»</span> </a> </li> <span style="font-size: 25px;margin-left: 5px;"> 共16条记录,共4页 </span> </ul> </nav> </div> </div> </body> </html> -
完成
删除选中功能,新建delSelectServletpackage com.uestc.web.servlet; @WebServlet("/delSelectServlet") public class DelSelectServlet extends HttpServlet { protected void doPost(HttpServletRequest request, HttpServletResponse response) throws ServletException, IOException { //1.获取所有id String [] ids=request.getParameterValues("uid"); //2.调用service删除 UserService service=new UserServiceImpl(); service.delSelectedUser(ids); //3.跳转到查询所有的servlet response.sendRedirect(request.getContextPath()+"/userListServlet"); } protected void doGet(HttpServletRequest request, HttpServletResponse response) throws ServletException, IOException { this.doPost(request,response); } } -
在
Userservice及其实现类UserserviceImpl中添加delSelectedUser方法package com.uestc.service; import com.uestc.dao.User; import java.util.List; /**
-
用户管理的业务接口
*/public interface UserService {
/**-
查询所有用户信息
- @return
*/
public List findAll();
/**
- @return
-
登录方法
- @param loginUser
- @return
*/
public User login(User loginUser);
/**
- 保存User
- @param user
*/
public void addUser(User user);
/**
- 删除User
- @param id
*/
public void deleteUser(String id);
/**
- 根据id查找用户
- @param id
- @return
*/
public User findUserById(String id);
/**
- 更新User
- @param user
*/
public void updateUser(User user);
/**
- 批量删除
- @param ids
*/
public void delSelectedUser(String []ids);
}
```java package com.uestc.service.impl; import com.uestc.dao.User; import com.uestc.dao.UserDao; import com.uestc.dao.impl.UserDaoImpl; import com.uestc.service.UserService; import java.util.List; public class UserServiceImpl implements UserService{ private UserDao dao=new UserDaoImpl(); @Override public List<User> findAll() { //调用dao完成查询 return dao.findAll(); } @Override public void addUser(User user) { dao.add(user); } @Override public void deleteUser(String id) { dao.delete(Integer.valueOf(id)); } @Override public User findUserById(String id) { return dao.findUserById(Integer.valueOf(id)); } @Override public void updateUser(User user) { dao.update(user); } @Override public void delSelectedUser(String [] ids) { //1.遍历 for(String id :ids){ dao.delete(Integer.valueOf(id)); } } @Override public User login(User loginUser) { return dao.findUserByUsernameAndPassWord(loginUser.getUsername(),loginUser.getPassword()); } }效果展示:
- 删除部分选中:


- 删除全选


-
优化:
问题:没有选中任何复选框,点击删除选中会出现空指针异常,并且需要删除提示


解决:
<script>
       function deleteUser(id) {
           //用户安全提示
           if(confirm("您确定删除么?")){
               //访问路径
               location.href="${pageContext.request.contextPath}/deleteUserServlet?id="+id;
           }

       }
       window.οnlοad=function() {
           //给删除选中按钮添加单击事件
           document.getElementById("delSelected").οnclick=function(){
               var flag=false;
               if(confirm("您确定要删除选中条目么?")){
                   var cbs= document.getElementsByName("uid");
                   for(var i=0;i<cbs.length;i++){
                       if(cbs[i].checked){
                           flag=true;
                           break;
                       }
                   }
                   if(flag){
                       //表单提交
                       document.getElementById("form").submit();
                   }
               }
           }
           //全选功能
           //获取第一个cb
           document.getElementById("firstCb").οnclick= function(){
               //获取下面列表中所有的cb
               var cbs= document.getElementsByName("uid");
               //遍历
               for(var i=0;i< cbs.length;i++){
                   //4.设置这些cbs[i]的状态=firstCb.checked
                   //cbs[i].checked=this.checked;
                   cbs[i].checked = this.checked;
               }
           }
       }
    </script>
效果展示: 此时不会出现空指针异常


9.47 分页查询

10. Filter:过滤器
10.1 概念
生活中的过滤器:净水器, 空气净化器,土匪、
web中的过滤器:当访问服务器的资源时,过滤器可以将请求拦截下来,完成一些特殊的功能。
过滤器的作用:一般用于完成通用的操作。如:登录验证、统一编码处理、敏感字符过滤…

10.2 快速入门:
10.3 步骤:
- 定义一个类,实现接口
Filter - 复写方法
- 配置拦截路径
web.xml- 注解
示例:
package com.uestc.web.filter;
import javax.servlet.*;
import javax.servlet.annotation.WebFilter;
import java.io.IOException;

@WebFilter("/*")//访问所有资源之前,都会执行该过滤器
public class FilterDemo1 implements Filter {
    @Override
    public void init(FilterConfig filterConfig) throws ServletException {

    }
    @Override
    public void doFilter(ServletRequest servletRequest, ServletResponse servletResponse, FilterChain filterChain) throws IOException, ServletException {
        System.out.println("filterDemo1被执行了。。。");
        //放行
        filterChain.doFilter(servletRequest,servletResponse);
    }

    @Override
    public void destroy() {

    }
}

10.3 过滤器细节:
10.31 web.xml配置
<?xml version="1.0" encoding="UTF-8"?>
<web-app xmlns="http://xmlns.jcp.org/xml/ns/javaee"
         xmlns:xsi="http://www.w3.org/2001/XMLSchema-instance"
         xsi:schemaLocation="http://xmlns.jcp.org/xml/ns/javaee http://xmlns.jcp.org/xml/ns/javaee/web-app_3_1.xsd"
         version="3.1">
        <filter>
            <filter-name>demo1</filter-name>
            <filter-class>com.uestc.web.filter.FilterDemo1</filter-class>
        </filter>
        <filter-mapping>
            <filter-name>demo1</filter-name>
            <!-- 拦截路径 -->
            <url-pattern>/*</url-pattern>
        </filter-mapping>
</web-app>
10.32 过滤器执行流程
-
执行过滤器
-
执行放行后的资源
-
回来执行过滤器放行代码下边的代码
package com.uestc.web.filter;
import javax.servlet.*;
import javax.servlet.annotation.WebFilter;
import java.io.IOException;
@WebFilter("/*")//访问所有资源之前,都会执行该过滤器
public class FilterDemo2 implements Filter {
    @Override
    public void init(FilterConfig filterConfig) throws ServletException {

    }
    @Override
    public void doFilter(ServletRequest servletRequest, ServletResponse servletResponse, FilterChain filterChain) throws IOException, ServletException {
        //对request对象请求消息增强
        System.out.println("filterDemo2被执行了。。。");
        //放行
        filterChain.doFilter(servletRequest,servletResponse);
		//对response对象的响应消息增强
        System.out.println("filterDemo2回来了。。。");
    }
    @Override
    public void destroy() {
    }
}

10.33 过滤器生命周期方法
init:在服务器启动后,会创建Filter对象,然后调用init方法。只执行一次。用于加载资源doFilter:每一次请求被拦截资源时,会执行。执行多次destroy:在服务器关闭后,Filter对象被销毁。如果服务器是正常关闭,则会执行destroy方法。只执行一次。用于释放资源
10.4 过滤器配置详解
拦截路径配置:
- 具体资源路径:
/index.jsp只有访问index.jsp资源时,过滤器才会被执行 - 拦截目录:
/user/*访问/user下的所有资源时,过滤器都会被执行 - 后缀名拦截:
*.jsp访问所有后缀名为jsp资源时,过滤器都会被执行 - 拦截所有资源:
/*访问所有资源时,过滤器都会被执行
拦截方式配置:
资源被访问的方式
10.41 注解配置:
设置dispatcherTypes属性
REQUEST:默认值。浏览器直接请求资源FORWARD:转发访问资源INCLUDE:包含访问资源ERROR:错误跳转资源ASYNC:异步访问资源
示例演示:
-
新建过滤器
FilterDemo3并设置dispatcherTypes属性为REQUESTpackage com.uestc.web.filter; import javax.servlet.*; import javax.servlet.annotation.WebFilter; import java.io.IOException; //浏览器直接请求index.jsp资源是,该该过滤器会被执行 @WebFilter( value="/index.jsp", dispatcherTypes = DispatcherType.REQUEST) public class FilterDemo3 implements Filter { public void destroy() { } public void doFilter(ServletRequest req, ServletResponse resp, FilterChain chain) throws ServletException, IOException { System.out.println("FilterDemo3执行了。。。"); chain.doFilter(req, resp); } public void init(FilterConfig config) throws ServletException { } } -
新建
ServletDemo1并对index.jsp进行转发package com.uestc.web.servlet; import javax.servlet.ServletException; import javax.servlet.annotation.WebServlet; import javax.servlet.http.HttpServlet; import javax.servlet.http.HttpServletRequest; import javax.servlet.http.HttpServletResponse; import java.io.IOException; @WebServlet("/user/servletDemo1") public class ServletDemo1 extends HttpServlet { protected void doPost(HttpServletRequest request, HttpServletResponse response) throws ServletException, IOException { request.getRequestDispatcher("/index.jsp").forward(request,response); } protected void doGet(HttpServletRequest request, HttpServletResponse response) throws ServletException, IOException { this.doPost(request,response); } }效果展示:
- 当直接访问
index.jsp的时候,过滤器被执行了

-
当访问
/user/servletDemo1时候,过滤器没有执行
**同理可得:**当设置
dispatcherTypes属性为FORWARD的时候- 当直接访问
index.jsp的时候,过滤器不会执行 - 当访问
/user/servletDemo1时候,过滤器执行
如果想要同时index.jsp和转发资源的时候过滤器都执行,那么我们只需要
dispatcherTypes设置成数组形式@WebFilter( value="/index.jsp", dispatcherTypes = {DispatcherType.REQUEST,DispatcherType.`FORWARD`}) - 当直接访问
10.42 web.xml配置
设置<dispatcher></dispatcher>标签即可

10.5 滤器链(配置多个过滤器)
10.51 执行顺序:
如果有两个过滤器:过滤器1和过滤器2
- 过滤器1
- 过滤器2
- 资源执行
- 过滤器2
- 过滤器1
10.52 过滤器先后顺序问题:
- 注解配置:按照类名的字符串比较规则比较,值小的先执行
如: AFilter 和 BFilter,AFilter就先执行了。
- web.xml配置:
<filter-mapping>谁定义在上边,谁先执行
10.6 案例1_登录验证
需求:
- 访问day17_case案例的资源。验证其是否登录
- 如果登录了,则直接放行。
- 如果没有登录,则跳转到登录页面,提示"您尚未登录,请先登录"。
分析:

代码实现:
新建LoginFilter
package com.uestc.web.filter;
import javax.servlet.*;
import javax.servlet.annotation.WebFilter;
import javax.servlet.http.HttpServlet;
import javax.servlet.http.HttpServletRequest;
import java.io.IOException;
@WebFilter("/*")
public class LoginFilter implements Filter {
    public void destroy() {
    }

    public void doFilter(ServletRequest req, ServletResponse resp, FilterChain chain) throws ServletException, IOException {
        //0.强制转换
        HttpServletRequest request=(HttpServletRequest) req;
        //1.获取资源的请求路径
        String uri=request.getRequestURI();
        //2.判断是否包含登录相关的资源路径,注意排除css/js/图片/验证码等资源
        if(uri.contains("/login.jsp")|| uri.contains("/loginServlet") || uri.contains("/css/") || uri.contains("/js/") || uri.contains("/fonts/")|| uri.contains("/checkCodeServlet")){
            //包含,用户就是想登录,放行
            chain.doFilter(req, resp);
        }else{
            //不包含,需要验证用户是否登录
            Object uesr=request.getSession().getAttribute("login_user");
            if(uesr!=null){
                //登录了,放行
                chain.doFilter(req,resp);
            }else{
                //没有登录,跳转登录界面
                request.setAttribute("login_msg","您尚未登录,请登录");
                request.getRequestDispatcher("/login.jsp").forward(request,resp);
            }
        }
    }
    public void init(FilterConfig config) throws ServletException {

    }

}

10.7 案例2_敏感词汇过滤
需求:
- 对day17_case案例录入的数据进行敏感词汇过滤
- 敏感词汇参考《敏感词汇.txt》
- 如果是敏感词汇,替换为 ***
分析:

- 对
request对象进行增强 , 增强获取参数相关方法 - 放行。传递代理对象
增强对象的功能:
设计模式:一些通用的解决固定问题的方式
- 装饰模式
- 代理模式
代码实现:
1、创建过滤器SensitiveWordFilter
package com.uestc.web.filter;
@WebFilter("/*")
public class SensitiveWordFilter implements Filter {
    public void destroy() {
    }
    public void doFilter(ServletRequest req, ServletResponse resp, FilterChain chain) throws ServletException, IOException {
        //1.创建代理对象,增强getParameter方法
        ServletRequest proxy_req=(ServletRequest)Proxy.newProxyInstance(req.getClass().getClassLoader(), req.getClass().getInterfaces(), new InvocationHandler() {
            @Override
            public Object invoke(Object proxy, Method method, Object[] args) throws Throwable {
                //增强getParameter方法
                //判断是否是getParameter方法
                if(method.getName().equals("getParameter")){
                    //增强返回值
                    String value=(String)method.invoke(req, args);
                    if(value!=null){
                        for(String str:list){
                            if(value.contains(str)){
                                value=value.replace(str,"***");
                            }
                        }
                    }
                    return value;
                }
                return method.invoke(req, args);
            }
        });
        chain.doFilter(proxy_req, resp);
    }
    private List<String> list=new ArrayList<String>();//敏感词汇list集合
    public void init(FilterConfig config) throws ServletException {
        try {
            //1.获取文件的真实路径
            ServletContext context=config.getServletContext();
            String realpath=context.getRealPath("/WEB-INF/classes/敏感词汇.txt");
            //2.读取文件
            BufferedReader br=new BufferedReader(new FileReader(realpath));
            //3.将文件的每一行数据添加到list
            String line=null;
            while((line=br.readLine())!=null){
                list.add(line);
            }
            br.close();
            System.out.println(list);
        } catch (Exception e) {
            e.printStackTrace();
        }
    }
}
2、 创建测试Testservlet
package com.uestc.web.servlet;
@WebServlet("/testServlet")
public class TestServlet extends HttpServlet {
    @Override
    protected void doPost(HttpServletRequest req, HttpServletResponse resp) throws ServletException, IOException {
        String name=req.getParameter("name");
        String msg=req.getParameter("msg");
        System.out.println(name+msg);
    }
    @Override
    protected void doGet(HttpServletRequest req, HttpServletResponse resp) throws ServletException, IOException {
        this.doPost(req,resp);
    }
}
效果展示:

11、JDBC
11.1 概念:
Java DataBase Connectivity Java 数据库连接, Java语言操作数据库
JDBC本质:
其实是官方(sun公司)定义的一套操作
所有关系型数据库的规则,即接口。各个数据库厂商去实现这套接口,提供数据库驱动jar包。我们可以使用这套接口(JDBC)编程,真正执行的代码是驱动jar包中的实现类。

JDBC是Java访问数据库的标准规范,真正怎么操作数据库还需要具体的实现类,也就是数据库驱动。每个数据库厂商根据自家数据库的通信格式编写好自己数据库的驱动。所以我们只需要会调用JDBC接口中的方法即可,数据库驱动由数据库厂商提供
使用JDBC的好处:
- 程序员如果要开发访问数据库的程序,只需要会调用JDBC接口中的方法即可,不用关注类是如何实现的。
- 使用同一套Java代码,进行少量的修改就可以访问其他JDBC支持的数据库

使用JDBC开发使用到的包:

JDBC的核心API
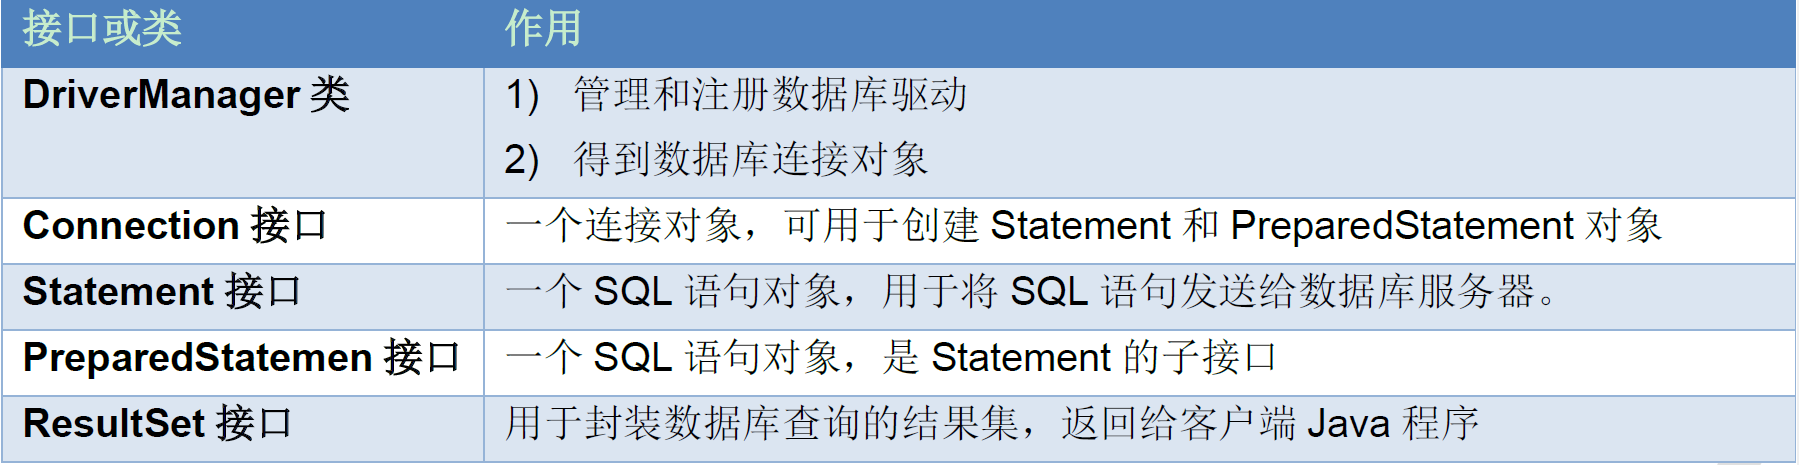
11.2 快速入门:
步骤:
1、 导入驱动jar包:mysql-connector-java-5.1.37-bin.jar
- 复制mysql-connector-java-5.1.37-bin.jar到项目的
libs目录下 右键–>Add As Library
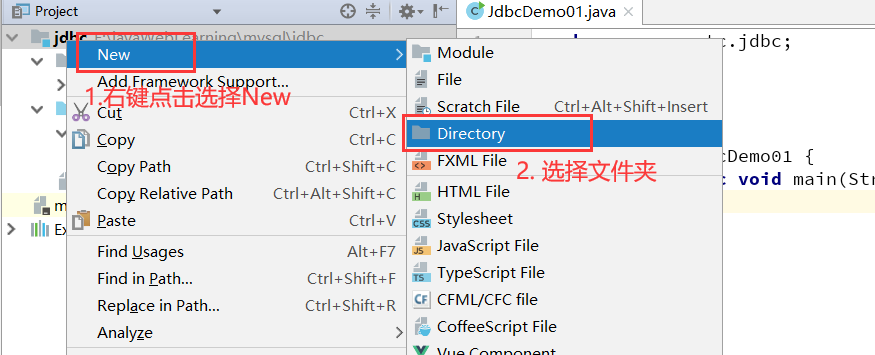


2、注册驱动

3、获取数据库连接对象Connection
4、定义sql
5、获取执行sql语句的对象 Statement
6、执行sql,接受返回结果
7、处理结果
8、释放资源
代码实现:
//1. 导入驱动jar包
//2.注册驱动
Class.forName("com.mysql.jdbc.Driver");
//3.获取数据库连接对象
Connection conn = DriverManager.getConnection("jdbc:mysql://localhost:3306/db3", "root", "root");
//4.定义sql语句
String sql = "update account set balance = 500 where id = 1";
//5.获取执行sql的对象 Statement
Statement stmt = conn.createStatement();
//6.执行sql
int count = stmt.executeUpdate(sql);
//7.处理结果
System.out.println(count);
//8.释放资源
stmt.close();
conn.close();
11.3 详解各个对象:
11.31 DriverManager:驱动管理类
DriverManager作用:
- 管理和注册驱动
- 创建数据库的连接
类中的方法:

使用JDBC连接数据库的四个参数:

连接数据库的URL地址格式:

MySQL写法:
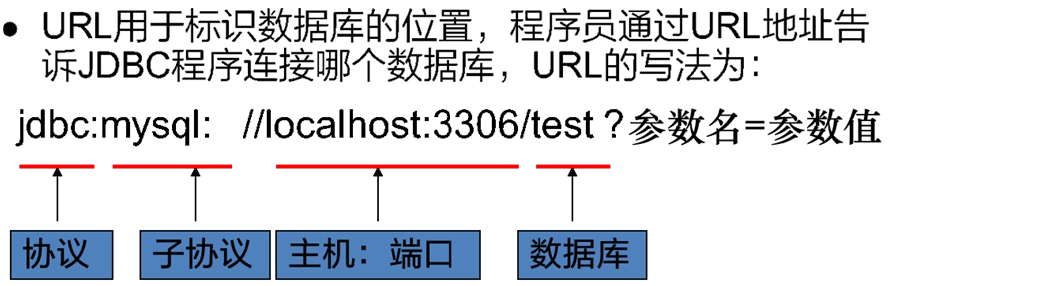
(1)注册驱动:告诉程序该使用哪一个数据库驱动jar
static void registerDriver(Driver driver) :注册与给定的驱动程序 DriverManager 。
写代码使用:Class.forName("com.mysql.jdbc.Driver");
通过查看源码发现:在com.mysql.jdbc.Driver类中存在静态代码块
static {
  try {
    java.sql.DriverManager.registerDriver(new Driver());
  } catch (SQLException E) {
    throw new RuntimeException("Can't register driver!");
  }
}
注意:mysql5之后的驱动jar包可以省略注册驱动的步骤。
(2)获取数据库连接:
方法:
static Connection getConnection(String url, String user, String password)
参数:
-
url:指定连接的路径语法:
jdbc:mysql://ip地址(域名):端口号/数据库名称例子:
jdbc:mysql://localhost:3306/db3细节:如果连接的是本机mysql服务器,并且mysql服务默认端口是
3306,则url可以简写为:jdbc:mysql:///数据库名称
user:用户名password:密码
11.32 Connection:数据库连接对象
Connection作用:
Connection接口,具体的实现类由数据库的厂商实现,代表一个连接对象
Connection方法:

1、获取执行sql 的对象
Statement createStatement()PreparedStatement prepareStatement(String sql)
2、管理事务:
- 开启事务:
setAutoCommit(boolean autoCommit):调用该方法设置参数为false,即开启事务 - 提交事务:
commit() - 回滚事务:
rollback()
11.33 Statement:执行sql的对象
JDBC访问数据库的步骤
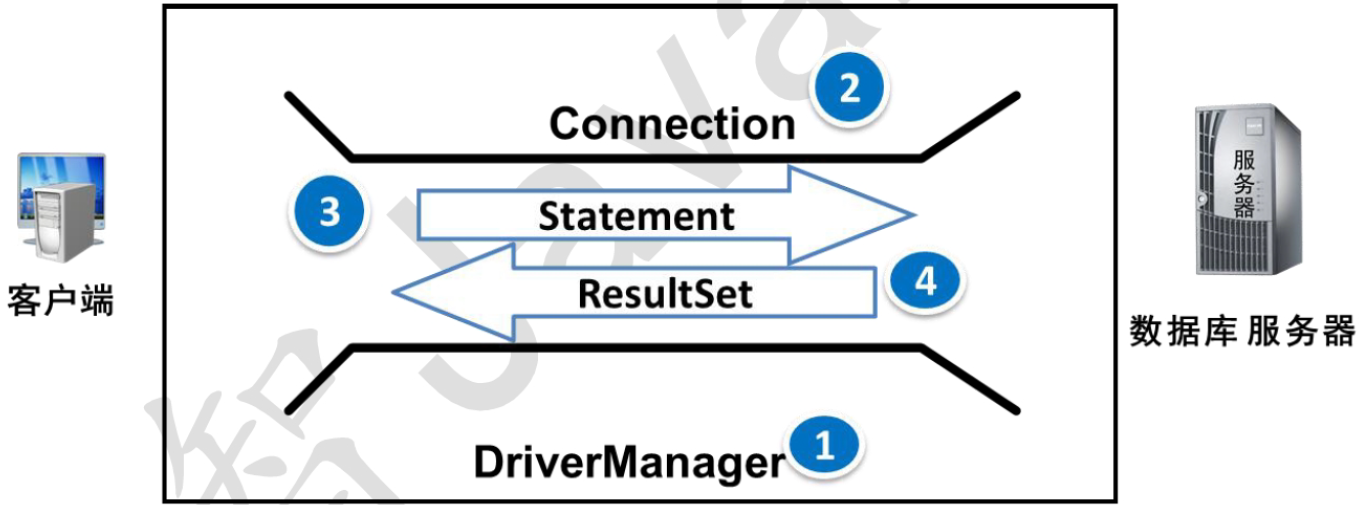
1.注册和加载驱动(可以省略)
2. 获取连接
3. Connection获取Statement对象
4. 使用Statement对象执行SQL语句
5. 返回结果集
6. 释放资源
Statement作用:
代表一条语句对象,用于发送SQL语句给服务器,用于执行静态 SQL 语句并返回它所生成结果的对象。
Statement中的方法:
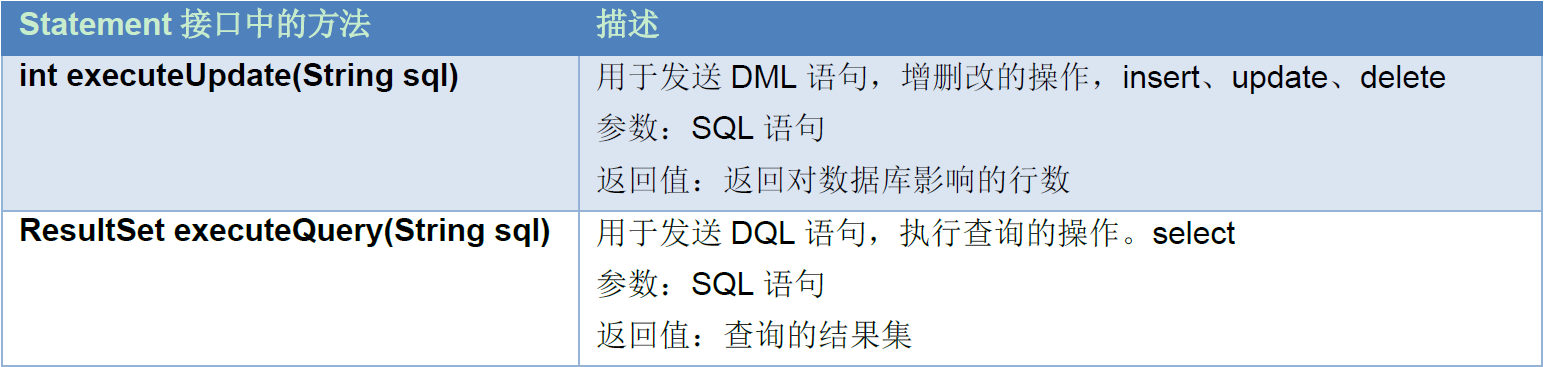
1、
boolean execute(String sql):可以执行任意的sql 了解
2、int executeUpdate(String sql):执行DML(insert、update、delete)语句、DDL(create,alter、drop)语句
- 返回值:影响的行数,可以通过这个影响的行数判断DML语句是否执行成功。
返回值>0的则执行成功,反之,则失败。3、
ResultSet executeQuery(String sql):执行DQL(select)语句
释放资源
需要释放的对象:
ResultSet结果集,Statement语句,Connection连接
释放原则:先开的后关,后开的先关。ResultSet->Statement->Connection
放在哪个代码块中:finally块
执行DML操作
需求: account表 添加一条记录,主键是自动增长
步骤:
- 创建连接对象
- 创建Statement语句对象
- 执行SQL语句:executeUpdate(sql)
- 返回影响的行数
- 释放资源
实现:
package src.com.uestc.jdbc;
import java.sql.*;
/**
 * account表 添加一条记录 insert语句
 */
public class JdbcDemo02 {
    public static void main(String[] args)  {
        Connection conn=null;
        Statement stmt=null;
        try {
            //1.注册驱动
            Class.forName("com.mysql.jdbc.Driver");
            //2.获取连接对象
            conn=DriverManager.getConnection("jdbc:mysql://localhost:3306/db3","root","287216");
            //3.创建sql语句
            String sql="insert into account (name,balance) values('刘飞',2000)";
            //4.创建statement对象
            stmt=conn.createStatement();
            //5.执行sql
            int count=0;
            //6.处理结果
            count= stmt.executeUpdate(sql);
            if(count>0){
                System.out.println("添加成功");
            }else{
                System.out.println("添加失败");
            }
        } catch (Exception e) {
            e.printStackTrace();
        } finally {
            //7. 释放资源
            //避免空指针异常
            if(stmt!=null){
                try {
                    stmt.close();
                } catch (SQLException e) {
                    e.printStackTrace();
                }
            }
            if(conn!=null){
                try {
                    conn.close();
                } catch (SQLException e) {
                    e.printStackTrace();
                }
            }
        }
    }
}
11.34 ResultSet:结果集对象,封装查询结果
作用:
封装数据库查询的结果集,对结果集进行遍历,取出每一条记录。
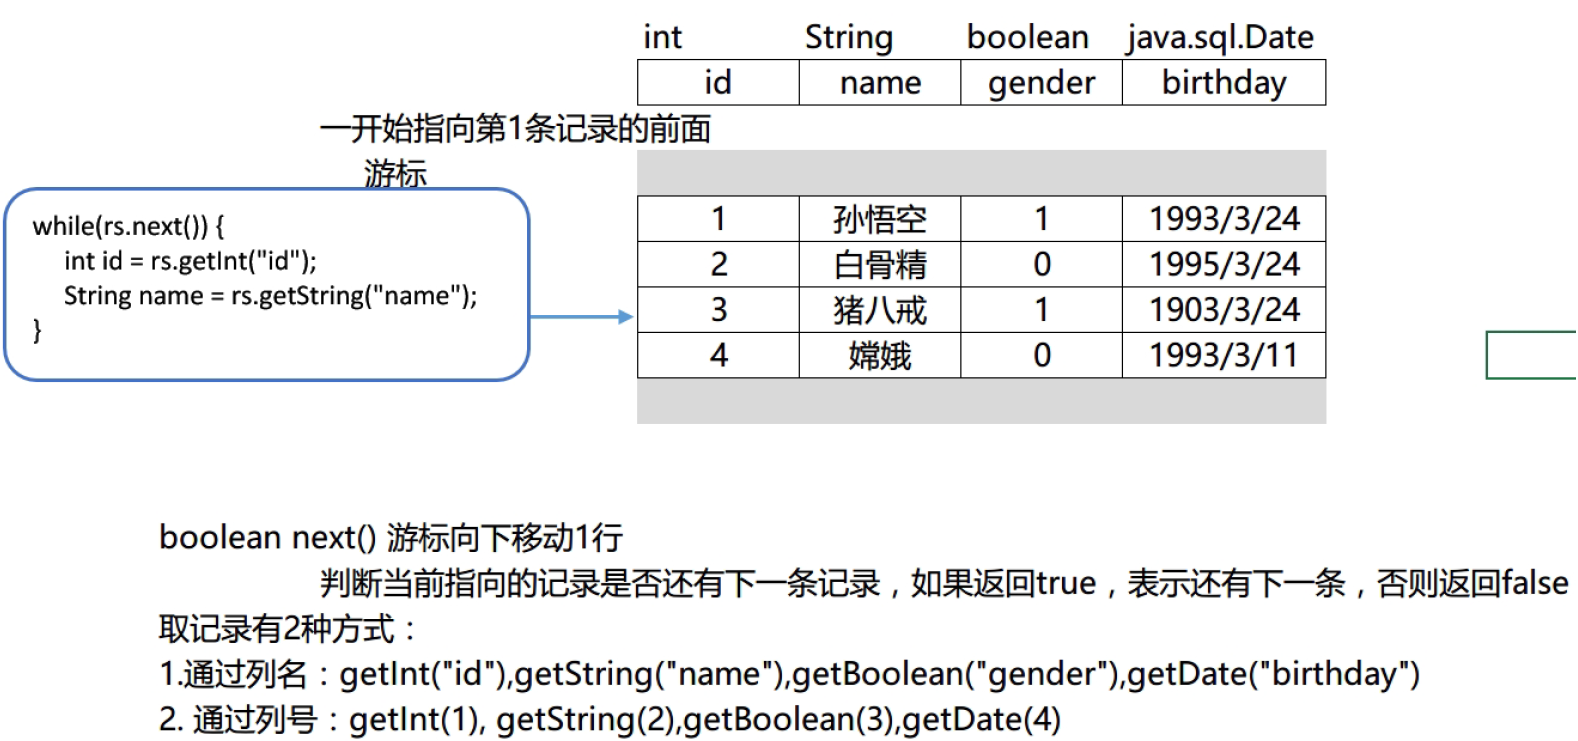
接口中的方法:

boolean next():
游标向下移动一行,判断当前行是否是最后一行末尾(是否有数据),
如果是,则返回false,如果不是则返回true
getXxx(参数):获取数据
-
Xxx:代表数据类型 如: int getInt() , String getString() -
参数:
int:代表列的编号,从1开始 如:getString(1)String:代表列名称。 如:getDouble("balance")
注意:
使用步骤:
1、游标向下移动一行
2、判断是否有数据
3、获取数据
常用数据类型转换表
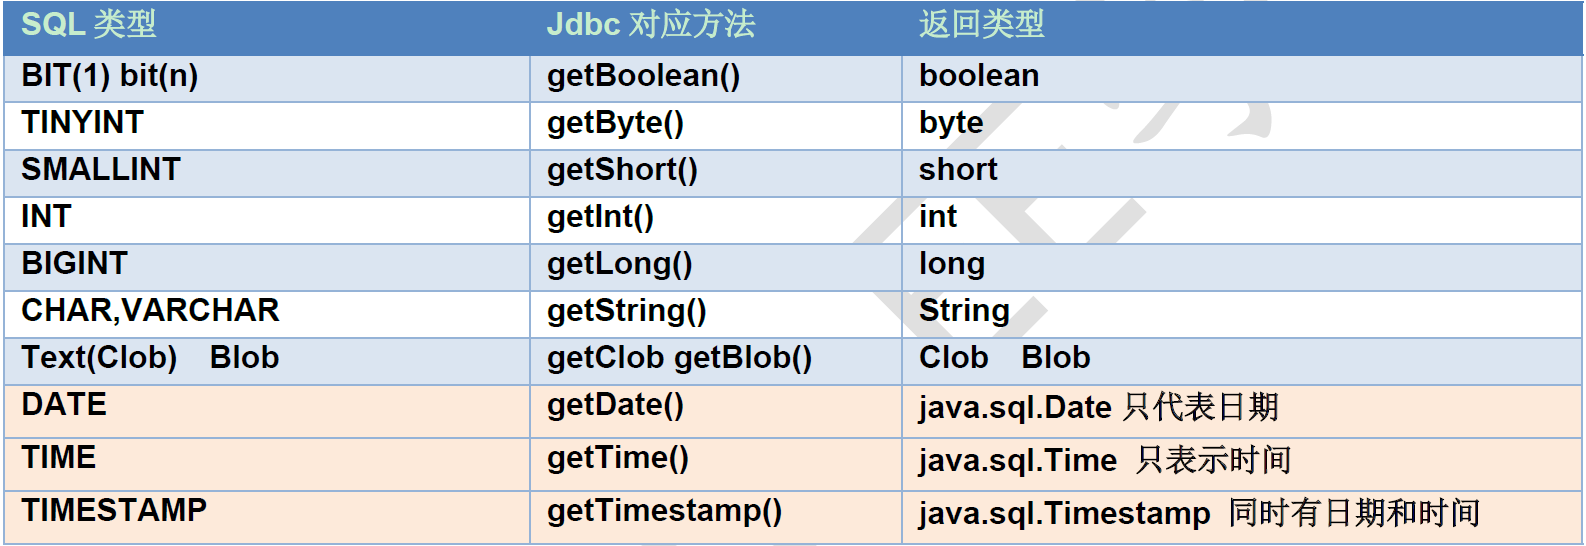
执行DQL操作
需求1:确保数据库中有3条以上的记录,查询所有的学员信息
步骤:
- 得到连接对象
- 得到语句对象
- 执行SQL语句得到结果集ResultSet对象
- 循环遍历取出每一条记录
- 输出的控制台上
- 释放资源
package src.com.uestc.jdbc;
import java.sql.*;
/**
 * account表查询记录
 */
public class JdbcDemo03 {
    public static void main(String[] args) {
        Connection conn=null;
        Statement stmt=null;
        ResultSet rs=null;
        try {
            //1.注册驱动
            Class.forName("com.mysql.jdbc.Driver");
            //2.获取数据库连接
            conn= DriverManager.getConnection("jdbc:mysql://localhost:3306/db3","root","287216");
            //3.创建sql语句
            String sql="select * from account";
            //4.通过连接获取statement对象
            stmt=conn.createStatement();
            //5.执行sql获取结果集
            rs=stmt.executeQuery(sql);
            //6.处理数据
            while(rs.next()){
                int id=rs.getInt("id");
                String name=rs.getString("name");
                Double balance=rs.getDouble(3);
                System.out.println(id+"---"+name+":"+balance);
            }
            //7.释放资源
        } catch (ClassNotFoundException e) {
            e.printStackTrace();
        } catch(SQLException e){
            e.printStackTrace();
        }
        finally {
            try {
                if(rs!=null){
                    rs.close();
                }
            } catch (SQLException e) {
                e.printStackTrace();
            }
            try {
                if(stmt!=null){
                    stmt.close();
                }
            } catch (SQLException e) {
                e.printStackTrace();
            }
            try {
                if(conn!=null){
                    conn.close();
                }
            } catch (SQLException e) {
                e.printStackTrace();
            }
        }
    }
}
需求2:定义一个方法,查询emp表的数据将其封装为对象,然后装载集合,返回。
步骤:
1、定义
Employee类
2、定义方法public List<Employee> findAll(){}
3、实现方法select * from emp;
实现:
1、定义Employee类
package src.com.uestc.jdbc;

import java.util.Date;

public class Employee {
    private int id;
    private String ename;
    private int job_id;
    private int mgr;
    private Date joindate;
    private double salary;
    private double bounds;
    private int dept_id;
    public Employee() {
    }
    public int getId() {
        return id;
    }
    public void setId(int id) {
        this.id = id;
    }
    public String getEname() {
        return ename;
    }
    public void setEname(String ename) {
        this.ename = ename;
    }
    public int getJob_id() {
        return job_id;
    }
    public void setJob_id(int job_id) {
        this.job_id = job_id;
    }
    public int getMgr() {
        return mgr;
    }
    public void setMgr(int mgr) {
        this.mgr = mgr;
    }
    public Date getJoindate() {
        return joindate;
    }
    public Employee(int id, String ename, int job_id, int mgr, Date joindate, double salary, double bounds, int dept_id) {
        this.id = id;
        this.ename = ename;
        this.job_id = job_id;
        this.mgr = mgr;
        this.joindate = joindate;
        this.salary = salary;
        this.bounds = bounds;
        this.dept_id = dept_id;
    }
    public void setJoindate(Date joindate) {
        this.joindate = joindate;
    }
    public double getSalary() {
        return salary;
    }
    public void setSalary(double salary) {
        this.salary = salary;
    }
    public double getBounds() {
        return bounds;
    }
    public void setBounds(double bounds) {
        this.bounds = bounds;
    }
    public int getDept_id() {
        return dept_id;
    }
    public void setDept_id(int dept_id) {
        this.dept_id = dept_id;
    }
    @Override
    public String toString() {
        return "Employee{" +
                "id=" + id +
                ", ename='" + ename + '\'' +
                ", job_id=" + job_id +
                ", mgr=" + mgr +
                ", joindate=" + joindate +
                ", salary=" + salary +
                ", bounds=" + bounds +
                ", dept_id=" + dept_id +
                '}';
    }
}
2、定义方法public List<Employee> findAll(){}
package src.com.uestc.jdbc;
import java.sql.*;
import java.util.ArrayList;
import java.util.List;
/**
 * 定义一个方法,查询emp表的数据将其封装为对象,然后装载集合,返回。
 */
public class JdbcDemo04 {
    public List<Employee> findAll(){
        Connection conn=null;
        Statement stmt=null;
        ResultSet rs=null;
        List<Employee> emp_list=new ArrayList();
        try {
            //1.注册驱动
            Class.forName("com.mysql.jdbc.Driver");
            //2.创建数据库连接connection对象
            conn= DriverManager.getConnection("jdbc:mysql://localhost:3306/db2","root","287216");
            //3.定义sql语句
            String sql="select * from emp";
            //4. 使用数据库连接对象创建statement语句对象
            stmt=conn.createStatement();
            //5.执行sql语句
            rs=stmt.executeQuery(sql);
            //6.获得结果集并封装对象
            while(rs.next()){
                Employee e=new Employee();
                e.setId(rs.getInt("id"));
                e.setEname(rs.getString("ename"));
                e.setJob_id(rs.getInt("job_id"));
                e.setMgr(rs.getInt("mgr"));
                e.setJoindate(rs.getDate("joindate"));
                e.setSalary(rs.getDouble("salary"));
                e.setBounds(rs.getDouble("bonus"));
                e.setDept_id(rs.getInt("dept_id"));
                emp_list.add(e);
            }
            //打印结果
            for(Employee e:emp_list){
                System.out.println(e);
            }
        } catch (ClassNotFoundException e) {
            e.printStackTrace();
        } catch (SQLException e){
            e.printStackTrace();
        } finally {
            //7.释放资源
            try {
                if(rs!=null){
                    rs.close();
                }
                if(stmt!=null){
                    stmt.close();
                }
                if(conn!=null){
                    conn.close();
                }
            } catch (SQLException e) {
                e.printStackTrace();
            }
        }
    }

}
结果:

11.35 PreparedStatement:执行sql的对象
SQL注入问题:当我们输入以下密码,我们发现我们账号和密码都不对竟然登录成功了
请输入用户名:
newboy
请输入密码:
a' or '1'='1
select * from user where name='newboy' and password='a' or '1'='1'
登录成功,欢迎您:newboy
问题分析:
select * from user where name='newboy' and password='a' or '1'='1'
name='newboy' and password='a' 为假
'1'='1' 真
相当于
select * from user where true; 查询了所有记录
解决sql注入问题:使用PreparedStatement对象来解决
概念: PreparedStatement:
PreparedStatement是Statement接口的子接口,继承于父接口中所有的方法。它是一个预编译的SQL语句
PreparedSatement的执行原理:
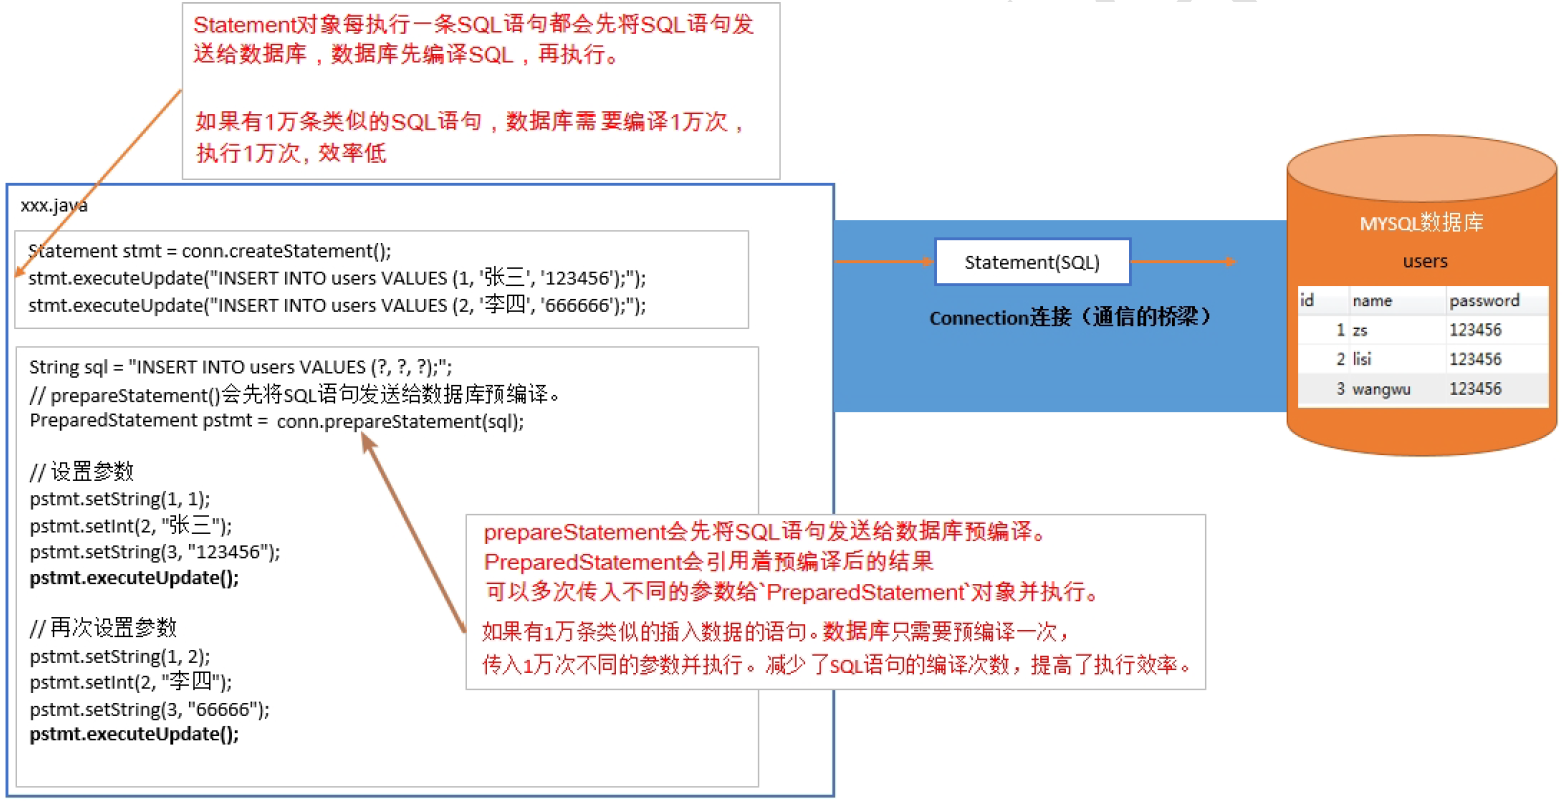
步骤:
导入驱动jar包 mysql-connector-java-5.1.37-bin.jar
注册驱动
获取数据库连接对象 Connection
定义sql
注意:sql的参数使用?作为占位符。 如:select * from user where username = ? and password = ?;获取执行sql语句的对象 :
PreparedStatement Connection.prepareStatement(String sql)设置实际参数:setXxx(占位符的位置, 真实的值)
注意:parameterIndex从1开始
执行sql,接受返回结果,不需要传递sql语句
处理结果
释放资源

实现
package com.uestc.jdbc;
import com.uestc.utils.JDBCUtils;
import java.sql.*;
import java.util.Scanner;
/**
 * 需求:1.通过键盘输入用户名和密码
 *      2.判断用户是否登录
 */
public class JDBCDemo06 {
    /**
     * 登录方法
     */
    public static boolean login(String username, String password){
        if(username== null && password==null){
            return false;
        }
        //连接数据库判断是否登录成功
        Connection conn=null;
        PreparedStatement pstmt=null;
        ResultSet rs=null;
        try{
            //获取数据库连接对象
            conn=JDBCUtils.getConnection();
            //定义sql语句
            String sql="select * from USER WHERE username=? AND password=?";
            //获取statement语句对象
            pstmt=conn.prepareStatement(sql);
            //设置参数
            pstmt.setString(1, username);
            pstmt.setString(2, password);
            //执行sql语句
            rs=pstmt.executeQuery();
            //判断
            return rs.next();
        }catch (SQLException e){
            e.printStackTrace();
        }finally {
            JDBCUtils.close(conn,pstmt,rs);
        }
        return false;
    }
    public static void main(String[] args) {
        //1.键盘录入,接收用户名和密码
        Scanner in=new Scanner(System.in);
        System.out.println("请输入用户名:");
        String username=in.next();
        System.out.println("请输入密码:");
        String password=in.next();
        boolean islogin=JDBCDemo06.login(username,password);
        if(islogin){
            System.out.println("登录成功");
        }else{
            System.out.println("用户名或者密码错误" );
        }
    }

}
PreparedSatement的好处
prepareStatement()会先将SQL语句发送给数据库预编译
PreparedStatement会引用着预编译后的结果。可以多次传入不同的参数
PreparedStatement对象并执行。减少SQL编译次数,提高效率。- 安全性更高,没有SQL注入的隐患。
- 提高了程序的可读性
注意:后期都会使用PreparedStatement来完成增删改查的所有操作
11.4 抽取JDBC工具类 : JDBCUtils
目的:简化书写
需求:上面写的代码中出现了很多重复的代码,可以把这些公共代码抽取出来
创建类JdbcUtil包含3个方法
1、 可以把几个字符串定义成常量:用户名,密码,URL,驱动类
2、得到数据库的连接:getConnection()
3、关闭所有打开的资源:
close(Connection conn, Statement stmt)close(Connection conn, Statement stmt, ResultSet rs)
分析:
1、注册驱动也抽取
2、抽取一个方法获取连接对象
-
需求:不想传递参数(麻烦),还得保证工具类的通用性。
-
解决:
配置文件:
jdbc.properties
	url=jdbc:mysql://localhost:3306/db3
	user=root
	password=287216
	driver=com.mysql.jdbc.Driver
3、 抽取一个方法释放资源
代码实现
step1:首先新建jdbc.properties文件
url=jdbc:mysql://localhost:3306/db2
user=root
password=287216
driver=com.mysql.jdbc.Driver
step2: 然后创建JDBCUtils工具类
package com.uestc.utils;
import java.io.FileNotFoundException;
import java.io.FileReader;
import java.io.IOException;
import java.net.URL;
import java.sql.*;
import java.util.Properties;
public class JDBCUtils {
    private static String url;
    private static String user;
    private static String password;
    private static String driver;
    //文件的读取,只需读取一次就可以拿到这些值,使用静态代码块
    static{
        try{
            //读取资源文件,获取值
            //1.properties集合类
            Properties pro=new Properties();
            //获取src路径下的文件的方式-->ClassLoader 类加载器
            ClassLoader classLoader=JDBCUtils.class.getClassLoader();
            URL res=classLoader.getResource("jdbc.properties");
            String path=res.getPath();
            System.out.println(path);
            //2.加载文件
            pro.load(new FileReader(path));
            //3.获取数据,赋值
            url=pro.getProperty("url");
            user=pro.getProperty("user");
            password=pro.getProperty("password");
            driver=pro.getProperty("driver");
            //4.注册驱动
            Class.forName(driver);
        } catch (IOException e) {
            e.printStackTrace();
        } catch (ClassNotFoundException e) {
            e.printStackTrace();
        }
    }

    /**
     * 获取连接
     * @return 连接对象
     */
    public static Connection getConnection(){
        Connection conn=null;
        try {
            //2.获取数据库连接对象
            conn= DriverManager.getConnection(url,user,password);
            return conn;
        } catch (SQLException e) {
            e.printStackTrace();
        }finally {
            return conn;
        }
    }
    public static void close(Connection conn, Statement stmt){
        try {
            if(stmt!=null){
                stmt.close();
            }
        } catch (SQLException e) {
            e.printStackTrace();
        }
        try {
            if(conn!=null){
                conn.close();
            }
        } catch (SQLException e) {
            e.printStackTrace();
        }
    }
    public static void  close(Connection conn, Statement stmt, ResultSet rs){
        try {
            if(rs!=null){
                rs.close();
            }
        } catch (SQLException e) {
            e.printStackTrace();
        }
        try {
            if(stmt!=null){
                stmt.close();
            }
        } catch (SQLException e) {
            e.printStackTrace();
        }
        try {
            if(conn!=null){
                conn.close();
            }
        } catch (SQLException e) {
            e.printStackTrace();
        }
    }

}
11.41 示例1:使用JDBCUtil 查询所有用户并封装对象
package com.uestc.jdbc;
import com.uestc.utils.JDBCUtils;
import java.sql.Connection;
import java.sql.ResultSet;
import java.sql.SQLException;
import java.util.ArrayList;
import java.util.List;
import java.sql.Statement;

/**
 * 演示JdbcUtil工具类
 */
public class JdbcDemo05 {
    public  static List<Employee> findAll()  {
        Connection conn=null;
        Statement stmt=null;
        ResultSet rs=null;
        List<Employee> emp_list=new ArrayList<>();

        try{

            //1.获取数据库连接对象
             conn=JDBCUtils.getConnection();
            //2.定义sql语句
            String sql="select * from emp";
            //3.创建statement对象
             stmt=conn.createStatement();
            //4.执行sql
             rs=stmt.executeQuery(sql);
            //5.封装对象
            while(rs.next()){
                Employee e=new Employee();
                e.setId(rs.getInt("id"));
                e.setEname(rs.getString("ename"));
                e.setJob_id(rs.getInt("job_id"));
                e.setMgr(rs.getInt("mgr"));
                e.setJoindate(rs.getDate("joindate"));
                e.setSalary(rs.getDouble("salary"));
                e.setBounds(rs.getDouble("bonus"));
                e.setDept_id(rs.getInt("dept_id"));
                emp_list.add(e);

            }
            return emp_list;

        }catch(SQLException e){
            e.printStackTrace();
        }finally {
            //6.关闭连接
            JDBCUtils.close(conn,stmt,rs);
        }

        return emp_list;
    }
    public static void main(String[] args) {
        List<Employee> list=JdbcDemo05.findAll();
        System.out.println(list.size());
        for(Employee e:list){
            System.out.println(e);
        }
    }
}
11.42 示例2:用户登陆
需求:
1、通过键盘录入用户名和密码
2、 判断用户是否登录成功
- select * from user where username = “” and password = “”;
- 如果这个sql有查询结果,则成功,反之,则失败
步骤:
- 得到用户从控制台上输入的用户名和密码来查询数据库
- 写一个登录的方法
- 通过工具类得到连接
- 创建语句对象,使用拼接字符串的方式生成SQL语句
- 查询数据库,如果有记录则表示登录成功,否则登录失败
- 释放资源
实现:
1、创建数据库表 user
CREATE TABLE USER(
	id INT PRIMARY KEY AUTO_INCREMENT,
	username VARCHAR(32),
	PASSWORD VARCHAR(32)

);
INSERT INTO USER VALUES(NULL, '张三',123456);
INSERT INTO USER VALUES(NULL, '李四',287216);
2、创建登录的方法
package com.uestc.jdbc;
import com.uestc.utils.JDBCUtils;
import java.sql.Connection;
import java.sql.ResultSet;
import java.sql.SQLException;
import java.sql.Statement;
import java.util.Scanner;
/**
 * 需求:1.通过键盘输入用户名和密码
 *      2.判断用户是否登录
 */
public class JDBCDemo06 {
    /**
     * 登录方法
     */
    public static boolean login(String username, String password){
        if(username== null && password==null){
            return false;
        }
        //连接数据库判断是否登录成功
        Connection conn=null;
        Statement stmt=null;
        ResultSet rs=null;
        try{
            //获取数据库连接对象
            conn=JDBCUtils.getConnection();
            //获取statement语句对象
            stmt=conn.createStatement();
            //定义sql语句
            String sql="select * from USER WHERE username='"+username+"' AND password='"+password+"'";
            //执行sql语句
            rs=stmt.executeQuery(sql);
            //判断
            return rs.next();
        }catch (SQLException e){
            e.printStackTrace();
        }finally {
            JDBCUtils.close(conn,stmt,rs);
        }
        return false;
    }
    public static void main(String[] args) {
        //1.键盘录入,接收用户名和密码
        Scanner in=new Scanner(System.in);
        System.out.println("请输入用户名:");
        String username=in.next();
        System.out.println("请输入密码:");
        String password=in.next();
        boolean islogin=JDBCDemo06.login(username,password);
        if(islogin){
            System.out.println("登录成功");
        }else{
            System.out.println("用户名或者密码错误" );
        }
    }
}

11.5 JDBC控制事务:
事务:一个包含多个步骤的业务操作。如果这个业务操作被事务管理,则这多个步骤要么同时成功,要么同时失败。
API介绍

开发步骤
- 获取连接
- 开启事务
- 获取到PreparedStatement
- 使用PreparedStatement执行两次更新操作
- 正常情况下提交事务
- 出现异常回滚事务
- 最后关闭资源
代码:
package com.uestc.jdbc;
import com.uestc.utils.JDBCUtils;
import java.sql.Connection;
import java.sql.PreparedStatement;
import java.sql.SQLException;
/**
 * 事务操作
 * 没有异常,提交事务,出现异常回滚事务
 public static
 */
public class JdbcDemo07 {
    public static void main(String[] args) {
        Connection conn=null;
        PreparedStatement pstmt1=null;
        PreparedStatement pstmt2=null;
        try{
            //1.获取数据库连接
            conn= JDBCUtils.getConnection();
            //开启事务
            conn.setAutoCommit(false);
            //2.定义sql
            //2.1 张三-500
            String sql1="update account set balance=balance- ? where name=?";
            //2.2 李四+500
            String sql2="update account set balance=balance+ ? where name=?";
            //3.获取prepareStatement
            pstmt1=conn.prepareStatement(sql1);
            pstmt2=conn.prepareStatement(sql2);
            //4.设置参数
            pstmt1.setDouble(1,500);
            pstmt1.setString(2,"张三");

            pstmt2.setDouble(1,500);
            pstmt2.setString(2,"李四");

            //5.执行sql
            pstmt1.executeUpdate();

            //手动制造异常
            int i=3/0;
            pstmt2.executeUpdate();
            //事务提交
            conn.commit();
        }catch (Exception e){
            //事务回滚
            if(conn!=null){
                try {
                    conn.rollback();
                } catch (SQLException e1) {
                    e1.printStackTrace();
                }
            }
            e.printStackTrace();
        }finally {
            JDBCUtils.close(conn,pstmt1);
            JDBCUtils.close(null,pstmt2);
        }
    }
}
11.6 数据库连接池
11.61 概念:
其实就是一个容器(集合),存放数据库连接的容器。
当系统初始化好后,容器被创建,容器中会申请一些连接对象,当用户来访问数据库时,从容器中获取连接对象,用户访问完之后,会将连接对象归还给容器。
好处:1. 节约资源 2. 用户访问高效
实现:
一般我们不去实现它,有数据库厂商来实现
C3P0:数据库连接池技术Druid:数据库连接池实现技术,由阿里巴巴提供的
标准接口:DataSource javax.sql包下的
方法:
- 获取连接:
getConnection()- 归还连接:
Connection.close()。如果连接对象Connection是从连接池中获取的,那么调用Connection.close()方法,则不会再关闭连接了。而是归还连接
11.62 C3P0:数据库连接池技术
步骤:
1、导入jar包 (两个) c3p0-0.9.5.2.jar 、mchange-commons-java-0.2.12.jar
注意不要忘记导入数据库驱动jar包
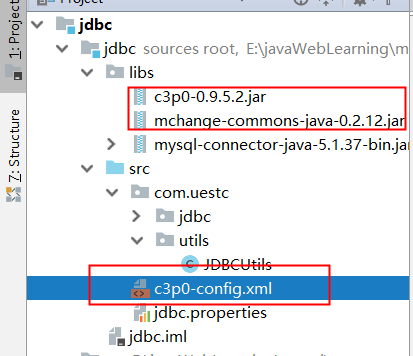
2、定义配置文件:
- 名称:
c3p0.properties或者c3p0-config.xml - 路径:直接将文件放在
src目录下即可。
<c3p0-config>
  <!-- 使用默认的配置读取连接池对象 -->
  <default-config>
  	<!--  连接参数 -->
    <property name="driverClass">com.mysql.jdbc.Driver</property>
    <property name="jdbcUrl">jdbc:mysql://localhost:3306/db3</property>
    <property name="user">root</property>
    <property name="password">287216</property>

    <!-- 连接池参数 -->
    <!-- 初始化申请的连接数量 -->
    <property name="initialPoolSize">5</property>
    <!-- 最大的连接数量 -->
    <property name="maxPoolSize">10</property>
    <!-- 超时时间 -->
    <property name="checkoutTimeout">3000</property>
  </default-config>

  <named-config name="otherc3p0">
    <!--  连接参数 -->
    <property name="driverClass">com.mysql.jdbc.Driver</property>
    <property name="jdbcUrl">jdbc:mysql://localhost:3306/day25</property>
    <property name="user">root</property>
    <property name="password">root</property>

    <!-- 连接池参数 -->
    <property name="initialPoolSize">5</property>
    <property name="maxPoolSize">8</property>
    <property name="checkoutTimeout">1000</property>
  </named-config>
</c3p0-config>
3、创建核心对象 数据库连接池对象 ComboPooledDataSource
4、获取连接: getConnection
代码:
package com.uestc.datasource.c3p0;
import com.mchange.v2.c3p0.ComboPooledDataSource;
import javax.sql.DataSource;
import java.sql.Connection;
import java.sql.SQLException;
public class C3P0Demo1  {
    public static void main(String[] args) {
        //1.创建数据库连接池对象, 这里不传参表示使用默认的c3p0配置
        DataSource ds=new ComboPooledDataSource();
        Connection conn=null;
        //2.获取连接对象
        try {
            conn=ds.getConnection();
        } catch (SQLException e) {
            e.printStackTrace();
        }
        //3.打印
        System.out.println(conn);
    }
}
11.63 Druid:数据库连接池实现技术,由阿里巴巴提供的
步骤:
1、 导入jar包
druid-1.0.9.jar
2、定义配置文件:
- 是
properties形式的- 可以叫任意名称,可以放在任意目录下
3、加载配置文件。Properties
4、获取数据库连接池对象:通过工厂来来获取DruidDataSourceFactory
5、获取连接:getConnection
代码:
package com.uestc.datasource.druid;
import com.alibaba.druid.pool.DruidDataSourceFactory;
import javax.sql.DataSource;
import java.io.InputStream;
import java.sql.Connection;
import java.util.Properties;
/**
 * Druid演示
 */
public class DruidDemo1 {
    public static void main(String[] args) throws Exception{
        //1.导入jar包
        //2.定义配置文件
        //3.加载配置文件
        Properties pro=new Properties();
        InputStream is=DruidDemo1.class.getClassLoader().getResourceAsStream("druid.properties");
        pro.load(is);
        //4.获取连接池对象
        DataSource ds=DruidDataSourceFactory.createDataSource(pro);
        //5.获取连接
        Connection conn=ds.getConnection();
        System.out.println(conn);
    }
}
11.64 定义工具类
步骤:
- 定义一个类 JDBCUtils
- 提供静态代码块加载配置文件,初始化连接池对象
- 提供方法
(1) 获取连接方法:通过数据库连接池获取连接
(2) 释放资源
(3) 获取连接池的方法
实现:
package com.uestc.utils;
import com.alibaba.druid.pool.DruidDataSourceFactory;
import javax.sql.DataSource;
import java.io.IOException;
import java.io.InputStream;
import java.sql.Connection;
import java.sql.ResultSet;
import java.sql.SQLException;
import java.sql.Statement;
import java.util.Properties;

/**
 * Druid连接池的工具类
 */
public class JDBCUtils {
   //1.定义成员变量 DataSouce 连接池对象
    private static DataSource ds;
   static{
       try {
           //1.加载配置文件
           Properties pro=new Properties();
           InputStream is=JDBCUtils.class.getClassLoader().getResourceAsStream("druid.properties");
           pro.load(is);
           ds=DruidDataSourceFactory.createDataSource(pro);
       } catch (IOException e) {
           e.printStackTrace();
       } catch (Exception e) {
           e.printStackTrace();
       }
   }
    /**
     * 获取连接
     * @return
     */
   public static Connection getConnection() throws SQLException {
       return ds.getConnection();
   }
    public static void close(ResultSet rs, Statement stmt, Connection conn){
        try {
            if(rs!=null){
                rs.close();
            }
        } catch (SQLException e) {
            e.printStackTrace();
        }
        try {
            if(stmt!=null){
                stmt.close();
            }
        } catch (SQLException e) {
            e.printStackTrace();
        }

        try {
            if(conn!=null){
                conn.close();
            }
        } catch (SQLException e) {
            e.printStackTrace();
        }
    }
   public static void close(Statement stmt, Connection conn){
       close(null,stmt,conn);
   }
    /**
     * 获取连接池对象
     * @return
     */
   public static DataSource getDataSource(){
       return ds;
   }
}
工具类测试
package com.uestc.datasource.druid;
import com.uestc.utils.JDBCUtils;
import java.sql.Connection;
import java.sql.PreparedStatement;
import java.sql.SQLException;
/**
 * 使用druid工具类
 */
public class DruidDemo2 {
    public static void main(String[] args) {
        /**
         * 完成给account添加一条记录
         */
        Connection conn=null;
        PreparedStatement pstmt=null;
        try {
            //1.获取连接
            conn=JDBCUtils.getConnection();
            //2.定义sql
            String sql="insert into account VALUES(null,?,?)";
            //3.获取prepareStatement对象
            pstmt=conn.prepareStatement(sql);
             //4.设置参数的值
            pstmt.setString(1,"老王");
            pstmt.setDouble(2,4000);
            //5.执行sql
            int count=pstmt.executeUpdate();
            if(count>0){
                System.out.println("插入成功");
            }else{
                System.out.println("插入失败");
            }
        } catch (SQLException e) {
            e.printStackTrace();
        } finally {
            JDBCUtils.close(pstmt,conn);
        }

    }
}
11.7 Spring JDBC
11.71 概念
Spring框架对JDBC的简单封装。提供了一个JDBCTemplate对象简化JDBC的开发
11.72 使用步骤:
1、导入jar包

2、 创建JdbcTemplate对象。依赖于数据源DataSource
JdbcTemplate template = new JdbcTemplate(ds);
3、调用JdbcTemplate的方法来完成CRUD的操作
-
update():执行DML语句。增、删、改语句 -
queryForMap():查询结果将结果集封装为map集合,将列名作为key,将值作为value 将这条记录封装为一个map集合注意:这个方法查询的结果集长度只能是
1 -
queryForList():查询结果将结果集封装为list集合注意:将每一条记录封装为一个Map集合,再将Map集合装载到List集合中
-
query():查询结果,将结果封装为JavaBean对象query的参数:RowMapper- 一般我们使用
BeanPropertyRowMapper实现类。可以完成数据到JavaBean的自动封装 new BeanPropertyRowMapper<类型>(类型.class)
- 一般我们使用
-
queryForObject:查询结果,将结果封装为对象 -
一般用于聚合函数的查询
7.3 使用案例:
需求:
- 修改1号数据的 salary 为 10000
- 添加一条记录
- 删除刚才添加的记录
- 查询id为1的记录,将其封装为Map集合
- 查询所有记录,将其封装为List
- 查询所有记录,将其封装为Emp对象的List集合
- 查询总记录数
代码实现:
package com.uestc.jdbctemplate;
import com.uestc.domain.Emp;
import com.uestc.jdbc.Employee;
import com.uestc.utils.JDBCUtils;
import org.junit.Test;
import org.springframework.jdbc.core.BeanPropertyRowMapper;
import org.springframework.jdbc.core.JdbcTemplate;
import org.springframework.jdbc.core.RowMapper;
import java.sql.ResultSet;
import java.sql.SQLException;
import java.util.List;
import java.util.Map;

public class JdbcTemplateDemo2 {
    //1.创建JdbcTemplate对象
    private JdbcTemplate jdbcTemplate=new JdbcTemplate(JDBCUtils.getDataSource());
    //Junit单元测试,可以让方法独立执行
    /**
     * 修改1号数据的 salary 为 10000
     */
    @Test
    public void test1(){

        //2.定义sql
        String sql="update emp set salary=10000 where id=1001";
        //3.执行sql
        int count=jdbcTemplate.update(sql);
        System.out.print(count);
    }
    /**
     * 添加一条记录
     */
    @Test
    public void test2(){

        //2.定义sql
        String sql="insert into emp(id,ename,dept_id) values(?,?,?)";
        //3.执行sql
        int count=jdbcTemplate.update(sql,1015,"刘飞",10);
        System.out.print(count);
    }
    /**
     *删除刚才添加的记录
     */
    @Test
    public void test3(){

        //2.定义sql
        String sql="delete from emp where id=?";
        //3.执行sql
        int count=jdbcTemplate.update(sql,1015);
        System.out.print(count);
    }
    /**
     *查询id为1001的记录,将其封装为Map集合
     */
    @Test
    public void test4(){

        //2.定义sql
        String sql="select * from emp where id=?";
        //3.执行sql
        Map<String,Object> map= jdbcTemplate.queryForMap(sql,1001);
        System.out.print(map);
    }

    /**
     * 查询所有记录,将其封装为List
     */

    @Test
    public void test5(){

        //2.定义sql
        String sql="select * from emp ";
        //3.执行sql
        List<Map<String,Object>> list= jdbcTemplate.queryForList(sql);
        for(Map map:list){
            System.out.println(map);
        }
    }

    /**
     * 查询所有记录,将其封装为Emp对象的List集合
     */
    @Test
    public void test6(){

        //2.定义sql
        String sql="select * from emp ";
        //3.执行sql
        List<Emp> list= jdbcTemplate.query(sql, new RowMapper<Emp>() {

            @Override
            public Emp mapRow(ResultSet rs, int i) throws SQLException {
                Emp e=new Emp();
                e.setId(rs.getInt("id"));
                e.setEname(rs.getString("ename"));
                e.setJob_id(rs.getInt("job_id"));
                e.setMgr(rs.getInt("mgr"));
                e.setJoindate(rs.getDate("joindate"));
                e.setSalary(rs.getDouble("salary"));
                e.setBounds(rs.getDouble("bonus"));
                e.setDept_id(rs.getInt("dept_id"));

                return e;
            }
        });
        for(Emp emp:list){
            System.out.println(emp);
        }
    }

    @Test
    public void test7(){

        //2.定义sql
        String sql="select * from emp ";
        //3.执行sql
        List<Emp> list= jdbcTemplate.query(sql, new BeanPropertyRowMapper<Emp>(Emp.class));
        for(Emp emp:list){
            System.out.println(emp);
        }
    }
    /**
     * 查询总记录数
     */

    @Test
    public void test8(){

        //2.定义sql
        String sql="select count(*) from emp ";
        //3.执行sql
        Long total= jdbcTemplate.queryForObject(sql, Long.class);
        System.out.println(total);
    }
}


 3889
3889

 被折叠的 条评论
为什么被折叠?
被折叠的 条评论
为什么被折叠?
 到【灌水乐园】发言


