


版权声明:本文为博主原创文章,未经博主允许不得转载。
Created By Cryking 转载请注明出处,谢谢
环境:
VMware Workstation8.0 +Centos 5.5(32位)+Oracle 11.2.0.1.0
两个节点crydb01(节点1)和crydb02(节点2)
一、设置主机名及 网络环境配置
在节点1上:
设置主机名
- 1
- 2
- 3
- 4
- 5
- 6
- 1
- 2
- 3
- 4
- 5
- 6
- 1
- 2
- 3
- 4
- 5
- 6
- 7
- 8
- 9
- 10
- 11
- 12
- 13
- 14
- 15
- 16
- 17
- 18
- 19
- 20
- 21
- 22
- 23
- 1
- 2
- 3
- 4
- 5
- 6
- 7
- 8
- 9
- 10
- 11
- 12
- 13
- 14
- 15
- 16
- 17
- 18
- 19
- 20
- 21
- 22
- 23
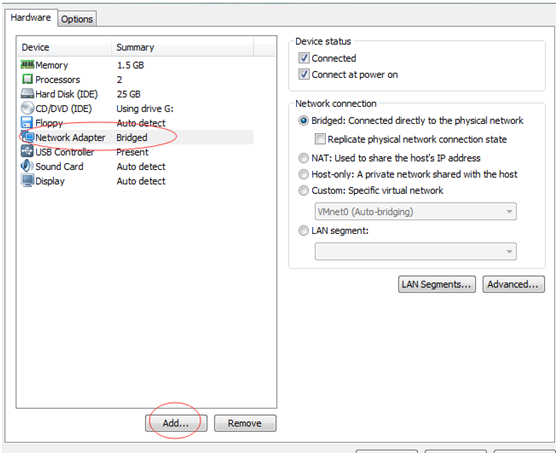
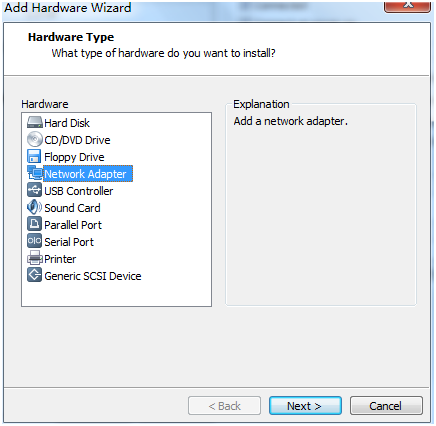
节点1的虚拟机添加网卡:
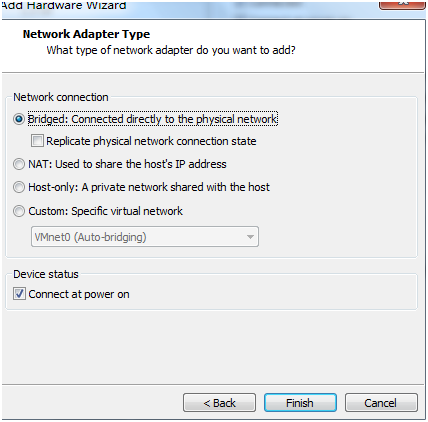
添加完网卡后重启系统并设置eth1的ip:
- 1
- 2
- 3
- 4
- 5
- 6
- 7
- 8
- 9
- 1
- 2
- 3
- 4
- 5
- 6
- 7
- 8
- 9
在节点2上:
- 1
- 2
- 3
- 4
- 5
- 6
- 7
- 8
- 9
- 10
- 11
- 12
- 13
- 14
- 15
- 16
- 17
- 18
- 19
- 20
- 21
- 22
- 23
- 24
- 25
- 26
- 27
- 28
- 29
- 30
- 1
- 2
- 3
- 4
- 5
- 6
- 7
- 8
- 9
- 10
- 11
- 12
- 13
- 14
- 15
- 16
- 17
- 18
- 19
- 20
- 21
- 22
- 23
- 24
- 25
- 26
- 27
- 28
- 29
- 30
重复上面的添加网卡过程,然后重启系统,然后:
- 1
- 2
- 3
- 4
- 5
- 6
- 7
- 1
- 2
- 3
- 4
- 5
- 6
- 7
二、 用户及用户组设置
分别在两个节点上以root用户进行如下操作:
- 1
- 2
- 3
- 4
- 5
- 6
- 7
- 8
- 9
- 10
- 11
- 12
- 13
- 14
- 15
- 16
- 1
- 2
- 3
- 4
- 5
- 6
- 7
- 8
- 9
- 10
- 11
- 12
- 13
- 14
- 15
- 16
三、配置用户SSH等效性
先配置Oracle用户SSH等效性.
在节点1上:
- 1
- 2
- 3
- 4
- 5
- 6
- 7
- 8
- 9
- 10
- 11
- 12
- 13
- 14
- 15
- 16
- 17
- 18
- 19
- 20
- 21
- 22
- 23
- 24
- 25
- 1
- 2
- 3
- 4
- 5
- 6
- 7
- 8
- 9
- 10
- 11
- 12
- 13
- 14
- 15
- 16
- 17
- 18
- 19
- 20
- 21
- 22
- 23
- 24
- 25
在节点2上进行同样操作:
- 1
- 2
- 3
- 4
- 5
- 6
- 7
- 8
- 9
- 10
- 11
- 12
- 13
- 14
- 15
- 16
- 17
- 18
- 19
- 20
- 21
- 22
- 23
- 24
- 25
- 1
- 2
- 3
- 4
- 5
- 6
- 7
- 8
- 9
- 10
- 11
- 12
- 13
- 14
- 15
- 16
- 17
- 18
- 19
- 20
- 21
- 22
- 23
- 24
- 25
再回到节点1上:
- 1
- 2
- 3
- 4
- 5
- 6
- 7
- 8
- 1
- 2
- 3
- 4
- 5
- 6
- 7
- 8
验证在节点2上:
- 1
- 2
- 1
- 2
在节点1上:
- 1
- 2
- 1
- 2
如果都不用输入密码则配置成功.
注意:如果确认已按上面的执行,但配置总是不成功的时候,请确保两个节点的/home/oracle的权限一致,或直接使用root在所有节点执行chmod -R 700 /home/oracle.
在grid用户下也重复进行上面的配置.
这样SSH用户等效性就配置完成了.
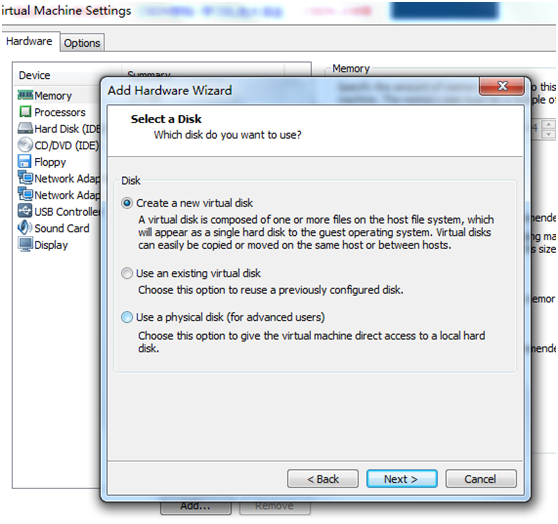
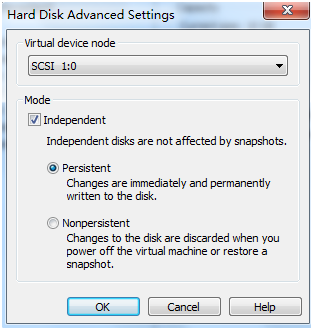
四、 创建共享磁盘
如图:
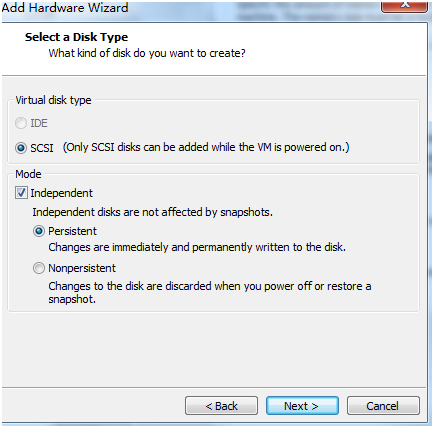
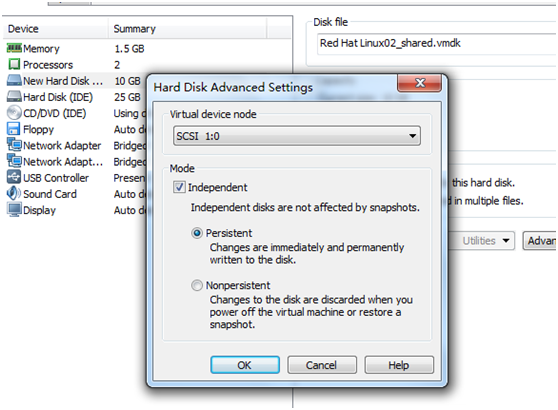
这里我只给了10G磁盘,勾选上立即分配所有空间,分配后点击增加的磁盘,在右边选择高级设置(Advanced),如下:
关闭节点1的系统
[root@crydb01 ~]# halt
编辑crydb01的虚拟机文件(*.vmx):
新增的磁盘内容如下:
…
scsi1.present = “TRUE”
scsi1:0.present = “TRUE”
scsi1:0.fileName = “Red Hat Linux02_shared.vmdk”
scsi1:0.mode = “independent-persistent”
scsi1:0.redo = “”
在最后加上:
- 1
- 2
- 3
- 4
- 5
- 6
- 7
- 8
- 9
- 1
- 2
- 3
- 4
- 5
- 6
- 7
- 8
- 9
启动节点1,发现没问题后再在节点2的虚拟机上进行如下操作:
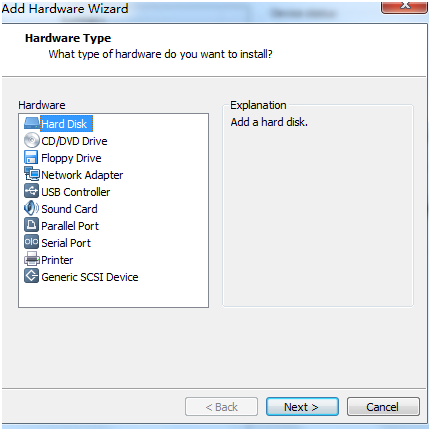
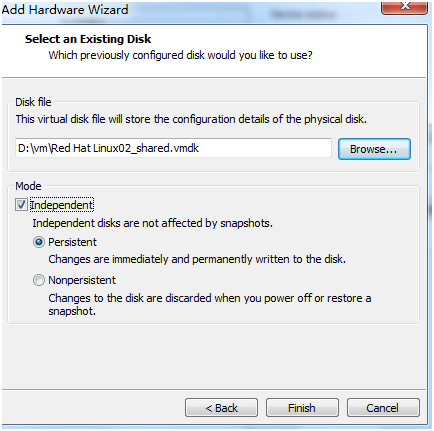
这里注意选使用现有的虚拟磁盘

然后关闭节点2的虚拟机后,进行和节点1一样的磁盘高级设置:

这里虚拟驱动代码要和节点1的保持一致.
然后编辑节点2的虚拟机文件(*.vmx),添加和节点1一样的内容.
期间发生一个问题,就是新增的SCSI盘系统总是无法认到,后来在vmx文件中添加这一行后就正常了:
scsi1.virtualDev = “lsilogic”
回到节点1,以root登录:
- 1
- 2
- 3
- 4
- 5
- 6
- 7
- 8
- 9
- 10
- 11
- 12
- 13
- 14
- 15
- 16
- 17
- 18
- 1
- 2
- 3
- 4
- 5
- 6
- 7
- 8
- 9
- 10
- 11
- 12
- 13
- 14
- 15
- 16
- 17
- 18
可以看到新加的磁盘/dev/sda,对它进行分区,如下:
- 1
- 2
- 3
- 4
- 5
- 6
- 7
- 8
- 9
- 10
- 11
- 12
- 13
- 14
- 15
- 16
- 17
- 18
- 19
- 20
- 21
- 22
- 23
- 24
- 25
- 26
- 27
- 28
- 29
- 30
- 31
- 32
- 33
- 34
- 35
- 36
- 37
- 38
- 39
- 40
- 41
- 1
- 2
- 3
- 4
- 5
- 6
- 7
- 8
- 9
- 10
- 11
- 12
- 13
- 14
- 15
- 16
- 17
- 18
- 19
- 20
- 21
- 22
- 23
- 24
- 25
- 26
- 27
- 28
- 29
- 30
- 31
- 32
- 33
- 34
- 35
- 36
- 37
- 38
- 39
- 40
- 41
再去到节点2上查看:
- 1
- 2
- 3
- 4
- 5
- 6
- 7
- 8
- 9
- 10
- 11
- 12
- 13
- 14
- 15
- 16
- 17
- 18
- 19
- 1
- 2
- 3
- 4
- 5
- 6
- 7
- 8
- 9
- 10
- 11
- 12
- 13
- 14
- 15
- 16
- 17
- 18
- 19
说明已经成功建立共享磁盘.
五、 集群配置检查
如下检查响应的rpm包是否安装:
[root@crydb01 dev]# rpm -qa | grep -i binutils-2.*
binutils-2.17.50.0.6-14.el5
…
如果没有就需要安装.
安装11g RAC需要的依赖包列表(也可在Concept上去找):
- 1
- 2
- 3
- 4
- 5
- 6
- 7
- 8
- 9
- 10
- 11
- 12
- 13
- 14
- 15
- 16
- 17
- 18
- 19
- 20
- 21
- 22
- 23
- 24
- 25
- 26
- 27
- 28
- 29
- 30
- 31
- 1
- 2
- 3
- 4
- 5
- 6
- 7
- 8
- 9
- 10
- 11
- 12
- 13
- 14
- 15
- 16
- 17
- 18
- 19
- 20
- 21
- 22
- 23
- 24
- 25
- 26
- 27
- 28
- 29
- 30
- 31
在节点1上执行检查:
- 1
- 2
- 3
- 4
- 5
- 6
- 7
- 8
- 9
- 10
- 11
- 12
- 13
- 1
- 2
- 3
- 4
- 5
- 6
- 7
- 8
- 9
- 10
- 11
- 12
- 13
仔细检查各个未通过的项目并解决.
注:如两个节点时间不同步,则可能出现
PRVF-5415 : Check to see if NTP daemon is running failed
在两个节点上启动ntpd服务: service ntpd start
如果还出现:
PRVF-5436 : The NTP daemon running on one or more nodes lacks the slewing option
则分别在两个节点上编辑文件如下(添加-x):
- 1
- 2
- 3
- 4
- 5
- 6
- 7
- 8
- 9
- 1
- 2
- 3
- 4
- 5
- 6
- 7
- 8
- 9
这里我有个Result: Swap space check failed,不用理它.
验证OS和硬件:
- 1
- 2
- 3
- 1
- 2
- 3
六、用户环境配置
在两个节点上关闭防火墙:
/etc/rc.d/init.d/iptables stop
分别在两个节点上:
- 1
- 2
- 3
- 4
- 5
- 6
- 7
- 8
- 9
- 10
- 11
- 12
- 13
- 14
- 15
- 16
- 17
- 18
- 19
- 20
- 21
- 22
- 23
- 24
- 25
- 26
- 27
- 28
- 29
- 30
- 31
- 32
- 33
- 34
- 35
- 36
- 37
- 38
- 39
- 40
- 41
- 42
- 43
- 44
- 45
- 46
- 47
- 48
- 49
- 50
- 51
- 52
- 53
- 54
- 55
- 56
- 57
- 58
- 59
- 60
- 61
- 62
- 63
- 64
- 65
设置资源限制,分别在两个节点下添加:
- 1
- 2
- 3
- 4
- 5
- 6
- 7
- 8
- 9
- 10
- 11
- 12
- 13
- 1
- 2
- 3
- 4
- 5
- 6
- 7
- 8
- 9
- 10
- 11
- 12
- 13
在/etc/profile文件最后加上:
- 1
- 2
- 3
- 4
- 5
- 6
- 7
- 8
- 9
- 10
- 1
- 2
- 3
- 4
- 5
- 6
- 7
- 8
- 9
- 10
七、为ASM安装、配置ASMLib
提示:配置ASM不一定需要ASMLib,也可使用标准Linux I/O调用来管理裸设备.
用root在两个节点上执行:
- 1
- 2
- 3
- 1
- 2
- 3
验证是否成功安装:
- 1
- 2
- 3
- 4
- 1
- 2
- 3
- 4
配置ASMLib:
- 1
- 2
- 3
- 4
- 5
- 6
- 7
- 8
- 9
- 10
- 11
- 12
- 13
- 14
- 15
- 16
- 17
- 18
- 1
- 2
- 3
- 4
- 5
- 6
- 7
- 8
- 9
- 10
- 11
- 12
- 13
- 14
- 15
- 16
- 17
- 18
创建ASM磁盘(只在节点1执行):
- 1
- 2
- 3
- 1
- 2
- 3
在节点2上执行扫描磁盘:
- 1
- 2
- 3
- 4
- 5
- 1
- 2
- 3
- 4
- 5
查看下当前的ASM磁盘(分别在两个节点上执行):
- 1
- 2
- 1
- 2
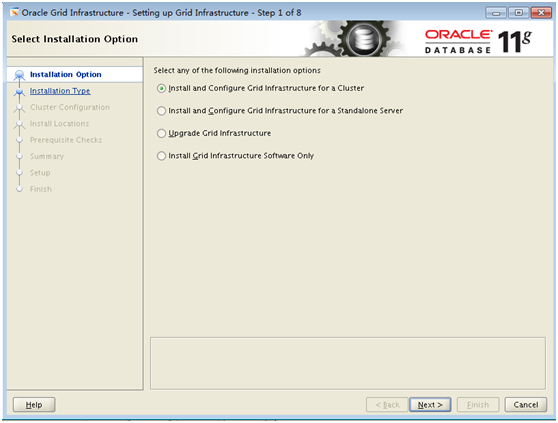
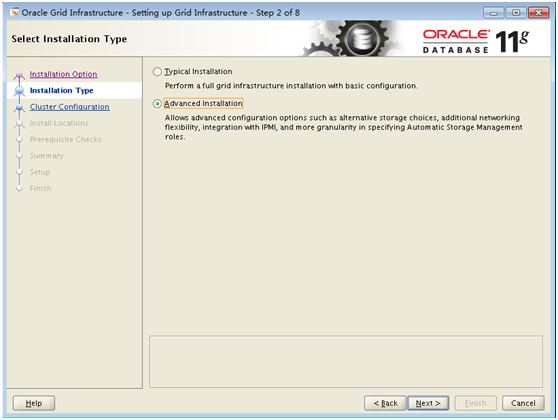
八、正式安装Grid
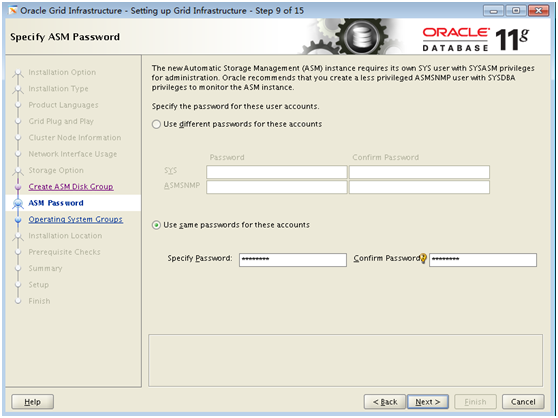
下面开始安装grid和ASM(只在节点1上执行):
在此之前需要保证X11远程显示正常(DISPLAY设置正确),我这里是直接使用的Xshell,不用配置
- 1
- 2
- 3
- 4
- 5
- 6
- 7
- 8
- 1
- 2
- 3
- 4
- 5
- 6
- 7
- 8

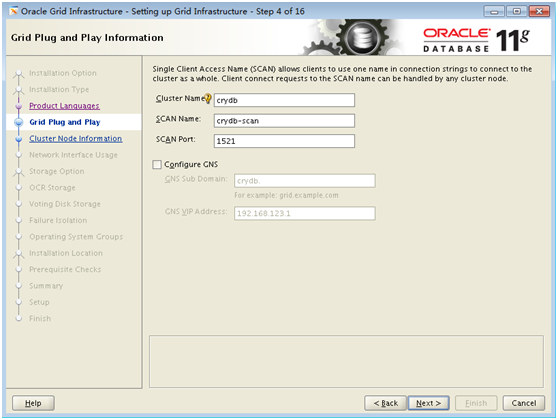
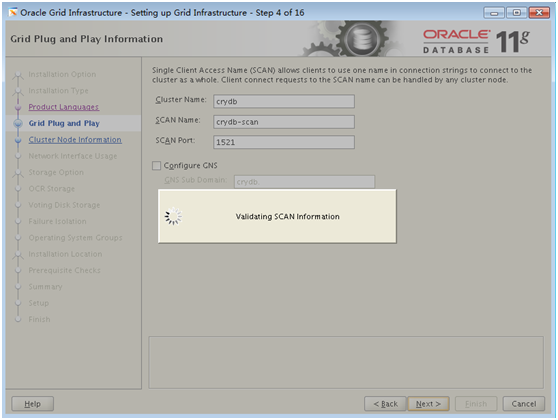
注意上图中的SCAN Name要和hosts中的一致
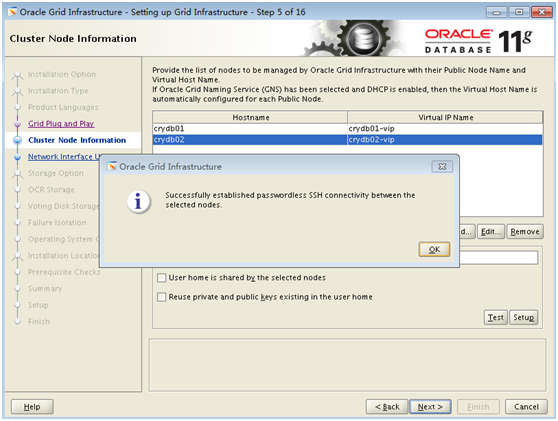
下面一步是添加节点并配置SSH的连通性:
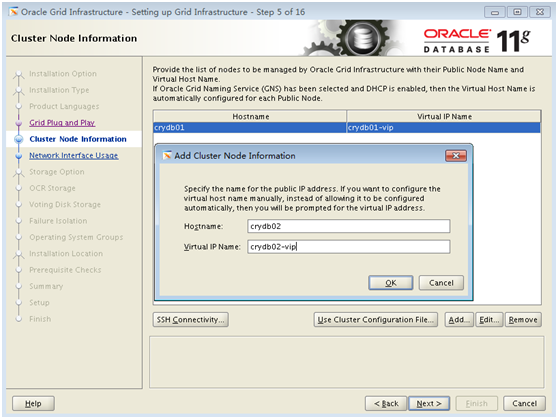
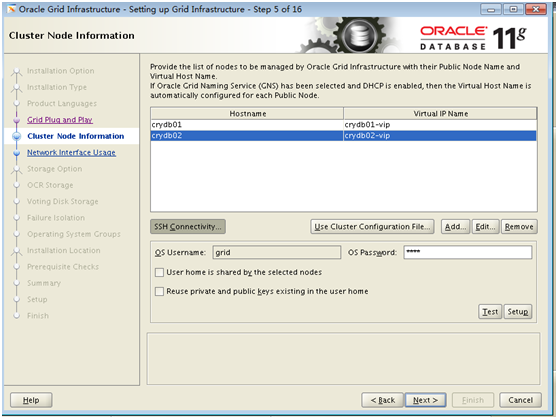
上图中点击”Setup”.
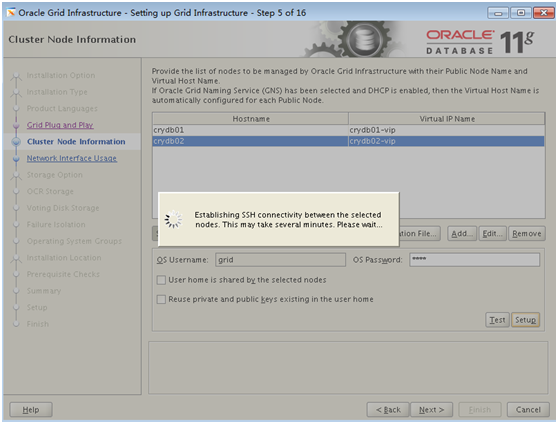
SSH连通性建立成功:
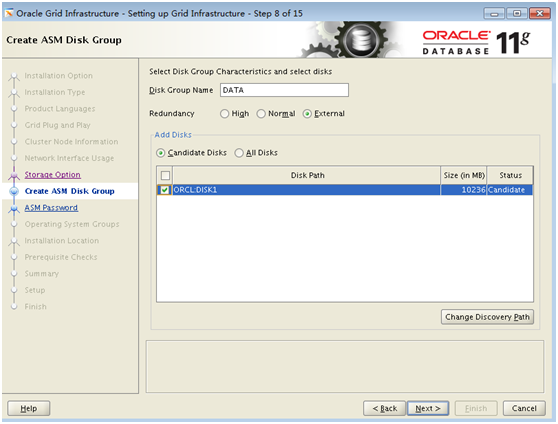
因为只创建了一块共享磁盘,所以选外部(External)
下面是先决条件检查:
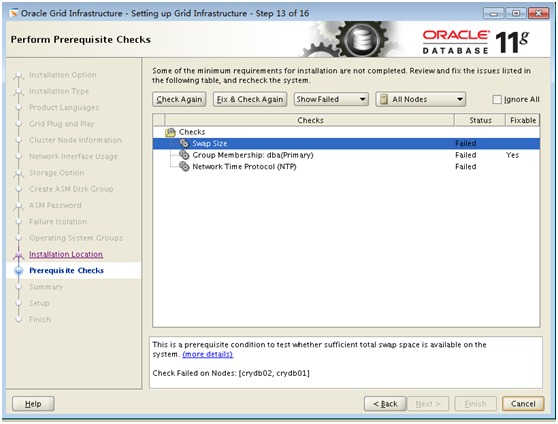
这里我的ntpd有问题,重启的时候报了:
ntpd: Synchronizing with time server: [FAILED]
后来发现是DNS配置(/etc/resolv.conf)有问题,改好后就正常了.
还有个错误(是dba组不是grid的主组导致),点击”Fix & Check Again”,找到修复脚本路径,以root登录执行下就可以了–文中上面的脚本已修改,应不会出现此错误了.
如我这里是:
- 1
- 2
- 3
- 4
- 5
- 6
- 1
- 2
- 3
- 4
- 5
- 6
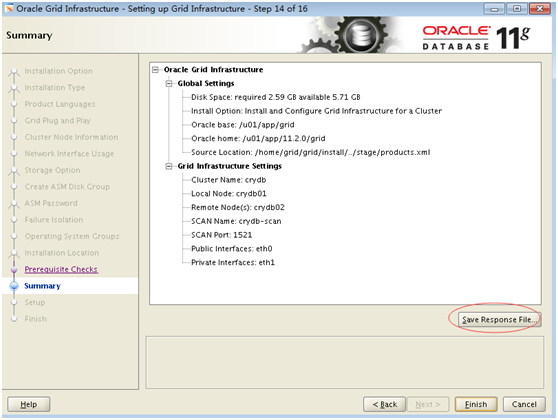
这里可以保存响应文件,方便后面做静默安装使用.
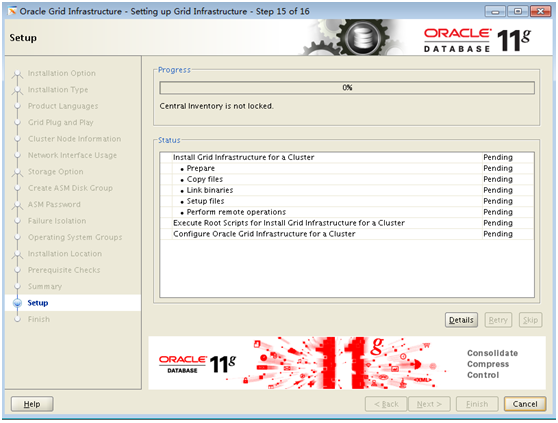
开始漫长的安装了…
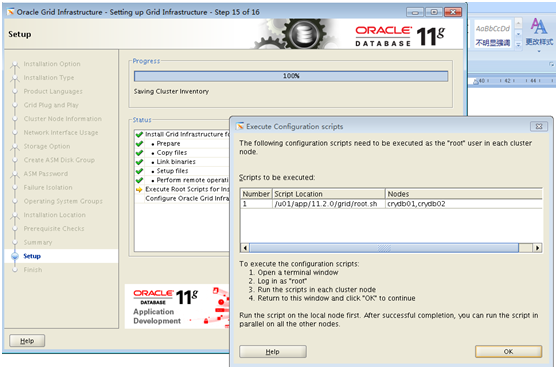
分别在节点1、2上以root执行图中提示的脚本:
- 1
- 2
- 3
- 4
- 5
- 6
- 7
- 8
- 9
- 10
- 11
- 12
- 13
- 14
- 15
- 16
- 17
- 18
- 19
- 20
- 21
- 22
- 23
- 24
- 25
- 26
- 27
- 28
- 29
- 30
- 31
- 32
- 33
- 34
- 35
- 36
- 37
- 38
- 39
- 40
- 41
- 42
- 43
- 44
- 45
- 46
- 47
- 48
- 49
- 50
- 51
- 52
- 53
- 54
- 55
- 56
- 57
- 58
- 59
- 60
- 61
- 62
- 63
- 64
- 65
- 66
- 67
- 68
- 69
- 70
- 71
- 72
- 73
- 74
- 75
- 76
- 77
- 78
- 79
- 80
- 81
- 82
- 83
- 84
- 85
- 86
- 87
- 88
- 89
- 90
- 91
- 92
- 93
- 94
- 95
- 96
- 97
- 98
- 99
- 100
- 101
- 102
- 103
- 104
- 105
- 106
- 107
- 108
- 109
- 110
- 111
- 112
- 113
- 114
- 115
- 116
- 117
- 118
- 119
- 120
- 121
- 122
- 123
- 124
- 125
- 126
- 127
- 128
- 129
- 130
- 131
- 132
- 133
- 134
- 135
- 136
- 137
- 138
- 139
- 140
- 141
在最后出现了这个错误:
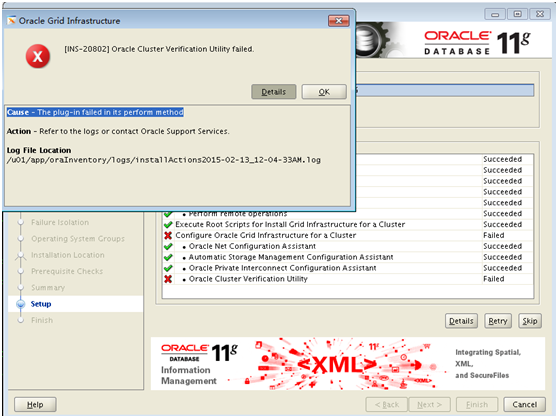
查看日志:
- 1
- 2
- 3
- 4
- 5
- 6
- 7
- 8
- 9
- 1
- 2
- 3
- 4
- 5
- 6
- 7
- 8
- 9
看来是scan-ip解析的问题.原因可能是使用了hosts解析scan-ip而不是使用oracle推荐的DNS或GNS;或者配置了DNS但nslookup crydb-scan不通.
由于我这里在两个节点上ping crydb-scan是通的:
- 1
- 2
- 3
- 4
- 5
- 1
- 2
- 3
- 4
- 5
故可忽略此错误.
至此11g Grid安装完成:
九、安装Grid后的检查和脚本备份
安装完成后,检查crs(Cluster Ready Services)状态:
- 1
- 2
- 3
- 4
- 5
- 1
- 2
- 3
- 4
- 5
查看集群节点:
- 1
- 2
- 3
- 1
- 2
- 3
查看ASM运行状态:
- 1
- 2
- 3
- 1
- 2
- 3
检查OCR(Oracle Cluster Registry):
- 1
- 2
- 3
- 4
- 5
- 6
- 7
- 8
- 9
- 10
- 11
- 12
- 13
- 14
- 15
- 16
- 17
- 18
- 19
- 20
- 21
- 1
- 2
- 3
- 4
- 5
- 6
- 7
- 8
- 9
- 10
- 11
- 12
- 13
- 14
- 15
- 16
- 17
- 18
- 19
- 20
- 21
检查表决磁盘:
- 1
- 2
- 3
- 4
- 5
- 1
- 2
- 3
- 4
- 5
一切正常.
备份root.sh脚本:
- 1
- 2
- 1
- 2
至此,Grid安装全部完成,下一篇将在此基础上安装Oracle数据库.
版权声明:本文为博主原创文章,未经博主允许不得转载。
Created By Cryking 转载请注明出处,谢谢
环境:
VMware Workstation8.0 +Centos 5.5(32位)+Oracle 11.2.0.1.0
两个节点crydb01(节点1)和crydb02(节点2)
一、设置主机名及 网络环境配置
在节点1上:
设置主机名
- 1
- 2
- 3
- 4
- 5
- 6
- 1
- 2
- 3
- 4
- 5
- 6
- 1
- 2
- 3
- 4
- 5
- 6
- 7
- 8
- 9
- 10
- 11
- 12
- 13
- 14
- 15
- 16
- 17
- 18
- 19
- 20
- 21
- 22
- 23
- 1
- 2
- 3
- 4
- 5
- 6
- 7
- 8
- 9
- 10
- 11
- 12
- 13
- 14
- 15
- 16
- 17
- 18
- 19
- 20
- 21
- 22
- 23
节点1的虚拟机添加网卡:
添加完网卡后重启系统并设置eth1的ip:
- 1
- 2
- 3
- 4
- 5
- 6
- 7
- 8
- 9
- 1
- 2
- 3
- 4
- 5
- 6
- 7
- 8
- 9
在节点2上:
- 1
- 2
- 3
- 4
- 5
- 6
- 7
- 8
- 9
- 10
- 11
- 12
- 13
- 14
- 15
- 16
- 17
- 18
- 19
- 20
- 21
- 22
- 23
- 24
- 25
- 26
- 27
- 28
- 29
- 30
- 1
- 2
- 3
- 4
- 5
- 6
- 7
- 8
- 9
- 10
- 11
- 12
- 13
- 14
- 15
- 16
- 17
- 18
- 19
- 20
- 21
- 22
- 23
- 24
- 25
- 26
- 27
- 28
- 29
- 30
重复上面的添加网卡过程,然后重启系统,然后:
- 1
- 2
- 3
- 4
- 5
- 6
- 7
- 1
- 2
- 3
- 4
- 5
- 6
- 7
二、 用户及用户组设置
分别在两个节点上以root用户进行如下操作:
- 1
- 2
- 3
- 4
- 5
- 6
- 7
- 8
- 9
- 10
- 11
- 12
- 13
- 14
- 15
- 16
- 1
- 2
- 3
- 4
- 5
- 6
- 7
- 8
- 9
- 10
- 11
- 12
- 13
- 14
- 15
- 16
三、配置用户SSH等效性
先配置Oracle用户SSH等效性.
在节点1上:
- 1
- 2
- 3
- 4
- 5
- 6
- 7
- 8
- 9
- 10
- 11
- 12
- 13
- 14
- 15
- 16
- 17
- 18
- 19
- 20
- 21
- 22
- 23
- 24
- 25
- 1
- 2
- 3
- 4
- 5
- 6
- 7
- 8
- 9
- 10
- 11
- 12
- 13
- 14
- 15
- 16
- 17
- 18
- 19
- 20
- 21
- 22
- 23
- 24
- 25
在节点2上进行同样操作:
- 1
- 2
- 3
- 4
- 5
- 6
- 7
- 8
- 9
- 10
- 11
- 12
- 13
- 14
- 15
- 16
- 17
- 18
- 19
- 20
- 21
- 22
- 23
- 24
- 25
- 1
- 2
- 3
- 4
- 5
- 6
- 7
- 8
- 9
- 10
- 11
- 12
- 13
- 14
- 15
- 16
- 17
- 18
- 19
- 20
- 21
- 22
- 23
- 24
- 25
再回到节点1上:
- 1
- 2
- 3
- 4
- 5
- 6
- 7
- 8
- 1
- 2
- 3
- 4
- 5
- 6
- 7
- 8
验证在节点2上:
- 1
- 2
- 1
- 2
在节点1上:
- 1
- 2
- 1
- 2
如果都不用输入密码则配置成功.
注意:如果确认已按上面的执行,但配置总是不成功的时候,请确保两个节点的/home/oracle的权限一致,或直接使用root在所有节点执行chmod -R 700 /home/oracle.
在grid用户下也重复进行上面的配置.
这样SSH用户等效性就配置完成了.
四、 创建共享磁盘
如图:
这里我只给了10G磁盘,勾选上立即分配所有空间,分配后点击增加的磁盘,在右边选择高级设置(Advanced),如下:
关闭节点1的系统
[root@crydb01 ~]# halt
编辑crydb01的虚拟机文件(*.vmx):
新增的磁盘内容如下:
…
scsi1.present = “TRUE”
scsi1:0.present = “TRUE”
scsi1:0.fileName = “Red Hat Linux02_shared.vmdk”
scsi1:0.mode = “independent-persistent”
scsi1:0.redo = “”
在最后加上:
- 1
- 2
- 3
- 4
- 5
- 6
- 7
- 8
- 9
- 1
- 2
- 3
- 4
- 5
- 6
- 7
- 8
- 9
启动节点1,发现没问题后再在节点2的虚拟机上进行如下操作:
这里注意选使用现有的虚拟磁盘
然后关闭节点2的虚拟机后,进行和节点1一样的磁盘高级设置:
这里虚拟驱动代码要和节点1的保持一致.
然后编辑节点2的虚拟机文件(*.vmx),添加和节点1一样的内容.
期间发生一个问题,就是新增的SCSI盘系统总是无法认到,后来在vmx文件中添加这一行后就正常了:
scsi1.virtualDev = “lsilogic”
回到节点1,以root登录:
- 1
- 2
- 3
- 4
- 5
- 6
- 7
- 8
- 9
- 10
- 11
- 12
- 13
- 14
- 15
- 16
- 17
- 18
- 1
- 2
- 3
- 4
- 5
- 6
- 7
- 8
- 9
- 10
- 11
- 12
- 13
- 14
- 15
- 16
- 17
- 18
可以看到新加的磁盘/dev/sda,对它进行分区,如下:
- 1
- 2
- 3
- 4
- 5
- 6
- 7
- 8
- 9
- 10
- 11
- 12
- 13
- 14
- 15
- 16
- 17
- 18
- 19
- 20
- 21
- 22
- 23
- 24
- 25
- 26
- 27
- 28
- 29
- 30
- 31
- 32
- 33
- 34
- 35
- 36
- 37
- 38
- 39
- 40
- 41
- 1
- 2
- 3
- 4
- 5
- 6
- 7
- 8
- 9
- 10
- 11
- 12
- 13
- 14
- 15
- 16
- 17
- 18
- 19
- 20
- 21
- 22
- 23
- 24
- 25
- 26
- 27
- 28
- 29
- 30
- 31
- 32
- 33
- 34
- 35
- 36
- 37
- 38
- 39
- 40
- 41
再去到节点2上查看:
- 1
- 2
- 3
- 4
- 5
- 6
- 7
- 8
- 9
- 10
- 11
- 12
- 13
- 14
- 15
- 16
- 17
- 18
- 19
- 1
- 2
- 3
- 4
- 5
- 6
- 7
- 8
- 9
- 10
- 11
- 12
- 13
- 14
- 15
- 16
- 17
- 18
- 19
说明已经成功建立共享磁盘.
五、 集群配置检查
如下检查响应的rpm包是否安装:
[root@crydb01 dev]# rpm -qa | grep -i binutils-2.*
binutils-2.17.50.0.6-14.el5
…
如果没有就需要安装.
安装11g RAC需要的依赖包列表(也可在Concept上去找):
- 1
- 2
- 3
- 4
- 5
- 6
- 7
- 8
- 9
- 10
- 11
- 12
- 13
- 14
- 15
- 16
- 17
- 18
- 19
- 20
- 21
- 22
- 23
- 24
- 25
- 26
- 27
- 28
- 29
- 30
- 31
- 1
- 2
- 3
- 4
- 5
- 6
- 7
- 8
- 9
- 10
- 11
- 12
- 13
- 14
- 15
- 16
- 17
- 18
- 19
- 20
- 21
- 22
- 23
- 24
- 25
- 26
- 27
- 28
- 29
- 30
- 31
在节点1上执行检查:
- 1
- 2
- 3
- 4
- 5
- 6
- 7
- 8
- 9
- 10
- 11
- 12
- 13
- 1
- 2
- 3
- 4
- 5
- 6
- 7
- 8
- 9
- 10
- 11
- 12
- 13
仔细检查各个未通过的项目并解决.
注:如两个节点时间不同步,则可能出现
PRVF-5415 : Check to see if NTP daemon is running failed
在两个节点上启动ntpd服务: service ntpd start
如果还出现:
PRVF-5436 : The NTP daemon running on one or more nodes lacks the slewing option
则分别在两个节点上编辑文件如下(添加-x):
- 1
- 2
- 3
- 4
- 5
- 6
- 7
- 8
- 9
- 1
- 2
- 3
- 4
- 5
- 6
- 7
- 8
- 9
这里我有个Result: Swap space check failed,不用理它.
验证OS和硬件:
- 1
- 2
- 3
- 1
- 2
- 3
六、用户环境配置
在两个节点上关闭防火墙:
/etc/rc.d/init.d/iptables stop
分别在两个节点上:
- 1
- 2
- 3
- 4
- 5
- 6
- 7
- 8
- 9
- 10
- 11
- 12
- 13
- 14
- 15
- 16
- 17
- 18
- 19
- 20
- 21
- 22
- 23
- 24
- 25
- 26
- 27
- 28
- 29
- 30
- 31
- 32
- 33
- 34
- 35
- 36
- 37
- 38
- 39
- 40
- 41
- 42
- 43
- 44
- 45
- 46
- 47
- 48
- 49
- 50
- 51
- 52
- 53
- 54
- 55
- 56
- 57
- 58
- 59
- 60
- 61
- 62
- 63
- 64
- 65
- 1
- 2
- 3
- 4
- 5
- 6
- 7
- 8
- 9
- 10
- 11
- 12
- 13
- 14
- 15
- 16
- 17
- 18
- 19
- 20
- 21
- 22
- 23
- 24
- 25
- 26
- 27
- 28
- 29
- 30
- 31
- 32
- 33
- 34
- 35
- 36
- 37
- 38
- 39
- 40
- 41
- 42
- 43
- 44
- 45
- 46
- 47
- 48
- 49
- 50
- 51
- 52
- 53
- 54
- 55
- 56
- 57
- 58
- 59
- 60
- 61
- 62
- 63
- 64
- 65
设置资源限制,分别在两个节点下添加:
- 1
- 2
- 3
- 4
- 5
- 6
- 7
- 8
- 9
- 10
- 11
- 12
- 13
- 1
- 2
- 3
- 4
- 5
- 6
- 7
- 8
- 9
- 10
- 11
- 12
- 13
在/etc/profile文件最后加上:
- 1
- 2
- 3
- 4
- 5
- 6
- 7
- 8
- 9
- 10
- 1
- 2
- 3
- 4
- 5
- 6
- 7
- 8
- 9
- 10
七、为ASM安装、配置ASMLib
提示:配置ASM不一定需要ASMLib,也可使用标准Linux I/O调用来管理裸设备.
用root在两个节点上执行:
- 1
- 2
- 3
- 1
- 2
- 3
验证是否成功安装:
- 1
- 2
- 3
- 4
- 1
- 2
- 3
- 4
配置ASMLib:
- 1
- 2
- 3
- 4
- 5
- 6
- 7
- 8
- 9
- 10
- 11
- 12
- 13
- 14
- 15
- 16
- 17
- 18
- 1
- 2
- 3
- 4
- 5
- 6
- 7
- 8
- 9
- 10
- 11
- 12
- 13
- 14
- 15
- 16
- 17
- 18
创建ASM磁盘(只在节点1执行):
- 1
- 2
- 3
- 1
- 2
- 3
在节点2上执行扫描磁盘:
- 1
- 2
- 3
- 4
- 5
- 1
- 2
- 3
- 4
- 5
查看下当前的ASM磁盘(分别在两个节点上执行):
- 1
- 2
- 1
- 2
八、正式安装Grid
下面开始安装grid和ASM(只在节点1上执行):
在此之前需要保证X11远程显示正常(DISPLAY设置正确),我这里是直接使用的Xshell,不用配置
- 1
- 2
- 3
- 4
- 5
- 6
- 7
- 8
- 1
- 2
- 3
- 4
- 5
- 6
- 7
- 8
注意上图中的SCAN Name要和hosts中的一致
下面一步是添加节点并配置SSH的连通性:
上图中点击”Setup”.
SSH连通性建立成功:
因为只创建了一块共享磁盘,所以选外部(External)
下面是先决条件检查:
这里我的ntpd有问题,重启的时候报了:
ntpd: Synchronizing with time server: [FAILED]
后来发现是DNS配置(/etc/resolv.conf)有问题,改好后就正常了.
还有个错误(是dba组不是grid的主组导致),点击”Fix & Check Again”,找到修复脚本路径,以root登录执行下就可以了–文中上面的脚本已修改,应不会出现此错误了.
如我这里是:
- 1
- 2
- 3
- 4
- 5
- 6
- 1
- 2
- 3
- 4
- 5
- 6
这里可以保存响应文件,方便后面做静默安装使用.
开始漫长的安装了…
分别在节点1、2上以root执行图中提示的脚本:
- 1
- 2
- 3
- 4
- 5
- 6
- 7
- 8
- 9
- 10
- 11
- 12
- 13
- 14
- 15
- 16
- 17
- 18
- 19
- 20
- 21
- 22
- 23
- 24
- 25
- 26
- 27
- 28
- 29
- 30
- 31
- 32
- 33
- 34
- 35
- 36
- 37
- 38
- 39
- 40
- 41
- 42
- 43
- 44
- 45
- 46
- 47
- 48
- 49
- 50
- 51
- 52
- 53
- 54
- 55
- 56
- 57
- 58
- 59
- 60
- 61
- 62
- 63
- 64
- 65
- 66
- 67
- 68
- 69
- 70
- 71
- 72
- 73
- 74
- 75
- 76
- 77
- 78
- 79
- 80
- 81
- 82
- 83
- 84
- 85
- 86
- 87
- 88
- 89
- 90
- 91
- 92
- 93
- 94
- 95
- 96
- 97
- 98
- 99
- 100
- 101
- 102
- 103
- 104
- 105
- 106
- 107
- 108
- 109
- 110
- 111
- 112
- 113
- 114
- 115
- 116
- 117
- 118
- 119
- 120
- 121
- 122
- 123
- 124
- 125
- 126
- 127
- 128
- 129
- 130
- 131
- 132
- 133
- 134
- 135
- 136
- 137
- 138
- 139
- 140
- 141
- 1
- 2
- 3
- 4
- 5
- 6
- 7
- 8
- 9
- 10
- 11
- 12
- 13
- 14
- 15
- 16
- 17
- 18
- 19
- 20
- 21
- 22
- 23
- 24
- 25
- 26
- 27
- 28
- 29
- 30
- 31
- 32
- 33
- 34
- 35
- 36
- 37
- 38
- 39
- 40
- 41
- 42
- 43
- 44
- 45
- 46
- 47
- 48
- 49
- 50
- 51
- 52
- 53
- 54
- 55
- 56
- 57
- 58
- 59
- 60
- 61
- 62
- 63
- 64
- 65
- 66
- 67
- 68
- 69
- 70
- 71
- 72
- 73
- 74
- 75
- 76
- 77
- 78
- 79
- 80
- 81
- 82
- 83
- 84
- 85
- 86
- 87
- 88
- 89
- 90
- 91
- 92
- 93
- 94
- 95
- 96
- 97
- 98
- 99
- 100
- 101
- 102
- 103
- 104
- 105
- 106
- 107
- 108
- 109
- 110
- 111
- 112
- 113
- 114
- 115
- 116
- 117
- 118
- 119
- 120
- 121
- 122
- 123
- 124
- 125
- 126
- 127
- 128
- 129
- 130
- 131
- 132
- 133
- 134
- 135
- 136
- 137
- 138
- 139
- 140
- 141
在最后出现了这个错误:
查看日志:
- 1
- 2
- 3
- 4
- 5
- 6
- 7
- 8
- 9
- 1
- 2
- 3
- 4
- 5
- 6
- 7
- 8
- 9
看来是scan-ip解析的问题.原因可能是使用了hosts解析scan-ip而不是使用oracle推荐的DNS或GNS;或者配置了DNS但nslookup crydb-scan不通.
由于我这里在两个节点上ping crydb-scan是通的:
- 1
- 2
- 3
- 4
- 5
- 1
- 2
- 3
- 4
- 5
故可忽略此错误.
至此11g Grid安装完成:
九、安装Grid后的检查和脚本备份
安装完成后,检查crs(Cluster Ready Services)状态:
- 1
- 2
- 3
- 4
- 5
- 1
- 2
- 3
- 4
- 5
查看集群节点:
- 1
- 2
- 3
- 1
- 2
- 3
查看ASM运行状态:
- 1
- 2
- 3
- 1
- 2
- 3
检查OCR(Oracle Cluster Registry):
- 1
- 2
- 3
- 4
- 5
- 6
- 7
- 8
- 9
- 10
- 11
- 12
- 13
- 14
- 15
- 16
- 17
- 18
- 19
- 20
- 21
- 1
- 2
- 3
- 4
- 5
- 6
- 7
- 8
- 9
- 10
- 11
- 12
- 13
- 14
- 15
- 16
- 17
- 18
- 19
- 20
- 21
检查表决磁盘:
- 1
- 2
- 3
- 4
- 5
- 1
- 2
- 3
- 4
- 5
一切正常.
备份root.sh脚本:
- 1
- 2
- 1
- 2
至此,Grid安装全部完成,下一篇将在此基础上安装Oracle数据库.


 1万+
1万+


 被折叠的 条评论
为什么被折叠?
被折叠的 条评论
为什么被折叠?
 到【灌水乐园】发言


