


子组件html
<
a *
ngIf=
"currentNodeStatus !== '0'" (
click)=
"navigateDetail(deliveryId,currentNodeStatus,nextNodeStatus)"
style=
" cursor:pointer;"
>
<
img
src=
"{{imgUrl}}"
width=
"32px"
>
</
a
>
@
Output() onSelectIcon
=
new
EventEmitter<
any>();
@
Input() deliveryId
:
string;
@
Input() currentNodeStatus
:
string;
@
Input() nextNodeStatus
:
string;
父组件 html
<
td
class=
"iconText"
>
<
appc-deliveryProgress (
onSelectIcon)=
"onGridSelected('delivered',od.deliveryId,od.deliveredStatus)"
deliveryId=
"{{od.deliveryId}}"
currentNodeStatus=
"{{od.deliveredStatus}}"></
appc-deliveryProgress>
</
td
>
父组件 .ts
onGridSelected(phase
:
string, deliveryId
:
string, phaseStatus
:
string) {
this.
router.
navigate([
'/deliveryProgressDashboard/progressDashboardDetail'], { queryParams: {
'orderId':
deliveryId,
'phase':
phase,
'phaseStatus':
phaseStatus } });
}
官方文档:
组件之间的交互
Component Interaction
本烹饪宝典包含了常见的组件通讯场景,也就是让两个或多个组件之间共享信息的方法。
要深入了解组件通讯的各个基本概念,在组件通讯文档中可以找到详细的描述和例子。
通过输入型绑定把数据从父组件传到子组件。
HeroChildComponent 有两个输入型属性,它们通常带@Input装饰器。
- import { Component, Input } from '@angular/core';
- import { Hero } from './hero';
- @Component({
- selector: 'app-hero-child',
- template: `
- <h3>{{hero.name}} says:</h3>
- <p>I, {{hero.name}}, am at your service, {{masterName}}.</p>
- `
- })
- export class HeroChildComponent {
- @Input() hero: Hero;
- @Input('master') masterName: string;
- }
第二个@Input为子组件的属性名masterName指定一个别名master(译者注:不推荐为起别名,请参见风格指南).
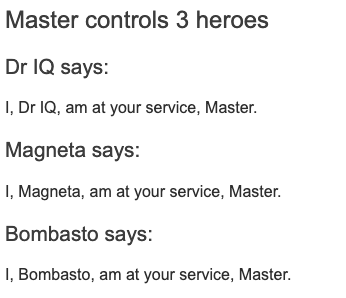
父组件HeroParentComponent把子组件的HeroChildComponent放到*ngFor循环器中,把自己的master字符串属性绑定到子组件的master别名上,并把每个循环的hero实例绑定到子组件的hero属性。
- import { Component } from '@angular/core';
- import { HEROES } from './hero';
- @Component({
- selector: 'app-hero-parent',
- template: `
- <h2>{{master}} controls {{heroes.length}} heroes</h2>
- <app-hero-child *ngFor="let hero of heroes"
- [hero]="hero"
- [master]="master">
- </app-hero-child>
- `
- })
- export class HeroParentComponent {
- heroes = HEROES;
- master = 'Master';
- }
运行应用程序会显示三个英雄:


 663
663


 被折叠的 条评论
为什么被折叠?
被折叠的 条评论
为什么被折叠?
 到【灌水乐园】发言


