


[rhel6.5]安装配置
nagios系统环境:
nagios主机:server20.com 172.25.23.20
mysql主机server20.com 172.25.23.21
nrpe主机;server21.com:172.25.23.21
需要的软件:
nagios-cn-3.2.3.tar.bz2
nagios-plugins-2.1.1.tar.gz
nrpe-2.15.tar.gz需要注意的几项
- 1.确定关闭
iptables; 2.确定
selinux不启用;首先在
nagios上面配置ngios主机- 首先配置主机的依赖关系
[root@server20 ~]# yum install httpd gcc make gd-devel perl-ExtUtils-Embed.x86_64 -y
- 添加nagios运行的用户nagios
[root@server20 ~]# useradd nagios- 使apache用于对于nagios具有写权限
[root@server20 ~]# id apache
uid=48(apache) gid=48(apache) groups=48(apache)
[root@server20 ~]# usermod -G nagios apache- 解压nagios软件,并且尝试进行安装
[root@server20 ~]# tar -jxf /mnt/nagios-cn-3.2.3.tar.bz2 -C /usr/local/- 进行软件的安装
[root@server20 nagios-cn-3.2.3]# cd /usr/local/nagios-cn-3.2.3/
[root@server20 nagios-cn-3.2.3]# ./configure --enable-embedded-perl
[root@server20 nagios-cn-3.2.3]# make all
[root@server20 nagios-cn-3.2.3]# make install

[root@server20 nagios-cn-3.2.3]# make install-init
/usr/bin/install -c -m 755 -d -o root -g root /etc/rc.d/init.d
/usr/bin/install -c -m 755 -o root -g root daemon-init /etc/rc.d/init.d/nagios

*** Init script installed ***

[root@server20 nagios-cn-3.2.3]# make install-commandmode
/usr/bin/install -c -m 775 -o nagios -g nagios -d /usr/local/nagios/var/rw
chmod g+s /usr/local/nagios/var/rw

*** External command directory configured ***

[root@server20 nagios-cn-3.2.3]# make install-config
/usr/bin/install -c -m 775 -o nagios -g nagios -d /usr/local/nagios/etc
/usr/bin/install -c -m 775 -o nagios -g nagios -d /usr/local/nagios/etc/objects
/usr/bin/install -c -b -m 664 -o nagios -g nagios sample-config/nagios.cfg /usr/local/nagios/etc/nagios.cfg

[root@server20 nagios-cn-3.2.3]# make install-webconf
/usr/bin/install -c -m 644 sample-config/httpd.conf /etc/httpd/conf.d/nagios.conf

*** Nagios/Apache conf file installed ***- 配置
Nagios的管理用户帐号
[root@server20 ~]# htpasswd -c /usr/local/nagios/etc/htpasswd.users nagiosadmin- 接下来需要编译nagios的插件,也就是用于或者各种服务状态的插件
- 首先配置编译环境
[root@server20 ~]# yum install mysql-devel openssl-devel -y- 然后解压软件,并且进行安装
[root@server20 ~]# tar zxf /mnt/nagios-plugins-2.1.1.tar.gz -C /usr/local/

[root@server20 ~]# cd /usr/local/nagios-plugins-2.1.1/

[root@server20 nagios-plugins-2.1.1]# ./configure --with-nagios-user=nagios --with-nagios-group=nagios --enable-extra-opts --enable-libtap --enable-perl-modules --with-cgiurl --with-perl
[root@server20 nagios-plugins-2.1.1]# make
[root@server20 nagios-plugins-2.1.1]# make install- 更改配置文件
[root@server20 ~]# vim /usr/local/nagios/etc/nagios.cfg
cfg_file=/usr/local/nagios/etc/objects/hosts.cfg
cfg_file=/usr/local/nagios/etc/objects/service.cfg
#cfg_file=/usr/local/nagios/etc/objects/localhost.cfg- 然后创建
hosts.cfg文件
[root@server20 ~]# vim /usr/local/nagios/etc/objects/hosts.cfg
define host{
    use     linux-server
    host_name 监控主机
    alias   nagios 服务器
    address 127.0.0.1
    icon_image  web.gif
    statusmap_image web.gd2
#   check_command check-host-alive
    2d_coords   100,300
    3d_coords   100,300,100
}

define hostgroup{
    hostgroup_name Linux-servers
    alias   Linux Servers
    members *
}- 创建
service.cfg文件
[root@server20 ~]# vim /usr/local/nagios/etc/objects/service.cfg

define service{
    use         local-service
    host_name       *
    service_description PING
    check_command       check-host-alive
}
define service{
    use         local-service
    host_name       监控主机
    service_groups      系统状况检查
    service_description  登录用户数
    check_command       check_local_users!20!50
}
define service{
    use         local-service
    host_name        监控主机
    service_groups       系统状况检查
    service_description  根分区
    check_command        check_local_disk!20%!10%!/
}
define service{
    use          local-service
    host_name        监控主机
    service_groups       系统状况检查
    service_description  进程总数
    check_command        check_local_procs!250!400!RSZDT
}

define service{
    use          local-service
    host_name        监控主机
    service_groups       系统状况检查
    service_description  系统负载
    check_command        check_local_load!5.0,4.0,3.0!10.0,6.0,4.0
}

define service{
    use         local-service
    host_name       监控主机
    service_groups      系统状况检查
    service_description     交换空间利用率
    check_command       check_local_swap!20!10
}

#服务组并不是必须的,这是配合 nagios 的监控页面的显示
define servicegroup{
    servicegroup_name   系统状况检查
    alias           系统概况
}- 使用命令检查配置文件的修改后的合法性
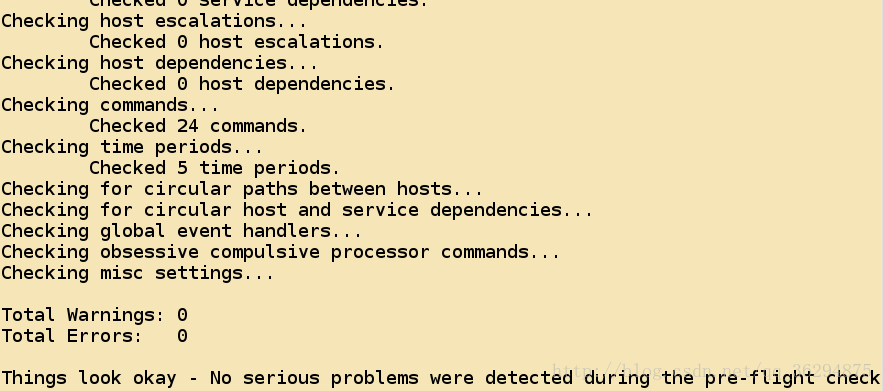
[root@server20 ~]# /usr/local/nagios/bin/nagios -v /usr/local/nagios/etc/nagios.cfg

Nagios Core 3.2.3
Copyright (c) 2009-2010 Nagios Core Development Team and Community Contributors
Copyright (c) 1999-2009 Ethan Galstad
Last Modified: 10-03-2010
License: GPL

Website: http://www.nagios.org
Reading configuration data...
   Read main config file okay...
Processing object config file '/usr/local/nagios/etc/objects/commands.cfg'...
Processing object config file '/usr/local/nagios/etc/objects/contacts.cfg'...
Processing object config file '/usr/local/nagios/etc/objects/timeperiods.cfg'...
Processing object config file '/usr/local/nagios/etc/objects/templates.cfg'...
Processing object config file '/usr/local/nagios/etc/objects/hosts.cfg'...
Processing object config file '/usr/local/nagios/etc/objects/service.cfg'...
   Read object config files okay...

Running pre-flight check on configuration data...

Checking services...
    Checked 6 services.
Checking hosts...
    Checked 1 hosts.
Checking host groups...
    Checked 1 host groups.
Checking service groups...
    Checked 1 service groups.
Checking contacts...
    Checked 1 contacts.
Checking contact groups...
    Checked 1 contact groups.
Checking service escalations...
    Checked 0 service escalations.
Checking service dependencies...
    Checked 0 service dependencies.
Checking host escalations...
    Checked 0 host escalations.
Checking host dependencies...
    Checked 0 host dependencies.
Checking commands...
    Checked 24 commands.
Checking time periods...
    Checked 5 time periods.
Checking for circular paths between hosts...
Checking for circular host and service dependencies...
Checking global event handlers...
Checking obsessive compulsive processor commands...
Checking misc settings...

Total Warnings: 0
Total Errors:   0

Things look okay - No serious problems were detected during the pre-flight check- 这里必须确定配置文件修改后是正确的
- 为nagios创建管理用户并且创建密码
[root@server20 ~]# htpasswd -c /usr/local/nagios/etc/htpasswd.users nagiosadmin- 启动服务
[root@server20 ~]# service nagios start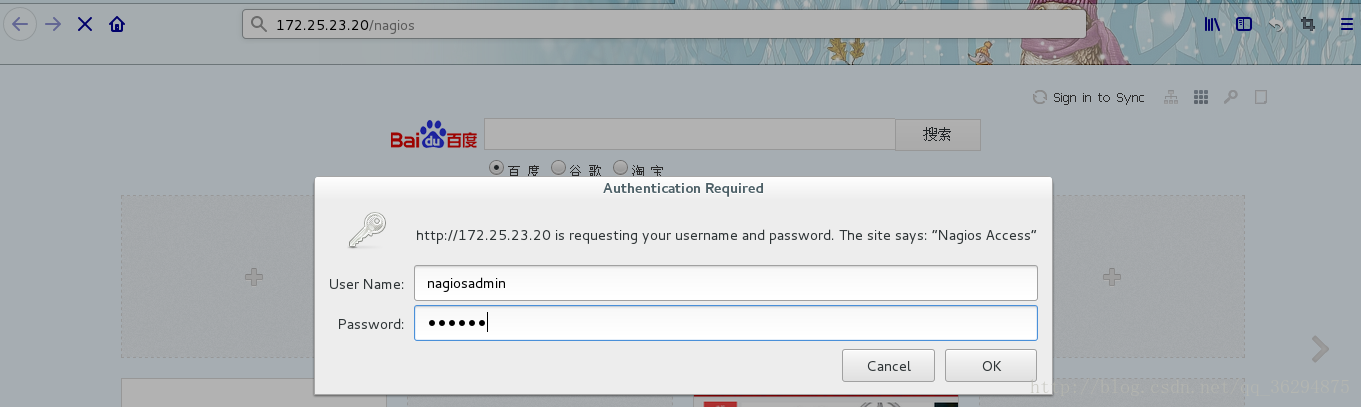
[root@server20 ~]# service httpd start- 使用浏览器进行访问,并且尝试登陆,用户是
nagisoadmin密码是上面设定的密码
* 接下来可以看到这个界面
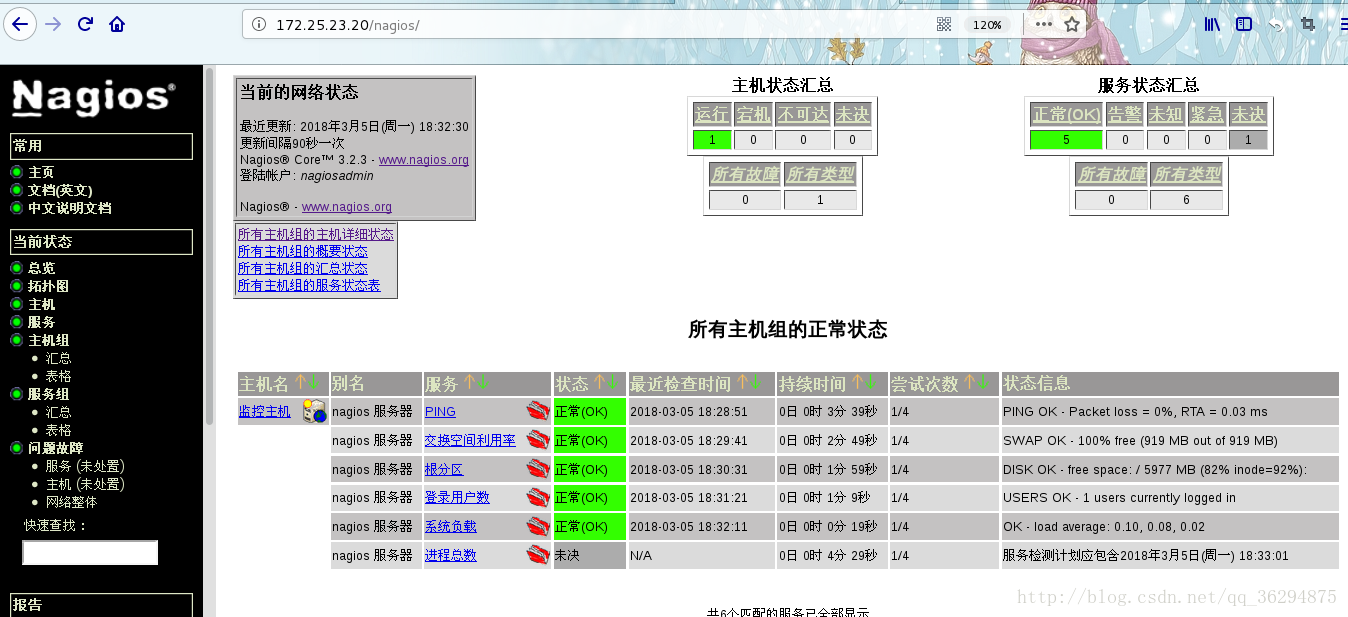
* 出现未决状态的原因是因为还没有到状态的检测时间;
- 接下来配置
Nagios连接本地的mysql主机 - 首先需要创建
Mysql主机上面的测试用户nagdb
[root@server20 html]# mysql -uroot -p
Enter password:
Welcome to the MySQL monitor.  Commands end with ; or \g.
Your MySQL connection id is 4
Server version: 5.1.71 Source distribution

mysql> create database nagdb;
Query OK, 1 row affected (0.00 sec)

mysql> grant select on nagdb.* to nagdb@'172.25.23.20';
Query OK, 0 rows affected (0.00 sec)

mysql> grant select on nagdb.* to nagdb@'172.25.23.21';
Query OK, 0 rows affected (0.00 sec)

mysql> flush privileges;
Query OK, 0 rows affected (0.00 sec)- 使用命令测试连接数据库
[root@server20 html]# /usr/local/nagios/libexec/check_mysql -H 172.25.23.20 -u nagdb -d nagdb
Uptime: 461 Threads: 1 Questions: 2125 Slow queries: 0 Opens: 33 Flush tables: 1 Open tables: 24 Queries per second avg: 4.609|Connections=18c;;; Open_files=44;;; Open_tables=24;;; Qcache_free_memory=0;;; Qcache_hits=0c;;; Qcache_inserts=0c;;; Qcache_lowmem_prunes=0c;;; Qcache_not_cached=0c;;; Qcache_queries_in_cache=0;;; Queries=2125c;;; Questions=2125c;;; Table_locks_waited=2c;;; Threads_connected=1;;; Threads_running=1;;; Uptime=461c;;;- 然后需要配置
hosts.cfg
[root@server20 html]# vim /usr/local/nagios/etc/objects/hosts.cfg
添加:

define host{
        use             linux-server
        host_name       mysql 主机
        alias           mysql 服务器
        address         172.25.23.20
        icon_image      server.gif
        statusmap_image server.gd2
        2d_coords       500,200
        3d_coords       500,200,100
}- 接下来更改
service.cfg
[root@server20 html]# vim /usr/local/nagios/etc/objects/service.cfg

define service{
        use                      local-service
        host_name                mysql 主机
        servce_groups            mysql 服务组
        service_description      mysql 服务
        check_command            check_mysql
}


define servicegroup{
        servicegroup_name        mysql 服务组
        alias                    mysql 服务器
}- 最后更改
command.cfg
define command{
        command_name check_mysql
        command_line $USER1$/check_mysql -H $HOSTADDRESS$ -u nagdb -d nagdb
}- 重新检测配置文件的合法性
[root@server20 html]# /usr/local/nagios/bin/nagios -v /usr/local/nagios/etc/nagios.cfg

Nagios Core 3.2.3
Copyright (c) 2009-2010 Nagios Core Development Team and Community Contributors
Copyright (c) 1999-2009 Ethan Galstad
Last Modified: 10-03-2010
License: GPL

Website: http://www.nagios.org
Reading configuration data...
   Read main config file okay...
Processing object config file '/usr/local/nagios/etc/objects/commands.cfg'...
Processing object config file '/usr/local/nagios/etc/objects/contacts.cfg'...
Processing object config file '/usr/local/nagios/etc/objects/timeperiods.cfg'...
Processing object config file '/usr/local/nagios/etc/objects/templates.cfg'...
Processing object config file '/usr/local/nagios/etc/objects/hosts.cfg'...
Processing object config file '/usr/local/nagios/etc/objects/service.cfg'...
   Read object config files okay...

Running pre-flight check on configuration data...

Checking services...
    Checked 6 services.
Checking hosts...
    Checked 1 hosts.
Checking host groups...
    Checked 1 host groups.
Checking service groups...
    Checked 1 service groups.
Checking contacts...
    Checked 1 contacts.
Checking contact groups...
    Checked 1 contact groups.
Checking service escalations...
    Checked 0 service escalations.
Checking service dependencies...
    Checked 0 service dependencies.
Checking host escalations...
    Checked 0 host escalations.
Checking host dependencies...
    Checked 0 host dependencies.
Checking commands...
    Checked 24 commands.
Checking time periods...
    Checked 5 time periods.
Checking for circular paths between hosts...
Checking for circular host and service dependencies...
Checking global event handlers...
Checking obsessive compulsive processor commands...
Checking misc settings...

Total Warnings: 0
Total Errors:   0

Things look okay - No serious problems were detected during the pre-flight check- 通知服务器重新加载配置文件
[root@server20 html]# service nagios reload
Running configuration check...done.
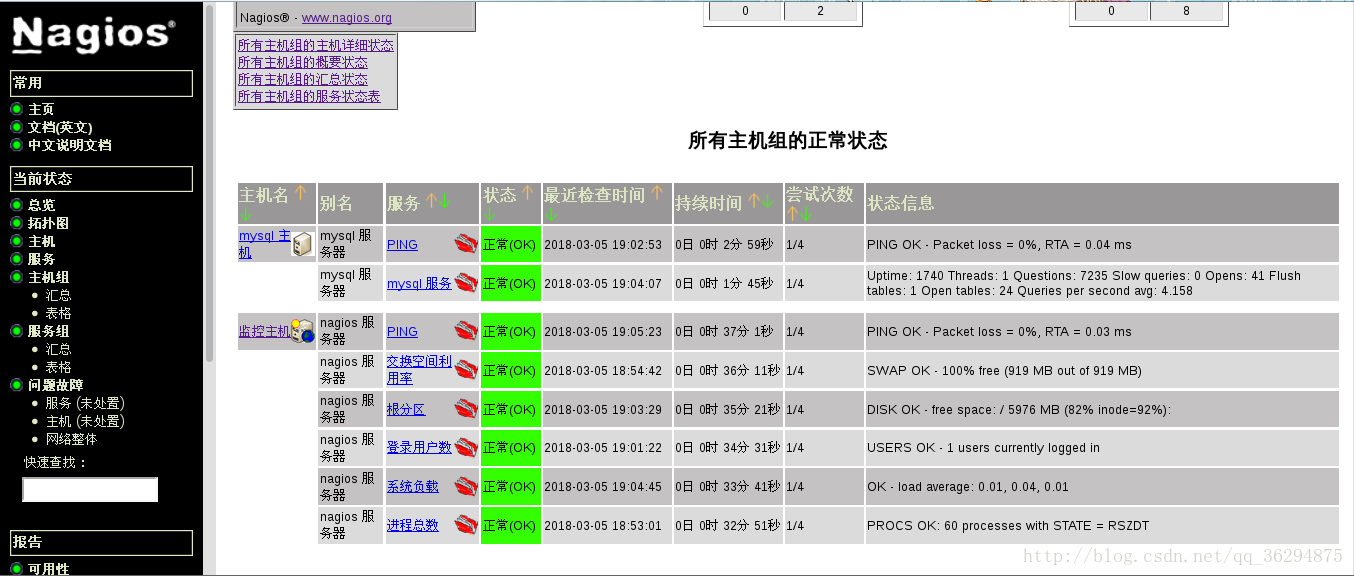
Reloading nagios configuration...done使用浏览器访问可以得到数据库的状态信息
接下来配置
Nagios监控远程主机- 这里使用的远程主机是
server21.com - 首先需要创建用户
[root@server21 ~]# useradd nagios
[root@server21 ~]# id nagios
uid=500(nagios) gid=500(nagios) groups=500(nagios)- 安装
nagiso-plugins插件
[root@server21 ~]# tar -zxf /mnt/nagios-plugins-2.1.1.tar.gz -C /usr/local/

[root@server21 ~]# cd /usr/local/nagios-plugins-2.1.1/- 然后进行编译安装,执行属主和属组
[root@server21 nagios-plugins-2.1.1]# ./configure --with-nagios-user=nagios --with-nagios-group=nagios

[root@server21 nagios-plugins-2.1.1]# make

[root@server21 nagios-plugins-2.1.1]# make install - 接下来需要安装
nrpe - 首先来安装xinetd服务
[root@server21 nagios-plugins-2.1.1]# yum install xinetd -y- 接下来进行编译安装
[root@server21 mnt]# tar -zxf nrpe-2.15.tar.gz -C /usr/local/
[root@server21 mnt]# cd /usr/local/nrpe-2.15/
[root@server21 nrpe-2.15]# ./configure
..................................................
*** Configuration summary for nrpe 2.15 09-06-2013 ***:

 General Options:
 -------------------------
 NRPE port:    5666
 NRPE user:    nagios
 NRPE group:   nagios
 Nagios user:  nagios
 Nagios group: nagios


Review the options above for accuracy.  If they look okay,
type 'make all' to compile the NRPE daemon and client

[root@server21 nrpe-2.15]# make all
[root@server21 nrpe-2.15]# make install-plugin
[root@server21 nrpe-2.15]# make install-daemon
[root@server21 nrpe-2.15]# make install-daemon-config
[root@server21 nrpe-2.15]# make install-xinetd- 接下来配置
nrpe
[root@server21 nrpe-2.15]# vim /etc/xinetd.d/nrpe
# default: on
# description: NRPE (Nagios Remote Plugin Executor)
service nrpe
{
        flags           = REUSE
        socket_type     = stream
        port            = 5666
        wait            = no
        user            = nagios
        group           = nagios
        server          = /usr/local/nagios/bin/nrpe
        server_args     = -c /usr/local/nagios/etc/nrpe.cfg --inetd
        log_on_failure  += USERID
        disable         = no
        only_from       = 172.25.23.20
}- 添加
nrpe的端口信息
[root@server21 nrpe-2.15]# vim /etc/services
nrpe            5666/tcp                # nrpe监听端口
- 配置磁盘检查的选项
[root@server21 nrpe-2.15]# vim /usr/local/nagios/etc/nrpe.cfg
command[check_disk]=/usr/local/nagios/libexec/check_disk -w 20% -c 10% -p /- 确保服务启动,并且端口正常开始
[root@server21 nrpe-2.15]# service xinetd restart
Stopping xinetd:                                           [FAILED]
Starting xinetd:                                           [  OK  ]
[root@server21 nrpe-2.15]# netstat -antlp | grep 5666
tcp 0 0 :::5666 :::* LISTEN 22567/xinetd - 接下来需要配置监控主机
- 首先解压安装
nrpe
[root@server20 mnt]# tar -zxf nrpe-2.15.tar.gz -C /usr/local/

[root@server20 mnt]# cd /usr/local/nrpe-2.15/
[root@server20 nrpe-2.15]# ./configure --with-nagios-user=nagios --with-nagios-group=nagios

[root@server20 nrpe-2.15]# make all

[root@server20 nrpe-2.15]# make install-plugin- 使用命令测试远程主机的
nrpe是否是正常的
[root@server20 nrpe-2.15]# /usr/local/nagios/libexec/check_nrpe -H 172.25.23.21
NRPE v2.15- 修改监控主机的
command.cfg
define command{
        command_name     check_nrpe
        command_line     $USER1$/check_nrpe -H $HOSTADDRESS$ -c $ARG1$
}- 这里需要修改hosts文件
添加
define host{
        use             linux-server
        host_name       server21.com  //这个远程主机的地址;
        alias           server21.com 状态
        address         172.25.23.21
        icon_image      server.gif
        statusmap_image server.gd2
        2d_coords       500,200
        3d_coords       500,200,100
}- 修改
service.cfg文件
define service{
    use          generic-service
    host_name server21.com
    service_description  CPU Load
    check_command        check_nrpe!check_load
}

define service{
    use          generic-service
    host_name       server21.com
    service_description      Current Users
    check_command        check_nrpe!check_users
}


define service{
    use         generic-service
    host_name       server21.com
    service_description / Free Space
    check_command       check_nrpe!check_disk
}

define service{
    use         generic-service
    host_name       server21.com
    service_description Total Processes
    check_command       check_nrpe!check_total_procs
}


define service{
    use         generic-service
    host_name       server21.com
    service_description Zombie Processes
    check_command       check_nrpe!check_zombie_procs
}- 接下来需要重新检测[配置文件的语法
[root@server20 nrpe-2.15]# /usr/local/nagios/bin/nagios -v /usr/local/nagios/etc/nagios.cfg

Nagios Core 3.2.3
Copyright (c) 2009-2010 Nagios Core Development Team and Community Contributors
Copyright (c) 1999-2009 Ethan Galstad
Last Modified: 10-03-2010
License: GPL

Website: http://www.nagios.org
Reading configuration data...
   Read main config file okay...
Processing object config file '/usr/local/nagios/etc/objects/commands.cfg'...
Processing object config file '/usr/local/nagios/etc/objects/contacts.cfg'...
Processing object config file '/usr/local/nagios/etc/objects/timeperiods.cfg'...
Processing object config file '/usr/local/nagios/etc/objects/templates.cfg'...
Processing object config file '/usr/local/nagios/etc/objects/hosts.cfg'...
Processing object config file '/usr/local/nagios/etc/objects/service.cfg'...
   Read object config files okay...

Running pre-flight check on configuration data...

Checking services...
    Checked 13 services.
Checking hosts...
    Checked 2 hosts.
Checking host groups...
    Checked 1 host groups.
Checking service groups...
    Checked 2 service groups.
Checking contacts...
    Checked 1 contacts.
Checking contact groups...
    Checked 1 contact groups.
Checking service escalations...
    Checked 0 service escalations.
Checking service dependencies...
    Checked 0 service dependencies.
Checking host escalations...
    Checked 0 host escalations.
Checking host dependencies...
    Checked 0 host dependencies.
Checking commands...
    Checked 26 commands.
Checking time periods...
    Checked 5 time periods.
Checking for circular paths between hosts...
Checking for circular host and service dependencies...
Checking global event handlers...
Checking obsessive compulsive processor commands...
Checking misc settings...

Total Warnings: 0
Total Errors:   0

Things look okay - No serious problems were detected during the pre-flight check
- 重新加载服务的配置文件
- 这里可以看到的是三个分组,
server21.com表示的是远程主机,其余两个组均是本地主机


 2210
2210

 被折叠的 条评论
为什么被折叠?
被折叠的 条评论
为什么被折叠?
 到【灌水乐园】发言


