


第三章、Ansible常用模块——新手快速入门
文章目录
- 一、 查看系统上安装的所有模块
- 二、ansible常用模块
-
- 1、常用模块之–USER
- 2、常用模块之–shell
- 3、常用模块之–copy
- 4、常用模块之–template
- 5、常用模块之–file
- 6、常用模块之–lineinfile
- 7、常用模块之-- yum_repository
- 8、常用模块之–yum
- 9、常用模块之-- service
- 10、常用模块之–fetch(拉取)
- 11、常用模块之–firewalld
- 12、常用模块之–replace
- 13、常用模块之–parted
- 14、常用模块之–filesystem(设置文件系统)
- 15、常用模块之–mount(挂载)
- 16、常用模块之–创建逻辑卷
- 17、常用模块之–sefcontext(修改context值)
- 18、常用模块之–debug
- 19、常用模块之–cron(计划任务模块)
- 20、常用模块之–(get_url)
一、 查看系统上安装的所有模块
使用临时命令通过模块来执行任务
ansible-doc -l
//一共有3387的模块
[student@ansible ansible]$ ansible-doc -l | wc -l
查看ping模块帮助文档
[student@ansible ansible]$ ansible-doc ping
/EXA //这里可以直接查找到模板来学习
EXAMPLES:
# Test we can logon to 'webservers' and execute python with json lib.


# ansible webservers -m ping

# Example from an Ansible Playbook

- ping:

# Induce an exception to see what happens
- ping:
    data: crash


RETURN VALUES:

ping:
    description: value provided with the data parameter
    returned: success
    type: str
    sample: pong
二、ansible常用模块
文件模块:
- copy:将本地文件复制到受控主机
- file:设置文件的权限和其他属性
- lineinfile:确保特定行是否在文件中,也就是说修改文件内容(起替换或插入)
- synchronize:使用rsync同步内容
软件包模块
- package:使用操作系统本机的自动检测软件包管理器管理软件包
- yum:使用yum软件包管理器管理软件
- apt:使用apt软件包管理器管理软件包 dnf:使用dnf软件包管理器管理软件包
- pip:从PyPI管理Python软件包
系统模块
- firewalld:使用firewalld管理任意端口和服务
- reboot:重新启动计算机
- service:管理服务
- user:添加、删除和管理用户账户
Net Tools模块
- get_url:通过http、https或者ftp下载文件
- nmcli:管理网络
- uri:与WEB服务交互
点对点模式:
语法例子:
ansible bgx -m command -a 'df -h'
命令 主机名称 指定模块 模块名称 模块动作 具体命令
执行的状态返回信息:
绿色:绿色显示结果成功了,但受控主机并没有发生改变
黄色:执行成功并且对目标主机做变更
红色:命令参数有问题执行失败
紫色:代表主机清单文件配置内容有问题
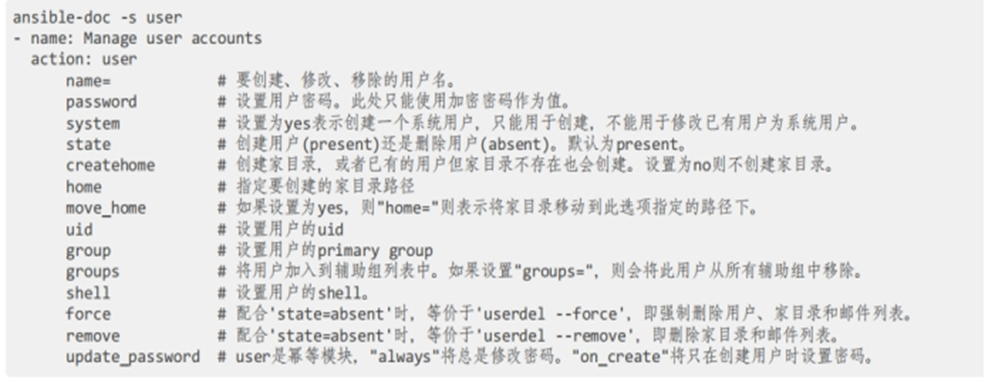
1、常用模块之–USER
[student@ansible ansible]$ ansible-doc user
案例1:user
EXAMPLES:
- user:
- name: johnd //确定用户名
- comment: John Doe //描述信息
- uid: 1040 //uid
- group: admin //用户组
练习:
临时命令使用user模块来确保harry用户存在于node1.example.com上,并且其UID为2000
//主机上执行模块并生成
[student@server ansible]$ ansible node1 -m user -a 'name=harry uid=2000'
node1 | CHANGED => {
    "ansible_facts": {
        "discovered_interpreter_python": "/usr/libexec/platform-python"
    },
    "changed": true,
    "comment": "",
    "create_home": true,
    "group": 2000,
    "home": "/home/harry",
    "name": "harry",
    "shell": "/bin/bash",
    "state": "present",
    "system": false,
    "uid": 2000
}
//node1查看
[root@node1 ~]# cat /etc/passwd | grep harry
harry:x:2000:2000::/home/harry:/bin/bash
练习2:
创建用户并指定密码,如果该用户存在,仍然只修改密码
//先生成一对密钥
[student@server ansible]$ openssl passwd -1 linux
1 11Es2G9Um1GoCn1ZM9jHiXwcQXcIGEn0
//这里前面已经创建了harry用户,但利用参数update_password=always在不创建用户的前提下修改密码
[student@server ansible]$ ansible node1 -m user -a 'name=harry state=present
password="$1$Es2G9Um1$GoCn1ZM9jHiXwcQXcIGEn0" update_password=always'
node1 | CHANGED => {
    "ansible_facts": {
        "discovered_interpreter_python": "/usr/libexec/platform-python"
    },
    "append": false,
    "changed": true,
    "comment": "",
    "group": 2000,
    "home": "/home/harry",
    "move_home": false,
    "name": "harry",
    "password": "NOT_LOGGING_PASSWORD",
    "shell": "/bin/bash",
    "state": "present",
    "uid": 2000
}
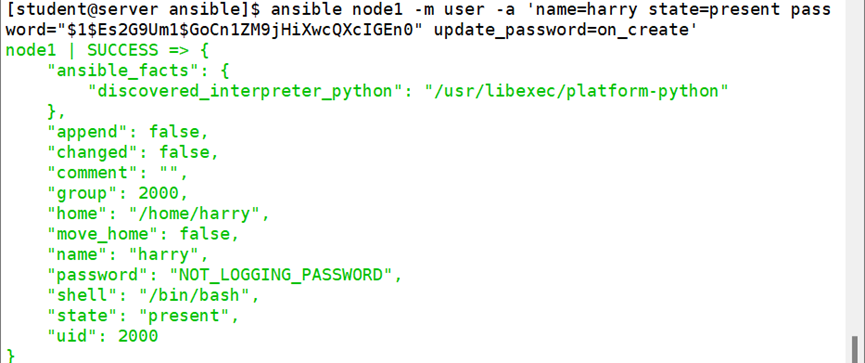
update_password=on_create命令只能在创建用户并指定密码,但是如果改用户存在,则不修改密码
//绿色显示结果成功了,但受控主机并没有发生改变
2、常用模块之–shell
可以做为类似于单方面的linux操作命令,可直接输出(mkdir、ls、cp)等
案例2:shell
临时命令使用shell模块来删除node1.example.com节点中的用户harry
[student@server ansible]$ ansible node1 -m shell -a 'userdel -r harry'
node1 | CHANGED | rc=0 >>

[root@node1 ~]# cat /etc/passwd | grep harry
[root@node1 ~]#

案例3:copy


[root@node1 ~]# cd /var/tmp/
[root@node1 tmp]# ls
//基本的传输文件
[student@server ansible]$ ansible node1 -m copy -a 'src=/etc/fstab dest=/var/tmp/fstab'
node1 | CHANGED => {
    "ansible_facts": {
        "discovered_interpreter_python": "/usr/libexec/platform-python"
    },
    "changed": true,
    "checksum": "3f7b6d48cd443d823e06cfdb31d258637769d5e1",
    "dest": "/var/tmp/fstab",
    "gid": 0,
    "group": "root",
    "md5sum": "ad739e683277c60c2bb7e2b0616ea86f",
    "mode": "0644",
    "owner": "root",
    "size": 579,
    "src": "/home/student/.ansible/tmp/ansible-tmp-1666603549.804251-3230-9172776234934/source",
    "state": "file",
    "uid": 0
}
3、常用模块之–copy
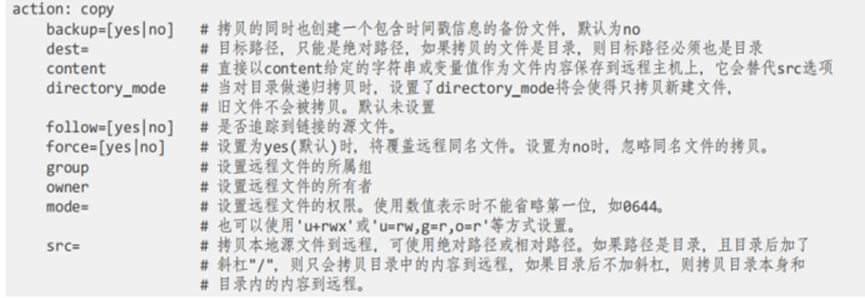
练习
这里定义好复制文件的所属组和所有者时候,需要保证对方受控主机用户组存在
[root@node1 tmp]# useradd harry
[student@server ansible]$ ansible node1 -m copy -a 'src=/etc/fstab dest=/var/tmp/aa group=harry owner=harry'
Contentc参数:可以在传输的过程中的时候添加文本内容
[student@server ansible]$ ansible node1 -m copy -a 'content="hhh\n" dest=/tmp/b'
node1 | CHANGED => {
    "ansible_facts": {
        "discovered_interpreter_python": "/usr/libexec/platform-python"
    },
    "changed": true,
    "checksum": "e47a5df36d5f8e158dd378ca783fbfb77de634c2",
    "dest": "/tmp/b",
    "gid": 0,
    "group": "root",
    "md5sum": "0f5146d5ed9441853c3f2821745a4173",
    "mode": "0644",
    "owner": "root",
    "size": 4,
    "src": "/home/student/.ansible/tmp/ansible-tmp-1666604812.7789319-3435-40576527196625/source",
    "state": "file",
    "uid": 0
}
//node1机
[root@node1 tmp]# cat /tmp/b
hhh
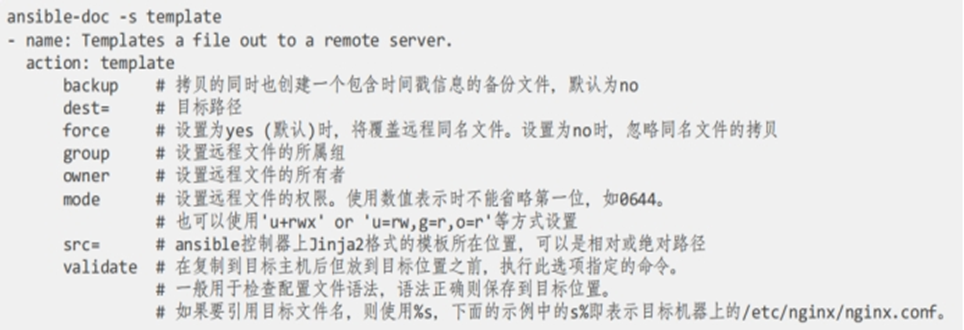
4、常用模块之–template
案例4:template模块—template模块用法和copy模块用法基本一致,它主要用于复制配置文件(意为在服务器中的文件内容有变量值,在复制到受控主机时候会直接返回为命令)
练习
意为定义好以主机清单中的内容做变量值匹配
[student@server ansible]$ echo "this is {{ inventory_hostname }}" > aa
[student@server ansible]$ cat aa
this is {{ inventory_hostname }}
[student@server ansible]$ ansible node1 -m template -a 'src=/home/student/ansible/aa dest=/tmp/'
node1 | CHANGED => {
    "ansible_facts": {
        "discovered_interpreter_python": "/usr/libexec/platform-python"
    },
    "changed": true,
    "checksum": "0c8fc18ab5533916ba8b55c4977049ed5341f33f",
    "dest": "/tmp/aa",
    "gid": 0,
    "group": "root",
    "md5sum": "574d1f9fc76eb05a9218cb6dab7f0aac",
    "mode": "0644",
    "owner": "root",
    "size": 14,
    "src": "/home/student/.ansible/tmp/ansible-tmp-1666605437.6020904-3517-30759399495895/source",
    "state": "file",
    "uid": 0
}

//数值发生变化
[root@node1 tmp]# cat /tmp/aa
this is node1
5、常用模块之–file
案例5:file
意为对文件系统进行修改和授权
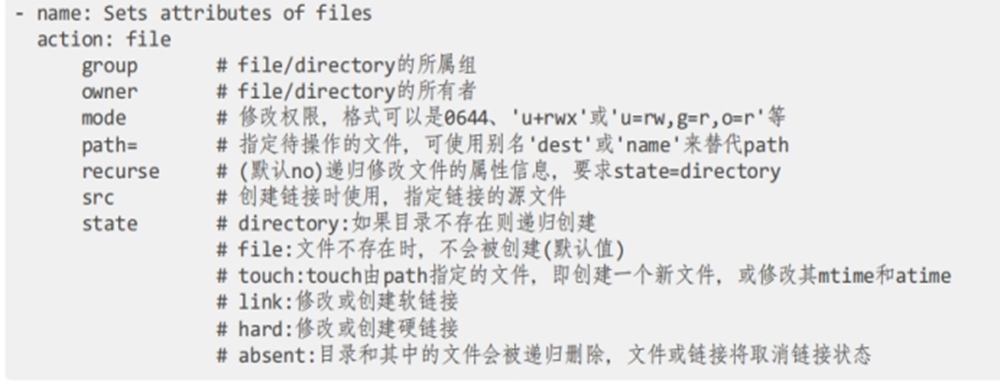
- mode:设置权限可以是mode=g+w 也可以是
- mode=666
- group:设置文件的所属组
- owner:设置文件的所有者
- setype:修改文件的context值
state指定新建文件
[student@server ansible]$ ansible node1 -m file -a 'path=/tmp/lty state=touch'
[root@node1 tmp]# ll /tmp | grep lty
-rw-r--r-- 1 root root  0 Oct 24 18:06 lty
123
新建目录
[student@server ansible]$ ansible node1 -m file -a 'path=/tmp/qwer state=directory'
[root@node1 tmp]# ll /tmp | grep qwer
drwxr-xr-x 2 root root  6 Oct 24 18:05 qwer
123
删除文件或者目录
[student@server ansible]$ ansible node1 -m file -a 'path=/tmp/lty state=absent'
[root@node1 tmp]# ll /tmp | grep lty
[root@node1 tmp]#
//需要注意的是控制主机上必须定义好文件,但受控主机不需要创建
创建软链接
src:表示控制机绝对路径。
dest:表受控节点
[student@server ansible]$ ansible node1 -m file -a 'src=/tmp/aa dest=/tmp/ggg state=link'
[root@node1 tmp]# ll /tmp | grep ggg
lrwxrwxrwx 1 root root  7 Oct 24 18:21 ggg -> /tmp/aa

创建硬链接
[student@server ansible]$ ansible node1 -m file -a 'dest=/tmp/hhh src=/tmp/aa state=hard'
[root@node1 tmp]# ll /tmp | grep hhh
-rw-r--r-- 2 root root 14 Oct 24 17:57 hhh
6、常用模块之–lineinfile
案例6:lineinfile
起替换和插入文本的模式
把aaa开头的一行换成 bbbbb
[root@node1 tmp]# cat hhh
aaaa
[student@server ansible]$ ansible node1 -m lineinfile -a 'dest=/tmp/hhh regexp=aaa line=bbbb'
node1 | CHANGED => {
    "ansible_facts": {
        "discovered_interpreter_python": "/usr/libexec/platform-python"
    },
    "backup": "",
    "changed": true,
    "msg": "line replaced"
}
[root@CA tmp]# cat hhh
bbbb
在某一行前面插入一行新数据---insertbefore
[root@CA tmp]# echo dada >> hhh
[root@CA tmp]# cat hhh
bbbb
dada

[student@server ansible]$ ansible node1 -m lineinfile -a 'dest=/tmp/hhh insertbefore="bbbb(.*)" line=lty'
[root@CA tmp]# cat hhh
lty
bbbb
dada
在某一行后面插入一行新数据---insertafter
[student@server ansible]$ ansible node1 -m lineinfile -a 'dest=/tmp/hhh insertafter="bbbb(.*)" line=ppp'

[root@CA tmp]# cat hhh
lty
bbbb
ppp
dada

删除以ppp开头一行的数据
[student@server ansible]$ ansible node1 -m lineinfile -a 'dest=/tmp/hhh regexp="ppp(.*)" state=absent'
7、常用模块之-- yum_repository
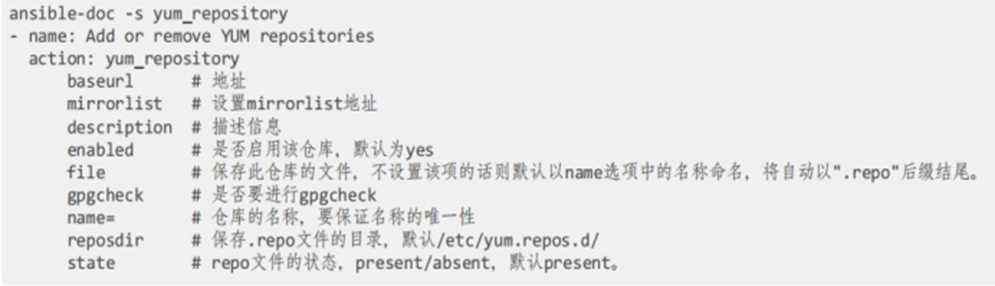
案例7:yum_repository模块-----配置yum仓库
//构建本地镜像挂载规则
[student@server ansible]$ ansible node1 -m mount -a 'src=/dev/cdrom path=/mnt fstype=iso9660 state=mounted'
//构建BaseOs仓库
[student@server ansible]$ ansible node1 -m yum_repository -a 'file=server name=BaseOS description=rhel8 baseurl=file:///mnt/BaseOS enabled=yes gpgcheck=no'
node1 | CHANGED => {
    "ansible_facts": {
        "discovered_interpreter_python": "/usr/libexec/platform-python"
    },
    "changed": true,
    "repo": "BaseOS",
    "state": "present"
}

//构建AppStream
[student@server ansible]$ ansible node1 -m yum_repository -a 'file=server name=AppStream description=rhel8 baseurl=file:///mnt/AppStream enabled=yes gpgcheck=no'
//构建成功
[root@CA yum.repos.d]# ls
server.repo
[root@CA yum.repos.d]# cat server.repo
[BaseOS]
baseurl = file:///mnt/BaseOS
enabled = 1
gpgcheck = 0
name = rhel8

[AppStream]
baseurl = file:///mnt/AppStream
enabled = 1
gpgcheck = 0
name = rhel8
8、常用模块之–yum
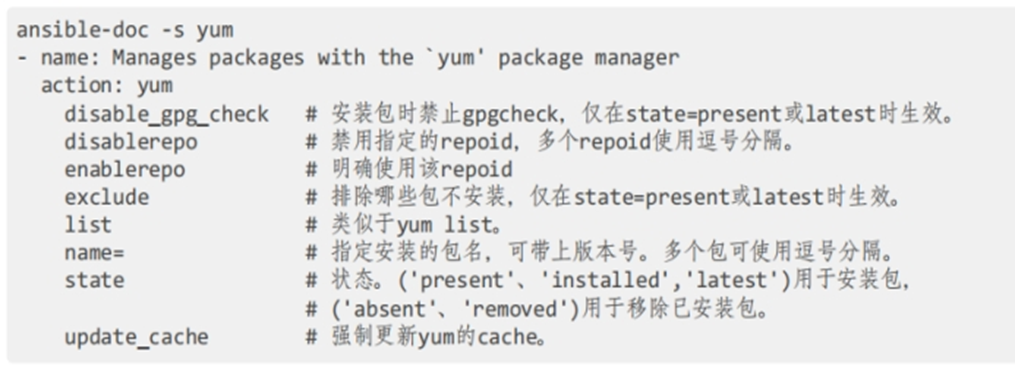
案例8:yum模块----yum安装与卸载
类型:
state:present、installed、latest:安装
absent、removed:卸载
下载服务
[student@server ansible]$ ansible node1 -m yum -a 'name=autofs state=installed'
----------------安装

//下载完成
[root@CA yum.repos.d]# systemctl status autofs
● autofs.service - Automounts filesystems on demand
   Loaded: loaded (/usr/lib/systemd/system/autofs.service; disabled; vendor pres>
   Active: inactive (dead)
卸载:
[student@server ansible]$ ansible node1 -m yum -a 'name=autofs state=removed'
----------------卸载
[root@CA yum.repos.d]# systemctl status autofs
Unit autofs.service could not be found.
9、常用模块之-- service
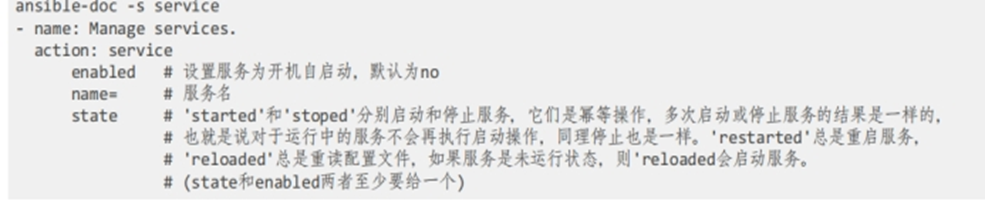
案例9:service模块
重启autofs服务并设置下次启动生效
[student@server ansible]$ ansible node1 -m service -a 'name=autofs state=started enabled=yes'
node1 | SUCCESS => {
    "ansible_facts": {
        "discovered_interpreter_python": "/usr/libexec/platform-python"

[root@CA yum.repos.d]# systemctl status autofs
● autofs.service - Automounts filesystems on demand
   Loaded: loaded (/usr/lib/systemd/system/autofs.service; enabled; vendor
扩展
Node1查看防火墙规则
[root@node1 ~]# firewall-cmd --list-all
public (active)
  target: default
  icmp-block-inversion: no
  interfaces: ens32
  sources:
  services: cockpit dhcpv6-client ssh
  ports:
  protocols:

要将我们部署好的服务放行规则
[student@server ansible]$ ansible node1 -m firewalld -a 'service=http state=enabled permanent=yes immediate=yes'

[root@node1 ~]# firewall-cmd --list-all
public (active)
  target: default
  icmp-block-inversion: no
  interfaces: ens32
  sources:
  services: cockpit dhcpv6-client http ssh
10、常用模块之–fetch(拉取)
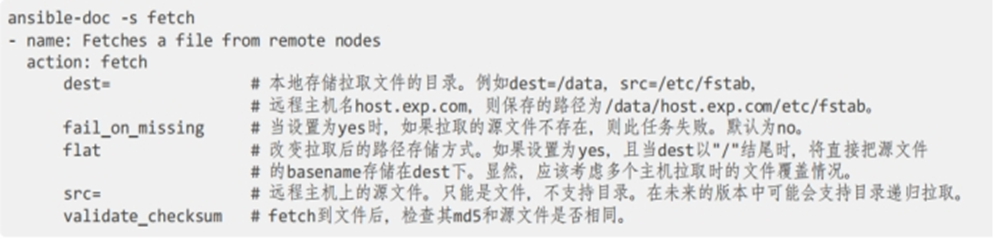
和copy工作方式类似,只不过是从远程主机将文件拉取到本地端,存储时使用主机名作为目录树,且只能拉取文件,不能拉取目录
将远程主机的/etc/fstab文件拉取到本地来,存储的名字为/tmp/node1(node2)/etc/fstab
[student@server ansible]$ ansible node1 -m fetch -a 'src=/etc/fstab dest=/tmp/'
node1 | CHANGED => {
    "changed": true,
    "checksum": "2bdc607f5f6e963b52e48283490dcf65e8b34ea4",
"dest": "/tmp/node1/etc/fstab",
//拉取成功
[student@server ansible]$ ls /tmp/node1/etc/fstab -d
/tmp/node1/etc/fstab
将某台远程主机的/etc/fstab文件拉取到本地来,添加flat参数来决定存储的名字为/tmp/fstab
[student@server ansible]$ ansible node1 -m fetch -a 'src=/etc/fstab dest=/tmp/ flat=yes'
[student@server ansible]$ cat /tmp/fstab  | wc -l
15
将远程主机的/etc/fstab文件拉取到本地来,存储的名字为/tmp/fstab-node1(node2),-{{inventory_hostname}}清单的内置变量,可以直接知道是从那个主机拉取过来的
[student@server ansible]$ ansible node1 -m fetch -a 'src=/etc/fstab dest=/tmp/fstab-{{inventory_hostname}} flat=yes'
node1 | CHANGED => {
    "changed": true,
    "checksum": "2bdc607f5f6e963b52e48283490dcf65e8b34ea4",
    "dest": "/tmp/fstab-node1",
[student@server ansible]$ ls /tmp
fstab-node1
11、常用模块之–firewalld
允许http流量的传入
Node1查看防火墙规则
[root@node1 ~]# firewall-cmd --list-all
public (active)
  target: default
  icmp-block-inversion: no
  interfaces: ens32
  sources:
  services: cockpit dhcpv6-client ssh
  ports:
  protocols:

要将我们部署好的服务放行规则
[student@server ansible]$ ansible node1 -m firewalld -a 'service=http state=enabled permanent=yes immediate=yes'

[root@node1 ~]# firewall-cmd --list-all
public (active)
  target: default
  icmp-block-inversion: no
  interfaces: ens32
  sources:
  services: cockpit dhcpv6-client http ssh
副规则 允许172.16.30.0/24主机http流量的传入

//受控查看规则已放行
[root@node1 ~]# firewall-cmd --list-all
  services: cockpit dhcpv6-client http ssh
  ports: 80/tcp
	rule family="ipv4" source address="192.168.47.0/24" service name="http" accept
12、常用模块之–replace
replace模块可以根据我们指定的正则表达式替换文件中的字符串,文件中所有被匹配的字符串都会被替换
参数:
-
path参数:2.3版本之前只能用dest、destfile、name指定操作文件,2.4版本中仍然可以用这些参数名,也可以用path
-
regexp参数:必须参数,指定一个python正则表达式,文件中与正则匹配的字符串将会被替换
-
replace参数:指定最终要替换成的字符串 backup参数:是否在修改文件之前对文件进行备份,最好设置为yes。
练习
将受控节点/tmp/kk文件中的“qwe”替换成“ewq”
[student@server ansible]$ ansible node1 -m replace -a 'path=/tmp/kk regexp="qwe" replace="ewq"'

[root@node1 tmp]# cat kk
aa dadda
dada adada
qwe
qwe
kk zxc
[root@node1 tmp]# cat kk
aa dadda
dada adada
ewq
ewq
kk zxc
将/tmp/kk文件中的“ewq”替换成“hhh”,且把替换前的/tmp/kk文件备份
[student@server ansible]$ ansible node1 -m replace -a 'path=/tmp/kk regexp="ewq" replace="hhh" backup=yes'
//备份成功
[root@node1 tmp]# ls | grep kk
kk
kk.34187.2022-10-26@21:01:45~
[root@node1 tmp]# cat kk
aa dadda
dada adada
hhh
hhh
kk zxc
13、常用模块之–parted
新建扩展分区
- Logical:逻辑分区
- Primary:主分区
- Extended:扩展分区
//使用shell先看下客户端磁盘情况
[student@server ansible]$ ansible node1 -m shell -a 'parted -l'
node1 | CHANGED | rc=0 >>
Model: VMware, VMware Virtual S (scsi)
Disk /dev/sda: 21.5GB
Sector size (logical/physical): 512B/512B
Partition Table: msdos
Disk Flags:

Number  Start   End     Size    Type     File system  Flags
 1      1049kB  1075MB  1074MB  primary  xfs          boot
 2      1075MB  21.5GB  20.4GB  primary               lvm


//创建扩展分区
[student@server ansible]$ ansible node1 -m parted -a 'device=/dev/sdb number=1 part_type=extended   state=present'
//逻辑分区
[student@server ansible]$ ansible node1 -m parted -a 'device=/dev/sdb number=2 part_type=logical   state=present'

Number  Start   End     Size    Type      File system  Flags
 1      1049kB  21.5GB  21.5GB  extended               lba
 5      2097kB  21.5GB  21.5GB  logical
14、常用模块之–filesystem(设置文件系统)
//设置为xfs文件系统
[student@server ansible]$ ansible node1 -m filesystem -a 'fstype=xfs dev=/dev/sdb5'

[root@node1 ~]# parted -l
Number  Start   End     Size    Type      File system  Flags
 1      1049kB  21.5GB  21.5GB  extended               lba
 5      2097kB  21.5GB  21.5GB  logical   xfs
15、常用模块之–mount(挂载)
//新建挂载点/common
[student@server ansible]$ ansible node1 -m file -a 'path=/common state=directory'
查看/dev/vdb5的UUID

[student@server ansible]$ ansible node1 -m shell -a 'blkid /dev/sdb5'
node1 | CHANGED | rc=0 >>
/dev/sdb5: UUID="54672a54-452d-4878-b801-d3eaf5635fe4" BLOCK_SIZE="512" TYPE="xfs" PARTUUID="fa0a2012-05"


将分区/dev/sda5挂载到/common目录
[student@server ansible]$ ansible node1 -m mount -a 'path=/common src=UUID="54672a54-452d-4878-b801-d3eaf5635fe4" fstype=xfs state=mounted'


卸载
[student@server ansible]$ ansible node1 -m mount -a 'path=/common src=UUID="54672a54-452d-4878-b801-d3eaf5635fe4" fstype=xfs state=absent'
16、常用模块之–创建逻辑卷
不同于fdisk,使用parted在第一次分区时物理卷就已经创建了
//创建lvg—新建卷组
[student@server ansible]$ ansible node1 -m lvg -a 'vg=vg0 pesize=16M pvs=/dev/sdb5'


//创建lvol—新建逻辑卷
[student@server ansible]$ ansible node1 -m lvol -a 'lv=lv0 size=1000M vg=vg0'


//在线扩容逻辑卷
ansible node1 -m lvol -a 'lv=lv0 size=1600M vg=vg0 resizefs=yes'
17、常用模块之–sefcontext(修改context值)
//修改一个目录
[student@ansible ansible]$ ansible node1 -m file -a 'path=/share state=directory'

修改context值
[student@ansible ansible]$ ansible node1 -m sefcontext -a 'target="/share(/.*)?" setype=samba_share_t state=present'

//刷新值
 [student@ansible ansible]$ ansible node1 -m shell -a 'restorecon -RVv /share '
应用新的selinux 文件的context值
ansible node1 -m command -a ‘restorecon -irv /share’
18、常用模块之–debug

用户输出自定义的信息,类似于echo、print等输出命令。ansible中的debug主要用于输出变量值、表达式值,以及用于when条件判断时。使用方式非常简单
  [student@server ansible]$ ansible node1 -m debug -a 'msg=lty'
node1 | SUCCESS => {
    "msg": "lty"
}
19、常用模块之–cron(计划任务模块)
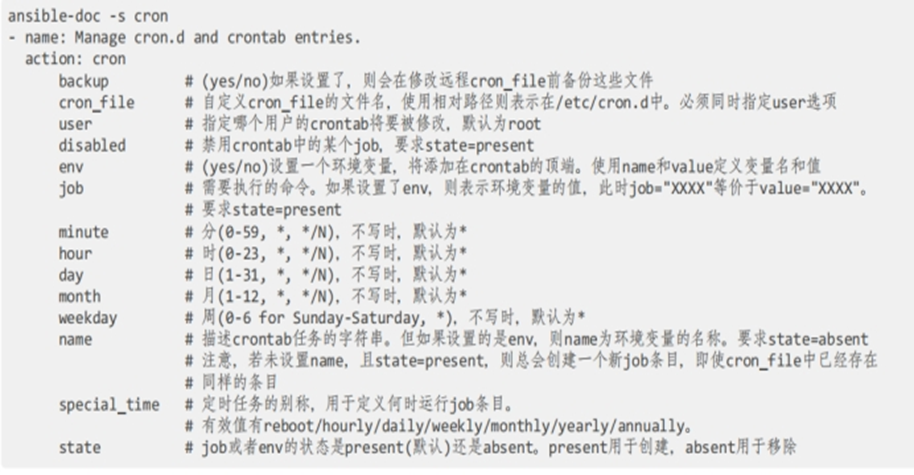
以每的下午14点运行输出 I AM RHCE
[student@server ansible]$ ansible node1 -m cron -a ‘name=“shuchu” job=“/bin/echo I AM RHCE” user=root minute=0 hour=14 state=present’
20、常用模块之–(get_url)
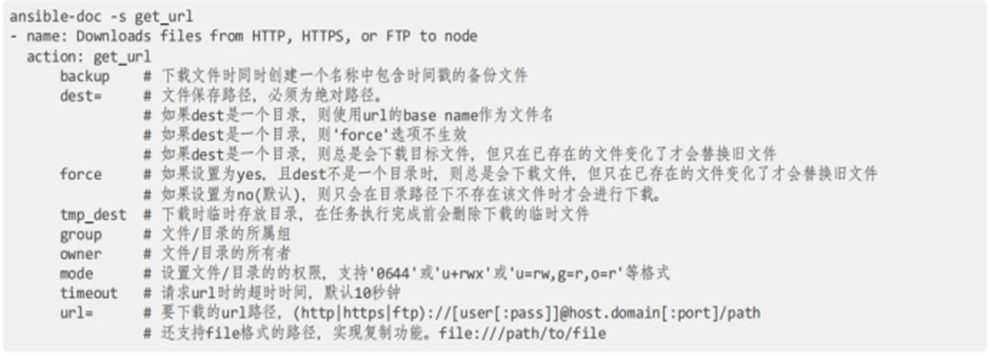
例如自己搭建的服务,和将要拉取如阿里云等网页地址
注意: dest为目录时或者force=yes时,总是会下载文件到临时存放的目录中,只不过不一定会替换旧文件。只有 force=no(默认)且dest,是一个文件时,在文件已存在时才不会下载文件
语法:ansible node1 -m get_url -a ‘url=需要下载的文件 dest=存放的位置’


 1010
1010


 被折叠的 条评论
为什么被折叠?
被折叠的 条评论
为什么被折叠?
 到【灌水乐园】发言


