


上节我们进行了Freemaker实现网页静态化测试,现在我们实现在项目中应用。
上节内容详见:
Freemarker实现网页静态化(一)
- 商品详情页面静态化
2.1. 网页的静态化方案
输出文件的名称:商品id+“.html”
输出文件的路径:工程外部的任意目录。
网页访问:使用nginx访问网页。在此方案下tomcat只有一个作用就是生成静态页面。
工程部署:可以把e3-item-web部署到多个服务器上。
生成静态页面的时机:商品添加后,生成静态页面。可以使用Activemq,订阅topic(商品添加)
静态化架构图:

2.2. 把jsp改造为freemarker模板
创建模板:将jsp文件夹的所有内容复制到ftl文件夹下,并将.jsp改为以.ftl后缀结尾。对应的原来jsp里面的内容对应改为ftl的语法。
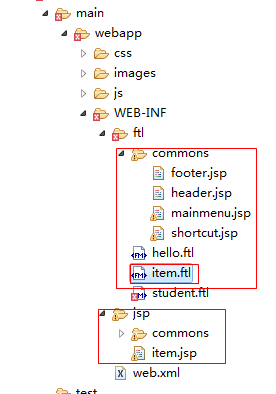
对应改为ftl的语法与下图类似,就不一一介绍了。
去掉jsp的格式化数字的形式,直接取值。

将forEach遍历数组改为ftl的语法格式。


2.3. MessageListener实现
pom文件添加依赖的jar包:

文档目录结构:

MessageListener类
@Override
	public void onMessage(Message message) {
		try {
			TextMessage textMessage = null;
			Long itemId = null;
			// 取商品id
			if (message instanceof TextMessage) {
				textMessage = (TextMessage) message;
				itemId = Long.parseLong(textMessage.getText());
				// 等待事务提交
				Thread.sleep(1000);
				//取Item内容
				TbItem tbItem = itemService.getItemById(itemId);
				//对图片的处理用我们新创建的pojo
				Item item = new Item(tbItem);
				//取商品描述
				TbItemDesc itemDesc = itemService.getItemDescById(itemId);
				//创建一个Configuration对象。
				Configuration configuration = freeMarkerConfigurer.getConfiguration();
				//加载一个模板,创建一个模板对象。
				Template template = configuration.getTemplate("item.ftl");
				//创建一个模板使用的数据集,可以是pojo也可以是map。一般是Map。
				Map dataModel = new HashMap<>();
				//向数据集中添加数据
				dataModel.put("item", item);
				dataModel.put("itemDesc", itemDesc);
				//创建一个输出流,指定输出的目录及文件名。
				Writer out = new FileWriter(HTML_GEN_PATH + itemId + ".html");
				//调用模板对象的process方法输出文件。
				template.process(dataModel, out);
				//第八步:关闭流。
				out.close();
			}
		} catch (Exception e) {
			// TODO: handle exception
		}
2.4. 配置MessageListener监听商品添加消息
resource.p roperties文件配置

applicationContext-activemq.xml
<?xml version="1.0" encoding="UTF-8"?>
<beans xmlns:context="http://www.springframework.org/schema/context" xmlns:p="http://www.springframework.org/schema/p" xmlns:aop="http://www.springframework.org/schema/aop" xmlns:tx="http://www.springframework.org/schema/tx" xmlns:xsi="http://www.w3.org/2001/XMLSchema-instance" xmlns:util="http://www.springframework.org/schema/util" xmlns="http://www.springframework.org/schema/beans" xsi:schemaLocation="http://www.springframework.org/schema/context http://www.springframework.org/schema/context/spring-context-4.2.xsd http://www.springframework.org/schema/aop http://www.springframework.org/schema/aop/spring-aop-4.2.xsd http://www.springframework.org/schema/tx http://www.springframework.org/schema/tx/spring-tx-4.2.xsd http://code.alibabatech.com/schema/dubbo http://code.alibabatech.com/schema/dubbo/dubbo.xsd http://www.springframework.org/schema/util http://www.springframework.org/schema/util/spring-util-4.2.xsd http://www.springframework.org/schema/beans http://www.springframework.org/schema/beans/spring-beans-4.2.xsd ">
	<!-- 真正可以产生Connection的ConnectionFactory,由对应的 JMS服务厂商提供 -->
	<bean id="targetConnectionFactory" class="org.apache.activemq.ActiveMQConnectionFactory">
		<property name="brokerURL" value="tcp://192.168.25.131:61616" />
	</bean>
	<!-- Spring用于管理真正的ConnectionFactory的ConnectionFactory -->
	<bean id="connectionFactory"
		class="org.springframework.jms.connection.SingleConnectionFactory">
		<!-- 目标ConnectionFactory对应真实的可以产生JMS Connection的ConnectionFactory -->
		<property name="targetConnectionFactory" ref="targetConnectionFactory" />
	</bean>

	<!--这个是主题目的地,一对多的 -->
	<bean id="topicDestination" class="org.apache.activemq.command.ActiveMQTopic">
		<constructor-arg value="item-change-topic" />
	</bean>
	<!-- 接收消息 -->
	<!-- 配置监听器 -->
	<bean id="htmlGenListener" class="cn.e3mall.item.listener.HtmlGenListener" />
	<!-- 消息监听容器 -->
	<bean class="org.springframework.jms.listener.DefaultMessageListenerContainer">
		<property name="connectionFactory" ref="connectionFactory" />
		<property name="destination" ref="topicDestination" />
		<property name="messageListener" ref="htmlGenListener" />
	</bean>
</beans>
*Web.xml修改servlet启动时加载配置文件

2.5. 网页静态化测试
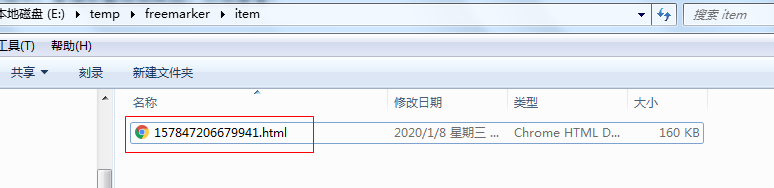
运行程序,管理页面添加商品,然后查看对应目录下生成itemId .html文件,说明测试成功。

2.6. 将静态页面部署到项目中。
(我们方便测试用nginx的windows版本)
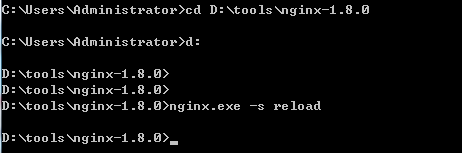
安装nginx的windows版本,直接将nginx-1.8.0.zip解压到指定目录中(目录中不能含有中文)打开即可运行。

Nginx启动方式与linux版本一样,这里就不多讲了。
Nginx.conf配置(更改文件目录)


重新加载配置。
通过http方式访问静态页面:
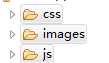
将对应的CSS,images,js文件夹复制到E:\temp\freemarker\(根目录中)中即可以完整生成静态页面。

展示效果:

然后再将原来动态生成的URL改为通过nginx生成的url就可以实现访问静态页面。


 2125
2125


 被折叠的 条评论
为什么被折叠?
被折叠的 条评论
为什么被折叠?
 到【灌水乐园】发言


