


实验环境:
ansible:192.168.2.10
iscsi:192.168.2.70
LNMP1/2:
lnmp1:192.168.2.20
lnmp2:192.168.2.30
建议将所有主机的yum都更换成阿里源 及设置epel库
rm -rf /etc/yum.repos.d/*  #删除所有yum源
wget -O /etc/yum.repos.d/CentOS-Base.repo https://mirrors.aliyun.com/repo/Centos-7.repo  #下载阿里源
yum install epel-release -y  #下载epel库
yum clean all  #清理缓存
yum makecache #生成缓存

如果epel的源不能用的话:
sed -e 's!^metalink=!#metalink=!g' \
    -e 's!^#baseurl=!baseurl=!g' \
    -e 's!https\?://download\.fedoraproject\.org/pub/epel!https://mirrors.tuna.tsinghua.edu.cn/epel!g' \
    -e 's!https\?://download\.example/pub/epel!https://mirrors.tuna.tsinghua.edu.cn/epel!g' \
    -i /etc/yum.repos.d/epel*.repo
Ansible搭建LNMP
yum install ansible -y #安装ansible设置对LNMP的主机的ssh免密登录
ssh-keygen
ssh-copy-id 192.168.2.20
ssh-copy-id 192.168.2.30
测试:

调整ansible配置文件,将要安装LNMP的两台被控端
vim /etc/ansible/hosts  #修改仓库文件
在最后一行添加
[lnmp]
192.168.2.20
192.168.2.30

ansible lnmp -m ping #检测被控端连通性
为了之后方便管理Nginx,所以提前在Ansible主机写好了Nginx的启动脚本
#!/bin/bash
#chkconfig:- 99 20
#description:Nginx Service Control Script
PROG="/usr/local/nginx/sbin/nginx"
PIDF="/usr/local/nginx/logs/nginx.pid"
case "$1" in
        start)
        $PROG
;;
        stop)
        kill -s QUIT $(cat $PIDF)
;;
        restart)
        $0 stop
        $0 start
;;
        reload)
        kill -s HUP $(cat $PIDF)
;;
        *)
        echo "Usage: $0 {start|stop|restart|reload}"
        exit 1
esac
exit 0

为了安装完毕验证php,提前在Ansible主机编写好php验证页面
<?php
$link=mysql_connect('127.0.0.1','root','123.com');
if($link) echo "conn success 2.20";
mysql_close($link);
?>

将安装LNMP所用安装包,都准备到Ansible主机,然后编写Playbook文件
下列红色高亮显示的名称是安装包

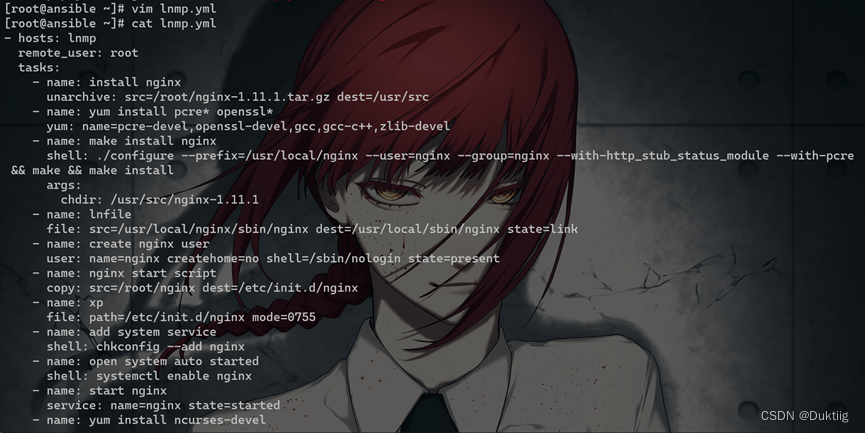
- hosts: lnmp
remote_user: root
tasks:
- name: install nginx
unarchive: src=/root/nginx-1.11.1.tar.gz dest=/usr/src
- name: yum install pcre* openssl*
yum: name=pcre-devel,openssl-devel,gcc,gcc-c++,zlib-devel
- name: make install nginx
shell: ./configure --prefix=/usr/local/nginx --user=nginx --group=nginx --with-http_stub_status_module --with-pcre && make && make install
args:
chdir: /usr/src/nginx-1.11.1
- name: lnfile
file: src=/usr/local/nginx/sbin/nginx dest=/usr/local/sbin/nginx state=link
- name: create nginx user
user: name=nginx createhome=no shell=/sbin/nologin state=present
- name: nginx start script
copy: src=/root/nginx dest=/etc/init.d/nginx
- name: xp
file: path=/etc/init.d/nginx mode=0755
- name: add system service
shell: chkconfig --add nginx
- name: open system auto started
shell: systemctl enable nginx
- name: start nginx
service: name=nginx state=started
- name: yum install ncurses-devel
yum: name=ncurses-devel
- name: install cmkae
unarchive: src=/root/cmake-2.8.7.tar.gz dest=/usr/src/
- name: make install cmake
shell: ./configure && gmake && gmake install
args:
chdir: /usr/src/cmake-2.8.7
- name: install mysql
unarchive: src=/root/mysql-5.5.22.tar.gz dest=/usr/src/
- name: make install mysql
shell: cmake -DCMAKE_INSTALL_PREFIX=/usr/local/mysql -DSYSCONFDIR=/etc -DDEFAULT_CHARSET=utf8 -DDEFAULT_COLLATION=utf8_general_ci -DWITH_EXTRA_CHARSETS=all && make && make install
args:
chdir: /usr/src/mysql-5.5.22
- name: soft link
file: src=/usr/local/mysql/lib/libmysqlclient.so.18 dest=/usr/lib/libmysqlclient.so.18 state=link
- name: soft link
file: src=/usr/local/mysql/bin/mysql dest=/usr/bin/mysql state=link
- name: mysqldupm soft link
file: src=/usr/local/mysql/bin/mysqldump dest=/usr/bin/mysqldump state=link
- name: add user
user: name=mysql createhome=no shell=/sbin/nologin state=present
- name: mysql config file
copy: src=/usr/src/mysql-5.5.22/support-files/my-medium.cnf dest=/etc/my.cnf remote_src=yes
- name: mysql start script
copy: src=/usr/src/mysql-5.5.22/support-files/mysql.server dest=/etc/init.d/mysqld remote_src=yes
- name: shou quan
file: path=/etc/init.d/mysqld mode=0755
- name: create system service
shell: chkconfig --add mysqld
- name: init database
shell: /usr/local/mysql/scripts/mysql_install_db --user=mysql --group=mysql --basedir=/usr/local/mysql/ --datadir=/usr/local/mysql/data
- name: directory quanxian
file: path=/usr/local/mysql owner=mysql group=mysql recurse=yes
- name: start mysqld
service: name=mysqld state=started
- name: bainliang
shell: echo "PATH=$PATH:/usr/local/mysql/bin" >> /etc/profile && source /etc/profile
- name: yum install gd libxml2-devel libjpeg-devel libpng-devel
yum: name=gd,libxml2-devel,libjpeg-devel,libpng-devel
- name: rz php tar
unarchive: src=/root/php-5.3.28.tar.gz dest=/usr/src
- name: make install php
shell: ./configure --prefix=/usr/local/php --with-gd --with-zlib --with-mysql=mysqlnd --with-pdo-mysql=mysqlnd --with-mysqli=mysqlnd --with-config-file-path=/usr/local/php --enable-fpm --enable-mbstring --with-jpeg-dir=/usr/lib && make && make install
args:
chdir: /usr/src/php-5.3.28
- name: cp configfile
copy: src=/usr/src/php-5.3.28/php.ini-development dest=/usr/local/php/php.ini remote_src=yes
- name: alter primary configfile
replace: path=/usr/local/php/php.ini regexp='^default_charset' replace='default_charset = "utf-8"'
- name: alter primary configfile1
replace: path=/usr/local/php/php.ini regexp='^short_open_tag' replace='short_open_tag = On'
- name: install youhua
unarchive: src=/root/ZendGuardLoader-php-5.3-linux-glibc23-x86_64.tar.gz dest=/usr/src
- name: cp configfile
copy: src=/usr/src/ZendGuardLoader-php-5.3-linux-glibc23-x86_64/php-5.3.x/ZendGuardLoader.so dest=/usr/local/php/lib/php/ remote_src=yes
- name: edit configfile
shell: sed -i '$azend_extension=/usr/local/php/lib/php/ZendGuardLoader.so\nzend_loader.enable=1' /usr/local/php/php.ini
- name: cp php-fpm
copy: src=/usr/src/php-5.3.28/sapi/fpm/init.d.php-fpm dest=/etc/init.d/php-fpm remote_src=yes
- name: script php-fpm quanxian
file: path=/etc/init.d/php-fpm mode=0755
- name: add system service
shell: chkconfig --add php-fpm
- name: cp php-fpm configfile
copy: src=/usr/local/php/etc/php-fpm.conf.default dest=/usr/local/php/etc/php-fpm.conf remote_src=yes
- name: edit php-fpm cfg max_children
replace: path=/usr/local/php/etc/php-fpm.conf regexp='^pm.max_children = 5' replace='pm.max_children = 50'
- name: edit php-fpm cfg star_servers
replace: path=/usr/local/php/etc/php-fpm.conf regexp='^pm.start_servers = 2' replace='pm.start_servers = 20'
- name: edit php-fpm cfg min_spare_servers
replace: path=/usr/local/php/etc/php-fpm.conf regexp='^pm.min_spare_servers = 1' replace='pm.min_spare_servers = 5'
- name: edit php-fpm cfg max_spare_servers
replace: path=/usr/local/php/etc/php-fpm.conf regexp='^pm.max_spare_servers = 3' replace='pm.max_spare_servers = 35'
- name: edit php-fpm pid
replace: path=/usr/local/php/etc/php-fpm.conf regexp=';pid = run/php-fpm.pid' replace='pid = run/php-fpm.pid'
- name:
replace: path=/usr/local/php/etc/php-fpm.conf regexp='user = nobody' replace='user = nginx'
- name:
replace: path=/usr/local/php/etc/php-fpm.conf regexp='group = nobody' replace='group = nginx'
- name: start php-fpm
service: name=php-fpm state=started
- shell: sed -i '/ server_name localhost;/a \ location ~ \.php$ {\n root html;\n fastcgi_pass 127.0.0.1:9000;\n fastcgi_index index.php;\n fastcgi_param SCRIPT_FILENAME /scripts$fastcgi_script_name;\n include fastcgi.conf;\n}' /usr/local/nginx/conf/nginx.conf
- replace: path=/usr/local/nginx/conf/nginx.conf regexp=' index index.html index.htm;' replace=' index index.html index.htm index.php;'
- service: name=nginx state=restarted
- file: path=/usr/local/nginx/html/index.php state=touch
- template: src=/root/index.php.j2 dest=/usr/local/nginx/html/index.php
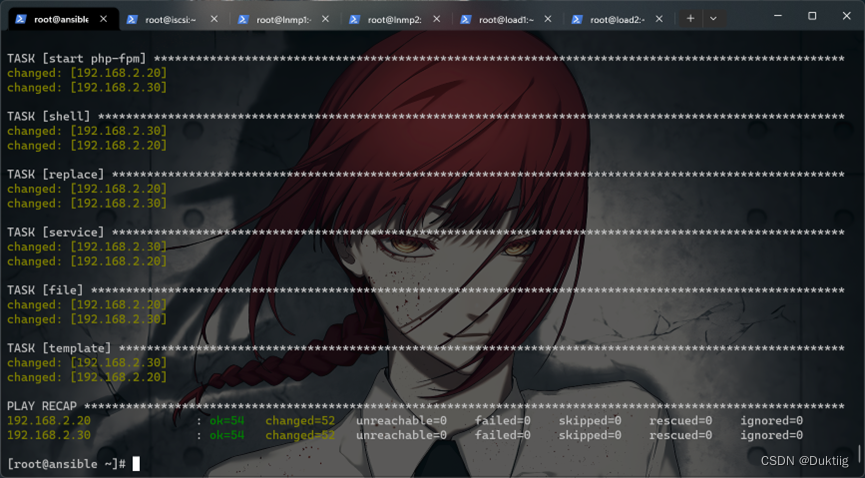
ansible-playbook lnmp.yml #执行剧本 过程比较缓慢 静等剧本执行完成即可

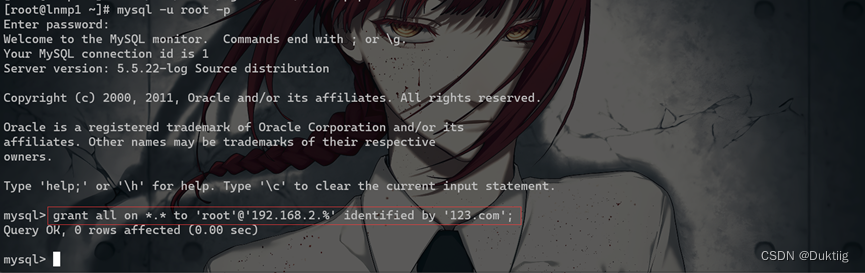
接下来验证,访问php连接数据库是否成功 先修改一下数据库的密码 lnmp1/2
用UPDATE直接编辑user表 首先登录MySQL 默认没有密码 直接回车即可
use mysql;
update user set password=password('123.com') where user='root' and host='localhost';
flush privileges;
需要MySQL授权登录,登录两台MySQL,分别执行以下语句
grant all on *.* to 'root'@'192.168.2.%' identified by '123.com';

使用任意一台服务器,访问192.168.2.20/index.php和192.168.2.30/index.php


搭建ISCSI共享存储
使用ISCSI为lnmp1/2做远程存储
iscsi端添加一块硬盘 设置分区并更改sdb1和sdb2的分区类型为8e 我这边是添加了一块20G的硬盘

对刚添加的硬盘/etc/sdb,添加两个LVM分区,分别用来存储两台LNMP的网页根目录
这里我创建了两个LVM分区,容量分别为10G
fdisk /dev/sdb  #打开磁盘分区工具
在fdisk提示符下,输入 n 创建新分区。按照以下提示输入分区信息:
Partition type: p(主分区)或 e(扩展分区),选择一个适合您的需求。
Partition number: 输入分区号(例如,1、2、3)。
First sector: 按Enter键接受默认值,或输入起始扇区编号。
Last sector: 输入 +10G,表示分区大小为10GB。
重复以上步骤,创建sdb2。
输入 t 来更改分区类型。然后输入分区号(例如,1或2),并选择分区类型为8e,即Linux LVM分区类型。
输入 p 查看分区表,确保分区类型已成功更改,并检查分区的起始扇区和大小是否正确。
输入 w 保存并退出fdisk。

partprobe /dev/sdb #重新加载分区表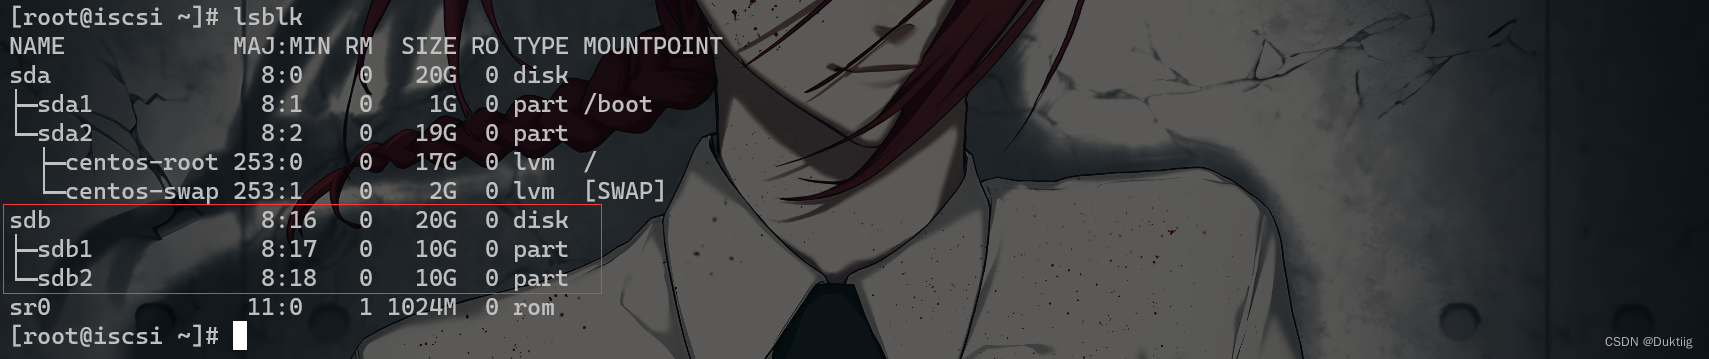
然后做逻辑卷分区,每个分区5G
vgcreate lnmp1 /dev/sdb1 -s 16M  #创建名为 lnmp1 的卷组,使用 /dev/sdb1 作为物理卷,并设置物理扩展 (PE) 的大小为 16MB。
vgcreate lnmp2 /dev/sdb2 -s 16M  #创建名为 lnmp2 的卷组,使用 /dev/sdb2 作为物理卷,并设置物理扩展 (PE) 的大小为 16MB。
lvcreate -L 5G -n lnmp lnmp1  #创建一个大小为 5GB 的逻辑卷,命名为 lnmp,并将其放置在 lnmp1 卷组中。
lvcreate -L 5G -n lnmp lnmp2  #创建一个大小为 5GB 的逻辑卷,命名为 lnmp,并将其放置在 lnmp2 卷组中。

yum -y install target*  #安装以 "target" 开头的软件。
systemctl start target;systemctl enable target #启动并开机自启target服务
使用targetcli对LVM卷和块分区进行绑定,先来绑定lnmp1组的逻辑卷
targetcli  #进入targetcli 控制台
backstores/block create lnmp1 /dev/mapper/lnmp1-lnmp  #将逻辑卷/dev/mapper/lnmp1lnmp作为lnmp1的共享存储设备,并命名为lnmp1

iscsi/ create iqn.1111-11.com.server.www:lnmp1 #创建本机中的iscsi的共享名为iqn.1111-11.com.server.www:lnmp1
iscsi/iqn.1111-11.com.server.www:lnmp1/tpg1/acls create iqn.1111-11.com.lnmp.www:lnmp1  #配置acl,只有客户机(LNMP1)的名为iqn.1111-11.com.lnmp.www:lnmp1时才会允许被获取服务端的空间
iscsi/iqn.1111-11.com.server.www:lnmp1/tpg1/luns create /backstores/block/lnmp1  #将共享名与共享存储设备绑定,客户端能访问到共享名就能获取共享存储设备的空间

iscsi/iqn.1111-11.com.server.www:lnmp1/tpg1/portals/ delete 0.0.0.0 3260  #删除默认的0.0.0.0端口
iscsi/iqn.1111-11.com.server.www:lnmp1/tpg1/portals/ create 192.168.2.70 3260  #添加本地监听端口

无需退出,继续创建LNMP2使用的共享存储设备
backstores/block/ create lnmp2 /dev/mapper/lnmp2-lnmp
iscsi/ create iqn.1111-11.com.server.www:lnmp2
iscsi/iqn.1111-11.com.server.www:lnmp2/tpg1/acls create iqn.1111-11.com.lnmp.www:lnmp2
iscsi/iqn.1111-11.com.server.www:lnmp2/tpg1/luns create /backstores/block/lnmp2
iscsi/iqn.1111-11.com.server.www:lnmp2/tpg1/portals/ create 192.168.2.70 3260
saveconfig  #保存配置
exit  #退出
systemctl stop firewalld  #关闭防火墙
setenforce 0  #关闭selinux
配置两台LNMP作为ISCSI的客户端
lnmp1:
yum -y install iscsi* #安装iscsi软件编辑ISCSI的标签名为ISCSI服务端创建的acl中的名称
vim /etc/iscsi/initiatorname.iscsi
InitiatorName=iqn.1111-11.com.lnmp.www:lnmp1

systemctl restart iscsid;systemctl enable iscsid  #重新启动并开机自启iscsi服务
iscsiadm -m discovery -p 192.168.2.70:3260 -t sendtargets  #在ISCSI服务端(192.168.2.70)中发现共享存储设备

iscsiadm -m node -T iqn.1111-11.com.server.www:lnmp1 -l  #访问并获取服务端的共享存储设备空间lnmp1
fdisk -l  #验证是否成功

创建/dev/sdb1,容量为全部容量
fdisk /dev/sdb  #创建分区
partprobe /dev/sdb  #重读分区表
mkfs.xfs /dev/sdb1  #格式化为xfs文件系统

设置网络磁盘自动挂载到网页根目录
vim /etc/fstab
/dev/sdb1       /usr/local/nginx/html   xfs     defaults,_netdev        0 0

mount -a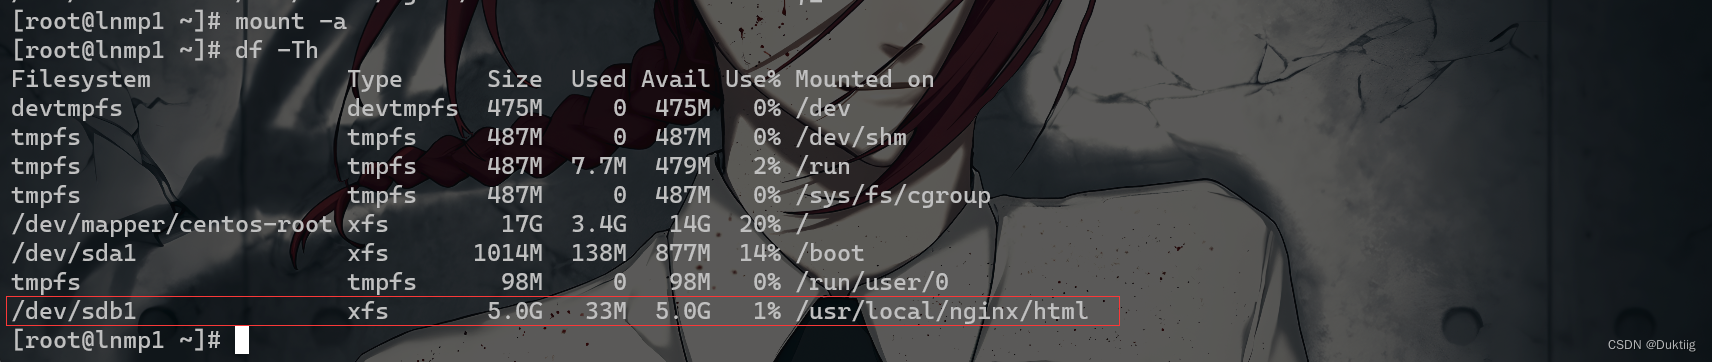
lnmp2:
vim /etc/iscsi/initiatorname.iscsi
InitiatorName=iqn.1111-11.com.lnmp.www:lnmp2

systemctl restart iscsid;systemctl enable iscsid
iscsiadm -m discovery -p 192.168.2.70:3260 -t sendtargets
iscsiadm -m node -T iqn.1111-11.com.server.www:lnmp2 -l
fdisk /dev/sdb
partprobe /dev/sdb
mkfs.xfs /dev/sdb1
vim /etc/fstab
/dev/sdb1       /usr/local/nginx/html   xfs     defaults,_netdev        0 0
mount -a

LNMP搭建Rsync+Inotify
做两台LNMP之间的网页根目录实时同步
为了同步方便,两台LNMP主机之间互相做免密登录,互相做是因为既要lnmp1监控lnmp2的目录,lnmp2的也要监控lnmp1的目录,无论哪台的网页根目录更新了数据,也会同步到另一台
lnmp1/2 互相做免密登录
lnmp1:
ssh-keygen
ssh-copy-id root@192.168.2.30
lnmp2:
ssh-keygen
ssh-copy-id root@192.168.2.20


yum install rsync -y #安装rsync软件两台分别安装inotify目录监控服务,拖包
lnmp1/2:

tar -zxf inotify-tools-3.13.tar.gz -C /usr/src  #解压缩 inotify-tools-3.13.tar.gz 压缩包并将文件提取到 /usr/src 目录下
cd /usr/src/inotify-tools-3.13/  #进入 inotify-tools-3.13 目录
./configure --prefix=/usr/local/inotify && make && make install  #运行脚本并编译安装
ln -s /usr/local/inotify/bin/* /usr/local/bin/  #创建符号链接,将 /usr/local/inotify/bin/ 目录下的可执行文件链接到 /usr/local/bin/ 目录,使其在系统中可执行
调整两个主机的rsync配置文件
vim /etc/rsyncd.conf
uid = root
gid = root
use chroot = no
max connections = 0
pid file = /var/run/rsyncd.pid
transfer logging = yes
log file = /var/lib/rsyncd.log
timeout = 900
ignore nonreadable = yes
dont compress   = *.gz *.tgz *.zip *.z *.Z *.rpm *.deb *.bz2
port 873

[html]
       path = /usr/local/nginx/html
       comment = nginx html
       writeable = yes
       read only = no

直接使用scp传到lnmp2即可
scp /etc/rsyncd.conf root@192.168.2.30:/etc/rsyncd.conf
重启Rsync服务lnmp1/2
systemctl restart rsyncd
netstat -anput | grep rsync  #查看是否运行 没有这条命令的话需安装yum install net-tools -y

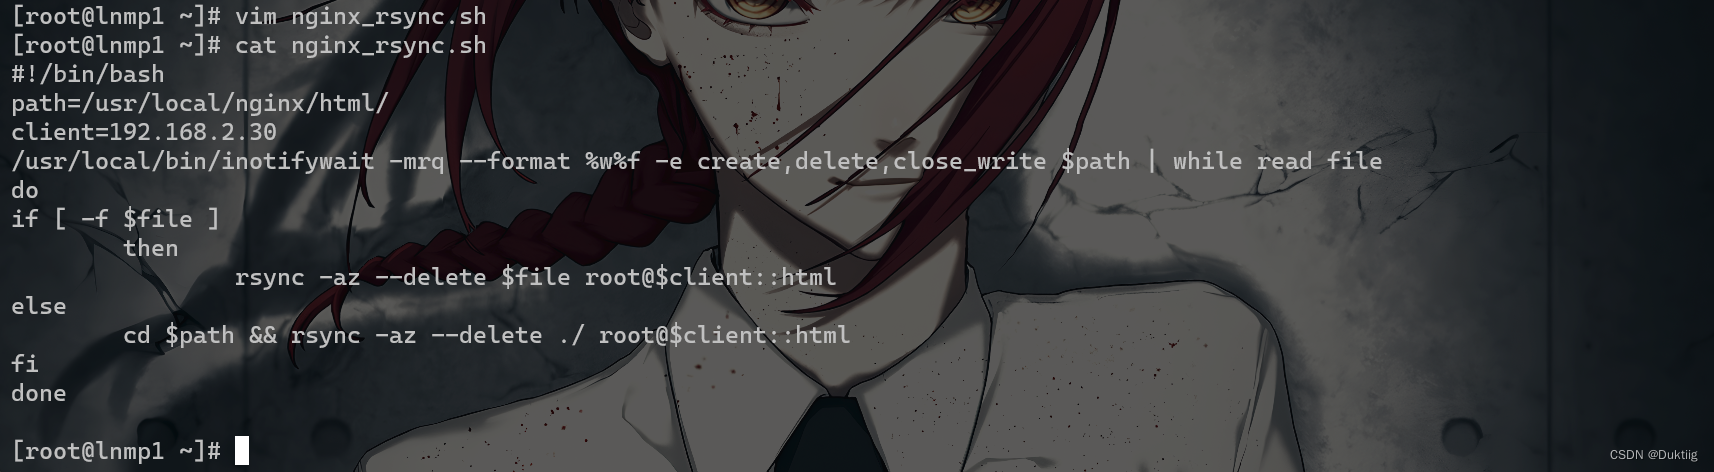
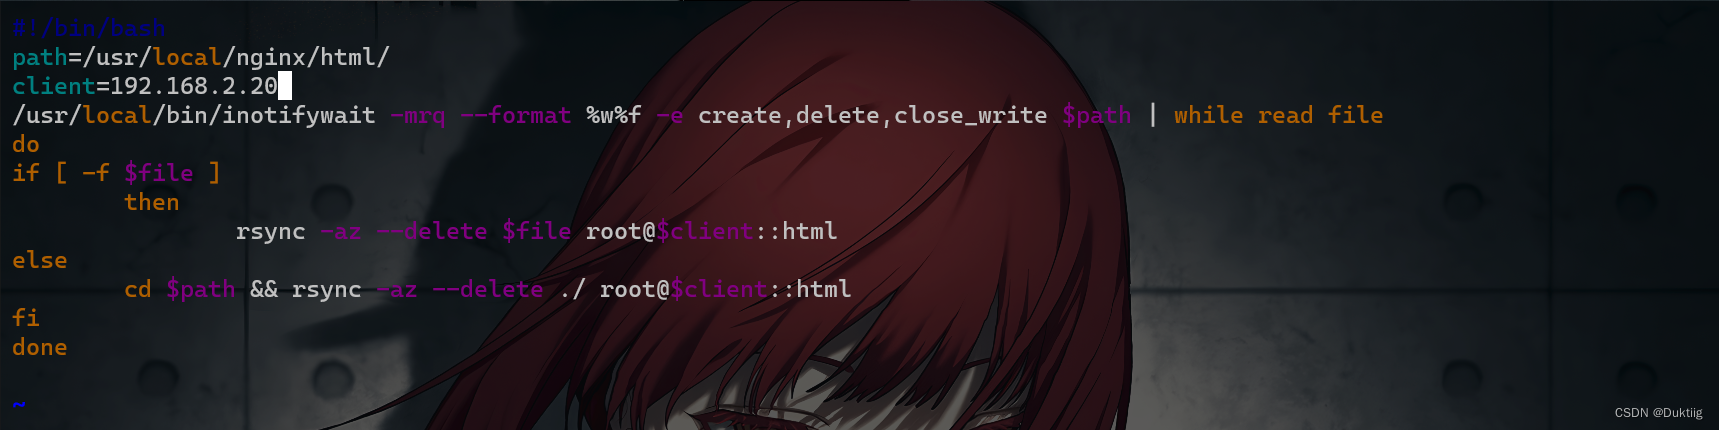
编写脚本,并后台执行脚本使得两台LNMP的网页根目录互相监控
vim nginx_rsync.sh
#!/bin/bash
path=/usr/local/nginx/html/
client=192.168.2.30
/usr/local/bin/inotifywait -mrq --format %w%f -e create,delete,close_write $path | while read file
do
if [ -f $file ]
        then
                rsync -az --delete $file root@$client::html
else
        cd $path && rsync -az --delete ./ root@$client::html
fi
done
同样使用scp传给lnmp2
scp nginx_rsync.sh root@192.168.2.30:/root/并更改文件中的ip为2.20
两台主机赋予脚本执行权限并执行 lnmp1/2
chmod +x nginx_rsync.sh
./nginx_rsync.sh &
验证LNMP,进入LNMP1的监控目录,创建目录1

查看LNMP2监控目录,然后在LNMP2删除此目录

再次查看LNMP1的监控目录,发现目录1没了,实时同步搭建成功


 1079
1079


 被折叠的 条评论
为什么被折叠?
被折叠的 条评论
为什么被折叠?
 到【灌水乐园】发言


