


使用篇
首先引入WorkManager库(使用java和kotlin引入库不同,需要注意):
// Kotlin + coroutines
implementation 'androidx.work:work-runtime-ktx:2.7.1'
单任务场景
我们开始来写一个最简单的使用,先写一个Worker:
const val TAG = "UploadWorker"

class UploadWorker(appContext: Context, workerParameters: WorkerParameters) :
    Worker(appContext, workerParameters) {

    override fun doWork(): Result {
        Thread.sleep(6000)
        Log.d(TAG, "lzy是大帅哥!")
        return Result.success()
    }

}
注意:这个doWork方法是异步的,后面分析源码时会讲到。
我们首先来个一次性任务:
class MainActivity : AppCompatActivity() {

    override fun onCreate(savedInstanceState: Bundle?) {
        super.onCreate(savedInstanceState)
        setContentView(R.layout.activity_main)
        initView()
    }

    private fun initView() {
        val btn = findViewById<Button>(R.id.btn_01)
        btn.setOnClickListener {
            val oneTimeWorkRequest = OneTimeWorkRequest
.Builder(UploadWorker::class.java).build()
            WorkManager.getInstance().enqueue(oneTimeWorkRequest)
        }
    }

}
OneTimeRequest顾名思义就是一个一次性任务,然后通过enqueue方法放到workmanager里面去执行。
布局文件:
<?xml version="1.0" encoding="utf-8"?>
<androidx.constraintlayout.widget.ConstraintLayout xmlns:android="http://schemas.android.com/apk/res/android"
    xmlns:app="http://schemas.android.com/apk/res-auto"
    xmlns:tools="http://schemas.android.com/tools"
    android:layout_width="match_parent"
    android:layout_height="match_parent"
    tools:context=".MainActivity">

    <LinearLayout
        android:layout_width="match_parent"
        android:layout_height="match_parent"
        android:orientation="vertical"
        >

        <Button
            android:id="@+id/btn_01"
            android:layout_width="match_parent"
            android:layout_height="50dp"
            android:text="测试1"
            />

        <Button
            android:layout_marginTop="20dp"
            android:id="@+id/btn_02"
            android:layout_width="match_parent"
            android:layout_height="50dp"
            android:text="测试2"
            />

        ···

    </LinearLayout>

</androidx.constraintlayout.widget.ConstraintLayout>
运行效果图:

点击测试1,等个6s:
2022-08-13 12:57:51.578 5703-5742/com.example.workmanagertest
 D/UploadWorker: lzy是大帅哥!
2022-08-13 12:57:51.581 5703-5730/com.example.workmanagertest
 I/WM-WorkerWrapper: Worker result SUCCESS for Work [
 id=74aa4669-28f0-4e20-93fc-2716f4ebc686,
 tags={ com.example.workmanagertest.UploadWorker } ]
数据互传
我们工程中一定会有大量activity和WorkManager传递参数的场景,那么该如何传递参数呢?接着往下看:
const val TAG2 = "LzyWorkManager2"

class LzyWorkManager2(appContext: Context, var workerParameters: WorkerParameters) :
    Worker(appContext, workerParameters) {

    override fun doWork(): Result {
        //接收数据
        val data = workerParameters.inputData.getString("lzy")
        Log.d(TAG2, "$data")
        return Result.success()
    }

}


        val btn2 = findViewById<Button>(R.id.btn_02)
        btn2.setOnClickListener {
            val sendData = Data.Builder()
                .putString("lzy", "lzy是个人才啊!")
                .build()
            val oneTimeWorkRequest = OneTimeWorkRequest
                .Builder(LzyWorkManager2::class.java)
                .setInputData(sendData)
                .build()
            WorkManager.getInstance().enqueue(oneTimeWorkRequest)
        }
activity里面先构建data,然后通过setInputData传入data,最后woker里面从params里面接收data。既然activity可以向worker里面发送data,那么woker里面该如何回传data呢?接着看:
const val TAG2 = "LzyWorkManager2"

class LzyWorkManager2(appContext: Context, var workerParameters: WorkerParameters) :
    Worker(appContext, workerParameters) {

    override fun doWork(): Result {
        //接收数据
        val data = workerParameters.inputData.getString("lzy")
        Log.d(TAG2, "$data")
        //回传数据
        val data2 = Data.Builder().putString("st", "st也很帅").build()
        return Result.success(data2)
    }

}
worker里面我们通过Result.success返回数据。再看activity如何处理:
class MainActivity : AppCompatActivity() {

    override fun onCreate(savedInstanceState: Bundle?) {
        super.onCreate(savedInstanceState)
        setContentView(R.layout.activity_main)
        initView()
    }

    private fun initView() {
        val btn = findViewById<Button>(R.id.btn_01)
        btn.setOnClickListener {
            val oneTimeWorkRequest = OneTimeWorkRequest.Builder(UploadWorker::class.java).build()
            WorkManager.getInstance().enqueue(oneTimeWorkRequest)
        }
        val btn2 = findViewById<Button>(R.id.btn_02)
        btn2.setOnClickListener {
            val sendData = Data.Builder()
                .putString("lzy", "lzy是个人才啊!")
                .build()
            val oneTimeWorkRequest = OneTimeWorkRequest
                .Builder(LzyWorkManager2::class.java)
                .setInputData(sendData)
                .build()
            WorkManager.getInstance().enqueue(oneTimeWorkRequest)
            WorkManager.getInstance()
                .getWorkInfoByIdLiveData(oneTimeWorkRequest.id)
                .observe(this) {
                    val getData = it.outputData.getString("st")
                    Log.d(TAG2, "$getData")
                }
        }
    }

}
很明显,WorkManager里面又封装了LiveData,是通过LiveData监听数据返回的。
注:it是WorkInfo类型。
按下测试2按钮,打印日志:
2022-08-13 13:35:57.619 6215-6215/com.example.workmanagertest
 D/LzyWorkManager2: null
2022-08-13 13:35:57.630 6215-6215/com.example.workmanagertest
D/LzyWorkManager2: null
2022-08-13 13:35:57.631 6215-6248/com.example.workmanagertest
D/LzyWorkManager2: lzy是个人才啊!
2022-08-13 13:35:57.632 6215-6240/com.example.workmanagertest
I/WM-WorkerWrapper: Worker result SUCCESS for Work
 [ id=7555eb6d-95ab-4a25-8b5d-15b8d4709316, tags=
{ com.example.workmanagertest.LzyWorkManager2 } ]
2022-08-13 13:35:57.645 6215-6215/com.example.workmanagertest
D/LzyWorkManager2: st也很帅
我们发现有两个日志打印了null,这是什么原因呢?原来这个LiveData监听的是WorkInfo的状态变化,我们只有当数据拿到后再处理,优化一下代码:
WorkManager.getInstance()
            .getWorkInfoByIdLiveData(oneTimeWorkRequest.id)
             .observe(this) {
                    if (it.state.isFinished) {
                        val getData = it.outputData.getString("st")
                        Log.d(TAG2, "$getData")
                    }
              }
如果workInfo的状态是完成了,那么:
2022-08-13 13:50:31.397 6390-6425/com.example.workmanagertest
 D/LzyWorkManager2: lzy是个人才啊!
2022-08-13 13:50:31.397 6390-6412/com.example.workmanagertest
I/WM-WorkerWrapper: Worker result SUCCESS for Work
 [ id=b7ea9abe-d89b-4c2c-b4b3-66ddb779f675,
tags={ com.example.workmanagertest.LzyWorkManager2 } ]
2022-08-13 13:50:31.401 6390-6390/com.example.workmanagertest
D/LzyWorkManager2: st也很帅
这样就过滤掉一些中间状态了。
多任务场景
我们多定义几个Woker:
class LzyWorkManager3(appContext: Context, workerParameters: WorkerParameters) :
    Worker(appContext, workerParameters) {

    override fun doWork(): Result {
        Log.e(TAG3, "work3 执行了")
        return Result.success()
    }

}

class LzyWorkManager4(appContext: Context, workerParameters: WorkerParameters) :
    Worker(appContext, workerParameters) {

    override fun doWork(): Result {
        Log.e(TAG3, "work4 执行了")
        return Result.success()
    }

}

class LzyWorkManager5(appContext: Context, workerParameters: WorkerParameters) :
    Worker(appContext, workerParameters) {

    override fun doWork(): Result {
        Log.e(TAG3, "work5 执行了")
        return Result.success()
    }

}

class LzyWorkManager6(appContext: Context, workerParameters: WorkerParameters) :
    Worker(appContext, workerParameters) {

    override fun doWork(): Result {
        Log.e(TAG3, "work6 执行了")
        return Result.success()
    }

}
activity里面事件:
        val btn3 = findViewById<Button>(R.id.btn_03)
        btn3.setOnClickListener {
            val oneTimeWorkRequest3 =
                OneTimeWorkRequest
.Builder(LzyWorkManager3::class.java).build()
            val oneTimeWorkRequest4 =
                OneTimeWorkRequest
.Builder(LzyWorkManager4::class.java).build()
            val oneTimeWorkRequest5 =
                OneTimeWorkRequest
.Builder(LzyWorkManager5::class.java).build()
            val oneTimeWorkRequest6 =
                OneTimeWorkRequest
.Builder(LzyWorkManager6::class.java).build()
            val requestList = ArrayList<OneTimeWorkRequest>()
            requestList.add(oneTimeWorkRequest3)
            requestList.add(oneTimeWorkRequest5)
            requestList.add(oneTimeWorkRequest6)
            WorkManager.getInstance().beginWith(requestList)
                .then(oneTimeWorkRequest4)
                .enque
首先获取每个单任务事件,然后把3,5,6加到一个集合里面,beginWith意思是开始执行任务,then意思是然后再执行这个任务,想必执行顺序大家已经猜到了:
E/多任务: work3 执行了
E/多任务: work6 执行了
E/多任务: work5 执行了
E/多任务: work4 执行了
注意:beginWith和then是有顺序的,集合里面执行并不是按照加入顺序执行。
周期性任务(重点)
我们经常会接到类似这样的的需求:每隔一天上传一次日志,看起来很简单,但是实现起来却异常困难!Google应该也考虑到了这样的场景,于是在WorkManager里面加入了周期性支持!这样的话我们的代码逻辑就会非常优雅。
        val btn4 = findViewById<Button>(R.id.btn_04)
        btn4.setOnClickListener {
            val periodicWorkRequest =
                PeriodicWorkRequest
                    .Builder(
                        LzyWorkManager2::class.java,
                        10,
                        TimeUnit.SECONDS
                    )
                    .build()
            WorkManager.getInstance().enqueue(periodicWorkRequest)
}注意:周期性任务最少15min一次,如果设置小于15min,按15分钟一次执行。
原理篇
我们只关注主线流程,注意下面的代码:
WorkManager.getInstance().enqueue(oneTimeWorkRequest)这个流程可以拆解成两个部分,先来看第一部分:
    @Deprecated
    public static @NonNull WorkManager getInstance() {
        WorkManager workManager = WorkManagerImpl.getInstance();
        if (workManager == null) {
            throw new IllegalStateException("WorkManager is not initialized properly.  The most "
                    + "likely cause is that you disabled WorkManagerInitializer in your manifest "
                    + "but forgot to call WorkManager#initialize in your Application#onCreate or a "
                    + "ContentProvider.");
        } else {
            return workManager;
        }
    }
我们发现里面调用了WorkManagerImpl的getInstance方法,暂且先不进去看。按照单例的常规思维,如果为null,初始化。但是发现没有,直接抛出一个异常(英文不好的自行翻译):
WorkManager is not initialized properly.
 The most likely cause is that you disabled WorkManagerInitializer
in your manifest but forgot to call
WorkManager#initialize in your
Application#onCreate or a ContentProvider.
说明这个方法只是获取的而并非初始化的,那么初始化是在什么地方呢?
我们点击生成的apk文件:
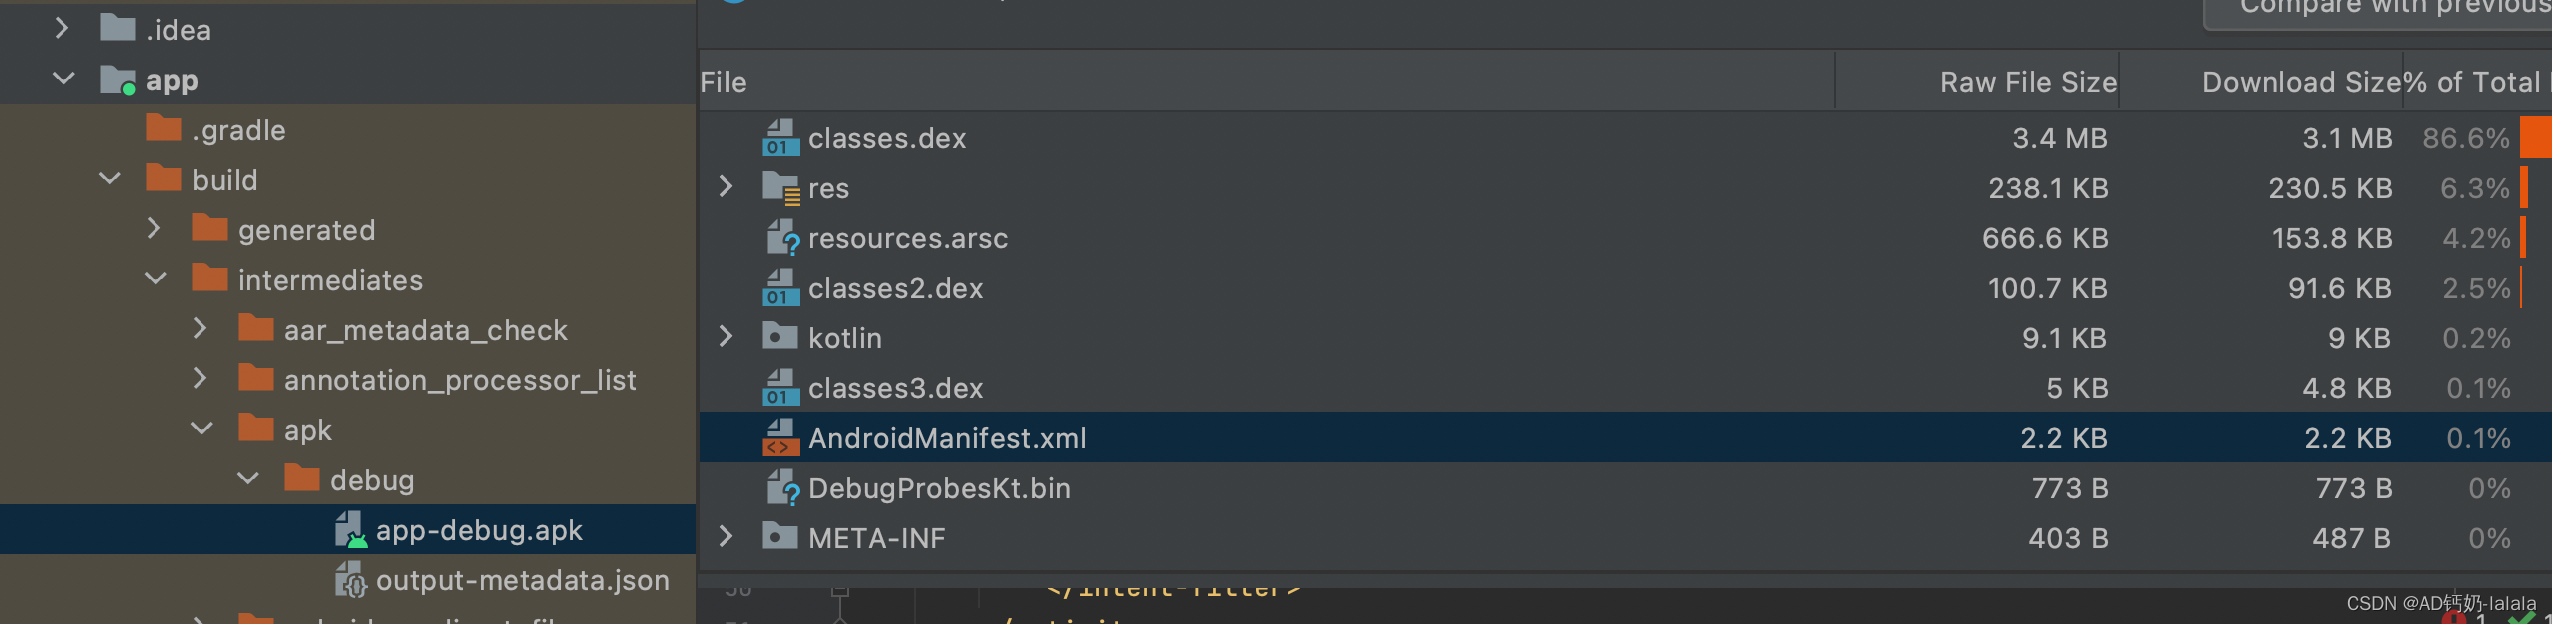
进AndroidManifest.xml查看,注意这个provider:
        <provider
            android:name="androidx.startup.InitializationProvider"
            android:exported="false"
            android:authorities="com.example.workmanagertest.androidx-startup">

            <meta-data
                android:name="androidx.work.WorkManagerInitializer"
                android:value="androidx.startup" />
        </provider>
点进去看一看:
public final class WorkManagerInitializer implements Initializer<WorkManager> {

    private static final String TAG = Logger.tagWithPrefix("WrkMgrInitializer");

    @NonNull
    @Override
    public WorkManager create(@NonNull Context context) {
        // Initialize WorkManager with the default configuration.
        Logger.get().debug(TAG, "Initializing WorkManager with default configuration.");
        WorkManager.initialize(context, new Configuration.Builder().build());
        return WorkManager.getInstance(context);
    }

    @NonNull
    @Override
    public List<Class<? extends androidx.startup.Initializer<?>>> dependencies() {
        return Collections.emptyList();
    }
}
很明显了,初始化是在ContentProvider里面进行的。进初始化方法看下:
public static void initialize(@NonNull Context context,
@NonNull Configuration configuration) {
        WorkManagerImpl.initialize(context, configuration);
}
前面我们讲了,获取WorkManager是通过WorkManagerImpl进行的,初始化同样也是。
@RestrictTo(RestrictTo.Scope.LIBRARY_GROUP)
    public static void initialize(@NonNull Context context, @NonNull Configuration configuration) {
        synchronized (sLock) {
            if (sDelegatedInstance != null && sDefaultInstance != null) {
                throw new IllegalStateException("WorkManager is already initialized.  Did you "
                        + "try to initialize it manually without disabling "
                        + "WorkManagerInitializer? See "
                        + "WorkManager#initialize(Context, Configuration) or the class level "
                        + "Javadoc for more information.");
            }

            if (sDelegatedInstance == null) {
                context = context.getApplicationContext();
                if (sDefaultInstance == null) {
                    sDefaultInstance = new WorkManagerImpl(
                            context,
                            configuration,
                            new WorkManagerTaskExecutor(configuration.getTaskExecutor()));
                }
                sDelegatedInstance = sDefaultInstance;
            }
        }
    }
进WorkManagerImpl构造看下,最终的构造函数如下:
@RestrictTo(RestrictTo.Scope.LIBRARY_GROUP)
    public WorkManagerImpl(
            @NonNull Context context,
            @NonNull Configuration configuration,
            @NonNull TaskExecutor workTaskExecutor,
            @NonNull WorkDatabase database) {
        Context applicationContext = context.getApplicationContext();
        Logger.setLogger(new Logger.LogcatLogger(configuration.getMinimumLoggingLevel()));
        List<Scheduler> schedulers =
                createSchedulers(applicationContext, configuration, workTaskExecutor);
        Processor processor = new Processor(
                context,
                configuration,
                workTaskExecutor,
                database,
                schedulers);
        internalInit(context, configuration, workTaskExecutor, database, schedulers, processor);
    }
我们注意两个点就够了:
- 使用了database:WorkManager能保证任务一定会被执行,即使你的应用程序当前不在运行中,哪怕你的设备重启,任务仍然会在适当的时候被执行。这是因为WorkManager有自己的数据库,关于任务的所有信息和数据都保存在这个数据库中,因此,只要你的任务交给了WorkManager,哪怕你的应用程序彻底退出,或者设备重新启动,WorkManager依然能够保证完成你交给的任务。
- 使用了schedulers
@RestrictTo(RestrictTo.Scope.LIBRARY_GROUP)
    @NonNull
    public List<Scheduler> createSchedulers(
            @NonNull Context context,
            @NonNull Configuration configuration,
            @NonNull TaskExecutor taskExecutor) {

        return Arrays.asList(
                Schedulers.createBestAvailableBackgroundScheduler(context, this),
                // Specify the task executor directly here as this happens before internalInit.
                // GreedyScheduler creates ConstraintTrackers and controllers eagerly.
                new GreedyScheduler(context, configuration, taskExecutor, this));
    }
最终使用了贪婪调度器。
再来分析第二步:
    @NonNull
    public final Operation enqueue(@NonNull WorkRequest workRequest) {
        return enqueue(Collections.singletonList(workRequest));
    }

    @NonNull
    public abstract Operation enqueue(@NonNull
List<? extends WorkRequest> requests);
发现enqueue是一个抽象方法,我们去实现类WorkManagerImpl看看:
    @Override
    @NonNull
    public Operation enqueue(
            @NonNull List<? extends WorkRequest> requests) {

        // This error is not being propagated as part of the Operation, as we want the
        // app to crash during development. Having no workRequests is always a developer error.
        if (requests.isEmpty()) {
            throw new IllegalArgumentException(
                    "enqueue needs at least one WorkRequest.");
        }
        return new WorkContinuationImpl(this, requests).enqueue();
    }
又交给了WorkContinuationImpl处理:构造方法里面传入了requests。
rivate final List<? extends WorkRequest> mWork;

public WorkContinuationImpl(
            @NonNull WorkManagerImpl workManagerImpl,
            @NonNull List<? extends WorkRequest> work) {
        this(
                workManagerImpl,
                null,
                ExistingWorkPolicy.KEEP,
                work,
                null);
    }


public WorkContinuationImpl(@NonNull WorkManagerImpl workManagerImpl,
            @Nullable String name,
            @NonNull ExistingWorkPolicy existingWorkPolicy,
            @NonNull List<? extends WorkRequest> work,
            @Nullable List<WorkContinuationImpl> parents) {
        mWorkManagerImpl = workManagerImpl;
        mName = name;
        mExistingWorkPolicy = existingWorkPolicy;
        mWork = work;
        mParents = parents;
        mIds = new ArrayList<>(mWork.size());
        mAllIds = new ArrayList<>();
        if (parents != null) {
            for (WorkContinuationImpl parent : parents) {
                mAllIds.addAll(parent.mAllIds);
            }
        }
        for (int i = 0; i < work.size(); i++) {
            String id = work.get(i).getStringId();
            mIds.add(id);
            mAllIds.add(id);
        }
    }
我们再来看看WorkContinuationImpl的enqueue方法:
    @Override
    public @NonNull Operation enqueue() {
        // Only enqueue if not already enqueued.
        if (!mEnqueued) {
            // The runnable walks the hierarchy of the continuations
            // and marks them enqueued using the markEnqueued() method, parent first.
            EnqueueRunnable runnable = new EnqueueRunnable(this);
            mWorkManagerImpl.getWorkTaskExecutor()
.executeOnBackgroundThread(runnable);
            mOperation = runnable.getOperation();
        } else {
            Logger.get().warning(TAG,
                    String.format("Already enqueued work ids (%s)", TextUtils.join(", ", mIds)));
        }
        return mOperation;
    }
先来看EnqueueRunnable是个啥:
public class EnqueueRunnable implements Runnable {

    private final WorkContinuationImpl mWorkContinuation;
    private final OperationImpl mOperation;

    public EnqueueRunnable(@NonNull WorkContinuationImpl workContinuation) {
        mWorkContinuation = workContinuation;
        mOperation = new OperationImpl();
    }

    @Override
    public void run() {
        try {
            if (mWorkContinuation.hasCycles()) {
                throw new IllegalStateException(
                        String.format("WorkContinuation has cycles (%s)", mWorkContinuation));
            }
            boolean needsScheduling = addToDatabase();
            if (needsScheduling) {
                // Enable RescheduleReceiver, only when there are Worker's that need scheduling.
                final Context context =
                        mWorkContinuation.getWorkManagerImpl().getApplicationContext();
                PackageManagerHelper.setComponentEnabled(context, RescheduleReceiver.class, true);
                scheduleWorkInBackground();
            }
            mOperation.setState(Operation.SUCCESS);
        } catch (Throwable exception) {
            mOperation.setState(new Operation.State.FAILURE(exception));
        }
    }
```
}
首先将任务相关的信息加到数据库里面持久化,然后关注scheduleWorkInBackground方法:
    @VisibleForTesting
    public void scheduleWorkInBackground() {
        WorkManagerImpl workManager = mWorkContinuation.getWorkManagerImpl();
        Schedulers.schedule(
                workManager.getConfiguration(),
                workManager.getWorkDatabase(),
                workManager.getSchedulers());
    }
public static void schedule(
@NonNull Configuration configuration,
@NonNull WorkDatabase workDatabase,
List<Scheduler> schedulers) {
if (schedulers == null || schedulers.size() == 0) {
return;
}
WorkSpecDao workSpecDao = workDatabase.workSpecDao();
List<WorkSpec> eligibleWorkSpecsForLimitedSlots;
List<WorkSpec> allEligibleWorkSpecs;
workDatabase.beginTransaction();
try {
// Enqueued workSpecs when scheduling limits are applicable.
eligibleWorkSpecsForLimitedSlots = workSpecDao.getEligibleWorkForScheduling(
configuration.getMaxSchedulerLimit());
// Enqueued workSpecs when scheduling limits are NOT applicable.
allEligibleWorkSpecs = workSpecDao.getAllEligibleWorkSpecsForScheduling(
MAX_GREEDY_SCHEDULER_LIMIT);
if (eligibleWorkSpecsForLimitedSlots != null
&& eligibleWorkSpecsForLimitedSlots.size() > 0) {
long now = System.currentTimeMillis();
// Mark all the WorkSpecs as scheduled.
// Calls to Scheduler#schedule() could potentially result in more schedules
// on a separate thread. Therefore, this needs to be done first.
for (WorkSpec workSpec : eligibleWorkSpecsForLimitedSlots) {
workSpecDao.markWorkSpecScheduled(workSpec.id, now);
}
}
workDatabase.setTransactionSuccessful();
} finally {
workDatabase.endTransaction();
}
if (eligibleWorkSpecsForLimitedSlots != null
&& eligibleWorkSpecsForLimitedSlots.size() > 0) {
WorkSpec[] eligibleWorkSpecsArray =
new WorkSpec[eligibleWorkSpecsForLimitedSlots.size()];
eligibleWorkSpecsArray =
eligibleWorkSpecsForLimitedSlots.toArray(eligibleWorkSpecsArray);
// Delegate to the underlying schedulers.
for (Scheduler scheduler : schedulers) {
if (scheduler.hasLimitedSchedulingSlots()) {
scheduler.schedule(eligibleWorkSpecsArray);//1
}
}
}
if (allEligibleWorkSpecs != null && allEligibleWorkSpecs.size() > 0) {
WorkSpec[] enqueuedWorkSpecsArray = new WorkSpec[allEligibleWorkSpecs.size()];
enqueuedWorkSpecsArray = allEligibleWorkSpecs.toArray(enqueuedWorkSpecsArray);
// Delegate to the underlying schedulers.
for (Scheduler scheduler : schedulers) {
if (!scheduler.hasLimitedSchedulingSlots()) {
scheduler.schedule(enqueuedWorkSpecsArray);
}
}
}
}首先将一些配置持久化到数据库里面,我们注释1处:
最终调用的是初始化的时候初始化好的贪婪调度器的schedule方法:
@Override
    public void schedule(@NonNull WorkSpec... workSpecs) {
        if (mInDefaultProcess == null) {
            checkDefaultProcess();
        }

        if (!mInDefaultProcess) {
            Logger.get().info(TAG, "Ignoring schedule request in a secondary process");
            return;
        }

        registerExecutionListenerIfNeeded();

        // Keep track of the list of new WorkSpecs whose constraints need to be tracked.
        // Add them to the known list of constrained WorkSpecs and call replace() on
        // WorkConstraintsTracker. That way we only need to synchronize on the part where we
        // are updating mConstrainedWorkSpecs.
        Set<WorkSpec> constrainedWorkSpecs = new HashSet<>();
        Set<String> constrainedWorkSpecIds = new HashSet<>();

        for (WorkSpec workSpec : workSpecs) {
            long nextRunTime = workSpec.calculateNextRunTime();
            long now = System.currentTimeMillis();
            if (workSpec.state == WorkInfo.State.ENQUEUED) {
                if (now < nextRunTime) {
                    // Future work
                    if (mDelayedWorkTracker != null) {
                        mDelayedWorkTracker.schedule(workSpec);
                    }
                } else if (workSpec.hasConstraints()) {
                    if (SDK_INT >= 23 && workSpec.constraints.requiresDeviceIdle()) {
                        // Ignore requests that have an idle mode constraint.
                        Logger.get().debug(TAG,
                                String.format("Ignoring WorkSpec %s, Requires device idle.",
                                        workSpec));
                    } else if (SDK_INT >= 24 && workSpec.constraints.hasContentUriTriggers()) {
                        // Ignore requests that have content uri triggers.
                        Logger.get().debug(TAG,
                                String.format("Ignoring WorkSpec %s, Requires ContentUri triggers.",
                                        workSpec));
                    } else {
                        constrainedWorkSpecs.add(workSpec);
                        constrainedWorkSpecIds.add(workSpec.id);
                    }
                } else {
                    Logger.get().debug(TAG, String.format("Starting work for %s", workSpec.id));
                    mWorkManagerImpl.startWork(workSpec.id);//1
                }
            }
        }

        // onExecuted() which is called on the main thread also modifies the list of mConstrained
        // WorkSpecs. Therefore we need to lock here.
        synchronized (mLock) {
            if (!constrainedWorkSpecs.isEmpty()) {
                Logger.get().debug(TAG, String.format("Starting tracking for [%s]",
                        TextUtils.join(",", constrainedWorkSpecIds)));
                mConstrainedWorkSpecs.addAll(constrainedWorkSpecs);
                mWorkConstraintsTracker.replace(mConstrainedWorkSpecs);
            }
        }
    }
如果没有约束,走注释1处:
又回到了WorkManagerImpl里面:
    @RestrictTo(RestrictTo.Scope.LIBRARY_GROUP)
    public void startWork(@NonNull String workSpecId) {
        startWork(workSpecId, null);
    }

    @RestrictTo(RestrictTo.Scope.LIBRARY_GROUP)
    public void startWork(
            @NonNull String workSpecId,
            @Nullable WorkerParameters.RuntimeExtras runtimeExtras) {
        mWorkTaskExecutor
                .executeOnBackgroundThread(
                        new StartWorkRunnable(this, workSpecId, runtimeExtras));
    }
很明显,这是一个线程池,进StartWorkRunable方法里面看看:
@RestrictTo(RestrictTo.Scope.LIBRARY_GROUP)
public class StartWorkRunnable implements Runnable {

    private WorkManagerImpl mWorkManagerImpl;
    private String mWorkSpecId;
    private WorkerParameters.RuntimeExtras mRuntimeExtras;

    public StartWorkRunnable(
            WorkManagerImpl workManagerImpl,
            String workSpecId,
            WorkerParameters.RuntimeExtras runtimeExtras) {
        mWorkManagerImpl = workManagerImpl;
        mWorkSpecId = workSpecId;
        mRuntimeExtras = runtimeExtras;
    }

    @Override
    public void run() {
        mWorkManagerImpl.getProcessor().startWork(mWorkSpecId, mRuntimeExtras);
    }
}
继续看Process的startWork:
public boolean startWork(
            @NonNull String id,
            @Nullable WorkerParameters.RuntimeExtras runtimeExtras) {

        WorkerWrapper workWrapper;
        synchronized (mLock) {
            // Work may get triggered multiple times if they have passing constraints
            // and new work with those constraints are added.
            if (isEnqueued(id)) {
                Logger.get().debug(
                        TAG,
                        String.format("Work %s is already enqueued for processing", id));
                return false;
            }

            workWrapper =
                    new WorkerWrapper.Builder(
                            mAppContext,
                            mConfiguration,
                            mWorkTaskExecutor,
                            this,
                            mWorkDatabase,
                            id)
                            .withSchedulers(mSchedulers)
                            .withRuntimeExtras(runtimeExtras)
                            .build();
            ListenableFuture<Boolean> future = workWrapper.getFuture();
            future.addListener(
                    new FutureListener(this, id, future),
                    mWorkTaskExecutor.getMainThreadExecutor());
            mEnqueuedWorkMap.put(id, workWrapper);
        }
        mWorkTaskExecutor.getBackgroundExecutor().execute(workWrapper);//1
        Logger.get().debug(TAG, String.format("%s: processing %s", getClass().getSimpleName(), id));
        return true;
    }
将其封装成workWrapper,并执行execute方法:我们猜想workWrapper也是一个runnable!
public class WorkerWrapper implements Runnable {

```

    @WorkerThread
    @Override
    public void run() {
        mTags = mWorkTagDao.getTagsForWorkSpecId(mWorkSpecId);
        mWorkDescription = createWorkDescription(mTags);
        runWorker();
    }

    private void runWorker() {

        ···
        runExpedited.addListener(new Runnable() {
                @Override
                public void run() {
                    try {
                        runExpedited.get();
                        Logger.get().debug(TAG,
                                String.format("Starting work for %s", mWorkSpec.workerClassName));
                        // Call mWorker.startWork() on the main thread.
                        mInnerFuture = mWorker.startWork();//1
                        future.setFuture(mInnerFuture);
                    } catch (Throwable e) {
                        future.setException(e);
                    }
                }
            }, mWorkTaskExecutor.getMainThreadExecutor());
···
    }

```

}
关注注释1处:
public abstract class ListenableWorker {

```
    @MainThread
    public abstract @NonNull ListenableFuture<Result> startWork();
```

}
而Worker又是实现了ListenableWorker:
    @Override
    public final @NonNull ListenableFuture<Result> startWork() {
        mFuture = SettableFuture.create();
        getBackgroundExecutor().execute(new Runnable() {
            @Override
            public void run() {
                try {
                    Result result = doWork();//happy
                    mFuture.set(result);
                } catch (Throwable throwable) {
                    mFuture.setException(throwable);
                }

            }
        });
        return mFuture;
    }
Wow,终于我们熟悉的doWork出来了!
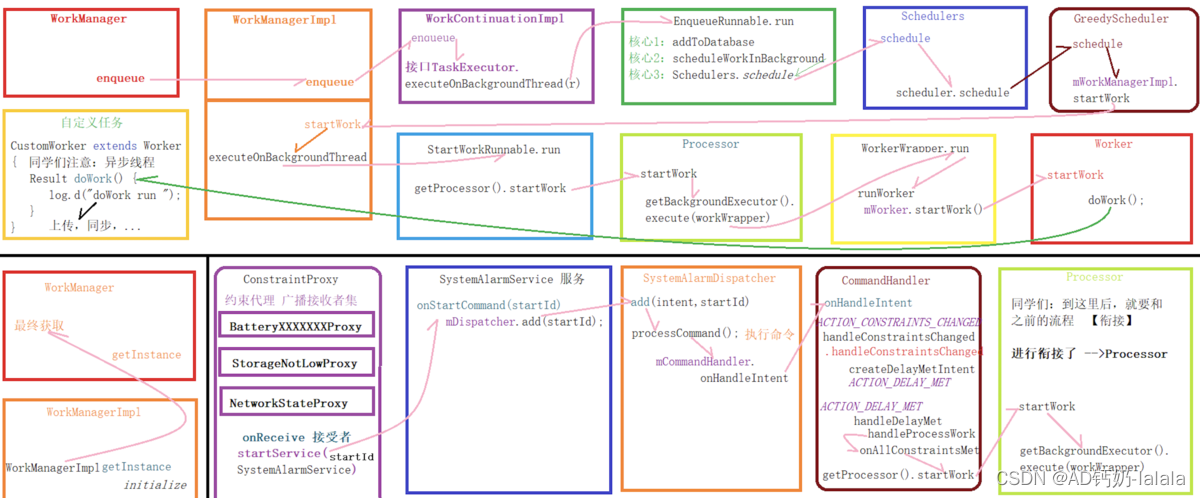
一张图总结一下流程吧:
关于WorkManager的线程池设计也非常有意思,有时间会单独写一篇文章详细聊聊!


 1518
1518


 被折叠的 条评论
为什么被折叠?
被折叠的 条评论
为什么被折叠?
 到【灌水乐园】发言


