


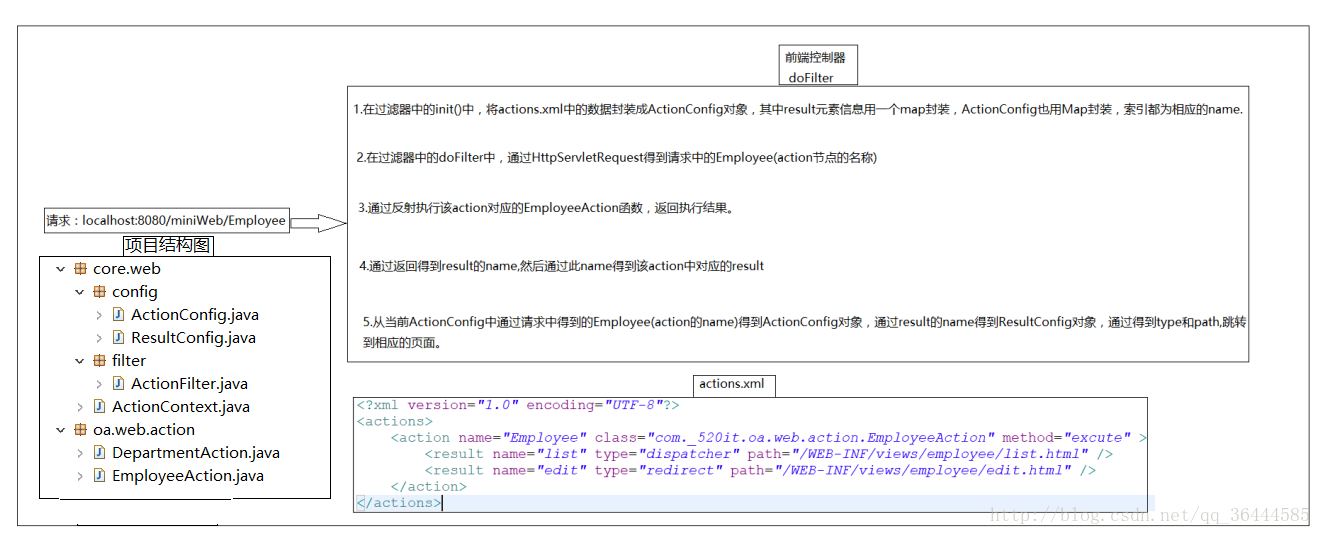
miniMVC流程和项目结构:
1:创建oa.web.action包,并在其中编写两个对象的action,如:EmployeeAction和DepartmentAction:
package com._520it.oa.web.action;

public class EmployeeAction {
    public void excute(){
        System.out.println("员工的列表");
    }
}


package com._520it.oa.web.action;

public class DepartmentAction {
    public void excute(){
        System.out.println("部门列表");
    }
}
2.1:在源文件夹resources中编写actions.xml文件,为action节点配置name,class,method属性,代表每次请求时需要执行的对象方法:
<!-- actions.xml -->
<?xml version="1.0" encoding="UTF-8"?>
<actions>
    <action name="Employee" class="com._520it.oa.web.action.EmployeeAction" method="excute" />
    <action name="Department" class="com._520it.oa.web.action.DepartmentAction" method="excute" />
</actions>
2.2:在包web.core.config中编写ActionConfig类,用来封装每一个actions.xml中action节点的信息(以后只需在actions.xml中添加action节点即可):
package com._520it.core.web.config;

//使用lombok完成get/set/toString
@Data
public class ActionConfig {
    private String name;
    private String className;
    private String method;

    public ActionConfig(String name, String className, String method) {
        this.name = name;
        this.className = className;
        this.method = method;
    }
}
2.3:在包filter中编写处理请求的过滤器:
//1.解析actions.xml文件,将actions.xml中的action节点封装成对象,在过滤器中的init中封装成ActionConfigMap
//2.在doFilter中根据请求中的信息,取出ActionConfigMap中的ActionConfig对象,利用反射创建对象并执行函数
package com._520it.core.web.filter;

import java.io.IOException;
import java.lang.reflect.Method;
import java.util.HashMap;
import java.util.Map;

import javax.servlet.Filter;
import javax.servlet.FilterChain;
import javax.servlet.FilterConfig;
import javax.servlet.ServletException;
import javax.servlet.ServletRequest;
import javax.servlet.ServletResponse;
import javax.servlet.http.HttpServletRequest;
import javax.servlet.http.HttpServletResponse;
import javax.xml.parsers.DocumentBuilder;
import javax.xml.parsers.DocumentBuilderFactory;

import org.w3c.dom.Document;
import org.w3c.dom.Element;
import org.w3c.dom.NodeList;

import com._520it.core.web.config.ActionConfig;

/**
 * @author lq
 *
 */
@SuppressWarnings("all")
public class ActionFilter implements Filter {
    //将action对象的配置信息封装成对象,并装在Map中,获取时方便用请求名索引
    private Map<String, Object> actionConfigMap = new HashMap<>();

    public void init(FilterConfig filterConfig) throws ServletException {
        //1.获取文档对象
        Document doc = getDocument();
        //2.获取文档中所有action节点的节点集合
        NodeList nodeList = doc.getElementsByTagName("action");
        for (int i = 0; i < nodeList.getLength(); i++) {
            //3.获取每个节点中的属性信息,并封装成配置对象
            Element actionEl = (Element) nodeList.item(i);
            String actionName = actionEl.getAttribute("name");
            String actionClassName = actionEl.getAttribute("class");
            String actionMethod = actionEl.getAttribute("method");
            //4.创建配置文件对象,并放入配置文件对象映射中
            ActionConfig actionConfig = new ActionConfig(actionName, actionClassName, actionMethod);
            actionConfigMap.put(actionName, actionConfig);
        }
    }

    public void doFilter(ServletRequest request, ServletResponse response,
            FilterChain chain) throws IOException, ServletException {
        try {
            //1.在过滤器中对请求和相应对象强强转成Http类型,方便处理Http请求相关操作
            HttpServletRequest req = (HttpServletRequest) request;
            HttpServletResponse resp = (HttpServletResponse) response;
            //2.得到请求中的最后一个/请求的名称
            String requestUri = req.getRequestURI();
            String actionName = requestUri.substring(requestUri
                    .lastIndexOf("/") + 1);
            //3.判断配置对象映射中是否含有当前请求的信息
            if (!actionConfigMap.containsKey(actionName)) {
                chain.doFilter(req, resp);
            }
            //4.获取当前请求操作的配置对象
            ActionConfig actionConfig = (ActionConfig) actionConfigMap.get(actionName);
            //5.通过反射执行请求对象中的函数
            Class clz = Class.forName(actionConfig.getClassName());
            Object actionObj = clz.newInstance();
            Method method = clz.getMethod(actionConfig.getMethod());
            method.invoke(actionObj);
        } catch (Exception e) {
            e.printStackTrace();
        }
    }

    public void destroy() {

    }

    //返回文档对象
    public Document getDocument() {
        DocumentBuilderFactory db = DocumentBuilderFactory.newInstance();
        try {
            DocumentBuilder builder = db.newDocumentBuilder();
            return builder.parse(Thread.currentThread().getContextClassLoader()
                    .getResourceAsStream("actions.xml"));
        } catch (Exception e) {
            e.printStackTrace();
        }
        throw new RuntimeException("解析action.xml文件失败!");
    }
}
3.1:如何在对象Action中得到请求中的参数信息,写一个函数ActionContext,用来封装HttpServletRequest和HttpServletResponse:
//1.含HttpServletRequest和HttpServletResponse参数的构造器,方便构造函数。
//2.既然有了这个构造器,已上两个参数就不需要setter方法了。
//3.设置一个静态私有的ActionContext对象:
    静态目的就是方便该类的静态方法getContext()能调用它,
    私有目的:其他类不能直接调用该变量
package com._520it.core.web;

import javax.servlet.http.HttpServletRequest;
import javax.servlet.http.HttpServletResponse;

public class ActionContext {
    private HttpServletRequest req;
    private HttpServletResponse resp;

    //虽然此变量是静态的,但是是私有的,和getContext的static不重复
    private static ActionContext mContext;


    public ActionContext(HttpServletRequest req, HttpServletResponse resp) {
        this.req = req;
        this.resp = resp;
    }

    public static void setContext(ActionContext context){
        mContext = context;
    }

    public static ActionContext getContext(){
        return mContext;
    }


    //因为构造器中已经有传req和resp得ActionContext对象,此处创建get即可
    public HttpServletRequest getReq() {
        return req;
    }
    public HttpServletResponse getResp() {
        return resp;
    }

}
3.2:在过滤器中,将当前的环境变量存储到ActionContext对象中,方便在其他对象中操作请求的信息:
    ActionContext context = new ActionContext(req, resp);
    context.setContext(context);
3.3:在对象Action中调用ActionContext对象,以得到请求中的参数信息:
public class EmployeeAction {
    public void excute(){
        System.out.println("员工的列表");
        ActionContext context = ActionContext.getContext();
        String username = context.getReq().getParameter("username");
        System.out.println("username=" + username);
    }
}
4.但此时在对象ActionContext中有线程不安全情况:
public class EmployeeAction {
    public void excute(){
        System.out.println("员工的列表");
        try {
            Thread.sleep(8000);
        } catch (InterruptedException e) {
            e.printStackTrace();
        }

        ActionContext context = ActionContext.getContext();
        String username = context.getReq().getParameter("username");
        System.out.println("username=" + username);
    }
}
4.1:问题:最后一次请求中的参数值会覆盖前面请求中的参数,主要原因是ActionContext中每次请求使用的是同一个该类中的ActionContext对象成员变量

4.2:解决:
    为容易发生线程不安全的变量使用ThreadLocal,ThreadLocal又称为“线程局部变量”,它为每一个使用该变量的线程都提供一个变量值的副本,使每一个线程都可以独立地改变自己的副本,而不会和其他线程的副本冲突(好比每一个线程都使用的是一个新的变量),相应ActionContext的变化:
private static ThreadLocal<ActionContext> threadLocal = new ThreadLocal<>();

public static void setContext(ActionContext context){
    threadLocal.set(context);
}

public static ActionContext getContext(){
    return threadLocal.get();
}
5.在执行完action对象中的函数后跳转到一个页面中:
5.1:在actions.xml中的action节点展开并配置result节点,包含name,type,path,页面名字,请求类型,路径:
<actions>
    <action name="Employee" class="com._520it.oa.web.action.EmployeeAction" method="excute" >
        <result name="list" type="dispatcher" path="/WEB-INF/views/employee/list.html" />
        <result name="edit" type="redirect" path="/WEB-INF/views/employee/edit.html" />
    </action>
</actions>
5.2:在core.web.config中创建ResultConfig对象,封装result节点的属性信息:
package com._520it.core.web.config;
@Data
public class ResultConfig {
    private String name;
    private String type;
    private String path;

    public ResultConfig(String name, String type, String path) {
        this.name = name;
        this.type = type;
        this.path = path;
    }

}
5.3:在ActionConfig类中添加成员变量:
private Map<String, ResultConfig> resultConfigMap = new HashMap<>();并提供getter和setter方法,用于封装action节点中result节点属性信息。
5.4:在过滤器中,解析actions.xml时,在每个action节点迭代时,迭代得出result属性:
//将action对象的配置信息封装成对象,并装在Map中,获取时方便用请求名索引
    private Map<String, ActionConfig> actionConfigMap = new HashMap<>();
    private Map<String, ResultConfig> resultConfigMap = new HashMap<>();

    public void init(FilterConfig filterConfig) throws ServletException {
        //1.获取文档对象
        Document doc = getDocument();
        //2.获取文档中所有action节点的节点集合
        NodeList nodeList = doc.getElementsByTagName("action");
        for (int i = 0; i < nodeList.getLength(); i++) {
            //3.获取每个节点中的属性信息,并封装成配置对象
            Element actionEl = (Element) nodeList.item(i);
            String actionName = actionEl.getAttribute("name");
            String actionClassName = actionEl.getAttribute("class");
            String actionMethod = actionEl.getAttribute("method");
            //4.创建配置文件对象,并放入配置文件对象映射中
            ActionConfig actionConfig = new ActionConfig(actionName, actionClassName, actionMethod);
            actionConfigMap.put(actionName, actionConfig);

            //5.获取文档中所有result节点的节点集合
            resultConfigMap = new HashMap<>();
            NodeList resultNode = actionEl.getElementsByTagName("result");
            for (int j = 0; j < resultNode.getLength(); j++) {
                Element resultEl = (Element) resultNode.item(j);
                String resultName = resultEl.getAttribute("name");
                String resultType = resultEl.getAttribute("type");
                String resultPath = resultEl.getAttribute("path");

                ResultConfig resultConfig = new ResultConfig(resultName, resultType, resultPath);
                resultConfigMap.put(resultName, resultConfig);
                //6.将该action中所有result节点组成的map对象封装到actionConfig对象中
                actionConfig.setResultConfigMap(resultConfigMap);
            }
        }
    }
5.5:在doFilter中,执行完函数后,得到函数返回值(result的名称),由请求得到action的名称,得到对应ActionConfig对象,由函数返回值得到ActionConfig对象中对应的ResultConfig对象,然后根据请求类型和资源路径跳转到相应界面:
public void doFilter(ServletRequest request, ServletResponse response,
            FilterChain chain) throws IOException, ServletException {
        try {
            //1.在过滤器中对请求和相应对象强强转成Http类型,方便处理Http请求相关操作
            HttpServletRequest req = (HttpServletRequest) request;
            HttpServletResponse resp = (HttpServletResponse) response;

            //2.将当前的环境变量存储到ActionContext对象中,方便在其他对象中操作请求的信息
            ActionContext context = new ActionContext(req, resp);
            context.setContext(context);

            //3.得到请求中的最后一个/请求的名称
            String requestUri = req.getRequestURI();
            String actionName = requestUri.substring(requestUri
                    .lastIndexOf("/") + 1);
            //4.判断配置对象映射中是否含有当前请求的信息
            if (!actionConfigMap.containsKey(actionName)) {
                chain.doFilter(req, resp);
            }
            //5.获取当前请求操作的配置对象
            ActionConfig actionConfig = (ActionConfig) actionConfigMap.get(actionName);
            //6.通过反射执行请求对象中的函数
            Class clz = Class.forName(actionConfig.getClassName());
            Object actionObj = clz.newInstance();
            Method method = clz.getMethod(actionConfig.getMethod());
            String action = (String) method.invoke(actionObj);
            System.out.println("acton=" + action);

            //7.通过执行函数返回的result的name,得到该action中确切的ResultConfig对象
            ResultConfig resultConfig = actionConfigMap.get(actionName).getResultConfigMap().get(action);
            String type = resultConfig.getType();
            String path = resultConfig.getPath();

            if("dispatcher".equals(type)){
                req.getRequestDispatcher(path).forward(req, resp);
                System.out.println(path);
            }else if("redirect".equals(type)){
                resp.sendRedirect(path);
                System.out.println(path);
            }
        } catch (Exception e) {
            e.printStackTrace();
        }
    }
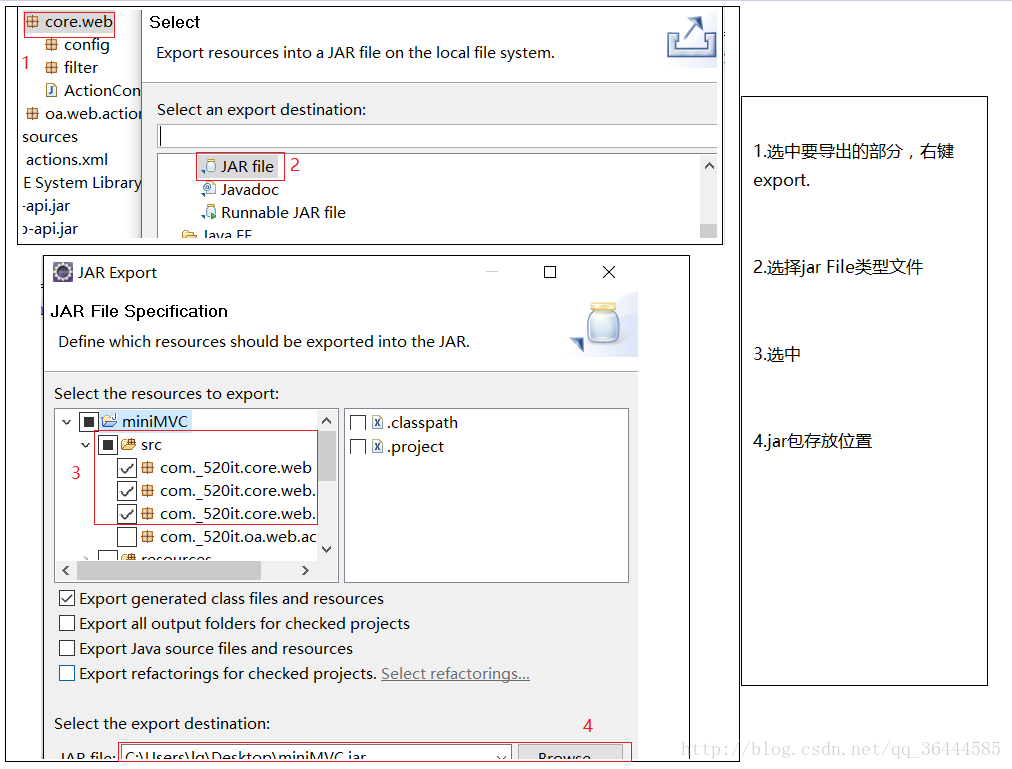
6.导出miniMVC框架:
7.使用jar包:
7.1:导入jar包并buildpath.
7.2:在web.xml中配置ActionFilter前端控制器:
<filter>
    <filter-name>ActionFilter</filter-name>
    <filter-class>com._520it.core.web.filter.ActionFilter</filter-class>
  </filter>
  <filter-mapping>
    <filter-name>ActionFilter</filter-name>
    <url-pattern>/*</url-pattern>
  </filter-mapping>
7.3:书写自己的Action函数,如Product:
package A.B.C;

public class Product {
    public String execute(){
        System.out.println("Product.execute()");
        return "welcome";
    }
}
7.4:在resources源文件夹中新建actions.xml文件,并配置:
<?xml version="1.0" encoding="UTF-8"?>
<actions>
    <action name="Product" class="A.B.C.Product" method="execute">
        <result name="welcome" type="redirect" path="/abc.html" />
    </action>
</actions>
7.5:然后在webapp中随便写个html页面,如abc.html
7.6:访问格式:http://localhost:8080/miniMVC/Product;
miniMVC:tomcat根/config/server.xml中context元素属性path的值

Product:应该和action中的name向对应;

Product中的execute返回值应与result元素中的name相对应


 463
463


 被折叠的 条评论
为什么被折叠?
被折叠的 条评论
为什么被折叠?
 到【灌水乐园】发言


