


准备工作
1、系统环境
Windows server 2016
2、下载Nginx
①官网可下载最新版
②天翼云盘可下载
3、下载Windows Service Wrapper工具
http://repo.jenkins-ci.org/releases/com/sun/winsw/winsw/
作用:将Nginx注册为Windows Service应用程序。
下载的文件(winsw-2.9.0-bin.exe)放到nginx目录下和nginx.exe平级
4、net framework 3.5
1、下载
①官网下载
②天翼云盘
2、安装:
传送链接:https://blog.csdn.net/qq_36532459/article/details/114360043
开始安装
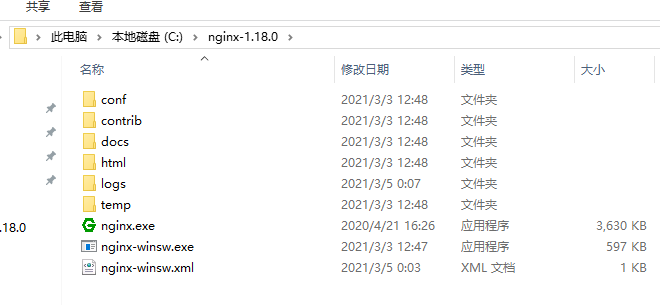
1、解压Nginx
2、配置Windows Service应用程序
- winsw-2.9.0-bin.exe放到nginx目录下和nginx.exe平级,并改名nginx-winsw.exe。
- 同级目录创建配置文件
(旧版):nginx-winsw.xml、nginx-winsw.exe.config。
nginx-winsw.xml:
<service>
  <id>nginx</id>
  <name>Nginx Service</name>
  <description>High Performance Nginx Service</description>
  <logpath>C:\nginx-1.18.0\logs</logpath>
  <log mode="roll-by-size">
    <sizeThreshold>10240</sizeThreshold>
    <keepFiles>8</keepFiles>
  </log>
  <executable>C:\nginx-1.18.0\nginx.exe</executable>
  <startarguments>-p C:\nginx-1.18.0</startarguments>
  <stopexecutable>C:\nginx-1.18.0\nginx.exe</stopexecutable>
  <stoparguments>-p C:\nginx-1.18.0 -s stop</stoparguments>
</service>
nginx-winsw.exe.config:
<configuration>
  <startup>
    <supportedRuntime version="v2.0.50727" />
    <supportedRuntime version="v4.0" />
  </startup>
  <runtime>
    <generatePublisherEvidence enabled="false"/>
  </runtime>
</configuration>
(新版):与旧版本差异较大
新版目录结构:
同级目录创建配置文件nginx-winsw.xml
<service>
  <id>nginx</id>
  <name>Nginx Service</name>
  <description>nginx</description>
  <env name="path" value="C:\nginx-1.18.0"/>
  <executable>C:\nginx-1.18.0\nginx.exe</executable>
  <arguments>-p C:\nginx-1.18.0</arguments>
  <logpath>C:\nginx-1.18.0\logs/</logpath>
  <logmode>roll</logmode>
</service>
我本人两台服务器一个使用的是旧版本,没问题;另一个怎么都不行,换成新版本就ok!
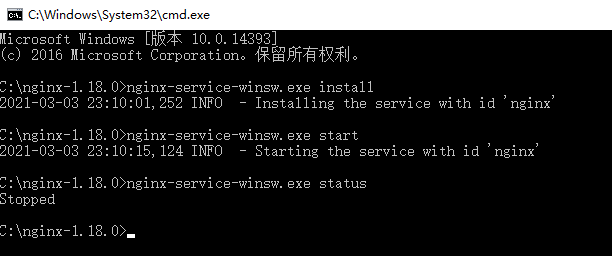
3、命令窗口(cmd):
接下来到命令窗口(cmd):
- 安装nginx输入:
nginx-winsw.exe install
- 命令操作
nginx-winsw.exe start // 启动nginx
nginx-winsw.exe status // 查看nginx启动状态:started即启动成功
失败处理:见【补充】
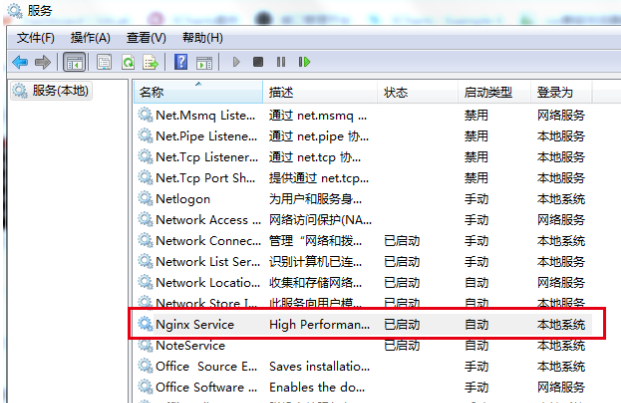
也可通过服务启动nginx
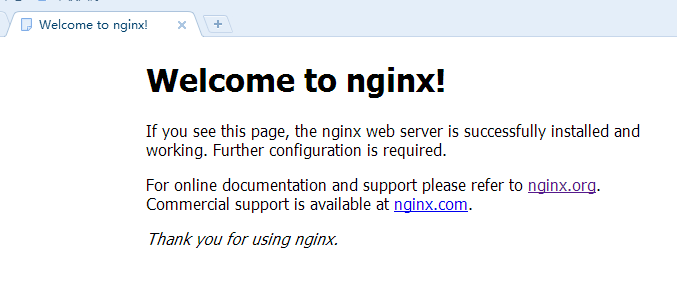
- 检查nginx是否启动成功
直接在浏览器地址栏输入网址http://localhost:80,回车,出现以下页面说明启动成功
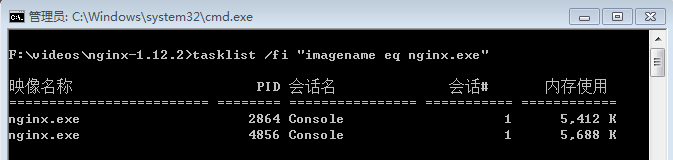
也可以在cmd命令窗口输入命令 tasklist /fi “imagename eq nginx.exe” ,出现如下结果说明启动成功
配置文件
nginx的配置文件是conf目录下的nginx.conf,默认配置的nginx监听的端口为80,如果80端口被占用可以修改为未被占用的端口即可
检查80端口是否被占用的命令是: netstat -ano | findstr 0.0.0.0:80 或 netstat -ano | findstr “80”
#user  nobody;
worker_processes  1;
#error_log  logs/error.log;
#error_log  logs/error.log  notice;
#error_log  logs/error.log  info;
#pid        logs/nginx.pid;

events {
    worker_connections  1024;
}

http {
    include       mime.types;
    default_type  application/octet-stream;
    #log_format  main  '$remote_addr - $remote_user [$time_local] "$request" '
    #                  '$status $body_bytes_sent "$http_referer" '
    #                  '"$http_user_agent" "$http_x_forwarded_for"';
    #access_log  logs/access.log  main;
    sendfile        on;
    #tcp_nopush     on;
    #keepalive_timeout  0;
    keepalive_timeout  65;
    #gzip  on;
    server {
        listen       80;
        server_name  localhost;
        #charset koi8-r;
        #access_log  logs/host.access.log  main;
        location / {
            root   html;
            index  index.html index.htm;
        }
        #error_page  404              /404.html;
        # redirect server error pages to the static page /50x.html
        #
        error_page   500 502 503 504  /50x.html;
        location = /50x.html {
            root   html;
        }
        # proxy the PHP scripts to Apache listening on 127.0.0.1:80
        #
        #location ~ \.php$ {
        #    proxy_pass   http://127.0.0.1;
        #}
        # pass the PHP scripts to FastCGI server listening on 127.0.0.1:9000
        #
        #location ~ \.php$ {
        #    root           html;
        #    fastcgi_pass   127.0.0.1:9000;
        #    fastcgi_index  index.php;
        #    fastcgi_param  SCRIPT_FILENAME  /scripts$fastcgi_script_name;
        #    include        fastcgi_params;
        #}
        # deny access to .htaccess files, if Apache's document root
        # concurs with nginx's one
        #
        #location ~ /\.ht {
        #    deny  all;
        #}
    }

    # another virtual host using mix of IP-, name-, and port-based configuration
    #
    #server {
    #    listen       8000;
    #    listen       somename:8080;
    #    server_name  somename  alias  another.alias;
    #    location / {
    #        root   html;
    #        index  index.html index.htm;
    #    }
    #}

    # HTTPS server
    #
    #server {
    #    listen       443 ssl;
    #    server_name  localhost;
    #    ssl_certificate      cert.pem;
    #    ssl_certificate_key  cert.key;
    #    ssl_session_cache    shared:SSL:1m;
    #    ssl_session_timeout  5m;
    #    ssl_ciphers  HIGH:!aNULL:!MD5;
    #    ssl_prefer_server_ciphers  on;
    #    location / {
    #        root   html;
    #        index  index.html index.htm;
    #    }
    #}
}
当我们修改了nginx的配置文件nginx.conf 时,不需要关闭nginx后重新启动nginx,只需要执行命令 nginx -s reload 即可让改动生效
关闭nginx
如果使用cmd命令窗口启动nginx,关闭cmd窗口是不能结束nginx进程的,可使用两种方法关闭nginx
(1)输入nginx命令 nginx -s stop(快速停止nginx) 或 nginx -s quit(完整有序的停止nginx)
(2)使用taskkill taskkill /f /t /im nginx.exe
负载均衡
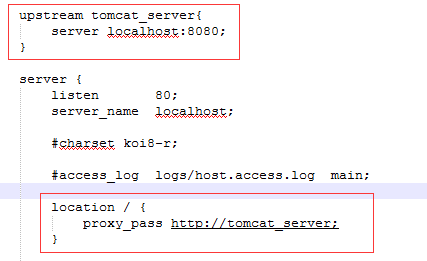
1、跳转到指定服务器
我们可以修改nginx的配置文件nginx.conf 达到访问nginx代理服务器时跳转到指定服务器的目的,即通过proxy_pass 配置请求转发地址,即当我们依然输入http://localhost:80时,请求会跳转到我们配置的服务器
2、配置多个目标服务器
当一台服务器出现故障时,nginx能将请求自动转向另一台服务器,例如配置如下:
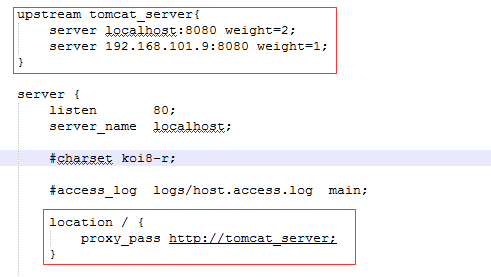
当服务器 localhost:8080 挂掉时,nginxnginx能将请求自动转向服务器 192.168.101.9:8080。
上面还加了一个weight属性,此属性表示各服务器被访问到的权重,weight
越高被访问到的几率越高。
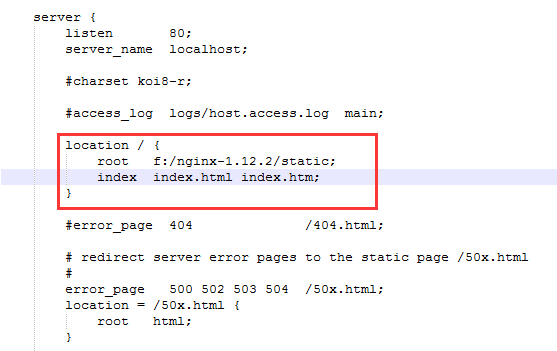
3、配置静态资源
将静态资源(如jpg|png|css|js等)放在如下配置的f:/nginx-1.12.2/static目录下,然后在nginx配置文件中做如下配置(注意:静态资源配置只能放在 location / 中),浏览器中访问http://localhost:80/1.png即可访问到 f:/nginx-1.12.2/static目录下的 1.png图片
补充:
命令启动nginx失败处理
原因一:检查nginx-winsw.xml文件,各个路径是否正确;
原因二:端口是否占用
查看nginx目录下logs>nginx-service-winsw.err.log文件

表示80端口被占了 ,需要关闭占据80端口的服务
关闭80端口的服务
输入netstat -aon | findstr “80” 查看80端口服务pid,根据pid值找到服务

再输入tasklist | findster “4” 可以看到是system服务占据


 4395
4395


 被折叠的 条评论
为什么被折叠?
被折叠的 条评论
为什么被折叠?
 到【灌水乐园】发言


