


Spring IOC
IOC:Inversion of Control ,即 “控制反转”,原先需要自行实例化的对象, 交给IOC容器去实现。
在传统的Java程序中,直接在类的内部通过new关键字来创建对象的实例,是程序主动去创建依赖对象,而IOC有一个专门的容器,来创建这些对象,由IOC容器来控制对象的创建,依赖对象也是容器帮忙查找创建并进行注入,对象只是被动的接受,依赖对象的获取被反转了。它还有一个更加形象的名字叫 DI(Dependency Injection) 依赖注入。
1. 导入依赖
<!-- commons-logging,spring必须的依赖 -->
<dependency>
<groupId>commons-logging</groupId>
<artifactId>commons-logging</artifactId>
2. 基础类准备
Pet接口
Pet接口的实现类,Dog、Cat、Snake
Boy
<version>1.2</version>
</dependency>
<!-- spring-beans -->
<dependency>
<groupId>org.springframework</groupId>
<artifactId>spring-beans</artifactId>
<version>5.3.9</version>
</dependency>
<!-- spring-context -->
<dependency>
<groupId>org.springframework</groupId>
<artifactId>spring-context</artifactId>
<version>5.3.9</version>
</dependency>
<!-- spring-core -->
<dependency>
<groupId>org.springframework</groupId>
<artifactId>spring-core</artifactId>
<version>5.3.9</version>
</dependency>
2. 基础类准备
Pet接口
public interface Pet {
public String showPetInfo();
}
Pet接口的实现类,Dog、Cat、Snake
public class Dog implements Pet{
private String name;
private String type;
// getter和setter
@Override
public String showPetInfo() {
return "狗的名字:" + this.name + ",类型:" + this.type;
}
}
3. Bean的配置
spring.xml
 xmlns:xsi="http://www.w3.org/2001/XMLSchema-instance"
       xmlns:context="http://www.springframework.org/schema/context"
       xmlns:aop="http://www.springframework.org/schema/aop"
       xmlns:tx="http://www.springframework.org/schema/tx"
       xsi:schemaLocation="http://www.springframework.org/schema/beans
        http://www.springframework.org/schema/beans/spring-beans.xsd
        http://www.springframework.org/schema/context
        http://www.springframework.org/schema/context/spring-context.xsd
        http://www.springframework.org/schema/aop
        http://www.springframework.org/schema/aop/spring-aop.xsd
        http://www.springframework.org/schema/tx
        http://www.springframework.org/schema/tx/spring-tx-2.5.xsd
	<!-- bean的配置信息 -->
	<!-- id属性,bean的标识符 -->
	<!-- class属性,表示bean对象所属的类 -->
	<bean id="cat" class="com.spring.entity.Cat"></bean>
	<bean name="dog" class="com.spring.entity.Dog">
	<property name="name" value="旺财"></property>
	<property name="type" value="中华田园犬"></property>
	</bean>
	<bean id="boy" class="com.spring.entity.Boy">
	<property name="name" value="scott"></property>
	<property name="age" value="30"></property>
	<!-- ref属性,引用一个已经定义的bean -->
	<property name="pet" ref="dog"></property>
	</bean>
	<bean name="boy1,boy2,boy3" class="com.spring.entity.Boy">
	<property name="pet" ref="cat"></property>
	</bean>
	</beans>
<bean id="cat" class="com.wk.spring.entity.Cat"></bean>
等同于
Cat cat=new Cat();
Dog dog=new Dog();
dog.setName("旺财");
使用bean标签配置一个Bean,相当于一个java对象,id为Bean的标识符
name属性也可以作为Bean的标识符
property标签配置Bean的属性,name为属性名,value为属性值
ref标签引用其它已经配置的Bean
bean标签的name属性可以通过逗号(“,”)、分号(“;”)、空格(" "),同时为Bean指定多个标识
4. 测试
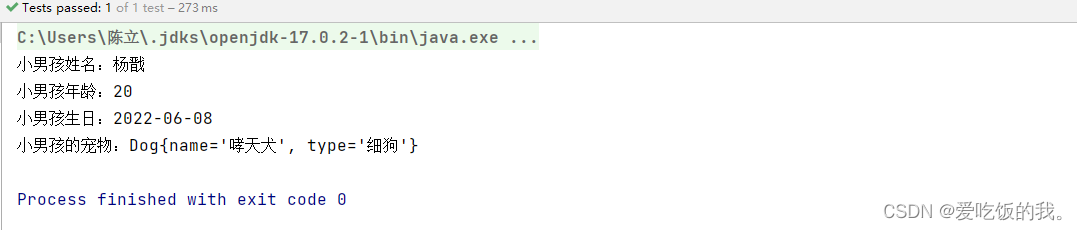
public class BoyTest {
@Test
public void testBoy(){
ApplicationContext context = new
ClassPathXmlApplicationContext("spring.xml");
Boy boy = (Boy)context.getBean("boy");
boy.feed();
 }
}
5. 结果
6. 补充
在导入依赖依赖的过程中
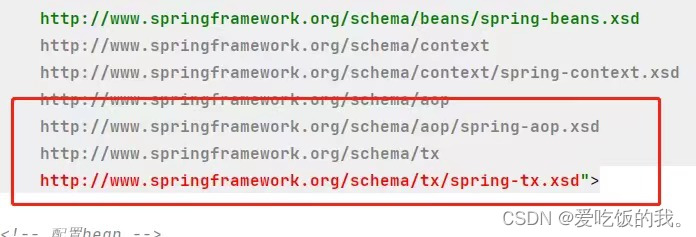
报错 Error while fetchinghttp://www.Springframework.org/schema/tx/Spring-tx.xsd 改为 http://www.springframework.org/schema/tx/spring-tx-2.5.xsd就好了


 549
549


 被折叠的 条评论
为什么被折叠?
被折叠的 条评论
为什么被折叠?
 到【灌水乐园】发言


