


目录
前言
现在登录方式越来越多,传统的账号密码登录已经不能满足我们的需求。可能我们还需要手机验证码登录,邮箱验证码登录,一键登录等。这时候就需要我们自定义我们系统的认证登录流程,下面,我就一步一步在SpringSecurity 自定义认证登录,以手机验证码登录为例
1-自定义用户对象
Spring Security 中定义了 UserDetails 接口来规范开发者自定义的用户对象,我们自定义对象直接实现这个接口,然后定义自己的对象属性即可
/**
 * 自定义用户角色
 */
@Data
public class PhoneUserDetails implements UserDetails {

    public static final String ACCOUNT_ACTIVE_STATUS = "ACTIVE";

    public static final Integer NOT_EXPIRED = 0;

    private String userId;
    private String userName;
    private String phone;
    private String status;
    private Integer isExpired;

    @Override
    public Collection<? extends GrantedAuthority> getAuthorities() {
        Collection<GrantedAuthority> collection = new HashSet<>();
        return collection;
    }

    @Override
    public String getPassword() {
        return null;
    }

    @Override
    public String getUsername() {
        return this.phone;
    }

    @Override
    public boolean isAccountNonExpired() {
        return NOT_EXPIRED.equals(isExpired);
    }

    @Override
    public boolean isAccountNonLocked() {
        return true;
    }

    @Override
    public boolean isCredentialsNonExpired() {
        return true;
    }

    @Override
    public boolean isEnabled() {
        return ACCOUNT_ACTIVE_STATUS.equals(status);
    }
}
自定义角色实现UserDetails接口方法时,根据自己的需要来实现
2-自定义UserDetailsService
UserDetails是用来规范我们自定义用户对象,而负责提供用户数据源的接口是UserDetailsService,它提供了一个查询用户的方法,我们需要实现它来查询用户
@Service
public class PhoneUserDetailsService implements UserDetailsService {

    public static final String USER_INFO_SUFFIX = "user:info:";

    @Autowired
    private PhoneUserMapper phoneUserMapper;

    @Autowired
    private RedisTemplate<String,Object> redisTemplate;

    /**
     * 查找用户
     * @param username
     * @return
     * @throws UsernameNotFoundException
     */
    @Override
    public UserDetails loadUserByUsername(String username) throws UsernameNotFoundException {
        //先查询缓存
        String userKey = USER_INFO_SUFFIX + username;
        PhoneUserDetails cacheUserInfo = (PhoneUserDetails) redisTemplate.opsForValue().get(userKey);
        if (cacheUserInfo == null){
            //缓存不存在,从数据库查找用户信息
            PhoneUserDetails phoneUserDetails = phoneUserMapper.selectPhoneUserByPhone(username);
            if (phoneUserDetails == null){
                throw new UsernameNotFoundException("用户不存在");
            }
            //加入缓存
            redisTemplate.opsForValue().set(userKey,phoneUserDetails);
            return phoneUserDetails;
        }
        return cacheUserInfo;
    }

}
3-自定义Authentication
在SpringSecurity认证过程中,最核心的对象为Authentication,这个对象用于在认证过程中存储主体的各种基本信息(例如:用户名,密码等等)和主体的权限信息(例如,接口权限)。
我们可以通过继承AbstractAuthenticationToken来自定义的Authentication对象,我们参考SpringSecurity自有的UsernamePasswordAuthenticationToken来实现自己的AbstractAuthenticationToken 实现类
@Getter
@Setter
public class PhoneAuthenticationToken  extends AbstractAuthenticationToken {

    private final Object principal;

    private Object credentials;

   /**
     * 可以自定义属性
     */
    private String phone;

    /**
     * 创建一个未认证的对象
     * @param principal
     * @param credentials
     */
    public PhoneAuthenticationToken(Object principal, Object credentials) {
        super(null);
        this.principal = principal;
        this.credentials = credentials;
        setAuthenticated(false);
    }

    public PhoneAuthenticationToken(Collection<? extends GrantedAuthority> authorities, Object principal, Object credentials) {
        super(authorities);
        this.principal = principal;
        this.credentials = credentials;
        // 必须使用super,因为我们要重写
        super.setAuthenticated(true);
    }

    /**
     * 不能暴露Authenticated的设置方法,防止直接设置
     * @param isAuthenticated
     * @throws IllegalArgumentException
     */
    @Override
    public void setAuthenticated(boolean isAuthenticated) throws IllegalArgumentException {
        Assert.isTrue(!isAuthenticated,
                "Cannot set this token to trusted - use constructor which takes a GrantedAuthority list instead");
        super.setAuthenticated(false);
    }

    /**
     * 用户凭证,如密码
     * @return
     */
    @Override
    public Object getCredentials() {
        return credentials;
    }

    /**
     * 被认证主体的身份,如果是用户名/密码登录,就是用户名
     * @return
     */
    @Override
    public Object getPrincipal() {
        return principal;
    }
}
因为我们的验证码是有时效性的,所以eraseCredentials 方法也没必要重写了,无需擦除。主要是设置Authenticated属性,Authenticated属性代表是否已认证
4-自定义AuthenticationProvider
AuthenticationProvider对于Spring Security来说相当于是身份验证的入口。通过向AuthenticationProvider提供认证请求,我们可以得到认证结果,进而提供其他权限控制服务。
在Spring Security中,AuthenticationProvider是一个接口,其实现类需要覆盖authenticate(Authentication authentication)方法。当用户请求认证时,Authentication Provider就会尝试对用户提供的信息(Authentication对象里的信息)进行认证评估,并返回Authentication对象。通常一个provider对应一种认证方式,ProviderManager中可以包含多个AuthenticationProvider表示系统可以支持多种认证方式。
Spring Security定义了AuthenticationProvider 接口来规范我们的AuthenticationProvider 实现类,AuthenticationProvider 接口只有两个方法,源码如下
public interface AuthenticationProvider {

	//身份认证
	Authentication authenticate(Authentication authentication)
			throws AuthenticationException;

	//是否支持传入authentication类型的认证
	boolean supports(Class<?> authentication);
}
下面自定义我们的AuthenticationProvider,如果AuthenticationProvider认证成功,它会返回一个完全有效的Authentication对象,其中authenticated属性为true,已授权的权限列表(GrantedAuthority列表),以及用户凭证。
/**
 * 手机验证码认证授权提供者
 */
@Data
public class PhoneAuthenticationProvider  implements AuthenticationProvider {

    private RedisTemplate<String,Object> redisTemplate;

    private PhoneUserDetailsService phoneUserDetailsService;

    public static final String PHONE_CODE_SUFFIX = "phone:code:";

    @Override
    public Authentication authenticate(Authentication authentication) throws AuthenticationException {
        //先将authentication转为我们自定义的Authentication对象
        PhoneAuthenticationToken authenticationToken = (PhoneAuthenticationToken) authentication;
        //校验参数
        Object principal = authentication.getPrincipal();
        Object credentials = authentication.getCredentials();
        if (principal == null || "".equals(principal.toString()) || credentials == null || "".equals(credentials.toString())){
            throw new InternalAuthenticationServiceException("手机/手机验证码为空!");
        }
        //获取手机号和验证码
        String phone = (String) authenticationToken.getPrincipal();
        String code = (String) authenticationToken.getCredentials();
        //查找手机用户信息,验证用户是否存在
        UserDetails userDetails = phoneUserDetailsService.loadUserByUsername(phone);
        if (userDetails == null){
            throw new InternalAuthenticationServiceException("用户手机不存在!");
        }
        String codeKey =  PHONE_CODE_SUFFIX+phone;
        //手机用户存在,验证手机验证码是否正确
        if (!redisTemplate.hasKey(codeKey)){
            throw new InternalAuthenticationServiceException("验证码不存在或已失效!");
        }
        String realCode = (String) redisTemplate.opsForValue().get(codeKey);
        if (StringUtils.isBlank(realCode) || !realCode.equals(code)){
            throw new InternalAuthenticationServiceException("验证码错误!");
        }
        //返回认证成功的对象
        PhoneAuthenticationToken phoneAuthenticationToken = new PhoneAuthenticationToken(userDetails.getAuthorities(),phone,code);
        phoneAuthenticationToken.setPhone(phone);
        //details是一个泛型属性,用于存储关于认证令牌的额外信息。其类型是 Object,所以你可以存储任何类型的数据。这个属性通常用于存储与认证相关的详细信息,比如用户的角色、IP地址、时间戳等。
        phoneAuthenticationToken.setDetails(userDetails);
        return phoneAuthenticationToken;
    }


    /**
     * ProviderManager 选择具体Provider时根据此方法判断
     * 判断 authentication 是不是 SmsCodeAuthenticationToken 的子类或子接口
     */
    @Override
    public boolean supports(Class<?> authentication) {
        //isAssignableFrom方法如果比较类和被比较类类型相同,或者是其子类、实现类,返回true
        return PhoneAuthenticationToken.class.isAssignableFrom(authentication);
    }

}
5-自定义AbstractAuthenticationProcessingFilter
AbstractAuthenticationProcessingFilter是Spring Security中的一个重要的过滤器,用于处理用户的身份验证。它是一个抽象类,提供了一些基本的身份验证功能,可以被子类继承和扩展。该过滤器的主要作用是从请求中获取用户的身份认证信息,并将其传递给AuthenticationManager进行身份验证。如果身份验证成功,它将生成一个身份验证令牌,并将其传递给AuthenticationSuccessHandler进行处理。如果身份验证失败,它将生成一个身份验证异常,并将其传递给AuthenticationFailureHandler进行处理。AbstractAuthenticationProcessingFilter还提供了一些其他的方法,如setAuthenticationManager()、setAuthenticationSuccessHandler()、setAuthenticationFailureHandler()等,可以用于定制身份认证的处理方式。
我们需要自定义认证流程,那么就需要继承AbstractAuthenticationProcessingFilter这个抽象类
Spring Security 的UsernamePasswordAuthenticationFilter也是继承了AbstractAuthenticationProcessingFilter,我们可以参考实现自己的身份验证
public class PhoneVerificationCodeAuthenticationFilter extends AbstractAuthenticationProcessingFilter {

    /**
     * 参数名称
     */
    public static final String USER_PHONE = "phone";
    public static final String PHONE_CODE = "phoneCode";

    private String userPhoneParameter = USER_PHONE;
    private String phoneCodeParameter = PHONE_CODE;

    /**
     * 是否只支持post请求
     */
    private boolean postOnly = true;

    /**
     * 通过构造函数,设置对哪些请求进行过滤,如下设置,则只有接口为 /phone_login,请求方式为 POST的请求才会进入逻辑
     */
    public PhoneVerificationCodeAuthenticationFilter(){
        super(new RegexRequestMatcher("/phone_login","POST"));
    }


    /**
     * 认证方法
     * @param request
     * @param response
     * @return
     * @throws AuthenticationException
     * @throws IOException
     * @throws ServletException
     */
    @Override
    public Authentication attemptAuthentication(HttpServletRequest request, HttpServletResponse response) throws AuthenticationException, IOException, ServletException {
        PhoneAuthenticationToken phoneAuthenticationToken;
        //请求方法类型校验
        if (this.postOnly && !request.getMethod().equals("POST")) {
            throw new AuthenticationServiceException("Authentication method not supported: " + request.getMethod());
        }
        //如果不是json参数,从request获取参数
        if (!request.getContentType().equals(MediaType.APPLICATION_JSON_UTF8_VALUE) && !request.getContentType().equals(MediaType.APPLICATION_JSON_VALUE)) {
            String userPhone = request.getParameter(userPhoneParameter);
            String phoneCode = request.getParameter(phoneCodeParameter);
            phoneAuthenticationToken = new PhoneAuthenticationToken(userPhone,phoneCode);
        }else {
            //如果是json请求使用取参数逻辑,直接用map接收,也可以创建一个实体类接收
            Map<String, String> loginData = new HashMap<>(2);
            try {
                loginData = JSONObject.parseObject(request.getInputStream(), Map.class);
            } catch (IOException e) {
                throw new InternalAuthenticationServiceException("请求参数异常");
            }
            // 获得请求参数
            String userPhone = loginData.get(userPhoneParameter);
            String phoneCode = loginData.get(phoneCodeParameter);
            phoneAuthenticationToken = new PhoneAuthenticationToken(userPhone,phoneCode);
        }
        phoneAuthenticationToken.setDetails(authenticationDetailsSource.buildDetails(request));
        return this.getAuthenticationManager().authenticate(phoneAuthenticationToken);
    }


}
6-自定义认证成功和失败的处理类
pringSecurity处理成功和失败一般是进行页面跳转,但是在前后端分离的架构下,前后端的交互一般是通过json进行交互,不需要后端重定向或者跳转,只需要返回我们的登陆信息即可。
这就要实现我们的认证成功和失败处理类
认证成功接口:AuthenticationSuccessHandler,只有一个onAuthenticationSuccess认证成功处理方法
认证失败接口:AuthenticationFailureHandler,只有一个onAuthenticationFailure认证失败处理方法
我们实现相应接口,在方法中定义好我们的处理逻辑即可
@Component
public class CustomAuthenticationSuccessHandler implements AuthenticationSuccessHandler {
/**
* 登录成功处理
* @param httpServletRequest
* @param httpServletResponse
* @param authentication
* @throws IOException
* @throws ServletException
*/
@Override
public void onAuthenticationSuccess(HttpServletRequest httpServletRequest, HttpServletResponse httpServletResponse, Authentication authentication) throws IOException, ServletException {
httpServletResponse.setContentType("application/json;charset=utf-8");
Map<String, Object> resp = new HashMap<>();
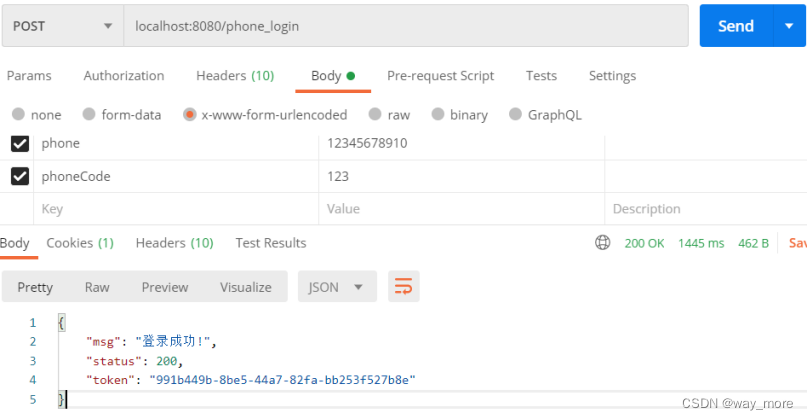
resp.put("status", 200);
resp.put("msg", "登录成功!");
resp.put("token", new UUIDGenerator().next());
String s = JSONObject.toJSONString(resp);
httpServletResponse.getWriter().write(s);
}
}
@Slf4j
@Component
public class CustomAuthenticationFailureHandler implements AuthenticationFailureHandler {
/**
* 登录失败处理
* @param httpServletRequest
* @param httpServletResponse
* @param exception
* @throws IOException
* @throws ServletException
*/
@Override
public void onAuthenticationFailure(HttpServletRequest httpServletRequest, HttpServletResponse httpServletResponse, AuthenticationException exception) throws IOException, ServletException {
httpServletResponse.setContentType("application/json;charset=utf-8");
Map<String, Object> resp = new HashMap<>();
resp.put("status", 500);
resp.put("msg", "登录失败!" );
String s = JSONObject.toJSONString(resp);
log.error("登录异常:",exception);
httpServletResponse.getWriter().write(s);
}
}
7-修改配置类
想要应用自定义的 AuthenticationProvider 和 AbstractAuthenticationProcessingFilter,还需在WebSecurityConfigurerAdapter 配置类进行配置。
@Configuration
@EnableWebSecurity
public class SecurityConfig extends WebSecurityConfigurerAdapter {

    @Autowired
    private RedisTemplate<String, Object> redisTemplate;

    @Autowired
    private PhoneUserDetailsService phoneUserDetailsService;


    @Override
    protected void configure(HttpSecurity http) throws Exception {
        http.authorizeRequests().anyRequest().authenticated()
                .and()
                .formLogin().successHandler(new CustomAuthenticationSuccessHandler()).permitAll()
                .and()
                .csrf().disable();

        //添加自定义过滤器
        PhoneVerificationCodeAuthenticationFilter phoneVerificationCodeAuthenticationFilter = new PhoneVerificationCodeAuthenticationFilter();
        //设置过滤器认证成功和失败的处理类
        phoneVerificationCodeAuthenticationFilter.setAuthenticationSuccessHandler(new CustomAuthenticationSuccessHandler());
        phoneVerificationCodeAuthenticationFilter.setAuthenticationFailureHandler(new CustomAuthenticationFailureHandler());
        //设置认证管理器
        phoneVerificationCodeAuthenticationFilter.setAuthenticationManager(authenticationManager());
        //addFilterBefore方法用于将自定义的过滤器添加到过滤器链中,并指定该过滤器在哪个已存在的过滤器之前执行
        http.addFilterBefore(phoneVerificationCodeAuthenticationFilter, UsernamePasswordAuthenticationFilter.class);
    }

    @Bean
    @Override
    public AuthenticationManager authenticationManagerBean() throws Exception {
        // 采用密码授权模式需要显式配置AuthenticationManager
        return super.authenticationManagerBean();
    }

    /**
     *
     * @param auth 认证管理器
     * @throws Exception
     */
    @Override
    protected void configure(AuthenticationManagerBuilder auth) throws Exception {
        //添加自定义认证提供者
        auth.authenticationProvider(phoneAuthenticationProvider());
    }

    /**
     * 手机验证码登录的认证提供者
     * @return
     */
    @Bean
    public PhoneAuthenticationProvider phoneAuthenticationProvider(){
        PhoneAuthenticationProvider phoneAuthenticationProvider = new PhoneAuthenticationProvider();
        phoneAuthenticationProvider.setRedisTemplate(redisTemplate);
        phoneAuthenticationProvider.setPhoneUserDetailsService(phoneUserDetailsService);
        return phoneAuthenticationProvider;
    }

}
在Spring Security框架中,addFilterBefore方法用于将自定义的过滤器添加到过滤器链中,并指定该过滤器在哪个已存在的过滤器之前执行。还有一个addFilterAfter方法可以将自定义过滤器添加到指定过滤器之后执行。
8-测试
完成上面的操作之后,我们就可以测试下新的登录方式是否生效了。我这里直接使用postman进行登录请求


 3119
3119

 被折叠的 条评论
为什么被折叠?
被折叠的 条评论
为什么被折叠?
 到【灌水乐园】发言


