


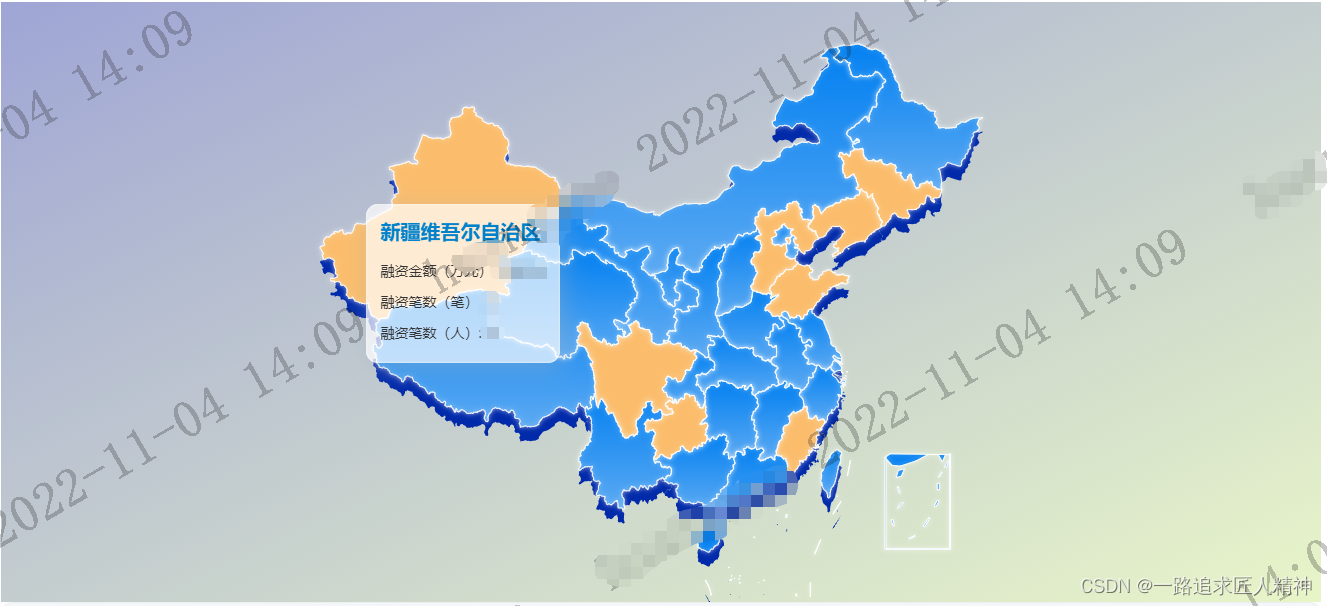
一.实现效果
图片上面的水印是公司软件自带的
二.html块代码
<div class="source-map-panel" id="chinaMap" ref="mapRef"></div>三.主代码
this.myChart = this.$echarts.init(document.getElementById("chinaMap")); // 这里是为了获得容器所在位置
      let options = {};
      options.tooltip = getTooltip(this);        //设置鼠标移动上去参数配置
      options.geo = getGeo(this);            //设置地图底层(实现3d效果)
      options.series = getSeries(this);    //设置地图数据

      this.myChart.setOption(options);
四.配置数据
toolTip配置js文件如下
import {toWan} from '@/utils/public.js'
export const getTooltip = (that) => {
    return {
        enterable: true, // 鼠标是否可进入提示框浮层中\
        hideDelay: 200, // 浮层隐藏的延迟
        confine: true,
        position: function (point, params, dom, rect, size) {
            // 提示框位置
            let x = 0; // x坐标位置
            let y = 0; // y坐标位置

            // 当前鼠标位置
            let pointX = point[0];
            let pointY = point[1];

            // 提示框大小
            let boxWidth = size.contentSize[0];
            let boxHeight = size.contentSize[1];

            if (boxWidth > pointX) {
                x = 5; // 自己定个x坐标值,以防出屏
                y -= 15; // 防止点被覆盖住,可根据情况自行调节
            } else {
                // 左边放的下
                x = pointX - boxWidth - 15;
            }

            if (boxHeight + 20 > pointY) {
                y = pointY + 15;
            } else if (boxHeight > pointY) {
                y = 5;
            } else {
                // 上边放得下
                y += pointY - boxHeight;
            }
            return [point[0] - boxWidth - 20, point[1] - 30];
        },

        backgroundColor: "rgba(255, 255, 255, 0.7)",
        padding: [15, 15, 15, 15],

        formatter: (params) => {
            let sumaryAmount, sumaryCnt, userCnt;
            var htmlStr = "";
            if (that.mapList) {
                let list = that.mapList;
                let dataList = list.filter(item => {
                    return item.name === params.name //判断返回数据的name和实际散点的name相同
                })
                if (dataList.length > 0) {
                    sumaryAmount = dataList[0].amount;
                    sumaryCnt = dataList[0].count;
                    userCnt = dataList[0].traderCount;
                    htmlStr = `<div class="tooltip-style" style="position:relative;">
                          <span style="margin-bottom: 10px;color: #0081CC;font-size:20px;font-weight:600;padding-top: 0">${params.name}</span><br />
                          <div style="line-height:30px;margin-top:10px">
                          <span style="color: #333;font-size:14px">融资金额(万元):  ${sumaryAmount?sumaryAmount:''}</span><br />
                          <span style="color: #333;font-size:14px">融资笔数(笔):  ${sumaryCnt?sumaryCnt:''}</span><br />
                          <span style="color: #333;font-size:14px">融资笔数(人):  ${userCnt?userCnt:''}</span><br />
                          </div>
                        </div>`;
                }
                return htmlStr;
            }
        },

        extraCssText: "box-shadow: 4px 6px 25px 0px rgba(163, 177, 190, 0.4), inset 0px 0px 2px 0px #FFFFFF; backdropFilter: blur(4px);border-radius:12px;width:auto;",
        textStyle: {
            fontSize: 16,
            color: "#fff",
        },
    }
}
geo配置数据如下:
export const getGeo = (that) => {
    //这里设置为地图的阴影
    return [{ // 这个是重点 —— 这里设置为地图的阴影
        map: 'china',
        roam: false, // 禁止拖拽
        silent: true, // 禁止hover效果
        zoom: that.zoomSize, // 地图比例
        center: [105.194115019531, 36.582111640625], // 地图中心位置, 此处的纬度与下面的center相差1度是形成阴影的距离,可自己随意调整
        itemStyle: {
            normal: {
                borderColor: 'transparent',
                areaColor: "rgb(1,42,170)",
            },
        },
        regions: [{
            name: "南海诸岛",
            itemStyle: {
                // 隐藏地图
                normal: {
                    opacity: 0, // 为 0 时不绘制该图形
                }
            },
            label: {
                show: false // 隐藏文字
            }
        }],
    }]
}
series配置如下:
export const getSeries = (that) => {
    // 此处为真正的地图
    let series = [{
        name: "", // 浮动框的标题
        type: "map",
        map: "china",
        zoom: that.zoomSize,
        layoutSize: "100%",
        emphasis: {
            // 鼠标hover是否显示内容,
            label: {
                //用于显示地图文本内容
                show: true,
                textStyle: {
                    color: "#fff",
                },
            },
        },
        label: {
            //这儿自定义图形样式
            // 地图标注
            normal: {
                show: false, // 是否显示对应地名
                textStyle: {
                    // color: "#fff",
                },
            },
        },
        center: [105.194115019531, 35.582111640625], // 设置地图中心
        itemStyle: {
            // 地图的样式
            normal: {
                borderColor: "#FFFFFF", // 省份边框颜色
                areaColor: {
                    type: "linear",
                    x: 0,
                    y: 1,
                    x2: 0,
                    y2: 0,
                    colorStops: [{
                            offset: 0,
                            color: "rgb(93,170,242)", // 100% 处的颜色
                        },
                        {
                            offset: 1,
                            color: "rgb(2,128,241)", // 0% 处的颜色

                        },
                    ],
                    global: false, // 缺省为 false
                },
                borderWidth: 1, // 省份边框宽度
                // shadowColor: "rgba(100,255,238,0.5)", // 省份边框阴影
                shadowColor: "rgba(255,255,255,0.5)", // 省份边框阴影
                shadowBlur: 5, // 省份边框聚焦
            },
            emphasis: {
                // 鼠标hover显示
                show: false,
                //areaColor: "#0D30D4",
                areaColor: {
                    type: "linear",
                    x: 1,
                    y: 0,
                    x2: 0,
                    y2: 0,
                    colorStops: [{
                            offset: 0,
                            color: "rgb(243,135,36)", // 0% 处的颜色
                        },
                        {
                            offset: 1,
                            color: "rgb(218,172,113)", // 100% 处的颜色
                        },
                    ],
                    global: false, // 缺省为 false
                },
                color: "#fff",
                // textStyle: {
                //   color: "#fff",
                // },
            },
        },

        data: that.mapList,
    }]

    if (that.mapList && that.mapList.length > 0) {
        that.mapList.forEach(item => {
            item.itemStyle = {
                // 单个区域的样式设置
                color: "rgb(251, 189, 108)",
                opacity: 1,
            }
        })
    }

    return series;
}
五.其他配置数据说明
1. zoomSize设置值为1.4
2.series数据格式为:[{name:'四川省',amount:'123456'},{name:'海南省,amount:'456'}]
3.加上地图适配
mounted() {
    window.addEventListener("resize", this.handleResize);
  },

handleResize() {
      // 地图自适应缩放
      this.myChart.resize();
      let domWidth =
        document.body.clientWidth || document.documentElement.clientWidth;
      if (domWidth > 1440) {
        return {
          "this.zoomSzie": 1.6,
        };
      } else {
        return {
          "this.zoomSzie": 1.2,
        };
      }
    },


 1103
1103

 被折叠的 条评论
为什么被折叠?
被折叠的 条评论
为什么被折叠?
 到【灌水乐园】发言


