


Install Ceph
本章主要介绍在单节点环境中,如何安装部署 Ceph 集群.
文章目录
Author
Name: Shinefire
E-mail: shine_fire@qq.com
Last-Update: 2024.05.19
Introduction
当前环境说明:
Ceph 版本:reef
OS:RHEL8
Podman:4.9.4-rhel
Ceph的一些安装方式
Ceph支持多种不同的安装方式,或者说是不同的安装工具,来创建Ceph集群。
Cephadm
Cephadm 是官方推荐的 Ceph 安装方式,可以用来安装和管理 Ceph 集群。
Cephadm 有以下几点需要注意的:
- 只支持 Octopus 及更新的版本使用;
- cephadm完全集成了编排API,并完全支持用于管理集群部署的CLI和仪表板功能;
- cephadm 需要容器支持(以 Podman 或 Docker 的形式出现),以及 Python 3。
Rook
Rook 在 Kubernetes 中部署和管理 Ceph 集群,同时还可以通过 Kubernetes API 管理存储资源和进行分配。建议使用 Rook 在 Kubernetes 中运行 Ceph ,或连接现有的 Ceph 存储集群到 Kubernetes。
目前还不计划在 k8s 集群中部署管理 Ceph,所以暂时不着重介绍此方案。
ceph-ansible
ceph-ansible 通过 Ansible 来部署和管理 Ceph 集群。
- ceph-ansible 是一个被广泛使用的部署方式
- Ceph-ansible并未整合 Nautilus 与 Octopus 版本中引入的编排器 API,这意味着通过ceph-ansible部署的Ceph集群无法利用Nautilus及Octopus所提供的管理功能与仪表板集成特性。
ceph-salt
通过 Salt 和 cephadm 来安装 Ceph
puppet-ceph
使用 Puppet 来安装 Ceph
Cephadm
我主要采用官方最推荐的 Cephadm 来部署和管理 Ceph 集群,所以后续的部署和管理就围绕 Cephadm 来进行。
在这里先重点学习 Cephadm 的原理以及如何使用。
Cephadm 介绍
Cephadm 是一个用来管理 Ceph 集群的套件,也就是它本身是集成了多种工具功能与一体的产品。
cephadm 主要可以做以下一些事:
- 添加/移除/更新 Ceph container 在 Ceph 集群中;
cephadm 不依赖于像 Ansible、Rook 或 Salt 这样的外部配置工具。但是,可以使用这些外部配置工具来自动化执行 cephadm 本身不执行的操作。要了解有关这些外部配置工具的更多信息,请访问它们的页面:
- https://github.com/ceph/cephadm-ansible
- https://rook.io/docs/rook/v1.10/Getting-Started/intro/
- https://github.com/ceph/ceph-salt
cephadm 可以用来管理一个 Ceph 集群的整个生命周期。
cephadm管理Ceph集群的整个生命周期。这个生命周期从引导过程开始,当cephadm在单个节点上创建一个小型Ceph集群时。该集群由一个监视器和一个管理器组成。然后,cephadm使用编排接口扩展集群,添加主机并提供Ceph守护进程和服务。这个生命周期的管理可以通过Ceph命令行界面(CLI)或仪表板(GUI)来执行。
Cephadm 的兼容性相关
在使用 Podman 来进行的环境中,需要参考一下 ceph 版本和 podman 版本的兼容性,因为两个产品的生命周期策略存在差异。
https://docs.ceph.com/en/reef/cephadm/compatibility/#compatibility-with-podman-versions
cephadm 单节点部署 ceph 集群
cephadm 部署 Ceph 集群的方式:通过先引导一个单独的 host 来创建一个新的 Ceph 集群,然后扩展集群以包含其他主机,然后部署所需的服务。
部署要求
cephadm 部署 ceph 集群对环境有以下一些要求:
- Python 3
- Systemd
- Podman or Docker for running containers
- Time synchronization (such as Chrony or the legacy
ntpd) - LVM2 for provisioning storage devices
安装 cephadm
安装 cephadm 主要有两种方式:
- 针对特定发行版本的安装方式;
- 基于 curl 获取 cephadm 安装程序的安装方式;(这种方式比较麻烦不太推荐,需要获取安装资源以后再通过python去执行,应该是相当于获取来一个 python 脚本然后在系统上运行一边来安装 cephadm);
我这里的环境是基于 RHEL8 发行版本来进行安装的。
配置 Ceph Repository
ref: https://docs.ceph.com/en/reef/install/get-packages/
For major releases, you may add a Ceph entry to the /etc/yum.repos.d directory. Create a ceph.repo file. In the example below, replace {ceph-release} with a major release of Ceph (e.g., |stable-release|) and {distro} with your Linux distribution (e.g., el8, etc.). You may view https://download.ceph.com/rpm-{ceph-release}/ directory to see which distributions Ceph supports. Some Ceph packages (e.g., EPEL) must take priority over standard packages, so you must ensure that you set priority=2.
# cat ceph.repo
[ceph]
name=Ceph packages for $basearch
baseurl=https://download.ceph.com/rpm-reef/el8/$basearch
enabled=1
priority=2
gpgcheck=1
gpgkey=https://download.ceph.com/keys/release.asc

[ceph-noarch]
name=Ceph noarch packages
baseurl=https://download.ceph.com/rpm-reef/el8/noarch
enabled=1
priority=2
gpgcheck=1
gpgkey=https://download.ceph.com/keys/release.asc

[ceph-source]
name=Ceph source packages
baseurl=https://download.ceph.com/rpm-reef/el8/SRPMS
enabled=0
priority=2
gpgcheck=1
gpgkey=https://download.ceph.com/keys/release.asc
2024.07.31 更新一个小补丁。
最近发现 https://download.ceph.com/rpm-reef/el8 这个 Yum Repository 被官方删除了,具体原因没有查到,个人猜测可能是因为不想维护 el8 版本了,只留下了一个 el9 的仓库,鼓励大家在新版的操作系统上去使用这新版本的 Reef 版本,作为补充仓库,可以在官方的 Staging 中去使用替补 Yum Repository:https://download.ceph.com/staging/rpm-reef/el8
安装 cephadm
配置好以后可以直接安装
[root@lab ~]# dnf install -y cephadm
通过 ceph bootstrap 引导安装
The first step in creating a new Ceph cluster is running the cephadm bootstrap command on the Ceph cluster’s first host. The act of running the cephadm bootstrap command on the Ceph cluster’s first host creates the Ceph cluster’s first Monitor daemon.
运行之前可以先查看一下帮助文档,详细了解一下 ceph bootstrap 命令提供的功能。
cephadm bootstrap -h
简单模式下可以直接运行 ceph bootstrap 命令:
cephadm bootstrap --mon-ip *<mon-ip>*
这个命令将会:
-
Create a Monitor and a Manager daemon for the new cluster on the local host.
-
Generate a new SSH key for the Ceph cluster and add it to the root user’s
/root/.ssh/authorized_keysfile. -
Write a copy of the public key to
/etc/ceph/ceph.pub. -
Write a minimal configuration file to
/etc/ceph/ceph.conf. This file is needed to communicate with Ceph daemons. -
Write a copy of the
client.adminadministrative (privileged!) secret key to/etc/ceph/ceph.client.admin.keyring. -
Add the
_adminlabel to the bootstrap host. By default, any host with this label will (also) get a copy of/etc/ceph/ceph.confand/etc/ceph/ceph.client.admin.keyring.
根据一些实际需要,可以指定更多的参数来安装:
cephadm bootstrap \
--mon-ip 192.168.31.100 \
--log-to-file \
--single-host-defaults \
--allow-fqdn-hostname \
--initial-dashboard-user "apt" \
--initial-dashboard-password "Password2024" \
--allow-overwrite
安装的具体过程内容可以参考文末 附件1
详细参数说明看下面内容
bootstrap 参数说明
针对上面我在 bootstrap 时,添加的一些参数,以下做出详细说明
–mon-ip
–log-to-file
–single-host-defaults
参考官方针对单节点部署ceph的文档:https://docs.ceph.com/en/reef/cephadm/install/#single-host
--single-host-defaults 是单节点安装最重要的参数选项,相当于官方直接给出了这样一个预设场景,为这个预设场景已经做除了一些特殊的参数配置调整。
实际上做了以下一些特殊的参数配置:
global/osd_crush_chooseleaf_type = 0
global/osd_pool_default_size = 2
mgr/mgr_standby_modules = False
这几个参数的意思可以参考:
- One Node Cluster
- ceph-mgr administrator’s guide 里面的
mgr_standby_modules
–allow-fqdn-hostname
如果主机名采用的 fqdn 形式,则需要加上此参数才行,否则会报错导致初始化失败
–initial-dashboard-user
创建一个用来后续登陆 dashboard 管理界面的用户
–initial-dashboard-password
创建一个用来后续登陆 dashboard 管理界面的用户密码
–allow-overwrite
--allow-overwrite 重复安装的时候使用这个参数可以覆盖之前环境的配置
例如我的环境之前部署过 Ceph,重新部署之前一些配置没删除干净,就会有以下提示:
ERROR: /etc/ceph/ceph.conf already exists; delete or pass --allow-overwrite to overwrite
安装 Ceph CLI
在官方文档中介绍了,Ceph CLI 管理工具提供三种方式来进行使用:
- cephadm shell
- cephadm shell – ceph -s
- install the
ceph-commonpackage
cephadm shell
在使用 Ceph 的命令行工具时,理论上是不需要再额外安装其他的包即可直接使用的,因为 Ceph 在部署和运行的过程中,会使用 podman 运行 container 的方式来进行管理,其中就有正在运行的 container 来提供来命令行工具 ceph。
例如:
[root@lab ~]# cephadm shell
Inferring fsid 8c5534d2-984d-11ee-b736-d45d64d3476d
Inferring config /var/lib/ceph/8c5534d2-984d-11ee-b736-d45d64d3476d/mon.lab/config
Using ceph image with id 'ca473d1770ef' and tag 'v18' created on 2023-11-22 16:10:17 +0000 UTC
quay.io/ceph/ceph@sha256:8e1c0c287ee035aa36699c1340da870ebf6d2b1effb327c012d917628367d9df
[ceph: root@lab /]# ceph -s
  cluster:
    id:     8c5534d2-984d-11ee-b736-d45d64d3476d
    health: HEALTH_WARN
            OSD count 0 < osd_pool_default_size 2

  services:
    mon: 1 daemons, quorum lab (age 38m)
    mgr: lab.rbcoix(active, since 35m), standbys: lab.mgzsop
    osd: 0 osds: 0 up, 0 in

  data:
    pools:   0 pools, 0 pgs
    objects: 0 objects, 0 B
    usage:   0 B used, 0 B / 0 B avail
    pgs:
ceph command
ceph 命令可以直接在 shell 中使用,让我们更方便地去管理 Ceph 集群。
安装 ceph-common 包之后即可直接在 shell 中使用 ceph 命令。
-
You can install the
ceph-commonpackage, which contains all of the ceph commands, includingceph,rbd,mount.ceph(for mounting CephFS file systems), etc.:cephadm add-repo --release reef cephadm install ceph-common
Confirm that the ceph command is accessible with:
ceph -v
Confirm that the ceph command can connect to the cluster and also its status with:
ceph status
Ceph 安装后的 containers
当前版本是通过 container 的方式来让 cephadm 安装 Ceph 集群的,所以必须要有例如 Podman、Docker 之类的来运行容器才行。
在 cephadm bootstrap 在创建新的 ceph 集群时,会提前下载好一些 container images 用来运行 container。
会启用如下一些 images:
[root@lab ~]# podman images
REPOSITORY                        TAG         IMAGE ID      CREATED        SIZE
quay.io/ceph/ceph                 v18         c250cbc76d9d  11 days ago    1.28 GB
quay.io/ceph/ceph-grafana         9.4.7       954c08fa6188  5 months ago   647 MB
quay.io/prometheus/prometheus     v2.43.0     a07b618ecd1d  14 months ago  235 MB
quay.io/prometheus/alertmanager   v0.25.0     c8568f914cd2  17 months ago  66.5 MB
quay.io/prometheus/node-exporter  v1.5.0      0da6a335fe13  18 months ago  23.9 MB
我当前环境中使用 Podman 来运行 container ,所以在 cephadm bootstrap 之后,能看到当前系统中已经运行了好几个 container。
[root@lab ~]# podman ps -f name=ceph
CONTAINER ID  IMAGE                                                                                      COMMAND               CREATED       STATUS       PORTS       NAMES
6497346d31dc  quay.io/ceph/ceph:v18                                                                      -n mon.lab -f --s...  47 hours ago  Up 47 hours              ceph-a4c92154-19da-11ef-920e-d45d64d3476d-mon-lab
03c7b81df640  quay.io/ceph/ceph:v18                                                                      -n mgr.lab.kfhlqp...  47 hours ago  Up 47 hours              ceph-a4c92154-19da-11ef-920e-d45d64d3476d-mgr-lab-kfhlqp
fa070917e79c  quay.io/ceph/ceph@sha256:257b3f5140c11b51fd710ffdad6213ed53d74146f464a51717262d156daef553  -n client.ceph-ex...  47 hours ago  Up 47 hours              ceph-a4c92154-19da-11ef-920e-d45d64d3476d-ceph-exporter-lab
e6b0e2582df6  quay.io/ceph/ceph@sha256:257b3f5140c11b51fd710ffdad6213ed53d74146f464a51717262d156daef553  -n client.crash.l...  47 hours ago  Up 47 hours              ceph-a4c92154-19da-11ef-920e-d45d64d3476d-crash-lab
4f5682efe405  quay.io/prometheus/node-exporter:v1.5.0                                                    --no-collector.ti...  47 hours ago  Up 47 hours              ceph-a4c92154-19da-11ef-920e-d45d64d3476d-node-exporter-lab
af7a9bfd4eba  quay.io/ceph/ceph@sha256:257b3f5140c11b51fd710ffdad6213ed53d74146f464a51717262d156daef553  -n mgr.lab.qwuxoq...  47 hours ago  Up 47 hours              ceph-a4c92154-19da-11ef-920e-d45d64d3476d-mgr-lab-qwuxoq
3f418e7e6d13  quay.io/prometheus/prometheus:v2.43.0                                                      --config.file=/et...  47 hours ago  Up 47 hours              ceph-a4c92154-19da-11ef-920e-d45d64d3476d-prometheus-lab
ef50fc1663dc  quay.io/prometheus/alertmanager:v0.25.0                                                    --cluster.listen-...  47 hours ago  Up 47 hours              ceph-a4c92154-19da-11ef-920e-d45d64d3476d-alertmanager-lab
2a9f6a9dff51  quay.io/ceph/ceph-grafana:9.4.7                                                            /bin/bash             47 hours ago  Up 47 hours              ceph-a4c92154-19da-11ef-920e-d45d64d3476d-grafana-lab
针对运行的这些 container 的功能,其实接触到后面的 ceph services 部分就好理解,这些 container 都是为了实现 ceph services 功能而运行的各种 container
[root@lab ~]# ceph orch ls
NAME           PORTS        RUNNING  REFRESHED  AGE  PLACEMENT
alertmanager   ?:9093,9094      1/1  5m ago     46h  count:1
ceph-exporter                   1/1  5m ago     46h  *
crash                           1/1  5m ago     46h  *
grafana        ?:3000           1/1  5m ago     46h  count:1
mgr                             2/2  5m ago     46h  count:2
mon                             1/5  5m ago     46h  count:5
node-exporter  ?:9100           1/1  5m ago     46h  *
prometheus     ?:9095           1/1  5m ago     46h  count:1
登录Dashboard
安装完成以后没什么问题就可以直接按安装后提示的登录 URL 进行 Web 端登录 Dashboard。
首次登录需要强制修改密码才行(还以为指定了初始用户和密码就不用再强制修改密码了呢,结果还是需要…)
附件
附件1
cephadm bootstrap 过程:
[root@lab ~]# cephadm bootstrap \
> --mon-ip 192.168.31.100 \
> --log-to-file \
> --single-host-defaults \
> --allow-fqdn-hostname \
> --initial-dashboard-user "apt" \
> --initial-dashboard-password "Password2024" \
> --allow-overwrite
Verifying podman|docker is present...
Verifying lvm2 is present...
Verifying time synchronization is in place...
Unit chronyd.service is enabled and running
Repeating the final host check...
podman (/usr/bin/podman) version 4.6.1 is present
systemctl is present
lvcreate is present
Unit chronyd.service is enabled and running
Host looks OK
Cluster fsid: a4c92154-19da-11ef-920e-d45d64d3476d
Verifying IP 192.168.31.100 port 3300 ...
Verifying IP 192.168.31.100 port 6789 ...
Mon IP `192.168.31.100` is in CIDR network `192.168.31.0/24`
Mon IP `192.168.31.100` is in CIDR network `192.168.31.0/24`
Internal network (--cluster-network) has not been provided, OSD replication will default to the public_network
Adjusting default settings to suit single-host cluster...
Pulling container image quay.io/ceph/ceph:v18...
Ceph version: ceph version 18.2.2 (531c0d11a1c5d39fbfe6aa8a521f023abf3bf3e2) reef (stable)
Extracting ceph user uid/gid from container image...
Creating initial keys...
Creating initial monmap...
Creating mon...
Waiting for mon to start...
Waiting for mon...
mon is available
Assimilating anything we can from ceph.conf...
Generating new minimal ceph.conf...
Restarting the monitor...
Setting public_network to 192.168.31.0/24 in mon config section
Wrote config to /etc/ceph/ceph.conf
Wrote keyring to /etc/ceph/ceph.client.admin.keyring
Creating mgr...
Verifying port 0.0.0.0:9283 ...
Verifying port 0.0.0.0:8765 ...
Verifying port 0.0.0.0:8443 ...
Waiting for mgr to start...
Waiting for mgr...
mgr not available, waiting (1/15)...
mgr not available, waiting (2/15)...
mgr not available, waiting (3/15)...
mgr is available
Enabling cephadm module...
Waiting for the mgr to restart...
Waiting for mgr epoch 5...
mgr epoch 5 is available
Setting orchestrator backend to cephadm...
Generating ssh key...
Wrote public SSH key to /etc/ceph/ceph.pub
Adding key to root@localhost authorized_keys...
Adding host lab.shinefire.cn...
Deploying mon service with default placement...
Deploying mgr service with default placement...
Deploying crash service with default placement...
Deploying ceph-exporter service with default placement...
Deploying prometheus service with default placement...
Deploying grafana service with default placement...
Deploying node-exporter service with default placement...
Deploying alertmanager service with default placement...
Enabling the dashboard module...
Waiting for the mgr to restart...
Waiting for mgr epoch 9...
mgr epoch 9 is available
Generating a dashboard self-signed certificate...
Creating initial admin user...
Fetching dashboard port number...
Ceph Dashboard is now available at:

	     URL: https://lab.shinefire.cn:8443/
	    User: apt
	Password: Password2024

Enabling client.admin keyring and conf on hosts with "admin" label
Saving cluster configuration to /var/lib/ceph/a4c92154-19da-11ef-920e-d45d64d3476d/config directory
Enabling autotune for osd_memory_target
You can access the Ceph CLI as following in case of multi-cluster or non-default config:

	sudo /usr/sbin/cephadm shell --fsid a4c92154-19da-11ef-920e-d45d64d3476d -c /etc/ceph/ceph.conf -k /etc/ceph/ceph.client.admin.keyring

Or, if you are only running a single cluster on this host:

	sudo /usr/sbin/cephadm shell

Please consider enabling telemetry to help improve Ceph:

	ceph telemetry on

For more information see:

	https://docs.ceph.com/en/latest/mgr/telemetry/

Bootstrap complete.
Troubleshooting
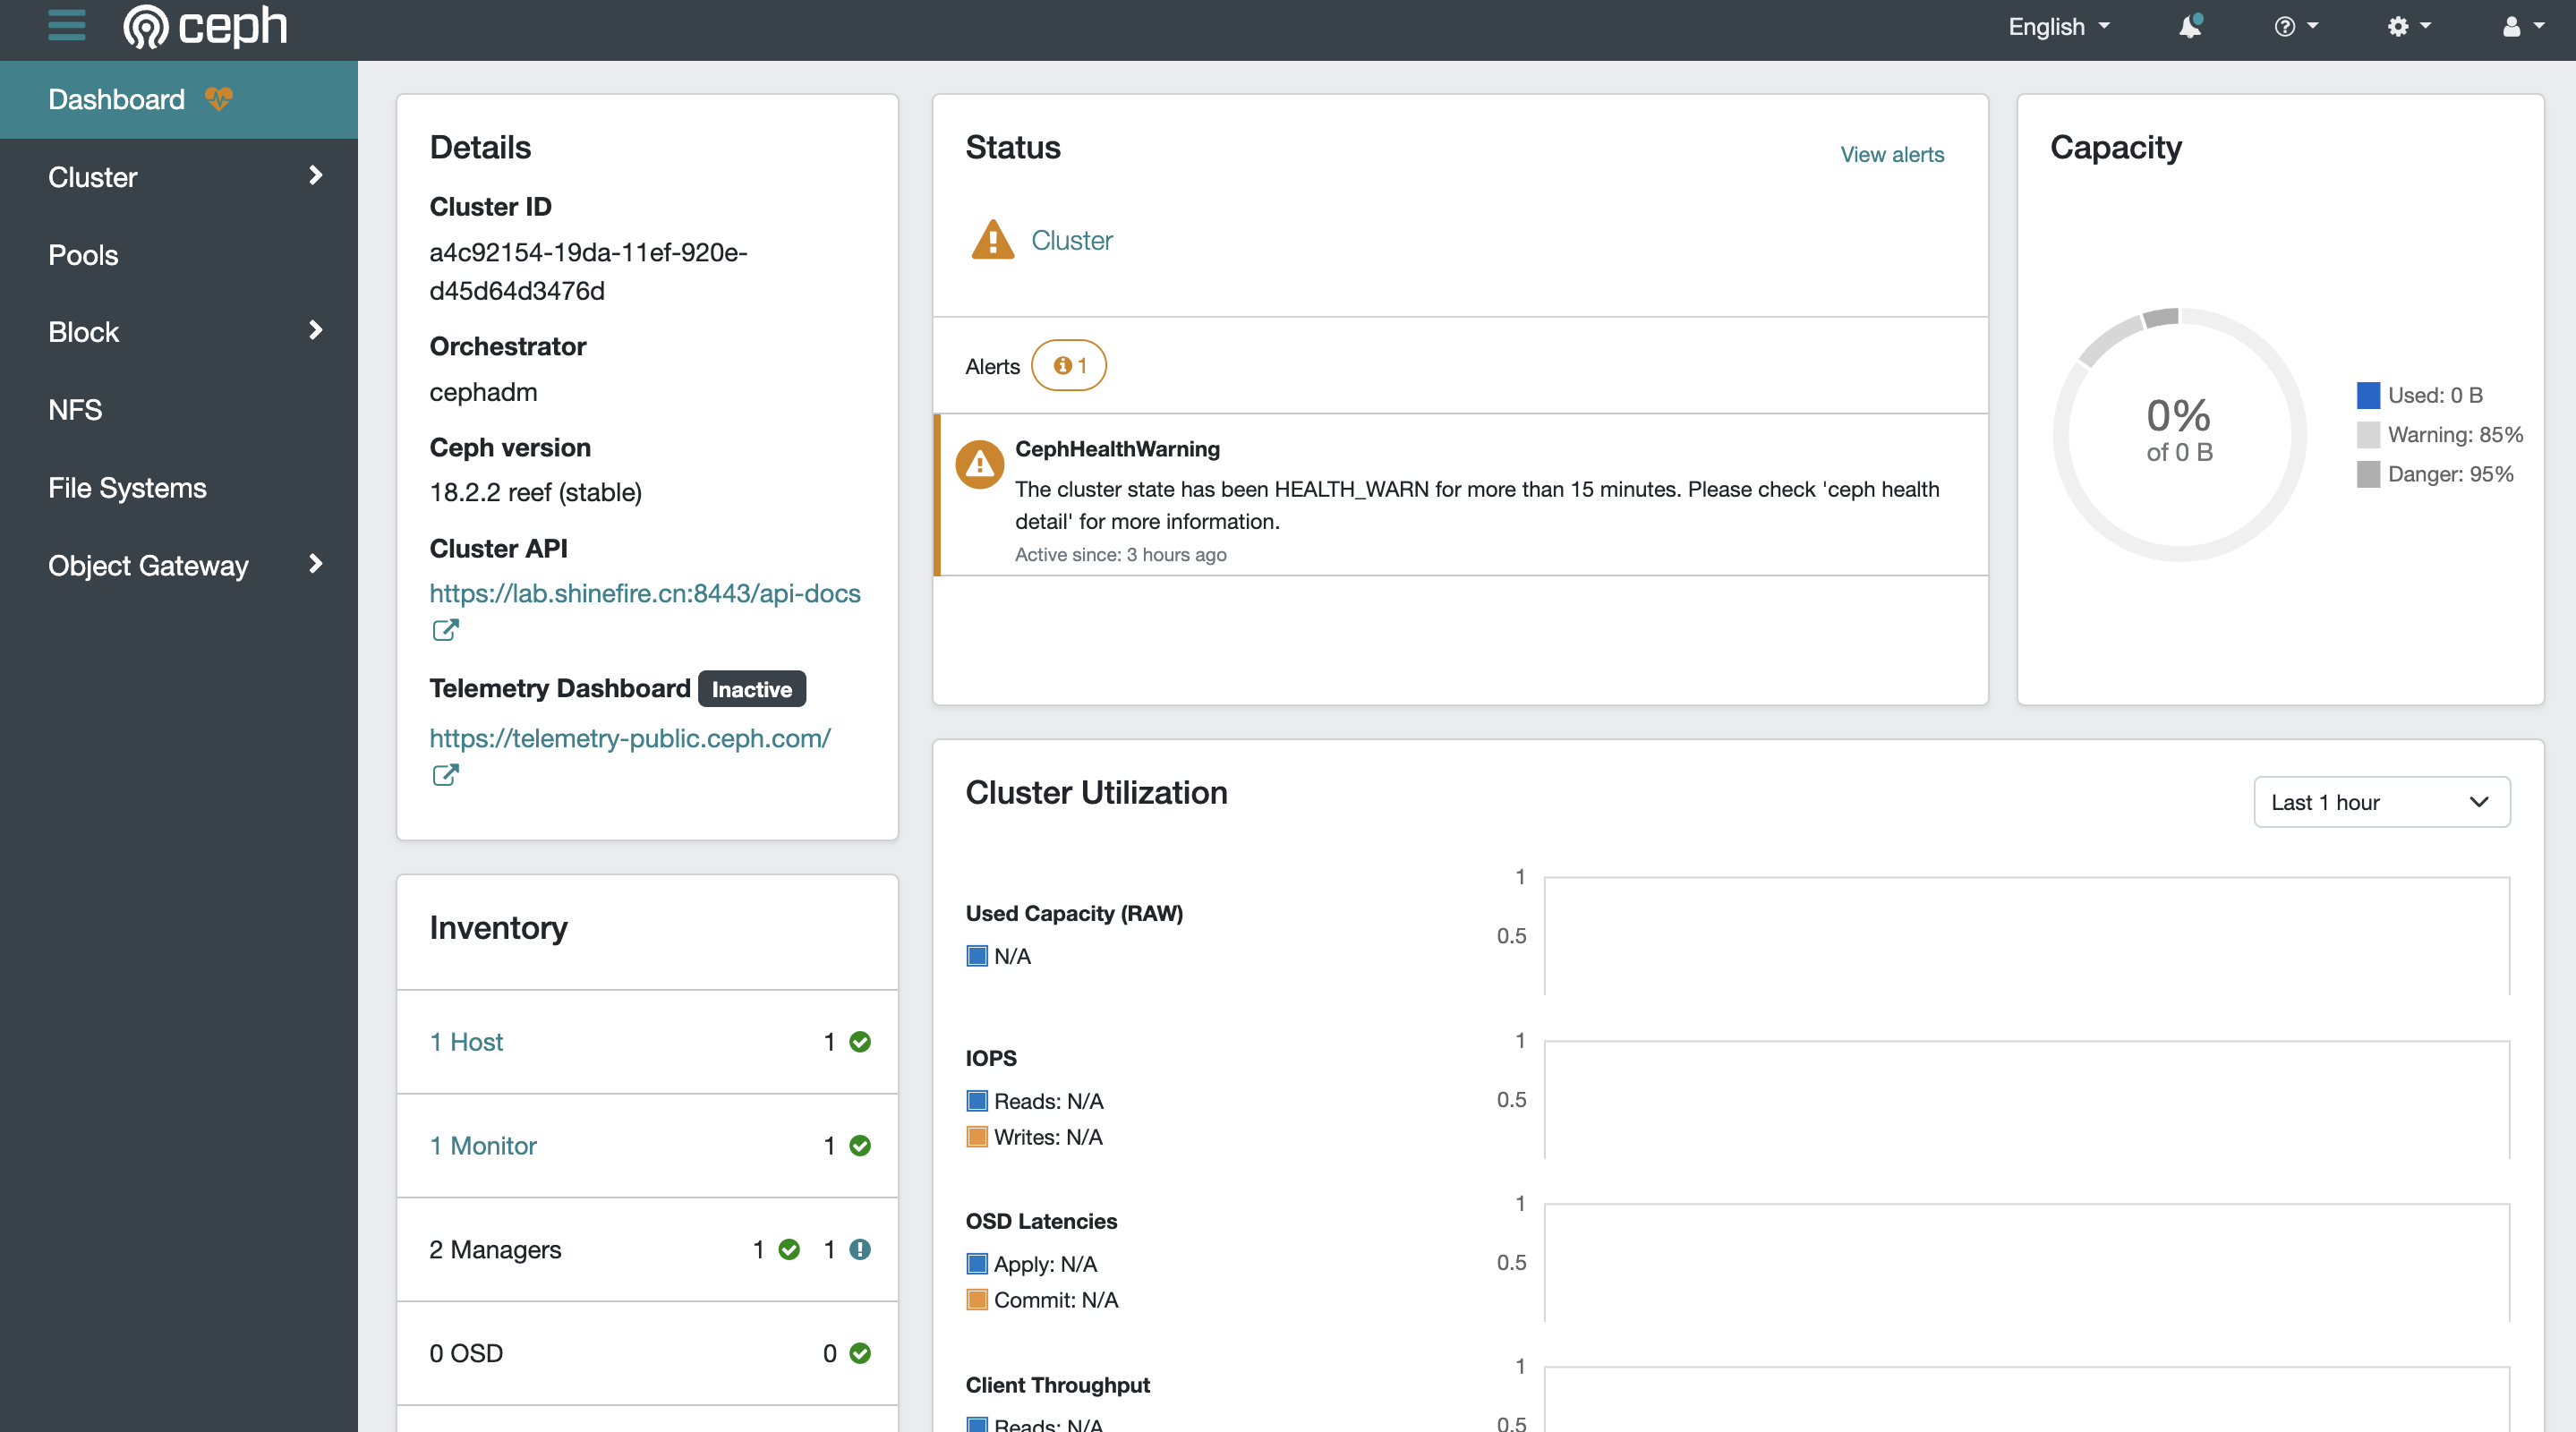
CephHealthWarning(active)
Dashboard 里面有通知信息的报错:
The cluster state has been HEALTH_WARN for more than 15 minutes. Please check 'ceph health detail' for more information.
进一步获取更多详情:
~]# ceph health detail
HEALTH_WARN OSD count 0 < osd_pool_default_size 2
[WRN] TOO_FEW_OSDS: OSD count 0 < osd_pool_default_size 2
这个应该是属于正常的告警,因为我这里还没有添加 OSD。
References
- INSTALLING CEPH
- https://docs.ceph.com/en/reef/install/get-packages/
- https://docs.ceph.com/en/reef/cephadm/install/#different-deployment-scenarios
- https://docs.ceph.com/en/reef/rados/troubleshooting/troubleshooting-pg/#one-node-cluster
- https://docs.ceph.com/en/reef/mgr/administrator/#mgr-administrator-guide


 1411
1411

 被折叠的 条评论
为什么被折叠?
被折叠的 条评论
为什么被折叠?
 到【灌水乐园】发言


