


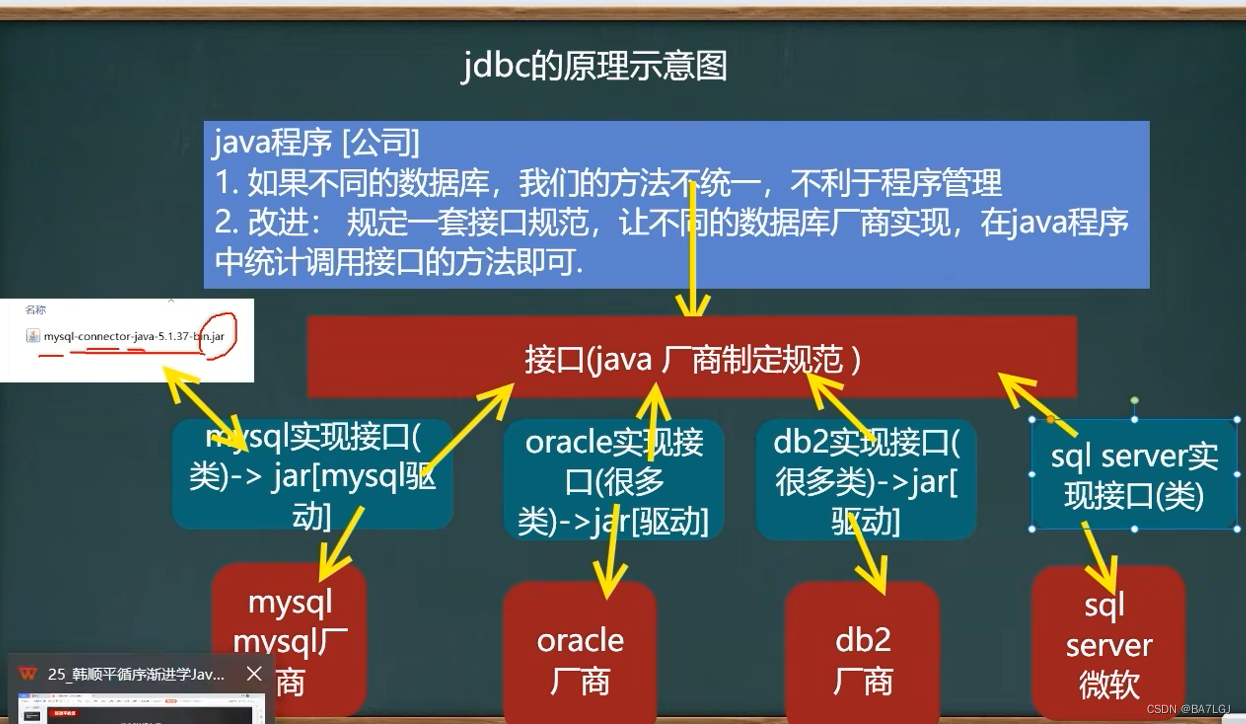
JDBC快速入门
jdbc程序编写步骤
前置步骤:下载对应数据库的jdbc驱动,提取jar文件
在项目下创建libs文件夹,将jar文件放入这个目录下
选中jar并右键,加入库,默认确定。
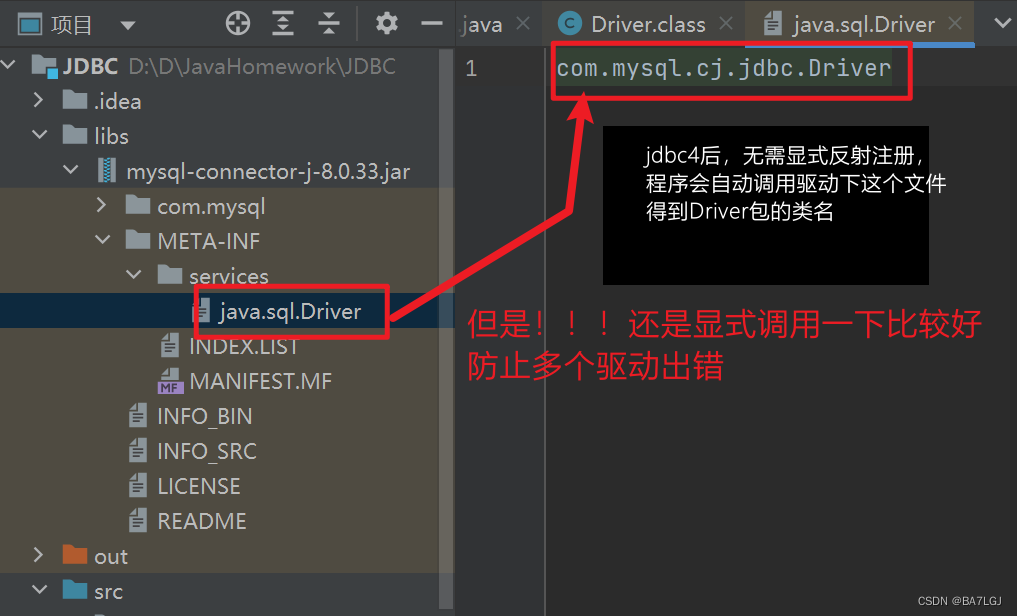
- 注册驱动——加载Driver
import com.mysql.cj.jdbc.Driver;
8.0的驱动更改了包路径,需要设置一下
-
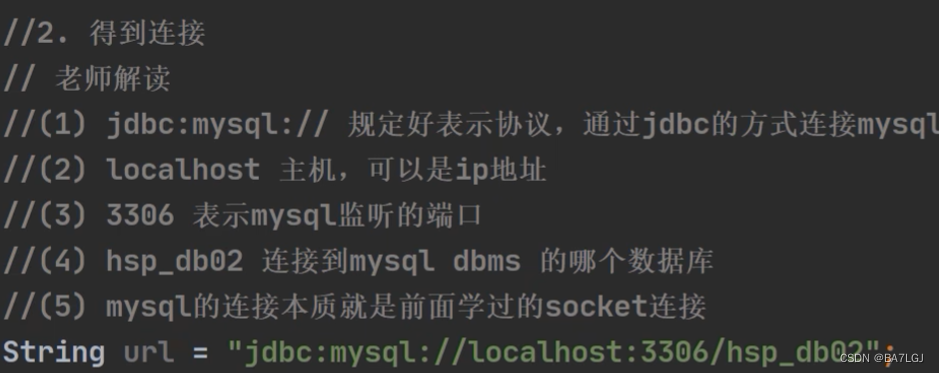
获取链接——获得Connection
connect 与数据库连接,是一个通道,需要关闭
-
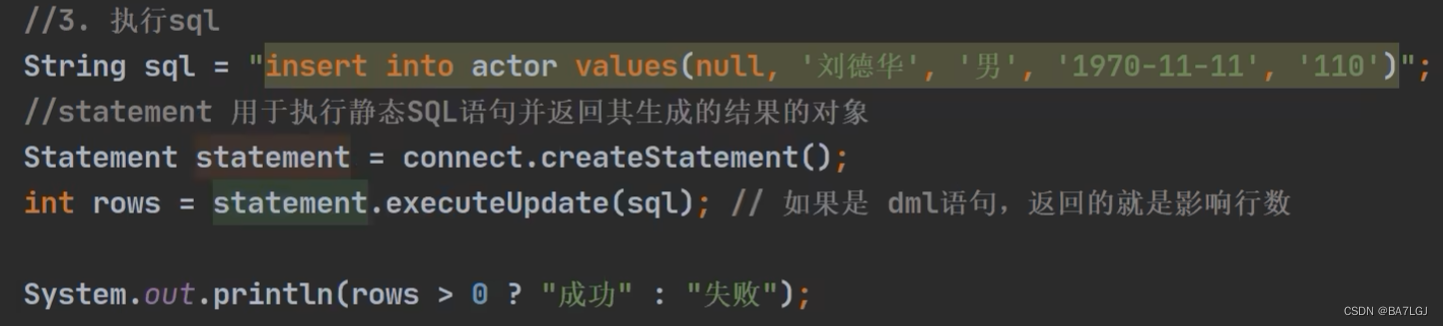
执行增删改查——发送SQL指令
statement是帮助执行sql代码的对象,后续需要关闭
-
释放资源——关闭连接
调用statement和connect的close方法
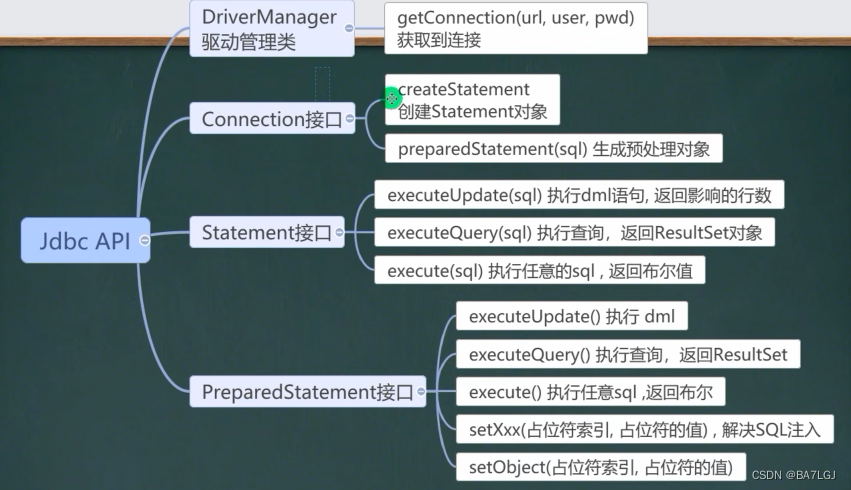
获取数据库连接的5种方法
第一种:直接new对象
静态加载,包是写死的,第二种反射机制会好一些
第二种: 反射
利用反射,相关参数可以设置在配置文件中
可以使用不同的数据库
Class<?> driverClass = Class.forName("com.mysql.cj.jdbc.Driver");
Driver driver = (Driver) driverClass.newInstance();
// 这里的Driver是java库中带的接口,驱动实现这个接口,所以强转是不会影响解耦合的
String url = "jdbc:mysql://localhost:3306/hsp_jdbc";
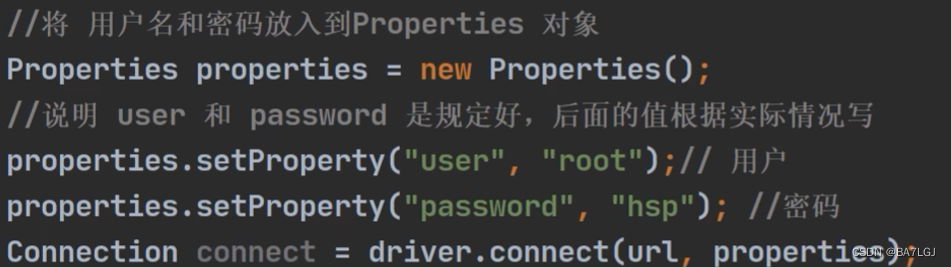
Properties properties = new Properties();
properties.setProperty("user", "root");
properties.setProperty("password", "000000");
Connection connect = driver.connect(url, properties);
String sql = "insert into actors values(null,'黄明俊','男','2004-04-02','13265801338');";
Statement statement = connect.createStatement();
int i = statement.executeUpdate(sql);
System.out.println(i == 1 ? "成功" : "失败");
statement.close();
connect.close();
第三 基于反射 再DriverManager代替Driver
第三种方法可以不使用properties
    public static void main(String[] args) throws Exception {
        Class<?> driverClass = Class.forName("com.mysql.cj.jdbc.Driver");
        Driver driver = (Driver) driverClass.newInstance();

        String url = "jdbc:mysql://localhost:3306/hsp_jdbc";
        Properties properties = new Properties();
        properties.setProperty("user", "root");
        properties.setProperty("password", "000000");

        DriverManager.registerDriver(driver);//DriverManager来注册Driver驱动

        Connection root = DriverManager.getConnection(url, "root", "000000");
//        Connection root = DriverManager.getConnection(url, properties);
        System.out.println(root);
    }
第四种:基于反射和DriverManager(常用)
反射中会自动完成注册驱动,简化代码,不需要调用Drivermanager的registerDriver方法,可以直接获取connect连接
    public static void main(String[] args) throws Exception {
		Class.forName("com.mysql.cj.jdbc.Driver");

        String url = "jdbc:mysql://localhost:3306/hsp_jdbc";
        Connection root = DriverManager.getConnection(url, "root", "000000");

        System.out.println(root);
    }
在反射加载Driver类时,会注册驱动
下面是com.mysql.cj.jdbc.driver反编译后的源码
在类加载时会调用静态代码块,注册Driver工作已经完成
public class Driver extends NonRegisteringDriver implements java.sql.Driver {
    public Driver() throws SQLException {
    }

    static {
        try {
            DriverManager.registerDriver(new Driver());
        } catch (SQLException var1) {
            throw new RuntimeException("Can't register driver!");
        }
    }
}

第五种: 基于第四种 使用配置文件
    public static void main(String[] args) throws Exception {
        Properties properties = new Properties();
        properties.load(new FileReader("src/mysql.properties"));


        Class.forName(properties.getProperty("driver"));
        Connection conn = DriverManager.getConnection(properties.getProperty("url"),properties.getProperty("user"),properties.getProperty("password"));
        System.out.println(conn);

    }
msyql.properties的配置文件
driver=com.mysql.cj.jdbc.Driver
url=jdbc:mysql://localhost:3306/hsp_jdbc
user=root
password=000000
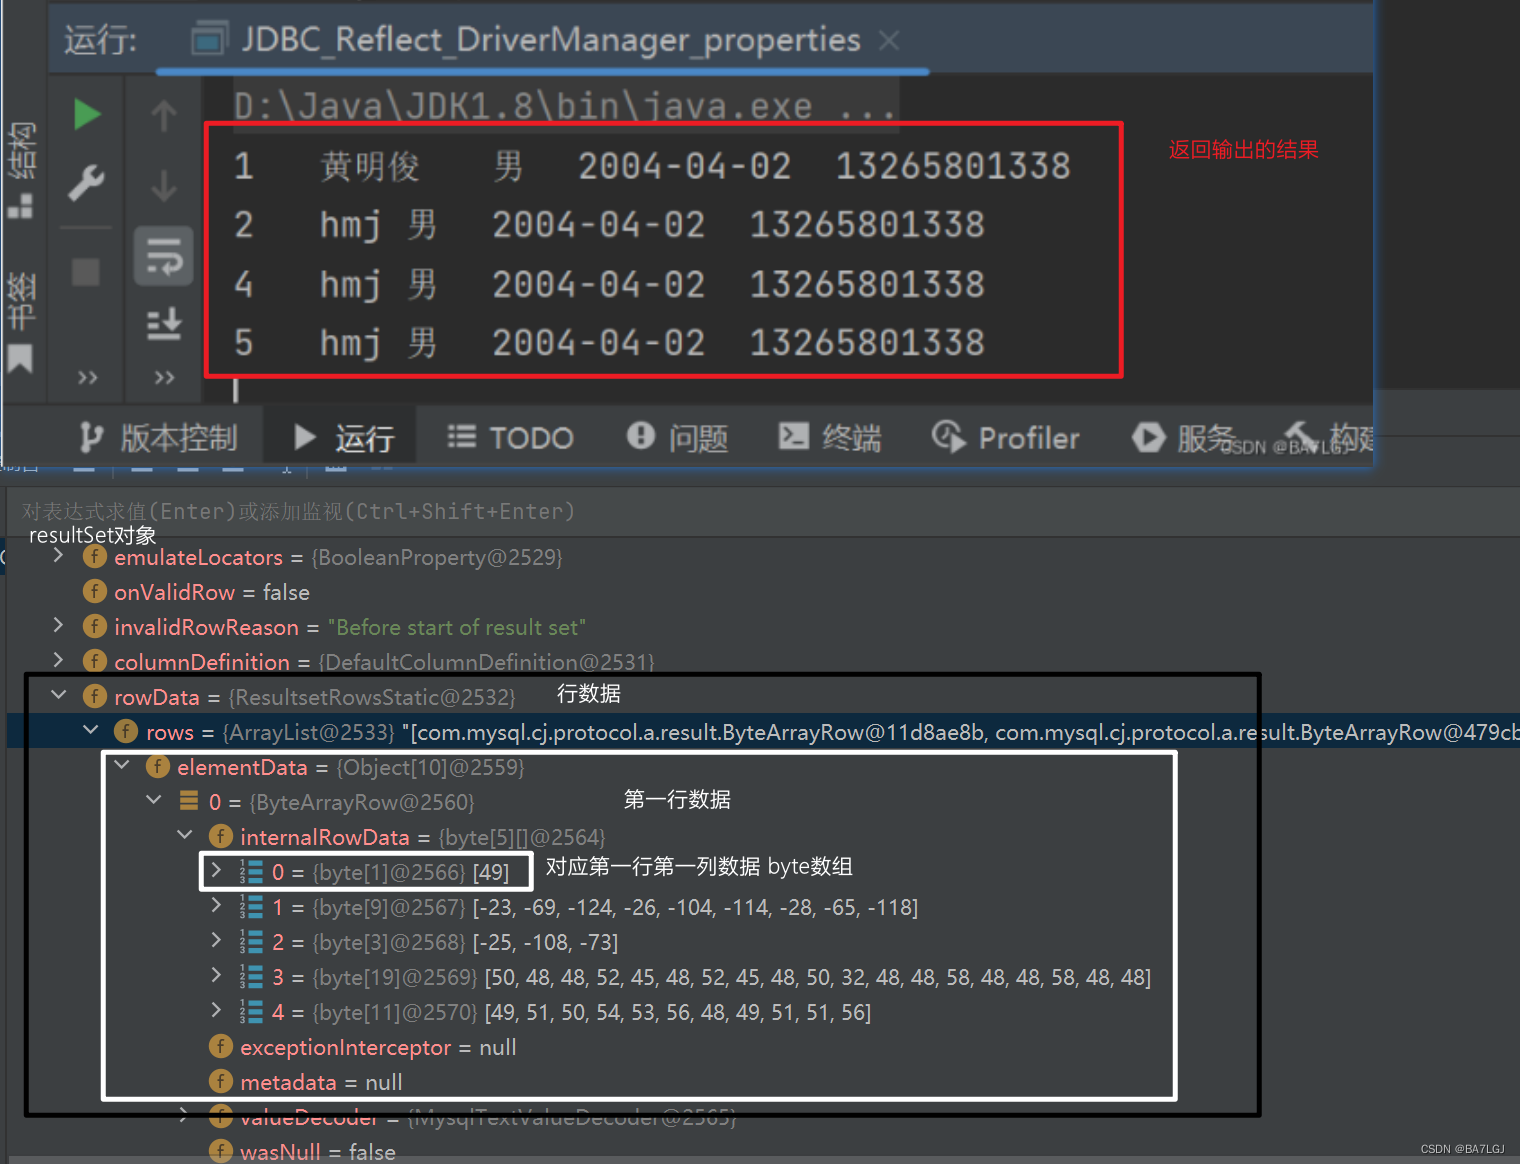
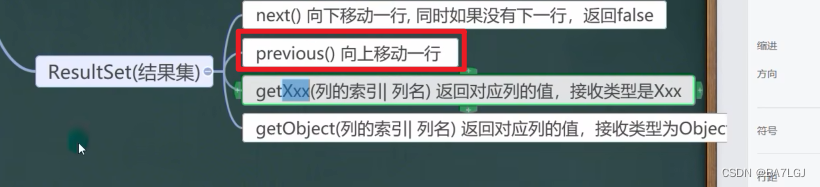
ResultSet结果集(select)
表示数据库结果集的数据表,select会返回这个类的对象

statement中的executeQuery
    public static void main(String[] args) throws Exception {
        Properties properties = new Properties();
        properties.load(new FileReader("src/mysql.properties"));


        Class.forName(properties.getProperty("driver"));
        Connection conn = DriverManager.getConnection(properties.getProperty("url"), properties.getProperty("user"), properties.getProperty("password"));

        Statement statement = conn.createStatement();

        String sql = "select * from actors;";

        ResultSet resultSet = statement.executeQuery(sql);

        //resultSet是一个接口,下载的驱动实现了这个接口
        while ((resultSet.next())) {
            int id = resultSet.getInt(1);
            String name = resultSet.getString(2);
            String sex = resultSet.getString(3);
            Date date = resultSet.getDate(4);
            String phone = resultSet.getString(5);
            System.out.println(id + "\t" + name + "\t" + sex + "\t" + date + "\t" + phone);
        }

        resultSet.close();
        statement.close();
        conn.close();
    }

resultSet解读:
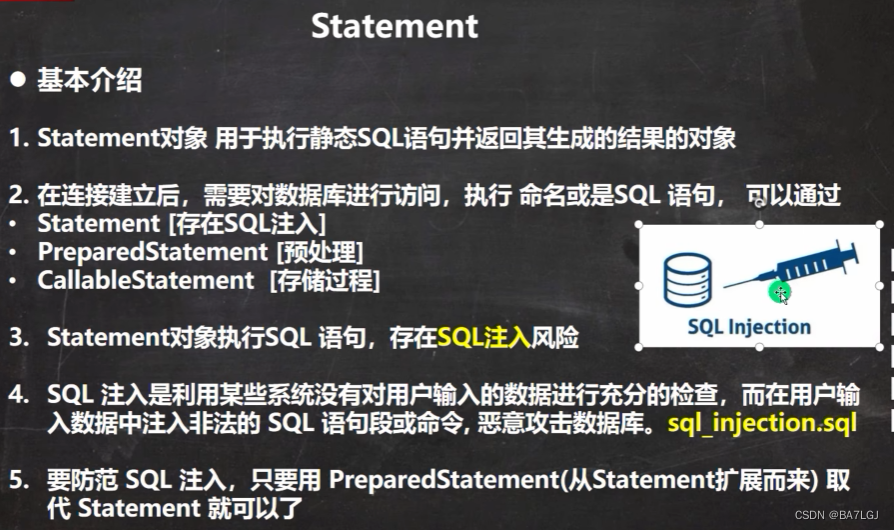
Statement
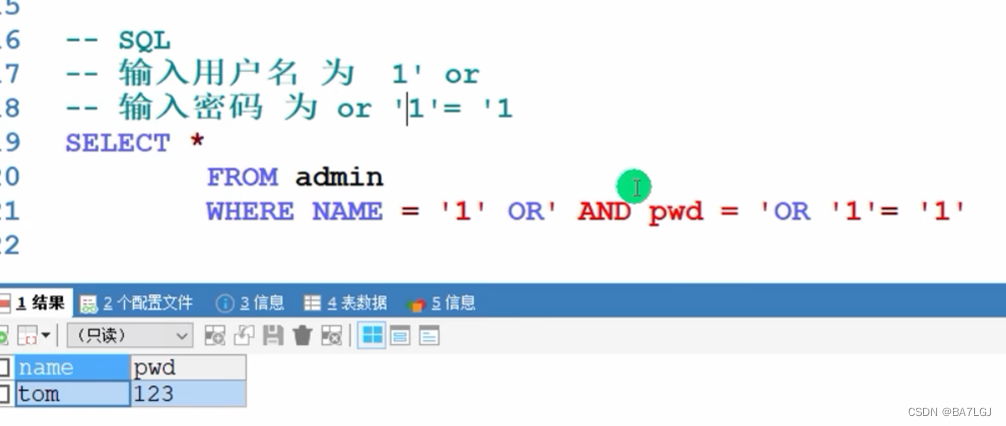
工作中禁止使用Statement,存在sql注入的风险
PreparedStatement类
preparedstatement相较于statement有一个比较大的区别就是,参数使用 问号 代替,后续通过set方法,按照问号顺序设置值
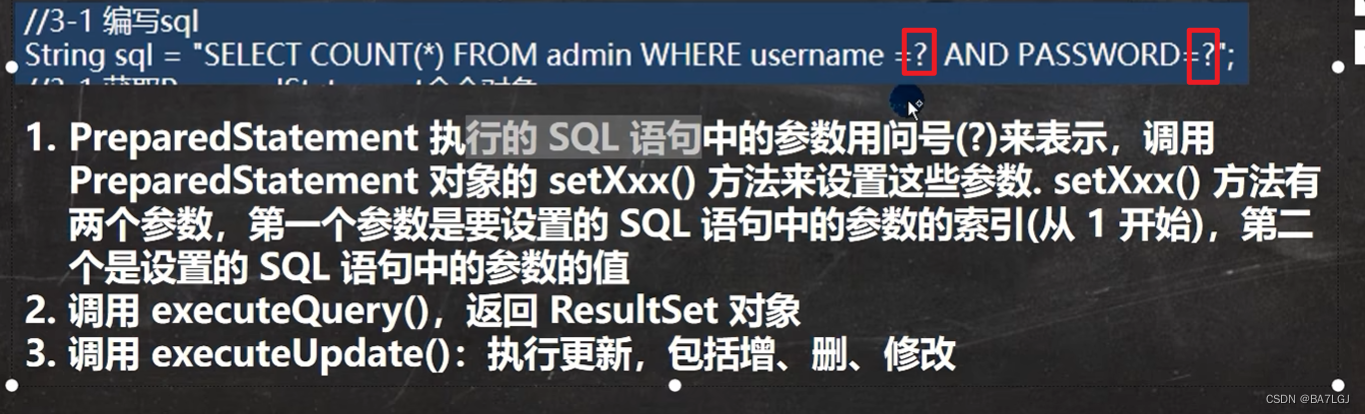
SQL参数中问号的索引(从1开始)
解决sql注入
不用拼接麻烦

preparedstatement有一个重点就是其executeQuery不能带参数,若带参数必须是完整的sql语句,无参则是通过公式语句查询
    public static void main(String[] args) throws Exception {

        Properties mysqlProperties = new Properties();
        mysqlProperties.load(new FileReader("src/mysql.properties"));
        String url = mysqlProperties.getProperty("url");
        String user = mysqlProperties.getProperty("user");
        String password = mysqlProperties.getProperty("password");
        String driver = mysqlProperties.getProperty("driver");

        Class.forName(driver);

        Connection conn = DriverManager.getConnection(url, user, password);

        PreparedStatement preparedStatement = conn.prepareStatement("select * from qq where `account` = ? or `password` = ?");
        String userAccount;
        String userPassword;
        Scanner scanner = new Scanner(System.in);
        System.out.printf("请输入用户账号:");
        userAccount = scanner.nextLine();
        System.out.printf("请输入用户密码:");
        userPassword = scanner.nextLine();
        preparedStatement.setString(1, userAccount);
        preparedStatement.setString(2, userPassword);

        ResultSet resultSet = preparedStatement.executeQuery();
        //此时这个executeQuery不能带参数,若带参数必须是完整的sql语句,无参则是通过公式语句查询

        if (resultSet.next()) {
            String enterAccount = resultSet.getString(1);
            String enterSecret = resultSet.getString(3);
            System.out.println("登录成功!");
            System.out.println("用户:" + enterAccount + "\t秘密:" + enterSecret);
        } else {
            System.out.println("登录失败,账号/密码错误");
        }

        resultSet.close();
        preparedStatement.close();
        conn.close();
    }
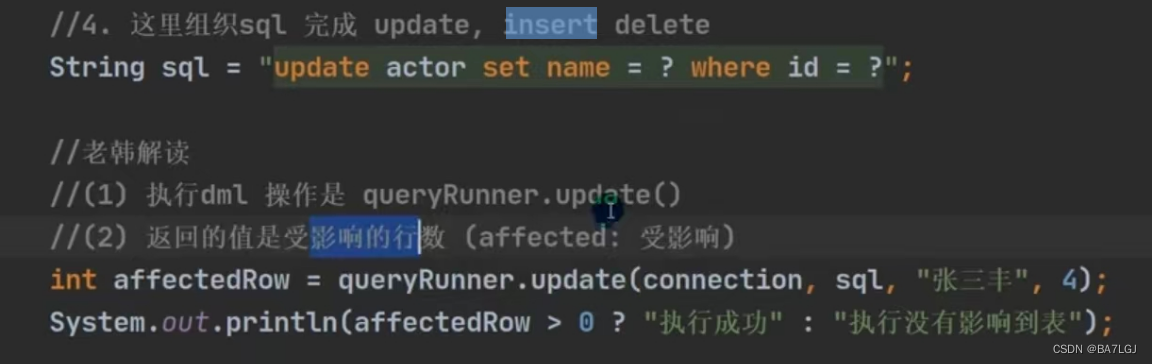
dml语句 增删改
增删改与查询使用方法十分相似,只有在函数返回值有差别,返回受影响的行数executeUpdate
工具类JDBC Utils
由于连接数据库需要先连接再使用再关闭,在多个类需要使用数据库时,则会在连接/关闭这个步骤中多次出现相同代码,则此时工具类应运而生
package com.lgj.jdbc;

import javax.swing.plaf.nimbus.State;
import javax.xml.transform.Result;
import java.io.FileInputStream;
import java.io.IOException;
import java.sql.*;
import java.util.Properties;

/**
 * @projectName: JDBC
 * @package: com.lgj.jdbc
 * @className: JDBCUtils
 * @author: LGJ
 * @description: TODO
 * @date: 2023/7/17 15:07
 * @version: 1.0
 */
public class JDBCUtils {
    private static String user;
    private static String password;
    private static String url;
    private static String driver;

    static {
        Properties properties = new Properties();
        try {
            properties.load(new FileInputStream("src/mysql.properties"));
            user = properties.getProperty("user");
            password = properties.getProperty("password");
            url = properties.getProperty("url");
            driver = properties.getProperty("driver");
        } catch (IOException e) {
            throw new RuntimeException(e);
//            实际开发中,会把编译一场转换为运行异常
//                    使调用者选择捕获/默认处理
        }
    }

    /**
     * 用于返回connection
     */
    public static Connection getConnection() {
        try {
            return DriverManager.getConnection(url, user, password);
        } catch (SQLException e) {
            throw new RuntimeException(e);
        }
    }


    /**
     * 关闭资源,ResultSet/Statement/connection
     */
    private static void close(ResultSet resultSet, Statement statement,Connection connection) {
        try {
            if (resultSet!=null){
                resultSet.close();
            }
            if (statement!=null){
                statement.close();
            }
            if (connection!=null){
                connection.close();
            }
        } catch (SQLException e) {
        //            实际开发中,会把编译一场转换为运行异常
//                    使调用者选择捕获/默认处理
            throw new RuntimeException(e);
        }

    }
}
事物处理
默认的connection对象只要有提交语句,则是自动提交,若需要等待,调用connection连接的setAutoCommit(false)则取消自动提交
不过要记得commit
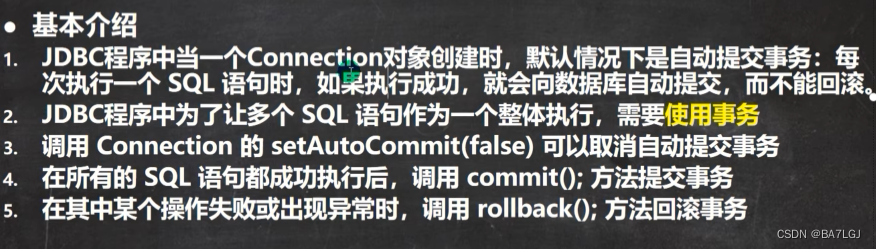
在try的最后一行调用commit提交,在catch中调用rollback,
JDBC批处理
需要在url中设置参数,准许当前连接进行批处理
?rewriteBatchedStatements=true
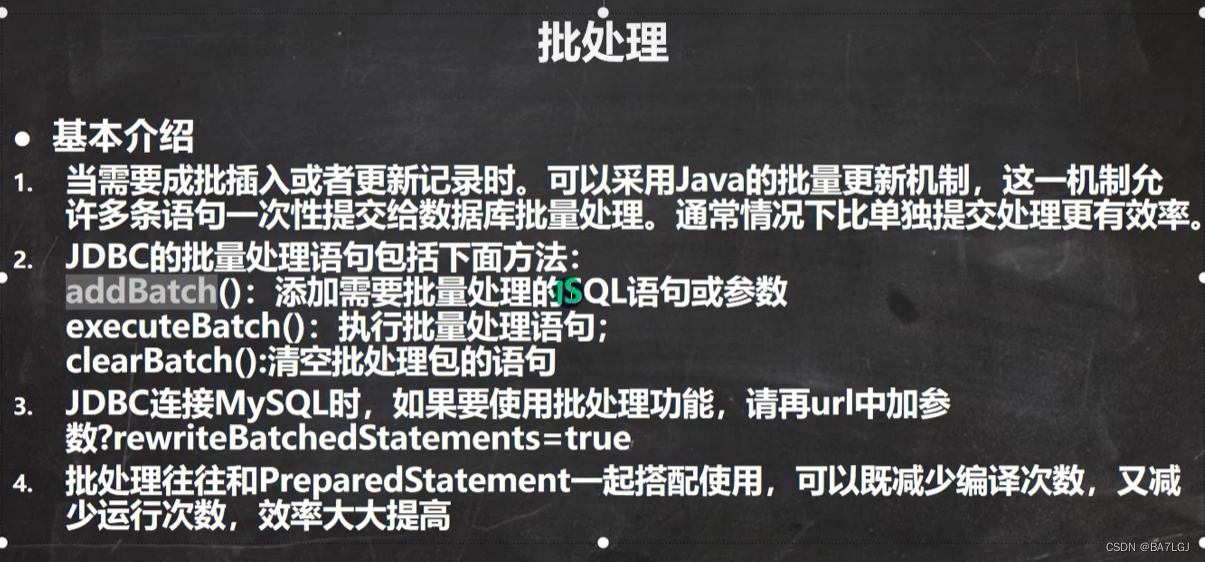
批处理底层维护的是ArrayList数组,数组中存放的是preparedStatment对象
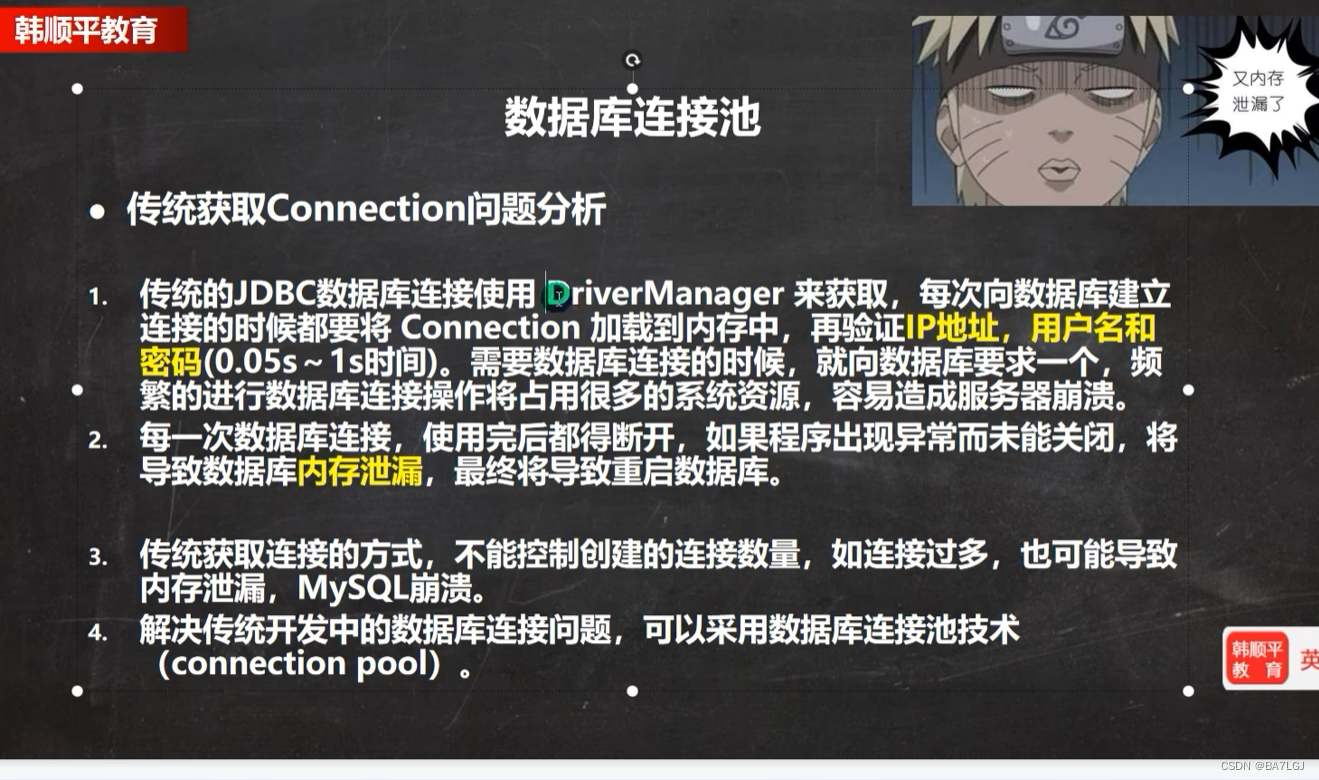
传统连接数据库方式弊端
当connection过多,由不关闭,数据库内存泄漏将会报错误重启
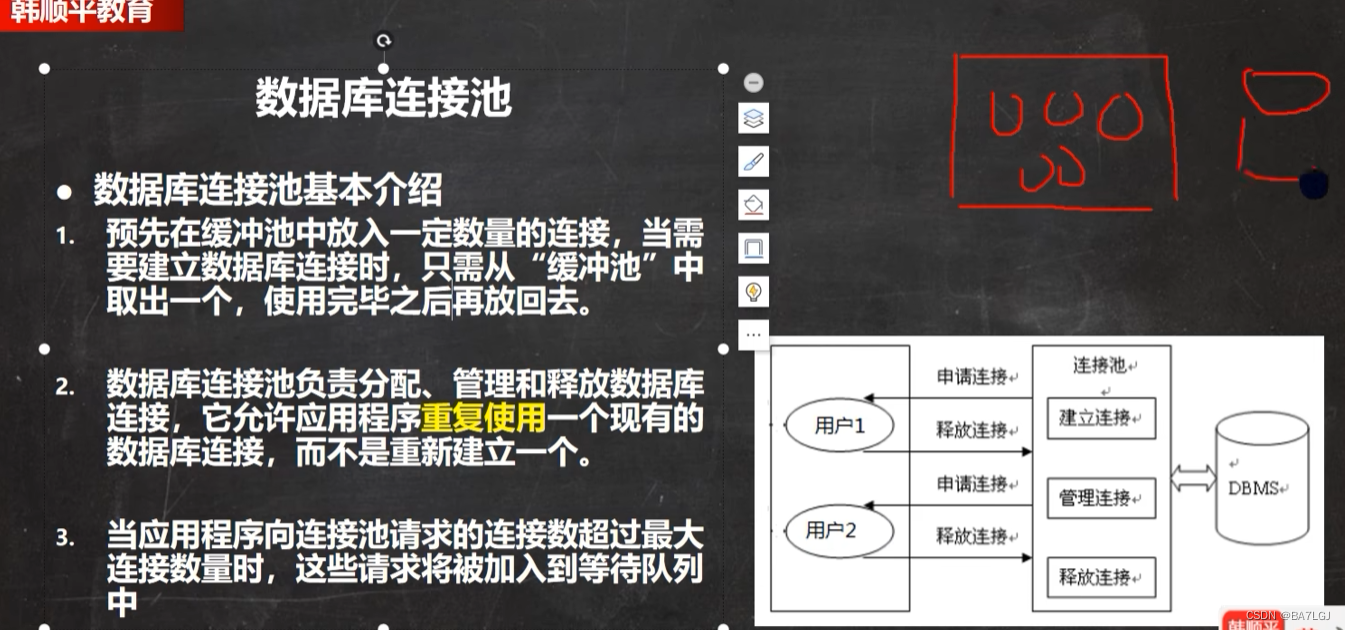
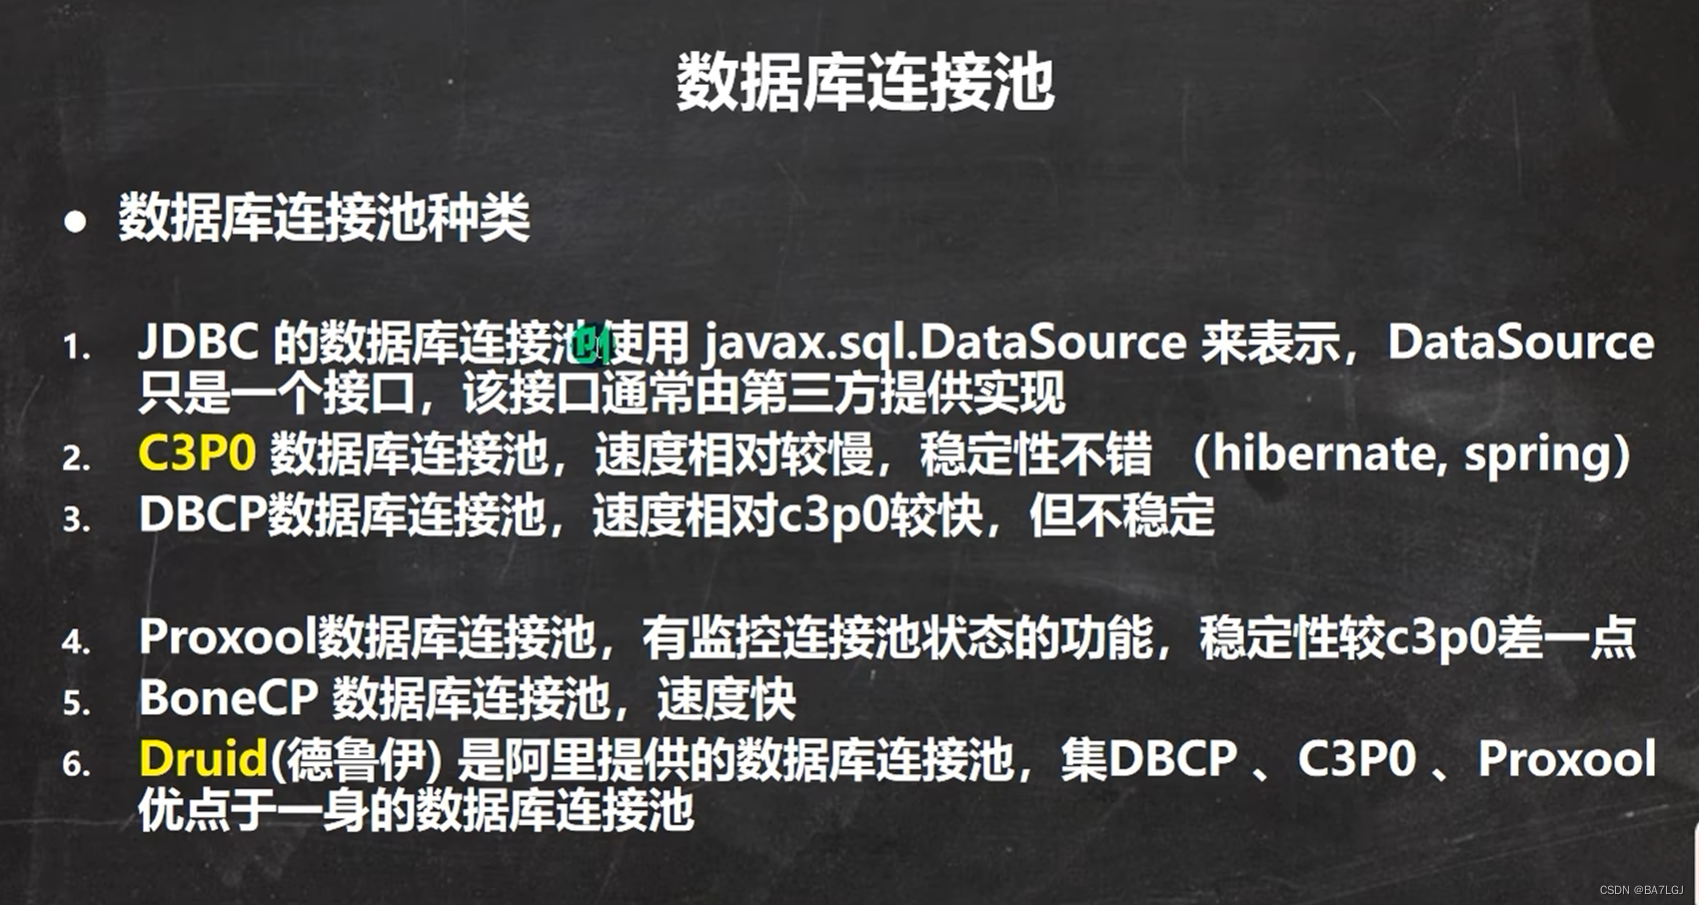
数据库连接池
数据库会设置一个连接池,池中有一定数量连接池,当有应用程序需要接入数据库时,只需要从连接池中获取一个连接,使用完毕后关闭引用即可
若池中无 可用连接 将会加入等待队列
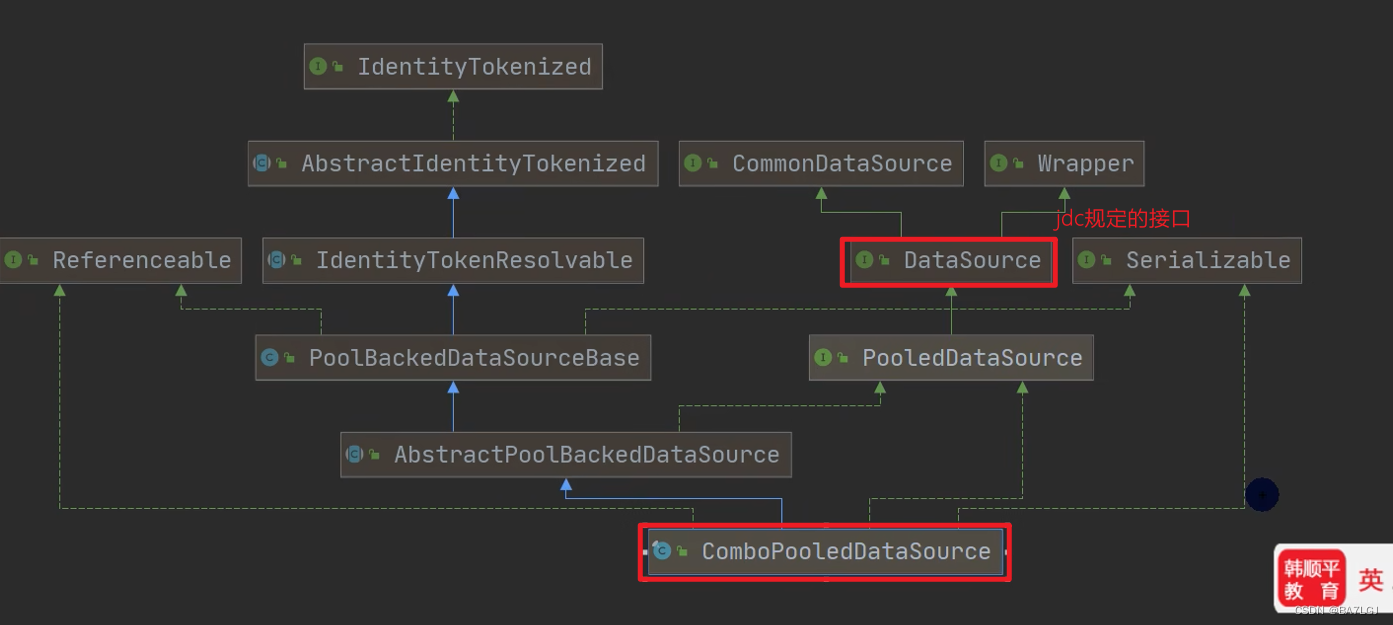
数据库连接池对象
第三方会实现jar包,需要手动引用 若需要使用xml配置文件则需要包含两个jar包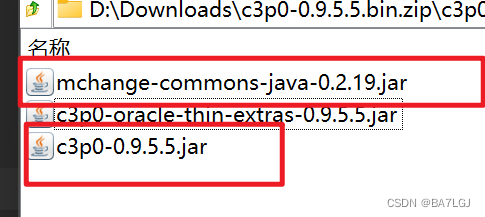
这个连接池是在软件中自己设定的连接池,如果一个软件频繁多次连接数据库会导致数据库内存溢出,此时在当前软件中设置连接池,连接池可以做到缓存的作用,设定初始/最大与数据库连接的次数,此时获取的connection并不是真正连接到真实的数据库,而是交给连接池,连接池会自行优化,给出的connection数量不会超过最大值,有效防止数据库内存溢出
下面代码需要使用C3P0
    public static void main(String[] args) throws Exception {
        /*
        创建数据源对象:
         */
        ComboPooledDataSource comboPooledDataSource = new ComboPooledDataSource();
        /*
        通过配置文件获取内容
         */
        Properties mysqlProperties = new Properties();
        mysqlProperties.load(new FileReader("src/mysql.properties"));
        String url = mysqlProperties.getProperty("url");
        String user = mysqlProperties.getProperty("user");
        String password = mysqlProperties.getProperty("password");
        String driver = mysqlProperties.getProperty("driver");

        //给数据源设置参数,连接管理已经交给数据源,让数据源完成操作
        comboPooledDataSource.setDriverClass(driver);
        comboPooledDataSource.setJdbcUrl(url);
        comboPooledDataSource.setUser(user);
        comboPooledDataSource.setPassword(password);

        //设置初始换连接数,当程序运行,设置连接池初始换连接数
        comboPooledDataSource.setInitialPoolSize(10);
        //设置池中最大连接数,当超出时,下一个客户端请求连接 将会进入等待队列
        comboPooledDataSource.setMaxPoolSize(50);
        //从datasource中获取连接
        Connection conn = comboPooledDataSource.getConnection();

        conn.close();


    }
C3P0第二种使用方式
通过C3P0设定的指定xml文件(放在src目录下),设置当前数据源的参数,名字必须是c3p0-congfig.xml
<c3p0-config>
	<named-config name="mysql_edu">
		<property name="driverClass">com.mysql.cj.jdbc.Driver</property>
		<property name="jdbcUrl">jdbc:mysql://localhost:3306/hsp_jdbc</property>
		<property name="user">root</property>
		<property name="password">000000</property>
		<property name="acquireIncrement">50</property>
		<property name="initialPoolSize">100</property>
		<property name="minPoolSize">50</property>
		<property name="maxPoolSize">1000</property><!--
		<property name="maxStatements">0</property>
		<property name="maxStatementsPerConnection">5</property>
	</named-config>
</c3p0-config>
下面是java代码,注意实例化对象时需要填写上面的数据源名称!
public class C3P0_XML {
    public static void main(String[] args) throws SQLException {
        ComboPooledDataSource comboPooledDataSource = new ComboPooledDataSource("hsp_mysql_edu");
        Connection connection = comboPooledDataSource.getConnection();
        System.out.println(connection);
        connection.close();
    }
}
德鲁伊连接池(阿里)
druid配置文件properties 来自德鲁伊配置文件
#key=value
driverClassName=com.mysql.jdbc.Driver
#jdbc代表数据库连接名称, ?rewriteBatchedStatements=true代表batch批处理
url=jdbc:mysql://localhost:3306/jdbc?rewriteBatchedStatements=true
#url=jdbc:mysql://localhost:3306/girls
username=root
password=root
#initial connection Size
initialSize=10
#min idle connecton size
minIdle=5
#max active connection size
maxActive=20
#max wait time (5000 mil seconds)
maxWait=5000
使用properties初始化德鲁伊数据库连接池
    public static void main(String[] args) throws Exception {
        //1.加入德鲁伊的jar包
        Properties properties = new Properties();
        properties.load(new FileReader("src/druid.properties"));

        DataSource dataSource = DruidDataSourceFactory.createDataSource(properties);

        long l = System.currentTimeMillis();
        for (int i = 0; i < 500000; i++) {
            Connection connection = dataSource.getConnection();
            connection.close();
        }
        long end = System.currentTimeMillis();
        System.out.println(end-l);


    }
德鲁伊处理50万次连接只需要2秒,C3P0则要用十几秒
每次在使用不同的connection的close方法时,运行类型是不同的
若使用jdbc的jar包,则真实关闭了连接
C3P0数据源连接池 / 或者是druid ,则只是吧连接放回了池子,并没有关闭连接
而正因为有动态绑定机制,使得出现多态
Druid工具类
package com.lgj.jdbc;

import com.alibaba.druid.pool.DruidDataSourceFactory;

import javax.sql.DataSource;
import java.io.FileInputStream;
import java.sql.Connection;
import java.sql.ResultSet;
import java.sql.SQLException;
import java.sql.Statement;
import java.util.Properties;

/**
 * @projectName: JDBC
 * @package: com.lgj.jdbc
 * @className: DruidUtils
 * @author: LGJ
 * @description: TODO
 * @date: 2023/7/17 21:01
 * @version: 1.0
 */
public class DruidUtils {
    private static DataSource ds;
    static {
        try {
            Properties properties = new Properties();
            properties.load(new FileInputStream("src/druid.properties"));
            ds = DruidDataSourceFactory.createDataSource(properties);
        } catch (Exception e) {
            throw new RuntimeException(e);
        }
    }

    public static Connection getConnection(){
        try {
            return ds.getConnection();
        } catch (SQLException e) {
            throw new RuntimeException(e);
        }
    }

    private static void close(ResultSet resultSet, Statement statement, Connection connection) {
        try {
            if (resultSet!=null){
                resultSet.close();
            }
            if (statement!=null){
                statement.close();
            }
            if (connection!=null){
                connection.close();
            }
        } catch (SQLException e) {
            throw new RuntimeException(e);
        }

    }
}
引入DButils
提出问题连接关闭 会直接导致 结果集 失效
resultSet不利于数据的管理,读取较为麻烦,并且只能一次
返回信息也不方便,不是一个对象
解决方案:先写一个类,将返回的数据映射成对象(javabean / pojo / domain)
封装一个Arraylist用于存放结果集返回的数据,类型就是刚刚写的类型
此时 connection 和resultSet 可以直接close
土方法DBUtils
将ResultSet结果集封装进Arraylist中
- 创建arraylist
- 根据Select返回的 语句写 actor类 最好使用包装类
该类需要反射 一定要给一个无参构造器 还需要全形参构造器,setget方法 - 将得到的resultSet遍历,封装成actor对象,放入arraylist集合中
- 最后将arraylist返回
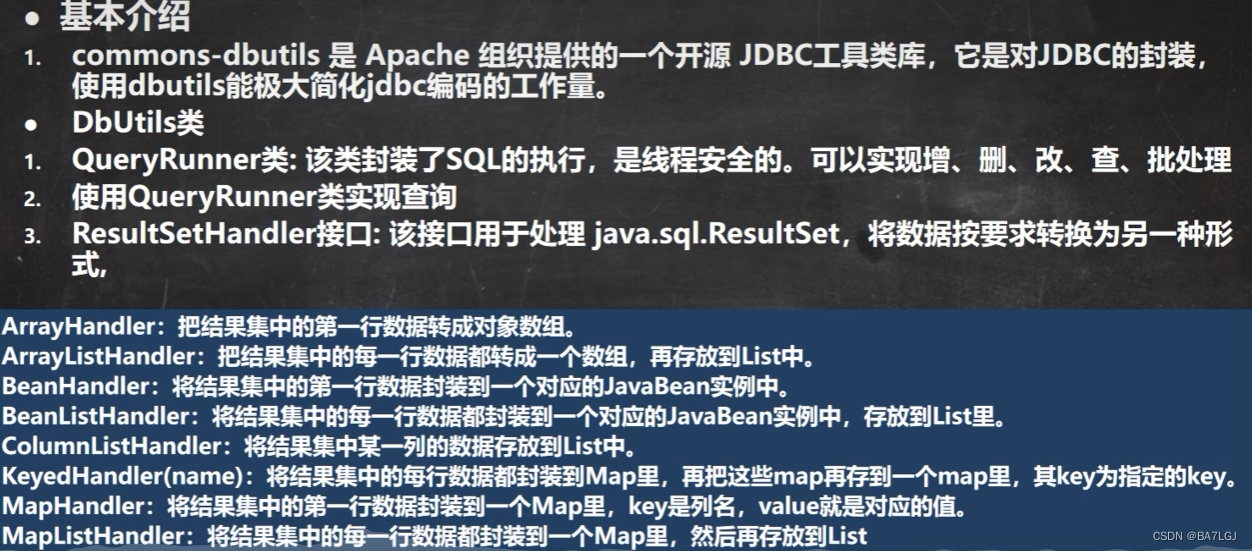
Apache-DBUtils
DBUtils+德鲁伊
dml操作则 使用的是update方法 无需new返回对象 并且返回值是int用于反馈受影响的行数
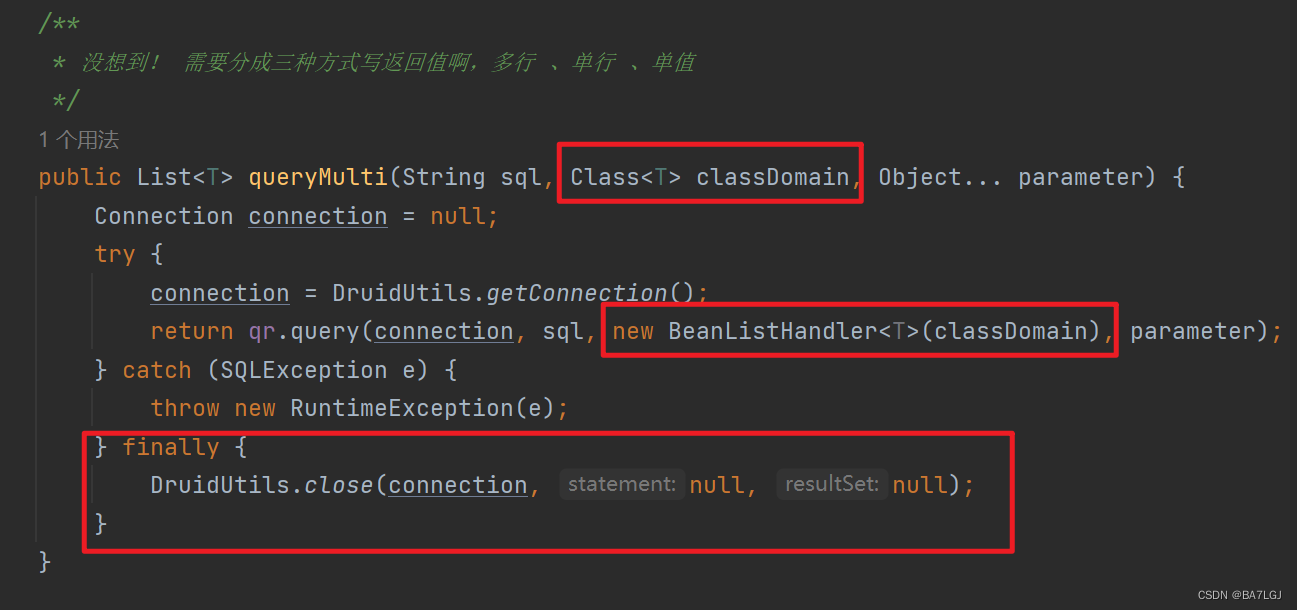
若是Select语句则 使用query方法
可能会返回 arraylist(多行多列) 某类(单行) Object 单行单列,对应的handler也不同
多行多列 集合 返回一个arraylist集合,集合中存放着泛型对象

单行beanhandler(返回单个泛型对象)
单行单列Object对象

DAO引入
DAO就是封装apache和druid,达到每个表对应一个dao,每个表都有自己的处理方法
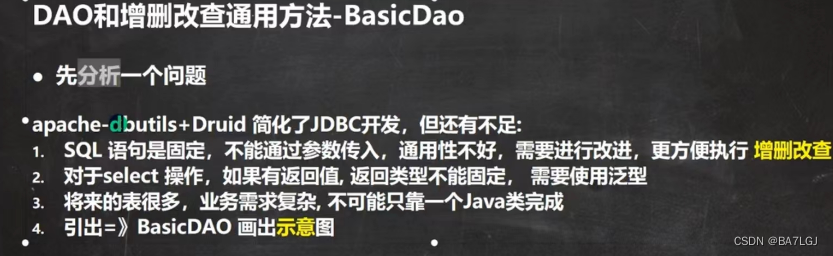
由基础的BasicDAO扩展出 其他表的DAO方法,用于处理
对每一张表的增删查改操作
BasicDAO需要包含四种方法, (dml用)update,(query) multi / single / Scalar
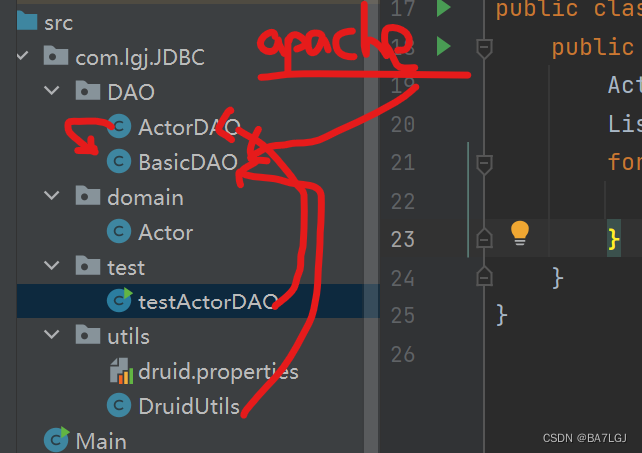
其他的DAO如ActorDAO只需要通过继承BasicDAO<Actor>即可,记得泛型需要填入对应的数据类型
DAO+apache-DBUtils+Druid池
测试程序通过实例化ActorDAO 并调用其方法query方法,ActorDAO继承BasicDAO<Actor> BasicDAO中有new QueryRunner(apache中的类),BasicDAO中的query方法 又通过DruidUtils获取连接,再通过qr中的访问数据库方法,传参语句/连接/语句 封装类参数等内容,获取值,结束后关闭连接,至此取数据结束。
BasicDAO中的方法
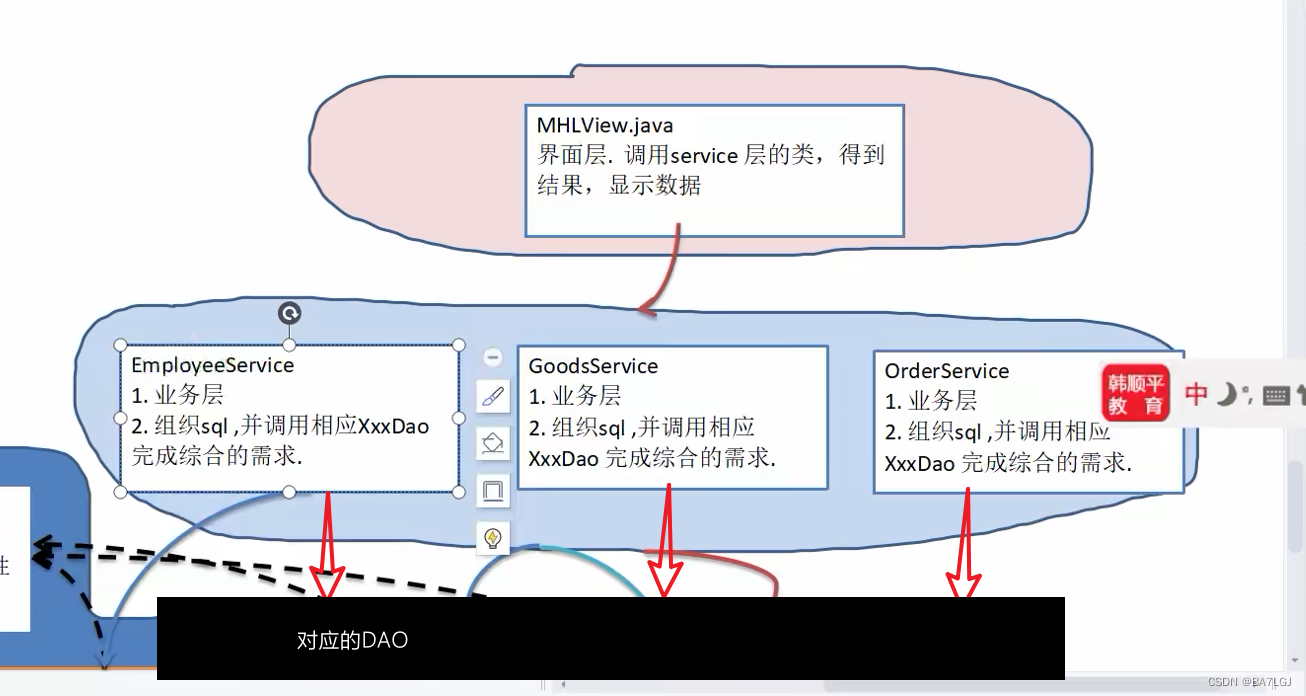
插入一个Service层
目的是在DAO之前,在界面之后,业务层 起到解耦合的作用


 485
485


 被折叠的 条评论
为什么被折叠?
被折叠的 条评论
为什么被折叠?
 到【灌水乐园】发言


