


在本地演示,所以使用的mock数据,真实环境的聊天需要接入websocket服务。界面里也加了两个按钮,用于模拟两个角色发消息。
因为我是在H5项目里,所以UI基于vant。
聊天界面实现
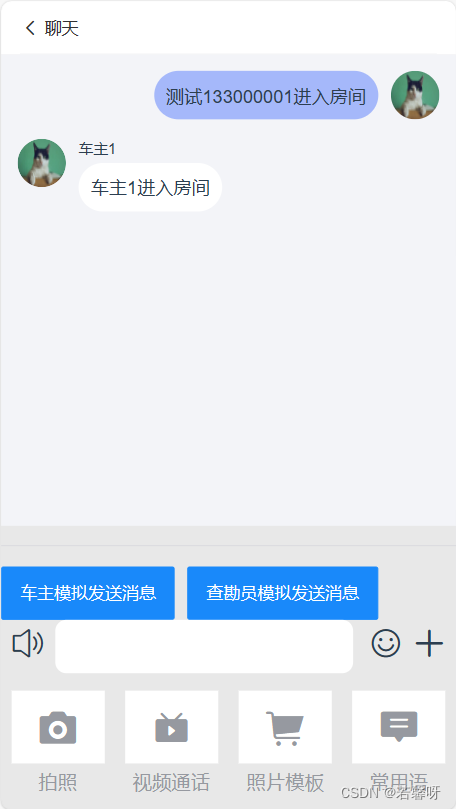
通过路由后面传递不同参数?user=1【1-查勘员,2-车主】,展示的界面也会略微不同。最下面会有效果截图,可自行查看。
界面布局
<div class="chat-page">
    <van-cell
      :title="title"
      icon="arrow-left"
      @click="$router.push('/home')"
    />
    <div
      ref="chatBoxRef"
      class="chat-content"
    >
      <template v-for="item in infoData">
        <div
          :key="item.name + Math.random() * 10"
          v-if="item.id === currentUser"
          class="user-box"
        >
          <div
            class="info"
            style="text-align: right;"
          >
            <!-- <div class="name">{{item.name}}</div> -->
            <div class="txt">
              <span class="current">{{item.message}}</span>
            </div>
          </div>
          <div class="icon-current">
            <van-image
              round
              width="40px"
              height="40px"
              src="https://img01.yzcdn.cn/vant/cat.jpeg"
            />
          </div>

        </div>
        <div
          v-else
          :key="item.name + Math.random() * 10"
          class="user-box"
        >
          <div class="icon">
            <van-image
              round
              width="40px"
              height="40px"
              src="https://img01.yzcdn.cn/vant/cat.jpeg"
            />
          </div>
          <div class="info">
            <div class="name">{{item.name}}</div>
            <div class="txt">
              <span class="notCurrent">{{item.message}}</span>
            </div>
          </div>
        </div>
      </template>
    </div>
    <div class="operate-bottom">

      <van-divider
        :style="{ borderColor: '#D8D9DD' }"
        :hairline="false"
      />
      <div>
        <van-button
          @click="handleSendMessage(2)"
          type="info"
        >车主模拟发送消息</van-button>
        <van-button
          style="margin-left: 10px;"
          @click="handleSendMessage(1)"
          type="info"
        >查勘员模拟发送消息</van-button>
      </div>
      <div class="operate-box">
        <div class="voice"><van-icon
            name="volume-o"
            size="28"
          /></div>
        <div class="ipt-box">
          <van-field
            v-model="inputValue"
            label=""
            class="ipt"
          />
        </div>
        <div class="smile-plus">
          <van-icon
            name="smile-o"
            size="28"
            style="margin-right: 8px;"
          />
          <van-icon
            name="plus"
            size="28"
          />
        </div>

      </div>
      <div class="more-operate-box">
        <div
          v-for="item in moreOperateData"
          :key="item.name + Math.random() * 10"
          @click="handleMoreOperate(item)"
        >
          <div class="icon">
            <van-icon
              :name="item.icon"
              :size="item.size"
            />
          </div>
          <div>{{item.name}}</div>
        </div>
      </div>
    </div>
  </div>
js部分
<script>
import { infoData } from "./data";

export default {
  name: "ChatPage",
  data() {
    return {
      // 2-车主 1-查勘员
      currentUser: 2,
      infoData,
      inputValue: "",
      moreOperateListsSurveyor: [
        { code: 1, name: "拍照", icon: "photograph", size: "34" },
        { code: 2, name: "视频通话", icon: "live", size: "34", path: "/video" },
        { code: 3, name: "照片模板", icon: "shopping-cart", size: "34" },
        { code: 4, name: "常用语", icon: "comment", size: "34" },
      ],
      moreOperateLists: [
        { code: 1, name: "视频通话", icon: "live", size: "34", path: "/video" },
        { code: 2, name: "案件照片", icon: "shopping-cart", size: "34" },
        { code: 3, name: "拍照", icon: "photograph", size: "34" },
        { code: 4, name: "相册", icon: "photo", size: "34" },
      ],
    };
  },
  computed: {
    title() {
      const title = this.currentUser == 2 ? "坐席人员:赵丽龙" : "聊天";
      return title;
    },
    moreOperateData() {
      let data = [];
      if (this.currentUser == 2) data = this.moreOperateLists;
      else data = this.moreOperateListsSurveyor;
      return data;
    },
  },
  created() {
    this.currentUser = JSON.parse(this.$route.query.user || 2);
    console.log(this.currentUser);
  },
  methods: {
    handleSendMessage(type) {
      if (!this.inputValue) {
        this.$notify({
          type: "warning",
          message: "不能发送空白消息!",
        });
        return;
      }
      this.infoData.push({
        id: type,
        name: type == 2 ? "车主1" : "测试133000001",
        time: "2021-4-23 18:00:05 星期五",
        images:
          type == 2
            ? "https://img01.yzcdn.cn/vant/leaf.jpg"
            : "https://img01.yzcdn.cn/vant/cat.jpeg",
        message: this.inputValue,
      });
      this.$nextTick(() => {
        const boxDom = this.$refs.chatBoxRef;
        boxDom.scrollTop = boxDom.scrollHeight;
        this.inputValue = '';
      });
    },
    handleMoreOperate(item) {
      console.log(">>> item", item);
      item.path && this.$router.push(item.path+'?user=' + this.currentUser);
    },
  },
};
</script>
data.js
因为我把初始聊天的数据单独抽离出来了,你们可以根据自身情况,是否抽离。
export const infoData = [{
        id: 1,
        name: '测试133000001',
        time: '2021-4-23 17:59:50 星期五',
        images: 'https://img01.yzcdn.cn/vant/cat.jpeg',
        message: '测试133000001进入房间'
    },
    {
        id: 2,
        name: '车主1',
        time: '2021-4-23 18:00:05 星期五',
        images: 'https://img01.yzcdn.cn/vant/leaf.jpg',
        message: '车主1进入房间'
    },
];
css
因为vant是基于less,所以我用的样式处理器是less、less-loader。
<style lang="less" scoped>
.chat-page {
  display: flex;
  flex-direction: column;
  height: 100%;
  > div {
    width: 100%;
  }
  .chat-content {
    flex: 1;
    overflow-y: auto;
    padding: 14px;
    box-sizing: border-box;
    background-color: #f3f4f8;
    .user-box {
      display: flex;
      margin-bottom: 10px;
      .icon {
        width: 40px;
        margin-right: 10px;
      }
      .icon-current {
        width: 40px;
        margin-left: 10px;
      }
      .info {
        flex: 1;
        .name {
          height: 20px;
          font-size: 12px;
        }
        .txt {
          height: 40px;
          font-size: 15px;
          > span {
            display: inline-block;
            padding: 10px;
            border-radius: 20px;
          }
          .current {
            background-color: #a5b8fa;
          }
          .notCurrent {
            background: white;
          }
        }
      }
    }
  }
  .operate-height {
    height: 102px;
  }
  .operate-bottom {
    // position: fixed;
    // bottom: 0px;
    box-sizing: border-box;
    .operate-box {
      display: flex;
      line-height: 44px;
      .voice {
        margin-left: 8px;
        width: 24px;
      }
      .ipt-box {
        flex: 1;
        .ipt {
          width: 90.5%;
          display: inline-block;
          margin: 0 13px;
          border-color: #eeeff1;
          border-radius: 9px;
        }
      }

      .smile-plus {
        width: 72px;
      }
    }
    .more-operate-box {
      display: flex;
      justify-content: space-around;
      font-size: 16px;
      color: #9699a0;
      text-align: center;
      margin-bottom: 14px;
      > div {
        width: 77px;
        .icon {
          background: white;
          height: 60px;
          line-height: 76px;
          margin-bottom: 4px;
        }
      }
    }
  }
}
</style>
```
聊天界面,滚动条始终在底部
上面代码中也有,这里单独拿出来写,方便查找。
因为vue数据更新是异步的,所以为了保险起见,对于新dom的操作我惯常会把这些逻辑放在`$nextTick`回调中。
this.$nextTick(() => {
    const boxDom = this.$refs.chatBoxRef;
    boxDom.scrollTop = boxDom.scrollHeight;
    this.inputValue = '';
 });
最后附上几张效果图
车主视角的界面
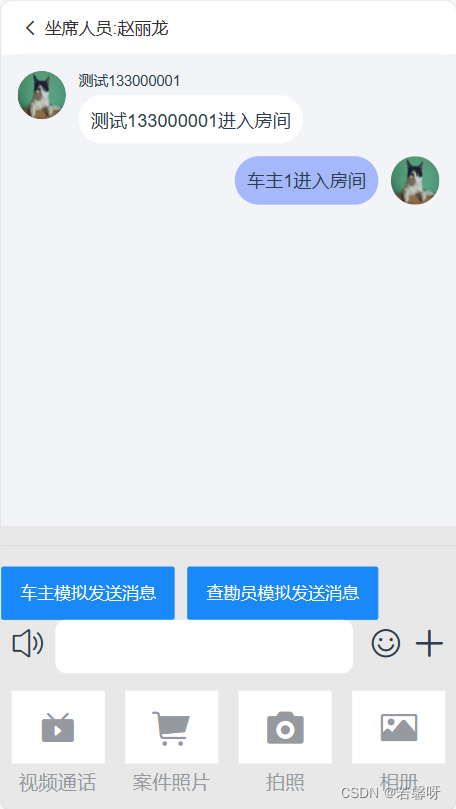
查勘员视角的界面:【底部操作栏会有略微不同】
如有不妥,欢迎指正,谢谢~~


 722
722

 被折叠的 条评论
为什么被折叠?
被折叠的 条评论
为什么被折叠?
 到【灌水乐园】发言


