


 本文介绍如何使用Apache CXF与SpringMVC结合创建WebService接口,包括配置步骤、客户端测试方法及调用方式。从环境搭建到接口实现,再到客户端调用,全面解析CXFWebService的开发流程。
一、WebService接口实现
1、实现步骤
1.1、采用CXF WebService 整合springmvc的方式
Apache CXF 是一个开放源代码框架,提供了用于方便地构建和开发 Web 服务的可靠基础架构。它允许创建高性能和可扩展的服务,您可以将这样的服务部署在 Tomcat 和基于 Spring 的轻量级容器中,以及部署在更高级的服务器上,例如 Jboss、IBM® WebSphere® 或 BEA WebLogic。
1.2、 Web.xml增加CXF监听器
        <!-- CXF Servlet -->
   	<servlet>
    	<servlet-name>CXFServlet</servlet-name>
    	<servlet-class>org.apache.cxf.transport.servlet.CXFServlet</servlet-class>
    	<load-on-startup>1</load-on-startup>
  	</servlet>
  	<servlet-mapping>
    	<servlet-name>CXFServlet</servlet-name>
    	<url-pattern>/webservice/*</url-pattern>
  	</servlet-mapping>
1.3、pom.xml引用CXF的jar包
                <!-- cxf webservice -->
	 	<dependency>
     		<groupId>org.apache.cxf</groupId>
     		<artifactId>cxf-rt-frontend-jaxws</artifactId>
      		<version>3.2.6</version>
		</dependency>
		<dependency>
      		<groupId>org.apache.cxf</groupId>
      		<artifactId>cxf-rt-transports-http</artifactId>
      	        <version>3.2.6</version>
		</dependency>
1.4、配置spring文件,新增ApplicationContext-server.xml文件配置发布信息
<?xml version="1.0" encoding="UTF-8"?>
<beans xmlns="http://www.springframework.org/schema/beans"
	xmlns:xsi="http://www.w3.org/2001/XMLSchema-instance" xmlns:context="http://www.springframework.org/schema/context"
	xmlns:aop="http://www.springframework.org/schema/aop" xmlns:jaxws="http://cxf.apache.org/jaxws"
	xsi:schemaLocation="http://www.springframework.org/schema/beans
	 http://www.springframework.org/schema/beans/spring-beans-3.2.xsd
         http://www.springframework.org/schema/context
          http://www.springframework.org/schema/context/spring-context-3.2.xsd
         http://www.springframework.org/schema/aop
          http://www.springframework.org/schema/aop/spring-aop-3.2.xsd
         http://cxf.apache.org/jaxws
          http://cxf.apache.org/schemas/jaxws.xsd">

	<import resource="classpath:META-INF/cxf/cxf.xml" />
<!-- 	<import resource="classpath:META-INF/cxf/cxf-extension-soap.xml" /> -->
	<import resource="classpath:META-INF/cxf/cxf-servlet.xml" />

    <jaxws:endpoint id="helloService" implementor="com.fh.webservice.test.impl.HelloServiceImpl" address="/helloService"/>
</beans>
1.5、在web.xml中引入文件,在shiro文件中配置webservice访问接口
Web.xml:(classpath:spring/ApplicationContext-server.xml为新增)
<context-param>
		<param-name>contextConfigLocation</param-name>
		<param-value>
			classpath:spring/ApplicationContext-main.xml,
			classpath:spring/ApplicationContext-dataSource.xml,
			classpath:spring/ApplicationContext-shiro.xml,
			classpath:spring/ApplicationContext-server.xml,
			classpath:spring/ApplicationContext-redis.xml
		</param-value>
	</context-param>
<!-- 项目中使用shiro登录拦截,所以需要配置 -->
ApplicationContext-shiro.xml中的filterChainDefinitions添加
/webservice/** 				= anon (一定要在/**之前)
1.6、接口与实现类
定义一个interface,使用@WebService注解标注接口,使用@WebMethod注解标注接口中定义的所有方法;实现类,使用@WebService注解标注实现类,实现接口中定义的所有方法(注意@WebService(endpointInterface="接口的包名.接口名", serviceName="服务名")中的配置)
package com.fh.webservice.test;

import javax.jws.WebService;


/**
 * 服务端测试接口
 * @author admin
 *
 */
@WebService
public interface HelloService {

	public String pringWord(String word);

}
package com.fh.webservice.test.impl;

import java.io.IOException;
import java.util.ArrayList;

import javax.jws.WebService;

import org.codehaus.jackson.JsonParseException;
import org.codehaus.jackson.map.JsonMappingException;
import org.codehaus.jackson.map.ObjectMapper;
import org.codehaus.jackson.type.TypeReference;

import com.fh.webservice.test.HelloService;

/**
 * 接口实现类
 * @author Administrator
 *
 */
@WebService(endpointInterface="com.fh.webservice.test.HelloService",serviceName="Hello")
public class HelloServiceImpl implements HelloService {

	public String pringWord(String word) {

		ObjectMapper mapper = new ObjectMapper();
		//数组解析,对象解析需要一个对象接收(springmvc内嵌解析)
		ArrayList<String> list;
		try {
			list = mapper.readValue(word, new TypeReference<ArrayList<String>>() {
			});
			System.out.println("2222"+list);
		} catch (JsonParseException e) {
			// TODO Auto-generated catch block
			e.printStackTrace();
		} catch (JsonMappingException e) {
			// TODO Auto-generated catch block
			e.printStackTrace();
		} catch (IOException e) {
			// TODO Auto-generated catch block
			e.printStackTrace();
		}

		return "00000";
	}

}
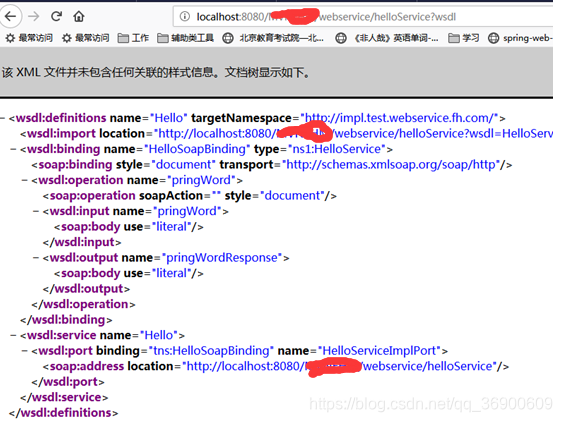
1.7、启动tomcat,输入地址,显示下面的画面则接口创建成功!!!
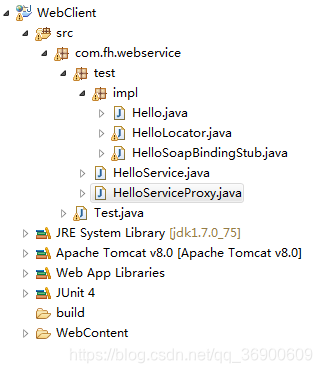
二、创建客户端测试
2.1、新建项目WebClient,选中项目,选择【New Web Service Client】,输入wsdl地址(服务端要启动)之后一路next
2.2、创建测试类,控制台输出HelloAAAA,成功连接服务端!
package com.fh.webservice;
import com.fh.webservice.test.HelloService;
import com.fh.webservice.test.HelloServiceProxy;

public class Test {

	public static void main(String[] args) throws Exception{
		// 对象嵌套数组嵌套对象
		String json1 = "[\"北京\",\"天津\",\"杭州\"]";
		HelloServiceProxy pro = new HelloServiceProxy();
		HelloService service = pro.getHelloService();
		System.out.println(service.pringWord(json1));
	}

}
2.3、代码调用
2.3.1、静态调用
        // 创建WebService客户端代理工厂
        JaxWsProxyFactoryBean factory = new JaxWsProxyFactoryBean();
        // 判断是否抛出异常
        factory.getOutInterceptors().add(new LoggingInInterceptor());
        // 注册webservice接口
        factory.setServiceClass(DeductionService.class);
        // 配置webservice地址
        factory.setAddress("http://localhost:7002/card/services/HelloWorld?wsdl");
        // 获得接口对象
        CxfService service = (CxfService) factory.create();
        // 调用接口方法
        String result = service.sayHello("aaaaaaaaaa");
        System.out.println("调用结果:" + result);
        // 关闭接口连接
        System.exit(0);
2.3.2、动态调用
        JaxWsDynamicClientFactory dcf = JaxWsDynamicClientFactory.newInstance();
        org.apache.cxf.endpoint.Client client = dcf


                .createClient("http://localhost:7002/card/services/HelloWorld?wsdl");
        // url为调用webService的wsdl地址
        QName name = new QName("http://dao.xcf.digitalchina.com/", "sayHello");
        // namespace是命名空间,methodName是方法名
        String xmlStr = "aaaaaaaa";
        // paramvalue为参数值
        Object[] objects;
        try {
            objects = client.invoke(name, xmlStr);
            System.out.println(objects[0].toString());
        } catch (Exception e) {
            e.printStackTrace();
        }
区别:静态调用需要依赖service类,因为客户端调用cxf webservice接口的过程中需要服务器端提供service,很不方便,如果同一个项目中则没有区别。
动态调用完全不依赖service类,服务器端只要提供接口名和路径就可以方便的调用。
2.2、一个接口多个方法,多个参数的实现
package com.fh.webservice.test;

import javax.jws.WebService;


/**
 * 服务端测试接口
 * @author admin
 *
 */
@WebService
public interface HelloService {

	public String pringWord(String word,String data);
	public String pringLol(String word);

}
package com.fh.webservice.test.impl;

import java.io.IOException;
import java.util.ArrayList;

import javax.jws.WebService;

import org.codehaus.jackson.JsonParseException;
import org.codehaus.jackson.map.JsonMappingException;
import org.codehaus.jackson.map.ObjectMapper;
import org.codehaus.jackson.type.TypeReference;

import com.fh.webservice.test.HelloService;

/**
 * 接口实现类
 * @author Administrator
 *
 */
@WebService(endpointInterface="com.fh.webservice.test.HelloService",serviceName="Hello")
public class HelloServiceImpl implements HelloService {

	public String pringWord(String word,String data) {

		ObjectMapper mapper = new ObjectMapper();
		//数组解析,对象解析需要一个对象接收(springmvc内嵌解析)
		ArrayList<String> list;
		try {
			list = mapper.readValue(word, new TypeReference<ArrayList<String>>() {
			});
			System.out.println("2222"+list);
		} catch (JsonParseException e) {
			// TODO Auto-generated catch block
			e.printStackTrace();
		} catch (JsonMappingException e) {
			// TODO Auto-generated catch block
			e.printStackTrace();
		} catch (IOException e) {
			// TODO Auto-generated catch block
			e.printStackTrace();
		}

		return "00000";
	}

	public String pringLol(String word) {

		ObjectMapper mapper = new ObjectMapper();
		//数组解析,对象解析需要一个对象接收(springmvc内嵌解析)
		ArrayList<String> list;
		try {
			list = mapper.readValue(word, new TypeReference<ArrayList<String>>() {
			});
			System.out.println("2222"+list);
		} catch (JsonParseException e) {
			// TODO Auto-generated catch block
			e.printStackTrace();
		} catch (JsonMappingException e) {
			// TODO Auto-generated catch block
			e.printStackTrace();
		} catch (IOException e) {
			// TODO Auto-generated catch block
			e.printStackTrace();
		}

		return "00000";
	}

}
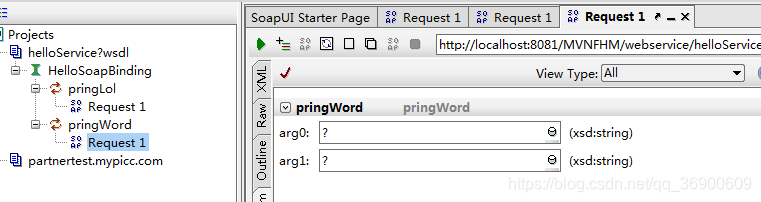
操作完成后使用soapui进行访问接口,出现两个参数。


 1954
1954

 被折叠的 条评论
为什么被折叠?
被折叠的 条评论
为什么被折叠?
 到【灌水乐园】发言


