


前言
next可以实现服务端渲染,也就是在服务端就就获取数据生成一个html页面到客户端,那么怎么实现呢?我们现在做个小案例看看效果,默认各位都是有看过next教程的哈
案例需求
页面
- 一个列表页
- 一个详情页
接口
- 列表接口
- 详情接口
案例实现
很简单就3个步骤
1、首先创建一个next官方脚手架项目
npx create-next-app
2、创建文件
- 在pages目录下创建一个
list页面,一个details页面 - 在api目录下创建一个
list接口,一个details接口
// 目录结构
...
pages
|	|---list.js
|	|---details
|		|---[id].js
|	|---api
|		|---list.js
|		|---details.js
...
3、代码实现
- api里的list接口代码
const data = [
  {
    id: '1',
    title: '测试内容1',
  },
  {
    id: '2',
    title: '测试内容2',
  },
  {
    id: '3',
    title: '测试内容3',
  },
  {
    id: '4',
    title: '测试内容4',
  },
];

export default (req, res) => {
  res.statusCode = 200;
  res.json(data);
};
- api里的details接口代码
const data = [
  {
    id: '1',
    title: '测试内容1',
  },
  {
    id: '2',
    title: '测试内容2',
  },
  {
    id: '3',
    title: '测试内容3',
  },
  {
    id: '4',
    title: '测试内容4',
  },
];

export default (req, res) => {
  res.statusCode = 200;
  let list = data.filter((el) => el.id === req.query.id);
  if (list.length > 0) {
    res.json(list[0]);
  } else {
    res.json({});
  }
};
- page下的list页面
import fetch from 'node-fetch';
import Link from 'next/link';

const list = (props) => {
  const { data } = props;

  return (
    <ul>
      {data.map((el) => (
        <li key={el.id}>
          <Link href="/details/[id]" as={`/details/${el.id}`}>
            <span>详情 {el.id}</span>
          </Link>
        </li>
      ))}
    </ul>
  );
};

export default list;

export const getServerSideProps = async () => {
  const res = await fetch('http://localhost:3000/api/list');

  const data = await res.json();

  return {
    props: { data },
  };
};
- page下的details页面,在这里有两个重点需要提示一下
- 1、注意一下详情页的写法

- 2、这里的渲染有两种方案,分别是静态生成
getStaticPaths & getStaticProps和动态渲染getServerSideProps。文档最后让大家看看他们的区别
- 1、注意一下详情页的写法
静态生成代码
const Details = function (props) {
  const { data } = props;
  return <div>{data.title}</div>;
};

export default Details;

export async function getStaticPaths() {
  const res = await fetch('http://localhost:3000/api/list');

  const data = await res.json();

  // 静态生成在build构建的时候,会根据这里的id生成多个js文件
  const paths = data.map((el) => ({ params: { id: el.id } }));

  return { paths, fallback: false };
}

export async function getStaticProps({ params }) {
  const res = await fetch(`http://localhost:3000/api/details?id=${params.id}`);

  const data = await res.json();

  return { props: { data } };
}
动态渲染代码
const Details = function (props) {
  const { data } = props;
  return <div>{data.title}</div>;
};

export default Details;

export async function getServerSideProps({ query: { id } }) {
  const res = await fetch(`http://localhost:3000/api/details?id=${id}`);

  const data = await res.json();

  return {
    props: { data },
  };
}
好了,启动后输入 http://localhost:3000/list试试效果吧
静态生成和动态渲染
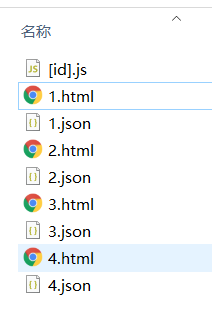
最后给大家看看这两种渲染方案的主要区别吧,每次build前删除原打包文件。 我们看看build后的details页面目录
- 静态生成方案
它在build完成后,会生成很多子页面,说实话,假如页面超级多,我觉得打包出来包会大很多。当然,详情页的访问肯定会很快,毕竟请求的就是静态页面嘛
- 动态渲染
这个就没啥好说的,写的啥,打包出来就是啥。访问的时候,需要在服务端进去接口请求


 8563
8563


 被折叠的 条评论
为什么被折叠?
被折叠的 条评论
为什么被折叠?
 到【灌水乐园】发言


