


目录
项目的结构
图片: 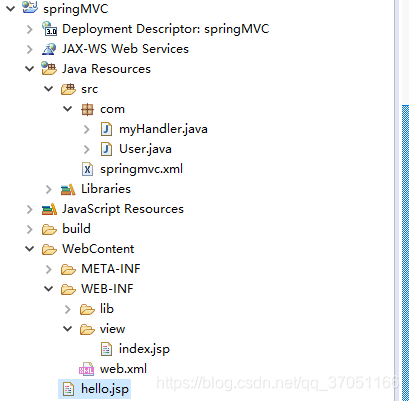
配置web.xml
在使用springMVC之前先要配置web.xm,代码片.
<?xml version="1.0" encoding="UTF-8"?>
<web-app xmlns:xsi="http://www.w3.org/2001/XMLSchema-instance"
	xmlns="http://java.sun.com/xml/ns/javaee"
	xsi:schemaLocation="http://java.sun.com/xml/ns/javaee
						http://java.sun.com/xml/ns/javaee/web-app_3_0.xsd"
	id="WebApp_ID" version="3.0">

	<display-name>**项目名称**</display-name>

	<!-- 配置springMVC的servlet,获取页面请求 -->
	<servlet>
		<servlet-name>springmvc</servlet-name>
		<servlet-class>org.springframework.web.servlet.DispatcherServlet</servlet-class>
		<!-- 引入springMVC配置文件-->
		<init-param>
			<param-name>contextConfigLocation</param-name>
			<param-value>classpath:springmvc.xml</param-value>
		</init-param>
	</servlet>
	<!-- 设置请求路径 -->
	<servlet-mapping>
		<servlet-name>springmvc</servlet-name>
		<url-pattern>*.do</url-pattern>
	</servlet-mapping>
</web-app>
配置springmvc.xml
配置springmvc.xml,代码片.
<?xml version="1.0" encoding="UTF-8"?>
<beans xmlns="http://www.springframework.org/schema/beans"
       xmlns:xsi="http://www.w3.org/2001/XMLSchema-instance"
       xmlns:mvc="http://www.springframework.org/schema/mvc"
       xmlns:context="http://www.springframework.org/schema/context"
       xmlns:aop="http://www.springframework.org/schema/aop"
       xmlns:tx="http://www.springframework.org/schema/tx"
       xsi:schemaLocation="http://www.springframework.org/schema/beans
        http://www.springframework.org/schema/beans/spring-beans-4.2.xsd
        http://www.springframework.org/schema/mvc
        http://www.springframework.org/schema/mvc/spring-mvc-4.2.xsd
        http://www.springframework.org/schema/context
        http://www.springframework.org/schema/context/spring-context.xsd
        http://www.springframework.org/schema/aop
        http://www.springframework.org/schema/aop/spring-aop-4.2.xsd
        http://www.springframework.org/schema/tx
        http://www.springframework.org/schema/tx/spring-tx.xsd">

	<!--使用注解  -->
 	<mvc:annotation-driven></mvc:annotation-driven>

    <!--批量配置Handler,指定扫描的包全称  -->
    <context:component-scan base-package="com"></context:component-scan>

    <!--定义bean  -->
    <bean class="com.User"/>

    <!--配置视图解析器  -->
    <bean class="org.springframework.web.servlet.view.InternalResourceViewResolver">
        <!-- 返回视图页面的前缀 -->
        <property name="prefix" value="/WEB-INF/view/"></property>
        <!-- 返回页面的后缀 -->
        <property name="suffix" value=".jsp"></property>
    </bean>
</beans>
说明:
使用注解来。
Handler处理类
处理页面请求的类,代码片.
package com;
import org.springframework.stereotype.Controller;
import org.springframework.web.bind.annotation.RequestMapping;
import org.springframework.web.servlet.ModelAndView;

//使用@Controller注解一个Handler类,接收请求,类似struts 2 的action类
@Controller
public class myHandler {

    //@RequestMapping注解一个页面访问URL
    @RequestMapping("/login.do")
    public ModelAndView hello(User user){
    	//视图对象
        ModelAndView modelView = new ModelAndView();
        //模拟数据库操作
        if(user.getName().equals("123")&&user.getPass().equals("123")){
       		//在返回视图中加入属性
        	modelView.addObject("name",user.getName());
            //配置返回的视图名,由于我们在springmvc.xml中配置了前缀和后缀,这里直接写视图名就好
            modelView.setViewName("index");
            //modelView.setViewName("/WEB-INF/view/index.jsp");
        }else{
        	//上一级的上一级../../
        	modelView.setViewName("../../hello");
        }
        return modelView;
    }
}
说明:
1. 在映射到控制类的控制方法中时,会将表单标签的属性值自动实例化User类,要求表单标签属性名和user的属性名一样。
2. 视图对象会自动加载前后缀。
3. 将请求映射到方法上。
4. 全文省略了User实体类的代码,可以根据下面的登录页面来写。
页面hello.jsp
登录页面,代码片.
<%@ page language="java" contentType="text/html; charset=utf-8"
	pageEncoding="utf-8"%>
<!DOCTYPE html PUBLIC "-//W3C//DTD HTML 4.01 Transitional//EN" "http://www.w3.org/TR/html4/loose.dtd">
<html>
<head>
<meta http-equiv="Content-Type" content="text/html; charset=utf-8">
<title>Insert title here</title>
</head>
<body>
	<div align="center">
	<form action="login.do" method="post">
			<table>
				<tr>
					<td>用户名:</td>
					<td><input name="name" type="text" /></td>
				</tr>
				<tr>
					<td>密码:</td>
					<td><input name="pass" type="password" /></td>
				</tr>
				<tr>
					<td><input type="submit" value="提交" id="s" /></td>
					<td><input type="reset" value="重置" id="r" /></td>
				</tr>
			</table>
		</form>
	</div>
</body>
</html>
说明:
访问路径login.do,属性和实体类属性一直
页面index.jsp
返回视图,代码片.
<%@ page language="java" contentType="text/html; charset=UTF-8"
    pageEncoding="UTF-8"%>
<!DOCTYPE html PUBLIC "-//W3C//DTD HTML 4.01 Transitional//EN" "http://www.w3.org/TR/html4/loose.dtd">
<html>
<head>
<meta http-equiv="Content-Type" content="text/html; charset=UTF-8">
<title>Insert title here</title>
</head>
<body>
用户名:${name}
</body>
</html>
说明:
可以直接使用EL表达式来访问加入视图中的属性
总结
1. springMVC注解有很多,需要掌握其含义
2. springMVC的流程和struts 2 的流程很像
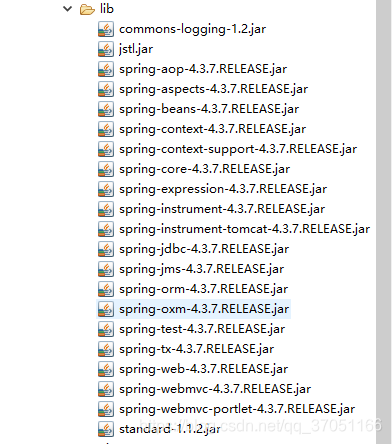
3. 包不要漏了
4. 本项目没有操作数据库的内容
**引用包是最大的困难(一步一步来)**


 9735
9735


 被折叠的 条评论
为什么被折叠?
被折叠的 条评论
为什么被折叠?
 到【灌水乐园】发言


