


柔性数组
柔性数组(Flexible Array)是C99引入的一个新特性:允许定义结构体的时候创建一个空数组,但空数组必须声明为结构体的最后一个成员,且结构体至少包含一个其他类型的成员。这个数组的大小可以在程序运行的过程中根据需求进行更改。
 struct st_type
{
	int i;
	int a[0];//柔性数组成员,也可以写int a[];
};
柔性数组的特点
1.结构体中柔性数组成员前面必须至少有一个其他成员
 struct st_type
{
	int i;
	int a[0];//柔性数组成员,也可以写int a[];
};
比如上面这段代码,如果你要创建一个柔性数组a,前面必须创建一些别的成员。
2.sizeof返回的这种结构大小不包括柔性数组的内存
 struct st_type
{
	int i;//4字节
	int a[0];//柔性数组成员,也可以写int a[];
	//因为是柔性数组,无法确认a占几个字节
};
 int main()
 {
	 printf("%d\n", sizeof(struct st_type)); //打印4
	 return 0;
 }
这里计算包含柔性数组的结构体大小,因为柔性数组本身是无法确定有几个字节的,所以计算整体结构体大小时,会省略柔性数组的计算。
3.柔性数组的大小可以在运行时根据需求进行改变。
现在,我们创建一个学生信息结构体,定义地址address成员为柔性数组,该数组在运行时可以根据需求自动的调整大小。
#include<string.h>
#include<errno.h>
#include <malloc.h>

//存放学生信息结构体
typedef struct {
	int stuID;
	int age;
	char address[];
}ST_STU_INFO, *pStuInfo;

//为结构体分配内存
pStuInfo ComposeStuInfo(int stuID, int age, const char *paddress)
{
	pStuInfo ptmpInfo = (pStuInfo)malloc(sizeof(*ptmpInfo) + sizeof(char) * strlen(paddress) + 1);
	if (ptmpInfo != NULL) {
		ptmpInfo->stuID = stuID;
		ptmpInfo->age = age;
		strcpy(ptmpInfo->address, paddress);
	}
	return ptmpInfo;
}

// 打印学生信息
void printStuInfo(pStuInfo ptmpInfo)
{
	printf("stuID : %d, age : %d, Address: %s, Size of Struct:%d\n",
		ptmpInfo->stuID, ptmpInfo->age, ptmpInfo->address, sizeof(*ptmpInfo));
}

int main() {
	pStuInfo CodeLab = ComposeStuInfo(100013, 20, "Tencent-Building");
	if (CodeLab != NULL) {
		printStuInfo(CodeLab);
		free(CodeLab);
	}

	pStuInfo subCodeLab = ComposeStuInfo(200013, 23, "Tencent");
	if (subCodeLab != NULL) {
		printStuInfo(subCodeLab);
		free(subCodeLab);
	}
	return 0;
}
结果:
stuID : 100013, age : 20, Address: Tencent-Building, Size of Struct:8
stuID : 200013, age : 23, Address: Tencent, Size of Struct:8
从结果输出可以看到,我们成功使用了不同长度的地址,而且用sizeof()计算结构体长度时,长度一直都是固定不变的。
跟使用指针的区别
向下面这样定义学生信息结构体,地址成员使用指针表示而非柔性数组:
typedef struct{
    int stuID;
    int age;
    char *pAddress;
}ST_STU_INFO;

sizeof(ST_STU_INFO) = 12首先柔性数组不占用内存,而指针则不然,此外柔性数组在使用上是直接访问,形式上更加直观,而指针需要经过声明再进行动态分配内存,在效率上和柔性数组相比也稍微低一些。
nginx基本数据结构
ngx_int_t
#ifdef _WIN64
    typedef unsigned __int64 size_t;
    typedef __int64          ptrdiff_t;
    typedef __int64          intptr_t;
#else
    typedef unsigned int     size_t;
    typedef int              ptrdiff_t;
    typedef int              intptr_t;
#endif

typedef intptr_t        ngx_int_t;
ngx_str_t
其定义在ngx_string.h中:
typedef struct {
    size_t      len;
    u_char     *data;
} ngx_str_t;
从结构体当中,data指向字符串数据的第一个字符,字符串的结束用长度len来表示,而不是由’\0’来表示结束。
nginx提供的操作字符串相关的api:
ngx_string(str)是一个宏,它通过一个以’\0’结尾的普通字符串str构造一个nginx的字符串,
鉴于其中采用sizeof操作符计算字符串长度,因此参数必须是一个常量字符串。

#define ngx_string(str)     { sizeof(str) - 1,  (u_char *) str }
例如:ngx_str_t str = ngx_string("hello world");
定义变量时,使用ngx_null_string初始化字符串为空字符串,符串的长度为0,data为NULL。
#define ngx_null_string     { 0, NULL }
例如:
ngx_str_t str1 = ngx_null_string();
ngx_str_set用于设置字符串str为text,由于使用sizeof计算长度,故text必须为常量字符串。
#define ngx_str_set(str, text) \
(str)->len = sizeof(text) - 1; (str)->data = (u_char *) text
例如:
ngx_str_t str;
ngx_str_set(&str, "hello world");
ngx_str_null用于设置字符串str为空串,长度为0,data为NULL。
#define ngx_str_null(str)   (str)->len = 0; (str)->data = NULL
例如:
ngx_str_t str1;
ngx_str_null(&str1);
将src的前n个字符转换成小写存放在dst字符串当中,调用者需要保证dst指向的空间大于等于n,且指向的空间必须可写。
void ngx_strlow(u_char *dst, u_char *src, size_t n);

区分大小写的字符串比较,只比较前n个字符。
ngx_strncmp(s1, s2, n);

区分大小写的不带长度的字符串比较。
ngx_strcmp(s1, s2);

不区分大小写的不带长度的字符串比较:
ngx_int_t ngx_strcasecmp(u_char *s1, u_char *s2);

不区分大小写的带长度的字符串比较,只比较前n个字符:
ngx_int_t ngx_strncasecmp(u_char *s1, u_char *s2, size_t n);

下面这三个函数用于字符串格式化:
u_char * ngx_cdecl ngx_sprintf(u_char *buf, const char *fmt, ...);
u_char * ngx_cdecl ngx_snprintf(u_char *buf, size_t max, const char *fmt, ...); #max指明buf的空间大小
u_char * ngx_cdecl ngx_slprintf(u_char *buf, u_char *last, const char *fmt, ...);#last来指明buf空间的大小

这两个函数用于对str进行base64编码与解码:
void ngx_encode_base64(ngx_str_t *dst, ngx_str_t *src);
ngx_int_t ngx_decode_base64(ngx_str_t *dst, ngx_str_t *src);


对src进行编码,根据type来按不同的方式进行编码和解码:
uintptr_t ngx_escape_uri(u_char *dst, u_char *src, size_t size,
    ngx_uint_t type);
void ngx_unescape_uri(u_char **dst, u_char **src, size_t size, ngx_uint_t type);
type的类型可以是:
#define NGX_ESCAPE_URI         0
#define NGX_ESCAPE_ARGS        1
#define NGX_ESCAPE_HTML        2
#define NGX_ESCAPE_REFRESH     3
#define NGX_ESCAPE_MEMCACHED   4
#define NGX_ESCAPE_MAIL_AUTH   5
ngx_buf_t 和 ngx_chain_t
ngx_buf_t
ngx_buf_t 可能是指向内存中的某个缓冲区,也可能指向一个文件的某一部分。该数据结构位于src/core/ngx_buf.h|c文件中。它是ngxin用的非常多的一种数据结构,主要用来接收和输出HTTP数据信息。我们来看一下它的定义。
typedef struct ngx_buf_s  ngx_buf_t;
/**
 * Nginx缓冲区
 */
struct ngx_buf_s {
    u_char          *pos;           /* 待处理数据的开始标记  */
    u_char          *last;          /* 待处理数据的结尾标记 */
    off_t            file_pos;		/* 处理文件时,待处理的文件开始标记  */
    off_t            file_last;		/* 处理文件时,待处理的文件结尾标记  */

    u_char          *start;         /* 缓冲区开始的指针地址 */
    u_char          *end;           /* 缓冲区结尾的指针地址 */
    ngx_buf_tag_t    tag;			/* 缓冲区标记地址,是一个void类型的指针。 */
    ngx_file_t      *file;			/* 引用的文件 */
    ngx_buf_t       *shadow;


    /* the buf's content could be changed */

    unsigned         temporary:1;	 /* 标志位,为1时,内存可修改 */

    /*
     * the buf's content is in a memory cache or in a read only memory
     * and must not be changed
     */
    unsigned         memory:1;   	/* 标志位,为1时,内存只读 */

    /* the buf's content is mmap()ed and must not be changed */
    unsigned         mmap:1;		/* 标志位,为1时,mmap映射过来的内存,不可修改 */

    unsigned         recycled:1;	/* 标志位,为1时,可回收 */
    unsigned         in_file:1;		/* 标志位,为1时,表示处理的是文件 */
    unsigned         flush:1;		/* 标志位,为1时,表示需要进行flush操作 */
    unsigned         sync:1;		/* 标志位,为1时,表示可以进行同步操作,容易引起堵塞 */
    unsigned         last_buf:1;	/* 标志位,为1时,表示为缓冲区链表ngx_chain_t上的最后一块待处理缓冲区 */
    unsigned         last_in_chain:1;/* 标志位,为1时,表示为缓冲区链表ngx_chain_t上的最后一块缓冲区 */

    unsigned         last_shadow:1;	/* 标志位,为1时,表示是否是最后一个影子缓冲区 */
    unsigned         temp_file:1;	/* 标志位,为1时,表示当前缓冲区是否属于临时文件 */

    /* STUB */ int   num;
};
Nginx中内存基本都是来自内存池--万物皆池化。这里ngx_buf_t自然也是需要从内存池中申请资源。
int main()
{
    ngx_pool_t *pool = ngx_create_pool(1024, NULL);
    ngx_buf_t *buf = ngx_calloc_buf(pool);
    size_t size = 100;
    buf->start = ngx_palloc(pool, size);
    b->pos = b->start;
    b->last = b->start;
    b->end = b->last + size;
    b->temporary = 1;

    return 0;
}
ngx_chain_t
Nginx的缓冲区 ngx_buf_t,通过 ngx_chain_t 链表结构进行关联和管理。
通过链表的方式实现缓冲区有一个非常大的好处:如果一次需要缓冲区的内存很大,那么并不需要分配一块完整的内存,只需要将多个缓冲区串起来就可以了。
Nginx可以在自定义的业务层面管理繁忙busy和空闲free的缓冲区链表结构。通过后边的函数,可以对缓冲区的链表结构和buf结构进行管理。下面是缓冲区的结构图:

管理缓冲区的函数列表如下:
//创建一个缓冲区。需要传入pool和buf的大小, 传入pool和buf大小
ngx_buf_t* ngx_create_temp_buf(ngx_pool_t *pool, size_t size);

//创建单个缓冲区的链表结构。单独创建缓冲区ngx_buf_t是没法形成回收和管理机制的。
//所以需要创建ngx_chain_t缓冲区链表结构,用来管理整个缓冲区。
ngx_chain_t* ngx_alloc_chain_link(ngx_pool_t *pool);

//批量创建多个buf,并且用链表串起来.当我们需要的缓冲区非常大的时候,可以通过此方法
ngx_chain_t* ngx_create_chain_of_bufs(ngx_pool_t *pool, ngx_bufs_t *bufs);

//将其它缓冲区链表放到已有缓冲区链表结构的尾部
ngx_int_t ngx_chain_add_copy(ngx_pool_t *pool, ngx_chain_t **chain, ngx_chain_t *in);

//从空闲的buf链表上,获取一个未使用的buf链表
ngx_chain_t* ngx_chain_get_free_buf(ngx_pool_t *p, ngx_chain_t **free);

//释放缓冲区链表
ngx_free_chain(pool, cl):直接交还给Nginx内存池的pool->chain空闲buf链表
ngx_chain_update_chains:可以交还给自定义的空闲链表上。
ngx_list_t
nginx的链表(头)结构为 ngx_list_t,链表节点结构为ngx_list_part_t,定义如下。
typedef struct ngx_list_part_s ngx_list_part_t;

struct ngx_list_part_s {      //链表节点结构
    void             *elts;   //指向该节点实际的数据区(该数据区中可以存放nalloc个大小为size的元素)
    ngx_uint_t        nelts;  //实际存放的元素个数
    ngx_list_part_t  *next;   //指向下一个节点
};

typedef struct{              //链表头结构
    ngx_list_part_t  *last;   //指向链表最后一个节点(part)
    ngx_list_part_t   part;   //链表头中包含的第一个节点(part)
    size_t            size;   //每个元素大小
    ngx_uint_t        nalloc; //链表所含空间个数,即实际分配的小空间的个数
    ngx_pool_t       *pool;   //该链表节点空间在此内存池中分配
}ngx_list_t;
由此可见,nginx的 ngx_list_t 也要从内存池中分配。对于每一个节点(ngx_list_part_t)将分配nalloc个大小为size的小空间,实际分配的大小为(nalloc * size)。
链表操作
链表操作共3个,如下:
//创建链表, n就是ngx_list_t.size, size就是ngx_list_t.nalloc
ngx_list_t* ngx_list_create(ngx_pool_t *pool, ngx_uint_t n, size_t size);

//初始化链表
static ngx_inline ngx_int_t ngx_list_init(ngx_list_t *list, ngx_pool_t *pool,
    ngx_uint_tn, size_t size);

//添加元素
void*ngx_list_push(ngx_list_t *l)
创建链表
创建链表的操作实现如下,首先分配链表头(ngx_list_t,28字节),然后分配头节点(ngx_list_part_t)数据区,两次分配均在传入的内存池(pool指向的内存池)中进行。然后简单初始化链表头并返回链表头的起始位置。

ngx_list_t* ngx_list_create(ngx_pool_t*pool, ngx_uint_t n, size_t size)
{
    ngx_list_t *list;

    list = ngx_palloc(pool,sizeof(ngx_list_t));  //从内存池中分配链表头
    if (list == NULL) {
        return NULL;
    }

    list->part.elts =ngx_palloc(pool, n * size); //接着分配n*size大小的区域作为链表数据区
    if (list->part.elts == NULL) {
        return NULL;
    }

    list->part.nelts = 0;     //初始化
    list->part.next = NULL;
    list->last = &list->part;
    list->size = size;
    list->nalloc = n;
    list->pool = pool;

    return list;    //返回链表头的起始位置
}
添加元素
函数ngx_list_push返回可以在该链表数据区中放置元素(元素可以是1个或多个)的位置,而添加操作即在获得添加位置之后进行。
void* ngx_list_push(ngx_list_t* l)
{
    void             *elt;
    ngx_list_part_t  *last;

    last = l->last;

    if (last->nelts ==l->nalloc) {  //链表数据区满

        /* the last part is full, allocate anew list part */

        last =ngx_palloc(l->pool, sizeof(ngx_list_part_t));  //分配节点(list part)
        if (last == NULL) {
            return NULL;
        }

        last->elts =ngx_palloc(l->pool, l->nalloc * l->size);//分配该节点(part)的数据区
        if (last->elts == NULL) {
            return NULL;
        }

        last->nelts = 0;
        last->next = NULL;

        l->last->next =last;  //将分配的list part插入链表
        l->last = last;        //并修改list头的last指针
    }

    elt = (char *)last->elts + l->size * last->nelts; //计算下一个数据在链表数据区中的位置
    last->nelts++;  //实际存放的数据个数加1

    return elt;  //返回该位置
}
由此可见,向链表中添加元素实际上就是从内存池中分配链表节点(ngx_list_part_t)及其该节点的实际数据区(size * nalloc),并修改链表节点(ngx_list_part_t)信息。
注意,链表的每个节点(ngx_list_part_t)的数据区(*elts)中可以放置1个或多个元素,这里的元素可以是一个整数,也可以是一个结构体。
下图是一个链表的逻辑图,含有3个节点:

使用示例
下面给出一个创建内存池并从中分配一个链表的简单例子。在该例中,链表的每个节点(ngx_list_part_t)可存放5个元素,每个元素4字节大小,创建链表后,要向链表添加15个整型元素。
/**
 * ngx_list_t_test.c
 */

#include <stdio.h>
#include "ngx_config.h"
#include "ngx_conf_file.h"
#include "nginx.h"
#include "ngx_core.h"
#include "ngx_string.h"
#include "ngx_palloc.h"
#include "ngx_list.h"

volatile ngx_cycle_t  *ngx_cycle;

void ngx_log_error_core(ngx_uint_t level, ngx_log_t *log, ngx_err_t err,
            const char *fmt, ...)
{
}

void dump_pool(ngx_pool_t* pool)
{
    while (pool)
    {
        printf("pool = 0x%x\n", pool);
        printf("  pool.d\n");
        printf("    pool.d.last = 0x%x\n", pool->d.last);
        printf("    pool.d.end = 0x%x\n", pool->d.end);
        printf("    pool.d.next = 0x%x\n", pool->d.next);
        printf("    pool.d.failed = %d\n", pool->d.failed);
        printf("  pool.max = %d\n", pool->max);
        printf("  pool.current = 0x%x\n", pool->current);
        printf("  pool.chain = 0x%x\n", pool->chain);
        printf("  pool.large = 0x%x\n", pool->large);
        printf("  pool.cleanup = 0x%x\n", pool->cleanup);
        printf("  pool.log = 0x%x\n", pool->log);
        printf("available pool memory = %d\n\n", pool->d.end - pool->d.last);
        pool = pool->d.next;
    }
}

void dump_list_part(ngx_list_t* list, ngx_list_part_t* part)
{
    int i;
    for (i = 0; i < part->nelts; i++)
    {
        printf("element = %d, ", *((int*)part->elts + i));
    }
    printf("  list.part.nelts = %d\n", part->nelts);
    printf("  list.part.next = 0x%x", part->next);
    if (part->next)
        printf(" -->\n");
    printf(" \n");
}

void dump_list(ngx_list_t* list)
{
    if (list == NULL)
        return;

    printf("list = 0x%x\n", list);
    printf("  list.last = 0x%x\n", list->last);
    printf("  list.part = 0x%x\n", &(list->part));
    printf("  list.size = %d\n", list->size);
    printf("  list.nalloc = %d\n", list->nalloc);
    printf("  list.pool = 0x%x\n\n", list->pool);

    printf("all list node:\n");

    ngx_list_part_t *part = &(list->part);
    int num = 1;
    while (part)
    {
        printf("  node %d: ", num++);
        dump_list_part(list, part);
        part = part->next;
    }
    printf("\n");
}

int main()
{
    ngx_pool_t *pool;
    int i;

    printf("--------- create a new pool:\n");
    pool = ngx_create_pool(1024, NULL);
    dump_pool(pool);

    printf("\n");
    printf("--------- alloc a list from the pool:\n");
    ngx_list_t *list = ngx_list_create(pool, 5, sizeof(int));
    dump_pool(pool);

    for (i = 0; i < 15; i++)
    {
        int *ptr = ngx_list_push(list);
        *ptr = i * 10;
    }

    printf("\n");
    printf("--------- the list information:\n");
    dump_list(list);

    printf("\n");
    printf("--------- the pool at the end:\n");
    dump_pool(pool);

    //销毁创建的内存池
    ngx_destroy_pool(pool);
    return 0;
}
然后再创建一个Makefile对测试代码进行编译:
CXX = gcc
CXXFLAGS += -g -Wall -Wextra

NGX_ROOT =/usr/nginx-1.14.1

TARGETS =ngx_list_t_test
TARGETS_C_FILE= $(TARGETS).c

CLEANUP = -rm -f $(TARGETS) *.o

all:$(TARGETS)

CORE_INCS =-I. \
    -I$(NGX_ROOT)/src/core \
    -I$(NGX_ROOT)/src/event \
    -I$(NGX_ROOT)/src/event/modules \
    -I$(NGX_ROOT)/src/os/unix \
    -I$(NGX_ROOT)/objs \

NGX_PALLOC =$(NGX_ROOT)/objs/src/core/ngx_palloc.o
NGX_STRING =$(NGX_ROOT)/objs/src/core/ngx_string.o
NGX_ALLOC =$(NGX_ROOT)/objs/src/os/unix/ngx_alloc.o
NGX_LIST =$(NGX_ROOT)/objs/src/core/ngx_list.o

$(TARGETS): $(TARGETS_C_FILE)
	$(CXX) $(CXXFLAGS) $(CORE_INCS) $(NGX_PALLOC) $(NGX_STRING) $(NGX_ALLOC) $(NGX_LIST) $^ -o $@

clean:
	-rm  $(TARGETS)
然后执行make命令,会生成ngx_list_t_test可执行文件,再执行./ngx_list_t_test启动测试程序,运行结果如下:
[root@localhost src]# pwd
/usr/nginx-1.14.1/src
[root@localhost src]# ./ngx_list_t_test
--------- create a new pool:
pool = 0x8a5010
  pool.d
    pool.d.last = 0x8a5060
    pool.d.end = 0x8a5410
    pool.d.next = 0x0
    pool.d.failed = 0
  pool.max = 944
  pool.current = 0x8a5010
  pool.chain = 0x0
  pool.large = 0x0
  pool.cleanup = 0x0
  pool.log = 0x0
available pool memory = 944


--------- alloc a list from the pool:
pool = 0x8a5010
  pool.d
    pool.d.last = 0x8a50ac
    pool.d.end = 0x8a5410
    pool.d.next = 0x0
    pool.d.failed = 0
  pool.max = 944
  pool.current = 0x8a5010
  pool.chain = 0x0
  pool.large = 0x0
  pool.cleanup = 0x0
  pool.log = 0x0
available pool memory = 868


--------- the list information:
list = 0x8a5060
  list.last = 0x8a50e0
  list.part = 0x8a5068
  list.size = 4
  list.nalloc = 5
  list.pool = 0x8a5010

all list node:
  node 1: element = 0, element = 10, element = 20, element = 30, element = 40,   list.part.nelts = 5
  list.part.next = 0x8a50b0 -->

  node 2: element = 50, element = 60, element = 70, element = 80, element = 90,   list.part.nelts = 5
  list.part.next = 0x8a50e0 -->

  node 3: element = 100, element = 110, element = 120, element = 130, element = 140,   list.part.nelts = 5
  list.part.next = 0x0


--------- the pool at the end:
pool = 0x8a5010
  pool.d
    pool.d.last = 0x8a510c
    pool.d.end = 0x8a5410
    pool.d.next = 0x0
    pool.d.failed = 0
  pool.max = 944
  pool.current = 0x8a5010
  pool.chain = 0x0
  pool.large = 0x0
  pool.cleanup = 0x0
  pool.log = 0x0
available pool memory = 772
ngx_table_elt_t
typedef struct {
    ngx_uint_t  hash;
    //http头的名称
    ngx_str_t   key
    //http头对应的value
    ngx_str_t   value;
    //指向的全是小写的key字符串
    u_char      *lowcase_key;
} ngx_table_elt_t;
ngx_table_elt_t是为HTTP头部量身定制的,其中key存储头部名称,value存储对应的值,lowcase_key是指向HTTP头部名称的大小写,hash用于快速检索到头部。
下面是http请求用到的结构体:
typedef struct {
	// 链表结构体,
    ngx_list_t                        headers;

	//  自定义请求头声明
	ngx_table_elt_t                  *ts;

	// 解析函数执行后 存储host的数据,
    ngx_table_elt_t                  *host;
    ngx_table_elt_t                  *connection;
    ngx_table_elt_t                  *if_modified_since;
    ngx_table_elt_t                  *if_unmodified_since;
    ngx_table_elt_t                  *if_match;
    ngx_table_elt_t                  *if_none_match;
    ngx_table_elt_t                  *user_agent;
    ngx_table_elt_t                  *referer;
    ngx_table_elt_t                  *content_length;
    ngx_table_elt_t                  *content_range;
    ngx_table_elt_t                  *content_type;

    ngx_table_elt_t                  *range;
    ngx_table_elt_t                  *if_range;

    ngx_table_elt_t                  *transfer_encoding;
    ngx_table_elt_t                  *te;
    ngx_table_elt_t                  *expect;
    ngx_table_elt_t                  *upgrade;

#if (NGX_HTTP_GZIP || NGX_HTTP_HEADERS)
    ngx_table_elt_t                  *accept_encoding;
    ngx_table_elt_t                  *via;
#endif

    ngx_table_elt_t                  *authorization;

    ngx_table_elt_t                  *keep_alive;

#if (NGX_HTTP_X_FORWARDED_FOR)
    ngx_array_t                       x_forwarded_for;
#endif

#if (NGX_HTTP_REALIP)
    ngx_table_elt_t                  *x_real_ip;
#endif

#if (NGX_HTTP_HEADERS)
    ngx_table_elt_t                  *accept;
    ngx_table_elt_t                  *accept_language;
#endif

#if (NGX_HTTP_DAV)
    ngx_table_elt_t                  *depth;
    ngx_table_elt_t                  *destination;
    ngx_table_elt_t                  *overwrite;
    ngx_table_elt_t                  *date;
#endif

    ngx_str_t                         user;
    ngx_str_t                         passwd;

    ngx_array_t                       cookies;

    ngx_str_t                         server;
    off_t                             content_length_n;
    time_t                            keep_alive_n;

    unsigned                          connection_type:2;
    unsigned                          chunked:1;
    unsigned                          msie:1;
    unsigned                          msie6:1;
    unsigned                          opera:1;
    unsigned                          gecko:1;
    unsigned                          chrome:1;
    unsigned                          safari:1;
    unsigned                          konqueror:1;
} ngx_http_headers_in_t;
在处理http请求时,由ngx_http_headers_in[]负责解析请求头:
typedef struct {
    ngx_str_t                         name;			// 请求头名
    ngx_uint_t                        offset;		//
    ngx_http_header_handler_pt        handler;		// 回调函数
} ngx_http_header_t;

// 解析相对应请求头的结构体
ngx_http_header_t  ngx_http_headers_in[] = {

    // 声明自定义请求头
    { ngx_string("ts"), offsetof(ngx_http_headers_in_t, ts),
                 ngx_http_process_unique_header_line },

    { ngx_string("Host"), offsetof(ngx_http_headers_in_t, host),
                 ngx_http_process_host },
	....(省略)
};

例如上图, 解析完之后,ngx_table_elt_t内的值为:
key : Host
value : 192.168.226.151:9001
ngx_pool_t
nginx对内存的管理由其自己实现的内存池结构 ngx_pool_t 来完成,内存分配相关的操作,封装了最基本的内存分配函数:
- ngx_alloc:封装malloc分配内存
- ngx_calloc:封装malloc分配内存并初始化空间内容为0
- ngx_memalign:返回基于一个指定alignment的大小为size的内存空间,且其地址为alignment的整数倍,alignment为2的幂
ngx_pool_t结构
nginx的内存池结构如下:
typedef struct ngx_pool_s  ngx_pool_t;
typedef struct ngx_pool_cleanup_s  ngx_pool_cleanup_t;
typedef struct ngx_pool_large_s  ngx_pool_large_t;

typedef void (*ngx_pool_cleanup_pt)(void *data); //cleanup的callback类型
struct ngx_pool_cleanup_s {
    ngx_pool_cleanup_pt   handler;
    void                 *data;    //指向要清除的数据
    ngx_pool_cleanup_t   *next;    //下一个cleanup callback
};

struct ngx_pool_large_s {
    ngx_pool_large_t     *next;    //指向下一块大块内存
    void                 *alloc;   //指向分配的大块内存
};

typedef struct {
    u_char        *last;  //当前内存池分配到此处,即下一次分配从此处开始
    u_char        *end;   //内存池结束位置
    ngx_pool_t    *next;  //内存池里面有很多块内存,这些内存块就是通过该指针连成链表的
    ngx_uint_t    failed; //内存池分配失败次数
} ngx_pool_data_t;    //内存池的数据块位置信息

struct ngx_pool_s{        //内存池头部结构
    ngx_pool_data_t      d;         //内存池的数据块
    size_t               max;       //内存池数据块的最大值
    ngx_pool_t           *current;  //指向当前内存池
    ngx_chain_t          *chain;    //该指针挂接一个ngx_chain_t结构
    ngx_pool_large_t     *large;    //大块内存链表,即分配空间超过max的内存
    ngx_pool_cleanup_t   *cleanup;  //释放内存池的callback
    ngx_log_t            *log;      //日志信息
};

在centos 32位下:sizeof(ngx_pool_data_t)=16B,sizeof(ngx_pool_t)=40B
创建内存池
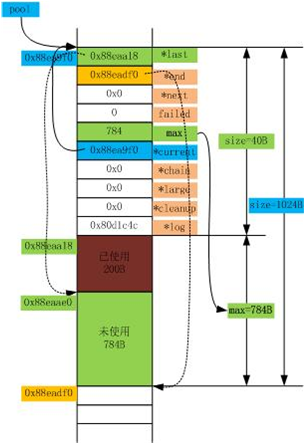
在调用 ngx_pool_t* pool = ngx_create_pool(1024, 0x80d1c4c); 之后,创建的内存池物理结构如下图:

注:0x88eaa18 - 0x88ea9f0 = 0x28 = 40(十进制)
销毁内存池
销毁内存池由如下函数完成:
void ngx_destroy_pool(ngx_pool_t *pool);
该函数将遍历内存池链表,释放所有内存,如果注册了clenup(也是一个链表结构),
亦将遍历该cleanup链表结构依次调用clenup的handler清理。同时,还将遍历large链表,释放大块内存。
重置内存池
重置内存池由下面的函数完成:
void ngx_reset_pool(ngx_pool_t *pool);
该函数将释放所有large内存,并且将d->last指针重新指向ngx_pool_t结构之后数据区的开始位置,
同刚创建后的位置相同。
分配内存
内存分配的函数如下:
void *ngx_palloc(ngx_pool_t *pool, size_t size);

void *ngx_pnalloc(ngx_pool_t *pool, size_t size);

void *ngx_pcalloc(ngx_pool_t *pool, size_t size);

void *ngx_pmemalign(ngx_pool_t *pool, size_t size, size_t alignment);

返回值为分配的内存起始地址。
例如,从创建的内存池中分配200B的内存,调用 ngx_paaloc(pool, 200); 后,该内存池物理结构如下图:
释放内存
请参考如下函数:

ngx_int_t ngx_pfree(ngx_pool_t *pool, void *p)

注意:该函数只释放large链表中注册的内存,普通内存在ngx_destroy_pool中统一释放
注册cleanup
请参考如下函数:
ngx_pool_cleanup_t *ngx_pool_cleanup_add(ngx_pool_t *p, size_t size);
内存池的分配内存时内部物理结构
假设,我们创建了一个1024B的内存池,然后连续从中取出3块512B的内存使用,下图是整个分配过程的内部物理结构图:

下面是示例代码:
/**
 * ngx_pool_t_test.c
 */

#include <stdio.h>
#include "ngx_config.h"
#include "ngx_conf_file.h"
#include "nginx.h"
#include "ngx_core.h"
#include "ngx_string.h"
#include "ngx_alloc.h"
#include "ngx_palloc.h"

volatile ngx_cycle_t  *ngx_cycle;

void ngx_log_error_core(ngx_uint_t level, ngx_log_t *log, ngx_err_t err,
            const char *fmt, ...)
{
}

void dump_pool(ngx_pool_t* pool)
{
    while (pool)
    {
        printf("pool = 0x%x\n", pool);
        printf("  .d\n");
        printf("    .last = 0x%x\n", pool->d.last);
        printf("    .end = 0x%x\n", pool->d.end);
        printf("    .next = 0x%x\n", pool->d.next);
        printf("    .failed = %d\n", pool->d.failed);
        printf("  .max = %d\n", pool->max);
        printf("  .current = 0x%x\n", pool->current);
        printf("  .chain = 0x%x\n", pool->chain);
        printf("  .large = 0x%x\n", pool->large);
        printf("  .cleanup = 0x%x\n", pool->cleanup);
        printf("  .log = 0x%x\n", pool->log);
        printf("available pool memory = %d\n\n", pool->d.end - pool->d.last);
        pool = pool->d.next;
    }
}

int main()
{
    ngx_pool_t *pool;

    printf("--------------------------------\n");
    printf("create a new pool:\n");
    printf("--------------------------------\n");
    pool = ngx_create_pool(1024, NULL);
    dump_pool(pool);

    printf("--------------------------------\n");
    printf("alloc block 1 from the pool:\n");
    printf("--------------------------------\n");
    ngx_palloc(pool, 512);
    dump_pool(pool);

    printf("--------------------------------\n");
    printf("alloc block 2 from the pool:\n");
    printf("--------------------------------\n");
    ngx_palloc(pool, 512);
    dump_pool(pool);

    printf("--------------------------------\n");
    printf("alloc block 3 from the pool :\n");
    printf("--------------------------------\n");
    ngx_palloc(pool, 512);
    dump_pool(pool);

    ngx_destroy_pool(pool);
    return 0;
}
Makefile编写如下:
CXX = gcc
CXXFLAGS += -g -Wall -Wextra

NGX_ROOT =/usr/nginx-1.14.1

TARGETS =ngx_pool_t_test
TARGETS_C_FILE= $(TARGETS).c

CLEANUP = -rm -f $(TARGETS) *.o

all:$(TARGETS)

CORE_INCS =-I. \
    -I$(NGX_ROOT)/src/core \
    -I$(NGX_ROOT)/src/event \
    -I$(NGX_ROOT)/src/event/modules \
    -I$(NGX_ROOT)/src/os/unix \
    -I$(NGX_ROOT)/objs \

NGX_PALLOC =$(NGX_ROOT)/objs/src/core/ngx_palloc.o
NGX_STRING =$(NGX_ROOT)/objs/src/core/ngx_string.o
NGX_ALLOC =$(NGX_ROOT)/objs/src/os/unix/ngx_alloc.o

$(TARGETS): $(TARGETS_C_FILE)
	$(CXX) $(CXXFLAGS) $(CORE_INCS) $(NGX_PALLOC) $(NGX_STRING) $(NGX_ALLOC) $(NGX_LIST) $^ -o $@

clean:
	-rm  $(TARGETS)
执行make,生成ngx_pool_t_test,再执行./ngx_pool_t_test,输出结果如下:
# ./ngx_pool_t_test
--------------------------------
create a new pool:
--------------------------------
pool = 0x8922020
  .d
    .last = 0x8922048
    .end = 0x8922420
    .next = 0x0
    .failed = 0
  .max = 984
  .current = 0x8922020
  .chain = 0x0
  .large = 0x0
  .cleanup = 0x0
  .log = 0x0
available pool memory = 984

--------------------------------
alloc block 1 from the pool:
--------------------------------
pool = 0x8922020
  .d
    .last = 0x8922248
    .end = 0x8922420
    .next = 0x0
    .failed = 0
  .max = 984
  .current = 0x8922020
  .chain = 0x0
  .large = 0x0
  .cleanup = 0x0
  .log = 0x0
available pool memory = 472

--------------------------------
alloc block 2 from the pool:
--------------------------------
pool = 0x8922020
  .d
    .last = 0x8922248
    .end = 0x8922420
    .next = 0x8922450
    .failed = 0
  .max = 984
  .current = 0x8922020
  .chain = 0x0
  .large = 0x0
  .cleanup = 0x0
  .log = 0x0
available pool memory = 472     //解释:申请512B,但仅剩下472B,因此需要重新开辟内存ngx_pool_large_t,大小1024B

pool = 0x8922450            //解释:新开辟的大小1024B内存块首地址,挂在内存池开始位置的后面
  .d
    .last = 0x8922660
    .end = 0x8922850
    .next = 0x0
    .failed = 0
  .max = 0
  .current = 0x0
  .chain = 0x0
  .large = 0x0
  .cleanup = 0x0
  .log = 0x0
available pool memory = 496 //解释:分配了512B,还剩下496B

--------------------------------
alloc block 3 from the pool :
--------------------------------
pool = 0x8922020
  .d
    .last = 0x8922248
    .end = 0x8922420
    .next = 0x8922450
    .failed = 1
  .max = 984
  .current = 0x8922020
  .chain = 0x0
  .large = 0x0
  .cleanup = 0x0
  .log = 0x0
available pool memory = 472     //解释:申请512B,但发现内存池开始位置的空闲内存仅剩下472B,因此遍历挂在后面的内存块

pool = 0x8922450
  .d
    .last = 0x8922660
    .end = 0x8922850
    .next = 0x8922880
    .failed = 0
  .max = 0
  .current = 0x0
  .chain = 0x0
  .large = 0x0
  .cleanup = 0x0
  .log = 0x0
available pool memory = 496    //解释:遍历到第一个内存块,发现剩余空间为496B,因此需要重新开辟内存ngx_pool_large_t块1024B

pool = 0x8922880
  .d
    .last = 0x8922a90
    .end = 0x8922c80
    .next = 0x0
    .failed = 0
  .max = 0
  .current = 0x0
  .chain = 0x0
  .large = 0x0
  .cleanup = 0x0
  .log = 0x0
available pool memory = 496    //解释:分配了512B,还剩下496B
ngx_align_ptr内存对齐
内存对齐可以减少CPU读取内存的次数,提升性能。首先看下该宏定义:
// p 是内存指针,a 是对齐字节数(必须是2的幂次方结果)
#define ngx_align_ptr(p, a)                                                   \
    (u_char *) (((uintptr_t) (p) + ((uintptr_t) a - 1)) & ~((uintptr_t) a - 1))
这个不容易理解,我们把它改成下面的样式,具有同样的效果,进行分析:
#define ngx_align(d, a) (((d) + (a - 1)) & ~(a - 1))
然后看下几个例子:
int d = 1;
d = ngx_align(d, 16); // d = 16

int d = 15;
d = ngx_align(d, 16); // d = 16

int d = 17;
d = ngx_align(d, 16); // d = 32

通过多次举例可以发现,当 1<= d <= 16 时,ngx_align(d, 16)会恒等于16;
当17<= d <= 32 时,ngx_align(d, 16)会恒等于32;
这就是内存对齐的效果。
为什么要用宏定义来做内存对齐呢?看下面一个nginx的内存分配的实现:
void *
ngx_palloc(ngx_pool_t *pool, size_t size)
{
	u_char      *m;
	ngx_pool_t  *p;

	if (size <= pool->max) {//如果申请的内存大小大于内存池的max值,则走另一条路,申请大内存

		p = pool->current;
		do {
			m = ngx_align_ptr(p->d.last, NGX_ALIGNMENT);//对内存地址进行对齐处理

			if ((size_t)(p->d.end - m) >= size) {//如果在当前内存块有效范围内,进行内存指针的移动
				p->d.last = m + size;

				return m;
			}
			p = p->d.next;//如果当前内存块有效容量不够分配,则移动到下一个内存块进行分配

		} while (p);

		return ngx_palloc_block(pool, size);
	}
}
因为这里并没有真正意义调用malloc等函数申请内存,而是移动指针标记而已,所以内存对齐的活,C编译器帮不了你了,得自己动手。
ngx_queue_t
nginx的队列是一个具有头节点的双向循环链表,每一个节点结构为ngx_queue_t,定义如下:
typedef struct ngx_queue_s  ngx_queue_t;
struct ngx_queue_s {          //队列结构
    ngx_queue_t  *prev;
    ngx_queue_t  *next;
};
队列操作
//初始化队列
ngx_queue_init(q)
//判断队列是否为空
ngx_queue_empty(h)
//在头节点之后插入新节点
ngx_queue_insert_head(h, x)
//在尾节点之后插入新节点
ngx_queue_insert_tail(h, x)
//删除节点x
ngx_queue_remove(x)
//分割队列
ngx_queue_split(h, q, n)
//链接队列
ngx_queue_add(h, n)
//获取队列的中间节点
ngx_queue_t *ngx_queue_middle(ngx_queue_t *queue)
//排序队列(稳定的插入排序)
void ngx_queue_sort(ngx_queue_t *queue,ngx_int_t (*cmp)(const ngx_queue_t*, const ngx_queue_t*))
其中,插入节点、取队列头、取队列尾等操作由宏实现。
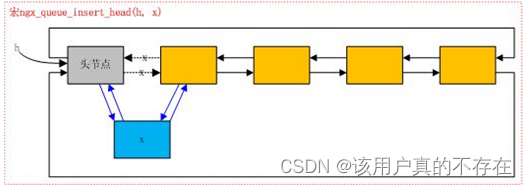
1、在头节点之后插入
其中,在头节点之后插入操作由宏ngx_queue_insert_head完成,如下:
#define ngx_queue_insert_head(h, x)                                           \
    (x)->next = (h)->next;                                                    \
    (x)->next->prev = x;                                                      \
    (x)->prev = h;                                                            \
    (h)->next = x
该操作的图示如下:(图中虚线表示被修改/删除的指针,蓝色表示新修改/增加的指针。下同)
2、在尾节点之后插入
在尾节点之后插入操作由宏ngx_queue_insert_tail完成,如下:
#define ngx_queue_insert_tail(h, x)                                           \
    (x)->prev = (h)->prev;                                                    \
    (x)->prev->next = x;                                                      \
    (x)->next = h;                                                            \
    (h)->prev = x
在尾节点之后插入的示意图如下:

3、删除节点
在尾节点之后插入操作由宏ngx_queue_remove完成:
#if (NGX_DEBUG)
#define ngx_queue_remove(x)                                                   \
    (x)->next->prev = (x)->prev;                                              \
    (x)->prev->next = (x)->next;                                              \
    (x)->prev = NULL;                                                         \
    (x)->next = NULL
#else
#define ngx_queue_remove(x)                                                   \
    (x)->next->prev = (x)->prev;                                              \
    (x)->prev->next = (x)->next
#endif
该操作的逻辑图如下:

4、分割队列
分割队列操作由宏 ngx_queue_split 完成:
#define ngx_queue_split(h, q, n)                                              \
    (n)->prev = (h)->prev;                                                    \
    (n)->prev->next = n;                                                      \
    (n)->next = q;                                                            \
    (h)->prev = (q)->prev;                                                    \
    (h)->prev->next = h;                                                      \
    (q)->prev = n;
该宏有3个参数,h为队列头(即链表头指针),在q节点的位置将队列(链表)分割为两个队列(链表),q之后的节点组成新队列的头节点n,图形演示如下:

5、链接队列
链接队列由宏 ngx_queue_add 完成,操作如下:
#define ngx_queue_add(h, n)                                                   \
    (h)->prev->next = (n)->next;                                              \
    (n)->next->prev = (h)->prev;                                              \
    (h)->prev = (n)->prev;                                                    \
    (h)->prev->next = h;
其中,h、n分别为两个队列的指针,即头节点指针,该操作将n队列链接在h队列之后。演示图形如下:

6、获取中间节点
中间节点,若队列有奇数个(除头节点外)节点,则返回中间的节点;若队列有偶数个节点,则返回后半个队列的第一个节点。操作如下:
ngx_queue_t *ngx_queue_middle(ngx_queue_t *queue);其示意图如下:

7、队列排序
队列排序采用的是稳定的简单插入排序方法,即从第一个节点开始遍历,依次将当前节点(q)插入前面已经排好序的队列(链表)中。
void* ngx_queue_sort(ngx_queue_t *queue,
    ngx_int_t (*cmp)(const ngx_queue_t *, const ngx_queue_t *));
8、获取队列节点数据
由队列基本结构和以上操作可知,nginx的队列操作只对链表指针进行简单的修改指向操作,并不负责节点数据空间的分配。因此,用户在使用nginx队列时,要自己定义数据结构并分配空间,且要在自定义数据结构中包含一个 ngx_queue_t 的指针或者对象,当需要获取队列节点数据时,使用 ngx_queue_data 宏,其定义如下:
#define ngx_queue_data(q, type, link)                 \
    (type *) ((u_char *) q – offsetof(type, link))


//该宏返回类型为 size_t 的值,表示 type 中成员的偏移量
offsetof(type, member-designator);
type:结构体类型
member-designator:结构体类型的成员指示器

示例:
struct address {
	char name[50];
	char street[50];
};
printf("address 结构中的 name 偏移 = %d 字节。\n",
		offsetof(struct address, name));
printf("address 结构中的 street 偏移 = %d 字节。\n",
		offsetof(struct address, street));
输出:
address 结构中的 name 偏移 = 0 字节。
address 结构中的 street 偏移 = 50 字节。
由该宏定义可以看出,一般定义队列节点结构(该结构类型为type)时,需要将真正的数据放在前面,而ngx_queue_t结构放在后面,故该宏使用减法计算整个节点结构的起始地址(需要进行类型转换)。
使用示例
本节给出一个创建内存池并从中分配队列头节点和其他节点组成队列的简单例子。在该例中,队列的数据是一系列的二维点(x,y分别表示该点的横、纵坐标),将这些点插入队列后进行排序,以此向读者展示nginx队列的使用方法。
//ngx_queue_t_test.c

#include <stdio.h>
#include "ngx_config.h"
#include "ngx_conf_file.h"
#include "nginx.h"
#include "ngx_core.h"
#include "ngx_palloc.h"
#include "ngx_queue.h"

//2-dimensional point (x, y) queue structure
typedef struct
{
    int x;
    int y;
} my_point_t;

typedef struct
{
    my_point_t point;
    ngx_queue_t queue;
} my_point_queue_t;

volatile ngx_cycle_t  *ngx_cycle;

void ngx_log_error_core(ngx_uint_t level, ngx_log_t *log, ngx_err_t err,
            const char *fmt, ...)
{
}

void print_pool(ngx_pool_t* pool)
{
    while (pool)
    {
        printf("pool = 0x%x\n", pool);
        printf("  .d\n");
        printf("    .last = 0x%x\n", pool->d.last);
        printf("    .end = 0x%x\n", pool->d.end);
        printf("    .next = 0x%x\n", pool->d.next);
        printf("    .failed = %d\n", pool->d.failed);
        printf("  .max = %d\n", pool->max);
        printf("  .current = 0x%x\n", pool->current);
        printf("  .chain = 0x%x\n", pool->chain);
        printf("  .large = 0x%x\n", pool->large);
        printf("  .cleanup = 0x%x\n", pool->cleanup);
        printf("  .log = 0x%x\n", pool->log);
        printf("available pool memory = %d\n\n", pool->d.end - pool->d.last);
        pool = pool->d.next;
    }
}

//从前往后打印坐标点队列
void print_queue_from_head(ngx_queue_t *que)
{
    ngx_queue_t *q = ngx_queue_head(que);

    printf("(0x%x: (0x%x, 0x%x)) <==> \n", que, que->prev, que->next);

    for (; q != que; q = ngx_queue_next(q))
    {
        my_point_queue_t *point = ngx_queue_data(q, my_point_queue_t, queue);
        printf("(0x%x: (%-2d, %-2d), 0x%x: (0x%x, 0x%x)) <==> \n", point, point->point.x,
            point->point.y, &point->queue, point->queue.prev, point->queue.next);
    }
}

//从后往前打印坐标点队列
void print_queue_from_tail(ngx_queue_t *que)
{
    ngx_queue_t *q = ngx_queue_last(que);

    printf("(0x%x: (0x%x, 0x%x)) <==> \n", que, que->prev, que->next);

    for (; q != que; q = ngx_queue_prev(q))
    {
        my_point_queue_t *point = ngx_queue_data(q, my_point_queue_t, queue);
        printf("(0x%x: (%-2d, %-2d), 0x%x: (0x%x, 0x%x)) <==> \n", point, point->point.x,
            point->point.y, &point->queue, point->queue.prev, point->queue.next);
    }
}

//将坐标点队列从小到达排序
ngx_int_t my_point_cmp(const ngx_queue_t* A, const ngx_queue_t* B)
{
    my_point_queue_t *pt1 = ngx_queue_data(A, my_point_queue_t, queue);
    my_point_queue_t *pt2 = ngx_queue_data(B, my_point_queue_t, queue);

    if (pt1->point.x < pt2->point.x)
        return 0;
    else if (pt1->point.x > pt2->point.x)
        return 1;
    else if (pt1->point.y < pt2->point.y)
        return 0;
    else if (pt1->point.y > pt2->point.y)
        return 1;
    return 1;
}

#define Max_Num 6

int main()
{
    ngx_pool_t *pool;
    ngx_queue_t *ngxQueHead;
    my_point_queue_t *point;
    my_point_t points[Max_Num] = {
            {10, 1}, {20, 9}, {9, 9}, {90, 80}, {5, 3}, {50, 20}
    };
    int i;

    printf("--------------------------------\n");
    printf("create a new pool:\n");
    printf("--------------------------------\n");
    pool = ngx_create_pool(1024, NULL);
    print_pool(pool);

    printf("--------------------------------\n");
    printf("alloc a queue head and nodes :\n");
    printf("--------------------------------\n");
    ngxQueHead = ngx_palloc(pool, sizeof(ngx_queue_t));  //alloc a ngx queue head
    ngx_queue_init(ngxQueHead);  //init the ngx queue

    //创建坐标点队列并给每个元素赋值
    for (i = 0; i < Max_Num; i++)
    {
        point = (my_point_queue_t*)ngx_palloc(pool, sizeof(my_point_queue_t));
        point->point.x = points[i].x;
        point->point.y = points[i].y;
        ngx_queue_init(&point->queue);

        //将坐标点元素插入队列
        ngx_queue_insert_head(ngxQueHead, &point->queue);
    }

    print_queue_from_tail(ngxQueHead);
    printf("\n");

    printf("--------------------------------\n");
    printf("sort the queue:\n");
    printf("--------------------------------\n");
    ngx_queue_sort(ngxQueHead, my_point_cmp);
    print_queue_from_head(ngxQueHead);
    printf("\n");

    printf("--------------------------------\n");
    printf("the pool at the end:\n");
    printf("--------------------------------\n");
    print_pool(pool);

    ngx_destroy_pool(pool);
    return 0;
}
Makefile文件如下:
CXX = gcc
CXXFLAGS += -g -Wall -Wextra

NGX_ROOT =/usr/nginx-1.14.1

TARGETS =ngx_queue_t_test
TARGETS_C_FILE= $(TARGETS).c

CLEANUP = -rm -f $(TARGETS) *.o

all:$(TARGETS)

CORE_INCS =-I. \
    -I$(NGX_ROOT)/src/core \
    -I$(NGX_ROOT)/src/event \
    -I$(NGX_ROOT)/src/event/modules \
    -I$(NGX_ROOT)/src/os/unix \
    -I$(NGX_ROOT)/objs \

NGX_PALLOC =$(NGX_ROOT)/objs/src/core/ngx_palloc.o
NGX_STRING =$(NGX_ROOT)/objs/src/core/ngx_string.o
NGX_ALLOC =$(NGX_ROOT)/objs/src/os/unix/ngx_alloc.o
NGX_QUEUE = $(NGX_ROOT)/objs/src/core/ngx_queue.o

$(TARGETS): $(TARGETS_C_FILE)
	$(CXX) $(CXXFLAGS) $(CORE_INCS) $(NGX_PALLOC) $(NGX_STRING) $(NGX_ALLOC) $(NGX_QUEUE) $^ -o $@

clean:
	-rm  $(TARGETS)
运行结果如下:
[root@localhost src]# ./ngx_queue_t_test
--------------------------------
create a new pool:
--------------------------------
pool = 0x9b2010
  .d
    .last = 0x9b2060
    .end = 0x9b2410
    .next = 0x0
    .failed = 0
  .max = 944
  .current = 0x9b2010
  .chain = 0x0
  .large = 0x0
  .cleanup = 0x0
  .log = 0x0
available pool memory = 944

--------------------------------
alloc a queue head and nodes :
--------------------------------
(0x9b2060: (0x9b2078, 0x9b20f0)) <==>
(0x9b2070: (10, 1 ), 0x9b2078: (0x9b2090, 0x9b2060)) <==>
(0x9b2088: (20, 9 ), 0x9b2090: (0x9b20a8, 0x9b2078)) <==>
(0x9b20a0: (9 , 9 ), 0x9b20a8: (0x9b20c0, 0x9b2090)) <==>
(0x9b20b8: (90, 80), 0x9b20c0: (0x9b20d8, 0x9b20a8)) <==>
(0x9b20d0: (5 , 3 ), 0x9b20d8: (0x9b20f0, 0x9b20c0)) <==>
(0x9b20e8: (50, 20), 0x9b20f0: (0x9b2060, 0x9b20d8)) <==>

--------------------------------
sort the queue:
--------------------------------
(0x9b2060: (0x9b20c0, 0x9b20d8)) <==>
(0x9b20d0: (5 , 3 ), 0x9b20d8: (0x9b2060, 0x9b20a8)) <==>
(0x9b20a0: (9 , 9 ), 0x9b20a8: (0x9b20d8, 0x9b2078)) <==>
(0x9b2070: (10, 1 ), 0x9b2078: (0x9b20a8, 0x9b2090)) <==>
(0x9b2088: (20, 9 ), 0x9b2090: (0x9b2078, 0x9b20f0)) <==>
(0x9b20e8: (50, 20), 0x9b20f0: (0x9b2090, 0x9b20c0)) <==>
(0x9b20b8: (90, 80), 0x9b20c0: (0x9b20f0, 0x9b2060)) <==>

--------------------------------
the pool at the end:
--------------------------------
pool = 0x9b2010
  .d
    .last = 0x9b2100
    .end = 0x9b2410
    .next = 0x0
    .failed = 0
  .max = 944
  .current = 0x9b2010
  .chain = 0x0
  .large = 0x0
  .cleanup = 0x0
  .log = 0x0
available pool memory = 784
该队列的逻辑图如下所示:

ngx_array_t
数组结构
nginx的数组结构为ngx_array_t,定义如下:
struct ngx_array_s {
    void        *elts;    //数组数据区起始位置
    ngx_uint_t   nelts;   //实际存放的元素个数
    size_t       size;    //每个元素大小
    ngx_uint_t   nalloc;  //数组所含空间个数,即实际分配的小空间的个数
    ngx_pool_t  *pool;    //该数组在此内存池中分配
};

typedef struct ngx_array_s  ngx_array_t;
centos 32位下:sizeof(ngx_array_t)=20
由其定义可见,nginx的数组也要从内存池中分配。将分配nalloc个大小为size的小空间,实际分配的内存大小为( nalloc * size )。
数组操作
//创建数组,从内存池pool中分配n * size大小区域作为数据区并初始化创建的数组
ngx_array_t* ngx_array_create(ngx_pool_t *p, ngx_uint_t n, size_t size);

//销毁数组
void ngx_array_destroy(ngx_array_t *a);

//向数组中添加元素
void* ngx_array_push(ngx_array_t *a);
void* ngx_array_push_n(ngx_array_t *a, ngx_uint_t n);

//初始化数组array,从内存池pool中分配n * size大小区域作为数据区并初始化array
static ngx_inline ngx_int_t
ngx_array_init(ngx_array_t *array, ngx_pool_t *pool, ngx_uint_t n, size_t size);
创建数组
//创建数组,从内存池pool中分配n * size大小区域作为数据区并初始化创建的数组
ngx_array_t* ngx_array_create(ngx_pool_t *p, ngx_uint_t n, size_t size);
示例:创建并初始化一个5 * 10大小的数组
ngx_array_t* array = ngx_array_create(p, 5, 10);
创建数组的操作首先分配数组头(20B),然后分配数组数据区,两次分配均在传入的内存池(pool指向的内存池)中进行。然后初始化数组头并返回数组头的起始位置array.
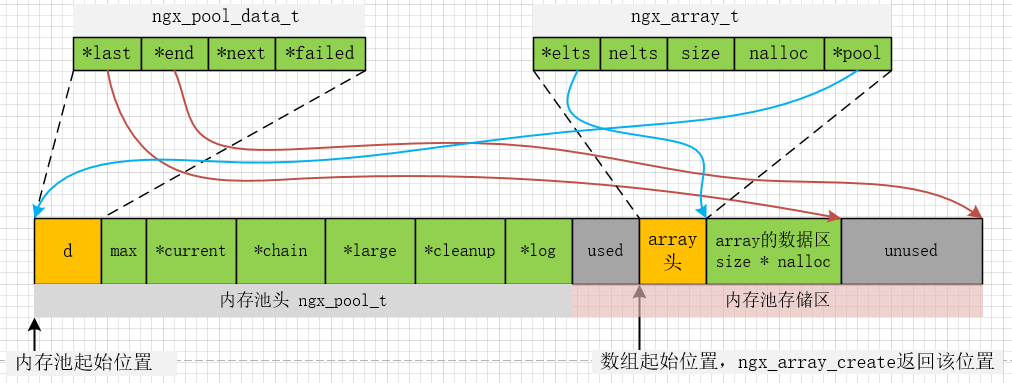
创建数组后内存池的物理结构图如下:
初始化数组
//初始化数组array,从内存池pool中分配n * size大小区域作为数据区并初始化array
static ngx_inline ngx_int_t
ngx_array_init(ngx_array_t *array, ngx_pool_t *pool, ngx_uint_t n, size_t size);
示例:初始化大小位5 * 10的数组
ngx_array_t *array = ngx_palloc(p,sizeof(ngx_array_t));  //从内存池中分配数组头
ngx_int_t ret = ngx_array_init(array, pool, 5, 10);
销毁数组
销毁数组的操作包括销毁数组数据区和数组头。这里的销毁动作实际上就是修改内存池的last指针,并没有调用free等释放内存的操作,显然,这种维护效率是很高的。
void
ngx_array_destroy(ngx_array_t*a)
{
    ngx_pool_t *p;

    p = a->pool;

    if ((u_char *) a->elts+ a->size * a->nalloc == p->d.last) {  //先销毁数组数据区
        p->d.last -=a->size * a->nalloc;  //设置内存池的last指针
    }

    if ((u_char *) a +sizeof(ngx_array_t) == p->d.last) {  //接着销毁数组头
        p->d.last = (u_char*) a;          //设置内存池的last指针
    }
}
添加1个元素
向数组添加元素的操作有两个,ngx_array_push 和 ngx_array_push_n,分别添加一个和多个元素。
但实际的添加操作并不在这两个函数中完成,例如ngx_array_push返回可以在该数组数据区中添加这个元素的位置,ngx_array_push_n则返回可以在该数组数据区中添加n个元素的起始位置,而添加操作即在获得添加位置之后进行,如后文的例子:
void *
ngx_array_push(ngx_array_t*a)
{
    void       *elt, *new;
    size_t      size;
    ngx_pool_t *p;

    if (a->nelts ==a->nalloc) {  //数组数据区满

        /* the arrayis full */

        size = a->size *a->nalloc;  //计算数组数据区的大小

        p = a->pool;

        if ((u_char *)a->elts + size == p->d.last  //若内存池的last指针指向数组数据区的末尾
            &&p->d.last + a->size <= p->d.end) //且内存池未使用的区域可以再分配一个size大小的小空间
        {
            p->d.last +=a->size;  //分配一个size大小的小空间(a->size为数组一个元素的大小)
            a->nalloc++;           //实际分配小空间的个数加1

        } else {
            /* allocate a new array */

            new =ngx_palloc(p, 2 * size);  //否则,扩展数组数据区为原来的2倍
            if (new == NULL) {
                return NULL;
            }

            ngx_memcpy(new,a->elts, size);//将原来数据区的内容拷贝到新的数据区
            a->elts = new;
            a->nalloc *= 2;             //注意:此处转移数据后,并未释放原来的数据区,内存池将统一释放
        }
    }

    elt = (u_char *)a->elts + a->size * a->nelts; //数据区中实际已经存放数据的子区的末尾
    a->nelts++;                                  //即最后一个数据末尾,该指针就是下一个元素开始的位置

    return elt;    //返回该末尾指针,即下一个元素应该存放的位置
}由此可见,向数组中添加元素实际上也是在修改内存池的last指针(若数组数据区满)及数组头信息,即使数组满了,需要扩展数据区内容,也只需要内存拷贝完成,并不需要数据的移动操作,这个效率也是相当高的。
使用示例
下面是向数组中添加10个整型元素后的一个例子:
/**
 * ngx_array_t_test.c
 */

#include <stdio.h>
#include "ngx_config.h"
#include "ngx_conf_file.h"
#include "nginx.h"
#include "ngx_core.h"
#include "ngx_string.h"
#include "ngx_palloc.h"
#include "ngx_array.h"

volatile ngx_cycle_t  *ngx_cycle;

void ngx_log_error_core(ngx_uint_t level, ngx_log_t *log, ngx_err_t err,
            const char *fmt, ...)
{
}

void print_pool(ngx_pool_t* pool)
{
    while (pool)
    {
        printf("pool = 0x%x\n", pool);
        printf("  .d\n");
        printf("    .last = 0x%x\n", pool->d.last);
        printf("    .end = 0x%x\n", pool->d.end);
        printf("    .next = 0x%x\n", pool->d.next);
        printf("    .failed = %d\n", pool->d.failed);
        printf("  .max = %d\n", pool->max);
        printf("  .current = 0x%x\n", pool->current);
        printf("  .chain = 0x%x\n", pool->chain);
        printf("  .large = 0x%x\n", pool->large);
        printf("  .cleanup = 0x%x\n", pool->cleanup);
        printf("  .log = 0x%x\n", pool->log);
        printf("available pool memory = %d\n\n", pool->d.end - pool->d.last);
        pool = pool->d.next;
    }
}

void print_array(ngx_array_t* a)
{
    if (a)
    {
        printf("array = 0x%x\n", a);
        printf("  .elts = 0x%x\n", a->elts);
        printf("  .nelts = %d\n", a->nelts);
        printf("  .size = %d\n", a->size);
        printf("  .nalloc = %d\n", a->nalloc);
        printf("  .pool = 0x%x\n", a->pool);

        printf("elements: ");
        int *ptr = (int*)(a->elts);
        for (; ptr < (int*)(a->elts + a->nalloc * a->size); )
        {
            printf("0x%x  ", *ptr++);
        }
        printf("\n");
    }
}

int main()
{
    ngx_pool_t *pool;
    int i;

    printf("--------------------------------\n");
    printf("create a new pool:\n");
    printf("--------------------------------\n");
    //创建内存池pool
    pool = ngx_create_pool(1024, NULL);
    print_pool(pool);

    printf("--------------------------------\n");
    printf("alloc an array from the pool:\n");
    printf("--------------------------------\n");
    //创建并初始化数组array,大小为10 * 4
    ngx_array_t *a = ngx_array_create(pool, 10, sizeof(int));
    print_pool(pool);

    for (i = 0; i < 10; i++)
    {
        //向数组中添加整数1~10
        int *ptr = ngx_array_push(a);
        *ptr = i + 1;
    }

    print_array(a);

    ngx_array_destroy(a);
    ngx_destroy_pool(pool);
    return 0;
}
Makefile内容如下:
CXX = gcc
CXXFLAGS += -g -Wall -Wextra

NGX_ROOT =/usr/nginx-1.14.1

TARGETS =ngx_array_t_test
TARGETS_C_FILE= $(TARGETS).c

CLEANUP = -rm -f $(TARGETS) *.o

all:$(TARGETS)

CORE_INCS =-I. \
    -I$(NGX_ROOT)/src/core \
    -I$(NGX_ROOT)/src/event \
    -I$(NGX_ROOT)/src/event/modules \
    -I$(NGX_ROOT)/src/os/unix \
    -I$(NGX_ROOT)/objs \

NGX_PALLOC =$(NGX_ROOT)/objs/src/core/ngx_palloc.o
NGX_STRING =$(NGX_ROOT)/objs/src/core/ngx_string.o
NGX_ALLOC =$(NGX_ROOT)/objs/src/os/unix/ngx_alloc.o
NGX_ARRAY =$(NGX_ROOT)/objs/src/core/ngx_array.o

$(TARGETS): $(TARGETS_C_FILE)
	$(CXX) $(CXXFLAGS) $(CORE_INCS) $(NGX_PALLOC) $(NGX_STRING) $(NGX_ALLOC) $(NGX_ARRAY) $^ -o $@

clean:
	-rm  $(TARGETS)
编译并执行的结果如下:(由于在centos 64位环境下,sizeof(ptr) = 8 )
[root@localhost src]# ./ngx_array_t_test
--------------------------------
create a new pool:
--------------------------------
pool = 0x163b010
  .d
    .last = 0x163b060
    .end = 0x163b410
    .next = 0x0
    .failed = 0
  .max = 944
  .current = 0x163b010
  .chain = 0x0
  .large = 0x0
  .cleanup = 0x0
  .log = 0x0
available pool memory = 944

--------------------------------
alloc an array from the pool:
--------------------------------
pool = 0x163b010
  .d
    .last = 0x163b0b0
    .end = 0x163b410
    .next = 0x0
    .failed = 0
  .max = 944
  .current = 0x163b010
  .chain = 0x0
  .large = 0x0
  .cleanup = 0x0
  .log = 0x0
available pool memory = 864

array = 0x163b060
  .elts = 0x163b088
  .nelts = 10
  .size = 4
  .nalloc = 10
  .pool = 0x163b010
elements: 0x1  0x2  0x3  0x4  0x5  0x6  0x7  0x8  0x9  0xa
下图是该示例内存分配结果的逻辑说明图:

ngx_hash_t
ngx_hash_t 结构
nginx的hash结构为 ngx_hash_t,hash元素结构为 ngx_hash_elt_t,定义如下:
typedef struct {               //hash元素结构
    void             *value;   //value,即某个key对应的值,即<key,value>中的value
    u_short           len;     //name长度
    u_char            name[1]; //某个要hash的数据(在nginx中表现为字符串),即<key,value>中的key
} ngx_hash_elt_t;

typedef struct {               //hash结构
    ngx_hash_elt_t  **buckets; //hash桶(有size个桶)
    ngx_uint_t        size;    //hash桶个数

} ngx_hash_t;

其中,sizeof(ngx_hash_t) = 8,sizeof(ngx_hash_elt_t) = 8。
实际上,ngx_hash_elt_t 结构中的name字段就是 ngx_hash_key_t 结构中的key。这在ngx_hash_init()函数中可以看到。该结构在模块配置解析时经常使用。
ngx_hash_init_t 结构
nginx的hash初始化结构是 ngx_hash_init_t,用来将其相关数据封装起来作为参数传递给ngx_hash_init() 或 ngx_hash_wildcard_init() 函数。这两个函数主要是在http相关模块中使用,例如 ngx_http_server_names() 函数,ngx_http_merge_types() 函数。
ngx_hash_init_t 结构如下:
typedef struct {                    //hash初始化结构
    ngx_hash_t       *hash;         //指向待初始化的hash结构
    ngx_hash_key_pt   key;          //hash函数指针

    ngx_uint_t        max_size;     //bucket的最大个数
    ngx_uint_t        bucket_size;  //每个bucket的空间

    char             *name;         //该hash结构的名字(仅在错误日志中使用)
    ngx_pool_t       *pool;         //该hash结构从pool指向的内存池中分配
    ngx_pool_t       *temp_pool;    //分配临时数据空间的内存池
} ngx_hash_init_t;

sizeof(ngx_hash_init_t)=28
ngx_hash_key_t 结构
该结构也主要用来保存要hash的数据,即键-值对<key,value>,在实际使用中,一般将多个键-值对保存在 ngx_hash_key_t 结构的数组中,作为参数传给 ngx_hash_init() 或ngx_hash_wildcard_init() 函数。其定义如下:
typedef struct {                    //hash key结构
    ngx_str_t         key;          //key,为nginx的字符串结构
    ngx_uint_t        key_hash;     //由该key计算出的hash值(通过hash函数如ngx_hash_key_lc())
    void             *value;        //该key对应的值,组成一个键-值对<key,value>
} ngx_hash_key_t;

typedef struct {                    //字符串结构
    size_t      len;                //字符串长度
    u_char     *data;               //字符串内容
} ngx_str_t;

sizeof(ngx_hash_key_t) = 16
一般在使用中,value指针可能指向静态数据区(例如全局数组、常量字符串)、堆区(例如动态分配的数据区用来保存value值)等。
hash操作
NGX_HASH_ELT_SIZE宏
NGX_HASH_ELT_SIZE宏用来计算上述ngx_hash_elt_t结构大小,定义如下:
#define NGX_HASH_ELT_SIZE(name)         \      //该参数name为ngx_hash_key_t结构指针
    (sizeof(void *) + ngx_align((name)->key.len + 2, sizeof(void *))) //以4字节对齐

在32位平台上,sizeof(void*)=4,(name)->key.len 即是 ngx_hash_key_t 结构中key的长度,
其中的"+2"是要加上该结构中len字段(u_short类型)的大小。
因此,NGX_HASH_ELT_SIZE(name)=4+ngx_align((name)->key.len + 2, 4),
该式后半部分即是(name)->key.len+2以4字节对齐的大小。

#define ngx_align(d, a)     (((d) + (a - 1)) & ~(a - 1))
功能:把d已a为最小单位对齐。d为要操作的目标;a为对齐单位,2的n次方。
用途:一般用于内存、数据对齐。
例如:ngx_align(12, 8)=16,即:如果将12字节按8字节对齐,那么至少要申请16字节这么大才能把12字节放里面
hash函数
hash函数有以下几种。
#define ngx_hash(key, c)   ((ngx_uint_t) key * 31 + c)  //hash宏
ngx_uint_t ngx_hash_key(u_char *data, size_t len);
ngx_uint_t ngx_hash_key_lc(u_char *data, size_t len);   //lc表示lower case,即字符串转换为小写后再计算hash值
ngx_uint_t ngx_hash_strlow(u_char *dst, u_char *src, size_t n);
hash函数都很简单,以上3个函数都会调用ngx_hash宏,该宏返回一个(长)整数。此处介绍第一个函数,定义如下。
ngx_uint_t
ngx_hash_key(u_char *data, size_t len)
{
    ngx_uint_t  i, key;

    key = 0;

    for (i = 0; i < len; i++) {
        key = ngx_hash(key, data[i]);
    }

    return key;
}
因此,ngx_hash_key函数的计算可表述为下列公式。
Key[0] = data[0]
Key[1] = data[0]*31 + data[1]
Key[2] = (data[0]*31 + data[1])*31 + data[2]
...
Key[len-1] = ((((data[0]*31 + data[1])*31 + data[2])*31) ... data[len-2])*31 + data[len-1]
即:key[len-1]即为传入的参数data对应的hash值。
hash初始化
hash初始化由 ngx_hash_init() 函数完成:
ngx_int_t
ngx_hash_init(ngx_hash_init_t *hinit, ngx_hash_key_t *names, ngx_uint_t nelts);
hinit:待初始化的hash结构
names:ngx_hash_key_t结构的数组,即键-值对<key,value>数组
nelts:该数组元素的个数
因此,在调用该函数进行初始化之前,ngx_hash_key_t 结构的数组是准备好的,如何使用,可以采用nginx的 ngx_array_t 结构。
该函数初始化的结果就是将names数组保存的键-值对<key,value>,通过hash的方式将其存入相应的一个或多个hash桶(即代码中的buckets)中,该hash过程用到的hash函数一般为ngx_hash_key_lc 等。hash桶里面存放的是 ngx_hash_elt_t 结构的指针(hash元素指针),该指针指向一个基本连续的数据区。该数据区中存放的是经hash之后的键-值对<key',value'>,即ngx_hash_elt_t 结构中的字段<name,value>。每一个这样的数据区存放的键-值对<key',value'>可以是一个或多个。
//nelts是names数组中(实际)元素的个数
ngx_int_t
ngx_hash_init(ngx_hash_init_t *hinit, ngx_hash_key_t *names, ngx_uint_t nelts)
{
    u_char          *elts;
    size_t           len;
    u_short         *test;
    ngx_uint_t       i, n, key, size, start, bucket_size;
    ngx_hash_elt_t  *elt, **buckets;

    for (n = 0; n < nelts; n++) {  //检查names数组的每一个元素,判断桶的大小是否够分配
        if (hinit->bucket_size < NGX_HASH_ELT_SIZE(&names[n]) + sizeof(void *))
        {   //有任何一个元素,桶的大小不够为该元素分配空间,则退出
            ngx_log_error(NGX_LOG_EMERG, hinit->pool->log, 0,
                          "could not build the %s, you should "
                          "increase %s_bucket_size: %i",
                          hinit->name, hinit->name, hinit->bucket_size);
            return NGX_ERROR;
        }
    }

    //分配2*max_size个字节的空间保存hash数据(该内存分配操作不在nginx的内存池中进行,因为test只是临时的)
    test = ngx_alloc(hinit->max_size * sizeof(u_short), hinit->pool->log);
    if (test == NULL) {
        return NGX_ERROR;
    }

    bucket_size = hinit->bucket_size - sizeof(void *); //一般sizeof(void*)=4

    start = nelts / (bucket_size / (2 * sizeof(void *))); //
    start = start ? start : 1;

    if (hinit->max_size > 10000 && hinit->max_size / nelts < 100) {
        start = hinit->max_size - 1000;
    }

    for (size = start; size < hinit->max_size; size++) {

        ngx_memzero(test, size * sizeof(u_short));

        //标记1:此块代码是检查bucket大小是否够分配hash数据
        for (n = 0; n < nelts; n++) {
            if (names[n].key.data == NULL) {
                continue;
            }

            //计算key和names中所有name长度,并保存在test[key]中
            key = names[n].key_hash % size; //若size=1,则key一直为0
            test[key] = (u_short) (test[key] + NGX_HASH_ELT_SIZE(&names[n]));

            if (test[key] > (u_short) bucket_size) {//若超过了桶的大小,则到下一个桶重新计算
                goto next;
            }
        }

        goto found;

    next:

        continue;
    }

    //若没有找到合适的bucket,退出
    ngx_log_error(NGX_LOG_EMERG, hinit->pool->log, 0,
                  "could not build the %s, you should increase "
                  "either %s_max_size: %i or %s_bucket_size: %i",
                  hinit->name, hinit->name, hinit->max_size,
                  hinit->name, hinit->bucket_size);

    ngx_free(test);

    return NGX_ERROR;

found:  //找到合适的bucket

    for (i = 0; i < size; i++) {  //将test数组前size个元素初始化为4
        test[i] = sizeof(void *);
    }

    /** 标记2:与标记1代码基本相同,但此块代码是再次计算所有hash数据的总长度(标记1的检查已通过)
        但此处的test[i]已被初始化为4,即相当于后续的计算再加上一个void指针的大小。
     */
    for (n = 0; n < nelts; n++) {
        if (names[n].key.data == NULL) {
            continue;
        }

        //计算key和names中所有name长度,并保存在test[key]中
        key = names[n].key_hash % size; //若size=1,则key一直为0
        test[key] = (u_short) (test[key] + NGX_HASH_ELT_SIZE(&names[n]));
    }

     //计算hash数据的总长度
    len = 0;

    for (i = 0; i < size; i++) {
        if (test[i] == sizeof(void *)) {//若test[i]仍为初始化的值4,即没有变化,则继续
            continue;
        }

        //对test[i]按ngx_cacheline_size对齐(32位平台,ngx_cacheline_size=32)
        test[i] = (u_short) (ngx_align(test[i], ngx_cacheline_size));

        len += test[i];
    }

    if (hinit->hash == NULL) {//在内存池中分配hash头及buckets数组(size个ngx_hash_elt_t*结构)
        hinit->hash = ngx_pcalloc(hinit->pool, sizeof(ngx_hash_wildcard_t)
            + size * sizeof(ngx_hash_elt_t *));
        if (hinit->hash == NULL) {
            ngx_free(test);
            return NGX_ERROR;
        }

        //计算buckets的启示位置(在ngx_hash_wildcard_t结构之后)
        buckets = (ngx_hash_elt_t **)
            ((u_char *) hinit->hash + sizeof(ngx_hash_wildcard_t));

    } else {  //在内存池中分配buckets数组(size个ngx_hash_elt_t*结构)
        buckets = ngx_pcalloc(hinit->pool, size * sizeof(ngx_hash_elt_t *));
        if (buckets == NULL) {
            ngx_free(test);
            return NGX_ERROR;
        }
    }

    //接着分配elts,大小为len+ngx_cacheline_size,此处为什么+32?——下面要按32字节对齐
    elts = ngx_palloc(hinit->pool, len + ngx_cacheline_size);
    if (elts == NULL) {
        ngx_free(test);
        return NGX_ERROR;
    }

     //将elts地址按ngx_cacheline_size=32对齐
    elts = ngx_align_ptr(elts, ngx_cacheline_size);

    for (i = 0; i < size; i++) {  //将buckets数组与相应elts对应起来
        if (test[i] == sizeof(void *)) {
            continue;
        }

        buckets[i] = (ngx_hash_elt_t *) elts;
        elts += test[i];

    }

    for (i = 0; i < size; i++) {  //test数组置0
        test[i] = 0;
    }

    for (n = 0; n < nelts; n++) { //将传进来的每一个hash数据存入hash表
        if (names[n].key.data == NULL) {
            continue;
        }

        //计算key,即将被hash的数据在第几个bucket,并计算其对应的elts位置
        key = names[n].key_hash % size;
        elt = (ngx_hash_elt_t *) ((u_char *) buckets[key] + test[key]);

        //对ngx_hash_elt_t结构赋值
        elt->value = names[n].value;
        elt->len = (u_short) names[n].key.len;

        ngx_strlow(elt->name, names[n].key.data, names[n].key.len);

        //计算下一个要被hash的数据的长度偏移
        test[key] = (u_short) (test[key] + NGX_HASH_ELT_SIZE(&names[n]));
    }

    for (i = 0; i < size; i++) {
        if (buckets[i] == NULL) {
            continue;
        }

        //test[i]相当于所有被hash的数据总长度
        elt = (ngx_hash_elt_t *) ((u_char *) buckets[i] + test[i]);

        elt->value = NULL;
    }

    ngx_free(test);  //释放该临时空间

    hinit->hash->buckets = buckets;
    hinit->hash->size = size;

    return NGX_OK;
}
所谓的hash数据长度即指 ngx_hash_elt_t 结构被赋值后的长度。nelts个元素存放在names数组中,调用该函数对hash进行初始化之后,这nelts个元素被保存在size个hash桶指向的ngx_hash_elt_t 数据区,这些数据区中共保存了nelts个hash元素。即hash桶(buckets)存放的是ngx_hash_elt_t 数据区的起始地址,以该起始地址开始的数据区存放的是经hash之后的hash元素,每个hash元素的最后是以name[0]为开始的字符串,该字符串就是names数组中某个元素的key,即键值对<key,value>中的key,然后该字符串之后会有几个字节的因对齐产生的padding。
下面是一个初始化后的hash的物理结构图:

使用示例
本节给出一个创建内存池并从中分配hash结构、hash桶、hash元素并将键-值对<key,value>加入该hash结构的简单例子。
在该例中,将完成这样一个应用,将给定的多个url及其ip组成的二元组<url,ip>作为<key,value>,初始化时对这些<url,ip>进行hash,然后根据给定的url查找其对应的ip地址,若没有找到,则给出相关提示信息。下面是示例代码。
/**
 * ngx_hash_t_test.c
 */

#include <stdio.h>
#include "ngx_config.h"
#include "ngx_conf_file.h"
#include "nginx.h"
#include "ngx_core.h"
#include "ngx_string.h"
#include "ngx_palloc.h"
#include "ngx_array.h"
#include "ngx_hash.h"

#define Max_Num 7
#define Max_Size 1024
#define Bucket_Size 64  //256, 64

#define NGX_HASH_ELT_SIZE(name)               \
    (sizeof(void *) + ngx_align((name)->key.len + 2, sizeof(void *)))

/* for hash test */
static ngx_str_t urls[Max_Num] = {
    ngx_string("www.baidu.com"),  //220.181.111.147
    ngx_string("www.sina.com.cn"),  //58.63.236.35
    ngx_string("www.google.com"),  //74.125.71.105
    ngx_string("www.qq.com"),  //60.28.14.190
    ngx_string("www.163.com"),  //123.103.14.237
    ngx_string("www.sohu.com"),  //219.234.82.50
    ngx_string("www.abo321.org")  //117.40.196.26
};

static char* values[Max_Num] = {
    "220.181.111.147",
    "58.63.236.35",
    "74.125.71.105",
    "60.28.14.190",
    "123.103.14.237",
    "219.234.82.50",
    "117.40.196.26"
};

#define Max_Url_Len 15
#define Max_Ip_Len 15

#define Max_Num2 2

/* for finding test */
static ngx_str_t urls2[Max_Num2] = {
    ngx_string("www.china.com"),  //60.217.58.79
    ngx_string("www.csdn.net")  //117.79.157.242
};

/* for passing compiling */
volatile ngx_cycle_t  *ngx_cycle;
void ngx_log_error_core(ngx_uint_t level, ngx_log_t *log, ngx_err_t err, const char *fmt, ...)
{
}

ngx_hash_t* init_hash(ngx_pool_t *pool, ngx_array_t *array)
{
    ngx_int_t result;
    ngx_hash_init_t hinit;

    ngx_cacheline_size = 32;  //here this variable for nginx must be defined
    hinit.hash = NULL;  //if hinit.hash is NULL, it will alloc memory for it in ngx_hash_init
    hinit.key = &ngx_hash_key_lc;  //hash function
    hinit.max_size = Max_Size;
    hinit.bucket_size = Bucket_Size;
    hinit.name = "my_hash_sample";
    hinit.pool = pool;  //the hash table exists in the memory pool
    hinit.temp_pool = NULL;
    //把数组中存放的元素放到hash表中
    result = ngx_hash_init(&hinit, (ngx_hash_key_t*)array->elts, array->nelts);
    if (result != NGX_OK)
        return NULL;

    return hinit.hash;
}

void print_pool(ngx_pool_t* pool)
{
    while (pool)
    {
        printf("pool = 0x%x\n", pool);
        printf("  .d\n");
        printf("    .last = 0x%x\n", pool->d.last);
        printf("    .end = 0x%x\n", pool->d.end);
        printf("    .next = 0x%x\n", pool->d.next);
        printf("    .failed = %d\n", pool->d.failed);
        printf("  .max = %d\n", pool->max);
        printf("  .current = 0x%x\n", pool->current);
        printf("  .chain = 0x%x\n", pool->chain);
        printf("  .large = 0x%x\n", pool->large);
        printf("  .cleanup = 0x%x\n", pool->cleanup);
        printf("  .log = 0x%x\n", pool->log);
        printf("available pool memory = %d\n\n", pool->d.end - pool->d.last);
        pool = pool->d.next;
    }
}

void print_hash_array(ngx_array_t* a)
{
    char prefix[] = "          ";

    if (a == NULL)
        return;

    printf("array = 0x%x\n", a);
    printf("  .elts = 0x%x\n", a->elts);
    printf("  .nelts = %d\n", a->nelts);
    printf("  .size = %d\n", a->size);
    printf("  .nalloc = %d\n", a->nalloc);
    printf("  .pool = 0x%x\n", a->pool);

    printf("  elements:\n");
    ngx_hash_key_t *ptr = (ngx_hash_key_t*)(a->elts);
    for (; ptr < (ngx_hash_key_t*)(a->elts + a->nalloc * a->size); ptr++)
    {
        printf("    0x%x: {key = (\"%s\"%.*s, %d), key_hash = %-10ld, value = \"%s\"%.*s}\n",
            ptr, ptr->key.data, Max_Url_Len - ptr->key.len, prefix, ptr->key.len,
            ptr->key_hash, ptr->value, Max_Ip_Len - strlen(ptr->value), prefix);
    }
    printf("\n");
}

/**
 * pass array pointer to read elts[i].key_hash, then for getting the position - key
 */
void print_hash(ngx_hash_t *hash, ngx_array_t *array)
{
    int loop;
    char prefix[] = "          ";
    u_short test[Max_Num] = {0};
    ngx_uint_t key;
    ngx_hash_key_t* elts;
    int nelts;

    if (hash == NULL)
        return;

    printf("hash = 0x%x: **buckets = 0x%x, buckets nums = %d\n", hash, hash->buckets, hash->size);

    for (loop = 0; loop < hash->size; loop++)
    {
        ngx_hash_elt_t *elt = hash->buckets[loop];
        printf("  0x%x: buckets[%d] = 0x%x\n", &(hash->buckets[loop]), loop, elt);
    }
    printf("\n");

    //elts是数组存放数据的起始地址
    elts = (ngx_hash_key_t*)array->elts;
    nelts = array->nelts;
    //遍历hash表中所有元素,从hash表中获取元素
    for (loop = 0; loop < nelts; loop++)
    {
        char url[Max_Url_Len + 1] = {0};
        //计算元素在哪个hash桶里
        key = elts[loop].key_hash % hash->size;
        printf("&&&&& ngx_hash_key_t: name = %s, value = %s\n", (char*)elts[loop].value, elts[loop].key.data);

        ngx_hash_elt_t *elt = (ngx_hash_elt_t *) ((u_char *) hash->buckets[key] + test[key]);
        //将name的值拷贝到url中
        ngx_strlow(url, elt->name, elt->len);
        //replace elt->name with url
        printf("  buckets %d: 0x%x: {value = \"%s\", len = %d, name = \"%s\"}\n",
            key, elt, (char*)elt->value, elt->len, url);

        test[key] = (u_short) (test[key] + NGX_HASH_ELT_SIZE(&elts[loop]));
    }
}

ngx_array_t* add_urls_to_array(ngx_pool_t *pool)
{
    int loop;
    char prefix[] = "          ";
    ngx_array_t *a = ngx_array_create(pool, Max_Num, sizeof(ngx_hash_key_t));

    for (loop = 0; loop < Max_Num; loop++)
    {
        ngx_hash_key_t *hashkey = (ngx_hash_key_t*)ngx_array_push(a);
        hashkey->key = urls[loop];
        //由该key计算出的hash值
        hashkey->key_hash = ngx_hash_key_lc(urls[loop].data, urls[loop].len);
        hashkey->value = (void*)values[loop];
    }

    return a;
}

void find_test(ngx_hash_t *hash, ngx_str_t addr[], int num)
{
    ngx_uint_t key;
    int loop;
    char prefix[] = "          ";

    for (loop = 0; loop < num; loop++)
    {
        //计算hash的key
        key = ngx_hash_key_lc(addr[loop].data, addr[loop].len);
        //在hash表中根据key查找对应的value(即IP)
        void *value = ngx_hash_find(hash, key, addr[loop].data, addr[loop].len);
        if (value)
        {
            printf("(url = \"%s\", key = %-10ld) found, (ip = \"%s\")\n",
                addr[loop].data, key, (char*)value);
        }
        else
        {
            printf("(url = \"%s\"%.*s, key = %-10d) not found!\n",
                addr[loop].data, Max_Url_Len - addr[loop].len, prefix, key);
        }
    }
}

int main(/* int argc, char **argv */)
{
    ngx_pool_t *pool = NULL;
    ngx_array_t *array = NULL;
    ngx_hash_t *hash;

    printf("--------------------------------\n");
    printf("create a new pool:\n");
    printf("--------------------------------\n");
    pool = ngx_create_pool(1024, NULL);

    print_pool(pool);

    printf("--------------------------------\n");
    printf("create and add urls to it:\n");
    printf("--------------------------------\n");
    array = add_urls_to_array(pool);  //in fact, here should validate array
    print_hash_array(array);

    printf("--------------------------------\n");
    printf("the pool:\n");
    printf("--------------------------------\n");
    print_pool(pool);

    hash = init_hash(pool, array);
    if (hash == NULL)
    {
        printf("Failed to initialize hash!\n");
        return -1;
    }

    printf("--------------------------------\n");
    printf("the hash:\n");
    printf("--------------------------------\n");
    print_hash(hash, array);
    printf("\n");

    printf("--------------------------------\n");
    printf("the pool:\n");
    printf("--------------------------------\n");
    print_pool(pool);

    //find test
    printf("--------------------------------\n");
    printf("find test:\n");
    printf("--------------------------------\n");
    find_test(hash, urls, Max_Num);
    printf("\n");

    find_test(hash, urls2, Max_Num2);

    //release
    ngx_array_destroy(array);
    ngx_destroy_pool(pool);

    return 0;
}
编码的Makefile内容如下:
CXX = gcc
CXXFLAGS += -g -Wall -Wextra

NGX_ROOT =/usr/nginx-1.14.1

TARGETS =ngx_hash_t_test
TARGETS_C_FILE= $(TARGETS).c

CLEANUP = -rm -f $(TARGETS) *.o

all:$(TARGETS)

CORE_INCS =-I. \
    -I$(NGX_ROOT)/src/core \
    -I$(NGX_ROOT)/src/event \
    -I$(NGX_ROOT)/src/event/modules \
    -I$(NGX_ROOT)/src/os/unix \
    -I$(NGX_ROOT)/objs \

NGX_PALLOC =$(NGX_ROOT)/objs/src/core/ngx_palloc.o
NGX_STRING =$(NGX_ROOT)/objs/src/core/ngx_string.o
NGX_ALLOC =$(NGX_ROOT)/objs/src/os/unix/ngx_alloc.o
NGX_ARRAY = $(NGX_ROOT)/objs/src/core/ngx_array.o
NGX_HASH = $(NGX_ROOT)/objs/src/core/ngx_hash.o

$(TARGETS): $(TARGETS_C_FILE)
	$(CXX) $(CXXFLAGS) $(CORE_INCS) $(NGX_PALLOC) $(NGX_STRING) $(NGX_ALLOC) $(NGX_ARRAY) $(NGX_HASH) $^ -o $@

clean:
	-rm  $(TARGETS)
执行结果如下:
[root@localhost src]# ./ngx_hash_t_test
--------------------------------
create a new pool:
--------------------------------
pool = 0x13a1010
  .d
    .last = 0x13a1060
    .end = 0x13a1410
    .next = 0x0
    .failed = 0
  .max = 944
  .current = 0x13a1010
  .chain = 0x0
  .large = 0x0
  .cleanup = 0x0
  .log = 0x0
available pool memory = 944

--------------------------------
create and add urls to it:
--------------------------------
array = 0x13a1060
  .elts = 0x13a1088
  .nelts = 7
  .size = 32
  .nalloc = 7
  .pool = 0x13a1010
  elements:
    0x13a1088: {key = ("www.baidu.com"  , 13), key_hash = 4620597989937505175, value = "220.181.111.147"}
    0x13a10a8: {key = ("www.sina.com.cn", 15), key_hash = -5256504115770613466, value = "58.63.236.35"   }
    0x13a10c8: {key = ("www.google.com" , 14), key_hash = -4335270595498688253, value = "74.125.71.105"  }
    0x13a10e8: {key = ("www.qq.com"     , 10), key_hash = 3251127237744874, value = "60.28.14.190"   }
    0x13a1108: {key = ("www.163.com"    , 11), key_hash = 100784885883762922, value = "123.103.14.237" }
    0x13a1128: {key = ("www.sohu.com"   , 12), key_hash = 3124333330398216435, value = "219.234.82.50"  }
    0x13a1148: {key = ("www.abo321.org" , 14), key_hash = -4335440368673832655, value = "117.40.196.26"  }

--------------------------------
the pool:
--------------------------------
pool = 0x13a1010
  .d
    .last = 0x13a1168
    .end = 0x13a1410
    .next = 0x0
    .failed = 0
  .max = 944
  .current = 0x13a1010
  .chain = 0x0
  .large = 0x0
  .cleanup = 0x0
  .log = 0x0
available pool memory = 680

--------------------------------
the hash:
--------------------------------
hash = 0x13a1168: **buckets = 0x13a1180, buckets nums = 6
  0x13a1180: buckets[0] = 0x0
  0x13a1188: buckets[1] = 0x13a11c0
  0x13a1190: buckets[2] = 0x13a11e0
  0x13a1198: buckets[3] = 0x13a1220
  0x13a11a0: buckets[4] = 0x13a1260
  0x13a11a8: buckets[5] = 0x13a12a0

&&&&& ngx_hash_key_t: name = 220.181.111.147, value = www.baidu.com
  buckets 5: 0x13a12a0: {value = "220.181.111.147", len = 13, name = "www.baidu.com"}
&&&&& ngx_hash_key_t: name = 58.63.236.35, value = www.sina.com.cn
  buckets 2: 0x13a11e0: {value = "58.63.236.35", len = 15, name = "www.sina.com.cn"}
&&&&& ngx_hash_key_t: name = 74.125.71.105, value = www.google.com
  buckets 1: 0x13a11c0: {value = "74.125.71.105", len = 14, name = "www.google.com"}
&&&&& ngx_hash_key_t: name = 60.28.14.190, value = www.qq.com
  buckets 4: 0x13a1260: {value = "60.28.14.190", len = 10, name = "www.qq.com"}
&&&&& ngx_hash_key_t: name = 123.103.14.237, value = www.163.com
  buckets 4: 0x13a1278: {value = "123.103.14.237", len = 11, name = "www.163.com"}
&&&&& ngx_hash_key_t: name = 219.234.82.50, value = www.sohu.com
  buckets 3: 0x13a1220: {value = "219.234.82.50", len = 12, name = "www.sohu.com"}
&&&&& ngx_hash_key_t: name = 117.40.196.26, value = www.abo321.org
  buckets 3: 0x13a1238: {value = "117.40.196.26", len = 14, name = "www.abo321.org"}

--------------------------------
the pool:
--------------------------------
pool = 0x13a1010
  .d
    .last = 0x13a12d0
    .end = 0x13a1410
    .next = 0x0
    .failed = 0
  .max = 944
  .current = 0x13a1010
  .chain = 0x0
  .large = 0x0
  .cleanup = 0x0
  .log = 0x0
available pool memory = 320

--------------------------------
find test:
--------------------------------
(url = "www.baidu.com", key = 4620597989937505175) found, (ip = "220.181.111.147")
(url = "www.sina.com.cn", key = -5256504115770613466) found, (ip = "58.63.236.35")
(url = "www.google.com", key = -4335270595498688253) found, (ip = "74.125.71.105")
(url = "www.qq.com", key = 3251127237744874) found, (ip = "60.28.14.190")
(url = "www.163.com", key = 100784885883762922) found, (ip = "123.103.14.237")
(url = "www.sohu.com", key = 3124333330398216435) found, (ip = "219.234.82.50")
(url = "www.abo321.org", key = -4335440368673832655) found, (ip = "117.40.196.26")

(url = "www.china.com"  , key = -1954599725) not found!
(url = "www.csdn.net"   , key = -1667448544) not found!
以上结果是bucket_size=64字节的输出。由该结果可以看出,对于给定的7个url,程序将其分到了3个bucket中,详见该结果。该例子的hash物理结构图如下。

ngx_rbtree_t
ngx_rbtree_node_t:红黑树节点
typedef ngx_uint_t  ngx_rbtree_key_t;
typedef ngx_int_t   ngx_rbtree_key_int_t;

typedef struct ngx_rbtree_node_s  ngx_rbtree_node_t;

struct ngx_rbtree_node_s {
    /* 无符号整型的关键字 */
    ngx_rbtree_key_t       key;
    /* 左子节点 */
    ngx_rbtree_node_t     *left;
    /* 右子节点 */
    ngx_rbtree_node_t     *right;
    /* 父节点 */
    ngx_rbtree_node_t     *parent;
    /* 节点的颜色,0 表示黑色,1 表示红色 */
    u_char                 color;
    /* 仅 1 字节的节点数据。由于表示的空间太小,一般很少使用 */
    u_char                 data;
};
ngx_rbtree_t:红黑树
typedef struct ngx_rbtree_s  ngx_rbtree_t;

/* 为解决不同节点含有相同关键字的元素冲突问题,红黑树设置了 ngx_rbtree_insert_pt
 * 指针,这样可灵活地添加冲突元素 */
typedef void (*ngx_rbtree_insert_pt) (ngx_rbtree_node_t *root,
    ngx_rbtree_node_t *node, ngx_rbtree_node_t *sentinel);

struct ngx_rbtree_s {
    /* 指树的根节点。注意,根节点也是数据元素 */
    ngx_rbtree_node_t     *root;
    /* 指向 NIL 哨兵节点 */
    ngx_rbtree_node_t     *sentinel;
    /* 添加元素节点的函数指针,解决具有相同键值,但不同颜色节点的冲突问题;
     * 该函数指针决定新节点的行为是新增还是替换原始某个节点*/
    ngx_rbtree_insert_pt   insert;
};
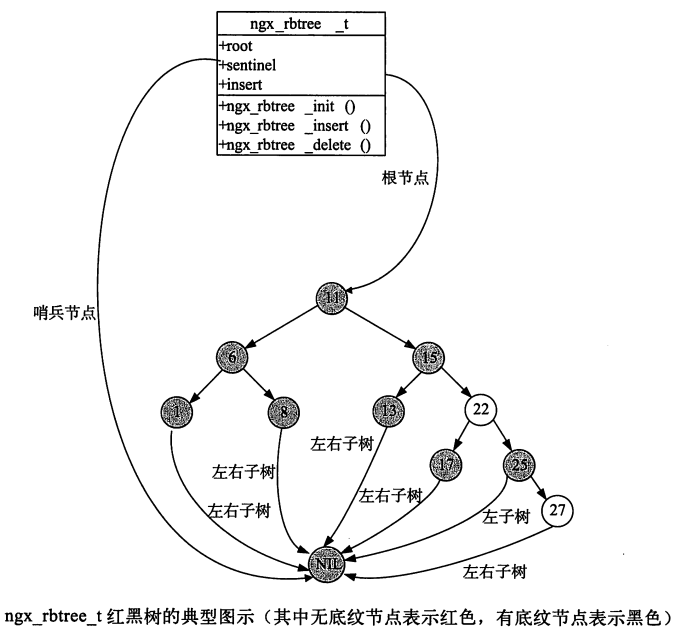
示例:依次往空的 ngx_rbtree_t 红黑树容器中添加元素 1、6、8、11、13、15、17、22、25、27 后,会形成如下的红黑树:
ngx_str_node_t:带字符串的红黑树节点
如果需要使用带字符串的红黑树节点,可以使用如下结构体:
typedef struct
{
	ngx_rbtree_node_t	node;	// 红黑树节点,不必是第一个成员
	ngx_str_t			str;	// 节点的其他信息
} ngx_str_node_t;
初始化红黑树
/* 设置该节点颜色为红色 */
#define ngx_rbt_red(node)               ((node)->color = 1)
/* 设置该节点颜色为黑色 */
#define ngx_rbt_black(node)             ((node)->color = 0)

/* a sentinel must be black */
/* 初始化一个哨兵节点,哨兵节点(即叶子节点)一定是黑色的 */
#define ngx_rbtree_sentinel_init(node)  ngx_rbt_black(node)

/*
 * 参数含义:
 * - tree:是红黑树容器的指针
 * - s:是哨兵节点的指针
 * - i:是ngx_rbtree_insert_pt类型的节点添加方法
 *
 * 执行意义:
 * 初始化红黑树,包括初始化根节点、哨兵节点、ngx_rbtree_insert_pt节点添加方法
 */
#define ngx_rbtree_init(tree, s, i)                                           \
    ngx_rbtree_sentinel_init(s);                                              \
    (tree)->root = s;                                                         \
    (tree)->sentinel = s;                                                     \
    (tree)->insert = i
向红黑树中添加节点
/*
 * 参数含义:
 * - tree:是红黑树容器的指针
 * - node:是需要添加到红黑树的节点指针
 *
 * 执行意义:
 * 向红黑树中添加节点,该方法会通过旋转红黑树保持树的平衡.
 */
void ngx_rbtree_insert(ngx_rbtree_t *tree, ngx_rbtree_node_t *node)
{
    ngx_rbtree_node_t  **root, *temp, *sentinel;

    /* a binary tree insert */

    root     = &tree->root;
    sentinel = tree->sentinel;

    /* 若当前红黑树为空,即此时为插入第一个节点 */
    if (*root == sentinel)
    {
        node->parent = NULL;
        node->left   = sentinel;
        node->right  = sentinel;
        /* 第一个节点为根节点,因此设置颜色为黑色 */
        ngx_rbt_black(node);
        *root = node;

        return;
    }

    /* 否则调用插入方法 */
    tree->insert(*root, node, sentinel);

    /* re-balance tree */

    /* 根据红黑树的性质调整树的结构 */
    while (node != *root && ngx_rbt_is_red(node->parent))
    {

        if (node->parent == node->parent->parent->left)
        {
            temp = node->parent->parent->right;

            if (ngx_rbt_is_red(temp))
            {
                ngx_rbt_black(node->parent);
                ngx_rbt_black(temp);
                ngx_rbt_red(node->parent->parent);
                node = node->parent->parent;

            }
            else
            {
                if (node == node->parent->right)
                {
                    node = node->parent;
                    ngx_rbtree_left_rotate(root, sentinel, node);
                }

                ngx_rbt_black(node->parent);
                ngx_rbt_red(node->parent->parent);
                ngx_rbtree_right_rotate(root, sentinel, node->parent->parent);
            }

        }
        else
        {
            temp = node->parent->parent->left;

            if (ngx_rbt_is_red(temp))
            {
                ngx_rbt_black(node->parent);
                ngx_rbt_black(temp);
                ngx_rbt_red(node->parent->parent);
                node = node->parent->parent;

            }
            else
            {
                if (node == node->parent->left)
                {
                    node = node->parent;
                    ngx_rbtree_right_rotate(root, sentinel, node);
                }

                ngx_rbt_black(node->parent);
                ngx_rbt_red(node->parent->parent);
                ngx_rbtree_left_rotate(root, sentinel, node->parent->parent);
            }
        }
    }

    ngx_rbt_black(*root);
}
红黑树插入节点
/*
 * 参数含义:
 * - tree:是红黑树容器的指针
 * - node:是需要添加到红黑树的节点指针
 *
 * 执行意义:
 * 向红黑树中添加节点,该方法会通过旋转红黑树保持树的平衡.
 */
void ngx_rbtree_insert(ngx_rbtree_t *tree, ngx_rbtree_node_t *node)
{
    ngx_rbtree_node_t  **root, *temp, *sentinel;

    /* a binary tree insert */

    root     = &tree->root;
    sentinel = tree->sentinel;

    /* 若当前红黑树为空,即此时为插入第一个节点 */
    if (*root == sentinel)
    {
        node->parent = NULL;
        node->left   = sentinel;
        node->right  = sentinel;
        /* 第一个节点为根节点,因此设置颜色为黑色 */
        ngx_rbt_black(node);
        *root = node;

        return;
    }

    /* 否则调用插入方法 */
    tree->insert(*root, node, sentinel);

    /* re-balance tree */

    /* 根据红黑树的性质调整树的结构 */
    while (node != *root && ngx_rbt_is_red(node->parent))
    {

        if (node->parent == node->parent->parent->left)
        {
            temp = node->parent->parent->right;

            if (ngx_rbt_is_red(temp))
            {
                ngx_rbt_black(node->parent);
                ngx_rbt_black(temp);
                ngx_rbt_red(node->parent->parent);
                node = node->parent->parent;

            }
            else
            {
                if (node == node->parent->right)
                {
                    node = node->parent;
                    ngx_rbtree_left_rotate(root, sentinel, node);
                }

                ngx_rbt_black(node->parent);
                ngx_rbt_red(node->parent->parent);
                ngx_rbtree_right_rotate(root, sentinel, node->parent->parent);
            }

        }
        else
        {
            temp = node->parent->parent->left;

            if (ngx_rbt_is_red(temp))
            {
                ngx_rbt_black(node->parent);
                ngx_rbt_black(temp);
                ngx_rbt_red(node->parent->parent);
                node = node->parent->parent;

            }
            else
            {
                if (node == node->parent->left)
                {
                    node = node->parent;
                    ngx_rbtree_right_rotate(root, sentinel, node);
                }

                ngx_rbt_black(node->parent);
                ngx_rbt_red(node->parent->parent);
                ngx_rbtree_left_rotate(root, sentinel, node->parent->parent);
            }
        }
    }

    ngx_rbt_black(*root);
}
一般该插入方法实际会调用ngx_rbtree_insert_value来插入。
使用示例
下面将展示一个例子:创建红黑树并插入节点、查找节点、遍历红黑树:
/**
 * ngx_rbtree_t_test.c
 */

#include <stdio.h>
#include "ngx_config.h"
#include "ngx_conf_file.h"
#include "nginx.h"
#include "ngx_core.h"
#include "ngx_string.h"
#include "ngx_rbtree.h"


/* for passing compiling */
volatile ngx_cycle_t  *ngx_cycle;
void ngx_log_error_core(ngx_uint_t level, ngx_log_t *log, ngx_err_t err, const char *fmt, ...)
{
}

//原函数是ngx_str_rbtree_insert_value,这里做了修改
void
ngx_str_rbtree_insert_value1(ngx_rbtree_node_t *temp,
    ngx_rbtree_node_t *node, ngx_rbtree_node_t *sentinel)
{
    ngx_str_node_t      *n, *t;
    ngx_rbtree_node_t  **p;

    for ( ;; ) {

        //结构体类型强制转换
        n = (ngx_str_node_t *) node;
        t = (ngx_str_node_t *) temp;

        if (node->key != temp->key) {

            p = (node->key < temp->key) ? &temp->left : &temp->right;

        } else if (n->str.len != t->str.len) {

            p = (n->str.len < t->str.len) ? &temp->left : &temp->right;

        } else {
            p = (ngx_memcmp(n->str.data, t->str.data, n->str.len) < 0)
                 ? &temp->left : &temp->right;
        }

        if (*p == sentinel) {
            break;
        }

        temp = *p;
    }

    printf("insert node : str = %s, key = %d\n", n->str.data, node->key);

    *p = node;
    node->parent = temp;
    node->left = sentinel;
    node->right = sentinel;
    ngx_rbt_red(node);
}

//ngx_str_rbtree_lookup,这里做了修改
ngx_str_node_t *
ngx_str_rbtree_lookup1(ngx_rbtree_t *rbtree, ngx_str_t *val, uint32_t hash)
{
    ngx_int_t           rc;
    ngx_str_node_t     *n;
    ngx_rbtree_node_t  *node, *sentinel;

    node = rbtree->root;
    sentinel = rbtree->sentinel;

    printf("\nbegin to find node : str = %s, key = %d ---------\n", val->data, hash);


    while (node != sentinel) {

        n = (ngx_str_node_t *) node;
        printf("cur node : str = %s, key = %d\n", n->str.data, node->key);
        if (hash != node->key) {
            node = (hash < node->key) ? node->left : node->right;
            continue;
        }

        if (val->len != n->str.len) {
            node = (val->len < n->str.len) ? node->left : node->right;
            continue;
        }

        rc = ngx_memcmp(val->data, n->str.data, val->len);

        if (rc < 0) {
            node = node->left;
            continue;
        }

        if (rc > 0) {
            node = node->right;
            continue;
        }

        return n;
    }
    printf("could not find node!\n");
    return NULL;
}

//中序遍历红黑树
void InOrder(ngx_rbtree_node_t *root, ngx_rbtree_node_t* sentinel)
{
    if (root == sentinel)
    {
        return;
    }
    InOrder(root->left, sentinel);
    ngx_str_node_t* node = (ngx_str_node_t *) root;
    printf("node: str = %s, key = %d\n", node->str.data, root->key);
    InOrder(root->right, sentinel);
}

int main(/* int argc, char **argv */)
{
    ngx_rbtree_t rbtree;
    ngx_rbtree_node_t sentinel;

    //初始化rbtree,且插入函数为ngx_str_rbtree_insert_value
    ngx_rbtree_init(&rbtree, &sentinel, ngx_str_rbtree_insert_value1);

    //初始化10个红黑树节点
    ngx_str_node_t strnode[10] = {0};
    ngx_str_set(&strnode[0].str, "he");
	ngx_str_set(&strnode[1].str, "jon");
	ngx_str_set(&strnode[2].str, "Issac");
	ngx_str_set(&strnode[3].str, "tursom");
	ngx_str_set(&strnode[4].str, "will");

	ngx_str_set(&strnode[5].str, "birate");
	ngx_str_set(&strnode[6].str, "ren");
	ngx_str_set(&strnode[7].str, "stephen");
	ngx_str_set(&strnode[8].str, "ultimate");
	ngx_str_set(&strnode[9].str, "he");

    int i;
    for(i = 0; i<10; i++)
    {
        //将strnode数组的每个节点的key设为不重复的值
        strnode[i].node.key = i;
        //会调用ngx_str_rbtree_insert_value1函数插入节点
        ngx_rbtree_insert(&rbtree, &strnode[i].node);

    }

    ngx_str_t str = ngx_string("he");
    //查找str且key=9的节点
    ngx_str_node_t* node = ngx_str_rbtree_lookup1(&rbtree, &str, 9);
    if (node != NULL)
    {
        printf("find node success!!!!!!! : %s\n", str.data);
    }

    printf("\nvisit rbtree-----------------:\n");
    InOrder(rbtree.root, rbtree.sentinel);

    return 0;
}
Makefile内容:
CXX = gcc
CXXFLAGS += -g -Wall -Wextra

NGX_ROOT =/usr/nginx-1.14.1

TARGETS =ngx_rbtree_t_test
TARGETS_C_FILE= $(TARGETS).c

CLEANUP = -rm -f $(TARGETS) *.o

all:$(TARGETS)

CORE_INCS =-I. \
    -I$(NGX_ROOT)/src/core \
    -I$(NGX_ROOT)/src/event \
    -I$(NGX_ROOT)/src/event/modules \
    -I$(NGX_ROOT)/src/os/unix \
    -I$(NGX_ROOT)/objs \

NGX_PALLOC =$(NGX_ROOT)/objs/src/core/ngx_palloc.o
NGX_STRING =$(NGX_ROOT)/objs/src/core/ngx_string.o
NGX_ALLOC =$(NGX_ROOT)/objs/src/os/unix/ngx_alloc.o
NGX_ARRAY = $(NGX_ROOT)/objs/src/core/ngx_array.o
NGX_RBTREE = $(NGX_ROOT)/objs/src/core/ngx_rbtree.o

$(TARGETS): $(TARGETS_C_FILE)
	$(CXX) $(CXXFLAGS) $(CORE_INCS) $(NGX_PALLOC) $(NGX_STRING) $(NGX_ALLOC) $(NGX_ARRAY) $(NGX_RBTREE) $^ -o $@

clean:
	-rm  $(TARGETS)
执行结果:
[root@localhost src]# ./ngx_rbtree_t_test
insert node : str = jon, key = 1
insert node : str = Issac, key = 2
insert node : str = tursom, key = 3
insert node : str = will, key = 4
insert node : str = birate, key = 5
insert node : str = ren, key = 6
insert node : str = stephen, key = 7
insert node : str = ultimate, key = 8
insert node : str = he, key = 9

begin to find node : str = he, key = 9 ---------
cur node : str = tursom, key = 3
cur node : str = birate, key = 5
cur node : str = stephen, key = 7
cur node : str = ultimate, key = 8
cur node : str = he, key = 9
find node success!!!!!!! : he

visit rbtree-----------------:
node: str = he, key = 0
node: str = jon, key = 1
node: str = Issac, key = 2
node: str = tursom, key = 3
node: str = will, key = 4
node: str = birate, key = 5
node: str = ren, key = 6
node: str = stephen, key = 7
node: str = ultimate, key = 8
node: str = he, key = 9

注意:在该示例中,2次插入str="he"节点都成功了,是应为插入函数比较的是key的值,而这2次插入的"he"的key是不同的。查找时也优先查找key。
我们可以通过修改源码中的插入和查找函数来实现自己的 插入和查找规则。
参考文档:


 91
91


 被折叠的 条评论
为什么被折叠?
被折叠的 条评论
为什么被折叠?
 到【灌水乐园】发言


