


过滤模块的作用和执行时间
过滤模块是一种 http 模块,能够过滤响应头和内容,也就是说它能对回复的头和内容进行处理。它的处理时间在获取服务器响应内容之后,向用户发送响应之前。例如,打开CSDN后看到的广告,可以通过过滤模块实现。
http 过滤模块仅处理服务器发送给客户端的 http 响应;而如果想处理客户端发往服务器的 http 请求,则可以通过 nginx 的 handler 模块实现。
http 过滤模块可以选择性处理 http 头部和 http 包体,也可以两者都处理。
过滤模块的原理
过滤模块链表
所有 http 过滤模块会组成一个单链表,http 核心模块中定义了两个 static 函数指针,指向整个模块链表的第一个节点,分别用于处理当前模块的 http 响应的 header 和 body:
// ngx_http_core_module.h
typedef ngx_int_t (*ngx_http_output_header_filter_pt)(ngx_http_request_t *r);
typedef ngx_int_t (*ngx_http_output_body_filter_pt) (ngx_http_request_t *r, ngx_chain_t *chain);
/* 参数
 - 参数 r: 当前请求;
 - 参数 chain:要发送的 http 包体
*/


// ngx_http.h 单链表的入口
extern ngx_http_output_header_filter_pt ngx_http_top_header_filter
extern ngx_http_output_body_filter_pt ngx_http_top_body_filter
由此可以看出,这个单链表的每个元素,实际上就是处理方法。
当执行 ngx_http_send_header() 发送 http 头部时,ngx_http_top_header_filter() 指针遍历所有的 http 头部过滤模块,并依次执行;当执行 ngx_http_output_filter() 发送 http 包体时,ngx_http_top_body_filter() 指针遍历所有的 http 包体过滤模块,并依次执行。
每个 http 过滤模块初始化时,会找到链表的首元素 ngx_http_top_header_filter 指针和ngx_http_top_body_filter 指针,再使用静态的 ngx_http_next_header_filter 指针变量和 ngx_http_next_body_filter 指针变量,将自己插入到链表的首部。例如将一个自定义模块插入模块链表首部,其定义如下:
// 定义两个静态指针,分别用于指向下一个过滤模块的 http header 和 http body
static ngx_http_output_header_filter_pt     ngx_http_next_header_filter;
static ngx_http_output_body_filter_pt       ngx_http_next_body_filter;

//初始化自定义过滤模块
//从上面介绍也能看出,ngx_http_top_header_filter 和 ngx_http_top_body_filter 是全局变量
static ngx_int_t ngx_http_myfilter_init(ngx_conf_t *cf)
{
    ngx_http_next_header_filter = ngx_http_top_header_filter;
    ngx_http_top_header_filter = ngx_http_myfilter_header_filter;


    ngx_http_next_body_filter = ngx_http_top_body_filter;
    ngx_http_top_body_filter = ngx_http_myfilter_body_filter;
    return NGX_OK;
}
注意两个指针必须是 static 静态变量,仅在当前文件中生效,这就允许所有的过滤模块有各自的指针。在实际使用中,如果需要调用下一个 http 模块,只需用 ngx_http_next_header_filter(r) 和ngx_http_next_body_filter(r, chain) 即可。
过滤模块执行顺序
过滤模块的调用是有顺序的,它的顺序在编译的时候就决定了。控制编译的脚本位于 auto/modules 中,当你编译完 Nginx 以后,可以在 objs 目录下面看到一个 ngx_modules.c 的 文件。打开这个文件,有类似的代码:
ngx_module_t *ngx_modules[] = {
    &ngx_core_module,
    ......
    &ngx_http_write_filter_module,
    &ngx_http_header_filter_module,
    &ngx_http_chunked_filter_module,
    &ngx_http_range_header_filter_module,
    &ngx_http_gzip_filter_module,
    &ngx_http_postpone_filter_module,
    &ngx_http_ssi_filter_module,
    &ngx_http_charset_filter_module,
    &ngx_http_userid_filter_module,
    &ngx_http_headers_filter_module,
    &ngx_http_copy_filter_module,
    &ngx_http_range_body_filter_module,
    &ngx_http_not_modified_filter_module,
    NULL
};
由于每个 http 过滤模块初始化方法都会把自己头插到单链表的首部,所以从 ngx_http_write_filter_module 到 ngx_http_not_modified_filter_module,模块的执行顺序是反向的。就是说最早执行的 是 ngx_http_not_modified_filter_module,然后各个模块依次执行。
过滤模块相关结构体
在过滤模块中,所有模块的 http body 都是通过一条单向链表 ngx_chain_t 所组成。这种设计的好处是在输出响应时简单,非阻塞。
编写过滤模块
加入自定义模块
我们在 /usr 目录下创建一个 ngx_http_location_count_module 文件夹,文件夹里面创建一个 ngx_http_location_count_module.c 文件和 config 配置文件,目录结构如下:
[root@localhost ~]# cd /usr/ngx_http_myfilter_module/
[root@localhost ngx_http_myfilter_module]# tree
ngx_http_myfilter_module/
├── config
└── ngx_http_myfilter_module.c
Nginx 可以方便的加入第三方的过滤模块。在过滤模块的目录里,首先需要加入 config 文件, 文件的内容如下:
ngx_addon_name=ngx_http_myfilter_module
HTTP_AUX_FILTER_MODULES="$HTTP_AUX_FILTER_MODULES ngx_http_myfilter_module"
NGX_ADDON_SRCS="$NGX_ADDON_SRCS $ngx_addon_dir/ngx_http_myfilter_module.c"
说明:
- ngx_http_myfilter_module:自定义过滤模块的名称
- ngx_http_myfilter_module.c:自定义模块的源码
- HTTP_AUX_FILTER_MODULES 这个变量与一般的内容处理模块不同
修改 nginx.conf 配置文件,添加 add_prefix on;
然后进入到ngxin源码目录 /usr/nginx-1.14.1 下,执行如下命令进行nginx配置命令,命令中会指定统计模块源码的路径:
[root@localhost nginx]# cd /usr/nginx-1.14.1/
[root@localhost nginx-1.14.1]# ./configure --prefix=/usr/local/nginx --with-http_realip_module --with-http_addition_module --with-http_gzip_static_module --with-http_secure_link_module --with-http_stub_status_module --with-stream --with-pcre=/usr/pcre-8.41 --with-zlib=/usr/zlib-1.2.11 --with-openssl=/usr/openssl-1.1.0 --add-module=/usr/ngx_http_myfilter_module
定义模块内容
定义模块结构体
定义 ngx_module_t 类型的模块本身信息,并添加配置信息,模块上下文信息:
ngx_module_t ngx_http_myfilter_module = {
    NGX_MODULE_V1,
    &ngx_http_myfilter_module_ctx,    //模块配置上下文,初始化模块配置
    ngx_http_mytest_commands,         //模块行为,实现模块的功能
    NGX_HTTP_MODULE,                  //模块类型
    NULL,
    NULL,
    NULL,
    NULL,
    NULL,
    NULL,
    NULL,
    NGX_MODULE_V1_PADDING
};
模块上下文
定义 ngx_http_module_t 类型的 ctx 成员,初始化模块的配置。该结构体由8个回调函数组成,实际的执行顺序分别是:
create_main_conf、create_srv_conf、create_loc_conf、preconfiguration、init_main_conf、merge_srv_conf、merge_loc_conf、postconfiguration。
由于本模块的处理时间在获取服务器响应内容之后,向用户发送响应之前。因此,需要实现postconfiguration,因为在所有配置初始化完成后才会被调用该函数,进入过滤器执行的入口。
此外,我们想让每个http请求的时候,该过滤器都能起作用,需要在 nginx.config 的 server{} 下添加 location{},所以,也需要实现 create_loc_conf 和 merge_loc_conf。
static ngx_http_module_t ngx_http_myfilter_module_ctx = {
    NULL,                   //preconfigure
    ngx_http_myfilter_init,	//所有配置初始化完成后会调用该接口,进入过滤器执行的入口

    NULL,                   //create main
    NULL,                   //init main

    NULL,                   //create server
    NULL,                   //merge server
    ngx_http_myfilter_create_conf,    //create loc
    ngx_http_myfilter_merge_conf      //merge loc
};
为了让该过滤模块具有开关的效果,故为该模块的结构体中加一个开关成员来控制是否启动该过滤模块的功能:
typedef struct {
    ngx_flag_t enable;    //开关
} ngx_http_myfilter_conf_t;
我们再看下配置文件的解析函数:
- 分配存储 loc 配置项的结构体
该函数的作用很简单,就是分配一个存储 loc 配置项的结构体:
static void* ngx_http_myfilter_create_conf(ngx_conf_t *cf)
{
    // 创建存储配置项的结构体
    ngx_http_myfilter_conf_t *mycf;
    mycf = (ngx_http_myfilter_conf_t *)ngx_pcalloc(cf->pool,sizeof(ngx_http_myfilter_conf_t));
    if(mycf == NULL) {
        return NULL;
    }

    // 设置当前配置项未使用
	// 若使用预设函数 ngx_conf_set_flag_slot 解析配置项参数,则必须初始化为 NGX_CONF_UNSET
    mycf->enable = NGX_CONF_UNSET;
    return mycf;
}- 合并 loc 配置
该函数用来合并 所有的 loc 配置:
static char* ngx_http_myfilter_merge_conf(ngx_conf_t *cf,void *parent, void *child)
{
    ngx_http_myfilter_conf_t *prev = (ngx_http_myfilter_conf_t *)parent;
    ngx_http_myfilter_conf_t *conf = (ngx_http_myfilter_conf_t *)child;

    // 合并 ngx_flag_t 类型的配置项 enable
    ngx_conf_merge_value(conf->enable,prev->enable,0);
    return NGX_CONF_OK;
}
当所有的配置解析完毕后,会调用模块的入口函数,也就是模块的初始化函数:
// 定义两个静态指针,分别用于指向下一个过滤模块的 http header 和 http body
static ngx_http_output_header_filter_pt  ngx_http_next_header_filter;
static ngx_http_output_body_filter_pt    ngx_http_next_body_filter;

// 初始化 http 过滤模块
static ngx_int_t ngx_http_myfilter_init(ngx_conf_t *cf) {
	// 插入到 http 响应头处理方法链表的首部
	ngx_http_next_header_filter = ngx_http_top_header_filter;
	ngx_http_top_header_filter = ngx_http_myfilter_header_filter;

	// 插入到 http 响应体处理方法链表的首部
	ngx_http_next_body_filter = ngx_http_top_body_filter;
	ngx_http_top_body_filter = ngx_http_myfilter_body_filter;

	return NGX_OK;
}
定义模块配置命令
自定义的 ngx_command_t 类型的 commands 数组:
static ngx_command_t ngx_http_mytest_commands[] = {
    {
        ngx_string("add_prefix"),    //模块配置名称
        NGX_HTTP_MAIN_CONF|NGX_HTTP_SRV_CONF|NGX_HTTP_LOC_CONF|NGX_HTTP_LMT_CONF|NGX_CONF_FLAG,
        ngx_conf_set_flag_slot,     //模块回调函数
        NGX_HTTP_LOC_CONF_OFFSET,
        offsetof(ngx_http_myfilter_conf_t,enable),
        NULL },
    ngx_null_command
};
使用预设的函数 ngx_conf_set_flag_slot 解析命令,作用于 HTTP状态机的NGX_HTTP_CONTENT_PHASE 阶段。这里的宏定义 offsetof():返回一个结构体成员相对于结构体起始的字节偏移量。
设置响应头和响应体函数
该模块的核心就在于实现响应头和响应体的过滤功能。
- 设置响应头
// 过滤模块的功能:添加过滤内容
static ngx_str_t prefix = ngx_string("<h2> Hello World !!! </h2>");

// 处理请求中的 http 头部
static ngx_int_t ngx_http_myfilter_header_filter(ngx_http_request_t *r) {

	// 若返回的响应码不是200,直接交由下一个过滤模块处理响应码非200的情况
	if (r->headers_out.status != NGX_HTTP_OK) {
		return ngx_http_next_header_filter(r);
	}

    r->headers_out.content_length_n += prefix.len;

	// 交由下一个过滤模块继续处理
	return ngx_http_next_header_filter(r);
}- 设置响应体
// 处理请求中的 http 包体
static ngx_int_t ngx_http_myfilter_body_filter(ngx_http_request_t *r, ngx_chain_t *chain) {

	// 从内存池中分配内存,用于存储字符串过滤内容
	ngx_buf_t *b = ngx_create_temp_buf(r->pool, prefix.len);
	// 将 ngx_buf_t 中的指针正确地指向 prefix 字符串
	b->start = b->pos = prefix.data;
	b->last = b->pos + prefix.len;

	// 从内存池中生成 ngx_chain_t 链表,将更分配的 ngx_chain_t 设置到 buf 成员中
	// 并将它添加到原先待发送的 http 响应体前面
	ngx_chain_t *c1 = ngx_alloc_chain_link(r->pool);
	c1->buf = b;
	c1->next = chain;

	// 调用下一个模块的 http body 处理方法,传入新生成的链表 c1
	return ngx_http_next_body_filter(r, c1);
}
过滤模块的运行
模块的完整代码
#include <ngx_config.h>
#include <ngx_core.h>
#include <ngx_http.h>

// 配置项
typedef struct {
	ngx_flag_t enable;
} ngx_http_myfilter_conf_t;

// 模块声明
ngx_module_t ngx_http_myfilter_module;

// 定义两个静态指针,分别用于指向下一个过滤模块的 http header 和 http body
static ngx_http_output_header_filter_pt  ngx_http_next_header_filter;
static ngx_http_output_body_filter_pt    ngx_http_next_body_filter;

// 过滤模块的功能:添加过滤内容
static ngx_str_t prefix = ngx_string("<h2> Hello World !!! </h2>");

// 处理请求中的 http 头部
static ngx_int_t ngx_http_myfilter_header_filter(ngx_http_request_t *r) {

	// 若返回的响应码不是200,直接交由下一个过滤模块处理响应码非200的情况
	if (r->headers_out.status != NGX_HTTP_OK) {
		return ngx_http_next_header_filter(r);
	}

    r->headers_out.content_length_n += prefix.len;

	// 交由下一个过滤模块继续处理
	return ngx_http_next_header_filter(r);
}

// 处理请求中的 http 包体
static ngx_int_t ngx_http_myfilter_body_filter(ngx_http_request_t *r, ngx_chain_t *chain) {

	// 从内存池中分配内存,用于存储字符串过滤内容
	ngx_buf_t *b = ngx_create_temp_buf(r->pool, prefix.len);
	// 将 ngx_buf_t 中的指针正确地指向 prefix 字符串
	b->start = b->pos = prefix.data;
	b->last = b->pos + prefix.len;

	// 从内存池中生成 ngx_chain_t 链表,将更分配的 ngx_chain_t 设置到 buf 成员中
	// 并将它添加到原先待发送的 http 响应体前面
	ngx_chain_t *c1 = ngx_alloc_chain_link(r->pool);
	c1->buf = b;
	c1->next = chain;

	// 调用下一个模块的 http body 处理方法,传入新生成的链表 c1
	return ngx_http_next_body_filter(r, c1);
}

// 初始化 http 过滤模块
static ngx_int_t ngx_http_myfilter_init(ngx_conf_t *cf) {
	// 插入到 http 响应头处理方法链表的首部
	ngx_http_next_header_filter = ngx_http_top_header_filter;
	ngx_http_top_header_filter = ngx_http_myfilter_header_filter;

	// 插入到 http 响应体处理方法链表的首部
	ngx_http_next_body_filter = ngx_http_top_body_filter;
	ngx_http_top_body_filter = ngx_http_myfilter_body_filter;

	return NGX_OK;
}

// loc 配置项回调函数1:分配存储配置项的结构体
static void *ngx_http_myfilter_create_loc_conf(ngx_conf_t *cf) {
	// 创建存储配置项的结构体
	ngx_http_myfilter_conf_t *conf = ngx_palloc(cf->pool, sizeof(ngx_http_myfilter_conf_t));
	if (conf == NULL) {
		return NULL;
	}
	// 设置当前配置项未使用
	// 若使用预设函数 ngx_conf_set_flag_slot 解析配置项参数,则必须初始化为 NGX_CONF_UNSET
	conf->enable = NGX_CONF_UNSET;

	return conf;
}

// loc 配置项回调函数2:合并配置项的方法
static char *ngx_http_myfilter_merge_loc_conf(ngx_conf_t *cf, void *parent, void *child) {
	ngx_http_myfilter_conf_t *prev = (ngx_http_myfilter_conf_t*)parent;
	ngx_http_myfilter_conf_t *next = (ngx_http_myfilter_conf_t*)child;

	// 合并 ngx_flag_t 类型的配置项 enable
	ngx_conf_merge_value(next->enable, prev->enable, 0);

	return NGX_CONF_OK;
}

// 定义命令数组
static ngx_command_t ngx_http_myfilter_module_cmds[] = {
	{
		ngx_string("add_prefix"),
		NGX_HTTP_MAIN_CONF | NGX_HTTP_SRV_CONF | NGX_HTTP_LOC_CONF | NGX_CONF_FLAG,
		ngx_conf_set_flag_slot,
		NGX_HTTP_LOC_CONF_OFFSET,
		offsetof(ngx_http_myfilter_conf_t, enable), // 宏定义:返回一个结构体成员相对于结构体起始的偏移量
		NULL,
	},
	ngx_null_command
};

// 定义 http 模块。记录 http 模块的上下文信息
static ngx_http_module_t ngx_http_myfilter_module_ctx = {
	NULL, 								/* preconfiguration */
	ngx_http_myfilter_init,				/* postconfiguration */

	NULL, 								/* create main configuration */
	NULL, 								/* init main configuration */

    NULL, 								/* create server configuration */
	NULL,								/* merge server configuration */

	ngx_http_myfilter_create_loc_conf,	/* create location configuration */
	ngx_http_myfilter_merge_loc_conf, 	/* merge location configuration */
};

// 定义模块。http 过滤模块
ngx_module_t ngx_http_myfilter_module = {
	NGX_MODULE_V1,
	&ngx_http_myfilter_module_ctx,
	ngx_http_myfilter_module_cmds,
	NGX_HTTP_MODULE,
	NULL,
	NULL,
	NULL,
	NULL,
	NULL,
	NULL,
	NULL,
	NGX_MODULE_V1_PADDING
};
执行模块
修改配置文件
修改 nginx.conf 配置文件,添加 add_prefix 内容:
http {
    ...
    server {
        ...
        listen 8894;
        server_name  192.168.226.151;
        location /image/ {
            add_prefix on;
        }
        ...
    }
    ...
}
编译模块
[root@localhost nginx-1.14.1]# cd /usr/nginx-1.14.1/
[root@localhost nginx-1.14.1]# make && make install
启动nginx
在执行下面的启动命令前,确保nginx尚未启动。
[root@localhost nginx]# cd /usr/local/nginx/
[root@localhost nginx]# ./sbin/nginx -c ./conf/nginx.conf
[root@localhost nginx]#
执行结果
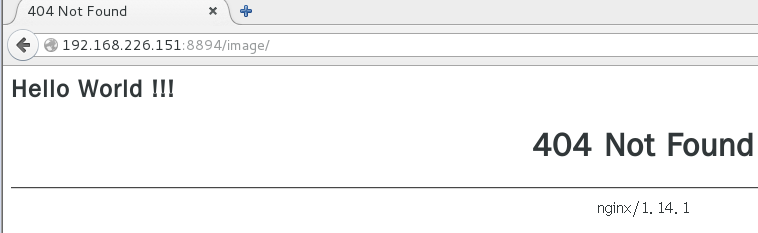
在浏览器中输入配置好的IP,并加上/test。效果如下:
参考文献:


 468
468


 被折叠的 条评论
为什么被折叠?
被折叠的 条评论
为什么被折叠?
 到【灌水乐园】发言


