


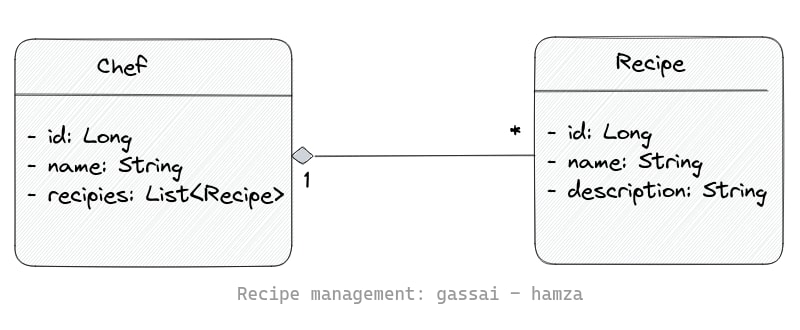
1 - 我们将建造什么?
出于演示目的,我们将创建一个简单的食谱管理应用程序,其中包含两个实体:Chef和Recipe。
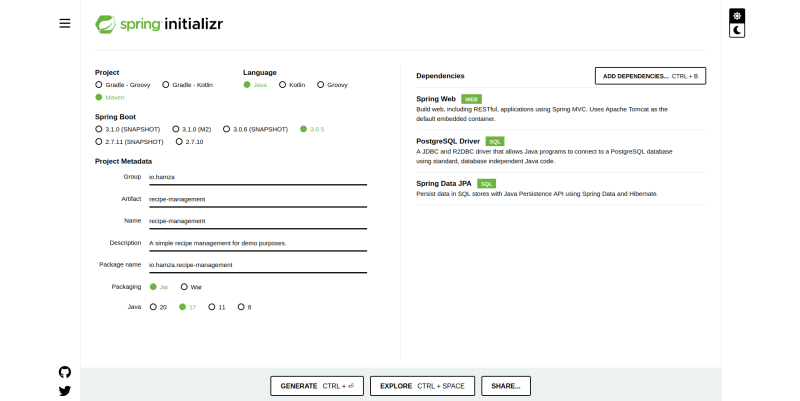
2 - 创建一个 spring boot 应用程序
为此,如果您使用IntelliJ idea. 并选择以下依赖项:Spring Web,PostgreSQL Driver当然Spring Data JPA还要确保选择maven作为项目经理。
安装项目后,将其解压缩并使用您喜欢的 IDE 打开它。
如第一部分所述,我们将创建两个实体Chef和Recipe。如下:
- Chef:
```
@Entity public class Chef { @Id @GeneratedValue(strategy = GenerationType.IDENTITY) private Long id;
private String name;

@OneToMany(mappedBy = "chef")
private List<Recipe> recipes;

public Chef() {
}

public Chef(Long id, String name) {
    this.id = id;
    this.name = name;
}

public Chef(String name) {
    this.name = name;
}

// ADD GETTERS AND SETTER...
} ```
- Recipe
@Entity
public class Recipe {
    @Id
    @GeneratedValue(strategy = GenerationType.IDENTITY)
    private Long id;

    @Column(length = 100)
    private String name;
    private String description;

    @ManyToOne
    @JsonBackReference
    private Chef chef;

    public Recipe() {
    }

    public Recipe(String name, String description) {
        this.name = name;
        this.description = description;
    }

    public Recipe(Long id, String name, String description) {
        this.id = id;
        this.name = name;
        this.description = description;
    }

    // GETTERS AND SETTERS...
}我们还需要创建ChefController、ChefService和ChefRepository。RecipeRepository
ChefService: 具有三个基本方法:createChefWithRecipes将厨师和食谱列表作为参数,getChefs获取厨师列表,最后getNumberOfChefs返回数据库中厨师的数量。
@Service
public class ChefService {
    private ChefRepository chefRepository;
    private RecipeRepository recipeRepository;

    public ChefService(ChefRepository chefRepository, RecipeRepository recipeRepository) {
        this.chefRepository = chefRepository;
        this.recipeRepository = recipeRepository;
    }

    @Transactional
    public Chef createChefWithRecipes(Chef chef,List<Recipe> recipes){

        recipes.stream().forEach(recipe -> recipe.setChef(chef));

        this.chefRepository.save(chef);
        this.recipeRepository.saveAll(recipes);

        return chef;
    }

    public List<Chef> getChefs(){
        System.out.println(this.chefRepository.findAll());
        return this.chefRepository.findAll();
    }

    public Long getNumberOfChefs(){
        return this.chefRepository.count();
    }
}
ChefController: 它只有一个返回厨师列表的方法
@RestController
@RequestMapping("/api/chefs")
public class ChefController {

    private final ChefService chefService;

    public ChefController(ChefService chefService) {
        this.chefService = chefService;
    }

    @GetMapping
    public List<Chef> getAllChefs(){
        return chefService.getChefs();
    }

}
最后,我们将向我们的数据库添加一些初始行 (可选) ,为此我们将创建一个数据初始化器类并从命令运行器界面实现运行方法。
@Component
public class DataInitializer implements CommandLineRunner {

    private final ChefService chefService;

    public DataInitializer(ChefService chefService) {
        this.chefService = chefService;
    }

    @Override
    public void run(String... args) throws Exception {

        if(chefService.getNumberOfChefs() > 1) {
            System.out.println("Chefs already initialized!");
            return;
        }

        Chef chef1 = new Chef("Gordon Ramsay");
        Chef chef2 = new Chef("Jamie Oliver");
        Chef chef3 = new Chef("Anthony Bourdain");

        List<Recipe> chef1Recipes = Arrays.asList(
                new Recipe("Beef Wellington", "A classic British..."),
                new Recipe("Scrambled Eggs", "A simple breakfast..."),
                new Recipe("Beef Burger", "A juicy burger made...")
        );

        List<Recipe> chef2Recipes = Arrays.asList(
                new Recipe("Spaghetti Carbonara", "A creamy pasta...")
                new Recipe("Roast Chicken", "A classic roastchicken"),
                new Recipe("Fish and Chips", "A traditional...")
        );

        chefService.createChefWithRecipes(chef1,chef1Recipes);
        chefService.createChefWithRecipes(chef2,chef2Recipes);
        chefService.createChefWithRecipes(chef3,new ArrayList<>());

    }
}
3 - 将应用程序打包成 JAR 文件
直接运行命令mvn package,查看文件夹下是否生成了jar文件target。
mvn package -DskipTests请注意,我们使用了-DskipTests跳过测试的选项,因为我们的应用程序将尝试连接到一个尚不存在的数据库。
我们的 Spring Boot 应用程序生成的 JAR 文件是一个可执行存档,其中包含运行应用程序所需的所有必要组件和依赖项,例如编译代码、依赖项、嵌入式服务器和一些其他资源……
我们可以简单地使用命令运行我们的应用程序java -jar target/recipe-management-0.0.1-SNAPSHOT.jar,这正是我们在容器内运行应用程序所需的命令。
4 - 创建应用程序的配置文件 (Dockerfile)
这是有趣的部分!但首先,什么是 docker 文件?
ADockerfile是一个文本文档,其中包含一组构建图像的指令,这些指令可以是提取和复制文件,或者运行命令......
好的,让我们在我们的应用程序的根目录中创建一个,它应该用Dockerfile大写的“D”命名(实际上你可以随意命名,但为了避免在接下来的步骤中令人头疼,让我们尊重约定)
FROM openjdk:17
VOLUME /tmp
EXPOSE 8080
COPY target/recipe-management-0.0.1-SNAPSHOT.jar recipe.jar
ENTRYPOINT ["java","-jar","/recipe.jar"]- FROM openjdk:17:每个 docker 镜像都需要一个包含核心操作系统和其他运行时组件的基础镜像,因为我们有一个 Spring Boot 应用程序,所以我们将
OpenJDK:17 Java Runtime Environment (JRE). - VOLUME /tmp:(可选)此指令指定
/tmpdocker 容器中的目录将用作存储临时文件和缓存数据的卷...以在 docker 容器和主机文件系统之间或容器之间共享它。 - EXPOSE 8080:该指令通知 Docker 容器将在运行时监听端口
8080。 - COPY target/recipe-management-0.0.1-SNAPSHOT.jar recipe.jar:该指令将
JAR文件复制到默认情况下图像的工作目录/,复制的JAR文件将重命名为:recipe.jar。(我们可以使用指令更改工作目录WORKDIR)。 - ENTRYPOINT ["java","-jar","/recipe.jar"] :第一部分
ENTRYPOINT用于配置容器启动时将执行的命令,您可能猜到第二部分指定实际运行我们的应用程序的命令。
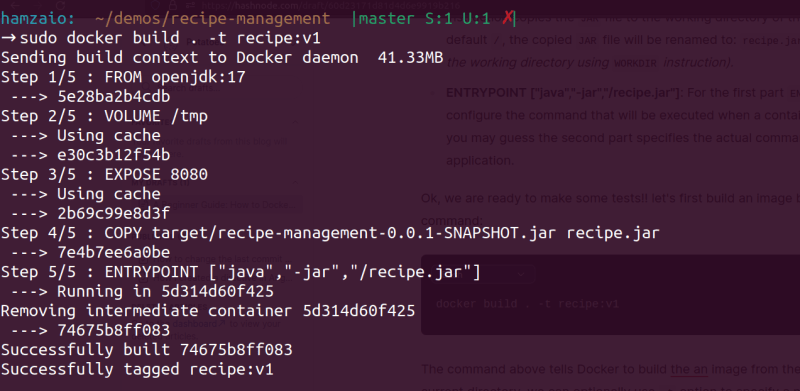
好的,我们准备进行一些测试!让我们首先通过运行命令来构建图像:
docker build . -t recipe:v1Dockerfile上面的命令告诉 Docker 从当前目录中的文件构建镜像。我们可以选择使用-t选项为我们的图像指定名称和标签。
现在我们已经使用 name 和 tag 进行了成功构建recipe:v1。
我们可以通过运行命令来简单地检查是否存在docker images:
5 - 创建容器
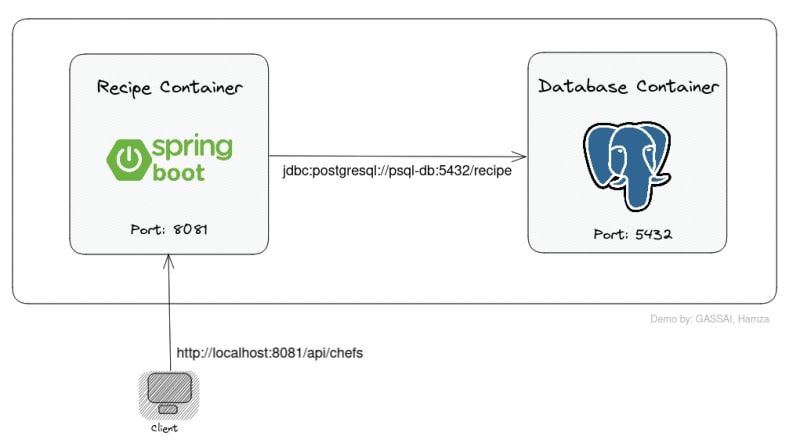
在本节中,我们将通过创建应用程序的容器并将其与PostgreSQL数据库容器链接来将所有内容放在一起,因为我们的应用程序需要数据库。
我们可以通过不同的方式实现这一点,但最常见和最清楚的是使用Docker Compose.
Docker Compose允许我们定义和配置我们所有的应用程序容器,将它们链接在一起并在单个文件中指定它们之间的依赖关系:docker-compose.yml.
version: "3.8"

services:
  psql-db:
    image: postgres
    container_name: psql-db
    restart: always
    environment:
      - POSTGRES_USER=admin
      - POSTGRES_PASSWORD=1234
      - POSTGRES_DB=recipe
    ports:
      - '5432:5432'

  recipe:
    container_name: recipe_app
    build:
      context: .
      dockerfile: Dockerfile
    ports:
      - '8081:8080'
    environment:
      - SPRING_DATASOURCE_URL=jdbc:postgresql://psql-db:5432/recipe
      - SPRING_DATASOURCE_USERNAME=admin
      - SPRING_DATASOURCE_PASSWORD=1234
      - SPRING_JPA_HIBERNATE_DDL_AUTO=update
    depends_on:
- psql-db- 首先,我们定义
yml版本。 psql-db使用 Postgres 官方镜像创建第一个容器image: postgres。- 我们给容器一个名字 (可选)
container_name: psql-db。 - 该
restart: always参数确保容器在崩溃时自动重启。 - 对于我们的 Postgres 数据库,该
environment选项可能因一个容器而异,我们需要一个数据库用户、密码和名称…… - 该
ports选项将容器的内部端口 (左侧5432:) 映射到主机端口5432。psql-db这允许在同一主机上运行的其他服务使用主机的 IP 地址和端口连接到容器中的 Postgres 数据库5432。 - 对于
recipe我们做了一些小改动的容器,我们曾经build告诉 Docker 从我们的Dockerfile. - 我们还在环境部分指定了数据库 URL、USERNAME 和 PASSWORD。请注意,数据库 URL 包含容器的名称
Postgres及其端口:jdbc:postgresql://psql-db:5432/recipe。 - 最后,
depends_on选项告诉容器在容器运行recipe之前它不应该启动。psql-db
现在我们准备好使用docker-compose.
(如果你在 Linux 机器上,你需要 安装 Docker Compose )
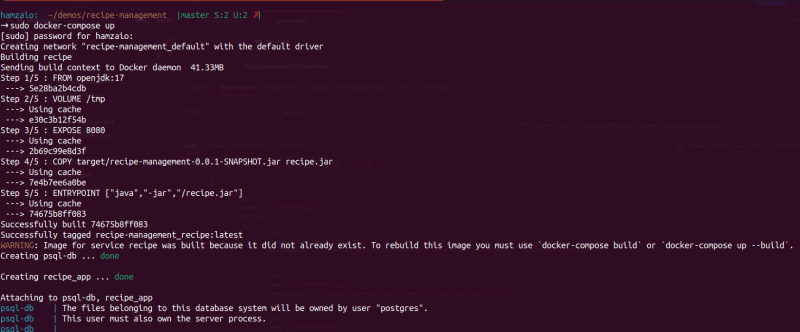
如果您的docker-compose.yml项目根目录中的文件刚刚运行:
docker-compose up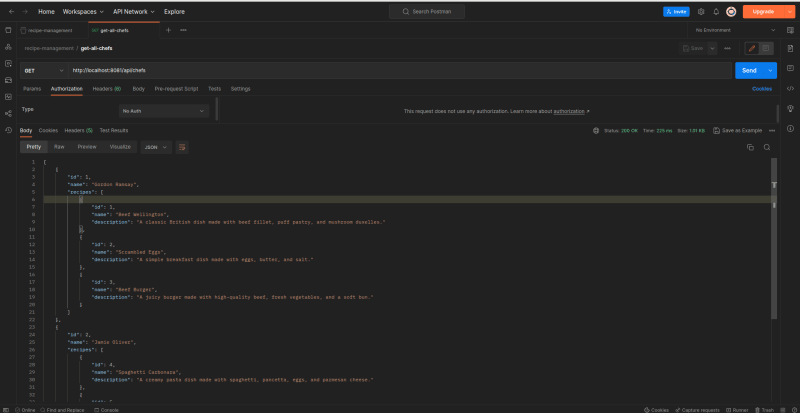
# you can also use -d tag to start containers in the background.从前几行来看,很明显 docker 已经根据 中的说明成功构建了配方镜像Dockerfile,它还创建了我们的psql-db和recipe_app容器并附psql-db加到recipe_app容器。 让我们发一个http请求,测试一下!


 7501
7501


 被折叠的 条评论
为什么被折叠?
被折叠的 条评论
为什么被折叠?
 到【灌水乐园】发言


