


Netty启动流程分析
本文基于Netty4.1.43.Final进行分析
文章目录
服务端引导代码
EventLoopGroup bossGroup = new NioEventLoopGroup(2);
EventLoopGroup workGroup = new NioEventLoopGroup(16);
ServerBootstrap serverBootstrap = new ServerBootstrap();
// 给ServerChannel设置handler
serverBootstrap.handler(new ChannelInitializer() {
    @Override
    protected void initChannel(Channel ch) throws Exception {
        ChannelPipeline pipeline = ch.pipeline();
        pipeline.addLast("inbound", new MyInBound(0));
        pipeline.addLast("outbound", new MyOutBound());
    }
});
// 赋值给引导类的属性指定 boss线程和work线程
serverBootstrap.group(bossGroup, workGroup);
serverBootstrap.channel(NioServerSocketChannel.class);
serverBootstrap.childHandler(new ChannelInitializer() {

    @Override
    protected void initChannel(Channel channel) throws Exception {
        NioEventLoop eventExecutors = (NioEventLoop) channel.eventLoop();
        ChannelPipeline pipeline = channel.pipeline();
        System.out.println(pipeline);
    }
}); //设置过滤器
// 服务器绑定端口监听
ChannelFuture f = serverBootstrap.bind(80).sync();
System.out.println("服务端启动成功...");
// 监听服务器关闭监听
f.channel().closeFuture().sync();
启动流程分析
设置serverBootstrap的handler
这块设置serverSocket的handler的,用于处理服务端Channel的连接事件;
ChannelHandler主要是一系列的处理器,用来处理请求数据和响应数据的责任链;
group(bossGroup, workGroup)
用于设置处理连接的线程池以及读写连接的线程池;默认线程数量是CPU核数*2;
EventLoopGroup可以当作一个线程池来看待,里面有一个EventLoop数组,每个EventLoop可以当作是单个线程来理解;
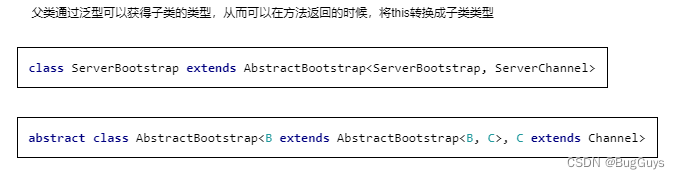
channel(NioServerSocketChannel.class)
指定服务端Channel的类型,这里是netty对javaNio的channel进行了二次封装,支持很多类型,这里我们用的是NioServerSocketChannel;channel()方法实际上是指定了serverBootstrap的ChannelFactory,等下后面专门会讲到Channel工厂的细节,这里我们只要知道我们通过一个基于反射的工厂来创建netty的Channel即可;引导类无需关注具体的Channel的实现类;(netty的Channel是一个接口)
childHandler()
这里是指定当有客户端建立了连接后会对子连接Channel的pipeLine绑定设置的handler;
bind(port)

这里是重点,也是上方流程图所绘制的地方,我们上述的方法都是在设置服务启动时的必要参数,当执行bind()方法时,他才真正的去创建Channel,并开始监听,处理连接;
我们可以看到,bind()方法中有两个部分,第一个就是initAndRegister(),第二个是doBind()方法;
首先分析initAndRegister()
我们要先注册一个netty的Channel,这个Channel是交给了反射工厂去创建的;我们在引导类中已经显示指定了Channel的具体的实现类NioServerSocketChannel.class,这个Channel在实例化的时候,已经指定了底层的关注的事件是OP_ACCEPT;表明该channel只是用来处理连接的;
public NioServerSocketChannel(ServerSocketChannel channel) {
    super(null, channel, SelectionKey.OP_ACCEPT);
    config = new NioServerSocketChannelConfig(this, javaChannel().socket());
}
#第一步#
我们在引导类中,对ServerChannel设置的option参数和attr属性也同时设置到Channel中;这里我们往channel的pipeline中增加了一个匿名对象ChannelInitializer,主要将我们在引导类中指定serverChannel的handler添加到真正的ChannelPipeLine中;
#第二步#
我们在该channel对应的线程中增加了一个任务;该任务主要是在channel中增加一个pipelineHandler去处理客户端的连接;
注意:
- 这块都是在ChannelInitializer中,此时channel还没有绑定eventLoop,也没有注册到eventLoop中的selector中;
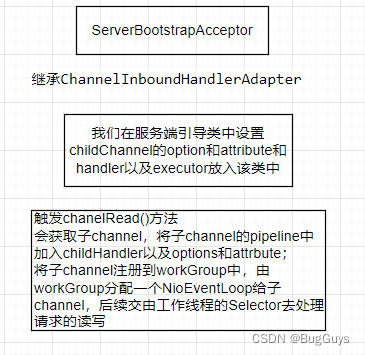
- 这里添加ServerBootstrapAcceptor这个Handle是异步处理的,又增加了一个task;
p.addLast(new ChannelInitializer<Channel>() {
    @Override
    public void initChannel(final Channel ch) {
        final ChannelPipeline pipeline = ch.pipeline();
        ChannelHandler handler = config.handler();
        if (handler != null) {
            // 将引导类中的handler加入到该channel中
            pipeline.addLast(handler);
        }
        // 异步处理,在该channel对应的线程中增加一个任务,添加一个handler用于处理连接请求
        ch.eventLoop().execute(new Runnable() {
            @Override
            public void run() {
                pipeline.addLast(new ServerBootstrapAcceptor(
                    ch, currentChildGroup, currentChildHandler, currentChildOptions, currentChildAttrs));
            }
        });
    }
});
#第三步#:
这里主要是将channel和eventLoop进行绑定,并执行相应的channel初始化工作(在第四步描述);
// 将channel注册到eventLoop上
ChannelFuture regFuture = config().group().register(channel);
这里register是eventGroup的方法,因此这里是从eventLoopGroup中分配一个EventLoop给Channel;
// MultithreadEventLoopGroup.class
@Override
public ChannelFuture register(Channel channel) {
    // 分配线程给Channel
    return next().register(channel);
}
我们看下eventLoop是如何操作channel的。其实是通过操作unsafe,将channel绑定eventLoop;
// EmbeddedEventLoop.class
@Override
public ChannelFuture register(ChannelPromise promise) {
    ObjectUtil.checkNotNull(promise, "promise");
    promise.channel().unsafe().register(this, promise);
    return promise;
}
我们看下channel这边在绑定eventLoop后做了哪些操作。由于此操作依旧是在main线程中,基于netty的工作模型,channel的相关注册方法要在其boss线程中完成;因此这里开启了一个任务去调用register0();
// AbstractChannel.class#register()

// 绑定eventLoop
AbstractChannel.this.eventLoop = eventLoop;
// 执行后续操作
if (eventLoop.inEventLoop()) {
    register0(promise);
} else {
    // 走这里
    eventLoop.execute(new Runnable() {
        @Override
        public void run() {
            register0(promise);
        }
    });
}
#第四步#
由于dobind0()方法要在register0()执行完成后才能执行(通过ChannelFuture来判定register0是否执行完成),所以我们在这里继续讲register0()方法;在这里声明:register0()方法是在channel对应的eventLoop线程中执行的;
// AbstractChannel.class
private void register0(ChannelPromise promise) {
    // 第一件事
    doRegister();
    // 第二件事
    pipeline.invokeHandlerAddedIfNeeded();
    // 第三件事-可以执行dobind0()了
    safeSetSuccess(promise);
    // 第四件事
    pipeline.fireChannelRegistered();
}
-
注册Channel,底层将javaChannel注册到selector上,但设置的兴趣事件是0;表示这个channel上发生的任何事件都不感兴趣;
-
我们对pipeline调用addLast()等操作的时候不但会把新的handler封装成context加入pipeline的链表中,同时还会触发这个新handler的handlerAdded()方法;若当前channel还没有初始化好,则会把新加入的handler封装成的context对象包装成一个task,放到待处理链中;调用invokeHandlerAddedIfNeeded()方法,就会依次处理待处理链上context对象的handlerAdded()方法;
这里就是我们第二步中的ChannelInitializer.initChannel()方法;
-
safeSetSuccess(promise)表示可以执行dobind0()方法了,这里会中断去执行dobind0()方法,因为channelFuture设置了监听器;后面会具体讲解做了什么的;
-
执行完dobind0()后会继续执行fireChannelRegistered();我们可以看到这里指定的是从HeadContext开始执行,由于第二件事已经执行了invokeHandlerAddedIfNeeded(),所以这里执行fireChannelRegistered()方法;
这块就是从HeadContext开始向后寻找第一个InBoundHandler且实现了channelRegistered()方法;这里找到TailContext符合要求,但这个channelRegistered()是空方法;所以执行了个寂寞;当然我们可以自己去自定义该handler,这样就会触发我们自定义的handler;
// DefaultChannelPipeline.class
@Override
public final ChannelPipeline fireChannelRegistered() {
    // 指定从HeadContext开始执行
    AbstractChannelHandlerContext.invokeChannelRegistered(head);
    return this;
}

// HeadContext.class#invokeChannelRegistered()
((ChannelInboundHandler) handler()).channelRegistered(this);

@Override
public void channelRegistered(ChannelHandlerContext ctx) {
    // 不执行-前面第二件事已做过
    invokeHandlerAddedIfNeeded();
    // 执行这里
    ctx.fireChannelRegistered();
}

@Override
public ChannelHandlerContext fireChannelRegistered() {
    // 从headContext向后寻找InBound中第一个实现了channelRegistered()的handler然后去执行
    invokeChannelRegistered(findContextInbound(MASK_CHANNEL_REGISTERED));
    return this;
}

static void invokeChannelRegistered(final AbstractChannelHandlerContext next) {
    next.invokeChannelRegistered();
}

// TailContext.class
@Override
// 空方法
public void channelRegistered(ChannelHandlerContext ctx) { }
注意:
- 为什么要将兴趣事件设为0?我认为这块只是为了先将该channel注册到selector上,后续再操作这个selectkey修改关注的事件;
- ChannelInitializer这个handler的handlerAdded方法就是调用initChannel();同时保证每一个channel只会执行一遍initChannel()方法;执行完毕后,就会把这个ChannelInitializerHandler移除;
然后分析doBind0()
private static void doBind0(
    final ChannelFuture regFuture, final Channel channel,
    final SocketAddress localAddress, final ChannelPromise promise) {

    // This method is invoked before channelRegistered() is triggered.  Give user handlers a chance to set up
    // the pipeline in its channelRegistered() implementation.
    channel.eventLoop().execute(new Runnable() {
        @Override
        public void run() {
            if (regFuture.isSuccess()) {
                channel.bind(localAddress, promise).addListener(ChannelFutureListener.CLOSE_ON_FAILURE);
            } else {
                promise.setFailure(regFuture.cause());
            }
        }
    });
}
这里是在channel对应eventLoop中的线程里执行,而且是在上面register0()方法中的第三步唤醒执行的;这块我们可以看到是给channel对应的eventLoop中扔了一个任务;这个任务是channel的bind(ip地址)操作;那么具体的代码是触发到了这里,我们可以看到,是交给了pipeline执行bind()方法;
pipeline的bind()方法是显示的指定从TailContext开始向前执行,找outBound中第一个实现了bind()方法的context,默认就是HeadContext;从而执行HeadContext的bind()方法;
HeadContext的bind()方法中主要是对底层Java的Channel绑定了端口,并调用pipeline的fireChannelActive()方法;
// AbstractChannel.class
@Override
public ChannelFuture bind(SocketAddress localAddress, ChannelPromise promise) {
    return pipeline.bind(localAddress, promise);
}

// DefaultChannelPipeline.class
@Override
public final ChannelFuture bind(SocketAddress localAddress, ChannelPromise promise) {
    return tail.bind(localAddress, promise);
}

// TailContext.class
@Override
public ChannelFuture bind(final SocketAddress localAddress, final ChannelPromise promise)
    // 从tail向前开始找outBound中第一个实现了bind()方法的context,默认就是HeadContext
    final AbstractChannelHandlerContext next = findContextOutbound(MASK_BIND);
	next.invokeBind(localAddress, promise);
	return promise;
}

// HeadContext.class
@Override
public void bind(
    ChannelHandlerContext ctx, SocketAddress localAddress, ChannelPromise promise) {
    unsafe.bind(localAddress, promise);
}

// AbstractChannel.class
public final void bind(final SocketAddress localAddress, final ChannelPromise promise) {

    boolean wasActive = isActive();
    try {
        // 这里就是执行JavaChannel的bind操作
        // javaChannel().bind(localAddress, config.getBacklog());
        doBind(localAddress);
    } catch (Throwable t) {
        safeSetFailure(promise, t);
        closeIfClosed();
        return;
    }
    // 新建了一个任务
    eventLoop().execute(new Runnable() {
        @Override
        public void run() {
            pipeline.fireChannelActive();
        }
    })
        safeSetSuccess(promise);
}
pipeline的fireChannelActive()方法从HeadContext开始执行,首先向后传递channelActive()事件;然后执行readIfIsAutoRead()方法;
readIfIsAutoRead()方法的主要目的就是将selectOps设置为ACCEPT监听模式,这里的具体调用链可以看下方的代码注释,前面我们将当前Channel绑定了兴趣事件为0,即selector不关注这个channel的任何事件变化,现在需要将其需修改为ACCPET(16),就是设置为监听状态;
// HeadContext.class
@Override
public void channelActive(ChannelHandlerContext ctx) {
    // 从当前context开始向后寻找实现了channelActive的Inbound的handler去执行;
    ctx.fireChannelActive();
    // 就是修改channel为监听状态
    readIfIsAutoRead();
}

// HeadContext.class
private void readIfIsAutoRead() {
    if (channel.config().isAutoRead()) {
        channel.read();
    }
}

// AbstractChannel.class
@Override
public Channel read() {
    //
    pipeline.read();
    return this;
}

// DefaultChannelPipeline.class
@Override
public final ChannelPipeline read() {
    // 这里就是从tail向前找第一个实现了read()的inboundHandler,默认就是HeadContext
    tail.read();
    return this;
}
// HeadContext.class
public void read(ChannelHandlerContext ctx) {
    // 这里最终就是调用下面Channel的doBeginRead()
    // 用于修改selectKey的监听事件
    unsafe.beginRead();
}

// AbstractNioChannel.class
@Override
protected void doBeginRead() throws Exception {
    // Channel.read() or ChannelHandlerContext.read() was called
    final SelectionKey selectionKey = this.selectionKey;

    // interestOps就是我们之前register的0
    final int interestOps = selectionKey.interestOps();
    // readInterestOp就是我们实例化NioServerSocketChannel对象时写死的ACCEPT=16
    if ((interestOps & readInterestOp) == 0) {
        // 将selectKey设置为监听状态
        selectionKey.interestOps(interestOps | readInterestOp);
    }
}
综上所述,我们可以看到HeadContext主要是用来给Channel绑定IP以及设置监听事件处理器(还有一个connect()这里先不展开了);TailContext主要是数据流转的;

最后一步
我们注册Channel的EventLoop上的线程肯定执行死循环,当没有任务的时候,就会执行selector.select(XXX)阻塞等待channel的连接;具体这块可以在后文见channel的请求连接流程;
执行器介绍

这里注意一下,我们在外层调用的时候,Windows下用NioEventLoopGroup,Linux下用EpollEventLoopGroup
if (Epoll.isAvailable()) {
    this.bossGroup = new EpollEventLoopGroup(bossCount, new PrefixDefaultThreadFactory(EpollEventLoopGroup.class, name + "BossGroup-"));
    this.workerGroup = new EpollEventLoopGroup(workerCount, new PrefixDefaultThreadFactory(EpollEventLoopGroup.class, name + "WorkerGroup-"));
} else {
    bossGroup = new NioEventLoopGroup(bossCount, new PrefixDefaultThreadFactory(NioEventLoopGroup.class, name + "BossGroup-"));
    workerGroup = new NioEventLoopGroup(workerCount, new PrefixDefaultThreadFactory(NioEventLoopGroup.class, name + "WorkerGroup-"));
}

if (Epoll.isAvailable()) {
    server.channel(EpollServerSocketChannel.class);
} else {
    server.channel(NioServerSocketChannel.class);
}
执行器初始化
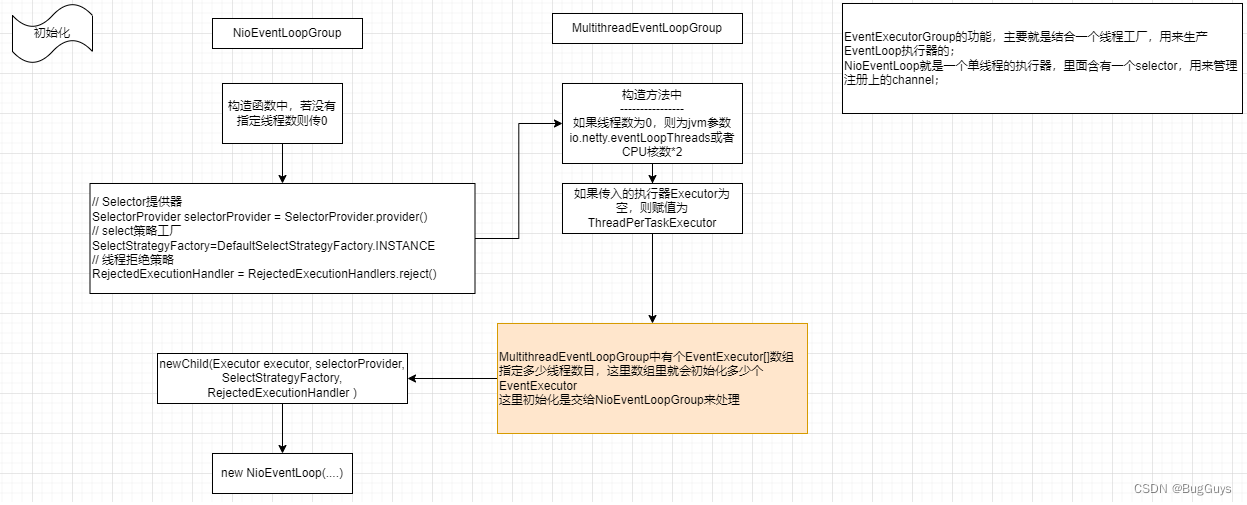
我们从流程图中一步一步分析可以得知;在初始化执行器组的时候,如果没有指定线程数量,则会从JVM参数中或是CPU核数的2倍作为线程数;每个EventLoopGroup中拥有一个执行器数组;在其父类构造函数中,会根据线程数初始化执行器数组,并且实例化相应数量的EventLoop赋给执行器数组;
执行器介绍
我们在定义EventLoopGroup时会设置EventLoop的数量,并初始化EventLoop保存在数组中;
分配EventLoop时,Group就会在EventLoop数组中选择一个;
每个EventLoop会绑定一个Thread,并在执行线程的时候通过线程工厂创建一个非守护线程;
我们所有的在这个EventLoop上的事件都会交给这个Thread去处理;
该Thread实际上就是执行NioEventLoop的run()方法,该方法是死循环,首先是阻塞在select等待连接;
当其他任务加入到EventLoop的任务队列时,会唤醒select,select上若有事件则执行,最终会从任务队列中取任务去执行;最后该趟循环结束,继续走到select处阻塞;
因此,即使只有一个EventLoop,也不会阻塞监听和其他任务的执行;当然我们必须保证我们提交到该EventLoop上的任务没有耗时操作或死循环;
若工作线程组EventLoopGroup设置多个线程数量,对于BossGroup而言仅有一个EventLoop上的selector监听连接;其余的EventLoop可以分配给handler去使用;因此BossGroup的线程数一般比较少;
// 例如可以让handler去在不同的eventLoop上执行;
pipeline.addFirst(nioEventLoopGroup, new ChannelDuplexHandler())
一个EventLoop上有一个Selector,上面可以绑定N个Channel,每个Channel只对应唯一的EventLoop;
Channel的介绍
创建Channel
#NioServerSocketChannel的创建#
我们回到服务端引导类创建的时候,显示指定了NioServerSocketChannel.class服务端监听Socket的类型。
// 研究一下这个
serverBootstrap.channel(NioServerSocketChannel.class);
// AbstractBootstrap.class
public B channel(Class<? extends C> channelClass) {
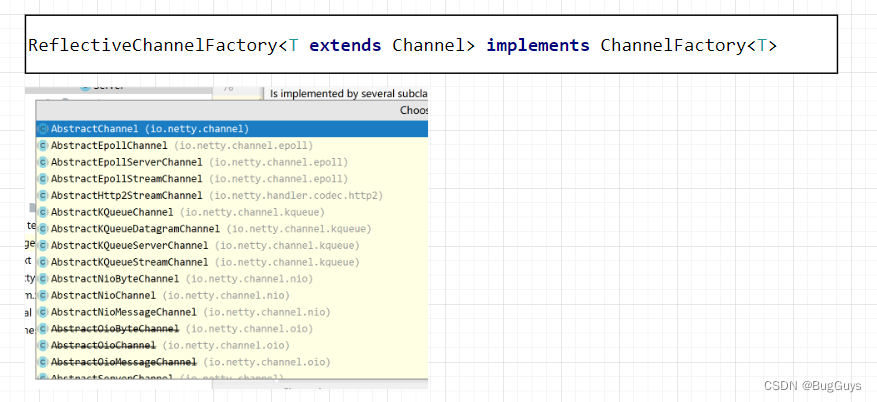
return channelFactory(new ReflectiveChannelFactory<C>(
ObjectUtil.checkNotNull(channelClass, "channelClass")
));
}
实际上,这里是保存了一个创建Socket的工厂。在服务端引导类的基类中有一个channelFactory,当我们调用这个类时,就会重新new一个ReflectiveChannelFactory反射工厂类;具体的逻辑见下面的代码;
这样做的目的就是,可以支持传入不同类型的channel,统一交给工厂去处理,业务上不再关注channel类型,指考虑如何New一个出来;
public ReflectiveChannelFactory(Class<? extends T> clazz) {
    ObjectUtil.checkNotNull(clazz, "clazz");
    try {
        this.constructor = clazz.getConstructor();
    } catch (NoSuchMethodException e) {
        throw new IllegalArgumentException("Class " + StringUtil.simpleClassName(clazz) +
                " does not have a public non-arg constructor", e);
    }
}

public T newChannel() {
    try {
        return constructor.newInstance();
    } catch (Throwable t) {
        throw new ChannelException("Unable to create Channel from class " + constructor.getDeclaringClass(), t);
    }
}
多说一句,在这里的channel是netty的channel不是java的channel,目前Netty4.1中有很多实现该接口的channel
#NioSocketChannel的创建#
这个Channel是与客户端建立连接的,他的创建是在ACCEPT收到连接请求时,会由NioServerSocketChannel去创建对应的NioSocketChannel,这里直接new出来的,不是通过工厂创建;

Netty的channel与JavaNio的channel
Netty的Channel主要维护了以下内容:
- Java的Channel->SelectableChannel
- unsafe->就是Netty的Channel中有很多protected方法,需要由内部对象
- unsafe去调用
该channel对应的线程eventLoop;
该channel对应的pipeline ;

客户端请求连接
我们在创建了NioSocketChannel后,将该channel传递到 ServerBootstrapAcceptor这个Handler上;他来负责注册NioSocketChannel到WorkGroup上;具体看流程图就懂了;
PipeLine介绍
PipeLine对应一个channel,每个channel在创建的时候都会new一个自己的pipeline对象,也就是DefaultChannelPipeline;
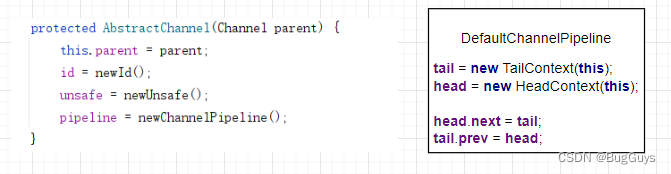
这个Pipeline对象有两个关键对象,tail和head;他们都是AbstractChannelHandlerContext类型,我们可以理解为上下文;并且tail指针指向TailContext对象,head指针指向HeadContext;最最最重要的是,head和tail相互指向,形成一个上下文双向链表;
addLast()

当调用addLast()的时候,我们一般传递的有handler,执行该handler的执行器组,以及该handler的名字;如果执行器组不为空,则会给该上下文绑定一个执行器,不然为空;这里会将handler,执行器,pipleLine对象,名字等包装成 DefaultChannelHandlerContext 上下文;并将其插入到双向队列中;然后执行handlerAdded()方法;具体可以看下底下的代码注释;
public final ChannelPipeline addLast(EventExecutorGroup group, String name, ChannelHandler handler) {
    final AbstractChannelHandlerContext newCtx;
    synchronized (this) {
        checkMultiplicity(handler);
        // 执行器组不为空的话产生一个执行器
        // 创建一个DefaultChannelHandlerContext上下文对象
        newCtx = newContext(group, filterName(name, handler), handler);
        // 将其加入双向队列中
        addLast0(newCtx);

        // If the registered is false it means that the channel was not registered on an eventLoop yet.
        // In this case we add the context to the pipeline and add a task that will call
        // ChannelHandler.handlerAdded(...) once the channel is registered.
        // channel未注册的时候走这里,主要就是延迟执行handlerAdded()方法
        if (!registered) {
            newCtx.setAddPending();
            callHandlerCallbackLater(newCtx, true);
            return this;
        }

        // 获取执行器或channel对应的执行器
        EventExecutor executor = newCtx.executor();
        if (!executor.inEventLoop()) {
            // 在执行器的线程中执行handlerAdded()方法
            callHandlerAddedInEventLoop(newCtx, executor);
            return this;
        }
    }
    // 执行handler的handlerAdded()方法
    callHandlerAdded0(newCtx);
    return this;
}
如何快速定位Handler
我们在启动流程分析的时候,看到许多findContextInbound(MASK_CHANNEL_REGISTERED)这样的方法;这块就需要ChannelHandlerMask来帮我们实现;
他会根据ChannelHandler继承的类型以及拥有的实现方法计算一个mask值,@Skip表示该方法跳过,不会计入该handler对应方法的mask值 ;根据mask值来判定该handler是否是我们想要的handler;
// ChannelHandlerMask.class 省略代码
private static int mask0(Class<? extends ChannelHandler> handlerType) {
    int mask = MASK_EXCEPTION_CAUGHT;
    try {
        if (ChannelInboundHandler.class.isAssignableFrom(handlerType)) {
            mask |= MASK_ALL_INBOUND;

            if (isSkippable(handlerType, "channelRegistered", ChannelHandlerContext.class)) {
                mask &= ~MASK_CHANNEL_REGISTERED;
            }
            if (isSkippable(handlerType, "channelUnregistered", ChannelHandlerContext.class)) {
                mask &= ~MASK_CHANNEL_UNREGISTERED;
            }
        }

        if (ChannelOutboundHandler.class.isAssignableFrom(handlerType)) {
            mask |= MASK_ALL_OUTBOUND;

            if (isSkippable(handlerType, "bind", ChannelHandlerContext.class,
                            SocketAddress.class, ChannelPromise.class)) {
                mask &= ~MASK_BIND;
            }
            if (isSkippable(handlerType, "connect", ChannelHandlerContext.class, SocketAddress.class,SocketAddress.class, ChannelPromise.class)) {
                mask &= ~MASK_CONNECT;
            }
        }

        if (isSkippable(handlerType, "exceptionCaught", ChannelHandlerContext.class, Throwable.class)) {
            mask &= ~MASK_EXCEPTION_CAUGHT;
        }
    } catch (Exception e) {
        // Should never reach here.
        PlatformDependent.throwException(e);
    }

    return mask;
}


 903
903


 被折叠的 条评论
为什么被折叠?
被折叠的 条评论
为什么被折叠?
 到【灌水乐园】发言


