


Linux常用命令的使用
Linux文件系统 和 Windows文件系统目录:
Windows是分C盘、D盘、E盘…的,但是在Linux中是有一个最大的目录,称之为根目录,用 / 表示,根目录下面会有很多子目录,这些子目录其实可以理解为windows中C盘、D盘、E盘。
不同的子目录具有不同的含义,存放不同类型的文件信息。

bin 存放二进制可执行文件(ls,cat,mkdir等)
boot 存放用于系统引导时使用的各种文件
dev 存放设备文件
etc 存放系统配置文件
home 存放所有用户文件的根目录
lib 存放跟文件系统中的程序运行所需要的共享库及内核模块
proc 虚拟文件系统,存放当前内存的映射
usr 存放系统应用程序,比较重要的目录/usr/local 管理员软件安装目录
var 存放运行时需要改变数据的文件
mnt 挂载目录
sbin 存储管理级别的二进制执行文件
root 超级用户主目录
opt 额外安装的可选应用程序包安装位置
文件查看
# pwd 列出当前目录的路径,查看当前所在的路径。
# 注意,~表示是用户家目录,目前我们登陆的是root用户,root用户的家目录是/root
[root@localhost ~]# pwd
/root
# ls 列出当前目录下的所有文件
[root@localhost ~]# ls
anaconda-ks.cfg
# ll(ls -l缩写) 列出当前目录下的文件(带文件信息)
[root@localhost ~]# ll
total 4
-rw-------. 1 root root 1243 Mar 28 20:59 anaconda-ks.cfg
[root@localhost ~]# ls -l
total 4
-rw-------. 1 root root 1243 Mar 28 20:59 anaconda-ks.cfg
# ll -a 列出当前目录下的所有文件(包括隐藏文件)
[root@localhost ~]# ll -a
total 28
dr-xr-x---.  2 root root  135 Mar 28 21:00 .
dr-xr-xr-x. 17 root root  224 Mar 28 20:58 ..
-rw-------.  1 root root 1243 Mar 28 20:59 anaconda-ks.cfg
-rw-------.  1 root root    8 Mar 28 21:00 .bash_history
-rw-r--r--.  1 root root   18 Dec 29  2023 .bash_logout
-rw-r--r--.  1 root root  176 Dec 29  2023 .bash_profile
-rw-r--r--.  1 root root  176 Dec 29  2023 .bashrc
-rw-r--r--.  1 root root  100 Dec 29  2023 .cshrc
-rw-r--r--.  1 root root  129 Dec 29  2023 .tcshrc
# ll --help 查看ls用法,–help是一个帮助命令
[root@localhost ~]# ll --help
Usage: ls [OPTION]... [FILE]...
List information about the FILEs (the current directory by default).
Sort entries alphabetically if none of -cftuvSUX nor --sort is specified.

Mandatory arguments to long options are mandatory for short options too.
  -a, --all                  do not ignore entries starting with .
.............
创建、重命名文件\文件夹
# touch filename 创建空文件
# 创建空文件hello.txt
[root@localhost ~]# touch hello.txt
[root@localhost ~]# ll
total 4
-rw-------. 1 root root 1243 Mar 28 20:59 anaconda-ks.cfg
-rw-r--r--. 1 root root    0 Mar 28 22:21 hello.txt
# mkdir 创建目录
# 创建目录abc
[root@localhost ~]# mkdir abc
[root@localhost ~]# ll
total 4
drwxr-xr-x. 2 root root    6 Mar 28 22:22 abc
-rw-------. 1 root root 1243 Mar 28 20:59 anaconda-ks.cfg
-rw-r--r--. 1 root root    0 Mar 28 22:21 hello.txt
# mkdir -p 目标目录存在也不报错
# 当我们在创建目录时不确定这个目录是否已存在的时候,可以使用-p参数, 就算目录已存在也不会报错,如果不指定-p参数会报错,会提示目录已存在
# 创建目录abc
[root@localhost ~]# mkdir -p abc
[root@localhost ~]# ll
total 4
drwxr-xr-x. 2 root root    6 Mar 28 22:22 abc
-rw-------. 1 root root 1243 Mar 28 20:59 anaconda-ks.cfg
-rw-r--r--. 1 root root    0 Mar 28 22:21 hello.txt
[root@localhost ~]# mkdir abc
mkdir: cannot create directory ‘abc’: File exists
# mv 重命名文件\文件夹
# 修改目录abc的名称为abx
[root@localhost ~]# ll
total 4
drwxr-xr-x. 2 root root    6 Mar 28 22:22 abc
-rw-------. 1 root root 1243 Mar 28 20:59 anaconda-ks.cfg
-rw-r--r--. 1 root root    0 Mar 28 22:21 hello.txt
[root@localhost ~]# mv abc abx
[root@localhost ~]# ll
total 4
drwxr-xr-x. 2 root root    6 Mar 28 22:22 abx
-rw-------. 1 root root 1243 Mar 28 20:59 anaconda-ks.cfg
-rw-r--r--. 1 root root    0 Mar 28 22:21 hello.txt
文件编辑
- vi或vim:文件编辑利器
# 编辑hello.txt文件,不管这个文件存在与否都可以,如果不存在,最后在保存的时候会创建这个文件。
vi hello.txt
# 此时我们处于一个不可编辑的模式,如果想编辑文件,需要按键盘上的i键,进入编辑模式。
# 文件编辑好了以后我们想要保存,此时需要按键盘左上角的esc键,退出编辑模式,此时即进入了命令模式(命令模式其实就是我们最开始进入的那个不可编辑的模式)
# 在命令模式下按shift和: ,最后输入wq 保存并退出
# 查找字符串:在命令模式下,输入/,然后再输入你想要查询的字符串,最后按回车键就可以进行查询了
# 查找某一行内容:按shift和: 输入行号 回车;
# 显示行号: 按shift和: 输入 set nu;
# 复制粘贴一行:光标移动到需复制那一行内容上面,连按yy,既复制上一行了,再按p粘贴;
# 快速删除:进入命令模式,把光标定位到需删除的一行,连按dd,就可以删除当前行的内容;清空当前行下的所有内容,先连按999,再连按dd;
# 快速跳到文件首行:在命令模式下,按G可以快速将光标移动到最后一行;
# 快速跳到文件末尾:在命令模式下,按gg即可快速跳转到第一行;
# 注意:当修改一个文件,修改到一半的时候,把这命令行直接关闭了。
# 没有正确关闭文件,所以产生了临时文件,解决这个问题最直接最暴力的方式就是删除这个临时文件。
# 默认和这个原始文件在一个目录下面,它是一个隐藏文件,通过ll命令看不到,这个隐藏文件的后缀名为.swp,通过ll -a就可以看到了,找到以后 使用rm删除掉即可
[root@localhost ~]# ll
total 8
-rw-------. 1 root root 1243 Mar 28 20:59 anaconda-ks.cfg
-rw-r--r--. 1 root root   78 Mar 29 18:02 hello.txt
[root@localhost ~]# ll -a
total 44
dr-xr-x---.  2 root root   174 Mar 29 18:16 .
dr-xr-xr-x. 17 root root   224 Mar 28 20:58 ..
-rw-------.  1 root root  1243 Mar 28 20:59 anaconda-ks.cfg
-rw-------.  1 root root   188 Mar 29 18:14 .bash_history
-rw-r--r--.  1 root root    18 Dec 29  2013 .bash_logout
-rw-r--r--.  1 root root   176 Dec 29  2013 .bash_profile
-rw-r--r--.  1 root root   176 Dec 29  2013 .bashrc
-rw-r--r--.  1 root root   100 Dec 29  2013 .cshrc
-rw-r--r--.  1 root root    78 Mar 29 18:02 hello.txt
-rw-r--r--.  1 root root 12288 Mar 29 18:14 .hello.txt.swp
-rw-r--r--.  1 root root   129 Dec 29  2013 .tcshrc
[root@localhost ~]# rm -rf .hello.txt.swp
- grep:查找
- sed:编辑
- awk:分析
[root@localhost ~]# cat hello.txt
hello world!
hello world!
hello world!
hello world!
hello world!
hello world!
abc

# grep 常用于查找文件里符合条件的字符串
[root@localhost ~]# grep abc hello.txt
abc
# grep后面跟的这个字符串是可以支持正则表达式的
[root@localhost ~]# grep ^a hello.txt
abc
# 忽略大小写的查找
[root@localhost ~]# grep ABC hello.txt
[root@localhost ~]# grep -i ABC hello.txt
abc
# 查询出来对应字符串所在的行号
[root@localhost ~]# grep -i ABC -n hello.txt
7:abc
# 从所有进程中查找到java进程
[root@localhost ~]# ps -ef | grep java
root       2497   2247  0 22:34 pts/1    00:00:00 grep --color=auto java
# grep -v 再做一次过滤,表示忽略包含指定字符串的数据。
[root@localhost ~]# ps -ef | grep java | grep -v grep
[root@localhost ~]# cat hello.txt
hello world!
hello world!
hello world!
hello world!
hello world!
hello world!
abc
# 注意sed 默认不会直接修改源文件数据,而是会将数据复制到缓冲区中,修改也仅限于缓冲区中的数据,最终把缓冲区内的数据输出到控制台
# 在指定文件的第2行下添加一行
[root@localhost ~]# sed '2a\haha' hello.txt
hello world!
hello world!
haha
hello world!
hello world!
hello world!
hello world!
abc
# sed '[第几行]a\[添加内容]' 文件 ,a参数表示向指定行的下面添加数据
[root@localhost ~]# sed '1a\haha' hello.txt
hello world!
haha
hello world!
hello world!
hello world!
hello world!
hello world!
abc
# sed ‘0a\haha’ hello.txt 此操作会报错,行号是从1开始的
[root@localhost ~]# sed '0a\haha' hello.txt
sed: -e expression #1, char 2: invalid usage of line address 0
#  sed '[第几行]i\[添加内容]' 文件 ,i的意思表示在指定行的前面插入一行
[root@localhost ~]# sed '1i\haha' hello.txt
haha
hello world!
hello world!
hello world!
hello world!
hello world!
hello world!
abc
# 在一个文件的最后一行的前面添加一行内容,$ 它在这里表示是最后一行
[root@localhost ~]# sed '$i\haha' hello.txt
hello world!
hello world!
hello world!
hello world!
hello world!
hello world!
haha
abc
# 删除第7行内容,sed '[行号]d' 文件,d表示删除
[root@localhost ~]# sed '7d' hello.txt
hello world!
hello world!
hello world!
hello world!
hello world!
hello world!
# 删除最后一行
[root@localhost ~]# sed '$d' hello.txt
hello world!
hello world!
hello world!
hello world!
hello world!
hello world!

# sed后面的参数格式为[行号]s/[需要替换的内容]/[要替换的新内容]/[flags,表示指定要替换的字符串在这一行中出现第几次时才进行替换] ,s表示替换
# flags有多种用法:1、flags可以表示为1~512之间的任意一个数字,表示指定要替换的字符串在这一行中出现第几次时才进行替换;
# 2、flags可以直接表示为g,这样的意思就是对每一行数据中所有匹配到的内容全部进行替换;
# 3、flags位置的值为空,则只会在第一次匹配成功时做替换操作。
[root@localhost ~]# sed 's/l/a/1' hello.txt
healo world!
healo world!
healo world!
healo world!
healo world!
healo world!
abc
[root@localhost ~]# sed 's/l/a/2' hello.txt
helao world!
helao world!
helao world!
helao world!
helao world!
helao world!
abc
[root@localhost ~]# sed 's/l/a/3' hello.txt
hello worad!
hello worad!
hello worad!
hello worad!
hello worad!
hello worad!
abc
[root@localhost ~]# sed 's/l/a/g' hello.txt
heaao worad!
heaao worad!
heaao worad!
heaao worad!
heaao worad!
heaao worad!
abc
[root@localhost ~]# sed 's/l/a/' hello.txt
healo world!
healo world!
healo world!
healo world!
healo world!
healo world!
abc
# 注意上述sed命令的所有操作,在执行之后都不会修改源文件中的内容,如果需要修改源文件的话,需要增加一个 -i 参数
[root@localhost ~]# sed -i '2s/l/a/g' hello.txt
[root@localhost ~]# cat hello.txt
hello world!
heaao worad!
hello world!
hello world!
hello world!
hello world!
abc
# awk就是把文件逐行的读入,以空白字符为默认分隔符将每行内容切片,切开的部分再进行各种分析处理
# awk [option,指定文件中数据的字段分隔符] [programe,具体的处理逻辑] [file,操作的文件]
# awk在处理文本数据的时候,它会自动给每行中的每个字段分配一个变量
# 变量从1开始,
# $1表示是文本中的第1个数据字段,$2表示是文本中的第2个数据字段,以此类推。
# $0 它代表整个文本行的内容
[root@localhost ~]# cat hello.txt
hello world!
heaao worad!
hello world!
hello world!
hello world!
hello world!
abc
[root@localhost ~]# awk '{print $1}' hello.txt
hello
heaao
hello
hello
hello
hello
abc
[root@localhost ~]# awk '{print $2}' hello.txt
world!
worad!
world!
world!
world!
world!
[root@localhost ~]# awk '{print $0}' hello.txt
hello world!
heaao worad!
hello world!
hello world!
hello world!
hello world!
abc

# 指定文件中分隔符操作某列字段
# 例如:/etc/password 文件中的字段之间是使用:分割的
# 通过-F 参数 awk -F: ‘{print $1}’ /etc/passwd
[root@localhost ~]# awk -F: '{print $1}' /etc/passwd
root
bin
daemon
adm
lp
sync
shutdown
halt
mail
operator
games
ftp
nobody
systemd-network
dbus
polkitd
sshd
postfix

# 使用正则表达式进行过滤
[root@localhost ~]# cat hello.txt
hello world!
heaao worad!
hello world!
hello world!
hello world!
hello world!
abc
# awk ‘/[指定匹配字符]/ {print $1}’ hello.txt 这种写法表示对每次读取到的那一行数据进行匹配
[root@localhost ~]# awk '/world/ {print $0}' hello.txt
hello world!
hello world!
hello world!
hello world!
hello world!
[root@localhost ~]# awk '/abc/ {print $0}' hello.txt
abc
# awk ‘($1 ~ /world/) {print $1}’ hello.txt 在这里面可以通过$来指定具体是哪一列,需要把具体的对比逻辑放到小括号里面
[root@localhost ~]# awk '($1 ~ /world/) {print $0}' hello.txt
[root@localhost ~]# awk '($2 ~ /world/) {print $0}' hello.txt
hello world!
hello world!
hello world!
hello world!
hello world!
[root@localhost ~]# awk '($2 ~ /wor[a-z]d/) {print $1}' hello.txt
hello world!
heaao worad!
hello world!
hello world!
hello world!
hello world!
# 注意:这里如果是不匹配的意思的话需要使用 !~
文件内容统计
- wc、uniq、sort、head:文件内容统计相关命令
# wc:统计字数相关信息
# -c是表示获取文件内容的字节数量
# -l表示是行数
# -L是获取最长的一行内容的长度
# -w 表示文件中单词的个数,默认使用空白符切割

[root@localhost ~]# wc --help
Usage: wc [OPTION]... [FILE]...
  or:  wc [OPTION]... --files0-from=F
Print newline, word, and byte counts for each FILE, and a total line if
more than one FILE is specified.  With no FILE, or when FILE is -,
read standard input.  A word is a non-zero-length sequence of characters
delimited by white space.
The options below may be used to select which counts are printed, always in
the following order: newline, word, character, byte, maximum line length.
  -c, --bytes            print the byte counts
  -m, --chars            print the character counts
  -l, --lines            print the newline counts
      --files0-from=F    read input from the files specified by
                           NUL-terminated names in file F;
                           If F is - then read names from standard input
  -L, --max-line-length  print the length of the longest line
  -w, --words            print the word counts
      --help     display this help and exit
      --version  output version information and exit

[root@localhost ~]# wc -c hello.txt
78 hello.txt
[root@localhost ~]# wc -m hello.txt
78 hello.txt
[root@localhost ~]# wc -l hello.txt
6 hello.txt
[root@localhost ~]# wc -L hello.txt
12 hello.txt
[root@localhost ~]# wc -w hello.txt
12 hello.txt
- sort:排序
# -n:意思是按照数据的数值大小排序,正序排序
[root@localhost ~]# sort -n num.txt
1
2
3
9
10

# -nr:意思是按照数据的数值大小排序,倒序排序
[root@localhost ~]# sort -nr num.txt
10
9
3
2
1

# 在-n的基础上增加-k 这个参数后面需要指定一个数字,这个数字表示是文件中的第几列,编号从1开始
[root@localhost ~]# sort -k 2 -n num2.txt
ax 1
bc 2
dd 7
aa 9
xc 15
- uniq:检查重复的行列
# -c:在输出行的前面加上数据在文件中重复出现的次数
[root@localhost ~]# uniq -c hello.txt
      6 hello world!

# -u:表示返回文件中不重复的行
[root@localhost ~]# uniq -u hello.txt
abc

# uniq只能对连续在一起的重复内容进行去重
[root@localhost ~]# cat test.txt
hello
hello
abc
hello
hello
[root@localhost ~]# uniq test.txt
hello
abc
hello

# |:通过管道可以把前面一个命令的输出结果传递给后面一个命令
[root@localhost ~]# sort test.txt | uniq
abc
hello
- head:取前N条数据
# head表示获取前N条数据,默认返回前10条,后面可以通过指定数字来控制返回的数据条数
[root@localhost ~]# cat num.txt
3
2
9
10
1
[root@localhost ~]# head -3 num.txt
3
2
9
[root@localhost ~]# sort -nr num.txt  | head -3
10
9
3
链接文件
# linux有两种链接:硬链接、符号(软)链接
# 软链接功能类似类似于windows的快捷方式,主要用于节省磁盘空间
# 首先看硬链接:硬链接相当于对原始文件的一个复制,不能对目录使用硬链接。
# 命令:ln hello.txt hlink
[root@localhost ~]# ll
total 4
drwxr-xr-x. 2 root root    6 Mar 28 22:22 abx
-rw-------. 1 root root 1243 Mar 28 20:59 anaconda-ks.cfg
-rw-r--r--. 1 root root    0 Mar 28 22:21 hello.txt
[root@localhost ~]# ln hello.txt hlink
[root@localhost ~]# ll
total 4
drwxr-xr-x. 2 root root    6 Mar 28 22:22 abx
-rw-------. 1 root root 1243 Mar 28 20:59 anaconda-ks.cfg
-rw-r--r--. 2 root root    0 Mar 28 22:21 hello.txt
-rw-r--r--. 2 root root    0 Mar 28 22:21 hlink
# 再看符号(软)链接:
# 如果想使用软连接,需要添加-s,相当于快捷方式,不能删除原文件
# 命令:ln -s hello.txt vlink
[root@localhost ~]# ll
total 4
drwxr-xr-x. 2 root root    6 Mar 28 22:22 abx
-rw-------. 1 root root 1243 Mar 28 20:59 anaconda-ks.cfg
-rw-r--r--. 2 root root    0 Mar 28 22:21 hello.txt
-rw-r--r--. 2 root root    0 Mar 28 22:21 hlink
[root@localhost ~]# ln -s hello.txt  vlink
[root@localhost ~]# ll
total 4
drwxr-xr-x. 2 root root    6 Mar 28 22:22 abx
-rw-------. 1 root root 1243 Mar 28 20:59 anaconda-ks.cfg
-rw-r--r--. 2 root root    0 Mar 28 22:21 hello.txt
-rw-r--r--. 2 root root    0 Mar 28 22:21 hlink
lrwxrwxrwx. 1 root root    9 Mar 28 22:33 vlink -> hello.txt
切换目录
# cd . 当前目录
# 一个.表示当前目录
[root@localhost ~]# pwd
/root
[root@localhost ~]# cd .
[root@localhost ~]# pwd
/root
# cd .. 去上一级目录
# 两个.表示上一级目录
[root@localhost ~]# pwd
/root
[root@localhost ~]# cd ..
[root@localhost /]# pwd
/
# cd / 去根目录
# 通过在cd后面指定目录,可以切换到指定目录
[root@localhost /]# cd /
[root@localhost /]# pwd
/
[root@localhost ~]# cd /bin/
[root@localhost bin]# pwd
/bin
# cd ~ 去当前用户主(家)目录
[root@localhost bin]# cd ~
[root@localhost ~]# pwd
/root
# cd xxx/xxx 直接跳转到某个目录
[root@localhost ~]# cd abx/test/
[root@localhost test]# pwd
/root/abx/test
删除文件\文件夹(目录)
# rm命令可以删除文件或者目录,也可以将某个目录及其下属的所有文件及其子目录均删除掉
# 对于链接文件,只是删除整个链接文件,而原有文件保持不变。
# 常见用法:rm 删除文件,但是会有提示确认对话,输入y确认删除!
[root@localhost test]# touch abc.txt
[root@localhost test]# ll
total 0
-rw-r--r--. 1 root root 0 Mar 29 13:53 abc.txt
[root@localhost test]# rm abc.txt
rm: remove regular empty file ‘abc.txt’? y
[root@localhost test]# ll
total 0
# rm -r 删除目录,需要确认
# 删除目录需要指定r参数,否则会提示不能删除
# r是给rm加入递归(recursion)特性,也就是目标为文件夹时删除文件夹下所有数据
# 使用rm -r 在删除目录的时候也会有提示确认对话,输入y确认删除
[root@localhost abx]# ll
total 0
drwxr-xr-x. 2 root root 6 Mar 29 14:01 test
[root@localhost abx]# rm test
rm: cannot remove ‘test’: Is a directory
[root@localhost abx]# rm -r test
rm: remove directory ‘test’? y
[root@localhost abx]# ll
total 0
# rm -f 强制删除
# f给rm加入强制(force)特性,也就是遇到删除时不需要询问即可直接删除
# 注意:这个操作还是比较危险的,建议慎用,因为删除之后就找不到了
# Linux系统中没有回收站
[root@localhost abx]# touch a.txt
[root@localhost abx]# ll
total 0
-rw-r--r--. 1 root root 0 Mar 29 14:03 a.txt
[root@localhost abx]# rm -f a.txt
[root@localhost abx]# ll
total 0
# rm -rf 递归删除目录及其文件
# Linux中最危险的操作,最具破坏性
# rf参数可以强制递归删除任何数据,并且没有任何提示,慎用!慎用!慎用!
[root@localhost ~]# ll
drwxr-xr-x. 2 root root    6 Mar 29 14:03 abx
-rw-------. 1 root root 1243 Mar 28 20:59 anaconda-ks.cfg
[root@localhost ~]# mkdir -p abx/test/aaa
[root@localhost ~]# cd abx/test/aaa/
[root@localhost aaa]# touch a.txt
[root@localhost aaa]# cd ~
[root@localhost ~]# rm -rf abx
[root@localhost ~]# ll
-rw-------. 1 root root 1243 Mar 28 20:59 anaconda-ks.cfg
复制\粘贴\剪切
# 常见用法:cp 复制&粘贴文件
# 复制hello.txt文件,复制后的文件名为hello-bak.txt
[root@localhost ~]# ll
-rw-r--r--. 1 root root    0 Mar 28 22:21 hello.txt
[root@localhost ~]# cp hello.txt  hello-bak.txt
[root@localhost ~]# ll
-rw-r--r--. 1 root root    0 Mar 29 14:20 hello-bak.txt
-rw-r--r--. 1 root root    0 Mar 28 22:21 hello.txt
# cp -r 复制&粘贴文件或目录,复制目录,需要指定r参数
[root@localhost ~]# mkdir abc
[root@localhost ~]# ll
drwxr-xr-x. 2 root root    6 Mar 29 14:21 abc
[root@localhost ~]# cp abc xyz 【错误用法,复制目录必须指定-r参数】
cp: omitting directory ‘abc’
[root@localhost ~]# cp -r abc xyz
[root@localhost ~]# ll
drwxr-xr-x. 2 root root    6 Mar 29 14:21 abc
drwxr-xr-x. 2 root root    6 Mar 29 14:21 xyz
# mv 移动(剪切)文件或目录
# 将目录xyz移动到目录abc下面
[root@localhost ~]# ll
drwxr-xr-x. 2 root root    6 Mar 29 14:21 abc
drwxr-xr-x. 2 root root    6 Mar 29 14:21 xyz
[root@localhost ~]# ll abc/
total 0
[root@localhost ~]# mv xyz abc
[root@localhost ~]# ll abc/
drwxr-xr-x. 2 root root 6 Mar 29 14:21 xyz
远程复制
# scp命令用于在网络中不同主机之间复制文件或目录。scp是有Security的文件copy,基于ssh登录,如果没有配置免密码登陆,需要输入主机密码。
# 常见用法:
# 从本地复制(192.168.182.131)到远程主机 (192.168.182.130)
# scp /root/hello.txt 192.168.182.130:/root
[root@localhost ~]# scp /root/hello.txt  192.168.182.130:/root/
The authenticity of host '192.168.182.130 (192.168.182.130)' can't be established.
ECDSA key fingerprint is SHA256:uUG2QrWRlzXcwfv6GUot9DVs9c+iFugZ7FhR89m2S00.
ECDSA key fingerprint is MD5:82:9d:01:51:06:a7:14:24:a9:16:3d:a1:5e:6d:0d:16.
Are you sure you want to continue connecting (yes/no)? yes 【第一次会提示此信息,输入yes即可,以后就不提示了】
Warning: Permanently added '192.168.182.130' (ECDSA) to the list of known hosts.
root@192.168.182.130's password: 【在这里输入192.168.182.130机器的密码即可】
hello.txt                        100%    0     0.0KB/s   00:00
# 提示:
# 显示进度在scp后添加-v
# 复制目录在scp后添加-r
# 静默复制模式在scp后添加-q
# scp -rq /root/abc 192.168.182.130:/root
[root@localhost ~]# scp -rq /root/abc/ 192.168.182.130:/root/
root@192.168.182.130's password:【在这里输入192.168.182.130机器的密码即可】
文件属性
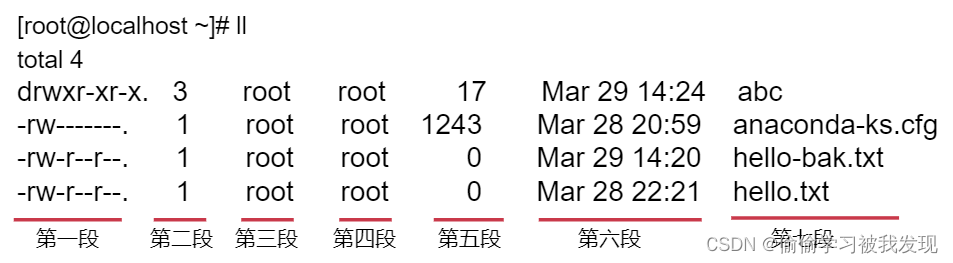
黑带七段
- 第一段:权限
- 第一个字符代表文件(-)、目录(d),链接(l)
其余字符每3个一组(rwx),读(r)、写(w)、执行(x) - 第一组:文件所有者的权限是读、写和执行
- 第二组:与文件所有者同一组的用户的权限
- 第三组:不与文件所有者同组的其他用户的权限
也可用数字表示为:r=4,w=2,x=1,如:权限6可以表示为r+w=6
- 第一个字符代表文件(-)、目录(d),链接(l)
- 第二段:目录/链接个数
对于目录文件,表示它的第一级子目录的个数
注意:此处的值要减2才等于该目录下的子目录的实际个数(目录下默认包含.和这两个目录)
对于其他文件,默认是1 - 第三段:所属用户
- 第四段:所属组
- 第五段:文件大小(字节)
- 第六段:最后修改时间
- 第七段:文件\文件夹名称
chmod 分配权限
# 常见用法:
# chmod u+x xxx.txt 给当前所有者添加执行权限【x表示是执行权限】
# 针对hello.txt文件,给当前用户添加执行权限
[root@localhost ~]# ll
-rw-r--r--. 1 root root    0 Mar 28 22:21 hello.txt
[root@localhost ~]# chmod u+x hello.txt
[root@localhost ~]# ll
-rwxr--r--. 1 root root    0 Mar 28 22:21 hello.txt
# chmod 777 xxx.txt 添加rwxrwxrwx权限
# 给hello.txt添加777权限
[root@localhost ~]# chmod 777 hello.txt
[root@localhost ~]# ll
-rwxrwxrwx. 1 root root    0 Mar 28 22:21 hello.txt
# chmod -R 777 xxx 给指定目录递归添加rwxrwxrwx权限
# 给abc目录及其子目录中的所有内容添加777权限
[root@localhost ~]# ll
drwxr-xr-x. 3 root root   17 Mar 29 14:24 abc
[root@localhost ~]# cd abc/
[root@localhost abc]# ll
total 0
drwxr-xr-x. 2 root root 6 Mar 29 14:21 xyz
[root@localhost abc]# cd ..
[root@localhost ~]# chmod -R 777 abc
[root@localhost ~]# ll
drwxrwxrwx. 3 root root   17 Mar 29 14:24 abc
[root@localhost ~]# cd abc/
[root@localhost abc]# ll
total 0
drwxrwxrwx. 2 root root 6 Mar 29 14:21 xyz
内容查看
# cat 显示文本内容,类似windows中的type(顺序输出)
[root@localhost ~]# cat anaconda-ks.cfg
#version=DEVEL
#System authorization information
auth --enableshadow --passalgo=sha512
......
# cat -b 显示行号输出
[root@localhost ~]# cat -b anaconda-ks.cfg
     1  #version=DEVEL
     2  # System authorization information
     3  auth --enableshadow --passalgo=sha512
     4  # Use CDROM installation media
........
# 分屏显示 more
# 用一次显示一屏,没有显示完时最后一行显示进度。回车显示下一行,按b显示上一页,空格显示下一页,q退出。根据当前屏幕大小显示一屏内容
[root@localhost ~]# more anaconda-ks.cfg
#version=DEVEL
#System authorization information
auth --enableshadow --passalgo=sha512
#Use CDROM installation media
cdrom
#Use graphical install
graphical
#Run the Setup Agent on first boot
firstboot --enable
ignoredisk --only-use=sda
#Keyboard layouts
keyboard --vckeymap=us --xlayouts='us'
#System language
lang en_US.UTF-8

#Network information
network  --bootproto=dhcp --device=ens33 --ipv6=auto --activate
network  --hostname=localhost.localdomain

#Root password
rootpw --iscrypted $6$sx2fOWF8AMiHgQTV$ExkpEX6Sq1EfZVHaP4RxfYls3B0o
dX2ouFfaTX2S0TttzWz7tX3L3cWRFeb1M4qfGUA2FGzrkylhlGfp4psze.
--More--(48%)
压缩、解压
常见用法:压缩和解压
参数:
-z 是否同时具有 gzip 的属性?亦即是否需要用 gzip 压缩?
-c 创建一个压缩文件的参数指令(create 的意思);
-x 解开一个压缩文件的参数指令!
-v 压缩的过程中显示文件!
-f 使用档案名字,这个参数是最后一个参数,后面只能接档案名!
注意:特别注意,在参数的下达中, c/x 仅能存在一个!不可同时存在!
# 压缩:
# tar -zcvf 打包及压缩(gzip方式)
# 将abc目录的内容打包压缩为abc.tar.gz
[root@localhost ~]# ll
drwxrwxrwx. 3 root root   17 Mar 29 14:24 abc
[root@localhost ~]# tar -zcvf abc.tar.gz abc
abc/
abc/xyz/
[root@localhost ~]# ll
drwxrwxrwx. 3 root root   17 Mar 29 14:24 abc
-rw-r--r--. 1 root root  130 Mar 29 15:24 abc.tar.gz
# 解压:
# tar -zxvf 解压(gzip包)
# 先把abc.tar.gz移动到test目录下,再解压缩
[root@localhost ~]# ll
drwxrwxrwx. 3 root root   17 Mar 29 14:24 abc
-rw-r--r--. 1 root root  130 Mar 29 15:24 abc.tar.gz
[root@localhost ~]# mkdir test
[root@localhost ~]# cd test/
[root@localhost test]# mv ../abc.tar.gz  .
[root@localhost test]# ll
total 4
-rw-r--r--. 1 root root 130 Mar 29 15:24 abc.tar.gz
[root@localhost test]# tar -zxvf abc.tar.gz
abc/
abc/xyz/
[root@localhost test]# ll
total 4
drwxrwxrwx. 3 root root  17 Mar 29 14:24 abc
-rw-r--r--. 1 root root 130 Mar 29 15:24 abc.tar.gz
输出及显示
echo:将内容输出到设备,类似java里面的system.out.println()
常见用法:
echo “hello\t\t world!” 不解析转义字符
echo -e “hello\t\t world!” 解析转义字符
echo $PATH 输出环境变量
注意:在打印变量信息的时候,使用echo ${PATH} 也可以,效果是一样的
[root@localhost ~]# echo "hello\t\t world!"
hello\t\t world!
[root@localhost ~]# echo -e "hello\t\t world!"
hello            world!
[root@localhost ~]# echo $PATH
/usr/local/sbin:/usr/local/bin:/usr/sbin:/usr/bin:/root/bin
[root@localhost ~]# echo ${PATH}
/usr/local/sbin:/usr/local/bin:/usr/sbin:/usr/bin:/root/bin
时间命令
[root@localhost ~]# date --help
Usage: date [OPTION]... [+FORMAT]
  or:  date [-u|--utc|--universal] [MMDDhhmm[[CC]YY][.ss]]
Display the current time in the given FORMAT, or set the system date.

Mandatory arguments to long options are mandatory for short options too.
  -d, --date=STRING         display time described by STRING, not 'now'
  -f, --file=DATEFILE       like --date once for each line of DATEFILE
.......
FORMAT controls the output.  Interpreted sequences are:

  %%   a literal %
  %a   locale's abbreviated weekday name (e.g., Sun)
  %A   locale's full weekday name (e.g., Sunday)
  %b   locale's abbreviated month name (e.g., Jan)
  %B   locale's full month name (e.g., January)
  %c   locale's date and time (e.g., Thu Mar  3 23:05:25 2005)
  %C   century; like %Y, except omit last two digits (e.g., 20)
  %d   day of month (e.g., 01)
  %D   date; same as %m/%d/%y
  %e   day of month, space padded; same as %_d
  %F   full date; same as %Y-%m-%d
  %g   last two digits of year of ISO week number (see %G)
  %G   year of ISO week number (see %V); normally useful only with %V
  %h   same as %b
  %H   hour (00..23)
  %I   hour (01..12)
  %j   day of year (001..366)
  %k   hour, space padded ( 0..23); same as %_H
  %l   hour, space padded ( 1..12); same as %_I
  %m   month (01..12)
  %M   minute (00..59)
  %n   a newline
  %N   nanoseconds (000000000..999999999)
  %p   locale's equivalent of either AM or PM; blank if not known
  %P   like %p, but lower case
  %r   locale's 12-hour clock time (e.g., 11:11:04 PM)
  %R   24-hour hour and minute; same as %H:%M
  %s   seconds since 1970-01-01 00:00:00 UTC
  %S   second (00..60)
  %t   a tab
  %T   time; same as %H:%M:%S
  %u   day of week (1..7); 1 is Monday
  %U   week number of year, with Sunday as first day of week (00..53)
  %V   ISO week number, with Monday as first day of week (01..53)
  %w   day of week (0..6); 0 is Sunday
  %W   week number of year, with Monday as first day of week (00..53)
  %x   locale's date representation (e.g., 12/31/99)
  %X   locale's time representation (e.g., 23:13:48)
  %y   last two digits of year (00..99)
  %Y   year
  %z   +hhmm numeric time zone (e.g., -0400)
  %:z  +hh:mm numeric time zone (e.g., -04:00)
  %::z  +hh:mm:ss numeric time zone (e.g., -04:00:00)
  %:::z  numeric time zone with : to necessary precision (e.g., -04, +05:30)
  %Z   alphabetic time zone abbreviation (e.g., EDT)

# date命令默认获取系统当前时间
[root@localhost ~]# date
Sun Mar 29 20:48:15 CST 2023

# 通过%Y,%m,%d这些参数可以对日期进行格式化
# date +"%Y-%m-%d %H:%M:%S"
# 注意:date后面的这些参数中间如果没有空格,可以省略双引号。
[root@localhost ~]# date +"%Y-%m-%d %H:%M:%S"
2026-03-29 21:06:45

# %s表示获取自1970-01-01 00:00:00以来的秒数 当前时间的时间戳 date +%s
[root@localhost ~]# date +%s
1585487600

# 虽然date命令没有直接支持获取毫秒数,但是从秒换算为毫秒最直接粗暴的方式就是在秒数后面加3个0
[root@localhost ~]# date +%s"000"
1585487796000

# 获得指定时间
[root@localhost ~]# date --date="2026-01-01 00:00:00"
Wed Jan  1 00:00:00 CST 2026

# 获得指定时间的时间戳
[root@localhost ~]# date --date="2026-01-01 00:00:00" +%s
1577808000

# 获取昨天的日期
[root@localhost ~]# date --date="1 days ago"
Sat Mar 28 21:36:37 CST 2026
# 获取昨天的日期 只获取年月日
[root@localhost ~]# date --date="1 days ago" +%Y-%m-%d
2026-03-28
# 2月份有多少天
[root@localhost ~]# date --date="2026-03-01 1 days ago" +%d
29
软件安装和卸载
第一种:压缩包安装方式,直接解压,配置相应的环境变量即可使用
第二种:在线安装,使用yum
yum集成了连接网络,软件安装,删除,更新等功能,yum在配置好repo后,机器只要连网,就能智能化安装软件,使用yum 安装的好处在于可以自动安装软件需要的依赖包
# 安装
yum install -y 安装
# 升级
yum update 不跟则更新全部
# 查找和显示
yum info 显示包信息
yum list 不跟则显示已安装或可安装包
# 删除程序
yum remove
# 清除缓存
yum clean all 清除所有缓存(包含文件、旧软件)
查看操作历史
history保留了最近执行的命令记录,默认可以保留1000。
历史清单从0开始编号到最大值。
常见用法:
history N 显示最近N条命令
history -c 清除所有的历史记录
history -w xxx.txt 保存历史记录到文本xxx.txt
[root@localhost ~]# history 10
  142  ll
  143  tar -zxvf abc.tar.gz
  144  ll
  145  cd .
  146  ll
  147  echo "hello\t\t world!"
  148  echo -e "hello\t\t world!"
  149  env
  150  echo $PATH
  151  history 10
[root@localhost ~]# history  -w his.txt
[root@localhost ~]# ll
-rw-------. 1 root root 1395 Mar 29 15:41 his.txt
[root@localhost ~]# more his.txt
ip addr
ls /
pwd
ls
ll
..........
磁盘使用情况
# 使用df命令查看硬盘使用情况
# 已使用1.2G,还剩余16G
[root@localhost ~]# df -h
Filesystem               Size  Used Avail Use% Mounted on
devtmpfs                 898M     0  898M   0% /dev
tmpfs                    910M     0  910M   0% /dev/shm
tmpfs                    910M  9.5M  901M   2% /run
tmpfs                    910M     0  910M   0% /sys/fs/cgroup
/dev/mapper/centos-root   17G  1.2G   16G   7% /
/dev/sda1               1014M  150M  865M  15% /boot
tmpfs                    182M     0  182M   0% /run/user/0
查看内存使用情况
# free 查看内存和交换空间的使用情况
# 常见用法:
# free -m:显示内存单位为MB
# free -h:根据值的大小,显示易于识别的单位
[root@localhost ~]# free -m
              total        used        free      shared  buff/cache   available
Mem:           1819         169        1509           9         140        1501
Swap:          2047           0        2047
[root@localhost ~]# free -h
              total        used        free      shared  buff/cache   available
Mem:           1.8G        169M        1.5G        9.5M        140M        1.5G
Swap:          2.0G          0B        2.0G
进程相关命令
- ps:显示进程信息
- netstat:显示端口信息
- jps:显示Java进程信息
- top:动态监控进程信息
- nohup:守护进程运行应用
# 显示系统内的所有进程
[root@localhost ~]# ps -ef
UID         PID   PPID  C STIME TTY          TIME CMD
root          1      0  0 20:46 ?        00:00:01 /usr/lib/systemd/systemd --sw
root          2      0  0 20:46 ?        00:00:00 [kthreadd]
root          4      2  0 20:46 ?        00:00:00 [kworker/0:0H]
........

# 过滤出系统内的java进程信息
# 过滤出系统内的python进程信息
# 注意:这里面返回的grep --color=auto这一行信息表示是grep这个命令本身
[root@localhost ~]# ps -ef | grep java
root       2239   1973  0 22:19 pts/0    00:00:00 grep --color=auto java
[root@localhost ~]# ps -ef | grep python
root        736      1  0 20:46 ?        00:00:00 /usr/bin/python2 -Es /usr/sbin/firewalld --nofork --nopid
root       1070      1  0 20:46 ?        00:00:00 /usr/bin/python2 -Es /usr/sbin/tuned -l -P
root       2241   1973  0 22:19 pts/0    00:00:00 grep --color=auto python

# ps -ef |grep abc 查看含有"abc"的活动进程
# ps -ef |grep -v abc 查看不含abc的活动进程
# ps a 显示现行终端机下的所有程序,包括其他用户的程序。
# ps -A 显示所有程序。
# ps c 列出程序时,显示每个程序真正的指令名称,而不包含路径,参数或常驻服务的标示。
# ps -e 此参数的效果和指定"A"参数相同。
# ps e 列出程序时,显示每个程序所使用的环境变量。
# ps f 用ASCII字符显示树状结构,表达程序间的相互关系。
# ps -H 显示树状结构,表示程序间的相互关系。
# ps -j:显示进程归属的进程组id、会话id、父进程id
# ps -u:显示进程的归属用户及内存使用情况
# ps x:显示没有关联控制终端的进程
# netstat也是显示进程相关信息的,只不过可以比ps命令额外显示端口相关的信息
# 这个命令默认是没有安装的,最方便的方式就是使用yum来在线安装 yum install -y net-tools
[root@localhost ~]# netstat -anp
Active Internet connections (servers and established)
Proto Recv-Q Send-Q Local Address           Foreign Address         State       PID/Program name
tcp        0      0 127.0.0.1:25            0.0.0.0:*               LISTEN      1312/master
tcp        0      0 0.0.0.0:22              0.0.0.0:*               LISTEN      1071/sshd
tcp        0     52 192.168.182.132:22      192.168.182.1:51472     ESTABLISHED 1969/sshd: root@pts
tcp6       0      0 ::1:25                  :::*                    LISTEN      1312/master
tcp6       0      0 :::22                   :::*                    LISTEN      1071/sshd
......
# ssh服务的端口使用情况
[root@localhost ~]# netstat -anp | grep 22
tcp        0      0 0.0.0.0:22              0.0.0.0:*               LISTEN      1071/sshd
tcp        0     52 192.168.182.132:22      192.168.182.1:51472     ESTABLISHED 1969/sshd: root@pts
tcp6       0      0 :::22                   :::*                    LISTEN      1071/sshd
# jps:显示当前正在运行的 Java 进程的进程 ID 和类名或 JAR 文件名。
# 用来查看基于HotSpot的JVM里面中,所有具有访问权限的Java进程的具体状态, 包括进程ID,进程启动的路径及启动参数等等,类似ps命令,不同的是ps是用来显示所有进程信息的,而jps只显示Java进程准确的说jps是显示当前用户已启动的Java进程信息,信息包括进程号和简短的进程command。
#注意:jps是Java提供的命令,只有在安装配置好Java环境之后才能使用
#使用jps时,如果没有指定hostid,它只会显示本地环境中所有的Java进程;如果指定了hostid,它就会显示指定hostid上面的java进程,不过这需要远程服务上开启了jstatd服务。
# hostid指定了目标的服务器,[protocol:][[//]hostname][:port][/servername]
jps [ options ] [ hostid ]
# -q 忽略输出的类名、Jar名以及传递给main方法的参数,只输出pid。
# -m 输出传递给main方法的参数,如果是内嵌的JVM则输出为null。
# -l 输出应用程序主类的完整包名,或者是应用程序JAR文件的完整路径。
# -v 输出传给JVM的参数。
# -V 输出通过标记的文件传递给JVM的参数(.hotspotrc文件,或者是通过参数-XX:Flags=指定的文件)。
# -J 用于传递jvm选项到由javac调用的java加载器中,例如,“-J-Xms48m”将把启动内存设置为48M,使用-J选项可以非常方便的向基于Java的开发的底层虚拟机应用程序传递参数。
在Linux系统中,ps和jps是两个不同的命令,用于查看不同类型的进程信息。
-
ps命令:ps命令是一个通用的进程查看工具,用于显示当前正在运行的所有进程的详细信息。它可以显示包括系统进程在内的所有进程,并提供有关进程ID(PID)、父进程ID(PPID)、CPU使用率、内存使用量等信息。ps命令适用于查看系统中所有类型的进程,不限于Java进程。
-
jps命令:jps命令是Java特定的进程查看工具,用于显示当前正在运行的Java进程的信息。它主要用于检查Java应用程序的运行状态和进程ID。jps命令只显示正在运行的Java进程,并提供每个Java进程对应的进程ID(PID)和Java类名称。jps命令需要在安装了Java Development Kit (JDK) 的系统上才能使用。
top:主要作用在于动态显示系统消耗资源最多的进程信息,包含进程ID、内存占用、CPU占用等,top和ps命令作用基本相同,唯一的区别是top命令能够动态显示进程信息。
- 动态视图:top 提供了一个实时动态更新的视图,能够持续显示系统中当前正在运行的进程信息及其资源占用情况。
- 系统性能监控:除了显示进程信息外,top 还可以显示系统的整体性能指标,如平均负载(uptime,load average)、CPU使用率(%CPU)、内存使用量(%MEM)等。
- 更新频率:默认情况下,top命令会定期(通常是3秒钟)刷新输出,更新进程列表和系统状态。 top -d 2。
注意:这里的CPU使用情况是总体CPU的使用情况,如果是多核CPU,想查看具体每个CPU的使用情况的话可以在监控模式中按键盘上的1,就可以查看每一个CPU的情况了,按q可以退出此监控模式。
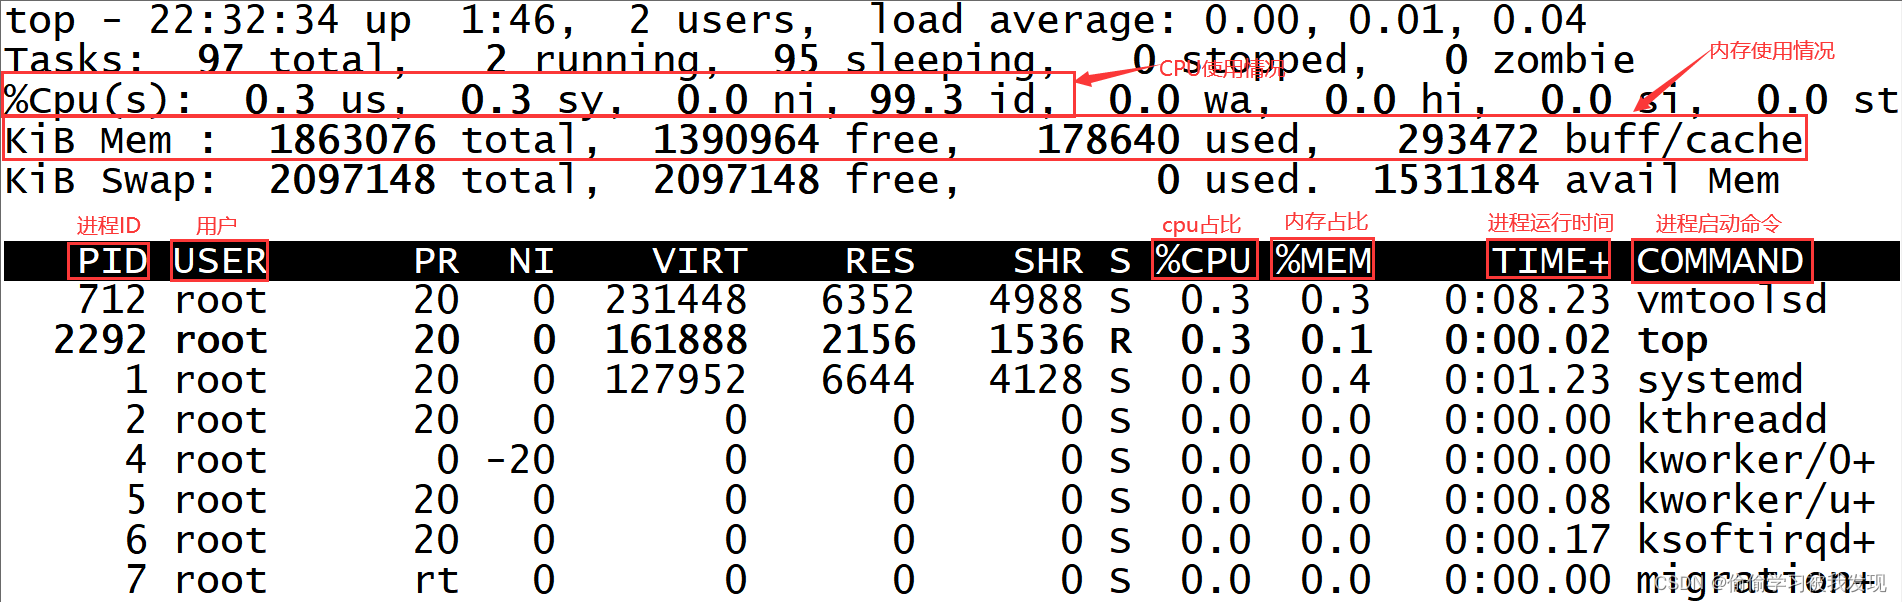
第一行:系统运行时间和平均负载
当前时间、系统已运行时间、当前登录用户的数量、最近5、10、15分钟内的平均负载
第二行:任务
任务的总数、运行中(running)的任务、休眠(sleeping)中的任务、停止(stopped)的任务、僵尸状态(zombie)的任务
第三行:cpu状态
| 字段 | 释义 |
|---|---|
| us | user: 运行(未调整优先级的) 用户进程的CPU时间 |
| sy | system: 运行内核进程的CPU时间 |
| ni | niced:运行已调整优先级的用户进程的CPU时间 |
| id | idle:空闲时间 |
| wa | IO wait: 用于等待IO完成的CPU时间 |
| hi | 处理硬件中断的CPU时间 |
| si | 处理软件中断的CPU时间 |
| st | 这个虚拟机被hypervisor偷去的CPU时间(译注:如果当前处于一个hypervisor下的vm,实际上hypervisor也是要消耗一部分CPU处理时间的) |
第四行:内存
全部可用内存、已使用内存、空闲内存、缓冲内存
第五行:swap
全部、已使用、空闲和缓冲交换空间
第七行至N行:各进程任务的的状态监控
| 字段 | 释义 |
|---|---|
| PID | 进程ID,进程的唯一标识符 |
| USER | 进程所有者的实际用户名 |
| PR | 进程的调度优先级。这个字段的一些值是’rt’。这意味这这些进程运行在实时态 |
| NI | 进程的nice值(优先级)。越小的值意味着越高的优先级。负值表示高优先级,正值表示低优先级 |
| VIRT | virtual memory usage 虚拟内存,进程使用的虚拟内存。进程使用的虚拟内存总量,单位kb,VIRT=SWAP+RES,1、进程“需要的”虚拟内存大小,包括进程使用的库、代码、数据等;2、假如进程申请100m的内存,但实际只使用了10m,那么它会增长100m,而不是实际的使用量 |
| RES | resident memory usage 常驻内存,驻留内存大小。驻留内存是任务使用的非交换物理内存大小。进程使用的、未被换出的物理内存大小,单位kb,RES=CODE+DATA,1、进程当前使用的内存大小,但不包括swap out,2、包含其他进程的共享,3、如果申请100m的内存,实际使用10m,它只增长10m,与VIRT相反,4、关于库占用内存的情况,它只统计加载的库文件所占内存大小 |
| SHR | shared memory 共享内存,1、除了自身进程的共享内存,也包括其他进程的共享内存,2、虽然进程只使用了几个共享库的函数,但它包含了整个共享库的大小,3、计算某个进程所占的物理内存大小公式:RES – SHR,4、swap out后,它将会降下来 |
| S | 这个是进程的状态。它有以下不同的值: D - 不可中断的睡眠态,R – 运行态,S – 睡眠态,T – 被跟踪或已停止,Z – 僵尸态 |
| %CPU | 自从上一次更新时到现在任务所使用的CPU时间百分比。%CPU显示的是进程占用一个核的百分比,而不是整个cpu(N核)的百分比,有时候可能大于100,那是因为该进程启用了多线程占用了多个核心,所以有时候我们看该值得时候会超过100%,但不会超过总核数*100 |
| %MEM | 进程使用的可用物理内存百分比 |
| TIME+ | 任务启动后到现在所使用的全部CPU时间,精确到百分之一秒 |
| COMMAND | 运行进程所使用的命令。进程名称(命令名/命令行) |
# 停止某一个进程,PID是进程号
kill PID
# 强制停止某一进程,PID是进程号
kill -9 PID
# nohup 是一个在类 Unix 操作系统(如 Linux 和 macOS)中广泛使用的命令,全称是 "no hang up",即“不挂断”。它的主要目的是允许用户在终端断开连接或注销账户后,仍然能够让指定的命令或程序在后台继续运行,不受 SIGHUP(挂起)信号的影响。
nohup java -jar your-project.jar &
# 如果你想要将输出重定向到一个日志文件,可以这样做:
nohup java -jar your-project.jar > /tmp/wms.log 2>&1 &
关机重启快捷命令
# 关机
shutdown -h now
# 重启
reboot -h now
# 退出当前登录状态
exit
Linux基本配置修改
- Linux静态ip设置
- Linux临时设置+永久设置(hostname)配置
- Linux临时关闭+永久关闭(防火墙)
临时关闭的特性是立刻生效,重启失效
永久关闭的特性是重启生效,永久有效
Linux静态ip设置
# 如果未设置静态ip,Linux虚拟机每次重启之后都可能会重新获取到新的ip地址
[root@localhost ~]# cat /etc/sysconfig/network-scripts/ifcfg-ens33
TYPE="Ethernet"
PROXY_METHOD="none"
BROWSER_ONLY="no"
BOOTPROTO="dhcp"
DEFROUTE="yes"
IPV4_FAILURE_FATAL="no"
IPV6INIT="yes"
IPV6_AUTOCONF="yes"
IPV6_DEFROUTE="yes"
IPV6_FAILURE_FATAL="no"
IPV6_ADDR_GEN_MODE="stable-privacy"
NAME="ens33"
UUID="9a0df9ec-a85f-40bd-9362-ebe134b7a100"
DEVICE="ens33"
ONBOOT="yes"
# 首先修改BOOTPROTO参数,将之前的dhcp改为static,BOOTPROTO="static"
# 然后在文件末尾增加三行内容【注意,我现在使用的是nat网络模式,不同的网络模式在这里填写的ip信息是不一样的】
IPADDR=192.168.182.100
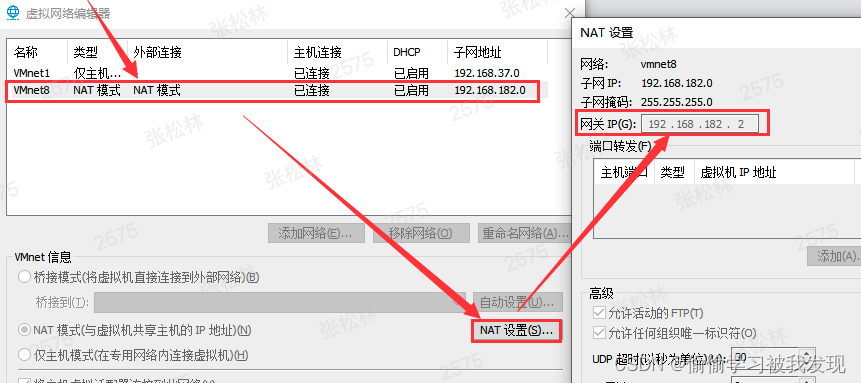
GATEWAY=192.168.182.2
DNS1=192.168.182.2
# DNS1的值和GATEWAY的值一样即可。
注意:IPADDR的值,192.168.182都是取自虚拟机中虚拟网络编辑器中子网地址的值,最后的100是自定义的,这个值可以取3~254之间的任意一个数值。
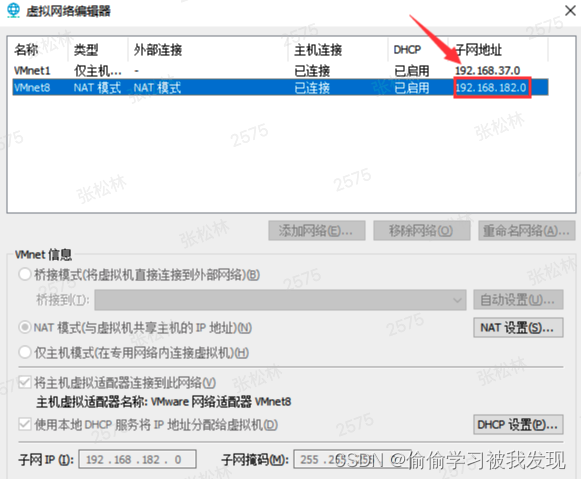
GATEWAY的值是取自虚拟网络编辑器中NAT设置里面的网关的值。
# /etc/sysconfig/network-scripts/ifcfg-ens33文件最终修改好的配置
[root@localhost ~]# cat /etc/sysconfig/network-scripts/ifcfg-ens33
TYPE="Ethernet"
PROXY_METHOD="none"
BROWSER_ONLY="no"
BOOTPROTO="static"
DEFROUTE="yes"
IPV4_FAILURE_FATAL="no"
IPV6INIT="yes"
IPV6_AUTOCONF="yes"
IPV6_DEFROUTE="yes"
IPV6_FAILURE_FATAL="no"
IPV6_ADDR_GEN_MODE="stable-privacy"
NAME="ens33"
UUID="9a0df9ec-a85f-40bd-9362-ebe134b7a100"
DEVICE="ens33"
ONBOOT="yes"
IPADDR=192.168.182.100
GATEWAY=192.168.182.2
DNS1=192.168.182.2

# 重启网卡
[root@localhost ~]# service network restart
Restarting network (via systemctl):                        [  OK  ]

# 查看ip地址
# 注意:每个机器的ip不能重复,前三段是一样的,第四段一定不能重复,因为ip是一个虚拟机的唯一标识
[root@localhost ~]# ip addr
1: lo: <LOOPBACK,UP,LOWER_UP> mtu 65536 qdisc noqueue state UNKNOWN group default qlen 1000
    link/loopback 00:00:00:00:00:00 brd 00:00:00:00:00:00
    inet 127.0.0.1/8 scope host lo
       valid_lft forever preferred_lft forever
    inet6 ::1/128 scope host
       valid_lft forever preferred_lft forever
2: ens33: <BROADCAST,MULTICAST,UP,LOWER_UP> mtu 1500 qdisc pfifo_fast state UP group default qlen 1000
    link/ether 00:0c:29:9c:86:11 brd ff:ff:ff:ff:ff:ff
    inet 192.168.182.100/24 brd 192.168.182.255 scope global noprefixroute ens33
       valid_lft forever preferred_lft forever
    inet6 fe80::c8a8:4edb:db7b:af53/64 scope link noprefixroute
       valid_lft forever preferred_lft forever
Linux临时设置+永久设置(hostname)配置
ip不好记,所以针对每一台linux机器还有一个主机名hostname
# 通过hostname命令可以直接查看主机名,这个是默认的主机名
[root@localhost ~]# hostname
localhost.localdomain

# 临时设置使用hostname命令直接设置即可
# 这种方式设置的可以立刻生效,机器重启之后就失效了。
[root@localhost ~]# hostname zsl01
[root@localhost ~]# hostname
zsl01

# 永久设置直接修改/etc/hostname文件即可
[root@localhost ~]# vi /etc/hostname
zsl01
[root@localhost ~]# cat /etc/hostname
zsl01
# 重启后生效
[root@localhost ~]# reboot -h now
Linux临时关闭+永久关闭(防火墙)
# 临时关闭防火墙
[root@localhost ~]# systemctl stop firewalld

# 通过status确认当前防火墙的状态
[root@localhost ~]# systemctl status firewalld
● firewalld.service - firewalld - dynamic firewall daemon
   Loaded: loaded (/usr/lib/systemd/system/firewalld.service; disabled; vendor preset: enabled)
   Active: inactive (dead)
     Docs: man:firewalld(1)

# 永久关闭防火墙
[root@localhost ~]# systemctl disable firewalld
Removed symlink /etc/systemd/system/multi-user.target.wants/firewalld.service.
Removed symlink /etc/systemd/system/dbus-org.fedoraproject.FirewallD1.service.

#通过这个list-unit-files来确认一下是否从开机启动项中关闭了
[root@localhost ~]# systemctl list-unit-files | grep firewalld
firewalld.service                             disabled

#注意:针对不同版本的centos系统,关闭防火墙的命令是不一样的,centos6和centos7关闭防火墙命令是不一样的
# centos6关闭防火墙
# centos6临时关闭
service iptables stop
# centos6永久关闭
chkconfig iptables off
shell基本语法
shell脚本以.sh结尾
# 创建一个专门放shell脚本的文件夹
[root@localhost ~]# mkdir shell
[root@localhost ~]# cd shell/
[root@localhost shell]#

# shell脚本的第一行内容是: #!/bin/bash
# 在shell脚本中的第一行引入/bin/bash,或者/bin/sh都是一样的
[root@localhost shell]# vi hello.sh
#!/bin/bash
# first command
echo hello world!

# 执行shell脚本的标准写法 bash hello.sh
# 还有一种写法是sh hello.sh
[root@localhost shell]# bash hello.sh
hello world!

# bash对应的是/bin目录下面的bash文件
[root@localhost shell]# ll /bin/bash
-rwxr-xr-x. 1 root root 964600 Aug  8  2019 /bin/bash
# sh是一个链接文件,指向的也是/bin目录下面的bash文件
[root@localhost shell]# ll /bin/sh
lrwxrwxrwx. 1 root root 4 Mar 28 20:54 /bin/sh -> bash

# 给脚本添加权限
[root@localhost shell]# chmod u+x hello.sh
[root@localhost shell]# ll
total 4
-rwxr--r--. 1 root root 45 Apr  2 16:11 hello.sh

# 添加完执行权限之后,再执行的时候就可以使用简化形式./hello.sh
# 这里的.表示是当前目录,表示在当前目录下执行这个脚本
[root@localhost shell]# ./hello.sh
hello world!
# 指定全路径也可以执行
[root@localhost shell]# /root/shell/hello.sh
hello world!
# 已经cd到这个文件所在的目录里面了,按理说是可以找到,那为什么会提示找不到呢?
[root@localhost shell]# hello.sh
-bash: hello.sh: command not found
#主要原因是这样的,因为在这里我们直接指定的文件名称,前面没有带任何路径信息,那么按照linux的查找规则,它会到PATH这个环境变量中指定的路径里面查找,这个时候PATH环境变量中都有哪些路径呢?
[root@localhost shell]# echo $PATH
/usr/local/sbin:/usr/local/bin:/usr/sbin:/usr/bin:/root/bin

# 修改这个PATH环境变量
[root@localhost shell]# vi /etc/profile
........
.......
.......
export PATH=.:$PATH
# 重新加载环境变量配置文件
[root@localhost shell]# source /etc/profile
# 再查看PATH变量的值
[root@localhost shell]# echo $PATH
.:/usr/local/sbin:/usr/local/bin:/usr/sbin:/usr/bin:/root/bin
# 再重新执行 hello.sh
[root@localhost shell]# hello.sh
hello world!

# shell脚本的单步执行,便于脚本调试
[root@localhost shell]# bash -x hello.sh
+ echo hello 'world!'
hello world!
# +号开头的内容表示是脚本中将要执行的命令,下面的内容是执行的结果,这样如果脚本中的命令比较多的话,看起来是比较清晰的
shell中的变量
- shell中的变量不需要声明,初始化也不需要指定类型,shell是一门弱类型的语言,JAVA则是强类型的语言,需要提前声明变量,并且指定变量类型。
- shell中变量的命名要求:只能使用数字、字母和下划线,且不能以数字开头
- 变量赋值是通过"="进行赋值,在变量、等号和值之间不能出现空格!
- 执行之后提示-bash: name: command not found的都表示是错误的,执行成功的话是没有任何输出的,没有反馈就是最好的结果
[root@localhost shell]# name=zs
[root@localhost shell]# name =zs
-bash: name: command not found
[root@localhost shell]# name= zs
-bash: zs: command not found
[root@localhost shell]# name2_=zs
[root@localhost shell]# 2name_=zs
-bash: 2name_=zs: command not found
[root@localhost shell]# name2$=zs
-bash: name2$=zs: command not found

# 打印变量的值,通过echo命令
[root@localhost shell]# echo $name
zs
# 这两种形式都可以,一个是完整写法,一个是简化写法
[root@localhost shell]# echo ${name}
zs

# 如果我们想在变量的结果后面直接无缝拼接其它字符串,那就只能使用带花括号的形式
[root@localhost shell]# echo $namehehe
[root@localhost shell]# echo ${name}hehe
zshehe
# 如果带空格的话就无所谓了
[root@localhost shell]# echo $name hehe
zs hehe
变量的分类
- 本地变量
- 环境变量
- 位置变量
- 特殊变量
本地变量
本地变量的格式是VAR_NAME=VALUE,这种变量一般用于在shell脚本中定义一些临时变量,只对当前shell进程有效,关闭shell进程之后就消失了,对当前shell进程的子进程和其它shell进程无效。
注意,开启一个shell的命令行窗口其实就是开启了一个shell进程,克隆一个会话,在这两个shell进程中执行echo $name 会发现在克隆的shell进程中获取不到name的值,表示本地变量对其它shell进程无效,
[root@localhost shell]# pstree
-bash: pstree: command not found
# 在线安装pstree,安装 psmisc
[root@localhost shell]# yum install -y psmisc
Loaded plugins: fastestmirror
Loading mirror speeds from cached hostfile
 * base: mirrors.cn99.com
 * extras: mirrors.cn99.com
 * updates: mirrors.nju.edu.cn
base                                                    | 3.6 kB     00:00
extras                                                  | 2.9 kB     00:00
updates                                                 | 2.9 kB     00:00
Resolving Dependencies
--> Running transaction check
---> Package psmisc.x86_64 0:22.20-16.el7 will be installed
--> Finished Dependency Resolution

Dependencies Resolved

===============================================================================
 Package          Arch             Version                Repository      Size
===============================================================================
Installing:
 psmisc           x86_64           22.20-16.el7           base           141 k

Transaction Summary
===============================================================================
Install  1 Package

Total download size: 141 k
Installed size: 475 k
Downloading packages:
psmisc-22.20-16.el7.x86_64.rpm                            | 141 kB   00:00
Running transaction check
Running transaction test
Transaction test succeeded
Running transaction
  Installing : psmisc-22.20-16.el7.x86_64                                  1/1
  Verifying  : psmisc-22.20-16.el7.x86_64                                  1/1

Installed:
  psmisc.x86_64 0:22.20-16.el7

Complete!

# 再执行pstree
[root@localhost shell]# pstree
systemd─┬─NetworkManager───2*[{NetworkManager}]
        ├─VGAuthService
        ├─agetty
        ├─anacron
        ├─auditd───{auditd}
        ├─crond
        ├─dbus-daemon───{dbus-daemon}
        ├─lvmetad
        ├─master─┬─pickup
        │        └─qmgr
        ├─polkitd───6*[{polkitd}]
        ├─rsyslogd───2*[{rsyslogd}]
        ├─sshd─┬─sshd───bash
        │      └─sshd───bash───pstree
        ├─systemd-journal
        ├─systemd-logind
        ├─systemd-udevd
        ├─tuned───4*[{tuned}]
        └─vmtoolsd───{vmtoolsd}

# 进入这个shell的子进程中
[root@localhost shell]# bash
# 执行exit退出子shell进程
[root@localhost shell]# exit
exit
# 主要注意本地变量的生效范围,如果我们在一个脚本中定义了一个本地变量,那么这个本地变量就只在当前shell脚本中有效。
- 环境变量
环境变量格式:export VAR_NAME=VALUE;
环境变量格式是在本地变量格式的基础上添加一个export参数;
环境变量的这种格式主要用于设置临时环境变量,当你关闭当前shell进程之后环境变量就消失了,还有就是对子shell进程有效,对其它shell进程无效;
注意,环境变量的生效范围和本地变量是不一样的,环境变量对子shell进程是有效的。
# 设置临时环境变量
[root@localhost shell]# export age=18
[root@localhost shell]# echo $age
18

# 进入子进程,环境变量对子shell进程是有效的
[root@localhost shell]# bash
[root@localhost shell]# echo $age
18
[root@localhost shell]# exit
exit

# 设置永久环境变量,添加到/etc/profile文件中,这样可以保证对所有用户都生效
[root@localhost shell]# vi /etc/profile
...........
...........
...........
export age=19

# 重新加载
[root@localhost shell]# source  /etc/profile
# 添加好了以后执行echo命令获取age的值
[root@localhost shell]# echo $age
19
- 位置变量
动态给shell脚本传递一些参数,这个时候就需要用到位置变量,类似于$0 $1 2 这样的, 2这样的, 2这样的,后面的数字理论上没有什么限制,
它的格式是:location.sh abc xyz
位置变量其实相当于java中main函数的args参数,可以在shell脚本中动态获取外部参数,这样就可以根据外部传的参数动态执行不同的业务逻辑了。
[root@localhost shell]# vi location.sh
#!/bin/bash
echo $0
echo $1
echo $2
echo $3

# 动态传参
# $0的值是这个脚本的名称
# $1 是脚本后面的第一个参数
# $2是脚本后面的第二个参数
# $3为空,是因为脚本后面就只有两个参数
# 理论上来说,脚本后面有多少个参数,在脚本中就可以通过$和角标获取对应参数的值。
# 多个参数中间使用空格分隔。
[root@localhost shell]# sh location.sh abc xyz
location.sh
abc
xyz
- 特殊变量
$? ,表示是上一条命令的返回状态码,状态码在0~255之间
如果命令执行成功,这个返回状态码是0,如果失败,则是在1~255之间,不同的状态码代表着不同的错误信息,也就是说,正确的道路只有一条,失败的道路有很多。
[root@localhost shell]# ll
total 8
-rwxr--r--. 1 root root 45 Apr  2 16:11 hello.sh
-rw-r--r--. 1 root root 44 Apr  3 16:23 location.sh
[root@localhost shell]# echo $?
0
[root@localhost shell]# lk
-bash: lk: command not found
[root@localhost shell]# echo $?
127

# 状态码	描述
# 0	命令成功结束
# 1	通用未知错误
# 2	误用Shell命令
# 126	命令不可执行
# 127	没找到命令
# 128	无效退出参数
# 128+x	Linux信号x的严重错误
# 130	命令通过Ctrl+C控制码越界
# 255	退出码越界
$# ,它表示的是shell脚本所有参数的个数
# $# ,它表示的是shell脚本所有参数的个数
[root@localhost shell]# vi paramnum.sh
#!/bin/bash
echo $#
[root@localhost shell]# sh paramnum.sh a b c
3
[root@localhost shell]# sh paramnum.sh a b c d
4
- 变量和引号的特殊使用
# 单引号'':单引号不解析变量
[root@localhost shell]# name=jack
[root@localhost shell]# echo '$name'
$name

# 双引号"":双引号解析变量
[root@localhost shell]# name=jack
[root@localhost shell]# echo "$name"
jack

# 反引号,在键盘左上角esc下面的那个键,在英文输入法模式下可以打出来
# 反引号是执行并引用命令的执行结果
[root@localhost shell]# name=pwd
[root@localhost shell]# echo `$name`
/root/shell
# 反引号还有另一种写法,$() 他们的效果一致
[root@localhost shell]# echo $($name)
/root/shell

# 在变量的值外面套一层引号
# 动态拼接sql的时候会用到
[root@localhost shell]# echo "'$name'"
'pwd'
shell中的循环和判断
- for循环
for((i=0;i<10;i++))
do
循环体...
done
[root@localhost shell]# vi for1.sh
#!/bin/bash
for((i=0;i<10;i++))
do
echo $i
done

[root@localhost shell]# sh for1.sh
0
1
2
3
4
5
6
7
8
9
for i in 1 2 3
do
循环体...
done
[root@localhost shell]# vi for2.sh
#!/bin/bash
for i in 1 2 3
do
echo $i
done

[root@localhost shell]# sh for2.sh
1
2
3
- while循环
while循环主要适用于循环次数未知,或不便于使用for直接生成较大列表时
while 测试条件
do
循环体...
done
测试条件 支持两种格式
test EXPR 或者 [ EXPR ] ,第二种形式里面中括号和表达式之间的空格不能少,这个EXPR表达式里面写的就是具体的比较逻辑。
整型测试:-gt(大于)、-lt(小于)、-ge(大于等于)、-le(小于等于)、-eq(等于)、-ne(不等于)
针对整型数据,需要使用-gt、-lt这样的写法,而不是大于号或小于号。
字符串数据,如果判断两个字符串相等,使用=号,这里的=号不是赋值的意思,不等于就使用!=,字符串测试:=(等于)、!=(不等于)
[root@localhost shell]# vi while1.sh
#!/bin/bash
while test 2 -gt 1
do
echo yes
sleep 1
done

[root@localhost shell]# vi while1.sh
#!/bin/bash
while test 2 -lt 1
do
echo yes
sleep 1
done
[root@localhost shell]# sh while1.sh
#执行脚本,按ctrl+c可强制退出程序

# 中括号和里面的表达式之间一定要有空格,否则就报错
[root@localhost shell]# vi while2.sh
#!/bin/bash
while [ 2 -gt 1 ]
do
echo yes
sleep 1
done
[root@localhost shell]# sh while2.sh
yes
yes
yes
...
- if判断
单分支
双分支
多分支
单分支
if 测试条件
then
    选择分支
fi
# 动态获取一个参数,在测试条件中动态判断
[root@localhost shell]# vi if1.sh
#!/bin/bash
flag=$1
if [ $flag -eq 1 ]
then
echo one
fi
# 如果脚本后面没有传参数的话,执行程序会抱错,程序不够健壮
[root@localhost shell]# sh if1.sh
if1.sh: line 3: [: -eq: unary operator expected

# 设计:先判断脚本后面参数的个数,如果参数个数不够,直接退出就行,在这里使用exit可以退出程序,并且可以在程序后面返回一个状态码,这个状态码其实就是我们之前使用$?获取到的状态码,如果这个程序不传任何参数,就会执行exit 100,结束程序,并且返回状态码100
[root@localhost shell]# vi if1.sh
#!/bin/bash
if [ $# -lt 1 ]
then
echo "not found param"
exit 100
fi

flag=$1
if [ $flag -eq 1 ]
then
echo "one"
fi
[root@localhost shell]# sh if1.sh
not found param
[root@localhost shell]# echo $?
100
双分支
if 测试条件
then
    选择分支1
else
    选择分支2
fi
[root@localhost shell]# vi if2.sh
#!/bin/bash
if [ $# -lt 1 ]
then
  echo "not found param"
  exit 100
fi

flag=$1
if [ $flag -eq 1 ]
then
  echo "one"
else
  echo "not support"
fi
多分支
if 测试条件1
then
    选择分支1
elif 测试条件2
then
    选择分支2
  ...
else
    选择分支n
fi
[root@localhost shell]# vi if3.sh
#!/bin/bash
if [ $# -lt 1 ]
then
  echo "not found param"
  exit 100
fi

flag=$1
if [ $flag -eq 1 ]
then
  echo "one"
elif [ $flag -eq 2 ]
then
  echo "two"
elif [ $flag -eq 3 ]
then
  echo "three"
else
  echo "not support"
fi
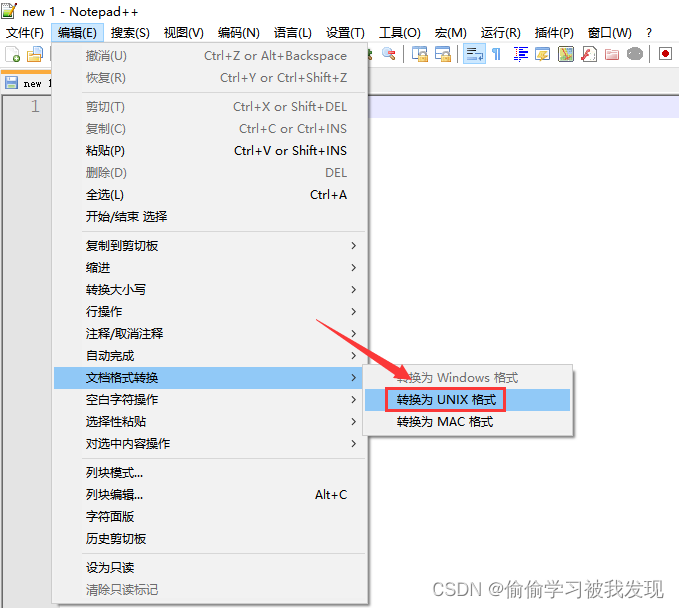
注意:如果在windows中使用notepad++开发shell脚本,需要将此参数设置为UNIX。
否则在windows中开发的脚本直接上传到linux中执行会报错。
shell扩展
# 后台执行,在脚本后面添加一个&即可
[root@localhost shell]# sh while2.sh &
[1]2228

# 当我们把这个窗口关闭以后会发现之前放到后台运行的shell脚本也停止了,我们是希望这个脚本能够一直在后台运行的
[root@localhost ~]# ps -ef|grep while2
root       2325   2306  0 20:48 pts/2    00:00:00 grep --color=auto while2

# 原理就是,默认情况下,当我们关闭shell窗口时,shell窗口会向之前通过它启动的所有shell
# 脚本发送停止信号,当我们加上nohup之后,就会阻断这个停止信号的发送,所以已经放到后台的shell脚本就不会停止了。
# 保证关闭shell窗口而不影响放到后台的shell脚本执行
[root@localhost shell]# nohup sh while2.sh &
[1]2326
nohup: ignoring input and appending output to ‘nohup.out’
# 注意:使用nohup之后,脚本输出的信息默认都会存储到当前目录下的一个nohup.out日志文件中,后期想要排查脚本的执行情况的话就可以看这个日志文件。

# 停止这个shell脚本使用kill
[root@localhost shell]# ps -ef|grep while2
root       2326   2306  0 20:51 pts/2    00:00:00 sh while2.sh
root       3515   2306  0 21:11 pts/2    00:00:00 grep --color=auto while2
[root@localhost shell]# kill 2326
[root@localhost shell]# ps -ef|grep while2
root       3525   2306  0 21:11 pts/2    00:00:00 grep --color=auto while2
- 标准输出:表示是命令或者程序输出的正常信息
- 标准错误输出:表示是命令或者程序输出的错误信息
- 重定向 >
# 将输出内容重定向至文本
# 重复执行此命令, > 会覆盖掉之前的内容
# 标准输出 使用参数1
# 标准错误输出 使用使用2
[root@localhost shell]# ll 1> a.txt
[root@localhost shell]# more a.txt
total 52
-rw-r--r--. 1 root root    0 Apr  3 21:39 a.txt
-rw-r--r--. 1 root root   48 Apr  3 17:32 for1.sh
-rw-r--r--. 1 root root   43 Apr  3 17:40 for2.sh
-rwxr--r--. 1 root root   45 Apr  2 16:11 hello.sh
-rw-r--r--. 1 root root  121 Apr  3 18:30 if1.sh
-rw-r--r--. 1 root root  147 Apr  3 18:30 if2.sh
-rw-r--r--. 1 root root  227 Apr  3 18:34 if3.sh
-rw-r--r--. 1 root root   44 Apr  3 16:23 location.sh
-rw-------. 1 root root 4692 Apr  3 21:11 nohup.out
-rw-r--r--. 1 root root   20 Apr  3 16:48 paramnum.sh
-rw-r--r--. 1 root root   56 Apr  3 17:59 while1.sh
-rw-r--r--. 1 root root   55 Apr  3 18:01 while2.sh
-rw-r--r--. 1 root root   61 Apr  3 18:03 while3.sh
# 标准错误输出 使用使用2
[root@localhost shell]# lk 2> b.txt
[root@localhost shell]# more b.txt
-bash: lk: command not found


# 追加的话需要使用 >>
[root@localhost shell]# ll 1>> a.txt
[root@localhost shell]# more a.txt
total 52
-rw-r--r--. 1 root root    0 Apr  3 21:39 a.txt
-rw-r--r--. 1 root root   48 Apr  3 17:32 for1.sh
-rw-r--r--. 1 root root   43 Apr  3 17:40 for2.sh
-rwxr--r--. 1 root root   45 Apr  2 16:11 hello.sh
-rw-r--r--. 1 root root  121 Apr  3 18:30 if1.sh
-rw-r--r--. 1 root root  147 Apr  3 18:30 if2.sh
-rw-r--r--. 1 root root  227 Apr  3 18:34 if3.sh
-rw-r--r--. 1 root root   44 Apr  3 16:23 location.sh
-rw-------. 1 root root 4692 Apr  3 21:11 nohup.out
-rw-r--r--. 1 root root   20 Apr  3 16:48 paramnum.sh
-rw-r--r--. 1 root root   56 Apr  3 17:59 while1.sh
-rw-r--r--. 1 root root   55 Apr  3 18:01 while2.sh
-rw-r--r--. 1 root root   61 Apr  3 18:03 while3.sh
total 56
-rw-r--r--. 1 root root  671 Apr  3 21:39 a.txt
-rw-r--r--. 1 root root   48 Apr  3 17:32 for1.sh
-rw-r--r--. 1 root root   43 Apr  3 17:40 for2.sh
-rwxr--r--. 1 root root   45 Apr  2 16:11 hello.sh
-rw-r--r--. 1 root root  121 Apr  3 18:30 if1.sh
-rw-r--r--. 1 root root  147 Apr  3 18:30 if2.sh
-rw-r--r--. 1 root root  227 Apr  3 18:34 if3.sh
-rw-r--r--. 1 root root   44 Apr  3 16:23 location.sh
-rw-------. 1 root root 4692 Apr  3 21:11 nohup.out
-rw-r--r--. 1 root root   20 Apr  3 16:48 paramnum.sh
-rw-r--r--. 1 root root   56 Apr  3 17:59 while1.sh
-rw-r--r--. 1 root root   55 Apr  3 18:01 while2.sh
-rw-r--r--. 1 root root   61 Apr  3 18:03 while3.sh
# nohup和& 可以让程序一直在后台运行
# /dev/null 是linux中的黑洞,任何数据扔进去都找不到了
# >/dev/null 把标准输出重定向到黑洞中,表示脚本的输出信息不需要存储
# 2>&1 :表示是把标准错误输出重定向到标准输出中
nohup hello.sh >/dev/null 2>&1 &

# 最终这条命令的意思就是把脚本放在后台一直运行,并且把脚本的所有输出都扔到黑洞里面
定时器crontab
针对周期性需要被执行的命令完全可以选择使用定时器定时调度执行。
crontab类似于java中的timer定时器,它可以作用于周期性被执行的命令
crontab的格式是这样的:* * * * * user-name command
*:分钟(0-59)
*:小时(0-23)
*:一个月中的第几天(1-31)
*:月份(1-12)
*:星期几(0-6) (星期天为0)
user-name:用户名,用哪个用户执行
command:具体需要指定的命令

这条配置需要添加到crontab服务对应的文件中,在配置之前,需要先确认crontab的服务是否正常
查看crontab服务状态:systemctl status crond
# 查看crontab的服务状态
[root@localhost shell]# systemctl status crond
● crond.service - Command Scheduler
   Loaded: loaded (/usr/lib/systemd/system/crond.service; enabled; vendor preset: enabled)
   Active: active (running) since Fri 2020-04-03 22:16:18 CST; 1min 53s ago
 Main PID: 3583 (crond)
   CGroup: /system.slice/crond.service
           └─3583 /usr/sbin/crond -n

Apr 03 22:16:18 localhost systemd[1]: Started Command Scheduler.
Apr 03 22:16:18 localhost crond[3583]: (CRON) INFO (RANDOM_DELAY will be sc...)
Apr 03 22:16:18 localhost crond[3583]: (CRON) INFO (running with inotify su...)
Apr 03 22:16:18 localhost crond[3583]: (CRON) INFO (@reboot jobs will be ru...)
Hint: Some lines were ellipsized, use -l to show in full.

# 启动crontab的服务
systemctl start crond
# 停止crontab的服务
systemctl stop crond

# crontab服务对应的配置文件了,/etc/crontab
[root@localhost shell]# vi /etc/crontab

SHELL=/bin/bash
PATH=/sbin:/bin:/usr/sbin:/usr/bin
MAILTO=root

# For details see man 4 crontabs

# Example of job definition:
# .---------------- minute (0 - 59)
# |  .------------- hour (0 - 23)
# |  |  .---------- day of month (1 - 31)
# |  |  |  .------- month (1 - 12) OR jan,feb,mar,apr ...
# |  |  |  |  .---- day of week (0 - 6) (Sunday=0 or 7) OR sun,mon,tue,wed,thu,fri,sat
# |  |  |  |  |
# *  *  *  *  * user-name  command to be executed
# 每隔1分钟打印一次当前时间,时间格式为年月日 时分秒
[root@localhost shell]# vi showTime.sh
#!/bin/bash
showTime=`date "+%Y-%m-%d %H:%M:%S"`
echo $showTime
# 然后在/etc/crontab文件中配置
* * * * * root sh /root/shell/showTime.sh
# 把脚本执行的结果重定向到showTime.log文件中,需要使用追加重定向
* * * * * root sh /root/shell/showTime.sh >> /root/shell/showTime.log
# 可以使用tail -f 监控
[root@localhost shell]# tail -f /root/shell/showTime.log
2026-04-06 21:14:01
2026-04-06 21:15:01
2026-04-06 21:16:01
# crontab的日志在/var/log/cron文件中,使用tail -f命令实时监控
[root@localhost shell]# tail -f /var/log/cron
.........
Apr  6 21:14:01 localhost CROND[1577]: (root) CMD (sh /root/shell/showTime.sh >> /root/shell/showTime.log)
Apr  6 21:15:01 localhost CROND[1584]: (root) CMD (sh /root/shell/showTime.sh >> /root/shell/showTime.log)
Apr  6 21:16:01 localhost CROND[1591]: (root) CMD (sh /root/shell/showTime.sh >> /root/shell/showTime.log)
Apr  6 21:17:01 localhost CROND[1597]: (root) CMD (sh /root/shell/showTime.sh >> /root/shell/showTime.log)
Apr  6 21:18:01 localhost CROND[1603]: (root) CMD (sh /root/shell/showTime.sh >> /root/shell/showTime.log)

# 设置任务每7分钟执行一次
# 注意,如果设置的7分钟执行一次,那么就会在每个小时的第0、7、14、21、28…分钟执行,而不是根据你配置好的时候往后推,这里的间隔时间是7分钟,7分钟无法被60整除,它最后会在第56分钟执行一次,下一次执行就是下一个小时的0分开始执行了,所以针对这种除不尽的到下一小时就开始重新计算了,不累计。
......


 154万+
154万+


 被折叠的 条评论
为什么被折叠?
被折叠的 条评论
为什么被折叠?
 到【灌水乐园】发言


