


Environment介绍
前提
org.springframework.core.env.Environment是当前应用运行环境的公开接口,主要包括应用程序运行环境的两个关键方面:配置文件(profiles)和属性。Environment继承自接口PropertyResolver,而PropertyResolver提供了属性访问的相关方法。
Environment类体系
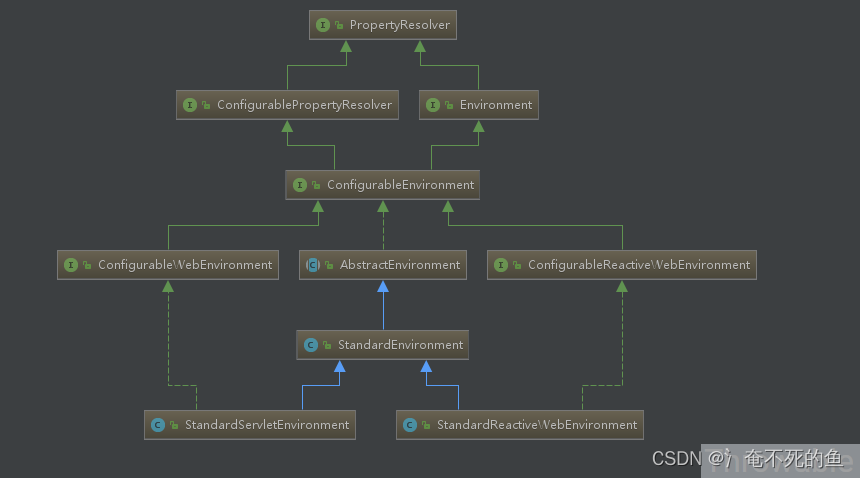
- PropertyResolver:提供属性访问功能。
- ConfigurablePropertyResolver:继承自PropertyResolver,主要提供属性类型转换(基于org.springframework.core.convert.ConversionService)功能。
- Environment:继承自PropertyResolver,提供访问和判断profiles的功能。
- ConfigurableEnvironment:继承自ConfigurablePropertyResolver和Environment,并且提供设置激活的profile和默认的profile的功能。
- ConfigurableWebEnvironment:继承自ConfigurableEnvironment,并且提供配置Servlet上下文和Servlet参数的功能。
- AbstractEnvironment:实现了ConfigurableEnvironment接口,默认属性和存储容器的定义,并且实现了ConfigurableEnvironment种的方法,并且为子类预留可覆盖了扩展方法。
- StandardEnvironment:继承自AbstractEnvironment,非Servlet(Web)环境下的标准Environment实现。
- StandardServletEnvironment:继承自StandardEnvironment,Servlet(Web)环境下的标准Environment实现。
reactive相关的暂时不研究。
Environment提供的方法
一般情况下,我们在SpringMVC项目中启用到的是StandardServletEnvironment,它的父接口问ConfigurableWebEnvironment,我们可以查看此接口提供的方法:

Environment的存储容器
Environment的静态属性和存储容器都是在AbstractEnvironment中定义的,ConfigurableWebEnvironment接口提供的getPropertySources()方法可以获取到返回的MutablePropertySources实例,然后添加额外的PropertySource。实际上,Environment的存储容器就是org.springframework.core.env.PropertySource的子类集合,AbstractEnvironment中使用的实例是org.springframework.core.env.MutablePropertySources,下面看下PropertySource的源码:
public abstract class PropertySource<T> {

 protected final Log logger = LogFactory.getLog(getClass());

 protected final String name;

 protected final T source;

 public PropertySource(String name, T source) {
 Assert.hasText(name, "Property source name must contain at least one character");
 Assert.notNull(source, "Property source must not be null");
 this.name = name;
 this.source = source;
 }

 @SuppressWarnings("unchecked")
 public PropertySource(String name) {
 this(name, (T) new Object());
 }

 public String getName() {
 return this.name;
 }

 public T getSource() {
 return this.source;
 }

 public boolean containsProperty(String name) {
 return (getProperty(name) != null);
 }

 @Nullable
 public abstract Object getProperty(String name);

 @Override
 public boolean equals(Object obj) {
 return (this == obj || (obj instanceof PropertySource &&
 ObjectUtils.nullSafeEquals(this.name, ((PropertySource<?>) obj).name)));
 }

 @Override
 public int hashCode() {
 return ObjectUtils.nullSafeHashCode(this.name);
 }
//省略其他方法和内部类的源码
}
源码相对简单,预留了一个getProperty抽象方法给子类实现,重点需要关注的是覆写了的equals和hashCode方法,实际上只和name属性相关,这一点很重要,说明一个PropertySource实例绑定到一个唯一的name,这个name有点像HashMap里面的key,部分移除、判断方法都是基于name属性。PropertySource的最常用子类是MapPropertySource、PropertiesPropertySource、ResourcePropertySource、StubPropertySource、ComparisonPropertySource:
- MapPropertySource:source指定为Map实例的PropertySource实现。
- PropertiesPropertySource:source指定为Map实例的PropertySource实现,内部的Map实例由Properties实例转换而来。
- ResourcePropertySource:继承自PropertiesPropertySource,source指定为通过Resource实例转化为Properties再转换为Map实例。
- StubPropertySource:PropertySource的一个内部类,source设置为null,实际上就是空实现。
- ComparisonPropertySource:继承自ComparisonPropertySource,所有属性访问方法强制抛出异常,作用就是一个不可访问属性的空实现。
AbstractEnvironment中的属性定义:
public static final String IGNORE_GETENV_PROPERTY_NAME = "spring.getenv.ignore";
public static final String ACTIVE_PROFILES_PROPERTY_NAME = "spring.profiles.active";
public static final String DEFAULT_PROFILES_PROPERTY_NAME = "spring.profiles.default";
protected static final String RESERVED_DEFAULT_PROFILE_NAME = "default";

private final Set<String> activeProfiles = new LinkedHashSet<>();

private final Set<String> defaultProfiles = new LinkedHashSet<>(getReservedDefaultProfiles());

private final MutablePropertySources propertySources = new MutablePropertySources(this.logger);

private final ConfigurablePropertyResolver propertyResolver = new PropertySourcesPropertyResolver(this.propertySources);
上面的propertySources(MutablePropertySources类型)属性就是用来存放PropertySource列表的,PropertySourcesPropertyResolver是ConfigurablePropertyResolver的实现,默认的profile就是字符串default。
MutablePropertySources的内部属性如下:
private final List<PropertySource<?>> propertySourceList = new CopyOnWriteArrayList<>();
没错,这个就是最底层的存储容器,也就是环境属性都是存放在一个CopyOnWriteArrayList<PropertySource<?>>实例中。
MutablePropertySources是PropertySources的子类,它提供了get(String name)、addFirst(放在最前面)、addLast(放在集合最后)、addBefore(在XX相对之前)、addAfter、remove、replace等便捷方法,方便操作propertySourceList集合的元素,这里挑选addBefore的源码分析:
public void addBefore(String relativePropertySourceName, PropertySource<?> propertySource) {
 if (logger.isDebugEnabled()) {
 logger.debug("Adding PropertySource '" + propertySource.getName() +
  "' with search precedence immediately higher than '" + relativePropertySourceName + "'");
 }
 //前一个PropertySource的name指定为relativePropertySourceName时候必须和添加的PropertySource的name属性不相同
 assertLegalRelativeAddition(relativePropertySourceName, propertySource);
 //尝试移除同名的PropertySource
 removeIfPresent(propertySource);
 //获取前一个PropertySource在CopyOnWriteArrayList中的索引
 int index = assertPresentAndGetIndex(relativePropertySourceName);
 //添加当前传入的PropertySource到指定前一个PropertySource的索引,相当于relativePropertySourceName对应的PropertySource后移到原来索引值+1的位置
 addAtIndex(index, propertySource);
}

protected void assertLegalRelativeAddition(String relativePropertySourceName, PropertySource<?> propertySource) {
 String newPropertySourceName = propertySource.getName();
 if (relativePropertySourceName.equals(newPropertySourceName)) {
 throw new IllegalArgumentException(
  "PropertySource named '" + newPropertySourceName + "' cannot be added relative to itself");
 }
}

protected void removeIfPresent(PropertySource<?> propertySource) {
 this.propertySourceList.remove(propertySource);
}

private int assertPresentAndGetIndex(String name) {
 int index = this.propertySourceList.indexOf(PropertySource.named(name));
 if (index == -1) {
 throw new IllegalArgumentException("PropertySource named '" + name + "' does not exist");
 }
 return index;
}

private void addAtIndex(int index, PropertySource<?> propertySource) {
 //注意,这里会再次尝试移除同名的PropertySource
 removeIfPresent(propertySource);
 this.propertySourceList.add(index, propertySource);
}
大多数PropertySource子类的修饰符都是public,可以直接使用,这里写个小demo:
MutablePropertySources mutablePropertySources = new MutablePropertySources();
Map<String, Object> map = new HashMap<>(8);
map.put("name", "throwable");
map.put("age", 25);
MapPropertySource mapPropertySource = new MapPropertySource("map", map);
mutablePropertySources.addLast(mapPropertySource);
Properties properties = new Properties();
PropertiesPropertySource propertiesPropertySource = new PropertiesPropertySource("prop", properties);
properties.put("name", "doge");
properties.put("gourp", "group-a");
mutablePropertySources.addBefore("map", propertiesPropertySource);
System.out.println(mutablePropertySources);
Environment加载过程源码分析
Environment加载的源码位于SpringApplication#prepareEnvironment:
 private ConfigurableEnvironment prepareEnvironment(
 SpringApplicationRunListeners listeners,
 ApplicationArguments applicationArguments) {
 // Create and configure the environment
 //创建ConfigurableEnvironment实例
 ConfigurableEnvironment environment = getOrCreateEnvironment();
 //启动参数绑定到ConfigurableEnvironment中
 configureEnvironment(environment, applicationArguments.getSourceArgs());
 //发布ConfigurableEnvironment准备完毕事件
 listeners.environmentPrepared(environment);
 //绑定ConfigurableEnvironment到当前的SpringApplication实例中
 bindToSpringApplication(environment);
 //这一步是非SpringMVC项目的处理,暂时忽略
 if (this.webApplicationType == WebApplicationType.NONE) {
 environment = new EnvironmentConverter(getClassLoader())
  .convertToStandardEnvironmentIfNecessary(environment);
 }
 //绑定ConfigurationPropertySourcesPropertySource到ConfigurableEnvironment中,name为configurationProperties,实例是SpringConfigurationPropertySources,属性实际是ConfigurableEnvironment中的MutablePropertySources
 ConfigurationPropertySources.attach(environment);
 return environment;
 }
这里重点看下getOrCreateEnvironment方法:
private ConfigurableEnvironment getOrCreateEnvironment() {
 if (this.environment != null) {
 return this.environment;
 }
 //在SpringMVC项目,ConfigurableEnvironment接口的实例就是新建的StandardServletEnvironment实例
 if (this.webApplicationType == WebApplicationType.SERVLET) {
 return new StandardServletEnvironment();
 }
 return new StandardEnvironment();
}
//REACTIVE_WEB_ENVIRONMENT_CLASS=org.springframework.web.reactive.DispatcherHandler
//MVC_WEB_ENVIRONMENT_CLASS=org.springframework.web.servlet.DispatcherServlet
//MVC_WEB_ENVIRONMENT_CLASS={"javax.servlet.Servlet","org.springframework.web.context.ConfigurableWebApplicationContext"}
//这里,默认就是WebApplicationType.SERVLET
private WebApplicationType deduceWebApplicationType() {
 if (ClassUtils.isPresent(REACTIVE_WEB_ENVIRONMENT_CLASS, null)
 && !ClassUtils.isPresent(MVC_WEB_ENVIRONMENT_CLASS, null)) {
 return WebApplicationType.REACTIVE;
 }
 for (String className : WEB_ENVIRONMENT_CLASSES) {
 if (!ClassUtils.isPresent(className, null)) {
 return WebApplicationType.NONE;
 }
 }
 return WebApplicationType.SERVLET;
}
还有一个地方要重点关注:发布ConfigurableEnvironment准备完毕事件listeners.environmentPrepared(environment),实际上这里用到了同步的EventBus,事件的监听者是ConfigFileApplicationListener,具体处理逻辑是onApplicationEnvironmentPreparedEvent方法:
private void onApplicationEnvironmentPreparedEvent(
 ApplicationEnvironmentPreparedEvent event) {
 List<EnvironmentPostProcessor> postProcessors = loadPostProcessors();
 postProcessors.add(this);
 AnnotationAwareOrderComparator.sort(postProcessors);
 //遍历所有的EnvironmentPostProcessor对Environment实例进行处理
 for (EnvironmentPostProcessor postProcessor : postProcessors) {
 postProcessor.postProcessEnvironment(event.getEnvironment(),
  event.getSpringApplication());
 }
}

//从spring.factories文件中加载,一共有四个实例
//ConfigFileApplicationListener
//CloudFoundryVcapEnvironmentPostProcessor
//SpringApplicationJsonEnvironmentPostProcessor
//SystemEnvironmentPropertySourceEnvironmentPostProcessor
List<EnvironmentPostProcessor> loadPostProcessors() {
 return SpringFactoriesLoader.loadFactories(EnvironmentPostProcessor.class,
 getClass().getClassLoader());
}
实际上,处理工作大部分都在ConfigFileApplicationListener中,见它的postProcessEnvironment方法:
public void postProcessEnvironment(ConfigurableEnvironment environment,
 SpringApplication application) {
 addPropertySources(environment, application.getResourceLoader());
}

protected void addPropertySources(ConfigurableEnvironment environment,
 ResourceLoader resourceLoader) {
 RandomValuePropertySource.addToEnvironment(environment);
 new Loader(environment, resourceLoader).load();
}
主要的配置环境加载逻辑在内部类Loader,Loader会匹配多个路径下的文件把属性加载到ConfigurableEnvironment中,加载器主要是PropertySourceLoader的实例,例如我们用到application-${profile}.yaml文件做应用主配置文件,使用的是YamlPropertySourceLoader,这个时候activeProfiles也会被设置到ConfigurableEnvironment中。加载完毕之后,ConfigurableEnvironment中基本包含了所有需要加载的属性(activeProfiles是这个时候被写入ConfigurableEnvironment)。值得注意的是,几乎所有属性都是key-value形式存储,如xxx.yyyy.zzzzz=value、xxx.yyyy[0].zzzzz=value-1、xxx.yyyy[1].zzzzz=value-2。Loader中的逻辑相对复杂,有比较多的遍历和过滤条件,这里不做展开。
Environment属性访问源码分析
上文提到过,都是委托到PropertySourcesPropertyResolver,先看它的构造函数:
@Nullable
private final PropertySources propertySources;

public PropertySourcesPropertyResolver(@Nullable PropertySources propertySources) {
 this.propertySources = propertySources;
 }
只依赖于一个PropertySources实例,在SpringBoot的SpringMVC项目中就是MutablePropertySources的实例。重点分析一下最复杂的一个方法:
protected <T> T getProperty(String key, Class<T> targetValueType, boolean resolveNestedPlaceholders) {
 if (this.propertySources != null) {
 //遍历所有的PropertySource
 for (PropertySource<?> propertySource : this.propertySources) {
 if (logger.isTraceEnabled()) {
 logger.trace("Searching for key '" + key + "' in PropertySource '" +
  propertySource.getName() + "'");
 }
 Object value = propertySource.getProperty(key);
 //选用第一个不为null的匹配key的属性值
 if (value != null) {
 if (resolveNestedPlaceholders && value instanceof String) {
  //处理属性占位符,如${server.port},底层委托到PropertyPlaceholderHelper完成
  value = resolveNestedPlaceholders((String) value);
 }
 logKeyFound(key, propertySource, value);
 //如果需要的话,进行一次类型转换,底层委托到DefaultConversionService完成
 return convertValueIfNecessary(value, targetValueType);
 }
 }
 }
 if (logger.isDebugEnabled()) {
 logger.debug("Could not find key '" + key + "' in any property source");
 }
 return null;
}
这里的源码告诉我们,如果出现多个PropertySource中存在同名的key,返回的是第一个PropertySource对应key的属性值的处理结果,因此我们如果需要自定义一些环境属性,需要十分清楚各个PropertySource的顺序。
扩展-实现分散配置
在不使用SpringCloud配置中心的情况下,一般的SpringBoot项目的配置文件如下:
 src
 - main
  - resources
   - application-prod.yaml
   - application-dev.yaml
   - application-test.yaml
随着项目发展,配置项越来越多,导致了application-${profile}.yaml迅速膨胀,大的配置文件甚至超过一千行,为了简化和划分不同功能的配置,可以考虑把配置文件拆分如下:
- src
 - main
  - resources
   - profiles
     - dev
       - business.yaml
       - mq.json
       - datasource.properties
     - prod
       - business.yaml
       - mq.json
       - datasource.properties
     - test
       - business.yaml
       - mq.json
       - datasource.properties
   - application-prod.yaml
   - application-dev.yaml
   - application-test.yaml
外层的application- p r o f i l e . y a m l 只留下项目的核心配置如 s e r v e r . p o r t 等,其他配置打散放在 / p r o f i l e s / {profile}.yaml只留下项目的核心配置如server.port等,其他配置打散放在/profiles/ profile.yaml只留下项目的核心配置如server.port等,其他配置打散放在/profiles/{profile}/各自的配置文件中。实现方式是:依据当前配置的spring.profiles.active属性,读取类路径中指定文件夹下的配置文件中,加载到Environment中,需要注意这一个加载步骤必须在Spring刷新上下文方法最后一步finishRefresh之前完成,否则有可能会影响到占位符属性的自动装配(例如使用了@Value(“${filed}”))。
配置文件加载
环境变量,启动参数介绍
- **系统环境变量(System Environment Variable):
**在Linux下使用export $ENV=123指定的值。获取的方式如下:
Map<String,String> map = System.getenv();
        Set<Map.Entry<String,String>> entries = map.entrySet();
        for (Map.Entry<String, String> entry : entries) {
            System.out.println(entry.getKey() + ":" + entry.getValue());
        }

        System.out.println(map.get("ENV"));
系统属性(System Properties):
通过java -jar test.jar -Denv=123启动时指定的值,获取方式如下:
Properties properties = System.getProperties();
        Set<Map.Entry<Object, Object>> set = properties.entrySet();
        for (Map.Entry<Object, Object> objectObjectEntry : set) {
            System.out.println(objectObjectEntry.getKey() + ":" + objectObjectEntry.getValue());
        }

        System.out.println(properties.getProperty("env"));
启动参数:
通过java -jar test.jar --env=123启动时指定的值,获取方式如下
  for (String arg : args) {
          System.out.println(arg);
      }
环境变量加载
创建springBoot环境变量时
构造Environment时
在构造方法中执行customizePropertySources方法
public AbstractEnvironment() {
		customizePropertySources(this.propertySources);
	}
@Override
	protected void customizePropertySources(MutablePropertySources propertySources) {
		propertySources.addLast(
				new PropertiesPropertySource(SYSTEM_PROPERTIES_PROPERTY_SOURCE_NAME, getSystemProperties()));
		propertySources.addLast(
				new SystemEnvironmentPropertySource(SYSTEM_ENVIRONMENT_PROPERTY_SOURCE_NAME, getSystemEnvironment()));
	}
propertySources就是前面说得MutablePropertySources
addLast就是尾插法
这里分别将systemProperties合systemEnvironment放到第一和第二位(越靠前优先级越高)
systemProperties代表得是系统属性
public Map<String, Object> getSystemProperties() {
    try {
        return (Map) System.getProperties();
    }
    catch (AccessControlException ex) {
        return (Map) new ReadOnlySystemAttributesMap() {
            @Override
            @Nullable
            protected String getSystemAttribute(String attributeName) {
                try {
                    return System.getProperty(attributeName);
                }
                catch (AccessControlException ex) {
                    if (logger.isInfoEnabled()) {
                        logger.info("Caught AccessControlException when accessing system property '" +
                                    attributeName + "'; its value will be returned [null]. Reason: " + ex.getMessage());
                    }
                    return null;
                }
            }
        };
    }
}
systemEnvironment代表得是系统环境变量
public Map<String, Object> getSystemEnvironment() {
		if (suppressGetenvAccess()) {
			return Collections.emptyMap();
		}
		try {
			return (Map) System.getenv();
		}
		catch (AccessControlException ex) {
			return (Map) new ReadOnlySystemAttributesMap() {
				@Override
				@Nullable
				protected String getSystemAttribute(String attributeName) {
					try {
						return System.getenv(attributeName);
					}
					catch (AccessControlException ex) {
						if (logger.isInfoEnabled()) {
							logger.info("Caught AccessControlException when accessing system environment variable '" +
									attributeName + "'; its value will be returned [null]. Reason: " + ex.getMessage());
						}
						return null;
					}
				}
			};
		}
	}
创建完毕Environment之后
prepareEnvironment方法中
configureEnvironment(environment, applicationArguments.getSourceArgs());
根据启参数配置
sources.addFirst(new SimpleCommandLinePropertySource(args));
将启动参数防止到首位。也就是目前为止优先级最高得位置
prepareEnvironment继续向下
ConfigurationPropertySources.attach(environment);
	public static void attach(Environment environment) {
		Assert.isInstanceOf(ConfigurableEnvironment.class, environment);
		MutablePropertySources sources = ((ConfigurableEnvironment) environment).getPropertySources();
		PropertySource<?> attached = sources.get(ATTACHED_PROPERTY_SOURCE_NAME);
		if (attached != null && attached.getSource() != sources) {
			sources.remove(ATTACHED_PROPERTY_SOURCE_NAME);
			attached = null;
		}
		if (attached == null) {
			sources.addFirst(new ConfigurationPropertySourcesPropertySource(ATTACHED_PROPERTY_SOURCE_NAME,
					new SpringConfigurationPropertySources(sources)));
		}
	}
这个方法很奇怪,将目前已经有sources集合对象包装成ConfigurationPropertySourcesPropertySource,再放,到第一位
springBoot出发onApplicationEnvironmentPreparedEvent事件后
会触发ConfigFileApplicationListener的
@Override
	public void postProcessEnvironment(ConfigurableEnvironment environment, SpringApplication application) {
		addPropertySources(environment, application.getResourceLoader());
	}
	protected void addPropertySources(ConfigurableEnvironment environment, ResourceLoader resourceLoader) {
		RandomValuePropertySource.addToEnvironment(environment);
		new Loader(environment, resourceLoader).load();
	}
添加一个RandomValuePropertySource到environment
public static void addToEnvironment(ConfigurableEnvironment environment) {
		environment.getPropertySources().addAfter(StandardEnvironment.SYSTEM_ENVIRONMENT_PROPERTY_SOURCE_NAME,
				new RandomValuePropertySource(RANDOM_PROPERTY_SOURCE_NAME));
		logger.trace("RandomValuePropertySource add to Environment");
	}
添加到systemEnvironment之后,也就是目前第三的优先级
什么是RandomValuePropertySource?是一个获取随机数的source
    @Test
    public void test1() {

        RandomValuePropertySource test = new RandomValuePropertySource("test");

        Console.log("数字格式必须遵守:要么random.数字类型,要么random.[数字类型][分隔符1][最小数字],[最大数字][分隔符2]");
        Console.log("\n===========随机的int数字===========");
        Console.log("=====不限定范围====");
        Integer intNum = (Integer) test.getProperty("random.int");
        Console.log(intNum);
        Console.log("=====限定范围(左闭右开)下面两个表达的意思是一样的====");
        intNum = (Integer) test.getProperty("random.int(1,2)");
        Console.log(intNum);
        intNum = (Integer) test.getProperty("random.int[1,2)");
        Console.log(intNum);

        Console.log("\n===========随机的long数字===========");
        Console.log("=====不限定范围====");
        Long longNum = (Long) test.getProperty("random.long");
        Console.log(longNum);
        Console.log("=====限定范围(左闭右开)====");
        longNum = (Long) test.getProperty("random.long(100,200)");
        Console.log(longNum);

        Console.log("\n===========随机的uuid===========");
        String uuid = (String) test.getProperty("random.uuid");
        Console.log(uuid);

        Console.log("\n===========随机的md5字符串===========");
        String md5 = (String) test.getProperty("random.");
        Console.log(md5);
        md5 = (String) test.getProperty("random.");
        Console.log(md5);
        md5 = (String) test.getProperty("random.rwewerwerewre");
        Console.log(md5);
    }
还可以注入到配置
application.yml
my:
  num: ${random.long}
  num2: ${random.int(100,200)}
配置文件的加载
ConfigFileApplicationListener的addPropertySources方法中还会执行
new Loader(environment, resourceLoader).load();
Loader是ConfigFileApplicationListener中的内部核心类,按照上面的调用来看下去。
那么看看这个方法中干了什么吧
Loader(ConfigurableEnvironment environment, ResourceLoader resourceLoader) {
			this.environment = environment;
			this.placeholdersResolver = new PropertySourcesPlaceholdersResolver(this.environment);
			this.resourceLoader = (resourceLoader != null) ? resourceLoader : new DefaultResourceLoader(null);
	///通过SPI方式获取PropertySourceLoader加载接口的实现类PropertiesPropertySourceLoader、YamlPropertySourceLoader
    this.propertySourceLoaders = SpringFactoriesLoader.loadFactories(PropertySourceLoader.class,
					getClass().getClassLoader());
		}
四个对象分别是environment环境变量
placeholdersResolver
我们在使用spring的时候可以通过占位符 获取系统变量,如:@Value(“${test.produce}”)
test.name=张三
test.age=28
test.produce=${test.name}:${test.age}
例如
application.properties
my.home=地球
my.location=${my.home}
my.address=${my.location:我来自哪里}
@EnableScheduling
@SpringBootApplication
public class Application {
   public static void main(String[] args) {
       ApplicationContext context = SpringApplication.run(Application.class, args);
       PropertySourcesPlaceholdersResolver resolver = new PropertySourcesPlaceholdersResolver(context.getEnvironment());
       val key = "${my.address}";
       System.out.println(resolver.resolvePlaceholders(key));
   }
}
结果输出
地球
如果环境变量my.location不存在将输出:我来自哪里
resourceLoader
Resource 定义了统一的资源,那资源的加载则由 ResourceLoader 来统一定义。是用来加载字段的接口,不管是文件,类都可以经加载
propertySourceLoaders
PropertySourceLoader接口实现类用来在项目启动的时候加载properties、xml、yml配置文件,其实现类一共有两个PropertiesPropertySourceLoader、YamlPropertySourceLoader,分别用来加载 properties文件及yml配置文件;
PropertiesPropertySourceLoader、YamlPropertySourceLoader两个实现类是通过springboot SPI机制在ConfigFileApplicationListener监听器类中被加载,并通过不同的逻辑加载classpath环境变量及其它配置方式制定地址下的配置文件
构建完毕Loader对象之后会进入load方法
		void load() {
      //PropertySource的内部实现类,被ConfigFileApplicationListener用于指定操作过滤出指定的属性配置
      //DEFAULT_PROPERTIES = "defaultProperties"
      //DEFAULT_PROPERTIES是Set集合,包含spring.profiles.active、spring.profiles.include
			FilteredPropertySource.apply(this.environment, DEFAULT_PROPERTIES, LOAD_FILTERED_PROPERTY,
					(defaultProperties) -> {
            //候选配置文件后缀,如:application-test.properties指的是test
						this.profiles = new LinkedList<>();
            //已经处理过的配置文件后缀,如:application-test.properties指的是test
						this.processedProfiles = new LinkedList<>();
            //是否有激活的配置文件:spring.profiles.active
						this.activatedProfiles = false;
            //存储从配置文件加载并解析后的配置文件
						this.loaded = new LinkedHashMap<>();
            //初始化默认的profile配置
						initializeProfiles();
						while (!this.profiles.isEmpty()) {
							Profile profile = this.profiles.poll();
              //判定是否是默认配置文件
							if (isDefaultProfile(profile)) {
								addProfileToEnvironment(profile.getName());
							}
              //加载指定的配置文件并将加载的结果存入loaded属性中
							load(profile, this::getPositiveProfileFilter,
									addToLoaded(MutablePropertySources::addLast, false));
              //添加已经处理过的配置
							this.processedProfiles.add(profile);
						}
                	// 进行无profile的文件的加载放到loaded队头,也就是默认配置文件放在头部,后面会反转,默认配置文件反而成为优先级最低的配置文件
						load(null, this::getNegativeProfileFilter, addToLoaded(MutablePropertySources::addFirst, true));
            //将加载到的配置文件件属性配置添加到Environment环境
						addLoadedPropertySources();
						applyActiveProfiles(defaultProperties);
					});
		}
initializeProfiles方法
private void initializeProfiles() {
			// The default profile for these purposes is represented as null. We add it
			// first so that it is processed first and has lowest priority.
			this.profiles.add(null);
			Binder binder = Binder.get(this.environment);
			Set<Profile> activatedViaProperty = getProfiles(binder, ACTIVE_PROFILES_PROPERTY);
			Set<Profile> includedViaProperty = getProfiles(binder, INCLUDE_PROFILES_PROPERTY);
			List<Profile> otherActiveProfiles = getOtherActiveProfiles(activatedViaProperty, includedViaProperty);
			this.profiles.addAll(otherActiveProfiles);
			// Any pre-existing active profiles set via property sources (e.g.
			// System properties) take precedence over those added in config files.
			this.profiles.addAll(includedViaProperty);
			addActiveProfiles(activatedViaProperty);
			if (this.profiles.size() == 1) { // only has null profile
				for (String defaultProfileName : this.environment.getDefaultProfiles()) {
					Profile defaultProfile = new Profile(defaultProfileName, true);
					this.profiles.add(defaultProfile);
				}
			}
		}
先介绍这个Binder
比Environment类好用很多,可以非常方便地进行类型转换,可以将属性绑定到对象,Map,List等类型上
例如
# 绑定到对象
  MailPropertiesC propertiesC = Binder.get(environment) //首先要绑定配置器
      //再将属性绑定到对象上
      .bind( "kaka.cream.mail-c", Bindable.of(MailPropertiesC.class) ).get(); //再获取实例

  # 绑定Map
  Map<String,Object> propMap = Binder.get(environment)
      .bind( "fish.jdbc.datasource",Bindable.mapOf(String.class, Object.class) ).get();

  # 绑定List
  List<String> list = Binder.get(environment)
      .bind( "kaka.cream.list",Bindable.listOf(String.class) ).get();
那么这两行代码就是分别从environment中获取spring.profiles.active,spring.profiles.include属性
	Set<Profile> activatedViaProperty = getProfiles(binder, ACTIVE_PROFILES_PROPERTY);
	Set<Profile> includedViaProperty = getProfiles(binder, INCLUDE_PROFILES_PROPERTY);
分别是spring.profiles.active和spring.profiles.include
那么这两个参数分别代表什么含义
【spring.profiles.active】和 【spring.profiles.include 的区别】:
【spring.profiles.active】和 【spring.profiles.include 的区别】:
主要是语意上的区别,实际使用效果相同。
以上两种,在创建不同的配置文件时,命名规则遵循 application-
p
r
o
f
i
l
e
.
p
r
o
p
e
r
t
i
e
s
,【
s
p
r
i
n
g
.
p
r
o
f
i
l
e
s
.
a
c
t
i
v
e
】:根据部署场景不同,切换不同的配置文件:配置
s
p
r
i
n
g
.
p
r
o
f
i
l
e
s
.
a
c
t
i
v
e
,属性值为
{profile}.properties, 【spring.profiles.active】:根据部署场景不同,切换不同的配置文件:配置spring.profiles.active,属性值为
profile.properties,【spring.profiles.active】:根据部署场景不同,切换不同的配置文件:配置spring.profiles.active,属性值为{profile}。
【spring.profiles.include】:可以用来无条件的添加生效的配置。
将特定的配置属性添加到生效的配置中而不是替换它们。
【格式】: spring.profiles.include: 子项1,子项2,子项3
【配置的位置和区别】:
配置方式一:application.properties中,配置spring.profiles.active=dev的同时指定spring.profiles.include=dev1,dev2
配置方式二:application.properties中,配置spring.profiles.active=dev,application-dev.properties中,配置spring.profiles.include=dev1,dev2。使用application-dev.properties时自动就激活了dev1、dev2两个文件,不用再次指定。(个人认为第二种方法更好)
区别:
第一种方式启动时,控制台打印The following profiles are active:dev1,dev2,dev。
第二种方式启动时,控制台打印The following profiles are active:dev, dev1,dev2。
按照顺序,后面的覆盖前面的。
看代码我们知道spring.profiles.active和spring.profiles.include都是集合,也就是都是支持多个使多个配置文件生效,因此说二者功能上一致,但是语义不同,使用的用法也不用
继续看源码
addActiveProfiles(activatedViaProperty);
this.profiles添加从environment中读取到profile
初始化profiles后进入while循环
while (!this.profiles.isEmpty()) {
							Profile profile = this.profiles.poll();
							if (isDefaultProfile(profile)) {
								addProfileToEnvironment(profile.getName());
							}
							load(profile, this::getPositiveProfileFilter,
									addToLoaded(MutablePropertySources::addLast, false));
							this.processedProfiles.add(profile);
						}
目前的profiles集合中,先看profile为空的情况
	private void load(Profile profile, DocumentFilterFactory filterFactory, DocumentConsumer consumer) {
			getSearchLocations().forEach((location) -> {
				boolean isDirectory = location.endsWith("/");
				Set<String> names = isDirectory ? getSearchNames() : NO_SEARCH_NAMES;
				names.forEach((name) -> load(location, name, profile, filterFactory, consumer));
			});
		}
进入load方法
getSearchLocations返回扫描的路径
private static final String DEFAULT_SEARCH_LOCATIONS = "classpath:/,classpath:/config/,file:./,file:./config/*/,file:./config/";
当然也可以自定义指定通过启动参数指定spring.config.additional-location
getSearchNames返回配置文件名称
默认是application不过也可以通过启动参数spring.config.name指定
进入load方法
	for (PropertySourceLoader loader : this.propertySourceLoaders) {
				for (String fileExtension : loader.getFileExtensions()) {
					if (processed.add(fileExtension)) {
						loadForFileExtension(loader, location + name, "." + fileExtension, profile, filterFactory,
								consumer);
					}
				}
			}
propertySourceLoaders分别是PropertiesPropertySourceLoader、YamlPropertySourceLoader分别根据location和合 name及加载properties和yml
String name = "applicationConfig: [" + getLocationName(location, resource) + "]";
					List<Document> documents = loadDocuments(loader, name, resource);
					if (CollectionUtils.isEmpty(documents)) {
						if (this.logger.isTraceEnabled()) {
							StringBuilder description = getDescription("Skipped unloaded config ", location, resource,
									profile);
							this.logger.trace(description);
						}
						continue;
					}
					List<Document> loaded = new ArrayList<>();
					for (Document document : documents) {
						if (filter.match(document)) {
							addActiveProfiles(document.getActiveProfiles());
							addIncludedProfiles(document.getIncludeProfiles());
							loaded.add(document);
						}
					}
					Collections.reverse(loaded);

						loaded.forEach((document) -> consumer.accept(profile, document));
如果在在目录内找到了配置文件那么加载,如果配置文件中有 【spring.profiles.active】和 【spring.profiles.include】标签
addActiveProfiles(document.getActiveProfiles());
addIncludedProfiles(document.getIncludeProfiles());
放在profiles中,在后面的循环中会被继续加载
配置文件被加载后放入loaded
对于配置文件的加载,最终调用addLast方法加入到MutablePropertySources(这是loader的MutablePropertySources,不是environment的)
上面是profile为空的情况下,下面看指定profile是如何加载的
if (profile != null) {
				// Try profile-specific file & profile section in profile file (gh-340)
				String profileSpecificFile = prefix + "-" + profile + fileExtension;
				load(loader, profileSpecificFile, profile, defaultFilter, consumer);
				load(loader, profileSpecificFile, profile, profileFilter, consumer);

			}
会在前缀后加上"-" + profile
所有配置加载完毕之后
需要将配置文件加载到environment
addLoadedPropertySources();
applyActiveProfiles(defaultProperties);
	private void addLoadedPropertySources() {
			MutablePropertySources destination = this.environment.getPropertySources();
			List<MutablePropertySources> loaded = new ArrayList<>(this.loaded.values());
			Collections.reverse(loaded);
			String lastAdded = null;
			Set<String> added = new HashSet<>();
			for (MutablePropertySources sources : loaded) {
				for (PropertySource<?> source : sources) {
					if (added.add(source.getName())) {
						addLoadedPropertySource(destination, lastAdded, source);
						lastAdded = source.getName();
					}
				}
			}
		}
注意这里首先对loader加载的source进行了reverse,与加载profile的顺序相反,越晚被加载的越靠前优先级越高
	private void addLoadedPropertySource(MutablePropertySources destination, String lastAdded,
				PropertySource<?> source) {
			if (lastAdded == null) {
				if (destination.contains(DEFAULT_PROPERTIES)) {
					destination.addBefore(DEFAULT_PROPERTIES, source);
				}
				else {
					destination.addLast(source);
				}
			}
			else {
				destination.addAfter(lastAdded, source);
			}
		}
这里的逻辑是加载的多个配置文件,第一个加到environment的最后一会。剩下的紧跟在后面。
@PropertySource
@PropertySource + @Value
package com.huang.pims.demo.props;

import org.springframework.beans.factory.annotation.Value;
import org.springframework.context.annotation.PropertySource;
import org.springframework.stereotype.Component;

@Component
@PropertySource(value = {"demo/props/demo.properties"})
public class ReadByPropertySourceAndValue {

    @Value("${demo.name}")
    private String name;

    @Value("${demo.sex}")
    private int sex;

    @Value("${demo.type}")
    private String type;

    @Override
    public String toString() {
        return "ReadByPropertySourceAndValue{" +
                "name='" + name + '\'' +
                ", sex=" + sex +
                ", type='" + type + '\'' +
                '}';
    }
}
因此PropertySource指定的配置文件也会被加载,但优先级低,而且可以自定义
源码
在扫描beanDefination时,如果碰到PropertySource注解那么执行processPropertySource
	// Process any @PropertySource annotations
		for (AnnotationAttributes propertySource : AnnotationConfigUtils.attributesForRepeatable(
				sourceClass.getMetadata(), PropertySources.class,
				org.springframework.context.annotation.PropertySource.class)) {
			if (this.environment instanceof ConfigurableEnvironment) {
				processPropertySource(propertySource);
			}
			else {
				logger.info("Ignoring @PropertySource annotation on [" + sourceClass.getMetadata().getClassName() +
						"]. Reason: Environment must implement ConfigurableEnvironment");
			}
		}
并放置到配置最后
配置文件加载优先级总结
优先级从高到低,高优先级的配置覆盖低优先级的配置,所有的配置会形成互补配置 。
1)命令行参数。所有的配置都可以在命令行上进行指定;
3)Java系统属性(System.getProperties());
4)操作系统环境变量 ;
5)jar包外部的application-{profile}.properties或application.yml(带spring.profile)配置文件
6)jar包内部的application-{profile}.properties或application.yml(带spring.profile)配置文件 再来加载不带profile
7)jar包外部的application.properties或application.yml(不带spring.profile)配置文件
8)jar包内部的application.properties或application.yml(不带spring.profile)配置文件
9)@Configuration注解类上的@PropertySource
spring配置文件启动参数指定active的情况下默认配置文件还会加载吗
在Spring Boot中,当使用启动参数来指定spring.profiles.active时,确实会改变配置文件的加载行为。但是,这并不意味着默认的配置文件(如application.properties或application.yml)不会被加载。
具体来说:

默认配置文件始终会加载:无论是否指定了spring.profiles.active,Spring Boot都会加载根目录、根目录的config目录、classpath目录、以及classpath目录的config目录下的application.properties或application.yml文件。
激活的配置文件也会加载:当你通过启动参数(例如--spring.profiles.active=dev)、环境变量、JVM系统参数或直接在配置文件中设置spring.profiles.active属性来指定一个或多个激活的profile时,Spring Boot会额外加载与这些profile对应的配置文件。例如,如果激活了dev profile,那么Spring Boot还会加载application-dev.properties或application-dev.yml文件。
配置合并:默认配置文件和激活的配置文件的设置会合并在一起,形成一个完整的配置集合。如果两个文件中存在相同的配置项,那么激活的配置文件中的值会覆盖默认配置文件中的值。
因此,即使你指定了spring.profiles.active来激活某个特定的profile,默认的配置文件仍然会被加载,并且它的设置会与激活的配置文件的设置合并
默认的配置文件和启动参数来指定的配置文件那个优先级更高
在Spring Boot中,当同时存在默认的配置文件(如application.properties或application.yml)和通过启动参数指定的配置文件时,它们的优先级取决于具体的情况。

默认配置文件:默认的配置文件,如application.properties或application.yml,在Spring Boot启动时总是会被加载。它们提供了应用程序的基本配置。
启动参数指定的配置文件:通过启动参数指定的配置文件(例如,使用--spring.config.location参数指定外部配置文件的位置)具有更高的优先级。这是因为这些配置文件是在启动过程中明确指定的,用于覆盖或补充默认配置。
当存在冲突时,启动参数指定的配置文件中的设置将优先于默认配置文件中的设置。这是因为启动参数提供了一种灵活的方式来在运行时动态地更改配置,以满足特定的需求或环境。

此外,如果同时激活了特定的profile(通过spring.profiles.active参数或其他方式),那么与该profile相关的配置文件(如application-{profile}.properties或application-{profile}.yml)也会被加载,并且它们的优先级高于默认配置文件但低于通过启动参数直接指定的配置文件。

总结来说,启动参数指定的配置文件具有最高的优先级,其次是与激活的profile相关的配置文件,最后是默认的配置文件。这种优先级机制允许你在不同的层次上灵活地管理和覆盖配置设置。


 773
773


 被折叠的 条评论
为什么被折叠?
被折叠的 条评论
为什么被折叠?
 到【灌水乐园】发言


