


本篇文章继续给大家介绍Kubernetes的内容,相较于之前的内容有些难度,需要反复练习和理解。
开始之前我们先思考几个问题,Pod和容器是什么关系?
一个Pod内可以有一个或多个容器,严格意义上说,Pod是容器的高度封装对象,让其扩展性变得更强,以往删除容器再启动,IP都会发生变化,但是在pod内启动容器后,再次删除,由于默认重启策略为Always,所以会自动重启容器,此时IP不会发生变化。
那么为什么在Pod内重启容器IP不会发生变化,如何让IP发生变化呢?
这就涉及初始化容器的内容。
configMap除了存储卷的方式挂载还有什么其他的方式挂载吗?
还可以通过注入环境变量的方式去挂载到容器中。
我们带着几个问题,进入今天的文章内容,包含初始化容器、configMap的进阶内容,env注入cm环境变量,rc控制器实现pod的数量控制,svc暴露pod端口进行负载均衡,健康状态检查探针livenessProbe
目录
三、tcpSocket
初始化容器
Pod在运行容器的时候会先运行pause容器,里面存放着最基础的设置,例如网络名称空间,其次是初始化容器,这个可做可不做,最后才是我们的业务容器,当重启业务重启的时候,pause容器不会重启,所以IP不会发生变化,初始化容器也不会重启,里面内容也不会再执行一次,初始化容器的内容只有创建Pod的时候执行,但是重启pause容器,pause和初始化容器都会再次执行命令,IP也自然会发生变化了。
一、pause-IP案例展示
编写资源清单
[root@Master231 pod]# cat 21-pods-init.yaml
apiVersion: v1
kind: Pod
metadata:
  name: linux-initcontainers-008
spec:
  volumes:
  - name: data01
    emptyDir: {}
  # 初始化容器,仅在Pod第一次创建时触发,即只触发一次。
  initContainers:
  - name: init-c1
    image: harbor.koten.com/koten-web/nginx:1.25.1-alpine
    # command: ["touch","/koten-linux/apps.log"]
    command: ["/bin/sh","-c","date >> /koten-linux/apps.log"]
    volumeMounts:
    - name:  data01
      mountPath: /koten-linux
  - name: init-c2
    image: harbor.koten.com/koten-web/nginx:1.25.1-alpine
    # command: ["sleep","60"]
    command: ["sleep","5"]
  # 业务容器
  containers:
  - name: web
    image: harbor.koten.com/koten-web/nginx:1.25.1-alpine
    command:
    - tail
    - -f
    - /etc/hosts
    volumeMounts:
    - name:  data01
      mountPath: /koten-linux-001    #挂载点名称可以修改
此时观察IP
[root@Master231 pod]# kubectl get pods -o wide
NAME                         READY   STATUS    RESTARTS   AGE   IP            NODE        NOMINATED NODE   READINESS GATES
linux-initcontainers-008   1/1     Running   0          62s   10.100.1.77   worker232   <none>           <none>
停止业务容器发现立即重启,IP不会发生变化
[root@Worker232 ~]# docker ps
CONTAINER ID   IMAGE                                               COMMAND                  CREATED          STATUS          PORTS     NAMES
4bed80634f74   4a20372d4940                                        "sleep 5"                4 seconds ago    Up 3 seconds              k8s_init-c2_linux-initcontainers-008_default_d8d647dd-8cd5-4495-895a-429f76b4edb1_0
f94ac8d2cde0   registry.aliyuncs.com/google_containers/pause:3.6   "/pause"                 6 seconds ago    Up 5 seconds              k8s_POD_linux-initcontainers-008_default_d8d647dd-8cd5-4495-895a-429f76b4edb1_0

[root@Worker232 ~]# docker stop 4bed80634f74   #停止业务容器,有默认重启策略
[root@Master231 pod]# kubectl get pods -o wide
NAME                         READY   STATUS    RESTARTS   AGE     IP            NODE        NOMINATED NODE   READINESS GATES
linux-initcontainers-008   1/1     Running   0          2m13s   10.100.1.77   worker232   <none>           <none>
停止pause容器发现,pause容器比业务容器重启的要慢,当它没有启动的时候IP还是原来IP,启动后IP发生变化
[root@Worker232 ~]# docker stop f94ac8d2cde0   #停止pause容器,有默认重启策略

[root@Master231 pod]# kubectl get pods -o wide
NAME                         READY   STATUS    RESTARTS   AGE    IP            NODE        NOMINATED NODE   READINESS GATES
linux-initcontainers-008   1/1     Running   0          4m1s   10.100.1.77   worker232   <none>           <none>

......

[root@Worker232 ~]# docker ps
CONTAINER ID   IMAGE                                               COMMAND                  CREATED          STATUS                  PORTS     NAMES
ab05e01c41a3   4a20372d4940                                        "tail -f /etc/hosts"     1 second ago     Up Less than a second             k8s_web_linux-initcontainers-008_default_d8d647dd-8cd5-4495-895a-429f76b4edb1_1
62c04da5b94e   registry.aliyuncs.com/google_containers/pause:3.6   "/pause"                 9 seconds ago    Up 8 seconds                      k8s_POD_linux-initcontainers-008_default_d8d647dd-8cd5-4495-895a-429f76b4edb1_1


[root@Master231 pod]# kubectl get pods -o wide
NAME                         READY   STATUS    RESTARTS      AGE     IP            NODE        NOMINATED NODE   READINESS GATES
linux-initcontainers-008   1/1     Running   1 (28s ago)   4m34s   10.100.1.78   worker232   <none>           <none>
1、原理介绍
原因是因为pause初始化了名称空间
查看他们的各自进程,在proc里面可以看到他们公用了网络名称空间,所以删除pause时
[root@Worker232 ~]# ps -axu | grep ab05e01c41a3 | grep -v grep
root      18968  0.0  0.1 720560  6212 ?        Sl   20:22   0:00 /koten/softwares/docker/containerd-shim-runc-v2 -namespace moby -id ab05e01c41a343e5d64d329c1dc716727a4fd00bea7b033a35df794507affdf8 -address /var/run/docker/containerd/containerd.sock
[root@Worker232 ~]# ps -axu | grep 62c04da5b94e | grep -v grep
root      18689  0.0  0.1 720752  6432 ?        Sl   20:22   0:00 /koten/softwares/docker/containerd-shim-runc-v2 -namespace moby -id 62c04da5b94eb4f3ce33779f8742f5ad1ee0e658e5641bfe168fd5d8eef4bb07 -address /var/run/docker/containerd/containerd.sock

[root@Worker232 ~]# ll /proc/18968/ns
total 0
lrwxrwxrwx 1 root root 0 Jun 19 20:27 ipc -> ipc:[4026531839]
lrwxrwxrwx 1 root root 0 Jun 19 20:27 mnt -> mnt:[4026531840]
lrwxrwxrwx 1 root root 0 Jun 19 20:27 net -> net:[4026531956]    # net与下面一致
lrwxrwxrwx 1 root root 0 Jun 19 20:27 pid -> pid:[4026531836]
lrwxrwxrwx 1 root root 0 Jun 19 20:27 user -> user:[4026531837]
lrwxrwxrwx 1 root root 0 Jun 19 20:27 uts -> uts:[4026531838]
[root@Worker232 ~]# ll /proc/18689/ns
total 0
lrwxrwxrwx 1 root root 0 Jun 19 20:27 ipc -> ipc:[4026531839]
lrwxrwxrwx 1 root root 0 Jun 19 20:27 mnt -> mnt:[4026531840]
lrwxrwxrwx 1 root root 0 Jun 19 20:27 net -> net:[4026531956]
lrwxrwxrwx 1 root root 0 Jun 19 20:27 pid -> pid:[4026531836]
lrwxrwxrwx 1 root root 0 Jun 19 20:27 user -> user:[4026531837]
lrwxrwxrwx 1 root root 0 Jun 19 20:27 uts -> uts:[4026531838]
[root@Worker232 ~]#
二、初始化容器案例展示
还是上面的资源清单,停止业务容器后,发现还是一行内容,是新创建Pod的时候初始化容器产生的
[root@Worker232 ~]# docker stop 4bed80634f74   #停止业务容器,有默认重启策略

[root@Master231 pod]# kubectl exec -it linux-initcontainers-008 -c web -- cat /koten-linux/apps.log
Mon Jun 19 12:18:26 UTC 2023
停止pause容器,发现多了信息,说明又执行了初始化容器
[root@Worker232 ~]# docker stop f94ac8d2cde0   #停止pause容器,有默认重启策略

[root@Master231 pod]# kubectl exec -it linux-initcontainers-008 -c web -- cat /koten-linux/apps.log
Mon Jun 19 12:18:26 UTC 2023
Mon Jun 19 12:22:32 UTC 2023
configMap进阶
先前介绍过configMap的一些基本使用,只了解那些是不够的,例如,默认的mountPath是挂载目录,如果你想挂载文件,mountPath写到了要挂载的文件的目录,那么除了该文件之外的其他所有文件都会被覆盖消失,如果mountPath写到了要挂载的文件,那么会把该文件当作一个目录,把要挂载的文件放在这个目录下面。所以这时候应该怎么处理;还有我们只想修改nginx的端口号,却需要复制那么多没有用的内容,能不能只配置端口,这些疑问会在你读完下面的内容后一一解决!
一、subPath
subPath也是volumeMounts的参数之一,是声明其在挂载点文件名称,要和 po.spec.volumes.configMap.items.path 相同,网上有其他人说还要与mountPath的最后文件名称相同,我亲测不需要!
编写configMap并运行
[root@Master231 configMap]# cat 05-cm-game.yaml
apiVersion: v1
kind: ConfigMap
metadata:
  name: nginx.conf
# 指定cm的数据
data:
  nginx-conf: |
    user nginx;
    worker_processes auto;
    error_log /var/log/nginx/error.log;
    pid /run/nginx.pid;

    # Load dynamic modules. See /usr/share/doc/nginx/README.dynamic.
    include /usr/share/nginx/modules/*.conf;

    events {
        worker_connections 1024;
    }

    http {
        log_format  main  '$remote_addr - $remote_user [$time_local] "$request" '
                          '$status $body_bytes_sent "$http_referer" '
                          '"$http_user_agent" "$http_x_forwarded_for"';

        access_log  /var/log/nginx/access.log  main;

        sendfile            on;
        tcp_nopush          on;
        tcp_nodelay         on;
        keepalive_timeout   65;
        types_hash_max_size 4096;

        include             /etc/nginx/mime.types;
        default_type        application/octet-stream;

        # Load modular configuration files from the /etc/nginx/conf.d directory.
        # See http://nginx.org/en/docs/ngx_core_module.html#include
        # for more information.
        include /etc/nginx/conf.d/*.conf;

        server {
            listen       80;
            listen       [::]:80;
            server_name  _;
            root         /usr/share/nginx/html;

            # Load configuration files for the default server block.
            include /etc/nginx/default.d/*.conf;

            error_page 404 /404.html;
            location = /404.html {
            }

            error_page 500 502 503 504 /50x.html;
            location = /50x.html {
            }
        }
    }

[root@Master231 configMap]# kubectl apply -f 05-cm-game.yaml
configmap/nginx.conf created
编写资源清单并运行
[root@Master231 pod]# cat 24-pods-volumes-configMaps.yaml
apiVersion: v1
kind: Pod
metadata:
name: koten-games-cm-subpath-004
spec:
nodeName: worker233
volumes:
- name: data01
configMap:
name: nginx.conf
items:
- key: nginx-conf
path: haha
containers:
- name: games
image: harbor.koten.com/koten-games/games:v0.5
volumeMounts:
- name: data01
# 指定挂载点,若不指定subPath属性,则挂载点默认为目录。
mountPath: /etc/nginx/nginx.conf
# 指定subPath,声明其在挂载点的文件名称。要和"po.spec.volumes.configMap.items.path"相同。
subPath: haha
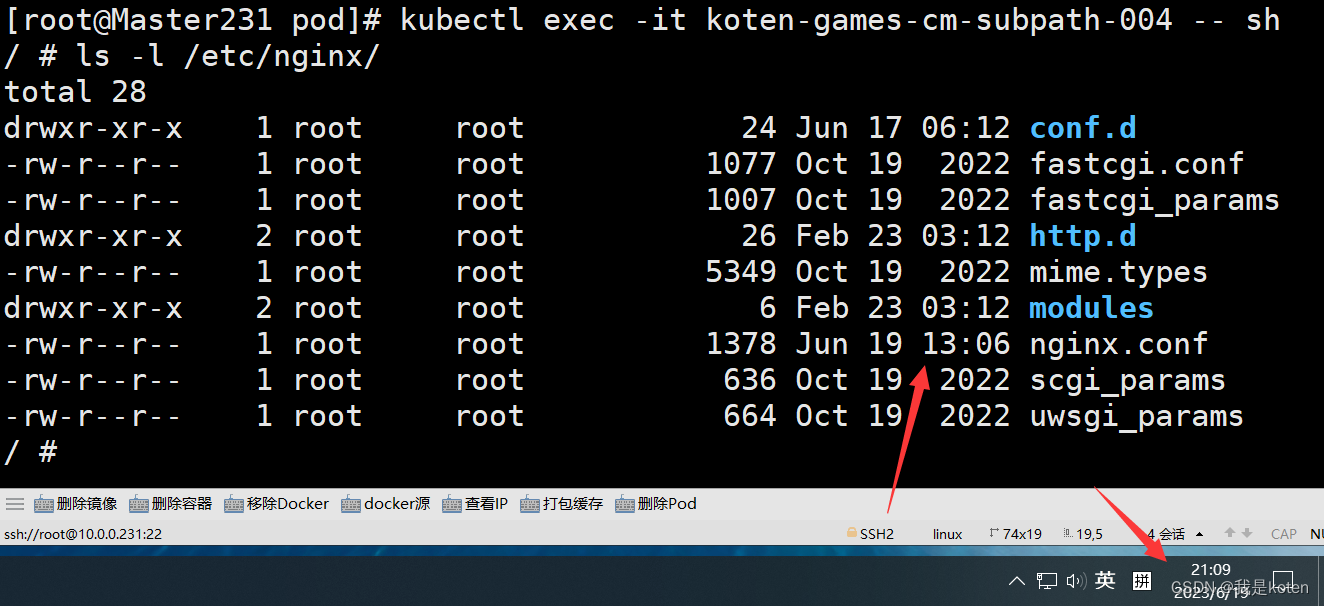
[root@Master231 pod]# kubectl apply -f 24-pods-volumes-configMaps.yaml
pod/koten-games-cm-subpath-004 created
[root@Master231 pod]# kubectl get pods -o wide
NAME READY STATUS RESTARTS AGE IP NODE NOMINATED NODE READINESS GATES
koten-games-cm-subpath-004 1/1 Running 0 117s 10.100.2.26 worker233 <none> <none>
观察文件时间可以发现nginx.conf成功挂载,看日期可以看出来,时间的话是因为linux系统里是格林威治时间,比东八区慢八个小时
二、readOnly
还是用上面的configMap配置文件,修改资源清单并运行
[root@Master231 pod]# cat 25-pods-volumes-configMaps.yaml
apiVersion: v1
kind: Pod
metadata:
  name: koten-games-cm-subpath-006
spec:
  nodeName: worker233
  # hostNetwork: true
  volumes:
  - name: data01
    configMap:
      name: nginx.conf
      items:
      - key: nginx-conf
        # path: nginx.conf
        path: haha
  containers:
  - name: games
    image: harbor.koten.com/koten-games/games:v0.5
    volumeMounts:
    - name: data01
      # 指定挂载点,若不指定subPath属性,则挂载点默认为目录。若指定后,可以让挂载点对应的是一个文件。
      mountPath: /etc/nginx/nginx.conf
      # 指定subPath,声明其在挂载点的文件名称。要和"po.spec.volumes.configMap.items.path"相同。
      # subPath: nginx.conf
      subPath: haha
      # 声明只读(ro)权限,默认是读写(rw)
      readOnly: true
[root@Master231 pod]# kubectl apply -f 25-pods-volumes-configMaps.yaml
pod/koten-games-cm-subpath-006 created
进入容器并尝试写入数据,发现写入失败
[root@Master231 pod]# kubectl get pods
NAME                         READY   STATUS    RESTARTS   AGE
koten-games-cm-subpath-006   1/1     Running   0          6s
[root@Master231 pod]# kubectl exec -it koten-games-cm-subpath-006 -- sh
/ # echo 111 > /etc/nginx/nginx.conf
sh: can't create /etc/nginx/nginx.conf: Read-only file system
三、env注入cm环境变量与字段引用
使用env注入cm环境变量的方式,就是我们文章开头提到的除了挂载外使用configMap的方式,这个方法使我们的configMap更加精简,configMap里面的参数注入到容器中成为环境变量,可以在很多地方进行使用,不是挂载只能挂载到一个地方,如果想挂载到多个地方,还要对同一个configMap进行多次注册,筛选出要用的key,再挂载到不同的地方这种麻烦方法。
字段引用,是指可以将Pod的一些状态信息,或者设置的参数等字段作为变量传递到容器中,使得在容器中也可以了解外Pod的信息。
编写configMap并运行
[root@Master231 configMap]# cat 06-cm-env.yaml
apiVersion: v1
kind: ConfigMap
metadata:
  name: cm-env
data:
  author: koten
  hobby: |
     k8s
     docker
     elfk

[root@Master231 configMap]# kubectl apply -f 06-cm-env.yaml
configmap/cm-env created
编写资源清单,在资源清单内写configMap定义的内容、Pod状态信息的内容和配置的参数等字段,传递到容器中
[root@Master231 pod]# cat 26-pods-volumes-configMaps-env.yaml
apiVersion: v1
kind: Pod
metadata:
  name: koten-games-cm-env-001
spec:
  nodeName: worker233
  containers:
  - name: games
    image: harbor.koten.com/koten-games/games:v0.5
    resources:
      requests:
        cpu: "500m"
        memory: "200M"
      limits:
        cpu: 1.5
        memory: "400M"
    env:
    - name: koten_linux_AUTHOR
      valueFrom:
        configMapKeyRef:
           name: cm-env
           key: author
    - name: koten_linux_hobby
      valueFrom:
        configMapKeyRef:
           name: cm-env
           key: hobby
    - name: koten_linux_METADATA_NAME
      valueFrom:
        fieldRef:
           fieldPath: "metadata.name"
    - name: koten_linux_SPEC_NODENAME
      valueFrom:
        fieldRef:
           fieldPath: "spec.nodeName"
    - name: koten_linux_status_PODIP
      valueFrom:
        fieldRef:
           fieldPath: "status.podIP"
    - name: koten_linux_LIMITS_CPU
      valueFrom:
        resourceFieldRef:
           resource: "limits.cpu"
    - name: koten_linux_REQUESTS_MEMORY
      valueFrom:
        resourceFieldRef:
           resource: "requests.memory"
运行资源清单,查看传递进去的环境变量
[root@Master231 pod]# kubectl apply -f 26-pods-volumes-configMaps-env.yaml
pod/koten-games-cm-env-001 created
[root@Master231 pod]# kubectl get pods
NAME                     READY   STATUS    RESTARTS   AGE
koten-games-cm-env-001   1/1     Running   0          6s
[root@Master231 pod]# kubectl exec -it koten-games-cm-env-001 -- env|grep koten
HOSTNAME=koten-games-cm-env-001
koten_linux_METADATA_NAME=koten-games-cm-env-001
koten_linux_SPEC_NODENAME=worker233
koten_linux_status_PODIP=10.100.2.29
koten_linux_LIMITS_CPU=2
koten_linux_REQUESTS_MEMORY=200000000
koten_linux_AUTHOR=koten
koten_linux_hobby=k8s
RC控制器
Kubernetes RC(Replication Controller)控制器是 Kubernetes 中的一个重要组件,用于确保指定数量的 Pod 副本运行。RC 控制器可以自动对 Pod 进行扩容或缩容,以保证 Pod 副本数量满足用户定义的需求,并能够监测 Pod 的状态,实现自愈能力。
Kubernetes RC 控制器的主要特点如下:
1、确保指定数量的 Pod 副本运行;
2、自动扩容或缩容 Pod 副本数量;
3、监测 Pod 的状态,实现自愈能力;
4、支持滚动升级和回滚操作。
一、启动多个Pod共享存储案例
在使用svc之前,我们启动多个Pod写资源清单时需要手动写很多重复的配置内容,一个两个还好,Pod要是多了写的很费劲,写错一个地方改也难改。
[root@Master231 pod]# cat 27-pods-volumes-configMaps-nfs-cm.yaml
apiVersion: v1
kind: ConfigMap
metadata:
  name: nginx.conf
data:
  nginx.conf: |
    user  nginx;
    worker_processes  auto;
    error_log  /var/log/nginx/error.log notice;
    pid        /var/run/nginx.pid;
    events {
        worker_connections  1024;
    }
    http {
        include       /etc/nginx/mime.types;
        default_type  application/octet-stream;
        log_format  main  '$remote_addr - $remote_user [$time_local] "$request" '
                          '$status $body_bytes_sent "$http_referer" '
                          '"$http_user_agent" "$http_x_forwarded_for"';
        access_log  /var/log/nginx/access.log  main;
        sendfile        on;
        keepalive_timeout  65;
        include /etc/nginx/conf.d/*.conf;
    }

---

apiVersion: v1
kind: Pod
metadata:
  name: linux-volumes-nfs-cm-004
spec:
  volumes:
  - name: data
    nfs:
      server: master231
      path: /koten/data/kubernetes
  - name: etc
    configMap:
      name: nginx.conf
      items:
      - key: nginx.conf
        path: nginx.conf
  containers:
  - name: web
    image: harbor.koten.com/koten-web/nginx:1.25.1-alpine
    volumeMounts:
    - name: data
      mountPath: /usr/share/nginx/html
    - name: etc
      mountPath: /etc/nginx/nginx.conf
      subPath: nginx.conf

---

apiVersion: v1
kind: Pod
metadata:
  name: linux-volumes-nfs-cm-005
spec:
  volumes:
  - name: data
    nfs:
      server: master231
      path: /koten/data/kubernetes
  - name: etc
    configMap:
      name: nginx.conf
      items:
      - key: nginx.conf
        path: nginx.conf
  containers:
  - name: web
    image: harbor.koten.com/koten-web/nginx:1.25.1-alpine
    volumeMounts:
    - name: data
      mountPath: /usr/share/nginx/html
    - name: etc
      mountPath: /etc/nginx/nginx.conf
      subPath: nginx.conf

---

apiVersion: v1
kind: Pod
metadata:
  name: linux-volumes-nfs-cm-006
spec:
  volumes:
  - name: data
    nfs:
      server: master231
      path: /koten/data/kubernetes
  - name: etc
    configMap:
      name: nginx.conf
      items:
      - key: nginx.conf
        path: nginx.conf
  containers:
  - name: web
    image: harbor.koten.com/koten-web/nginx:1.25.1-alpine
    volumeMounts:
    - name: data
      mountPath: /usr/share/nginx/html
    - name: etc
      mountPath: /etc/nginx/nginx.conf
      subPath: nginx.conf
[root@Master231 pod]# kubectl apply -f 27-pods-volumes-configMaps-nfs-cm.yaml
configmap/nginx.conf created
pod/linux-volumes-nfs-cm-004 created
pod/linux-volumes-nfs-cm-005 created
pod/linux-volumes-nfs-cm-006 created
[root@Master231 pod]# kubectl get pods
NAME                       READY   STATUS    RESTARTS   AGE
linux-volumes-nfs-cm-004   1/1     Running   0          6s
linux-volumes-nfs-cm-005   1/1     Running   0          6s
linux-volumes-nfs-cm-006   1/1     Running   0          6s
用了RC控制器后,只需要编写好Pod的数量和模板即可,我这边编写的是数量7就秒启了7个Pod
[root@Master231 rc]# cat 02-rc-nginx.yaml
apiVersion: v1
kind: ConfigMap
metadata:
  name: nginx.conf
data:
  nginx.conf: |
    user  nginx;
    worker_processes  auto;
    error_log  /var/log/nginx/error.log notice;
    pid        /var/run/nginx.pid;
    events {
        worker_connections  1024;
    }
    http {
        include       /etc/nginx/mime.types;
        default_type  application/octet-stream;
        log_format  main  '$remote_addr - $remote_user [$time_local] "$request" '
                          '$status $body_bytes_sent "$http_referer" '
                          '"$http_user_agent" "$http_x_forwarded_for"';
        access_log  /var/log/nginx/access.log  main;
        sendfile        on;
        keepalive_timeout  65;
        include /etc/nginx/conf.d/*.conf;
    }

---

apiVersion: v1
kind: ReplicationController
metadata:
  name: koten-rc
spec:
  # 表示运行几个Pod副本数量
  replicas: 7
  # 创建Pod的模板
  template:
    metadata:
      labels:
        apps: web
    spec:
      volumes:
      - name: data
        nfs:
          server: master231
          path: /koten/data/kubernetes
      - name: etc
        configMap:
          name: nginx.conf
          items:
          - key: nginx.conf
            path: nginx.conf
      containers:
      - name: web
        image: harbor.koten.com/koten-web/nginx:1.25.1-alpine
        volumeMounts:
        - name: data
          mountPath: /usr/share/nginx/html
        - name: etc
          mountPath: /etc/nginx/nginx.conf
          subPath: nginx.conf
[root@Master231 rc]# kubectl apply -f 02-rc-nginx.yaml
configmap/nginx.conf unchanged
replicationcontroller/koten-rc created
[root@Master231 rc]# kubectl get pods
NAME             READY   STATUS    RESTARTS   AGE
koten-rc-7smxk   1/1     Running   0          19s
koten-rc-9884w   1/1     Running   0          19s
koten-rc-bp287   1/1     Running   0          19s
koten-rc-bv9sw   1/1     Running   0          19s
koten-rc-rgchw   1/1     Running   0          19s
koten-rc-rntc5   1/1     Running   0          19s
koten-rc-sckcw   1/1     Running   0          19s
我们尝试停止一个Pod发现立马启动了个新的,说明RC控制器成功控制了Pod的数量
[root@Master231 rc]# kubectl get pods
NAME             READY   STATUS    RESTARTS   AGE
koten-rc-7smxk   1/1     Running   0          19s
koten-rc-9884w   1/1     Running   0          19s
koten-rc-bp287   1/1     Running   0          19s
koten-rc-bv9sw   1/1     Running   0          19s
koten-rc-rgchw   1/1     Running   0          19s
koten-rc-rntc5   1/1     Running   0          19s
koten-rc-sckcw   1/1     Running   0          19s
[root@Master231 rc]# kubectl delete pod koten-rc-7smxk
pod "koten-rc-7smxk" deleted
[root@Master231 rc]# kubectl get pods
NAME             READY   STATUS    RESTARTS   AGE
koten-rc-9884w   1/1     Running   0          2m56s
koten-rc-bp287   1/1     Running   0          2m56s
koten-rc-bv9sw   1/1     Running   0          2m56s
koten-rc-bxndn   1/1     Running   0          2s
koten-rc-rgchw   1/1     Running   0          2m56s
koten-rc-rntc5   1/1     Running   0          2m56s
koten-rc-sckcw   1/1     Running   0          2m56s
修改rc的资源清单再apply更新是声明式的方式,我们也可以通过响应式的方式,在命令行中编辑。我这边将7修改为5,直接保存就可以,发现已经做了修改,之前新创建的不见了,说明是从新的Pod开始删除。
[root@Master231 rc]# kubectl edit -f 02-rc-nginx.yaml
......
  spec:
    replicas: 5
    selector:
      apps: web
    template:
      metadata:
        creationTimestamp: null
        labels:
          apps: web
"/tmp/kubectl-edit-493441771.yaml" 99L, 4234C written
configmap/nginx.conf skipped
replicationcontroller/koten-rc edited
[root@Master231 rc]# kubectl get pods
NAME             READY   STATUS    RESTARTS   AGE
koten-rc-9884w   1/1     Running   0          6m35s
koten-rc-bp287   1/1     Running   0          6m35s
koten-rc-bv9sw   1/1     Running   0          6m35s
koten-rc-rgchw   1/1     Running   0          6m35s
koten-rc-sckcw   1/1     Running   0          6m35s
svc暴露Pod服务
service简称svc;主要有两大功能,一个是服务发现,是基于标签管理器关联后端的Pod列表;另一个是负载均衡,将用户请求转发给不同的Pod以均衡流量
创建几个带标签的Pod
[root@Master231 rc]# kubectl get pods --show-labels
NAME             READY   STATUS    RESTARTS   AGE     LABELS
koten-rc-52ffz   1/1     Running   0          4m9s    apps=web
koten-rc-52l5m   1/1     Running   0          7m20s   apps=web
koten-rc-6b6ph   1/1     Running   0          7m20s   apps=web
koten-rc-kh9xx   1/1     Running   0          7m20s   apps=web
koten-rc-m87mk   1/1     Running   0          7m20s   apps=web
koten-rc-rcvn2   1/1     Running   0          7m20s   apps=web
koten-rc-wc87l   1/1     Running   0          4m9s    apps=web
编写svc资源清单
[root@Master231 svc]# cat 01-svc-ClusterIP.yaml
apiVersion: v1
kind: Service
metadata:
  name: myweb
spec:
  # 基于标签选择器关联Pod
  selector:
    apps: web
  # 配置端口映射
  ports:
    # 指定Service服务本身的端口号
  - port: 8888
    # 后端Pod提供服务的端口号
    targetPort: 80
运行svc资源清单查看,可以看到暴露了10.200.0.0段的IP,这是因为在初始化master节点的时候,通过--pod-network-cidr=10.100.0.0/16 --service-cidr=10.200.0.0/16 指定了Pod的IP和service的IP范围
[root@Master231 svc]# kubectl apply -f 01-svc-ClusterIP.yaml
service/myweb created

#可以看到映射的IP与端口
[root@Master231 svc]# kubectl get services
NAME         TYPE        CLUSTER-IP      EXTERNAL-IP   PORT(S)    AGE
kubernetes   ClusterIP   10.200.0.1      <none>        443/TCP    85m
myweb        ClusterIP   10.200.250.66   <none>        8888/TCP   17s

#查看详细信息可以看到svc里面有几个Pod,展示出来三个后面加4,刚好是7个
[root@Master231 svc]# kubectl describe services myweb
Name:              myweb
Namespace:         default
Labels:            <none>
Annotations:       <none>
Selector:          apps=web
Type:              ClusterIP
IP Family Policy:  SingleStack
IP Families:       IPv4
IP:                10.200.250.66
IPs:               10.200.250.66
Port:              <unset>  8888/TCP
TargetPort:        80/TCP
Endpoints:         10.100.1.87:80,10.100.1.88:80,10.100.1.89:80 + 4 more...
Session Affinity:  None
Events:            <none>

#可以通过只查看Endpoints字段查看详细信息
[root@Master231 svc]# kubectl describe ep myweb
Name:         myweb
Namespace:    default
Labels:       <none>
Annotations:  endpoints.kubernetes.io/last-change-trigger-time: 2023-06-19T14:28:33Z
Subsets:
  Addresses:          10.100.1.87,10.100.1.88,10.100.1.89,10.100.1.90,10.100.2.33,10.100.2.34,10.100.2.35
  NotReadyAddresses:  <none>
  Ports:
    Name     Port  Protocol
    ----     ----  --------
    <unset>  80    TCP

Events:  <none>
此时我减少Pod发现Endpoints字段也减少了IP
[root@Master231 rc]# kubectl get pods
NAME             READY   STATUS    RESTARTS   AGE
koten-rc-52l5m   1/1     Running   0          12m
koten-rc-6b6ph   1/1     Running   0          12m
koten-rc-kh9xx   1/1     Running   0          12m
koten-rc-m87mk   1/1     Running   0          12m
koten-rc-rcvn2   1/1     Running   0          12m
[root@Master231 svc]# kubectl describe ep myweb
Name:         myweb
Namespace:    default
Labels:       <none>
Annotations:  <none>
Subsets:
  Addresses:          10.100.1.87,10.100.1.88,10.100.1.89,10.100.2.33,10.100.2.34
  NotReadyAddresses:  <none>
  Ports:
    Name     Port  Protocol
    ----     ----  --------
    <unset>  80    TCP

Events:  <none>
此时我增加Pod发现Endpoints字段也增加了IP,实现了自动发现
[root@Master231 rc]# kubectl get pods
NAME             READY   STATUS    RESTARTS   AGE
koten-rc-52l5m   1/1     Running   0          13m
koten-rc-6b6ph   1/1     Running   0          13m
koten-rc-f7whm   1/1     Running   0          13s
koten-rc-kh9xx   1/1     Running   0          13m
koten-rc-m87mk   1/1     Running   0          13m
koten-rc-mc7ls   1/1     Running   0          13s
koten-rc-rcvn2   1/1     Running   0          13m
koten-rc-wcs67   1/1     Running   0          13s
[root@Master231 svc]# kubectl describe ep myweb
Name:         myweb
Namespace:    default
Labels:       <none>
Annotations:  endpoints.kubernetes.io/last-change-trigger-time: 2023-06-19T14:34:20Z
Subsets:
  Addresses:          10.100.1.87,10.100.1.88,10.100.1.89,10.100.1.91,10.100.2.33,10.100.2.34,10.100.2.36,10.100.2.37
  NotReadyAddresses:  <none>
  Ports:
    Name     Port  Protocol
    ----     ----  --------
    <unset>  80    TCP

Events:  <none>
一、固定暴露IP
编写svc资源清单
[root@Master231 svc]# cat 02-svc-ClusterIP.yaml
apiVersion: v1
kind: Service
metadata:
  name: myweb
spec:
  # 指定service的IP地址
  clusterIP: 10.200.100.100
  # 基于标签选择器关联Pod
  selector:
    apps: web
  # 配置端口映射
  ports:
    # 指定Service服务本身的端口号
  - port: 8888
    # 后端Pod提供服务的端口号
    targetPort: 80
运行资源清单发现暴露的IP为固定IP
[root@Master231 svc]# kubectl apply -f 02-svc-ClusterIP.yaml
service/myweb created
[root@Master231 svc]# kubectl get svc
NAME         TYPE        CLUSTER-IP       EXTERNAL-IP   PORT(S)    AGE
kubernetes   ClusterIP   10.200.0.1       <none>        443/TCP    97m
myweb        ClusterIP   10.200.100.100   <none>        8888/TCP   46s
Pod信息展示实战
一、实战需求
1、不制作镜像,实现访问pod的首页文件,出现以下信息

Pod的所在节点--->Pod的名称--->Pod的IP地址

2、使用rc控制器部署3个副本,并使用svc的10.200.100.100:99端口进行服务的访问
二、项目思路
向容器传递环境变量,将所要展示的信息写入网站根目录,再使用rc部署,svc进行端口暴露三、实操
1、编写资源清单
Pod的标签可以比要关联的标签多,也可以关联上,反之,如果比要关联的少,就关联不上了。
[root@Master231 svc]# cat 03-svc-initContainers.yaml
apiVersion: v1
kind: Service
metadata:
  name: myweb
spec:
  # 指定service的IP地址
  clusterIP: 10.200.100.100
  # 基于标签选择器关联Pod
  selector:
    author: koten
  # 配置端口映射
  ports:
    # 指定Service服务本身的端口号
    - port: 99
    # 后端Pod提供服务的端口号
      targetPort: 80

---
apiVersion: v1
kind: ReplicationController
metadata:
  name: koten-rc-web
spec:
  replicas: 3
  template:
    metadata:
      labels:
        author: koten
        hobby: linux
    spec:
      volumes:
      - name: data
        emptyDir: {}
      initContainers:
      - name: init
        image: harbor.koten.com/koten-web/nginx:1.25.1-alpine
        command:
        - "/bin/sh"
        - "-c"
        - "echo \"<h1>${koten_POD_NAMENAME} ---> ${koten_POD_NAME} ---> ${koten_POD_IP}</h1>\" > /data/index.html"
        env:
        - name: koten_POD_NAMENAME
          valueFrom:
            fieldRef:
              fieldPath: "spec.nodeName"
        - name: koten_POD_NAME
          valueFrom:
            fieldRef:
              fieldPath: "metadata.name"
        - name: koten_POD_IP
          valueFrom:
            fieldRef:
              fieldPath: "status.podIP"
        volumeMounts:
        - name: data
          mountPath: /data
      containers:
      - name: web
        image: harbor.koten.com/koten-web/nginx:1.25.1-alpine
        volumeMounts:
        - name: data
          mountPath: /usr/share/nginx/html
2、创建资源并查看资源,通过curl暴露的IP和端口,可以看到是做了负载均衡
[root@Master231 svc]# kubectl apply -f 03-svc-initContainers.yaml
service/myweb created
replicationcontroller/koten-rc-web created
[root@Master231 svc]# kubectl get svc
NAME         TYPE        CLUSTER-IP       EXTERNAL-IP   PORT(S)   AGE
kubernetes   ClusterIP   10.200.0.1       <none>        443/TCP   57s
myweb        ClusterIP   10.200.100.100   <none>        99/TCP    47s

[root@Master231 svc]# for i in `seq 30`;do curl -s 10.200.100.100:99;done | sort | uniq -c
      9 <h1>worker232 ---> koten-rc-web-gss56 ---> 10.100.1.122</h1>
     16 <h1>worker232 ---> koten-rc-web-hcrld ---> 10.100.1.123</h1>
      5 <h1>worker233 ---> koten-rc-web-972c2 ---> 10.100.2.55</h1>
健康检查探针livenessProbe
常见的探针有livenessProbe、readinessProbe、startupProbe(1.16之后的版本才支持)
livenessProbe
健康状态检查,周期性检查服务是否存活,检查结果失败,将"重启"容器(删除源容器并重新创建新容器)。
如果容器没有提供健康状态检查,则默认状态为Success。

readinessProbe
可用性检查,周期性检查服务是否可用,从而判断容器是否就绪。
若检测Pod服务不可用,则会将Pod从svc的ep列表中移除。
若检测Pod服务可用,则会将Pod重新添加到svc的ep列表中。
如果容器没有提供可用性检查,则默认状态为Success。

startupProbe
如果提供了启动探针,则所有其他探针都会被禁用,直到此探针成功为止。
如果启动探测失败,kubelet将杀死容器,而容器依其重启策略进行重启。
如果容器没有提供启动探测,则默认状态为 Success。
探针(Probe)检测Pod服务的方法也大致有三种exec、httpGet、tcpSocket
exec
执行一段命令,根据返回值判断执行结果。返回值为0或非0,有点类似于"echo $?"。

httpGet
发起HTTP请求,根据返回的状态码来判断服务是否正常。
200: 返回状态码成功
301: 永久跳转
302: 临时跳转
401: 验证失败
403: 权限被拒绝
404: 文件找不到
413: 文件上传过大
500: 服务器内部错误
502: 无效的请求
504: 后端应用网关响应超时
...

tcpSocket:
测试某个TCP端口是否能够链接,类似于telnet,nc等测试工具。
一、exec
k8s的健康探针,规则类似于docker容器的健康状态检查,参数机制都差不
编写资源清单,配置好健康状态检查的参数,我们来判断下什么时候第一次报失败,第一次重启,由于创建会等10秒再删除,所以10秒前不会报错,按理说一秒一检查11秒开始报错,但是我们设置了参数15秒内失败的话不计数,所以应该在15-16秒出现第一次报错,报错3次后重启服务,所以在第18秒开始第一次重启
[root@Master231 pod]# cat 27-pods-volumes-livenessProbe-exec.yaml
apiVersion: v1
kind: Pod
metadata:
  name: linux-livenessprobe-exec-001
spec:
  containers:
  - name: web
    image: harbor.koten.com/koten-web/nginx:1.25.1-alpine
    command:
    - /bin/sh
    - -c
    - touch /tmp/koten-linux-healthy; sleep 10; rm -f /tmp/koten-linux-healthy; sleep 600
    # 健康状态检查,周期性检查服务是否存活,检查结果失败,将重启容器。
    livenessProbe:
      # 使用exec的方式去做健康检查
      exec:
        # 自定义检查的命令
        command:
        - cat
        - /tmp/koten-linux-healthy
      # 检测服务失败次数的累加值,默认值是3次,最小值是1。当检测服务成功后,该值会被重置!
      failureThreshold: 3
      # 指定多久之后进行健康状态检查,即此时间段内检测服务失败并不会对failureThreshold进行计数。
      initialDelaySeconds: 15
      # 指定探针检测的频率,默认是10s,最小值为1.
      periodSeconds: 1
      # 检测服务成功次数的累加值,默认值为1次,最小值1.
      successThreshold: 1
      # 一次检测周期超时的秒数,默认值是1秒,最小值为1.
      timeoutSeconds: 1
运行资源清单,查看详细信息,发现确实如此总调度了20s,2s前显示不健康,显示了三次,所以第一次重启在18秒,第一次报失败在第15秒
[root@Master231 pod]# kubectl apply -f 27-pods-volumes-livenessProbe-exec.yaml
pod/linux-livenessprobe-exec-001 created

[root@Master231 pod]# kubectl describe pod linux-livenessprobe-exec-001
......
xists for 300s
Events:
  Type     Reason     Age              From               Message
  ----     ------     ----             ----               -------
  Normal   Scheduled  20s              default-scheduler  Successfully assigned default/linux-livenessprobe-exec-001 to worker232
  Normal   Pulled     19s              kubelet            Container image "harbor.koten.com/koten-web/nginx:1.25.1-alpine" already present on machine
  Normal   Created    19s              kubelet            Created container web
  Normal   Started    19s              kubelet            Started container web
  Warning  Unhealthy  2s (x3 over 4s)  kubelet            Liveness probe failed: cat: can't open '/tmp/koten-linux-healthy': No such file or directory
  Normal   Killing    2s               kubelet            Container web failed liveness probe, will be restarted
二、httpGet
httpGet可以判断网页路径是否可以get通,可以的话会返回小于400,返回状态码大于400的话都会判定为返回失败,如果没有这个网页路径一般是超时,也会判定失败
编写资源清单,配置相应参数,第一次报错时间大概是20-21s,第一次重启时间大概是23-24s,如果在20秒内创建了网页,就不会出现报错了,也就不会重启了
[root@Master231 pod]# cat 28-pods-volumes-livenessProbe-httpget.yaml
kind: Pod
apiVersion: v1
metadata:
  name: koten-linux-httpget-001
  labels:
     apps: myweb
spec:
  volumes:
  - name: data
    emptyDir: {}
  containers:
  - name: linux-httpget
    image: harbor.koten.com/koten-web/nginx:1.25.1-alpine
    volumeMounts:
    - name: data
      mountPath: /usr/share/nginx/html
    # 健康状态检查,周期性检查服务是否存活,检查结果失败,将重启容器。
    livenessProbe:
      # 使用httpGet的方式去做健康检查
      httpGet:
        # 指定访问的端口号
        port: 80
        # 检测指定的访问路径
        path: /index.html
      # 检测服务失败次数的累加值,默认值是3次,最小值是1。当检测服务成功后,该值会被重置!
      failureThreshold: 3
      # 指定多久之后进行健康状态检查,即此时间段内检测服务失败并不会对failureThreshold进行计数。
      initialDelaySeconds: 20
      # 指定探针检测的频率,默认是10s,最小值为1.
      periodSeconds: 1
      # 检测服务成功次数的累加值,默认值为1次,最小值1.
      successThreshold: 1
      # 一次检测周期超时的秒数,默认值是1秒,最小值为1.
      timeoutSeconds: 1
运行资源清单,查看健康状态检查,发现23秒重启,20秒第一次报错
[root@Master231 pod]# kubectl apply -f 28-pods-volumes-livenessProbe-httpget.yaml
pod/koten-linux-httpget-001 created
[root@Master231 pod]# kubectl describe pod koten-linux-httpget-001
......
Events:
  Type     Reason     Age                From               Message
  ----     ------     ----               ----               -------
  Normal   Scheduled  36s                default-scheduler  Successfully assigned default/koten-linux-httpget-001 to worker232
  Normal   Pulled     13s (x2 over 35s)  kubelet            Container image "harbor.koten.com/koten-web/nginx:1.25.1-alpine" already present on machine
  Normal   Created    13s (x2 over 35s)  kubelet            Created container linux-httpget
  Normal   Started    13s (x2 over 35s)  kubelet            Started container linux-httpget
  Warning  Unhealthy  13s (x3 over 15s)  kubelet            Liveness probe failed: HTTP probe failed with statuscode: 404
  Normal   Killing    13s                kubelet            Container linux-httpget failed liveness probe, will be restarted
运行资源清单,在20s内创建好网页,此时就永远不会报失败了
[root@Master231 pod]# kubectl apply -f 28-pods-volumes-livenessProbe-httpget.yaml
pod/koten-linux-httpget-001 created
[root@Master231 pod]# kubectl exec -it koten-linux-httpget-001 -- sh
/ # echo 111 > /usr/share/nginx/html/index.html
/ #
[root@Master231 pod]# kubectl describe pod koten-linux-httpget-001
......
Events:
  Type    Reason     Age   From               Message
  ----    ------     ----  ----               -------
  Normal  Scheduled  42s   default-scheduler  Successfully assigned default/koten-linux-httpget-001 to worker232
  Normal  Pulled     41s   kubelet            Container image "harbor.koten.com/koten-web/nginx:1.25.1-alpine" already present on machine
  Normal  Created    41s   kubelet            Created container linux-httpget
  Normal  Started    41s   kubelet            Started container linux-httpget
三、tcpSocket
tcpSocket是判断tcp的端口是否存在,不存在判定为失败
编写资源清单,判断第一次报错时间为12s,因为停止服务大概需要1秒,第一次重启大概在15秒
[root@Master231 pod]# cat 29-pods-volumes-livenessProbe-tcpsocket.yaml
kind: Pod
apiVersion: v1
metadata:
  name: koten-linux-tcpsocket-001
  labels:
     apps: myweb
spec:
  containers:
  - name: linux-tcpsocket
    image: harbor.koten.com/koten-web/nginx:1.25.1-alpine
    command:
    - /bin/sh
    - -c
    - nginx ; sleep 10; nginx -s stop ; sleep 600
    # 健康状态检查,周期性检查服务是否存活,检查结果失败,将重启容器。
    livenessProbe:
      # 使用tcpSocket的方式去做健康检查
      tcpSocket:
        port: 80
      # 检测服务失败次数的累加值,默认值是3次,最小值是1。当检测服务成功后,该值会被重置!
      failureThreshold: 3
      # 指定多久之后进行健康状态检查,即此时间段内检测服务失败并不会对failureThreshold进行计数。
      initialDelaySeconds: 5
      # 指定探针检测的频率,默认是10s,最小值为1.
      periodSeconds: 1
      # 检测服务成功次数的累加值,默认值为1次,最小值1.
      successThreshold: 1
      # 一次检测周期超时的秒数,默认值是1秒,最小值为1.
      timeoutSeconds: 1
运行资源清单,查看详细信息,发现第一次重启时间为13秒,第一次检测到失败为10秒,10秒多,后面还有毫秒,应该是超过10秒按照11计数
[root@Master231 pod]# kubectl apply -f 29-pods-volumes-livenessProbe-tcpsocket.yaml
pod/koten-linux-tcpsocket-001 created
[root@Master231 pod]# kubectl describe pod koten-linux-tcpsocket-001
......
Events:
  Type     Reason     Age                From               Message
  ----     ------     ----               ----               -------
  Normal   Scheduled  24s                default-scheduler  Successfully assigned default/koten-linux86-tcpsocket-001 to worker232
  Normal   Pulled     23s                kubelet            Container image "harbor.koten.com/koten-web/nginx:1.25.1-alpine" already present on machine
  Normal   Created    23s                kubelet            Created container linux86-tcpsocket
  Normal   Started    23s                kubelet            Started container linux86-tcpsocket
  Warning  Unhealthy  11s (x3 over 13s)  kubelet            Liveness probe failed: dial tcp 10.100.1.134:80: connect: connection refused
  Normal   Killing    11s                kubelet            Container linux86-tcpsocket failed liveness probe, will be restarted
我是koten,10年运维经验,持续分享运维干货,感谢大家的阅读和关注!


 3881
3881


 被折叠的 条评论
为什么被折叠?
被折叠的 条评论
为什么被折叠?
 到【灌水乐园】发言


