


MP的环境搭建
1.依赖引入
<dependencies>
    <dependency>
        <groupId>org.springframework.boot</groupId>
        <artifactId>spring-boot-starter</artifactId>
    </dependency>

    <dependency>
        <groupId>org.projectlombok</groupId>
        <artifactId>lombok</artifactId>
        <optional>true</optional>
    </dependency>
    <dependency>
        <groupId>org.springframework.boot</groupId>
        <artifactId>spring-boot-starter-test</artifactId>
        <scope>test</scope>
        <exclusions>
            <exclusion>
                <groupId>org.junit.vintage</groupId>
                <artifactId>junit-vintage-engine</artifactId>
            </exclusion>
        </exclusions>
    </dependency>
    <!--mybatis-plus-->
    <dependency>
        <groupId>com.baomidou</groupId>
        <artifactId>mybatis-plus-boot-starter</artifactId>
        <version>3.3.1</version>
    </dependency>
    <!--mysql运行时依赖-->
    <dependency>
        <groupId>mysql</groupId>
        <artifactId>mysql-connector-java</artifactId>
        <scope>runtime</scope>
    </dependency>
</dependencies>
entity类
@Data
public class User {
    @TableId(type = IdType.ASSIGN_ID)
    private Long id;
    private String name;
    private Integer age;
    private String email;

}
Application.properties
spring.datasource.driver-class-name=com.mysql.cj.jdbc.Driver
spring.datasource.url=jdbc:mysql://localhost:3306/mybatis_plus?characterEncoding=utf-8&useSSL=false&serverTimezone=Asia/Shanghai
spring.datasource.username=root
spring.datasource.password=ljt

#mybatis日志
mybatis-plus.configuration.log-impl=org.apache.ibatis.logging.stdout.StdOutImpl
Mapper类
@Repository
public interface UserMapper extends BaseMapper<User> {

}
启动类
@SpringBootApplication
@MapperScan("com.atguigu.mybatis_plus.mapper")
public class MybatisPlusApplication {

    public static void main(String[] args) {
        SpringApplication.run(MybatisPlusApplication.class, args);
    }

}
MP的主键策略
1、ASSIGN_ID
MyBatis-Plus默认的主键策略是:ASSIGN_ID (使用了雪花算法)
@TableId(type = IdType.ASSIGN_ID)
private String id;
2、AUTO 自增策略
- 需要在创建数据表的时候设置主键自增
- 实体字段中配置 @TableId(type = IdType.AUTO)
@TableId(type = IdType.AUTO)
private Long id;
要想影响所有实体的配置,可以设置全局主键配置
#全局设置主键生成策略
mybatis-plus.global-config.db-config.id-type=auto
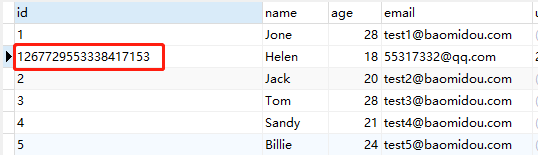
插入操作
@Test
public void testInsert(){
    User user = new User();
    user.setName("Helen");
    user.setAge(18);
    user.setEmail("55317332@qq.com");
    int result = userMapper.insert(user);
    System.out.println("影响的行数:" + result); //影响的行数
    System.out.println("id:" + user); //id自动回填
}
更新操作
@Test
public void testUpdateById(){
    User user = new User();
    user.setId(1L);
    user.setAge(28);
    int result = userMapper.updateById(user);
    System.out.println("影响的行数:" + result);
}
自动填充
需求描述:
项目中经常会遇到一些数据,每次都使用相同的方式填充,例如记录的创建时间,更新时间等。
我们可以使用MyBatis Plus的自动填充功能,完成这些字段的赋值工作
1、数据库修改
在User表中添加datetime类型的新的字段 create_time、update_time
2、实体类修改
实体上增加字段并添加自动填充注解
@Data
public class User {
    @TableId(type = IdType.ASSIGN_ID)
    private Long id;
    private String name;
    private Integer age;
    private String email;

    @TableField(fill = FieldFill.INSERT)
    private Date createTime;
    @TableField(fill = FieldFill.INSERT_UPDATE)
    private Date updateTime;
}
3、实现元(字段)对象处理器接口
@Slf4j
@Component
public class MyMetaObjectHandler implements MetaObjectHandler {
    @Override
    public void insertFill(MetaObject metaObject) {
        log.info("start insert fill ....");
        this.setFieldValByName("createTime", new Date(), metaObject);
        this.setFieldValByName("updateTime", new Date(), metaObject);
    }
    @Override
    public void updateFill(MetaObject metaObject) {
        log.info("start update fill ....");
        this.setFieldValByName("updateTime", new Date(), metaObject);
    }
}

乐观锁
1、场景
一件商品,成本价是80元,售价是100元。老板先是通知小李,说你去把商品价格增加50元。小李正在玩游戏,耽搁了一个小时。正好一个小时后,老板觉得商品价格增加到150元,价格太高,可能会影响销量。又通知小王,你把商品价格降低30元。
此时,小李和小王同时操作商品后台系统。小李操作的时候,系统先取出商品价格100元;小王也在操作,取出的商品价格也是100元。小李将价格加了50元,并将100+50=150元存入了数据库;小王将商品减了30元,并将100-30=70元存入了数据库。是的,如果没有锁,小李的操作就完全被小王的覆盖了。
现在商品价格是70元,比成本价低10元。几分钟后,这个商品很快出售了1千多件商品,老板亏1多万。
2、乐观锁与悲观锁
- 上面的故事,如果是乐观锁,小王保存价格前,会检查下价格是否被人修改过了。如果被修改过了,则重新取出的被修改后的价格,150元,这样他会将120元存入数据库。
- 如果是悲观锁,小李取出数据后,小王只能等小李操作完之后,才能对价格进行操作,也会保证最终的价格是120元。
接下来将我们演示这一过程:
3、模拟修改冲突
数据库中增加商品表和数据
CREATE TABLE product
(
    id BIGINT(20) NOT NULL COMMENT '主键ID',
    name VARCHAR(30) NULL DEFAULT NULL COMMENT '商品名称',
    price INT(11) DEFAULT 0 COMMENT '价格',
    version INT(11) DEFAULT 0 COMMENT '乐观锁版本号',
    PRIMARY KEY (id)
);
INSERT INTO product (id, NAME, price) VALUES (1, '外星人笔记本', 100);
实体类
@Data
public class Product {
private Long id;
private String name;
private Integer price;
private Integer version;
}
Mapper类
@Component
public interface ProductMapper extends BaseMapper<Product> {
}
测试
@Test
public void testConcurrentUpdate() {
    //1、小李
    Product p1 = productMapper.selectById(1L);
    System.out.println("小李取出的价格:" + p1.getPrice());
    //2、小王
    Product p2 = productMapper.selectById(1L);
    System.out.println("小王取出的价格:" + p2.getPrice());
    //3、小李将价格加了50元,存入了数据库
    p1.setPrice(p1.getPrice() + 50);
    productMapper.updateById(p1);
    //4、小王将商品减了30元,存入了数据库
    p2.setPrice(p2.getPrice() - 30);
    int result = productMapper.updateById(p2);
    if(result == 0){//更新失败,重试
        //重新获取数据
        p2 = productMapper.selectById(1L);
        //更新
        p2.setPrice(p2.getPrice() - 30);
        productMapper.updateById(p2);
    }
    //最后的结果
    Product p3 = productMapper.selectById(1L);
    System.out.println("最后的结果:" + p3.getPrice());
}
测试结果

4、解决方案
- 数据库中添加version字段
- 取出记录时,获取当前version
SELECT id,`name`,price,`version` FROM product WHERE id=1
- 更新时,version + 1,如果where语句中的version版本不对,则更新失败
UPDATE product SET price=price+50, `version`=`version` + 1 WHERE id=1 AND `version`=1


 2162
2162


 被折叠的 条评论
为什么被折叠?
被折叠的 条评论
为什么被折叠?
 到【灌水乐园】发言


