前言
当客户在使用我们的产品过程中,遇到问题需要向我们反馈时,如果用纯文字的形式描述,我们很难懂客户的意思,要是能配上问题截图,这样我们就能很清楚的知道客户的问题了。
那么,我们就需要为我们的产品实现一个自定义截屏的功能,用户点完"截图"按钮后,框选任意区域,随后在框选的区域内进行圈选、画箭头、马赛克、直线、打字等操作,做完操作后用户可以选择保存框选区域的内容到本地或者直接发送给我们。
聪明的开发者可能已经猜到了,这是QQ/微信的截图功能,我的开源项目正好做到了截图功能,在做之前我找了很多资料,没有发现web端有这种东西存在,于是我就决定参照QQ的截图自己实现一个并做成插件供大家使用。
本文就跟大家分享下我在做这个"自定义截屏功能"时的实现思路以及过程,欢迎各位感兴趣的开发者阅读本文。
运行结果视频:实现web端自定义截屏
写在前面
本文插件的写法采用的是Vue3的compositionAPI,如果对其不了解的开发者请移步我的另一篇文章:使用Vue3的CompositionAPI来优化代码量
实现思路
我们先来看下QQ的截屏流程,进而分析它是怎么实现的。
截屏流程分析
我们先来分析下,截屏时的具体流程。
-
点击截屏按钮后,我们会发现页面上所有动态效果都静止不动了,如下所示。

-
随后,我们按住鼠标左键进行拖动,屏幕上会出现黑色蒙板,鼠标的拖动区域会出现镂空效果,如下所示。

-
完成拖拽后,框选区域的下方会出现工具栏,里面有框选、圈选、箭头、直线、画笔等工具,如下图所示。

-
点击工具栏中任意一个图标,会出现画笔选择区域,在这里可以选择画笔大小、颜色如下所示。

-
随后,我们在框选的区域内进行拖拽就会绘制出对应的图形,如下所示。

-
最后,点击截图工具栏的下载图标即可将图片保存至本地,或者点击对号图片会自动粘贴到聊天输入框,如下所示。

截屏实现思路
通过上述截屏流程,我们便得到了下述实现思路:
- 获取当前可视区域的内容,将其存储起来
- 为整个cnavas画布绘制蒙层
- 在获取到的内容中进行拖拽,绘制镂空选区
- 选择截图工具栏的工具,选择画笔大小等信息
- 在选区内拖拽绘制对应的图形
- 将选区内的内容转换为图片
实现过程
我们分析出了实现思路,接下来我们将上述思路逐一进行实现。
获取当前可视区域内容
当点击截图按钮后,我们需要获取整个可视区域的内容,后续所有的操作都是在获取的内容上进行的,在web端我们可以使用canvas来实现这些操作。
那么,我们就需要先将body区域的内容转换为canvas,如果要从零开始实现这个转换,有点复杂而且工作量很大。
还好在前端社区种有个开源库叫html2canvas可以实现将指定dom转换为canvas,我们就采用这个库来实现我们的转换。
接下来,我们来看下具体实现过程:
新建一个名为screen-short.vue的文件,用于承载我们的整个截图组件。
- 首先我们需要一个canvas容器来显示转换后的可视区域内容
<template>
  <teleport to="body">
    <!--截图区域-->
    <canvas
      id="screenShotContainer"
      :width="screenShortWidth"
      :height="screenShortHeight"
      ref="screenShortController"
    ></canvas>
  </teleport>
</template>
此处只展示了部分代码,完整代码请移步:screen-short.vue
- 在组件挂载时,调用html2canvas提供的方法,将body中的内容转换为canvas,存储起来。
import html2canvas from "html2canvas";
import InitData from "@/module/main-entrance/InitData";

export default class EventMonitoring {
  // 当前实例的响应式data数据
  private readonly data: InitData;
  // 截图区域canvas容器
  private screenShortController: Ref<HTMLCanvasElement | null>;
  // 截图图片存放容器
  private screenShortImageController: HTMLCanvasElement | undefined;

  constructor(props: Record<string, any>, context: SetupContext<any>) {
    // 实例化响应式data
    this.data = new InitData();
    // 获取截图区域canvas容器
    this.screenShortController = this.data.getScreenShortController();

    onMounted(() => {
      // 设置截图区域canvas宽高
      this.data.setScreenShortInfo(window.innerWidth, window.innerHeight);

      html2canvas(document.body, {}).then(canvas => {
        // 装载截图的dom为null则退出
        if (this.screenShortController.value == null) return;

        // 存放html2canvas截取的内容
        this.screenShortImageController = canvas;
      })
    })
  }
}
此处只展示了部分代码,完整代码请移步:EventMonitoring.ts
为canvas画布绘制蒙层
我们拿到了转换后的dom后,我们就需要绘制一个透明度为0.6的黑色蒙层,告知用户你现在处于截屏区域选区状态。
具体实现过程如下:
- 创建DrawMasking.ts文件,蒙层的绘制逻辑在此文件中实现,代码如下。
/**
 * 绘制蒙层
 * @param context 需要进行绘制canvas
 */
export function drawMasking(context: CanvasRenderingContext2D) {
  // 清除画布
  context.clearRect(0, 0, window.innerWidth, window.innerHeight);
  // 绘制蒙层
  context.save();
  context.fillStyle = "rgba(0, 0, 0, .6)";
  context.fillRect(0, 0, window.innerWidth, window.innerHeight);
  // 绘制结束
  context.restore();
}
⚠️注释已经写的很详细了,对上述API不懂的开发者请移步:clearRect、save、fillStyle、fillRect、restore
- 在
html2canvas函数回调中调用绘制蒙层函数
html2canvas(document.body, {}).then(canvas => {
  // 获取截图区域画canvas容器画布
  const context = this.screenShortController.value?.getContext("2d");
  if (context == null) return;
  // 绘制蒙层
  drawMasking(context);
})
绘制镂空选区
我们在黑色蒙层中拖拽时,需要获取鼠标按下时的起始点坐标以及鼠标移动时的坐标,根据起始点坐标和移动时的坐标,我们就可以得到一个区域,此时我们将这块区域的蒙层凿开,将获取到的canvas图片内容绘制到蒙层下方,这样我们就实现了镂空选区效果。
整理下上述话语,思路如下:
- 监听鼠标按下、移动、抬起事件
- 获取鼠标按下、移动时的坐标
- 根据获取到的坐标凿开蒙层
- 将获取到的canvas图片内容绘制到蒙层下方
- 实现镂空选区的拖拽与缩放
实现的效果如下:
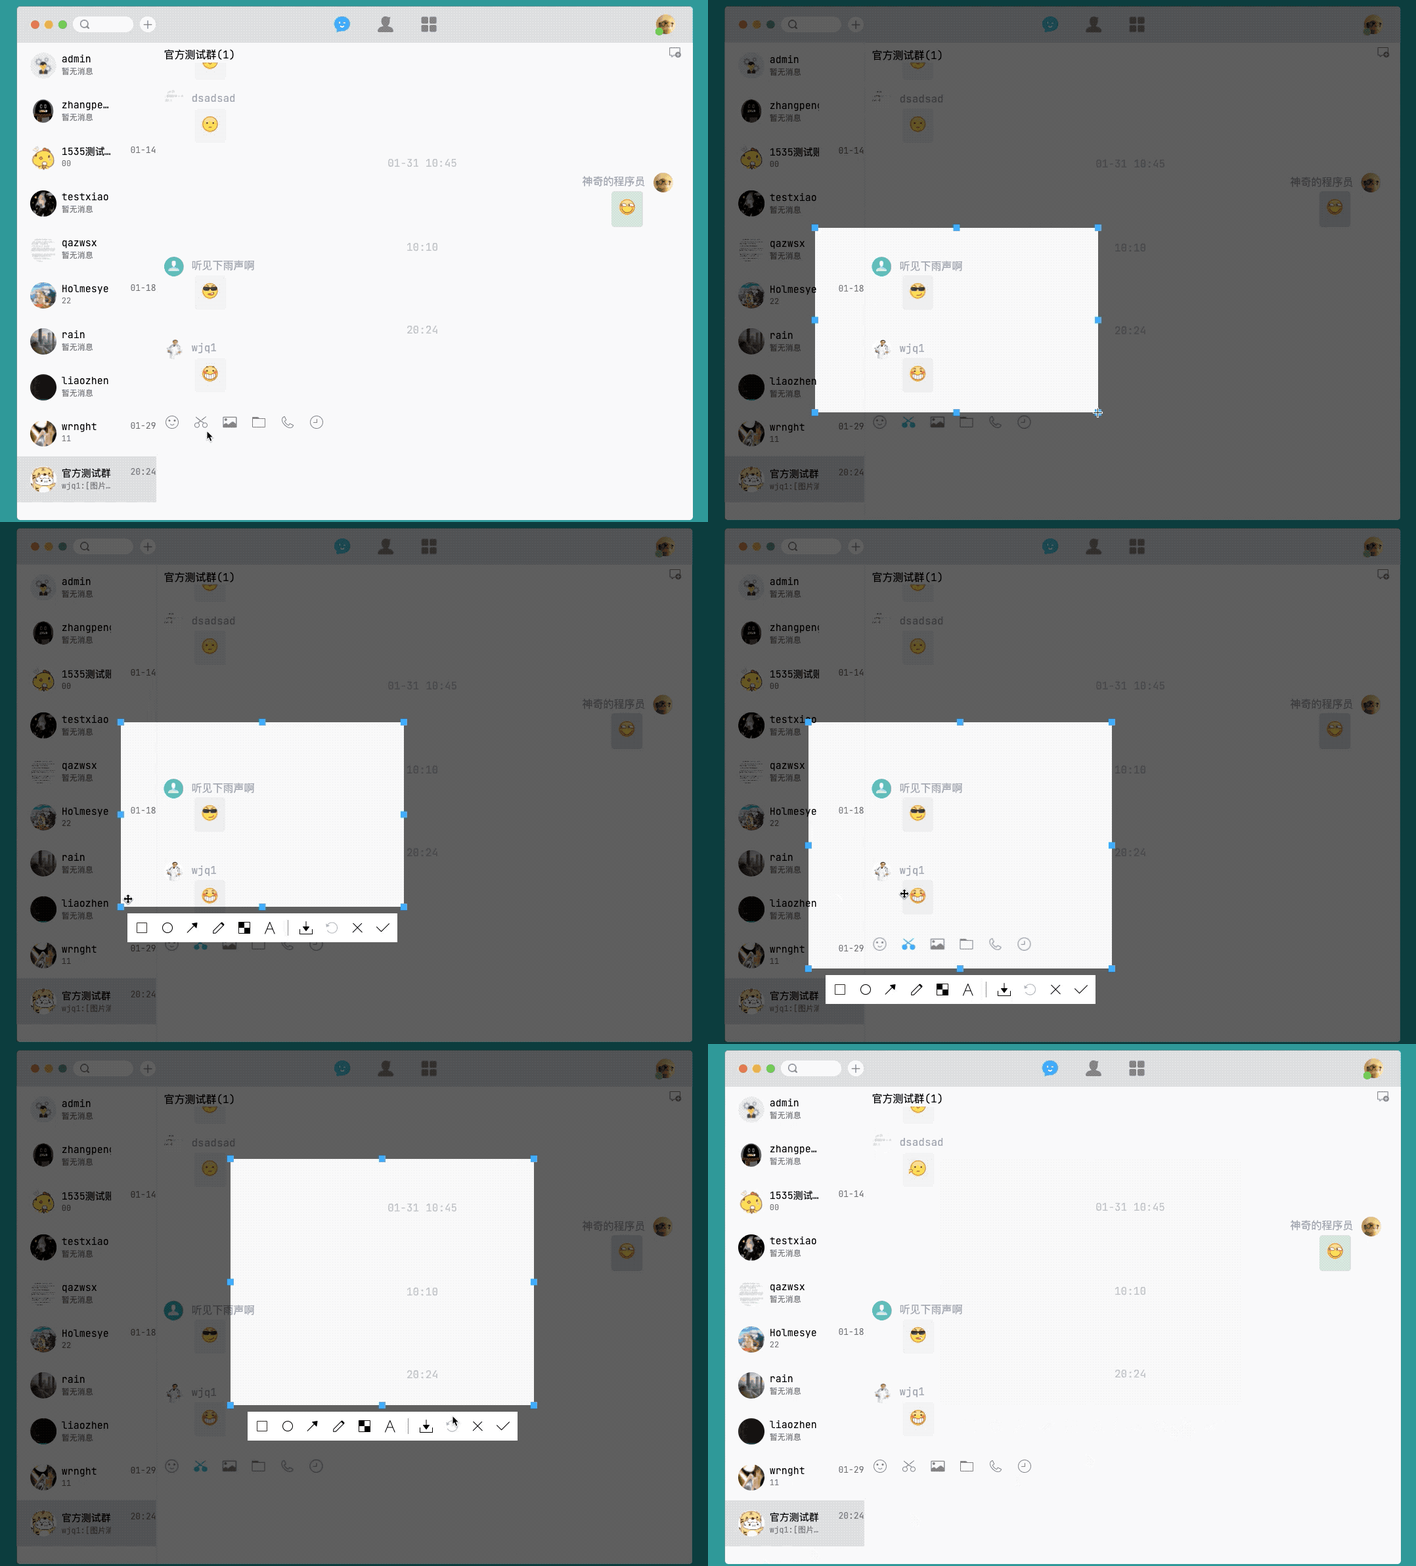
具体代码如下:
export default class EventMonitoring {
   // 当前实例的响应式data数据
  private readonly data: InitData;

  // 截图区域canvas容器
  private screenShortController: Ref<HTMLCanvasElement | null>;
  // 截图图片存放容器
  private screenShortImageController: HTMLCanvasElement | undefined;
  // 截图区域画布
  private screenShortCanvas: CanvasRenderingContext2D | undefined;

  // 图形位置参数
  private drawGraphPosition: positionInfoType = {
    startX: 0,
    startY: 0,
    width: 0,
    height: 0
  };
  // 临时图形位置参数
  private tempGraphPosition: positionInfoType = {
    startX: 0,
    startY: 0,
    width: 0,
    height: 0
  };

  // 裁剪框边框节点坐标事件
  private cutOutBoxBorderArr: Array<cutOutBoxBorder> = [];

  // 裁剪框顶点边框直径大小
  private borderSize = 10;
  // 当前操作的边框节点
  private borderOption: number | null = null;

  // 点击裁剪框时的鼠标坐标
  private movePosition: movePositionType = {
    moveStartX: 0,
    moveStartY: 0
  };

  // 裁剪框修剪状态
  private draggingTrim = false;
  // 裁剪框拖拽状态
  private dragging = false;
  // 鼠标点击状态
  private clickFlag = false;

  constructor(props: Record<string, any>, context: SetupContext<any>) {
     // 实例化响应式data
    this.data = new InitData();

    // 获取截图区域canvas容器
    this.screenShortController = this.data.getScreenShortController();

    onMounted(() => {
      // 设置截图区域canvas宽高
      this.data.setScreenShortInfo(window.innerWidth, window.innerHeight);

      html2canvas(document.body, {}).then(canvas => {
        // 装载截图的dom为null则退出
        if (this.screenShortController.value == null) return;

        // 存放html2canvas截取的内容
        this.screenShortImageController = canvas;
        // 获取截图区域画canvas容器画布
        const context = this.screenShortController.value?.getContext("2d");
        if (context == null) return;

        // 赋值截图区域canvas画布
        this.screenShortCanvas = context;
        // 绘制蒙层
        drawMasking(context);

        // 添加监听
        this.screenShortController.value?.addEventListener(
          "mousedown",
          this.mouseDownEvent
        );
        this.screenShortController.value?.addEventListener(
          "mousemove",
          this.mouseMoveEvent
        );
        this.screenShortController.value?.addEventListener(
          "mouseup",
          this.mouseUpEvent
        );
      })
    })
  }
  // 鼠标按下事件
  private mouseDownEvent = (event: MouseEvent) => {
    this.dragging = true;
    this.clickFlag = true;

    const mouseX = nonNegativeData(event.offsetX);
    const mouseY = nonNegativeData(event.offsetY);

    // 如果操作的是裁剪框
    if (this.borderOption) {
      // 设置为拖动状态
      this.draggingTrim = true;
      // 记录移动时的起始点坐标
      this.movePosition.moveStartX = mouseX;
      this.movePosition.moveStartY = mouseY;
    } else {
      // 绘制裁剪框,记录当前鼠标开始坐标
      this.drawGraphPosition.startX = mouseX;
      this.drawGraphPosition.startY = mouseY;
    }
  }

  // 鼠标移动事件
  private mouseMoveEvent = (event: MouseEvent) => {
    this.clickFlag = false;

    // 获取裁剪框位置信息
    const { startX, startY, width, height } = this.drawGraphPosition;
    // 获取当前鼠标坐标
    const currentX = nonNegativeData(event.offsetX);
    const currentY = nonNegativeData(event.offsetY);
    // 裁剪框临时宽高
    const tempWidth = currentX - startX;
    const tempHeight = currentY - startY;

    // 执行裁剪框操作函数
    this.operatingCutOutBox(
      currentX,
      currentY,
      startX,
      startY,
      width,
      height,
      this.screenShortCanvas
    );
    // 如果鼠标未点击或者当前操作的是裁剪框都return
    if (!this.dragging || this.draggingTrim) return;
    // 绘制裁剪框
    this.tempGraphPosition = drawCutOutBox(
      startX,
      startY,
      tempWidth,
      tempHeight,
      this.screenShortCanvas,
      this.borderSize,
      this.screenShortController.value as HTMLCanvasElement,
      this.screenShortImageController as HTMLCanvasElement
    ) as drawCutOutBoxReturnType;
  }

    // 鼠标抬起事件
  private mouseUpEvent = () => {
    // 绘制结束
    this.dragging = false;
    this.draggingTrim = false;

    // 保存绘制后的图形位置信息
    this.drawGraphPosition = this.tempGraphPosition;

    // 如果工具栏未点击则保存裁剪框位置
    if (!this.data.getToolClickStatus().value) {
      const { startX, startY, width, height } = this.drawGraphPosition;
      this.data.setCutOutBoxPosition(startX, startY, width, height);
    }
    // 保存边框节点信息
    this.cutOutBoxBorderArr = saveBorderArrInfo(
      this.borderSize,
      this.drawGraphPosition
    );
  }
}
⚠️绘制镂空选区的代码较多,此处仅仅展示了鼠标的三个事件监听的相关代码,完整代码请移步:EventMonitoring.ts
- 绘制裁剪框的代码如下
/**
 * 绘制裁剪框
 * @param mouseX 鼠标x轴坐标
 * @param mouseY 鼠标y轴坐标
 * @param width 裁剪框宽度
 * @param height 裁剪框高度
 * @param context 需要进行绘制的canvas画布
 * @param borderSize 边框节点直径
 * @param controller 需要进行操作的canvas容器
 * @param imageController 图片canvas容器
 * @private
 */
export function drawCutOutBox(
  mouseX: number,
  mouseY: number,
  width: number,
  height: number,
  context: CanvasRenderingContext2D,
  borderSize: number,
  controller: HTMLCanvasElement,
  imageController: HTMLCanvasElement
) {
  // 获取画布宽高
  const canvasWidth = controller?.width;
  const canvasHeight = controller?.height;

  // 画布、图片不存在则return
  if (!canvasWidth || !canvasHeight || !imageController || !controller) return;

  // 清除画布
  context.clearRect(0, 0, canvasWidth, canvasHeight);

  // 绘制蒙层
  context.save();
  context.fillStyle = "rgba(0, 0, 0, .6)";
  context.fillRect(0, 0, canvasWidth, canvasHeight);
  // 将蒙层凿开
  context.globalCompositeOperation = "source-atop";
  // 裁剪选择框
  context.clearRect(mouseX, mouseY, width, height);
  // 绘制8个边框像素点并保存坐标信息以及事件参数
  context.globalCompositeOperation = "source-over";
  context.fillStyle = "#2CABFF";
  // 像素点大小
  const size = borderSize;
  // 绘制像素点
  context.fillRect(mouseX - size / 2, mouseY - size / 2, size, size);
  context.fillRect(
    mouseX - size / 2 + width / 2,
    mouseY - size / 2,
    size,
    size
  );
  context.fillRect(mouseX - size / 2 + width, mouseY - size / 2, size, size);
  context.fillRect(
    mouseX - size / 2,
    mouseY - size / 2 + height / 2,
    size,
    size
  );
  context.fillRect(
    mouseX - size / 2 + width,
    mouseY - size / 2 + height / 2,
    size,
    size
  );
  context.fillRect(mouseX - size / 2, mouseY - size / 2 + height, size, size);
  context.fillRect(
    mouseX - size / 2 + width / 2,
    mouseY - size / 2 + height,
    size,
    size
  );
  context.fillRect(
    mouseX - size / 2 + width,
    mouseY - size / 2 + height,
    size,
    size
  );
  // 绘制结束
  context.restore();
  // 使用drawImage将图片绘制到蒙层下方
  context.save();
  context.globalCompositeOperation = "destination-over";
  context.drawImage(
    imageController,
    0,
    0,
    controller?.width,
    controller?.height
  );
  context.restore();
  // 返回裁剪框临时位置信息
  return {
    startX: mouseX,
    startY: mouseY,
    width: width,
    height: height
  };
}
⚠️同样的,注释写的很详细,上述代码用到的canvas API除了之前介绍的外,用到的新的API如下:globalCompositeOperation、drawImage
实现截图工具栏
我们实现镂空选区的相关功能后,接下来要做的就是在选区内进行圈选、框选、画线等操作了,在QQ的截图中这些操作位于截图工具栏内,因此我们要将截图工具栏做出来,做到与canvas交互。
在截图工具栏的布局上,一开始我的想法是直接在canvas画布中把这些工具画出来,这样应该更容易交互一点,但是我看了相关的api后,发现有点麻烦,把问题复杂化了。
琢磨了一阵后,想明白了,这块还是需要使用div进行布局的,在裁剪框绘制完毕后,根据裁剪框的位置信息计算出截图工具栏的位置,改变其位置即可。
工具栏与canvas的交互,可以绑定一个点击事件到EventMonitoring.ts中,获取当前点击项,指定与之对应的图形绘制函数。
实现的效果如下:

具体的实现过程如下:
- 在
screen-short.vue中,创建截图工具栏div并布局好其样式
<template>
  <teleport to="body">
       <!--工具栏-->
    <div
      id="toolPanel"
      v-show="toolStatus"
      :style="{ left: toolLeft + 'px', top: toolTop + 'px' }"
      ref="toolController"
    >
      <div
        v-for="item in toolbar"
        :key="item.id"
        :class="`item-panel ${item.title} `"
        @click="toolClickEvent(item.title, item.id, $event)"
      ></div>
      <!--撤销部分单独处理-->
      <div
        v-if="undoStatus"
        class="item-panel undo"
        @click="toolClickEvent('undo', 9, $event)"
      ></div>
      <div v-else class="item-panel undo-disabled"></div>
      <!--关闭与确认进行单独处理-->
      <div
        class="item-panel close"
        @click="toolClickEvent('close', 10, $event)"
      ></div>
      <div
        class="item-panel confirm"
        @click="toolClickEvent('confirm', 11, $event)"
      ></div>
    </div>
  </teleport>
</template>

<script lang="ts">
import eventMonitoring from "@/module/main-entrance/EventMonitoring";
import toolbar from "@/module/config/Toolbar.ts";

export default {
  name: "screen-short",
  setup(props: Record<string, any>, context: SetupContext<any>) {
    const event = new eventMonitoring(props, context as SetupContext<any>);
    const toolClickEvent = event.toolClickEvent;
    return {
      toolClickEvent,
      toolbar
    }
  }
}
</script>
⚠️上述代码仅展示了组件的部分代码,完整代码请移步:screen-short.vue、screen-short.scss
截图工具条目点击样式处理
截图工具栏中的每一个条目都拥有三种状态:正常状态、鼠标移入、点击,此处我的做法是将所有状态写在css里了,通过不同的class名来显示不同的样式。
部分工具栏点击状态的css如下:
.square-active {
  background-image: url("~@/assets/img/square-click.png");
}

.round-active {
  background-image: url("~@/assets/img/round-click.png");
}

.right-top-active {
  background-image: url("~@/assets/img/right-top-click.png");
}
一开始我想在v-for渲染时,定义一个变量,点击时改变这个变量的状态,显示每个点击条目对应的点击时的样式,但是我在做的时候却发现问题了,我的点击时的class名是动态的,没发通过这种形式来弄,无奈我只好选择dom操作的形式来实现,点击时传$event到函数,获取当前点击项点击时的class,判断其是否有选中的class,如果有就删除,然后为当前点击项添加class。
实现代码如下:
- dom结构
<div
    v-for="item in toolbar"
    :key="item.id"
    :class="`item-panel ${item.title} `"
    @click="toolClickEvent(item.title, item.id, $event)"
></div>
- 工具栏点击事件
  /**
   * 裁剪框工具栏点击事件
   * @param toolName
   * @param index
   * @param mouseEvent
   */
  public toolClickEvent = (
    toolName: string,
    index: number,
    mouseEvent: MouseEvent
  ) => {
    // 为当前点击项添加选中时的class名
    setSelectedClassName(mouseEvent, index, false);
  }
- 为当前点击项添加选中时的class,移除其兄弟元素选中时的class
import { getSelectedClassName } from "@/module/common-methords/GetSelectedCalssName";
import { getBrushSelectedName } from "@/module/common-methords/GetBrushSelectedName";

/**
 * 为当前点击项添加选中时的class,移除其兄弟元素选中时的class
 * @param mouseEvent 需要进行操作的元素
 * @param index 当前点击项
 * @param isOption 是否为画笔选项
 */
export function setSelectedClassName(
  mouseEvent: any,
  index: number,
  isOption: boolean
) {
  // 获取当前点击项选中时的class名
  let className = getSelectedClassName(index);
  if (isOption) {
    // 获取画笔选项选中时的对应的class
    className = getBrushSelectedName(index);
  }
  // 获取div下的所有子元素
  const nodes = mouseEvent.path[1].children;
  for (let i = 0; i < nodes.length; i++) {
    const item = nodes[i];
    // 如果工具栏中已经有选中的class则将其移除
    if (item.className.includes("active")) {
      item.classList.remove(item.classList[2]);
    }
  }
  // 给当前点击项添加选中时的class
  mouseEvent.target.className += " " + className;
}
- 获取截图工具栏点击时的class名
export function getSelectedClassName(index: number) {
  let className = "";
  switch (index) {
    case 1:
      className = "square-active";
      break;
    case 2:
      className = "round-active";
      break;
    case 3:
      className = "right-top-active";
      break;
    case 4:
      className = "brush-active";
      break;
    case 5:
      className = "mosaicPen-active";
      break;
    case 6:
      className = "text-active";
  }
  return className;
}
- 获取画笔选择点击时的class名
/**
 * 获取画笔选项对应的选中时的class名
 * @param itemName
 */
export function getBrushSelectedName(itemName: number) {
  let className = "";
  switch (itemName) {
    case 1:
      className = "brush-small-active";
      break;
    case 2:
      className = "brush-medium-active";
      break;
    case 3:
      className = "brush-big-active";
      break;
  }
  return className;
}
实现工具栏中的每个选项
接下来,我们来看看工具栏中每个选项的具体实现。
工具栏中每个图形的绘制都需要鼠标按下、移动、抬起这三个事件的配合下完成,为了防止鼠标在移动时图形重复绘制,这里我们采用"历史记录"模式来解决这个问题,我们先来看下重复绘制时的场景,如下所示:
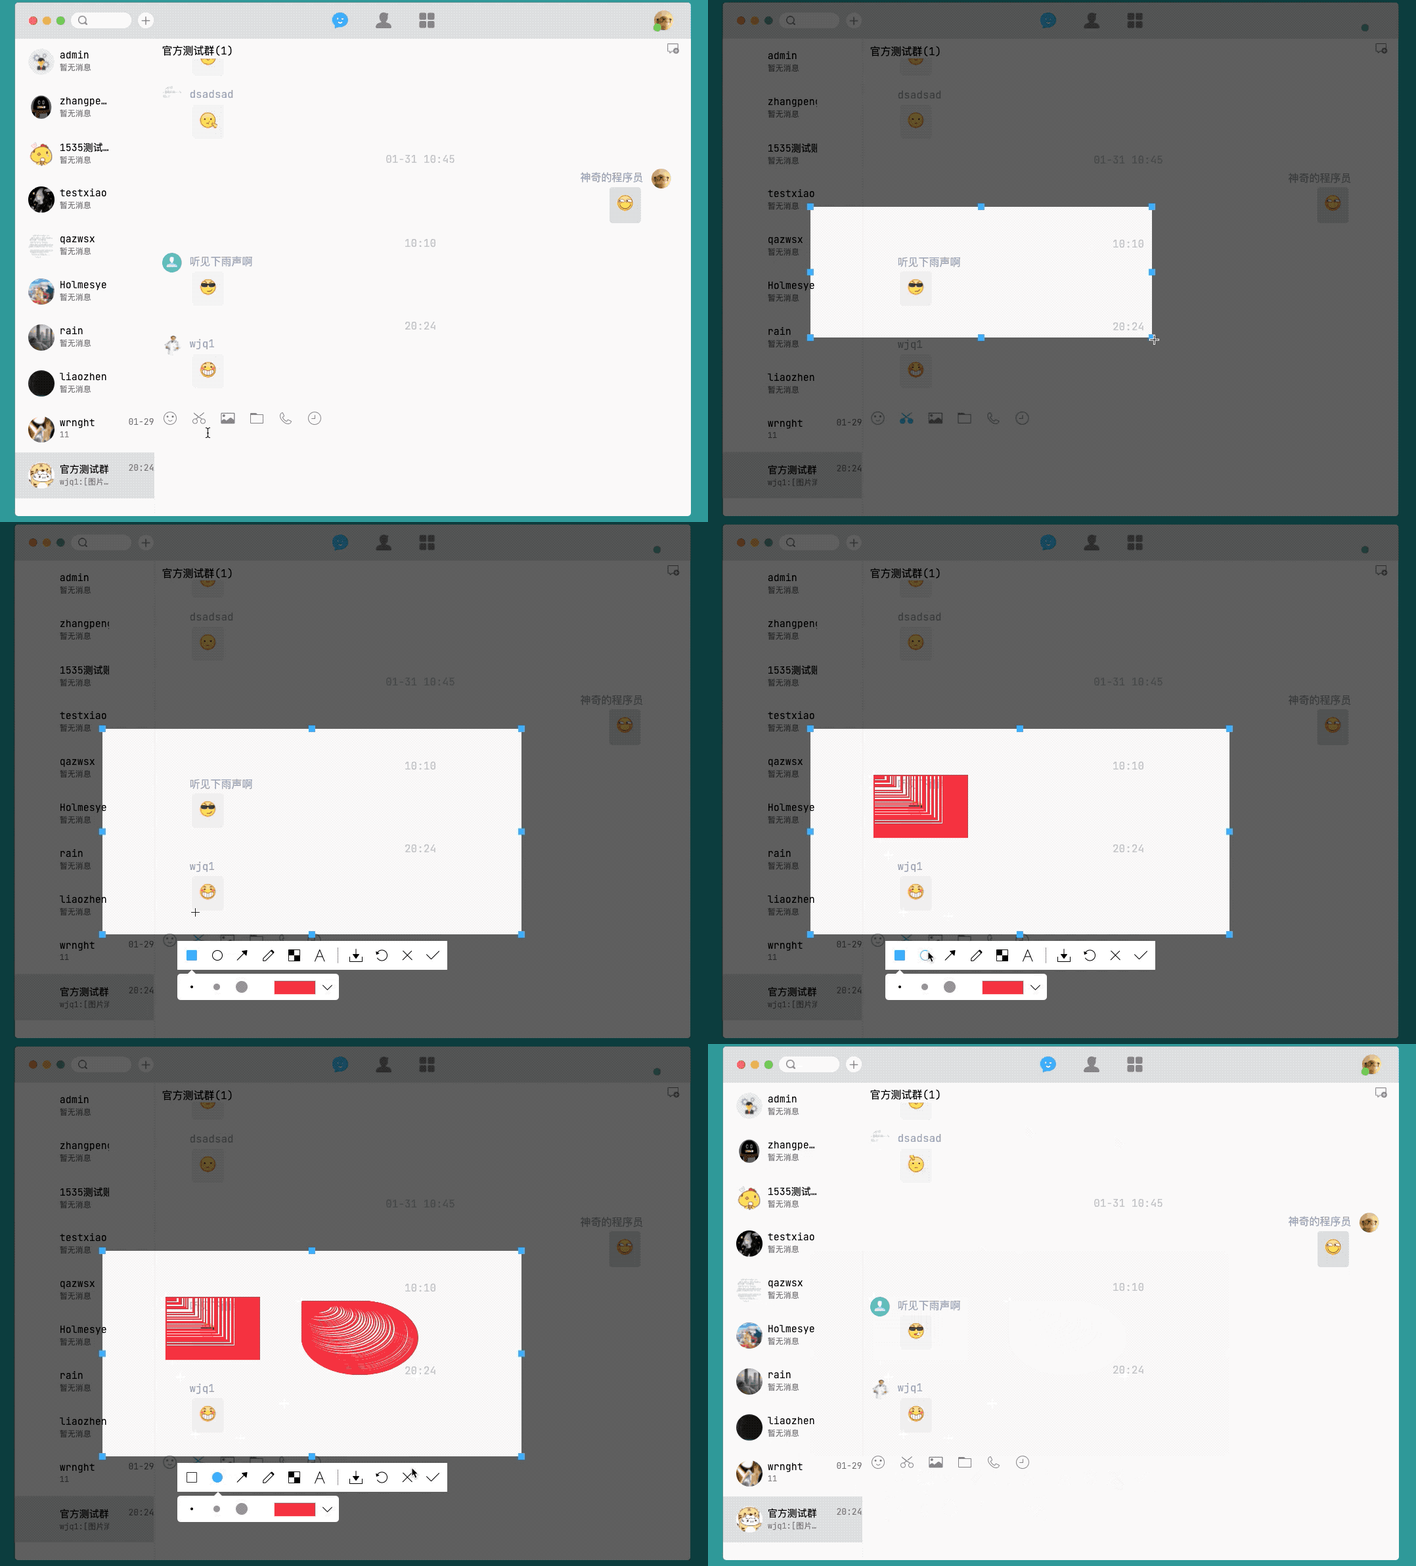
接下来,我们来看下如何使用历史记录来解决这个问题。
- 首先,我们需要定义一个数组变量,取名为
history。
private history: Array<Record<string, any>> = [];
- 当图形绘制结束鼠标抬起时,将当前画布状态保存至
history。
  /**
   * 保存当前画布状态
   * @private
   */
  private addHistoy() {
    if (
      this.screenShortCanvas != null &&
      this.screenShortController.value != null
    ) {
      // 获取canvas画布与容器
      const context = this.screenShortCanvas;
      const controller = this.screenShortController.value;
      if (this.history.length > this.maxUndoNum) {
        // 删除最早的一条画布记录
        this.history.unshift();
      }
      // 保存当前画布状态
      this.history.push({
        data: context.getImageData(0, 0, controller.width, controller.height)
      });
      // 启用撤销按钮
      this.data.setUndoStatus(true);
    }
  }
- 当鼠标处于移动状态时,我们取出
history中最后一条记录。
  /**
   * 显示最新的画布状态
   * @private
   */
  private showLastHistory() {
    if (this.screenShortCanvas != null) {
      const context = this.screenShortCanvas;
      if (this.history.length <= 0) {
        this.addHistoy();
      }
      context.putImageData(this.history[this.history.length - 1]["data"], 0, 0);
    }
  }
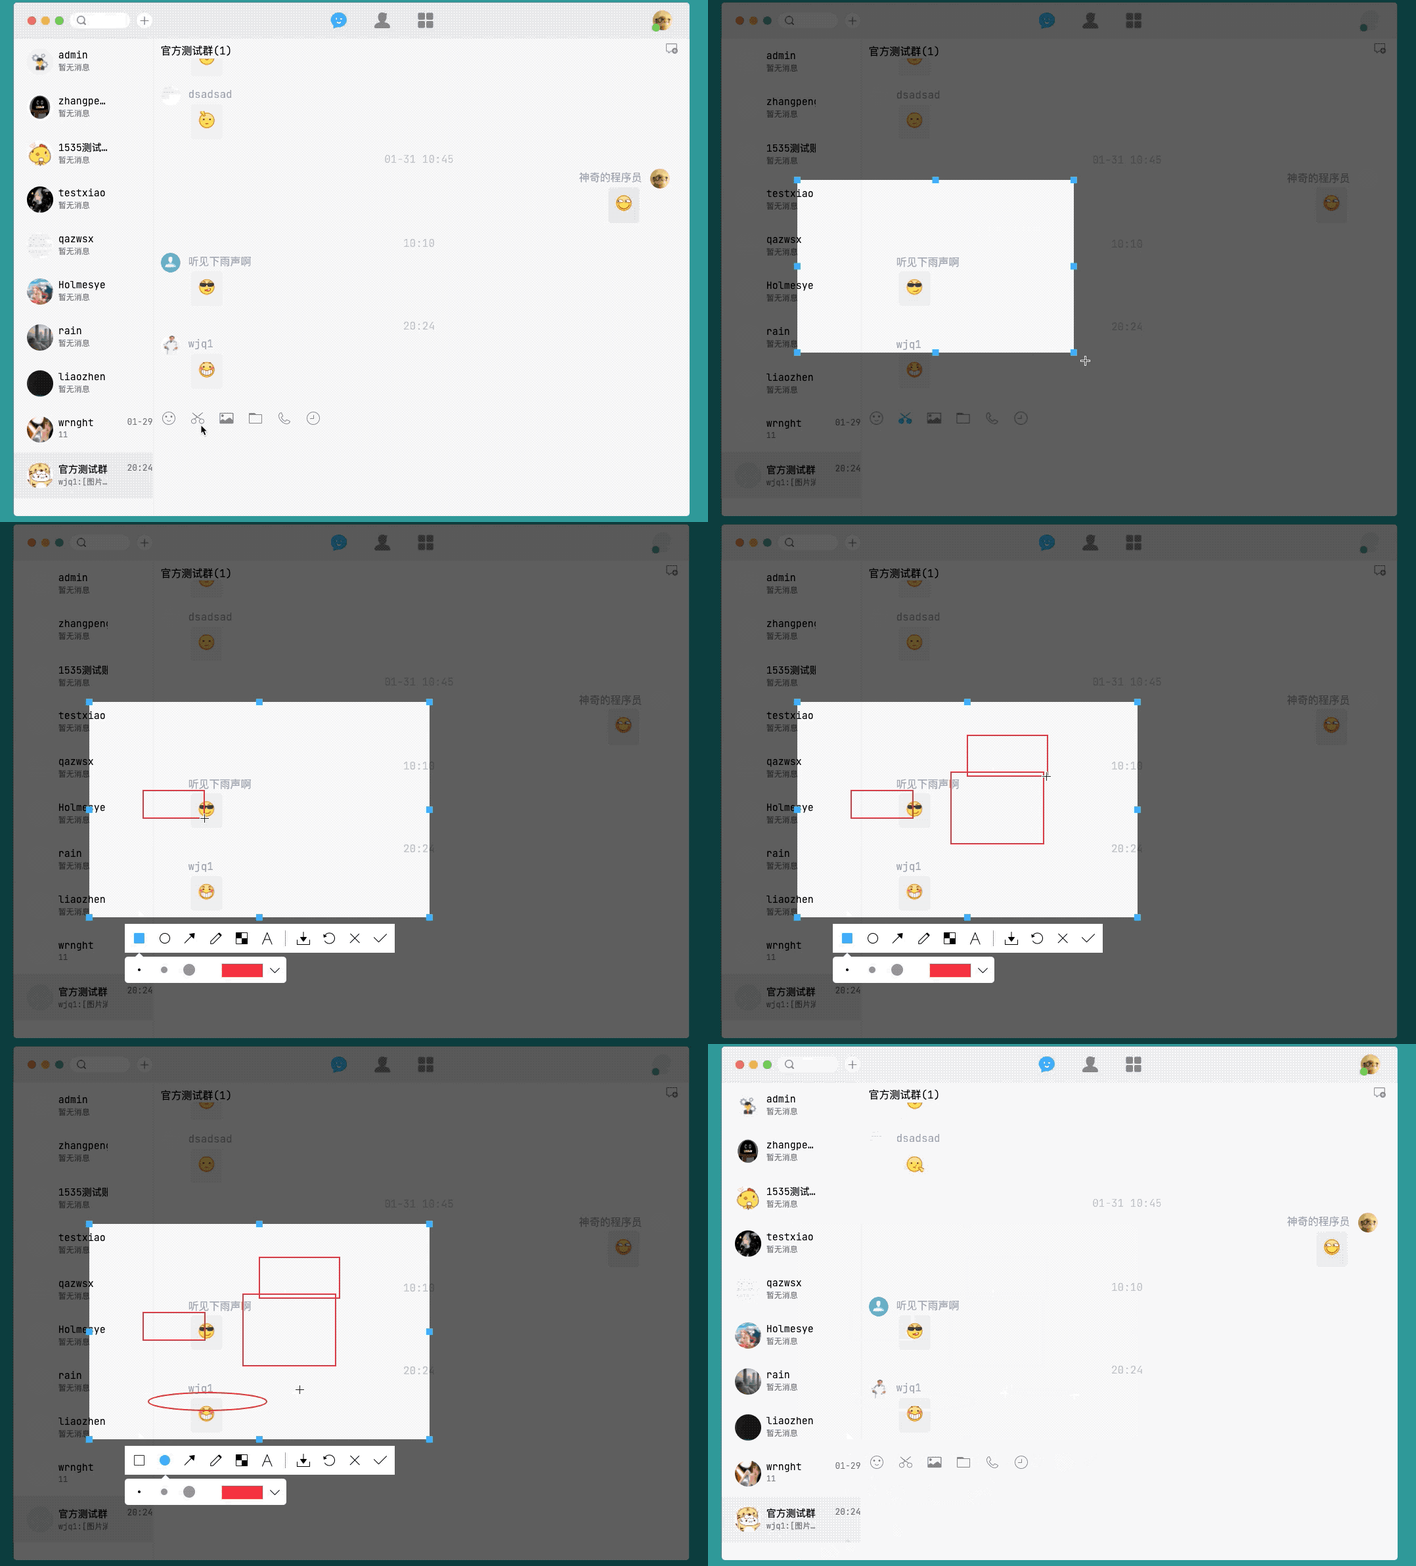
上述函数放在合适的时机执行,即可解决图形重复绘制的问题,接下来我们看下解决后的绘制效果,如下所示:
实现矩形绘制
在前面的分析中,我们拿到了鼠标的起始点坐标和鼠标移动时的坐标,我们可以通过这些数据计算出框选区域的宽高,如下所示。
// 获取鼠标起始点坐标
const { startX, startY } = this.drawGraphPosition;
// 获取当前鼠标坐标
const currentX = nonNegativeData(event.offsetX);
const currentY = nonNegativeData(event.offsetY);
// 裁剪框临时宽高
const tempWidth = currentX - startX;
const tempHeight = currentY - startY;
我们拿到这些数据后,即可通过canvas的rect这个API来绘制一个矩形了,代码如下所示:
/**
 * 绘制矩形
 * @param mouseX
 * @param mouseY
 * @param width
 * @param height
 * @param color 边框颜色
 * @param borderWidth 边框大小
 * @param context 需要进行绘制的canvas画布
 * @param controller 需要进行操作的canvas容器
 * @param imageController 图片canvas容器
 */
export function drawRectangle(
  mouseX: number,
  mouseY: number,
  width: number,
  height: number,
  color: string,
  borderWidth: number,
  context: CanvasRenderingContext2D,
  controller: HTMLCanvasElement,
  imageController: HTMLCanvasElement
) {
  context.save();
  // 设置边框颜色
  context.strokeStyle = color;
  // 设置边框大小
  context.lineWidth = borderWidth;
  context.beginPath();
  // 绘制矩形
  context.rect(mouseX, mouseY, width, height);
  context.stroke();
  // 绘制结束
  context.restore();
  // 使用drawImage将图片绘制到蒙层下方
  context.save();
  context.globalCompositeOperation = "destination-over";
  context.drawImage(
    imageController,
    0,
    0,
    controller?.width,
    controller?.height
  );
  // 绘制结束
  context.restore();
}
实现椭圆绘制
在绘制椭圆时,我们需要根据坐标信息计算出圆的半径、圆心坐标,随后调用ellipse函数即可绘制一个椭圆出来,代码如下所示:
/**
 * 绘制圆形
 * @param context 需要进行绘制的画布
 * @param mouseX 当前鼠标x轴坐标
 * @param mouseY 当前鼠标y轴坐标
 * @param mouseStartX 鼠标按下时的x轴坐标
 * @param mouseStartY 鼠标按下时的y轴坐标
 * @param borderWidth 边框宽度
 * @param color 边框颜色
 */
export function drawCircle(
  context: CanvasRenderingContext2D,
  mouseX: number,
  mouseY: number,
  mouseStartX: number,
  mouseStartY: number,
  borderWidth: number,
  color: string
) {
  // 坐标边界处理,解决反向绘制椭圆时的报错问题
  const startX = mouseX < mouseStartX ? mouseX : mouseStartX;
  const startY = mouseY < mouseStartY ? mouseY : mouseStartY;
  const endX = mouseX >= mouseStartX ? mouseX : mouseStartX;
  const endY = mouseY >= mouseStartY ? mouseY : mouseStartY;
  // 计算圆的半径
  const radiusX = (endX - startX) * 0.5;
  const radiusY = (endY - startY) * 0.5;
  // 计算圆心的x、y坐标
  const centerX = startX + radiusX;
  const centerY = startY + radiusY;
  // 开始绘制
  context.save();
  context.beginPath();
  context.lineWidth = borderWidth;
  context.strokeStyle = color;

  if (typeof context.ellipse === "function") {
    // 绘制圆,旋转角度与起始角度都为0,结束角度为2*PI
    context.ellipse(centerX, centerY, radiusX, radiusY, 0, 0, 2 * Math.PI);
  } else {
    throw "你的浏览器不支持ellipse,无法绘制椭圆";
  }
  context.stroke();
  context.closePath();
  // 结束绘制
  context.restore();
}
⚠️注释已经写的很清楚了,此处用到的API有:beginPath、lineWidth、ellipse、closePath,对这些API不熟悉的开发者请移步到指定位置进行查阅。
实现箭头绘制
箭头绘制相比其他工具来说是最复杂的,因为我们需要通过三角函数来计算箭头两个点的坐标,通过三角函数中的反正切函数来计算箭头的角度
既然需要用到三角函数来实现,那我们先来看下我们的已知条件:
  /**
   * 已知:
   *    1. P1、P2的坐标
   *    2. 箭头斜线P3到P2直线的长度,P4与P3是对称的,因此P4到P2的长度等于P3到P2的长度
   *    3. 箭头斜线P3到P1、P2直线的夹角角度(θ),因为是对称的,所以P4与P1、P2直线的夹角角度是相等的
   * 求:
   *    P3、P4的坐标
   */
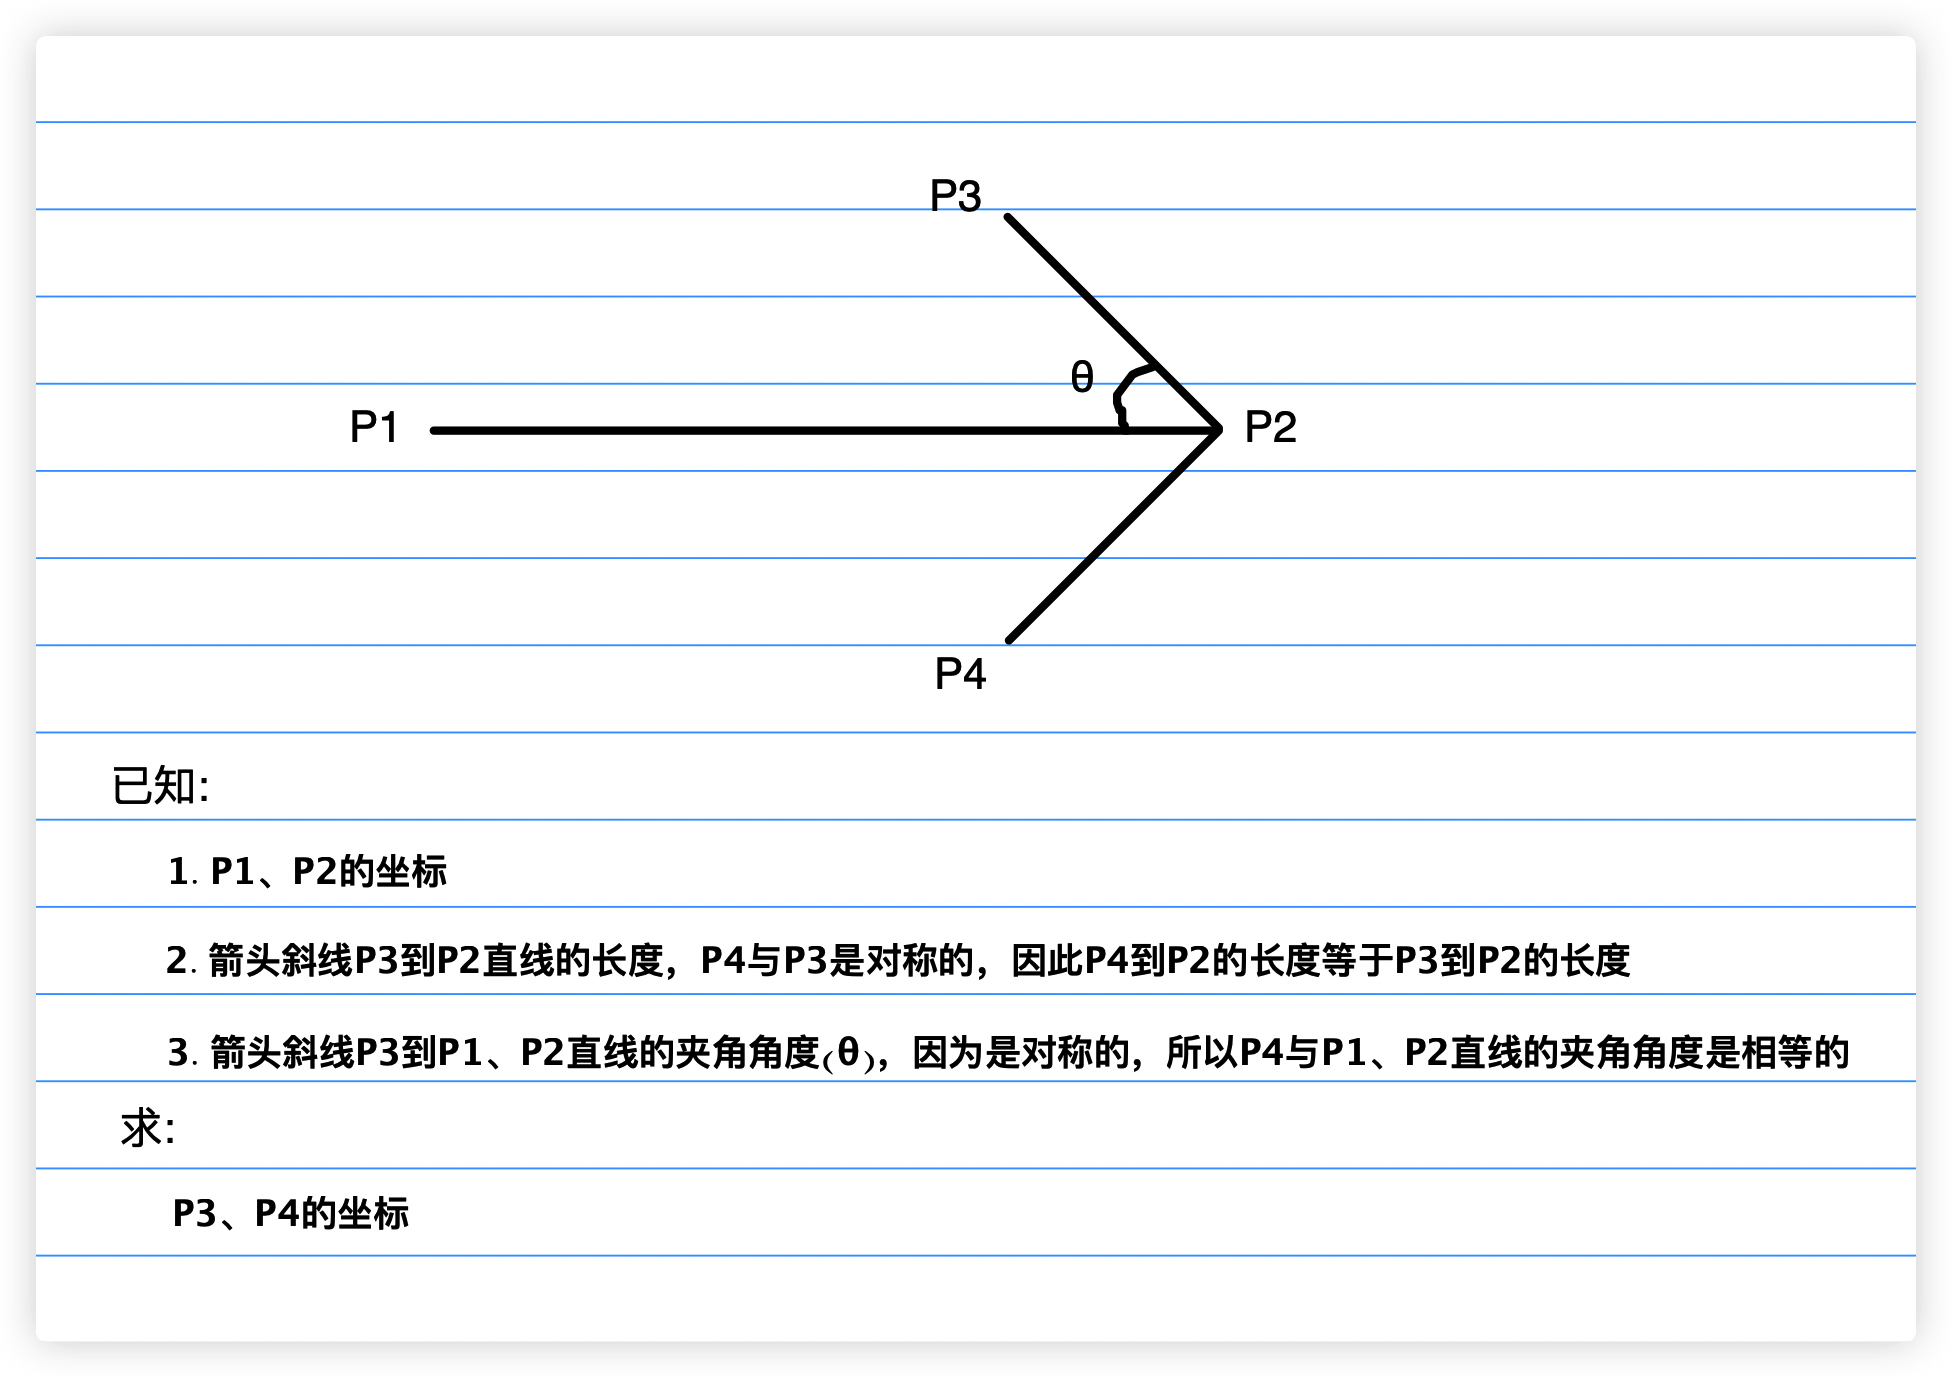
如上图所示,P1为鼠标按下时的坐标,P2为鼠标移动时的坐标,夹角θ的角度为30,我们知道这些信息后就可以求出P3和P4的坐标了,求出坐标后我们即可通过canvas的moveTo、lineTo来绘制箭头了。
实现代码如下:
/**
 * 绘制箭头
 * @param context 需要进行绘制的画布
 * @param mouseStartX 鼠标按下时的x轴坐标 P1
 * @param mouseStartY 鼠标按下式的y轴坐标 P1
 * @param mouseX 当前鼠标x轴坐标 P2
 * @param mouseY 当前鼠标y轴坐标 P2
 * @param theta 箭头斜线与直线的夹角角度 (θ) P3 ---> (P1、P2) || P4 ---> P1(P1、P2)
 * @param headlen 箭头斜线的长度 P3 ---> P2 || P4 ---> P2
 * @param borderWidth 边框宽度
 * @param color 边框颜色
 */
export function drawLineArrow(
  context: CanvasRenderingContext2D,
  mouseStartX: number,
  mouseStartY: number,
  mouseX: number,
  mouseY: number,
  theta: number,
  headlen: number,
  borderWidth: number,
  color: string
) {
  /**
   * 已知:
   *    1. P1、P2的坐标
   *    2. 箭头斜线(P3 || P4) ---> P2直线的长度
   *    3. 箭头斜线(P3 || P4) ---> (P1、P2)直线的夹角角度(θ)
   * 求:
   *    P3、P4的坐标
   */
  const angle =
      (Math.atan2(mouseStartY - mouseY, mouseStartX - mouseX) * 180) / Math.PI, // 通过atan2来获取箭头的角度
    angle1 = ((angle + theta) * Math.PI) / 180, // P3点的角度
    angle2 = ((angle - theta) * Math.PI) / 180, // P4点的角度
    topX = headlen * Math.cos(angle1), // P3点的x轴坐标
    topY = headlen * Math.sin(angle1), // P3点的y轴坐标
    botX = headlen * Math.cos(angle2), // P4点的X轴坐标
    botY = headlen * Math.sin(angle2); // P4点的Y轴坐标

  // 开始绘制
  context.save();
  context.beginPath();

  // P3的坐标位置
  let arrowX = mouseStartX - topX,
    arrowY = mouseStartY - topY;

  // 移动笔触到P3坐标
  context.moveTo(arrowX, arrowY);
  // 移动笔触到P1
  context.moveTo(mouseStartX, mouseStartY);
  // 绘制P1到P2的直线
  context.lineTo(mouseX, mouseY);
  // 计算P3的位置
  arrowX = mouseX + topX;
  arrowY = mouseY + topY;
  // 移动笔触到P3坐标
  context.moveTo(arrowX, arrowY);
  // 绘制P2到P3的斜线
  context.lineTo(mouseX, mouseY);
  // 计算P4的位置
  arrowX = mouseX + botX;
  arrowY = mouseY + botY;
  // 绘制P2到P4的斜线
  context.lineTo(arrowX, arrowY);
  // 上色
  context.strokeStyle = color;
  context.lineWidth = borderWidth;
  // 填充
  context.stroke();
  // 结束绘制
  context.restore();
}
实现画笔绘制
画笔的绘制我们需要通过lineTo来实现,不过在绘制时需要注意:在鼠标按下时需要通过beginPath来清空一条路径,并移动画笔笔触到鼠标按下时的位置,否则鼠标的起始位置始终是0,bug如下所示:
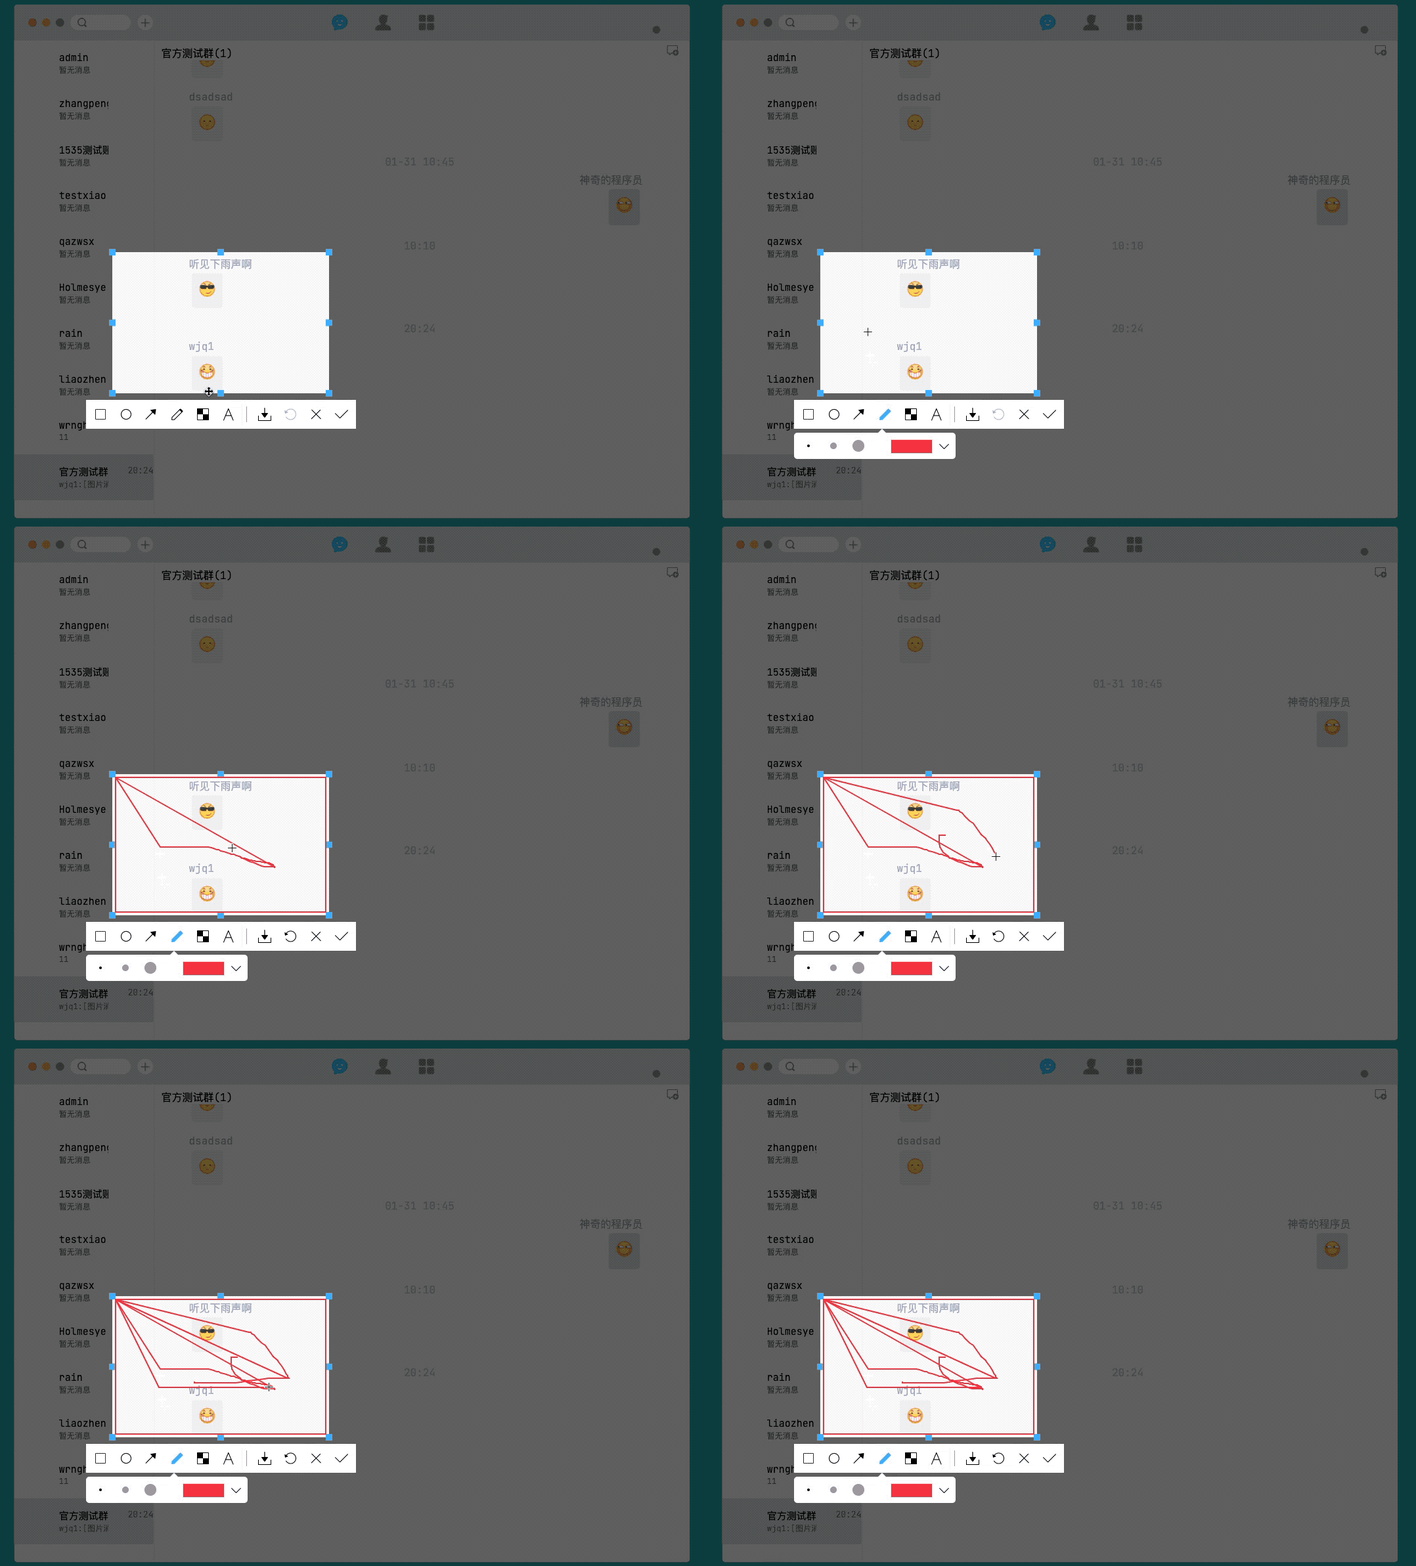
那么要解决这个bug,就需要在鼠标按下时初始化一下笔触位置,代码如下:
/**
 * 画笔初始化
 */
export function initPencli(
  context: CanvasRenderingContext2D,
  mouseX: number,
  mouseY: number
) {
  // 开始||清空一条路径
  context.beginPath();
  // 移动画笔位置
  context.moveTo(mouseX, mouseY);
}
随后,再鼠标位置时根据坐标信息绘制线条即可,代码如下:
/**
 * 画笔绘制
 * @param context
 * @param mouseX
 * @param mouseY
 * @param size
 * @param color
 */
export function drawPencli(
  context: CanvasRenderingContext2D,
  mouseX: number,
  mouseY: number,
  size: number,
  color: string
) {
  // 开始绘制
  context.save();
  // 设置边框大小
  context.lineWidth = size;
  // 设置边框颜色
  context.strokeStyle = color;
  context.lineTo(mouseX, mouseY);
  context.stroke();
  // 绘制结束
  context.restore();
}
实现马赛克绘制
我们都知道图片是由一个个像素点构成的,当我们把某个区域的像素点设置成同样的颜色,这块区域的信息就会被破坏掉,被我们破坏掉的区域就叫马赛克。
知道马赛克的原理后,我们就可以分析出实现思路:
- 获取鼠标划过路径区域的图像信息
- 将区域内的像素点绘制成周围相近的颜色
具体的实现代码如下:
/**
 * 获取图像指定坐标位置的颜色
 * @param imgData 需要进行操作的图片
 * @param x x点坐标
 * @param y y点坐标
 */
const getAxisColor = (imgData: ImageData, x: number, y: number) => {
  const w = imgData.width;
  const d = imgData.data;
  const color = [];
  color[0] = d[4 * (y * w + x)];
  color[1] = d[4 * (y * w + x) + 1];
  color[2] = d[4 * (y * w + x) + 2];
  color[3] = d[4 * (y * w + x) + 3];
  return color;
};

/**
 * 设置图像指定坐标位置的颜色
 * @param imgData 需要进行操作的图片
 * @param x x点坐标
 * @param y y点坐标
 * @param color 颜色数组
 */
const setAxisColor = (
  imgData: ImageData,
  x: number,
  y: number,
  color: Array<number>
) => {
  const w = imgData.width;
  const d = imgData.data;
  d[4 * (y * w + x)] = color[0];
  d[4 * (y * w + x) + 1] = color[1];
  d[4 * (y * w + x) + 2] = color[2];
  d[4 * (y * w + x) + 3] = color[3];
};

/**
 * 绘制马赛克
 *    实现思路:
 *      1. 获取鼠标划过路径区域的图像信息
 *      2. 将区域内的像素点绘制成周围相近的颜色
 * @param mouseX 当前鼠标X轴坐标
 * @param mouseY 当前鼠标Y轴坐标
 * @param size 马赛克画笔大小
 * @param degreeOfBlur 马赛克模糊度
 * @param context 需要进行绘制的画布
 */
export function drawMosaic(
  mouseX: number,
  mouseY: number,
  size: number,
  degreeOfBlur: number,
  context: CanvasRenderingContext2D
) {
  // 获取鼠标经过区域的图片像素信息
  const imgData = context.getImageData(mouseX, mouseY, size, size);
  // 获取图像宽高
  const w = imgData.width;
  const h = imgData.height;
  // 等分图像宽高
  const stepW = w / degreeOfBlur;
  const stepH = h / degreeOfBlur;
  // 循环画布像素点
  for (let i = 0; i < stepH; i++) {
    for (let j = 0; j < stepW; j++) {
      // 随机获取一个小方格的随机颜色
      const color = getAxisColor(
        imgData,
        j * degreeOfBlur + Math.floor(Math.random() * degreeOfBlur),
        i * degreeOfBlur + Math.floor(Math.random() * degreeOfBlur)
      );
      // 循环小方格的像素点
      for (let k = 0; k < degreeOfBlur; k++) {
        for (let l = 0; l < degreeOfBlur; l++) {
          // 设置小方格的颜色
          setAxisColor(
            imgData,
            j * degreeOfBlur + l,
            i * degreeOfBlur + k,
            color
          );
        }
      }
    }
  }
  // 渲染打上马赛克后的图像信息
  context.putImageData(imgData, mouseX, mouseY);
}
实现文字绘制
canvas没有直接提供API来供我们输入文字,但是它提供了填充文本的API,因此我们需要一个div来让用户输入文字,用户输入完成后将输入的文字填充到指定区域即可。
实现的效果如下:

- 在组件中创建一个div,开启div的可编辑属性,布局好样式
<template>
  <teleport to="body">
        <!--文本输入区域-->
    <div
      id="textInputPanel"
      ref="textInputController"
      v-show="textStatus"
      contenteditable="true"
      spellcheck="false"
    ></div>
  </teleport>
</template>
- 鼠标按下时,计算文本输入区域位置
// 计算文本框显示位置
const textMouseX = mouseX - 15;
const textMouseY = mouseY - 15;
// 修改文本区域位置
this.textInputController.value.style.left = textMouseX + "px";
this.textInputController.value.style.top = textMouseY + "px";
- 输入框位置发生变化时代表用户输入完毕,将用户输入的内容渲染到canvas,绘制文本的代码如下
/**
 * 绘制文本
 * @param text 需要进行绘制的文字
 * @param mouseX 绘制位置的X轴坐标
 * @param mouseY 绘制位置的Y轴坐标
 * @param color 字体颜色
 * @param fontSize 字体大小
 * @param context 需要你行绘制的画布
 */
export function drawText(
  text: string,
  mouseX: number,
  mouseY: number,
  color: string,
  fontSize: number,
  context: CanvasRenderingContext2D
) {
  // 开始绘制
  context.save();
  context.lineWidth = 1;
  // 设置字体颜色
  context.fillStyle = color;
  context.textBaseline = "middle";
  context.font = `bold ${fontSize}px 微软雅黑`;
  context.fillText(text, mouseX, mouseY);
  // 结束绘制
  context.restore();
}
实现下载功能
下载功能比较简单,我们只需要将裁剪框区域的内容放进一个新的canvas中,然后调用toDataURL方法就能拿到图片的base64地址,我们创建一个a标签,添加download属性,出发a标签的点击事件即可下载。
实现代码如下:
export function saveCanvasToImage(
  context: CanvasRenderingContext2D,
  startX: number,
  startY: number,
  width: number,
  height: number
) {
  // 获取裁剪框区域图片信息
  const img = context.getImageData(startX, startY, width, height);
  // 创建canvas标签,用于存放裁剪区域的图片
  const canvas = document.createElement("canvas");
  canvas.width = width;
  canvas.height = height;
  // 获取裁剪框区域画布
  const imgContext = canvas.getContext("2d");
  if (imgContext) {
    // 将图片放进裁剪框内
    imgContext.putImageData(img, 0, 0);
    const a = document.createElement("a");
    // 获取图片
    a.href = canvas.toDataURL("png");
    // 下载图片
    a.download = `${new Date().getTime()}.png`;
    a.click();
  }
}
实现撤销功能
由于我们绘制图形采用了历史记录模式,每次图形绘制都会存储一次画布状态,我们只需要在点击撤销按钮时,从history弹出一最后一条记录即可。
实现代码如下:
/**
 * 取出一条历史记录
 */
private takeOutHistory() {
  const lastImageData = this.history.pop();
  if (this.screenShortCanvas != null && lastImageData) {
    const context = this.screenShortCanvas;
    if (this.undoClickNum == 0 && this.history.length > 0) {
      // 首次取出需要取两条历史记录
      const firstPopImageData = this.history.pop() as Record<string, any>;
      context.putImageData(firstPopImageData["data"], 0, 0);
    } else {
      context.putImageData(lastImageData["data"], 0, 0);
    }
  }

  this.undoClickNum++;
  // 历史记录已取完,禁用撤回按钮点击
  if (this.history.length <= 0) {
    this.undoClickNum = 0;
    this.data.setUndoStatus(false);
  }
}
实现关闭功能
关闭功能指的是重置截图组件,因此我们需要通过emit向父组件推送销毁的消息。
实现代码如下:
  /**
   * 重置组件
   */
  private resetComponent = () => {
    if (this.emit) {
      // 隐藏截图工具栏
      this.data.setToolStatus(false);
      // 初始化响应式变量
      this.data.setInitStatus(true);
      // 销毁组件
      this.emit("destroy-component", false);
      return;
    }
    throw "组件重置失败";
  };
实现确认功能
当用户点击确认后,我们需要将裁剪框内的内容转为base64,然后通过emit推送给付组件,最后重置组件。
实现代码如下:
const base64 = this.getCanvasImgData(false);
this.emit("get-image-data", base64);
插件地址
至此,插件的实现过程就分享完毕了。
-
插件在线体验地址:chat-system
-
插件GitHub仓库地址:screen-shot
-
开源项目地址:chat-system-github
写在最后
- 文中如有错误,欢迎在评论区指正,如果这篇文章帮到了你,欢迎点赞和关注😊
- 未经许可禁止转载💌


 1621
1621

 被折叠的 条评论
为什么被折叠?


