


前言
在Spring Security整合oauth2实现认证token也不满足实际生产需求的时候,可以整合Jwt实现token认证,完全手写获取token,认证token的方法。
Maven依赖包
<dependency>
    <groupId>com.auth0</groupId>
    <artifactId>java-jwt</artifactId>
    <version>3.11.0</version>
</dependency>
业务实现
1、创建Jwt生成验证token工具类
import com.auth0.jwt.JWT;
import com.auth0.jwt.JWTVerifier;
import com.auth0.jwt.algorithms.Algorithm;
import com.auth0.jwt.exceptions.JWTVerificationException;
import com.auth0.jwt.interfaces.DecodedJWT;
import com.bw.dsm.entity.base.TokenEntity;
import org.slf4j.Logger;
import org.slf4j.LoggerFactory;

import java.util.*;

public class AppJwtUtil {

    private static final Logger LOGGER = LoggerFactory.getLogger(AppJwtUtil.class);

    public static final String secretKey = "asdfghjklsed";

    public static final long tokenExpireTime = 7200000;//#token过期时间:单位毫秒 2个小时

    public static final long refreshTokenExpireTime = 72000000000L;//refreshToken过期时间:单位毫秒

    public static final String jwtRefreshTokenKeyFormat = "jwt_refresh_token:";//refreshToken 存储key

    public static final String jwtBlacklistKeyFormat = "jwt_black_key:";//#token黑名单 存储key

    /**
     * 生成jwt
     *
     * @param platformID
     * @return
     */
    public static String buildJWT(String platformID,String platformSecret) {

        Date now = new Date();
        Algorithm algo = Algorithm.HMAC256(secretKey);
        String token = JWT.create()
                .withIssuer("MING")
                .withIssuedAt(now)
                .withExpiresAt(new Date(now.getTime() + tokenExpireTime))
                .withClaim("platformID", platformID)// 保存身份标识
                .withClaim("platformSecret",platformSecret)
                .sign(algo);
        return token;
    }

    /**
     * JWT验证
     *
     * @param token
     * @return userName
     */
    public static TokenEntity verifyJWT(String token) {
        TokenEntity tokenEntity = new TokenEntity();
        try {
            Algorithm algorithm = Algorithm.HMAC256(secretKey);
            JWTVerifier verifier = JWT.require(algorithm)
                    .withIssuer("MING")
                    .build();
            DecodedJWT jwt = verifier.verify(token);
            tokenEntity.setPlatformID(jwt.getClaim("platformID").asString());
            tokenEntity.setPlatformSecret(jwt.getClaim("platformSecret").asString());
            return tokenEntity;
        } catch (JWTVerificationException e) {
            LOGGER.error(e.getMessage(), e);
            return tokenEntity;
        }
    }

}
2、创建/oauth/token接口获取token
@RestController
@RequestMapping("/interaction/v1")
public class IndexController {

    @Value("${base.param.platformID}")
    private String platformID;

    @Value("${base.param.platformSecret}")
    private String platformSecret;

    @RequestMapping(value = "/oauth/token",method = RequestMethod.POST)
    public String getToken(@RequestBody String getParamInfo){
        MsgResult msg = new MsgResult();
        TokenData tokenData = new TokenData();
        getParamInfo = getParamInfo.replace("[+]","+");
        try {
            // 校验生成服务消息主题
            String data = Common.validMessage( getParamInfo );
            TokenEntity tokenEntity = Common.makeEntity(data,TokenEntity.class);
            if (!platformID.equals(tokenEntity.getPlatformID())){
                tokenData.setFailReason(1);
                throw new BusinessException("4004","平台标识错误");
            }
            if (!platformSecret.equals(tokenEntity.getPlatformSecret())){
                tokenData.setFailReason(2);
                throw new BusinessException("4004","平台秘钥错误");
            }
            String token = AppJwtUtil.buildJWT(
                    tokenEntity.getPlatformID(),tokenEntity.getPlatformSecret());
            tokenData.setSuccstat(0);
            tokenData.setFailReason(0);
            tokenData.setAccessToken( token );
            tokenData.setExpiresIn(7200000);
            msg.setCode("0");
            msg.setMesg("请求成功");
        } catch (BusinessException b){
            msg.setCode(b.getCode());
            msg.setMesg(b.getMessage());
            tokenData.setSuccstat(1);
        } catch (Exception e){
            msg.setCode("500");
            msg.setMesg(e.getMessage());
            tokenData.setSuccstat(1);
            tokenData.setFailReason(3);
        }
        msg.setData(Common.AESJaiMi(Common.makeJson(tokenData)));
        return Common.msgResult(msg);
    }
}
这里是我的生产环境上的获取token接口,主要功能就是根据传递过来的参数使用Jwt工具类创建token,再组合成规定的返回格式返回给对方。
3、创建接口拦截验证token类
@Component
public class JwtInterceptors implements HandlerInterceptor {

    @Value("${base.param.platformID}")
    private String platformID;

    @Value("${base.param.platformSecret}")
    private String platformSecret;

    @Override
    public boolean preHandle(HttpServletRequest request, HttpServletResponse response, Object handler) throws Exception {
        MsgResult msg = new MsgResult();
        //获取请求头部令牌
        String auth = request.getHeader("Authorization");
        try {
            if (StringUtils.isNotBlank(auth) && auth.indexOf("Bearer") >= 0) {
                auth = auth.substring("Bearer ".length() - 1, auth.length()).trim();
            } else {
                throw new BusinessException("4002","Token错误");
            }
            TokenEntity tokenEntity = AppJwtUtil.verifyJWT(auth);
            if (!platformID.equals(tokenEntity.getPlatformID())){
                throw new BusinessException("4002","Token错误");
            }
            if (!platformSecret.equals(tokenEntity.getPlatformSecret())){
                throw new BusinessException("4002","Token错误");
            }
//            //验证令牌
//            DecodedJWT decodedJWT = JwtUtils.verify(token);
            return true;
        } catch (BusinessException b){
            msg.setCode(b.getCode());
            msg.setMesg(b.getMessage());
            msg.setData(Common.AESJaiMi(auth));
        } catch (Exception e){
            msg.setCode("500");
            msg.setMesg(e.getMessage());
            msg.setData(Common.AESJaiMi(auth));
        }
        // 转json
        String json = Common.msgResult(msg);
        response.setContentType("application/json;charset=utf-8");
        response.getWriter().println(json);
        return false;
    }
}
基于HandlerInterceptor的实现类,对接口进行拦截,然后获取接口传递过来的token,用Jwt工具类进行解密,如果token验证通过则返回true并放行接口,验证不通过则返回错误信息。
4、创建拦截路径类
@Configuration
public class WebConfigurer implements WebMvcConfigurer {
@Autowired
private JwtInterceptors jwtInterceptors;
@Override
public void addInterceptors(InterceptorRegistry registry) {
registry.addInterceptor(jwtInterceptors)
// 放行接口
.excludePathPatterns("/interaction/v1/oauth/token")
.addPathPatterns("/**");
}
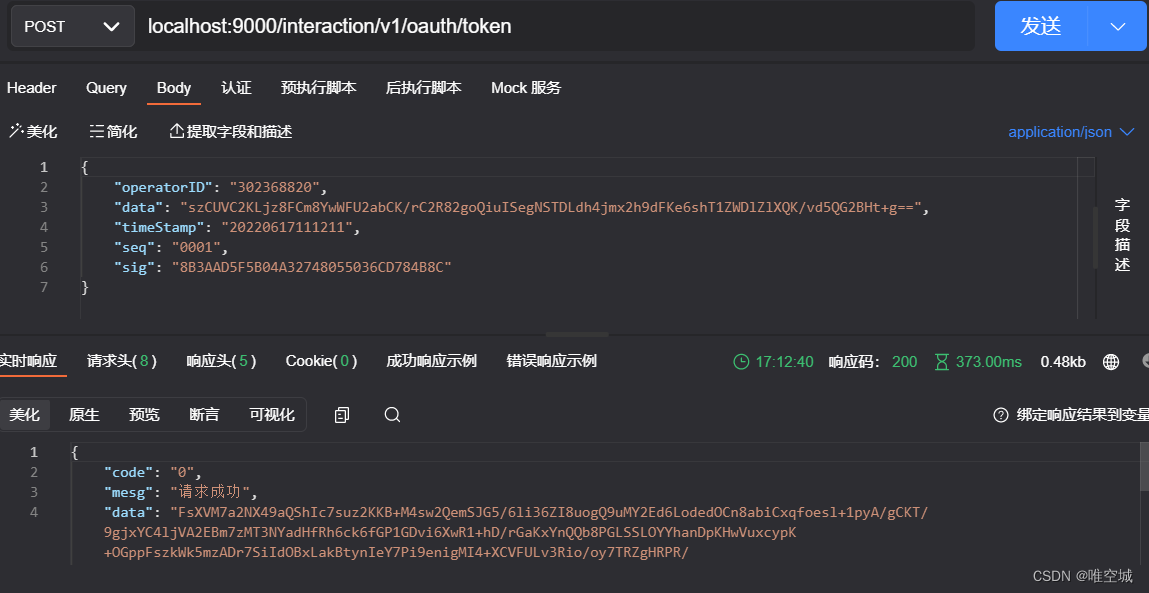
}5、测试获取token接口
至此功能实现。


 1010
1010


 被折叠的 条评论
为什么被折叠?
被折叠的 条评论
为什么被折叠?
 到【灌水乐园】发言


