


@Cacheable:查询数据,如果缓存中有,直接从缓存中取,如果没有执行方法中代码获取结果,并存入缓存中。
@CachePut:修改缓存的值
@EnableCaching:项目启动时扫描缓存注解
话不多说,直接开始上代码。
1.创建缓存服务
下面service中写了两个方法,一个是查询缓存,一个是修改缓存
 package com.youyou.address.service;

import org.springframework.cache.annotation.CachePut;
import org.springframework.cache.annotation.Cacheable;
import org.springframework.stereotype.Service;

import java.util.ArrayList;
import java.util.List;

/**
 * 这是一个测试缓存service
 *
 * @author 刘朋
 * <br/>date 2018-10-24
 */

@Service
public class CacheService {

    /**
     * 查询缓存,缓存的名字是testList,用key来标识
     * @param key
     * @return
     */
    @Cacheable(cacheNames = "testList" , key = "#key")
    public List<String> testCache(String key){
        List<String> list = new ArrayList<>();
        list.add("a");
        list.add("b");
        list.add("c");
        list.add(key);
        return list;
    }

    /**
     * 修改缓存,缓存的名字是testList,用key来标识
     * @param key
     * @return
     */
    @CachePut(cacheNames = "testList" , key = "#key")
    public List<String> testPutCache(String key){
        List<String> list = new ArrayList<>();
        list.add("1");
        list.add("2");
        list.add("3");
        list.add(key);
        return list;
    }
}
2.添加缓存扫描
在启动类上添加缓存扫描注解
 package com.youyou;

import org.mybatis.spring.annotation.MapperScan;
import org.springframework.boot.SpringApplication;
import org.springframework.boot.autoconfigure.SpringBootApplication;
import org.springframework.boot.web.servlet.ServletComponentScan;
import org.springframework.cache.annotation.EnableCaching;
import org.springframework.scheduling.annotation.EnableScheduling;

@SpringBootApplication
@MapperScan("com.youyou.*")//将项目中对应的mapper类的路径加进来就可以了
@EnableCaching  //如果想启动缓存,需要加此注解
public class WorldMainApplication {

    public static void main(String[] args) {
        //启动项目
        SpringApplication.run(WorldMainApplication.class, args);
    }
}
到此为止缓存服务已经创建完成。
来让我们测试一下!
 package com.youyou.address;

import com.youyou.address.service.CacheService;
import org.springframework.beans.factory.annotation.Autowired;
import org.springframework.web.bind.annotation.GetMapping;
import org.springframework.web.bind.annotation.RequestMapping;
import org.springframework.web.bind.annotation.RestController;
import io.swagger.annotations.Api;
import io.swagger.annotations.ApiImplicitParam;
import io.swagger.annotations.ApiImplicitParams;
import io.swagger.annotations.ApiOperation;

import java.util.List;

/**
 * //TODO 添加类/接口功能描述
 *
 * @author 刘朋
 * <br/>date 2018-09-06
 */

@Api(description = "第一个接口")
@RestController
@RequestMapping("/hello")
public class HelloWorldController {

    @Autowired
    private CacheService cacheService ;

    @ApiOperation(value = "测试缓存" )
    @GetMapping("/testCache")
    public String testCache(){
       //第一次中缓存中查询
        List<String> test = cacheService.testCache("test");
        System.out.println(test);

        //修改缓存中的值
        List<String> test2 = cacheService.testPutCache("test");
        System.out.println(test2);

        //再次从缓存中查询
        List<String> test3 = cacheService.testCache("test");
        System.out.println(test3);
        return "";
    }

}
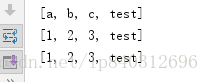
访问接口查看打印结果如下:


 396
396


 被折叠的 条评论
为什么被折叠?
被折叠的 条评论
为什么被折叠?
 到【灌水乐园】发言


