


简介
SpringSecurity集成到SpringBoot, 从而代替自己实现安全框架是一个较好的选择, 但SpringSecurity官方文档稍显晦涩, 而大部分博客内容又难以统一, 各执一词, 讲解含糊不清, 难以快速理解SpringSecurity的运作原理, 并快速应用到自己项目中.
本文是作者自己实践得出的基于前后端分离SpringBoot项目, 配置SpringSecurity的教程, 阅读本文, 你可以了解SpringSecurity认证过程中各种隐藏的点 (正是这些隐含的点让我们理解困难), 并轻松将其配置到自己的前后端分离项目中, 实现登入认证功能.
本文也借鉴学习了很多文章, 大家可以去那些文章深入了解一下, 补充一些内容.
文章较长, 可以保存收藏, 慢慢学习.
先决条件
作者还是新手, 所以部分内容可能讲的有出入, 欢迎指正.
本教程是基于前后端分离的SpringBoot项目上增加SpringSecurity, 需要一定的Springboot使用经验, 了解前后端分离的交互方式.
由于要使用到Redis, 所以需要在虚拟机中安装并配置Redis, 可以看作者的另一篇文章Redis安装与配置1.
实现功能
- 使用SpringSecurity实现用户登录的密码校验, 并将结果存入Redis, 返回token信息
- 携带token信息实现受限接口的访问
- 携带token信息实现用户登出操作

涉及技术
- SpringBoot, 提供基础的前后端web交互
- JWT, 选择的是jjwt, 用于token的创建和解析
- FastJson, 用于数据存入Redis的序列化和反序列化 (一堆坑)
- Redis, 用于用户登录状态的表示
- SpringSecurity, 用于用户登录认证及接口权限管理
- Mybatis, 数据库读取
相关的依赖导入:
<?xml version="1.0" encoding="UTF-8"?>
<project xmlns="http://maven.apache.org/POM/4.0.0" xmlns:xsi="http://www.w3.org/2001/XMLSchema-instance"
         xsi:schemaLocation="http://maven.apache.org/POM/4.0.0 http://maven.apache.org/xsd/maven-4.0.0.xsd">
    <modelVersion>4.0.0</modelVersion>

    <parent>
        <groupId>org.springframework.boot</groupId>
        <artifactId>spring-boot-starter-parent</artifactId>
        <version>2.5.6</version>
        <relativePath/> <!-- lookup parent from repository -->
    </parent>

    <groupId>bc208</groupId>
    <artifactId>bcblog-back</artifactId>
    <version>0.0.1-SNAPSHOT</version>
    <name>bcblog-back</name>
    <description>208bcblog</description>

    <properties>
        <java.version>17</java.version>
    </properties>

    <dependencies>
        <dependency>
            <groupId>org.springframework.boot</groupId>
            <artifactId>spring-boot-starter-web</artifactId>
            <!--            Web 场景启动器-->
        </dependency>
        <dependency>
            <groupId>org.mybatis.spring.boot</groupId>
            <artifactId>mybatis-spring-boot-starter</artifactId>
            <version>2.0.0</version>
        </dependency>
        <dependency>
            <groupId>mysql</groupId>
            <artifactId>mysql-connector-java</artifactId>
        </dependency>
        <dependency>
            <groupId>org.projectlombok</groupId>
            <artifactId>lombok</artifactId>
            <optional>true</optional>
        </dependency>

        <dependency>
            <groupId>org.springframework.boot</groupId>
            <artifactId>spring-boot-starter-test</artifactId>
            <scope>test</scope>
            <exclusions>
                <exclusion>
                    <groupId>org.junit.vintage</groupId>
                    <artifactId>junit-vintage-engine</artifactId>
                </exclusion>
            </exclusions>
        </dependency>

        <!--        热部署插件-->
        <dependency>
            <groupId>org.springframework.boot</groupId>
            <artifactId>spring-boot-devtools</artifactId>
            <scope>runtime</scope>
            <optional>true</optional>
        </dependency>

        <!--安全框架引入, 进行权限控制-->
        <dependency>
            <groupId>org.springframework.boot</groupId>
            <artifactId>spring-boot-starter-security</artifactId>
        </dependency>

        <dependency>
            <groupId>org.springframework.security</groupId>
            <artifactId>spring-security-test</artifactId>
            <scope>test</scope>
        </dependency>

        <dependency>
            <groupId>com.alibaba</groupId>
            <artifactId>fastjson</artifactId>
            <version>1.2.50</version>
        </dependency>
        <!--jwt依赖-->
        <dependency>
            <groupId>io.jsonwebtoken</groupId>
            <artifactId>jjwt</artifactId>
            <version>0.9.0</version>
        </dependency>

        <dependency>
            <groupId>javax.xml.bind</groupId>
            <artifactId>jaxb-api</artifactId>
            <version>2.3.1</version>
        </dependency>
        高版本的Java没用Javax, 会报错, 所以需要导入相关依赖

        <dependency>
            <groupId>org.springframework.boot</groupId>
            <artifactId>spring-boot-starter-data-redis</artifactId>
        </dependency>
    </dependencies>

    <build>
        <plugins>
            <plugin>
                <groupId>org.springframework.boot</groupId>
                <artifactId>spring-boot-maven-plugin</artifactId>
                <configuration>
                    <excludes>
                        <exclude>
                            <groupId>org.project-lombok</groupId>
                            <artifactId>lombok</artifactId>
                        </exclude>
                    </excludes>
                </configuration>
            </plugin>
        </plugins>

<!--        扫描Mapper文件-->
        <resources>
            <resource>
                <directory>src/main/java</directory>
                <includes>
                    <include>**/*.properties</include>
                    <include>**/*.xml</include>
                </includes>
                <filtering>false</filtering>
            </resource>
            <resource>
                <directory>src/main/resources</directory>
                <includes>
                    <include>**/*</include>
                </includes>
            </resource>
        </resources>
    </build>

</project>
项目结构
├─bcblog-back
│  ├─.idea
│  │  └─inspectionProfiles
│  ├─.mvn
│  │  └─wrapper
│  ├─src
│  │  ├─main
│  │  │  ├─java
│  │  │  │  └─com
│  │  │  │      └─bc208
│  │  │  │          └─blog
│  │  │  │              ├─common
│  │  │  │              │  ├─dto
│  │  │  │              │      └─ LoginDto 登入数据类
│  │  │  │              │  └─vo
│  │  │  │              │      └─ SecurityUser 安全信息类
│  │  │  │              ├─config
│  │  │  │              │  ├─auth
│  │  │  │              │      └─ JwtAuthenticationTokenFilter JWT过滤器
│  │  │  │              │      └─ WebSecurityConfig SpringSecurity安全配置类
│  │  │  │              │  └─redisCofig
│  │  │  │              │      └─ FastJsonRedisSerialize Redis序列化与反序列化类
│  │  │  │              │      └─ RedisCache Redis缓存配置类
│  │  │  │              │      └─ RedisConfig Redis序列化配置类
│  │  │  │              │  └─ CorsConfig 解决跨域问题配置类
│  │  │  │              ├─controller
│  │  │  │                 └─ UserController
│  │  │  │              ├─dao
│  │  │  │                 └─ UsersMapper.xml
│  │  │  │                 └─ UsersMapper
│  │  │  │              ├─pojo
│  │  │  │                 └─ User 用户实体类
│  │  │  │              ├─service
│  │  │  │                 └─impl
│  │  │  │                     └─ UserServiceImpl 用户服务类
│  │  │  │                 └─ UserService
│  │  │  │              └─utils 工具类
│  │  │  │                  └─ JwtUtil JWT工具类
│  │  │  │                  └─ ResultInfo 返回结果类
│  │  │  └─resources 配置文件
            └─ application.xml
            └─ application-dev.yaml
| pom.xml
基础代码
数据库样式
可以自行通过Navicat创建数据表.

实体类User
注意, 一切实体类都需要进行序列化, 这个知识点可以自行去了解. 而且序列化似乎会影响FastJson的使用, 如果不序列化可能会出现异常.
package com.bc208.blog.pojo;

import lombok.Data;

import java.io.Serial;
import java.io.Serializable;

/**
 * @author QingheLi
 */
@Data
public class User implements Serializable {

    @Serial
    private static final long serialVersionUID = -40356785423868312L;

    private Integer userId;
    private String userName;
    private String userEmail;
    private String userPassword;
    private String userRole;
    private String userToken;
    private Integer enabled;
    private Integer accountNoExpired;
    private Integer credentialsNoExpired;
    private Integer accountNoLocked;
}
后端返回类
用来封装UserServiceImpl各项服务的返回结果.
package com.bc208.blog.utils;

import com.fasterxml.jackson.annotation.JsonInclude;
import lombok.AllArgsConstructor;
import lombok.Data;
import lombok.NoArgsConstructor;


/**
 * @author QingheLi
 */
@Data
@NoArgsConstructor
@AllArgsConstructor
@JsonInclude(JsonInclude.Include.NON_NULL)
public class ResultInfo {
    private  Integer code;
    private  String msg;
    private  Object result = "null";


    public ResultInfo success(){
        return new ResultInfo(2000, "success", null);
    }

    public ResultInfo success(int code, String msg){
        return new ResultInfo(code, msg, null);
    }

    public ResultInfo success(int code, String msg, Object result){
        return new ResultInfo(code, msg, result);
    }

    public ResultInfo error(String msg){
        return new ResultInfo(5000, msg, null);
    }

    public ResultInfo error(Integer code, String msg){
        return new ResultInfo(code, msg, null);
    }

    /**
     * 模糊回复, 避免外人查看情况. 不能直接告诉外界出现什么错误
     */
    public ResultInfo error(){
        return new ResultInfo(5000, "system error", null);
    }

}
Jwt配置类
大部分JWT的配置都差不多, JWT只需要存入userid即可, 因为userid在数据库中是唯一的, 而且userid用于Redis缓存. 注意项目上线时候修改密匙.
package com.bc208.blog.utils;


import io.jsonwebtoken.Claims;
import io.jsonwebtoken.JwtBuilder;
import io.jsonwebtoken.Jwts;
import io.jsonwebtoken.SignatureAlgorithm;
import lombok.Data;
import lombok.extern.slf4j.Slf4j;
import org.springframework.stereotype.Component;

import javax.crypto.SecretKey;
import javax.crypto.spec.SecretKeySpec;
import java.util.Base64;
import java.util.Date;
import java.util.UUID;

@Component
@Slf4j
@Data
public class JwtUtil {

//    @Value("${mySecretKey}")
//    private String mySecretKey; //密钥 TODO:为什么没办法使用@Value读取配置文件中的内容
    private static final String JWT_KEY = "Hello"; //密钥
    private static final Long JWT_TTL = 1000 * 60 * 60 * 24 * 7L; //token有效时间7天

    public static String getUUID(){
        String token = UUID.randomUUID().toString().replaceAll("-","");
        return token;
    }

    public static String createJwt(String subject, Integer userid){
        JwtBuilder builder = getJwtBuilder(subject, getUUID(), userid);// 设置过期时间
        return builder.compact();
    }

    private static JwtBuilder getJwtBuilder(String subject, String uuid, Integer userid) {
        SignatureAlgorithm signatureAlgorithm = SignatureAlgorithm.HS256;
        SecretKey secretKey = generalKey();
        long nowMillis = System.currentTimeMillis();
        Date now = new Date(nowMillis);
        long expMillis = nowMillis + JwtUtil.JWT_TTL;
        Date expDate = new Date(expMillis);
        return Jwts.builder()
                .setId(uuid)              //唯一的ID
                .setSubject(subject)   // 主题  可以是JSON数据
                .setIssuer("Hello")     // 签发者
                .setIssuedAt(now)      // 签发时间
                .signWith(signatureAlgorithm, secretKey) //使用HS256对称加密算法签名, 第二个参数为秘钥
                .setExpiration(expDate)
                .claim("userId", userid)
                ;
    }

    /**
     * 生成加密后的秘钥 secretKey
     * @return
     */
    public static SecretKey generalKey() {
        byte[] encodedKey = Base64.getDecoder().decode(JwtUtil.JWT_KEY);
        SecretKey key = new SecretKeySpec(encodedKey, 0, encodedKey.length, "AES");
        return key;
    }

    /**
     * 解析
     * @param jwt
     * @return
     * @throws Exception
     */
    public static Claims parseJWT(String jwt) throws Exception {
        SecretKey secretKey = generalKey();
        return Jwts.parser()
                .setSigningKey(secretKey)
                .parseClaimsJws(jwt)
                .getBody();
    }
}
LoginDto
登入传数据用的Dto, 没什么好说的.
package com.bc208.blog.common.dto;

import lombok.Data;

import java.io.Serializable;

/**
 * @author QingheLi
 */
@Data
public class LoginDto implements Serializable {
    private String email;
    private String password;
}
RegisterDto
注册传数据用的Dto.
package com.bc208.blog.common.dto;

import lombok.Data;

import java.io.Serializable;

/**
 * @author QingheLi
 */
@Data
public class RegisterDto implements Serializable {
    private String username;
    private String email;
    private String password;
}
UserController
不必多说, 用户控制类.
一般我们不会在Controller中进行太多逻辑操作, 只是简单的逻辑判断和结果封装, 所以重点还是关注UserServiceImpl.
package com.bc208.blog.controller;

import com.bc208.blog.common.dto.LoginDto;
import com.bc208.blog.common.dto.RegisterDto;
import com.bc208.blog.common.dto.testDto;
import com.bc208.blog.service.impl.UsersServiceImpl;
import com.bc208.blog.utils.ResultInfo;
import lombok.extern.slf4j.Slf4j;
import org.springframework.beans.factory.annotation.Autowired;
import org.springframework.web.bind.annotation.*;

/**
 * @author QingheLi
 */
@Slf4j
@RestController
@RequestMapping("/bc208/")
public class UserController {

    @Autowired
    private UsersServiceImpl usersServiceImpl;

    @PostMapping("/login")
    @ResponseBody
    public ResultInfo userLogin(@RequestBody LoginDto user) throws Exception {
        try{
            log.info("Login successful");
            return new ResultInfo().success(2003, "User login success", usersServiceImpl.userLogin(user));
        }catch (Exception e){
            e.printStackTrace();
            log.info("Login failure");
            return new ResultInfo().error(5003, "User login fail");
        }
    }

    @PostMapping("/register")
    @ResponseBody
    public ResultInfo userRegister(@RequestBody RegisterDto registerDto) throws Exception {
        try{
            if (usersServiceImpl.userRegister(registerDto) == 1){
                log.info("User registration successful");
                return new ResultInfo().success(2005, "User registration success");
            }else{
                log.info("User registration failure");
                return new ResultInfo().error(5005, "User registration fail");
            }
        }catch (Exception e){
            e.printStackTrace();
            return new ResultInfo().error(5000, "system error");
        }
    }

    @PostMapping("/hello")
    @ResponseBody
    public ResultInfo hello(@RequestBody testDto test) {
        System.out.println(test.getTest());
        return new ResultInfo().success(2000, test.getTest());
    }

    @GetMapping("/logout")
    @ResponseBody
    public ResultInfo userLogout() {
        try {
            log.info("User logout");
            usersServiceImpl.userLogout();
            return new ResultInfo().success(2006, "User logout success");
        }catch (Exception e){
            e.printStackTrace();
            return new ResultInfo().error(5006, "User logout fail");
        }
    }
}
UserMapper
很普通的插入和查询语句
package com.bc208.blog.dao;

import com.bc208.blog.common.dto.DemandDto;
import com.bc208.blog.pojo.User;
import org.apache.ibatis.annotations.Mapper;

@Mapper
public interface UsersMapper {

    User queryUserByEmail(String userEmail);

    int registerUser(User user);

    User getByUserEmail(String email);

    User getByUserName(String userName);

}

<?xml version="1.0" encoding="UTF-8" ?>
<!DOCTYPE mapper PUBLIC "-//mybatis.org//DTD Mapper 3.0//EN" "http://mybatis.org/dtd/mybatis-3-mapper.dtd" >
<mapper namespace="com.bc208.blog.dao.UsersMapper">

    <select id="queryUserByEmail" resultType="com.bc208.blog.pojo.User">
        select * from user where userEmail=#{userEmail}
    </select>

    <select id="getByUserEmail" resultType="com.bc208.blog.pojo.User">
        select * from user where userEmail=#{email}
    </select>

    <select id="getByUserName" resultType="com.bc208.blog.pojo.User">
        select * from user where userName=#{userName}
    </select>

    <insert id="registerUser" parameterType="com.bc208.blog.pojo.User" statementType="PREPARED" keyProperty="userId">
        insert into user(userName, userEmail, userPassword, userRole, enabled, accountNoExpired,
                         credentialsNoExpired, accountNoLocked, userToken)
                values (#{userName}, #{userEmail}, #{userPassword}, #{userRole}, #{enabled}, #{accountNoExpired},
                                 #{credentialsNoExpired}, #{accountNoLocked}, #{userToken})
    </insert>

</mapper>
跨域解决配置类
这玩意网上很多.
package com.bc208.blog.config;

import org.springframework.context.annotation.Configuration;
import org.springframework.web.servlet.config.annotation.CorsRegistry;
import org.springframework.web.servlet.config.annotation.WebMvcConfigurer;

/**
 * 解决跨域问题
 * @author QingheLi
 */
@Configuration
public class CorsConfig implements WebMvcConfigurer {
    @Override
    public void addCorsMappings(CorsRegistry registry) {
        registry.addMapping("/**")
//               配置可被跨域的路径
//                .allowedOrigins("*")
                .allowedOriginPatterns("*")
//               允许所有的请求域名访问我们的跨域资源,可以固定单条或者多条内容
                .allowedMethods("GET", "HEAD", "POST", "PUT", "DELETE", "OPTIONS")
//               允许所有的请求方法访问该跨域资源服务器
                .allowCredentials(true)
                .maxAge(3600)
//               请求时间限制?
                .allowedHeaders("*");
//              允许所有的请求header访问,可以自定义设置任意请求头信息
    }
}
Redis配置
Redis很重要, 但在本文中Redis只是起辅助作用, 解析SpringSecurity的过程中不涉及Redis, 所以放基础代码这.
作者自己也没学Redis, 所以没办法解析太多, 但网上有很多类似的.
Redis缓存
package com.bc208.blog.config.redisCofig;

import org.springframework.beans.factory.annotation.Autowired;
import org.springframework.data.redis.core.BoundSetOperations;
import org.springframework.data.redis.core.HashOperations;
import org.springframework.data.redis.core.RedisTemplate;
import org.springframework.data.redis.core.ValueOperations;
import org.springframework.stereotype.Component;

import java.util.*;
import java.util.concurrent.TimeUnit;

@SuppressWarnings(value = { "unchecked", "rawtypes" })
@Component
public class RedisCache
{
    @Autowired
    public RedisTemplate redisTemplate;

    /**
     * 缓存基本的对象,Integer、String、实体类等
     *
     * @param key 缓存的键值
     * @param value 缓存的值
     */
    public <T> void setCacheObject(final String key, final T value)
    {
        redisTemplate.opsForValue().set(key, value);
    }

    /**
     * 缓存基本的对象,Integer、String、实体类等
     *
     * @param key 缓存的键值
     * @param value 缓存的值
     * @param timeout 时间
     * @param timeUnit 时间颗粒度
     */
    public <T> void setCacheObject(final String key, final T value, final Integer timeout, final TimeUnit timeUnit)
    {
        redisTemplate.opsForValue().set(key, value, timeout, timeUnit);
    }

    /**
     * 设置有效时间
     *
     * @param key Redis键
     * @param timeout 超时时间
     * @return true=设置成功;false=设置失败
     */
    public boolean expire(final String key, final long timeout)
    {
        return expire(key, timeout, TimeUnit.SECONDS);
    }

    /**
     * 设置有效时间
     *
     * @param key Redis键
     * @param timeout 超时时间
     * @param unit 时间单位
     * @return true=设置成功;false=设置失败
     */
    public boolean expire(final String key, final long timeout, final TimeUnit unit)
    {
        return redisTemplate.expire(key, timeout, unit);
    }

    /**
     * 获得缓存的基本对象。
     *
     * @param key 缓存键值
     * @return 缓存键值对应的数据
     */
    public <T> T getCacheObject(final String key)
    {
        ValueOperations<String, T> operation = redisTemplate.opsForValue();
        return operation.get(key);
    }

    /**
     * 删除单个对象
     *
     * @param key
     */
    public boolean deleteObject(final String key)
    {
        return redisTemplate.delete(key);
    }

    /**
     * 删除集合对象
     *
     * @param collection 多个对象
     * @return
     */
    public long deleteObject(final Collection collection)
    {
        return redisTemplate.delete(collection);
    }

    /**
     * 缓存List数据
     *
     * @param key 缓存的键值
     * @param dataList 待缓存的List数据
     * @return 缓存的对象
     */
    public <T> long setCacheList(final String key, final List<T> dataList)
    {
        Long count = redisTemplate.opsForList().rightPushAll(key, dataList);
        return count == null ? 0 : count;
    }

    /**
     * 获得缓存的list对象
     *
     * @param key 缓存的键值
     * @return 缓存键值对应的数据
     */
    public <T> List<T> getCacheList(final String key)
    {
        return redisTemplate.opsForList().range(key, 0, -1);
    }

    /**
     * 缓存Set
     *
     * @param key 缓存键值
     * @param dataSet 缓存的数据
     * @return 缓存数据的对象
     */
    public <T> BoundSetOperations<String, T> setCacheSet(final String key, final Set<T> dataSet)
    {
        BoundSetOperations<String, T> setOperation = redisTemplate.boundSetOps(key);
        Iterator<T> it = dataSet.iterator();
        while (it.hasNext())
        {
            setOperation.add(it.next());
        }
        return setOperation;
    }

    /**
     * 获得缓存的set
     *
     * @param key
     * @return
     */
    public <T> Set<T> getCacheSet(final String key)
    {
        return redisTemplate.opsForSet().members(key);
    }

    /**
     * 缓存Map
     *
     * @param key
     * @param dataMap
     */
    public <T> void setCacheMap(final String key, final Map<String, T> dataMap)
    {
        if (dataMap != null) {
            redisTemplate.opsForHash().putAll(key, dataMap);
        }
    }

    /**
     * 获得缓存的Map
     *
     * @param key
     * @return
     */
    public <T> Map<String, T> getCacheMap(final String key)
    {
        return redisTemplate.opsForHash().entries(key);
    }

    /**
     * 往Hash中存入数据
     *
     * @param key Redis键
     * @param hKey Hash键
     * @param value 值
     */
    public <T> void setCacheMapValue(final String key, final String hKey, final T value)
    {
        redisTemplate.opsForHash().put(key, hKey, value);
    }

    /**
     * 获取Hash中的数据
     *
     * @param key Redis键
     * @param hKey Hash键
     * @return Hash中的对象
     */
    public <T> T getCacheMapValue(final String key, final String hKey)
    {
        HashOperations<String, String, T> opsForHash = redisTemplate.opsForHash();
        return opsForHash.get(key, hKey);
    }

    /**
     * 删除Hash中的数据
     *
     * @param key
     * @param hkey
     */
    public void delCacheMapValue(final String key, final String hkey)
    {
        HashOperations hashOperations = redisTemplate.opsForHash();
        hashOperations.delete(key, hkey);
    }

    /**
     * 获取多个Hash中的数据
     *
     * @param key Redis键
     * @param hKeys Hash键集合
     * @return Hash对象集合
     */
    public <T> List<T> getMultiCacheMapValue(final String key, final Collection<Object> hKeys)
    {
        return redisTemplate.opsForHash().multiGet(key, hKeys);
    }

    /**
     * 获得缓存的基本对象列表
     *
     * @param pattern 字符串前缀
     * @return 对象列表
     */
    public Collection<String> keys(final String pattern)
    {
        return redisTemplate.keys(pattern);
    }
}
FastJson序列化工具
FastJson真是一堆坑啊, 出现问题的解法也非常魔幻.
package com.bc208.blog.config.redisCofig;

import com.alibaba.fastjson.JSON;
import com.alibaba.fastjson.parser.ParserConfig;
import com.alibaba.fastjson.serializer.SerializerFeature;
import com.fasterxml.jackson.databind.JavaType;
import com.fasterxml.jackson.databind.type.TypeFactory;
import org.springframework.data.redis.serializer.RedisSerializer;
import org.springframework.data.redis.serializer.SerializationException;

import java.nio.charset.Charset;

public class FastJsonRedisSerializer<T> implements RedisSerializer<T>
{

    public static final Charset DEFAULT_CHARSET = Charset.forName("UTF-8");

    private Class<T> clazz;

    static
    {
        ParserConfig.getGlobalInstance().setAutoTypeSupport(true);
    }

    public FastJsonRedisSerializer(Class<T> clazz)
    {
        super();
        this.clazz = clazz;
    }

    @Override
    public byte[] serialize(T t) throws SerializationException
    {
        if (t == null)
        {
            return new byte[0];
        }
        return JSON.toJSONString(t, SerializerFeature.WriteClassName).getBytes(DEFAULT_CHARSET);
    }

    @Override
    public T deserialize(byte[] bytes) throws SerializationException
    {
        if (bytes == null || bytes.length <= 0)
        {
            return null;
        }
        String str = new String(bytes, DEFAULT_CHARSET);
        return JSON.parseObject(str, clazz);
    }


    protected JavaType getJavaType(Class<?> clazz)
    {
        return TypeFactory.defaultInstance().constructType(clazz);
    }
}
Redis配置类
这里一定要这两行代码, 不然会疯狂报错, 说FastJson无法处理SimpleGrantedAuthority, 对RediCache(Redis缓存)的反序列化也一直出问题.
ParserConfig.getGlobalInstance().addAccept("org.springframework.security.core.authority.");
TypeUtils.addMapping("org.springframework.security.core.authority.SimpleGrantedAuthority",
        SimpleGrantedAuthority.class);

package com.bc208.blog.config.redisCofig;

import com.alibaba.fastjson.parser.ParserConfig;
import com.alibaba.fastjson.util.TypeUtils;
import org.springframework.context.annotation.Bean;
import org.springframework.context.annotation.Configuration;
import org.springframework.data.redis.connection.RedisConnectionFactory;
import org.springframework.data.redis.core.RedisTemplate;
import org.springframework.data.redis.serializer.StringRedisSerializer;
import org.springframework.security.core.authority.SimpleGrantedAuthority;

@Configuration
public class RedisConfig {

    @Bean
    @SuppressWarnings(value = { "unchecked", "rawtypes" })
    public RedisTemplate<Object, Object> redisTemplate(RedisConnectionFactory connectionFactory)
    {
        ParserConfig.getGlobalInstance().addAccept("org.springframework.security.core.authority.");
        TypeUtils.addMapping("org.springframework.security.core.authority.SimpleGrantedAuthority",
                SimpleGrantedAuthority.class);

        RedisTemplate<Object, Object> template = new RedisTemplate<>();
        template.setConnectionFactory(connectionFactory);

        FastJsonRedisSerializer serializer = new FastJsonRedisSerializer(Object.class);

        // 使用StringRedisSerializer来序列化和反序列化redis的key值
        template.setKeySerializer(new StringRedisSerializer());
        template.setValueSerializer(serializer);

        // Hash的key也采用StringRedisSerializer的序列化方式
        template.setHashKeySerializer(new StringRedisSerializer());
        template.setHashValueSerializer(serializer);

        template.afterPropertiesSet();
        return template;
    }

}
核心代码分析
先把SpringSecurity的关键代码粘贴出来, 方便讲解.
Jwt过滤器
package com.bc208.blog.config.auth;

import com.bc208.blog.common.vo.SecurityUser;
import com.bc208.blog.config.redisCofig.RedisCache;
import com.bc208.blog.utils.JwtUtil;
import io.jsonwebtoken.Claims;
import org.springframework.beans.factory.annotation.Autowired;
import org.springframework.security.authentication.UsernamePasswordAuthenticationToken;
import org.springframework.security.core.context.SecurityContextHolder;
import org.springframework.stereotype.Component;
import org.springframework.util.StringUtils;
import org.springframework.web.filter.OncePerRequestFilter;

import javax.servlet.FilterChain;
import javax.servlet.ServletException;
import javax.servlet.http.HttpServletRequest;
import javax.servlet.http.HttpServletResponse;
import java.io.IOException;
import java.util.Objects;

@Component
public class JwtAuthenticationTokenFilter extends OncePerRequestFilter {

    @Autowired
    private RedisCache redisCache;

    @Override
    protected void doFilterInternal(HttpServletRequest request, HttpServletResponse response, FilterChain filterChain) throws ServletException, IOException {
        //获取token
        String token = request.getHeader("token");
        if (!StringUtils.hasText(token)) {
            //token为空的话, 就不管它, 让SpringSecurity中的其他过滤器处理请求
            //请求放行
            filterChain.doFilter(request, response);
            return;
        }
        //token不为空时, 解析token
        int userid;
        try {
            Claims claims = JwtUtil.parseJWT(token);
            //解析出userid
            userid = claims.get("userId", Integer.class);
        } catch (Exception e) {
            e.printStackTrace();
            throw new RuntimeException("token非法");
        }
        //使用userid从Redis缓存中获取用户信息
        String redisKey = "login:" + userid;
        SecurityUser loginUser = redisCache.getCacheObject(redisKey);
        if (Objects.isNull(loginUser)) {
            throw new RuntimeException("用户未登录");
        }
        //将用户安全信息存入SecurityContextHolder, 在之后SpringSecurity的过滤器就不会拦截
        UsernamePasswordAuthenticationToken authenticationToken =
                new UsernamePasswordAuthenticationToken(loginUser, null, null);
        SecurityContextHolder.getContext().setAuthentication(authenticationToken);
        //放行
        filterChain.doFilter(request, response);
    }
}
Security配置类
package com.bc208.blog.config.auth;

import lombok.extern.slf4j.Slf4j;
import org.springframework.beans.factory.annotation.Autowired;
import org.springframework.context.annotation.Bean;
import org.springframework.context.annotation.Configuration;
import org.springframework.http.HttpStatus;
import org.springframework.http.MediaType;
import org.springframework.security.authentication.AuthenticationManager;
import org.springframework.security.config.annotation.method.configuration.EnableGlobalMethodSecurity;
import org.springframework.security.config.annotation.web.builders.HttpSecurity;
import org.springframework.security.config.annotation.web.configuration.EnableWebSecurity;
import org.springframework.security.config.annotation.web.configuration.WebSecurityConfigurerAdapter;
import org.springframework.security.config.http.SessionCreationPolicy;
import org.springframework.security.crypto.bcrypt.BCryptPasswordEncoder;
import org.springframework.security.web.authentication.UsernamePasswordAuthenticationFilter;

import java.io.PrintWriter;

@Configuration //注册为SpringBoot的配置类
@EnableWebSecurity
@EnableGlobalMethodSecurity(prePostEnabled = true) //配置SpringSecurity的身份预认证功能
@Slf4j
public class WebSecurityConfig extends WebSecurityConfigurerAdapter {

    //注入Jwt认证拦截器.
    @Autowired
    JwtAuthenticationTokenFilter jwtAuthenticationTokenFilter;

    @Override
    protected void configure(HttpSecurity http) throws Exception {
        http
                .csrf().disable() //跨站请求伪造
                .sessionManagement().sessionCreationPolicy(SessionCreationPolicy.STATELESS) //由于我们使用token作为信息传递介质, 所以禁用Session
                .and()
                .authorizeRequests() // 进行认证请求的配置
                .antMatchers("/bc208/login").anonymous() // 将所有登入和注册的接口放开, 这些都是无需认证就访问的
                .antMatchers("/bc208/register").anonymous()
                .antMatchers("/admin/login").anonymous()
                .antMatchers("/admin/register").anonymous()
                .anyRequest().authenticated() //除了上面的那些, 剩下的任何接口请求都需要经过认证
                .and()
                .cors() //允许跨域请求
        ;

        //把token校验过滤器添加到过滤器链中, 添加在UsernamePasswordAuthenticationFilter之前是因为只要用户携带token, 就不需要再去验证是否有用户名密码了 (而且我们不使用表单登入, UsernamePasswordAuthenticationFilter是无法解析Json的, 相当于它没用了)
        //UsernamePasswordAuthenticationFilter是SpringSecurity默认配置的表单登录拦截器
        http.addFilterBefore(jwtAuthenticationTokenFilter, UsernamePasswordAuthenticationFilter.class);

        // 下面这个是权限拒绝处理器, 这个直接照搬就行了.
        http.exceptionHandling(it -> it.authenticationEntryPoint(((httpServletRequest, httpServletResponse, e) -> {
            String msg = "{\"msg\": \"User not logged in.\"}";
            httpServletResponse.setStatus(HttpStatus.FORBIDDEN.value());
            httpServletResponse.setContentType(MediaType.APPLICATION_JSON_VALUE);
            PrintWriter writer = httpServletResponse.getWriter();
            writer.write(msg);
            writer.flush();
            writer.close();
        })));
    }

    @Bean
    @Override
    public AuthenticationManager authenticationManagerBean() throws Exception {
        // 身份验证管理器, 直接继承即可.
        return super.authenticationManagerBean();
    }

    // 将BCryptPasswordEncoder加密器注入SpringSecurity中, 之后SpringSecurity的DaoAuthenticaionProvider会调用该加密器中的match()方法进行密码比对, 密码比对过程不需要我们干涉
    @Bean
    public BCryptPasswordEncoder bcryptPasswordBean(){
        return new BCryptPasswordEncoder();
    }
}
SecurityUser
SpringSecurity的安全信息保存类.
这个类是专门用来实现User实体类和SpringSecurity安全认证过程的桥梁.
该类必须实现UserDetails接口从而获得各种SpringSecurity认证控制的参数.
在这里, 设置用户权限getAuthorities(), 必须使用如下的写法, 不然在反序列化时候会出问题, 作者暂时没发现其背后原因.
参数含义如下:

由于我们登入时使用的是email, 所以如下所示, 设置SecurityUser的Username时, 我使用的是getUserEmail().
在测试阶段, 为了节省麻烦, 我们将所设置的用户是否xxx全部设为true, 否则在SpringSecurity认证时, 会检测这些参数, 并判断该用户无法使用, 从而无法通过认证.
package com.bc208.blog.common.vo;

import com.bc208.blog.pojo.User;
import lombok.Data;
import lombok.NoArgsConstructor;
import org.springframework.security.core.GrantedAuthority;
import org.springframework.security.core.authority.SimpleGrantedAuthority;
import org.springframework.security.core.userdetails.UserDetails;

import java.io.Serializable;
import java.util.Collection;
import java.util.List;
import java.util.stream.Collectors;

/**
 * @author QingheLi
 */
@Data
@NoArgsConstructor
public class SecurityUser implements UserDetails, Serializable {
    private User user;

    public User getUser() {
        return user;
    }

    public SecurityUser(User user, List<String> permissions){
        this.user = user;
        this.permissions = permissions;
    }

    private List<String> permissions;
    private List<GrantedAuthority> authorities;

    @Override
    public Collection<? extends GrantedAuthority> getAuthorities() {
        if (authorities != null) {
            return authorities;
        }
        //把permissions中字符串类型的权限信息转换成GrantedAuthority对象存入authorities中
        authorities = permissions.stream().
                map(SimpleGrantedAuthority::new)
                .collect(Collectors.toList());
        return authorities;
    }

    @Override
    public String getPassword() {
        return user.getUserPassword();
    }

    @Override
    public String getUsername() {
        return user.getUserEmail();
    }

    @Override
    public boolean isAccountNonExpired() {
        return true;
    }

    @Override
    public boolean isAccountNonLocked() {
        return true;
    }

    @Override
    public boolean isCredentialsNonExpired() {
        return true;
    }

    @Override
    public boolean isEnabled() {
        return true;
    }
}
UserServiceImpl
UserServiceImpl必须实现UserDetailsService, 重写loadUserByUsername()方法. 该接口与前面的UserDetails相搭配, 在进行密码比对时, SpringSecurity框架中的DaoAuthenticationProvider会调用我们所实现的loadUserByUsername来获取数据库中的用户数据(包括密码), 然后自动调用我们所设置的加密器BCryptPasswordEncoder中的密码匹配方法match()对前端传入密码进行校验.
整个认证过程最重要的便是UserServiceImpl.
package com.bc208.blog.service.impl;

import com.bc208.blog.common.dto.LoginDto;
import com.bc208.blog.common.dto.RegisterDto;
import com.bc208.blog.common.vo.SecurityUser;
import com.bc208.blog.config.redisCofig.RedisCache;
import com.bc208.blog.dao.UsersMapper;
import com.bc208.blog.pojo.User;
import com.bc208.blog.pojo.UserModel;
import com.bc208.blog.service.UserService;
import com.bc208.blog.utils.JwtUtil;
import com.bc208.blog.utils.nullOrNot;
import lombok.extern.slf4j.Slf4j;
import org.springframework.beans.factory.annotation.Autowired;
import org.springframework.security.authentication.AuthenticationManager;
import org.springframework.security.authentication.UsernamePasswordAuthenticationToken;
import org.springframework.security.core.Authentication;
import org.springframework.security.core.GrantedAuthority;
import org.springframework.security.core.context.SecurityContextHolder;
import org.springframework.security.core.userdetails.UserDetails;
import org.springframework.security.core.userdetails.UserDetailsService;
import org.springframework.security.core.userdetails.UsernameNotFoundException;
import org.springframework.security.crypto.password.PasswordEncoder;
import org.springframework.stereotype.Service;
import org.springframework.transaction.annotation.Transactional;
import org.springframework.util.StringUtils;

import java.util.ArrayList;
import java.util.Arrays;
import java.util.HashMap;
import java.util.List;

/**
 * @author QingheLi
 */
@Service
@Slf4j
public class UsersServiceImpl implements UserService, UserDetailsService {

    @Autowired
    private UsersMapper usersMapper;

    @Autowired
    private JwtUtil jwtUtils;

    @Autowired
    private RedisCache redisCache;

    @Autowired
    private AuthenticationManager authenticationManager;

    /**
     * 用户登入
     * @param loginDto 账号密码输入
     * @return jwt
     */
    @Override
    public HashMap<String, String> userLogin(LoginDto loginDto) {
        UsernamePasswordAuthenticationToken authToken = new UsernamePasswordAuthenticationToken(loginDto.getEmail(), loginDto.getPassword());
        // 使用authenticationManager调用loadUserByUsername获取数据库中的用户信息,
        Authentication authentication = authenticationManager.authenticate(authToken);
        if(authentication == null) {
            throw new RuntimeException("Login false");
        }

        SecurityUser securityUser = (SecurityUser) authentication.getPrincipal();
        Integer useId = securityUser.getUser().getUserId();
        String usrName = securityUser.getUsername();

        List<String> authList = new ArrayList<String>();
        for (GrantedAuthority auth : securityUser.getAuthorities()) {
            authList.add(auth.getAuthority());
        }
        String jwt = JwtUtil.createJwt("user login", useId);
        // 存入Redis
        redisCache.setCacheObject("login:"+useId,securityUser);
        HashMap<String, String> map = new HashMap<String, String>();
        map.put("token", jwt);
        return map;
    }


    @Autowired
    private PasswordEncoder bcryptPasswordEncoder;

    /**
     * 用户注册
     * 逻辑很简单, 就是将内容传入
     * @param registerDto
     * @return
     */
    @Override
    @Transactional
    public int userRegister(RegisterDto registerDto) {
        // 先查询用户是否存在, 存在就用ResultInfo返回消息即可
        nullOrNot.isTrue(usersMapper.queryUserByEmail(registerDto.getEmail()) != null, "用户名已存在");

        //创建用户, 设置其中的内容
        User user = new User();
        user.setUserName(registerDto.getUsername());
        user.setUserEmail(registerDto.getEmail());
        // 在这里将用户密码进行加密, 存入数据库 (可不能对密码明文存储)
        user.setUserPassword(bcryptPasswordEncoder.encode(registerDto.getPassword()));
        user.setUserRole("user");
        user.setEnabled(1); //经过管理员确认后才可使用 TODO:这里需要修改
        user.setAccountNoExpired(1);
        user.setCredentialsNoExpired(1);
        user.setAccountNoLocked(1);
        user.setUserToken("a");

        return usersMapper.registerUser(user);
    }


    @Override
    public void userLogout(){
        Authentication authentication = SecurityContextHolder.getContext().getAuthentication();
        SecurityUser loginUser = (SecurityUser) authentication.getPrincipal();
        int userid = loginUser.getUser().getUserId();
        redisCache.deleteObject("login:"+userid);
    }

    @Override
    public UserDetails loadUserByUsername(String username) throws UsernameNotFoundException {
        User user = usersMapper.getByUserEmail(username);
        if (user == null) {
            log.info("username not found");
            throw new UsernameNotFoundException("username not found");
        }
        // 在这里将用户的权限转换为字符串数组
        List<String> list = new ArrayList<>(Arrays.asList(user.getUserRole()));
        return new SecurityUser(user, list);
    }
}
登录过程
通俗讲解
这里要想清楚, SpringSecurity是套在SpringBoot-web外的一堆拦截器, 而在Security配置类WebSecurityConfig中, 我将"/login"端口放开, 那SpringSecurity就不会去添加拦截, 所以这相当于变成了正常的SpringBoot前后端分离项目.
所以如果有小伙伴疑惑: 我添加SpringSecurity, 它就默认使用自带的表单登录, 我该怎么消除表单登录, 或自定义登录方式? 甚至要自己配置JSON解析类去处理前端传来的JSON格式数据, 重写UsernamePasswordAuthenticationFilter?
根本没必要, 我们不需要自定义JSON解析器, 因为SpringBoot-web自带. 那我们要做什么?
首先, 在UserController中弄好登录接口和登录结果返回方式.
其次, 所有核心还是在UserServiceImpl中:
第一个核心: 我们实现UserDetailsService接口并重写loadUserByUsername()方法, 重写也很简单, 就在里面调用我们的持久层Mapper获取完整的用户数据, 并封装到SecurityUser中即可, 剩下的我们就不用管了. 如果你问SpringSecurity什么时候调用这个方法获取数据, 那不用我们操心, SpringSecurity会自己来调用.
第二个核心: 这两句代码:
UsernamePasswordAuthenticationToken authToken = new UsernamePasswordAuthenticationToken(loginDto.getEmail(), loginDto.getPassword());
// 使用authenticationManager调用loadUserByUsername获取数据库中的用户信息,
Authentication authentication = authenticationManager.authenticate(authToken);
UsernamePasswordAuthenticationToken用户名密码验证令牌, 创建该令牌需要输入两个参数, 表示用户名和密码, 具体含义如下. 这里创建的令牌是一个未经认证, 且不含其他权限信息的简单令牌.

身份验证管理器器authenticationManager调用认证方法authenticate, 就这么一句代码就完成了SpringSecurity关于登录认证的功能. 我们将用UsernamePasswordAuthenticationToken生成的未认证令牌传入authenticticationManager.(authenticate()), 如果输入的账号和密码正确, 返回的结果是一个经过认证的, 包含用户全部信息的authentication令牌, 到这里登录认证就结束了. 剩下的就是token生成, Redis缓存安全信息了.
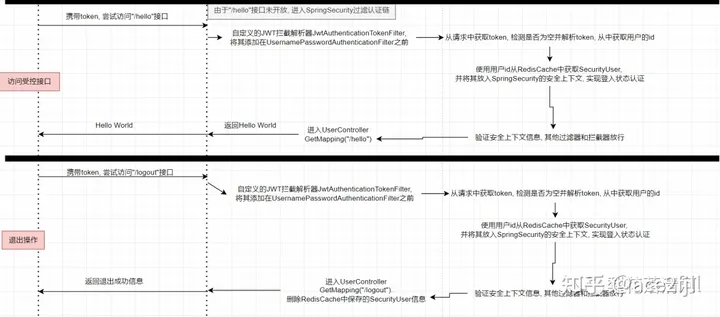
DeBug理解
先看一张包浆老图, 有个基础流程概念:

由于我们放开了\login接口, 所以并不会经过上图的UsernamePasswordAuthenticationFilter. 剩下的步骤就和上图一样, 第5步的loadUserByUsername就是我们重写的方法, 第6步的UserDetails对象就是我们实现的SecurityUser.
接下来通过IDEA的DeBug功能看看SpringSecurity的登录认证流程.
- 断点打在authenticationManager上, 因为这是登录认证的入口

- 启动Debug, 用Postman将登录JSON传入

- 生成UsernamePasswordAuthenticationToken未认证令牌: 如下图箭头所示, authToken的authenticated=false. 我们选择步入.

- 进入authenticate方法, 生成一个ProviderManager提供者管理器, 这里的Provider提供者是指从调用loadUserByUserName()方法获取SecurityUser完全信息用户类的某个类. 可以去官网看一下, SpringSecurity会获取全部的Provider, 逐个去匹配看能否有一个匹配得上我们输入的UsernamePasswordAuthenticationToken.

生成ProviderManager后, 进入delegate.authenticate()生成Provider

- 进来之后, 先获取我们传入的类型是什么, 然后获取一个默认的匿名Provider, AnonymousAuthenticationProvider, 调用support测试这个provider是否可用, 而这个匿名Provider没什么用, 所以自然是尝试下一个Provider.

- 我们继续Debug, 程序又一次进入ProviderManager.authenticate()中, 这次获取到的是DaoAuthenticationProvider这就是关键了, 它能够匹配UsernamePasswordAuthenticationToken. 我们继续往下走.

- 接下来就是把authentication传入DaoAuthenticationProvider中进行认证.

- 认证过程:
- 获取用户名, determineUsername内部是调用了UsernamePasswordAuthenticationToken.getPrinciple()方法.
- 向retrieveUser()传入username和我们创建的UsernamePasswordAuthenticationToken, 这里的username是为了调用我们在UserServiceImpl中重写的loadUserByUsername方法所需要传入的参数, 获取到数据库中的用户详细信息.

- 进入retrieveUser后, 就来到this.getUserDetailsService().loadUserByUsername(), 这里就会调用我们所重写的loadUserByUsername()方法获取用户详细信息并封装入SecurityUSer, 返回给UserDetails loadedUser

- 获取到数据库中用户信息后, 继续Debug, 会进入身份预认证check检测, 检测该用户是否可用.


- 检测该用户成功后, 在additionalAuthenticationChecks中进行密码校验, 从前端传入生成的UsernamePasswordAuthenticationFilter获取密码, 并调用SpringSecurity配置类中设置的密码加密器进行密码配对match(). 在下方的调试信息可以看到passwordEncoder的类型是BCryptPasswordEncoder.


- 完成密码匹配后, 在postAuthenticationChecks.check处检测密码是否过期.最后, 所有检测都通过, 就可以进行该用户的认证成功确定和权限授予, 通过createSuccessAuthentication()创建一个经过认证的SecurityUser类.
由调试信息可见, setAuthenticated(true)进行了认证确认.


- 可以看到经过一系列操作后得到的是一个认证通过的UserDetails

- 经过一层层返回, 回到UserServiceImpl完成后续操作: Userid存入token用于前端权限认证, SecurityUser存入RedisCache用于记住登录状态.
深度总结
在authenticationManager.authenticate()中:
- 获取数据库中的用户详细信息
- 检测该用户是否过期, 是否可用
- 检测该用户的密码是否过期
- 进行密码匹配
- 进行用户类封装并确认认证登录
- 返回结果
测试SpringSecurity的拦截

在SpringSecurity配置类中, 我们没有放行/hello接口, 所有它是会被SpringSecurity拦截.
启动项目, 使用Postman测试, 第一次测试不设置token (因为我们没登入, 就没有token), 此时的Redis中不存有任何内容.


很显然, 由于没有token, 在JwtAuthenticationTokenFilter中会因为token为null而放行, 让SpringSecurity的其他过滤器对请求进行处理. 其中我们配置的exceptionHandling()会因为无权限而被拒绝, 会返回给前端"User not logged in.".


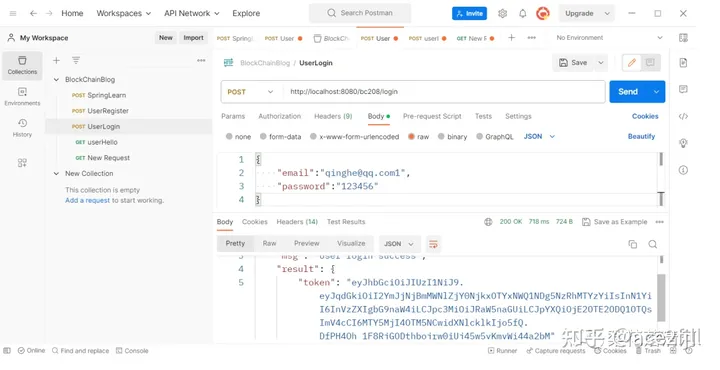
我们先登录, 登录成功后返回token, 此时Redis中存有SpringSecurity的安全信息:

在请求头中加入token, 再尝试访问成功:

关于Jwt拦截器的行为, 可以看看代码中的注释, 并不是很难理解.
退出操作

记录用户登录状态, 依靠的是Redis缓存. 所以登出操作主要是将Redis缓存保存的用户信息删除.
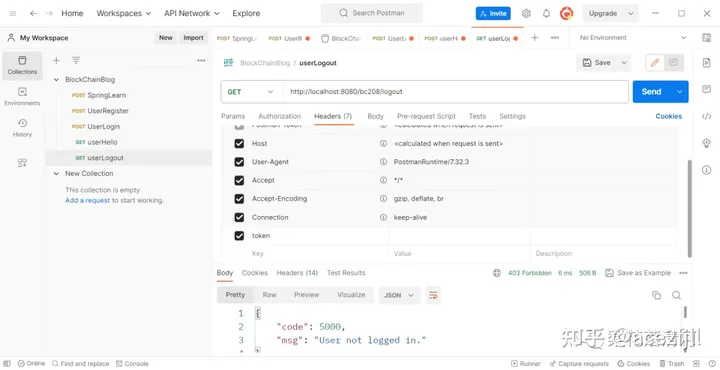
登出操作也是需要携带token的, 否则会被SpringSecurity以无权限拦截.

此时查看RedisCache, 已经没有用户信息了.


 3484
3484


 被折叠的 条评论
为什么被折叠?
被折叠的 条评论
为什么被折叠?
 到【灌水乐园】发言


