


目录
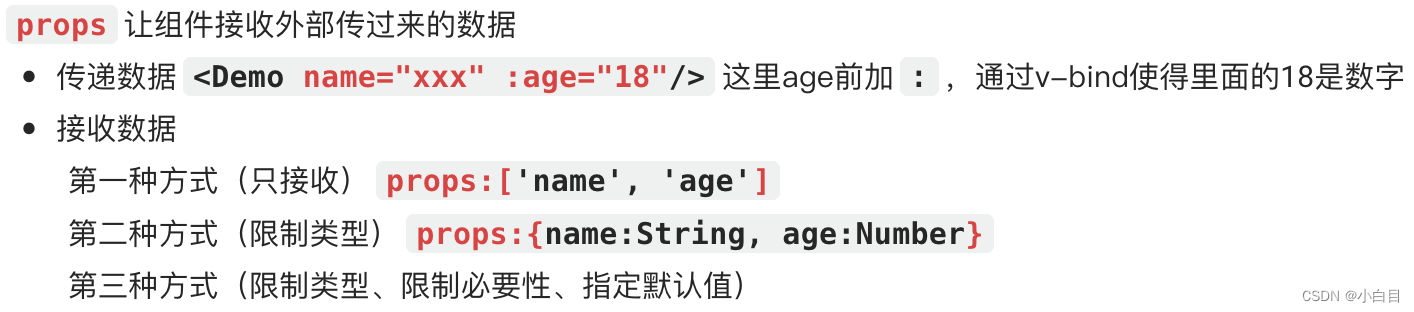
一. props组件传参
props只读,若需要修改,需拷贝到data中修改
父组件 ===》子组件 :
父组件App:
<template>
  <div>
    <Student name="李四" sex="女" :age="18"/>
    <Student name="王五" sex="男" :age="18"/>
  </div>
</template>

<script>
  import Student from './components/Student'

  export default {
    name:'App',
    components:{ Student }
  }
</script>
子组件 Student:
<template>
<div>
<h1>{{ msg }}</h1>
<h2>学生姓名:{{ name }}</h2>
<h2>学生性别:{{ sex }}</h2>
<h2>学生年龄:{{ myAge + 1 }}</h2>
<button @click="updateAge">尝试修改收到的年龄</button>
</div>
</template>
<script>
export default {
name: "Student",
data() {
console.log(this);
return {
msg: "我是一个UESTC大学的学生",
myAge: this.age,
};
},
methods: { updateAge() { this.myAge++; }, },
// 简单声明接收
// props:['name','age','sex']
// 接收的同时对数据进行类型限制
// props: {
// name: String,
// age: Number,
// sex: String,
// }
// 接收的同时对数据:进行类型限制+默认值的指定+必要性的限制
props: {
name: {
type: String, //name的类型是字符串
required: true, //name是必要的
},
age: {
type: Number,
default: 99, //默认值
},
sex: {
type: String,
required: true,
},
},
};
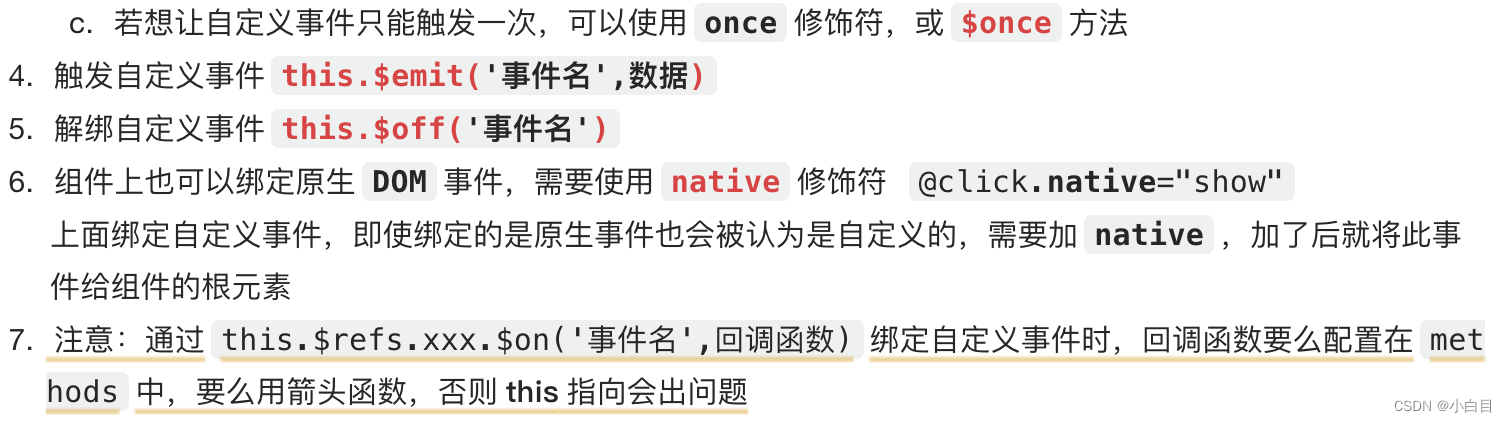
</script>二、组件自定义事件

<Demo ref="demo"/>
......
mounted(){
   this.$refs.demo.$on('atguigu',this.test)
}
三、全局事件总线 eventBus

使用步骤:
1.定义全局事件总线(src/main.js)
import Vue from 'vue'
import App from './App.vue'

Vue.config.productionTip = false

new Vue({
  el:'#app',
  render: h => h(App),
  beforeCreate() {
    Vue.prototype.$bus = this // 安装全局事件总线
  }
})
src/App.vue:
<template>
	<div class="app">
		<School/>
		<Student/>
	</div>
</template>

<script>
	import Student from './components/Student'
	import School from './components/School'

	export default {
		name:'App',
		components:{ School, Student }
	}
</script>

<style scoped>.app{background-color: gray;padding: 5px;}</style>
2.使用事件总线
a. School组件接收数据:
在组件里给 $bus 绑定自定义事件和回调函数 ;建议在beforeDestory钩子中,用 $off 解绑当前组件用到的事件。
<template>
  <div class="school">
    <h2>学校名称:{{ name }}</h2>
    <h2>学校地址:{{ address }}</h2>
  </div>
</template>

<script>
  export default {
    name: "School",
    data() {
      return {
        name: "尚硅谷",
        address: "北京",
      };
    },
    mounted() {  //🔴
      // console.log('School',this)
      this.$bus.$on("hello", (data) => {
        console.log("我是School组件,收到了数据", data);
      });
    },
    beforeDestroy() {  //🔴
      this.$bus.$off("hello");
    },
  };
</script>

<style scoped>.school {background-color: skyblue;padding: 5px;}</style>
b.Student提供数据:
![]()
<template>
  <div class="student">
    <h2>学生姓名:{{ name }}</h2>
    <h2>学生性别:{{ sex }}</h2>
    <button @click="sendStudentName">把学生名给School组件</button> //🔴
  </div>
</template>

<script>
  export default {
    name:'Student',
    data() {
      return {
        name:'张三',
        sex:'男'
      }
    },
    methods: {  //🔴
      sendStudentName(){
        this.$bus.$emit('demo', this.name)
      }
    }
  }
</script>

<style scoped>.student{background-color: pink;padding: 5px;margin-top: 30px;}</style>
四、消息订阅与发布
任意组件间通信,react中也可用。
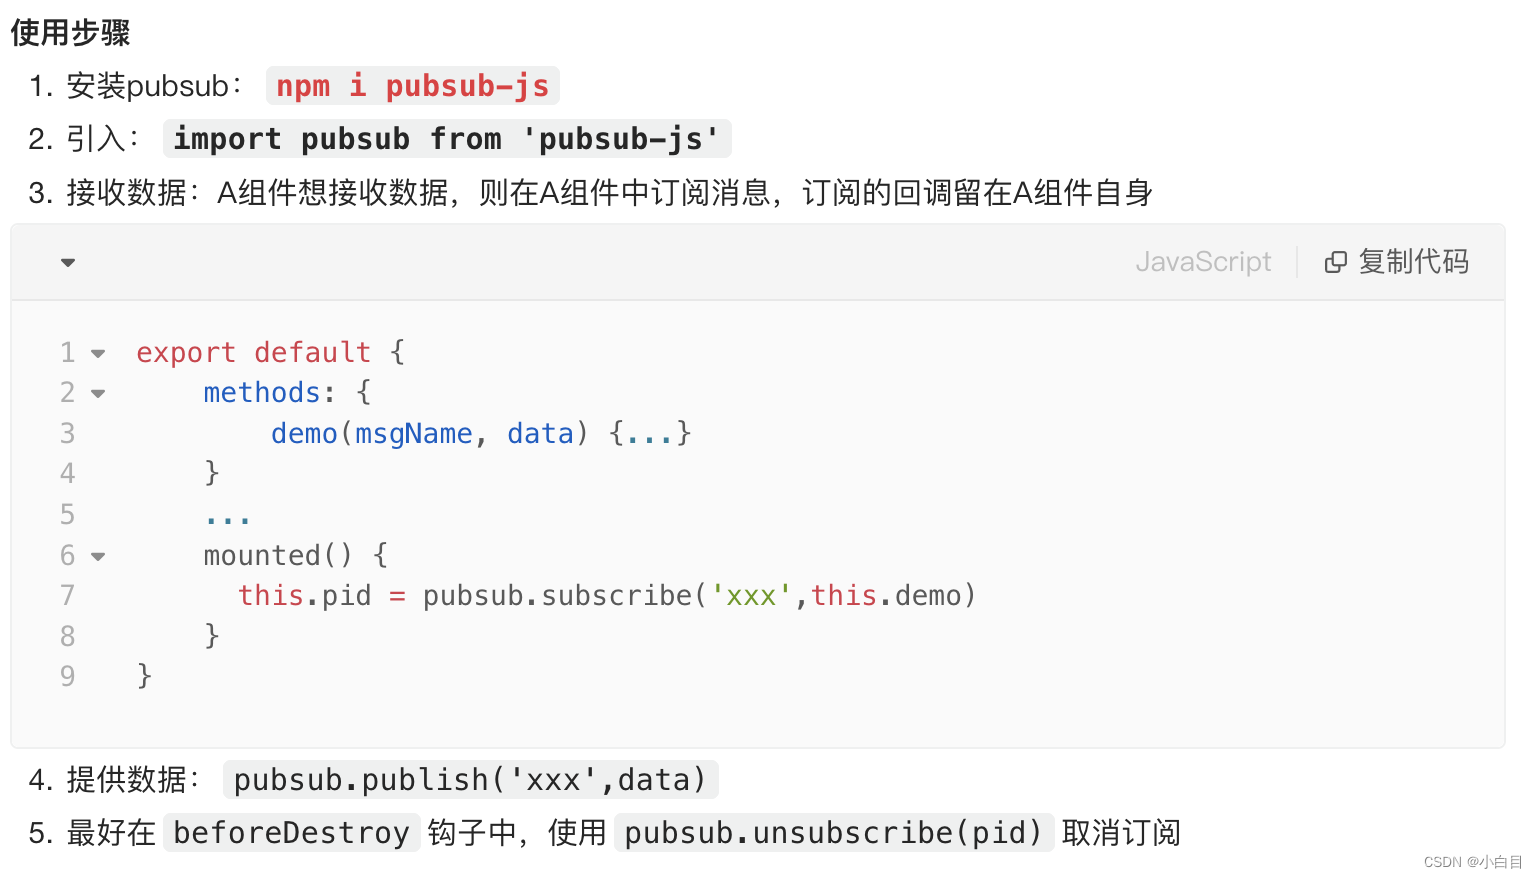
可以发现改使用步骤跟事件总线类似 ,麻烦在于要装第三方库,因此相比更推荐事件总线!
五、slot 插槽
正所谓一个萝卜一个坑,slot 插槽就是让父组件向子组件指定位置插入html结构,用于父==>子。父组件决定种什么萝卜(html),子组件决定萝卜具体种在什么位置(<slot>)。
插槽分类:默认插槽、具名插槽、作用域插槽
1、默认插槽:最简用法
父组件中:
        <Category>
           <div>html结构1</div>
        </Category>
子组件中:Category
        <template>
            <div>
               <!-- 定义插槽 -->
               <slot>插槽默认内容...</slot>
            </div>
</template>2、具名插槽:给萝卜和坑都起名字,分别对应。若不想凭空增加外层盒子,可用 <template> 标签,此时可以将 slot=‘footer’写成 v-slot:footer。
父组件中:
        <Category>
            <template slot="center">
              <div>html结构1</div>
            </template>

            <template v-slot:footer>
               <div>html结构2</div>
            </template>
        </Category>
子组件中:
        <template>
            <div>
               <!-- 定义插槽 -->
               <slot name="center">插槽默认内容...</slot>
               <slot name="footer">插槽默认内容...</slot>
            </div>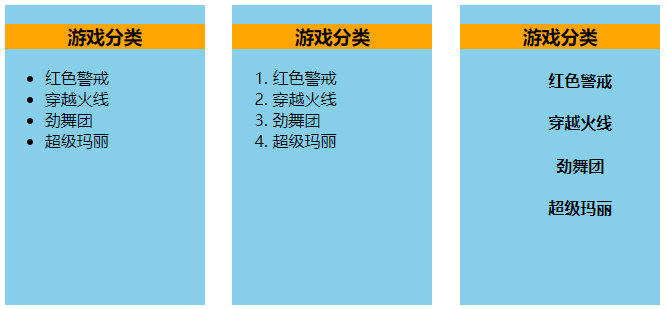
</template>3、作用域插槽:以上俩种插槽都是数据位于父组件中;但有的情景是数据位于子组件,且数据对应的结构样式(ul、ol、h4...)需由使用者(父组件决定)。
父组件中:
<template>
	<div class="container">

		<Category title="游戏">
			<template scope="atguigu">
				<ul>
					<li v-for="(g,index) in atguigu.games" :key="index">{{g}}</li>
				</ul>
			</template>
		</Category>

		<Category title="游戏">
			<template scope="{games}">
				<ol>
					<li style="color:red" v-for="(g,index) in games" :key="index">{{g}}</li>
				</ol>
			</template>
		</Category>

		<Category title="游戏">
			<template slot-scope="{games}">
				<h4 v-for="(g,index) in games" :key="index">{{g}}</h4>
			</template>
		</Category>
	</div>
</template>

<script>
	import Category from './components/Category'
	export default {
		name:'App',
		components:{ Category },
	}
</script>

<style scoped>
	.container,.foot{display: flex;justify-content: space-around;}
	h4{text-align: center;}
</style>
子组件:
<template>
	<div class="category">
		<h3>{{title}}分类</h3>
		<slot :games="games" msg="hello">我是默认的一些内容</slot>
	</div>
</template>

<script>
	export default {
		name:'Category',
		props:['title'],
		data() {
			return {
				games:['红色警戒','穿越火线','劲舞团','超级玛丽'],
			}
		},
	}
</script>

<style scoped>
	.category{background-color: skyblue;width: 200px;height: 300px;}
	h3{text-align: center;background-color: orange;}
	video{width: 100%;}
  img{width: 100%;}
</style>
效果图:
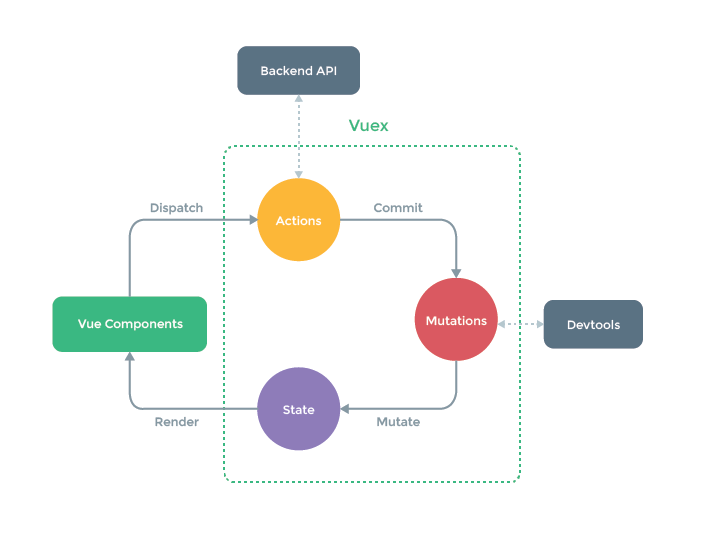
六、vuex
官方解释:Vuex 是一个专门为 Vue.js 应用程序开发的状态管理模式,它采用集中式存储管理应用的所有组件状态,并以相应的规则保证状态以一种可预测的方式发生变化。
可以理解为:将多个组件共享的变量全部存储在一个对象里面,然后将这个对象放在顶层的 Vue 实例中,让其他组件可以使用(任意组件间通信),它最大的特点是响应式。
什么时候用:多个组件依赖(操作)统一状态(数据)
原理图:
(1)搭建 vuex 环境 的基本使用

import Vue from 'vue'
import Vuex from 'vuex'	// 引入Vuex

Vue.use(Vuex)	// 应用Vuex插件

const actions = {}		// 准备actions——用于响应组件中的动作
const mutations = {}	// 准备mutations——用于操作数据(state)
const state = {}			// 准备state——用于存储数据

// 创建并暴露store
export default new Vuex.Store({
	actions,
	mutations,
	state,
})
注意:
![]()
(2)vuex 的基本使用
(3) getters配置项

......
const getters = {
bigSum(state){
return state.sum * 10
}
}
// 创建并暴露store
export default new Vuex.Store({
......
getters
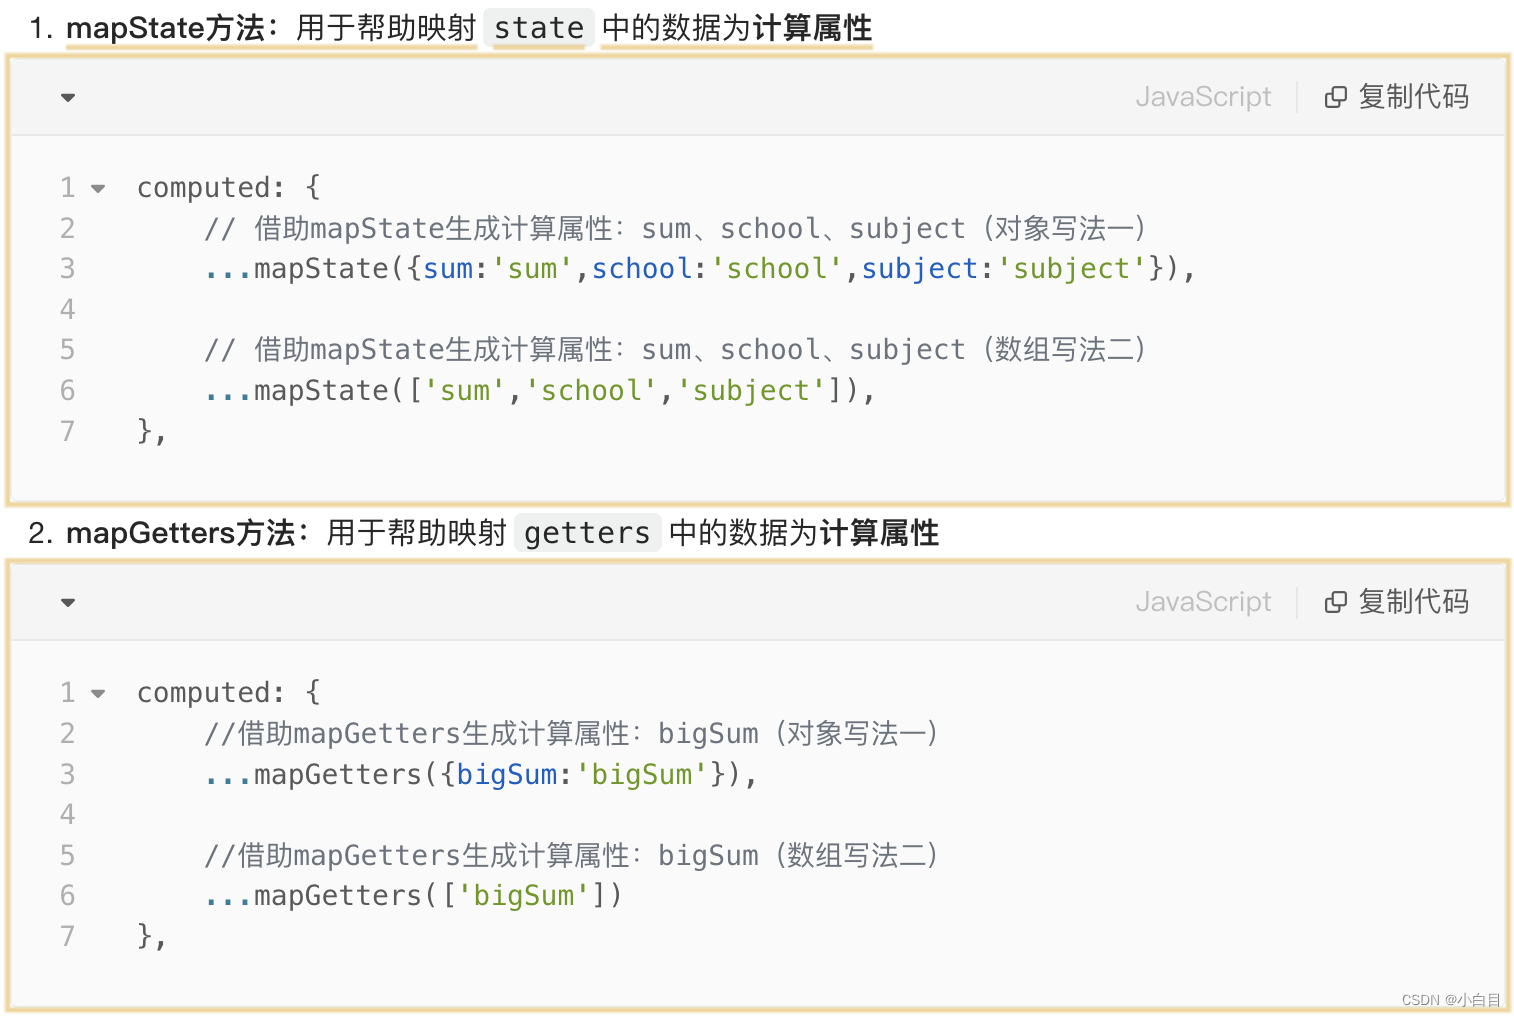
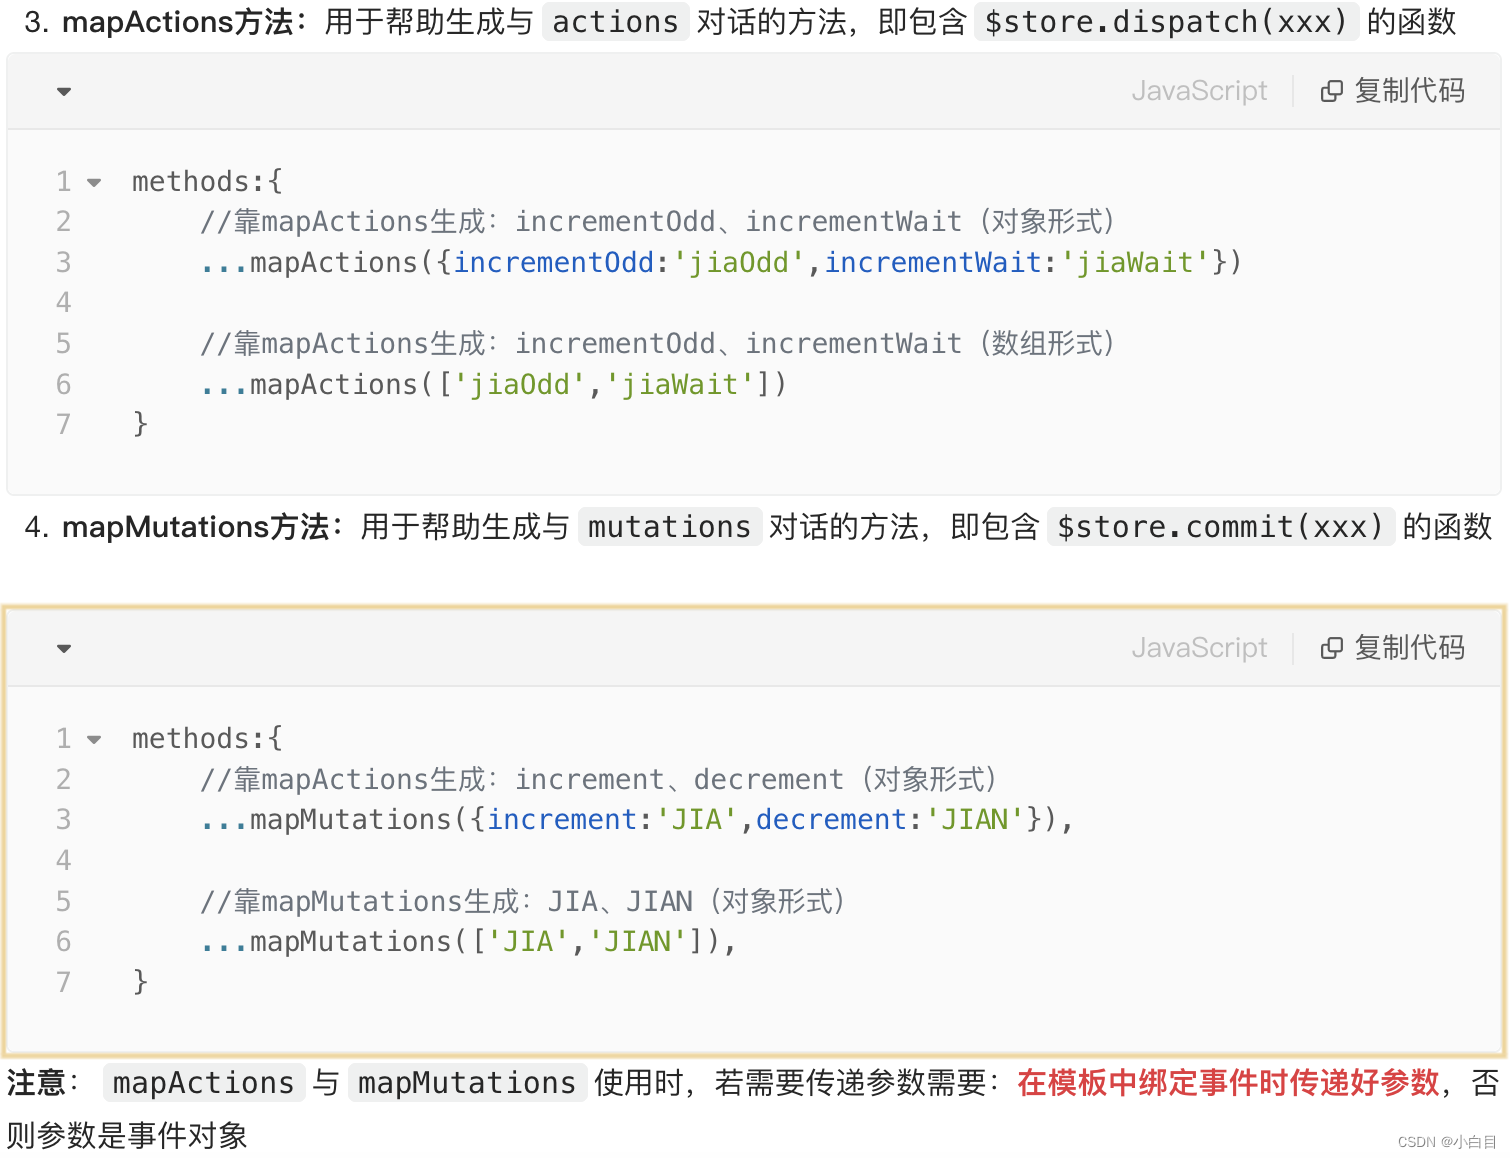
}) (4)四个 map 方法的使用
七、附录
其他通信方式后续更新


 被折叠的 条评论
为什么被折叠?
被折叠的 条评论
为什么被折叠?
 到【灌水乐园】发言


