


ubuntu 同时安装cuda8.0与cuda9.0,cuda9.1
部分代码需要cuda8.0,部分需要cuda9.0 于是萌生了同时安装2个版本的想法。
0 前提:
ubuntu 16.04. x86_64
已经安装 cuda 8.0:
- nvcc –version
- nvcc: NVIDIA (R) Cuda compiler driver
- Copyright (c) 2005-2016 NVIDIA Corporation
- Built on Tue_Jan_10_13:22:03_CST_2017
- Cuda compilation tools, release 8.0, V8.0.61
1 下载 cuda 9.0:

2. 在自己的目录下为cuda9.0新建一个文件夹,用于存放 cuda_9.0.176_384.81_linux.run 与后面的sample。
3. 生成可执行文件
- chmod 777 <span>cuda_9.0.176_384.81_linux.run</span>
4. 执行:
- ./cuda_9.0.176_384.81_linux.run
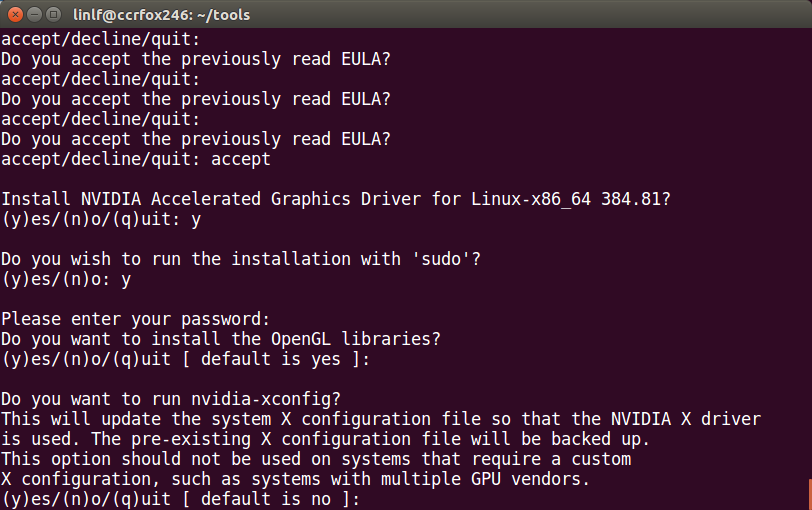
5. 一些安装过程:
(因为我需要保留cuda8.0 于是暂时不做软连接 )
- Do you want to install a symbolic link at /usr/local/cuda?
- (y)es/(n)o/(q)uit: n
- Do you accept the previously read EULA?
- accept/decline/quit: accept
- Install NVIDIA Accelerated Graphics Driver for Linux-x86_64 384.81?
- (y)es/(n)o/(q)uit: y
- Do you wish to run the installation with 'sudo'?
- (y)es/(n)o: y
- Please enter your password:
- Do you want to install the OpenGL libraries?
- (y)es/(n)o/(q)uit [ default is yes ]:
- Do you want to run nvidia-xconfig?
- This will update the system X configuration file so that the NVIDIA X driver
- is used. The pre-existing X configuration file will be backed up.
- This option should not be used on systems that require a custom
- X configuration, such as systems with multiple GPU vendors.
- (y)es/(n)o/(q)uit [ default is no ]:
- Install the CUDA 9.0 Toolkit?
- (y)es/(n)o/(q)uit: y
- Enter Toolkit Location
- [ default is /usr/local/cuda-9.0 ]:
- Do you want to install a symbolic link at /usr/local/cuda?
- (y)es/(n)o/(q)uit: n
- Install the CUDA 9.0 Samples?
- (y)es/(n)o/(q)uit: y
- Enter CUDA Samples Location
- [ default is /home/linlf ]: /home/linlf/tools/cuda9.0


5报错:
Itappears that an X server is running. Please exit X beforeinstallation. If you're sure that X is not running, but are gettingthis error, please delete any X lock files in /tmp.

6.1 查看 X:psaux | grep X
6.2 关闭X. light类型的桌面系统
Sudo /etc/init.d/lightdm stop

6.4 接着按照第一步第方法继续安装cuda9.0
7 修改配置文件:
export PATH="/usr/local/cuda/bin:$PATH"
export LD_LIBRARY_PATH="/usr/local/cuda/lib64:$LD_LIBRARY_PATH"
export LIBRARY_PATH="/usr/local/cuda/lib64:$LIBRARY_PATH"
8。 配置文件生效:
source ~/.bashrc9。然后就可以切换8.0与 9.0了:
- rm –rf /usr/local/cuda
- ln -s /usr/local/cuda-9.0 /usr/local/cuda
11。 最后进入 cuda9.0的sample。make所有第例子.
(后续:)
12 若需要再安装cuda9.1: 会报错:
- 15 Using built-in stream user interface
- 16 -> Detected 56 CPUs online; setting concurrency level to 32.
- 17 -> License accepted by command line option.
- 18 -> Installing NVIDIA driver version 387.26.
- 19 -> The NVIDIA driver appears to have been installed previously using a different installer. To prevent potential conflicts, it is recommended either to update the
- existing installation using the same mechanism by which it was originally installed, or to uninstall the existing installation before installing this driver. 20
- 21 Please review the message provided by the maintainer of this alternate installation method and decide how to proceed:
- 22
- 23 The package that is already installed is named nvidia-384.
- 24
- 25 You can upgrade the driver by running:
- 26 `apt-get install nvidia-384 nvidia-modprobe nvidia-settings`
- 27
- 28 You can remove nvidia-384, and all related packages, by running:
- 29 `apt-get remove --purge nvidia-384 nvidia-modprobe nvidia-settings`
- 30
- 31 This package is maintained by NVIDIA (cudatools@nvidia.com).
- 32
- 33
- 34 (Answer: Abort installation)
- 35 ERROR: The installation was canceled due to the availability or presence of an alternate driver installation. Please see /var/log/nvidia-installer.log for more de
- tails.
意思是CUDA 驱动版本冲突:
CUDA8.0依赖的是384版本驱动,而CUDA9.1依赖的是387版本驱动,因此需要更新/卸载384驱动。
卸载:
- sudo apt-get remove --purge nvidia-384 nvidia-modprobe nvidia-settings
卸载细节:
- lin@cc:~/tools/cuda9.1$ sudo apt-get remove --purge nvidia-384 nvidia-modprobe n
- vidia-settingsReading package lists... Done
- Building dependency tree
- Reading state information... Done
- The following packages were automatically installed and are no longer required:
- apt-xapian-index aptitude-common cuda-command-line-tools-8-0 cuda-core-8-0
- cuda-cublas-8-0 cuda-cublas-dev-8-0 cuda-cudart-8-0 cuda-cudart-dev-8-0
- cuda-cufft-8-0 cuda-cufft-dev-8-0 cuda-curand-8-0 cuda-curand-dev-8-0
- cuda-cusolver-8-0 cuda-cusolver-dev-8-0 cuda-cusparse-8-0 cuda-cusparse-dev-8-0
- cuda-documentation-8-0 cuda-driver-dev-8-0 cuda-license-8-0 cuda-misc-headers-8-0
- cuda-npp-8-0 cuda-npp-dev-8-0 cuda-nvgraph-8-0 cuda-nvgraph-dev-8-0 cuda-nvml-dev-8-0
- cuda-nvrtc-8-0 cuda-nvrtc-dev-8-0 cuda-samples-8-0 cuda-toolkit-8-0
- cuda-visual-tools-8-0 dh-apparmor fonts-dejavu g++-4.8 g++-4.8-multilib
- gir1.2-gconf-2.0 gir1.2-gnomebluetooth-1.0 gstreamer1.0-clutter iproute
- lib32stdc++-4.8-dev libatk-wrapper-java libatk-wrapper-java-jni libavcodec54
- libavformat54 libavutil52 libboost-atomic1.54.0 libboost-chrono1.54.0
- libboost-context1.54.0 libboost-date-time1.54.0 libboost-filesystem1.54.0
- libboost-graph1.54.0 libboost-iostreams1.54.0 libboost-locale1.54.0
- libboost-log1.54.0 libboost-math1.54.0 libboost-program-options1.54.0
- libboost-python1.54.0 libboost-random1.54.0 libboost-regex1.54.0
- libboost-serialization1.54.0 libboost-signals1.54.0 libboost-system1.54.0
- libboost-test1.54.0 libboost-thread1.54.0 libboost-timer1.54.0 libboost-wave1.54.0
- libc-ares2 libcamel-1.2-45 libclutter-gst-2.0-0 libcolord1 libcolorhug1 libcr0
- libcwidget3 libdbi1 libebackend-1.2-7 libebook-1.2-14 libebook-contacts-1.2-0
- libedata-book-1.2-20 libedataserver-1.2-18 libegl1-mesa-drivers libelfg0 libept1.4.12
- libgcrypt11-dev libgdata13 libgee2 libgif4 libgnome-bluetooth11 libgnome-desktop-3-7
- libgnutlsxx27 libgphoto2-port10 libgtop2-7 libicu52 libilmbase6 libimobiledevice4
- libisl10 libjavascriptcoregtk-3.0-0 libllvm3.4 libmbim-glib0 libmysqlclient-dev
- libmysqlclient18 libopenexr6 libopenjpeg2 libopenvg1-mesa libpango1.0-0 libpci-dev
- libplist1 libpoppler44 libqmi-glib0 libqpdf13 libqt5positioning5 libqt5sensors5
- libqt5test5 librrd4 libservlet3.0-java libsigc++-2.0-0c2a libsqlite3-dev libswscale2
- libsystemd-journal0 libtorque2 libupower-glib1 libusbmuxd2 libv8-3.14.5 libvpx1
- libvte-2.90-9 libvte-2.90-common libwebkitgtk-3.0-0 libwebkitgtk-3.0-common
- libx264-142 libx32stdc++-4.8-dev libxcb-util0 libxen-4.4 libzeitgeist-1.0-1
- linux-image-3.13.0-145-generic linux-image-extra-3.13.0-145-generic
- linux-image-generic-lts-xenial linux-lts-xenial-cloud-tools-4.4.0-31
- linux-lts-xenial-tools-4.4.0-31 nvidia-prime obex-data-server php5-cli php5-common
- php5-json php5-readline python-colorama python-cups python-dbus-dev python-distlib
- python-gnomekeyring python-gobject python-html5lib python-notify python-pycurl
- python-smbc python-urlgrabber python-xapian python3-colorama python3-distlib
- python3-imaging ttf-dejavu ttf-dejavu-core ttf-dejavu-extra watershed
- Use 'sudo apt autoremove' to remove them.
- The following packages will be REMOVED:
- cuda* cuda-8-0* cuda-demo-suite-8-0* cuda-drivers* cuda-runtime-8-0* libcuda1-384*
- libcupti5.5* nvidia-384* nvidia-384-dev* nvidia-modprobe* nvidia-opencl-icd-384*
- nvidia-settings*
- 0 upgraded, 0 newly installed, 12 to remove and 56 not upgraded.
- After this operation, 375 MB disk space will be freed.
- Do you want to continue? [Y/n] y
- (Reading database ... 219065 files and directories currently installed.)
- Removing cuda (8.0.61-1) ...
- Removing cuda-8-0 (8.0.61-1) ...
- Removing cuda-demo-suite-8-0 (8.0.61-1) ...
- Removing cuda-runtime-8-0 (8.0.61-1) ...
- Removing cuda-drivers (384.111-1) ...
- Removing libcupti5.5:amd64 (5.5.22-3ubuntu1) ...
- Purging configuration files for libcupti5.5:amd64 (5.5.22-3ubuntu1) ...
- Removing libcuda1-384 (384.111-0ubuntu1) ...
- Purging configuration files for libcuda1-384 (384.111-0ubuntu1) ...
- Removing nvidia-opencl-icd-384 (384.111-0ubuntu1) ...
- Purging configuration files for nvidia-opencl-icd-384 (384.111-0ubuntu1) ...
- Removing nvidia-384-dev (384.111-0ubuntu1) ...
- Removing nvidia-384 (384.111-0ubuntu1) ...
- Removing all DKMS Modules
- Done.
- update-alternatives: using /usr/lib/nvidia-384-prime/ld.so.conf to provide /etc/ld.so.con
- f.d/x86_64-linux-gnu_GL.conf (x86_64-linux-gnu_gl_conf) in auto modeupdate-alternatives: using /usr/lib/nvidia-384-prime/ld.so.conf to provide /etc/ld.so.con
- f.d/x86_64-linux-gnu_EGL.conf (x86_64-linux-gnu_egl_conf) in auto modeupdate-alternatives: using /usr/lib/nvidia-384-prime/alt_ld.so.conf to provide /etc/ld.so
- .conf.d/i386-linux-gnu_GL.conf (i386-linux-gnu_gl_conf) in auto modeupdate-alternatives: using /usr/lib/nvidia-384-prime/alt_ld.so.conf to provide /etc/ld.so
- .conf.d/i386-linux-gnu_EGL.conf (i386-linux-gnu_egl_conf) in auto modeupdate-alternatives: using /usr/lib/x86_64-linux-gnu/mesa/ld.so.conf to provide /etc/ld.s
- o.conf.d/x86_64-linux-gnu_GL.conf (x86_64-linux-gnu_gl_conf) in auto modeupdate-alternatives: using /usr/lib/x86_64-linux-gnu/mesa-egl/ld.so.conf to provide /etc/
- ld.so.conf.d/x86_64-linux-gnu_EGL.conf (x86_64-linux-gnu_egl_conf) in auto modeupdate-initramfs: deferring update (trigger activated)
- Purging configuration files for nvidia-384 (384.111-0ubuntu1) ...
- update-initramfs: deferring update (trigger activated)
- Removing nvidia-modprobe (384.111-0ubuntu1) ...
- Removing nvidia-settings (384.111-0ubuntu1) ...
- Purging configuration files for nvidia-settings (384.111-0ubuntu1) ...
- Processing triggers for libc-bin (2.23-0ubuntu10) ...
- Processing triggers for man-db (2.7.5-1) ...
- Processing triggers for initramfs-tools (0.122ubuntu8.11) ...
- update-initramfs: Generating /boot/initrd.img-4.4.0-124-generic
- W: Possible missing firmware /lib/firmware/ast_dp501_fw.bin for module ast
- Processing triggers for desktop-file-utils (0.22-1ubuntu5.1) ...
- Processing triggers for mime-support (3.59ubuntu1) ...
- Processing triggers for gnome-menus (3.13.3-6ubuntu3.1) ...
13. 继续安装cuda
安装细节:
- Installing the NVIDIA display driver...
- Installing the CUDA Toolkit in /usr/local/cuda-9.1 ...
- Installing the CUDA Samples in /home/linlf/tools/cuda9.1 ...
- Copying samples to /home/linlf/tools/cuda9.1/NVIDIA_CUDA-9.1_Samples now...
- Finished copying samples.
- ===========
- = Summary =
- ===========
- Driver: Installed
- Toolkit: Installed in /usr/local/cuda-9.1
- Samples: Installed in /home/linlf/tools/cuda9.1
- Please make sure that
- - PATH includes /usr/local/cuda-9.1/bin
- - LD_LIBRARY_PATH includes /usr/local/cuda-9.1/lib64, or, add /usr/local/cuda-9.1/lib64 to /etc/ld.so.conf and run ldconfig as root
- To uninstall the CUDA Toolkit, run the uninstall script in /usr/local/cuda-9.1/bin
- To uninstall the NVIDIA Driver, run nvidia-uninstall
- Please see CUDA_Installation_Guide_Linux.pdf in /usr/local/cuda-9.1/doc/pdf for detailed information on setting up CUDA.
- Logfile is /tmp/cuda_install_31995.log
14 最后,如果想更改cuda版本成9.1:
- rm –rf /usr/local/cuda
- ln -s /usr/local/cuda-9.1 /usr/local/cuda
参考: https://blog.csdn.net/u010821666/article/details/79957071


 5057
5057

 被折叠的 条评论
为什么被折叠?
被折叠的 条评论
为什么被折叠?
 到【灌水乐园】发言


