


普通vue项目的部署
- 在vue3.0中部署的配置文件又换了一个地方,在vue.co
在这里插入代码片nfig.js加入这样的话
	module.exports = {
	    publicPath: './',
	    outputDir: 'dist',
	    assetsDir: 'static'
	}
- 在项目根目录中的src/router/index.js,修改
const router = new VueRouter({
	//mode: 'history',
  mode: 'hash',
  base: process.env.BASE_URL,
  routes
})
- 进入控制台,cd 到项目根目录中
	npm run build
	or
	yarn build
- Cordova环境搭建
确保android环境搭建好了,jdk,sdk,gradle
安装了node环境
$ npm install cordova -g
$ cordova create hello com.briup.hello 我的App
- 上面这一步容易出错
 解决办法找到cordova项目将其node_modules删除后重新获取一下依赖


- 添加平台
$ cd hello
$ cordova platform add android
#添加安卓环境,还有很多,例如ios 自行去cordova官网查询
$ cordova platform ls
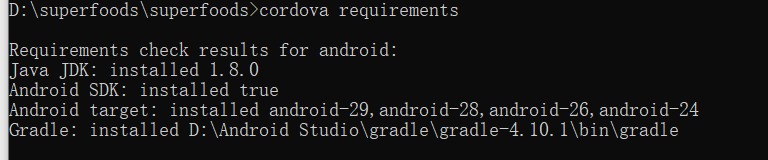
- 检测当前平台环境是否可用。
$ cordova requirements
成功截图
- 运行真机,此时手机端一定要开启手机的开发者模式,usb调试开启。
$ adb devices
- 因为现在大多手机的版本是安卓9.0以上的,所以需要修改我们cordova中的配置文件
 打开AndroidMainfest.xml,配置
android:networkSecurityConfig="@xml/network_security_config"。
<?xml version='1.0' encoding='utf-8'?>
<manifest android:hardwareAccelerated="true" android:versionCode="10000" android:versionName="1.0.0" package="com.briup.superfoods" xmlns:android="http://schemas.android.com/apk/res/android">
    <supports-screens android:anyDensity="true" android:largeScreens="true" android:normalScreens="true" android:resizeable="true" android:smallScreens="true" android:xlargeScreens="true" />
    <uses-permission android:name="android.permission.INTERNET" />
    <application android:hardwareAccelerated="true" android:icon="@mipmap/ic_launcher" android:label="@string/app_name"
    android:networkSecurityConfig="@xml/network_security_config"
    android:supportsRtl="true">
        <activity android:configChanges="orientation|keyboardHidden|keyboard|screenSize|locale|smallestScreenSize|screenLayout|uiMode" android:label="@string/activity_name" android:launchMode="singleTop" android:name="MainActivity" android:theme="@android:style/Theme.DeviceDefault.NoActionBar" android:windowSoftInputMode="adjustResize">
            <intent-filter android:label="@string/launcher_name">
                <action android:name="android.intent.action.MAIN" />
                <category android:name="android.intent.category.LAUNCHER" />
            </intent-filter>
        </activity>
    </application>
</manifest>
打开res/xml,新建network_security_config.xml配置如下信息。
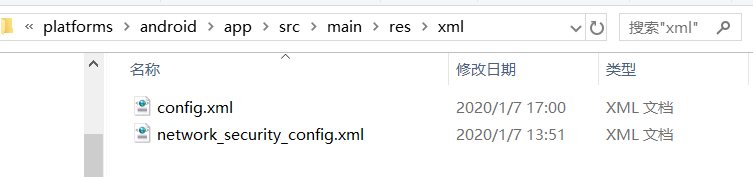
<?xml version="1.0" encoding="utf-8"?> <network-security-config> <base-config cleartextTrafficPermitted="true" /> </network-security-config>
- 然后回到控制台,接着进行第八步的操作,执行
$ cordova run android
- app运行到手机

Vue、axios、vue-element-admin技术栈的打包操作
-
更改.env.production文件

-
更改vue.config.js。

-
main.js中注释代码

-
执行npm run build.


 3201
3201


 被折叠的 条评论
为什么被折叠?
被折叠的 条评论
为什么被折叠?
 到【灌水乐园】发言


