


1. Vue高级
1.1 Vue自定义组件(了解)
<div id="div">
    <!-- 从vue对象中获取值,并通过自定义组件中props的某个元素值传递给自定义组件解析渲染 -->
    <my-ul :listdata="listdataUser"></my-ul>
</div>
</body>
<script>
    Vue.component(
        // 自定义组件名称
        "my-ul",

        // JSON格式数据,数据、逻辑、自定义组件的格式
        {
            // props可以为自定义组件(自定义列表)提供数据
            // 在自定以组件中,使用差值表达式等方式获取其中的值

            // 使用自定义组件时,就可以通过 :props中某个元素的值 = vue对象中某个属性名
            // 的方式从vue对象中获取数据,并传递给自定义组件
            props:["listdata"],

            // 为自定义组件传值,这些值多位固定不可以修改的值
            // 在自定以组件中,使用差值表达式等方式获取其中的值
            data: function () {
                return{
                    prefix: "$",
                }

            },
            //解析标签模板
            // 这里可以使用以后可用的标签、vue指令等内容,其中的值可以来源于props和data
            // 用户使用自定义标签的时候,vue会根据当前组件去解析渲染,最终得到一个显示效果
            template : "<ul><li v-for='iterm in listdata'>{{prefix}}{{iterm}}</li></ul>"
        })


    // 托管指定区域
    new Vue({
        el: "#div",
        data:{
            listdataUser: ["林心如","高圆圆","曹阿姨"]
        }
    });

    /*  Vue.component(
         // 组件名称
         "my-button",

         // JSON格式数据,数据、逻辑、自定义组件的格式
         {
         // 属性
         props:["style"],
         // 数据函数
         data: function(){
             return{
                 msg:"我的按钮"
             }
         },
         //解析标签模板
         template:"<button style='color:red'>{{msg}}</button>"
     });

     new Vue({
         el:"#div"
     });*/

</script>

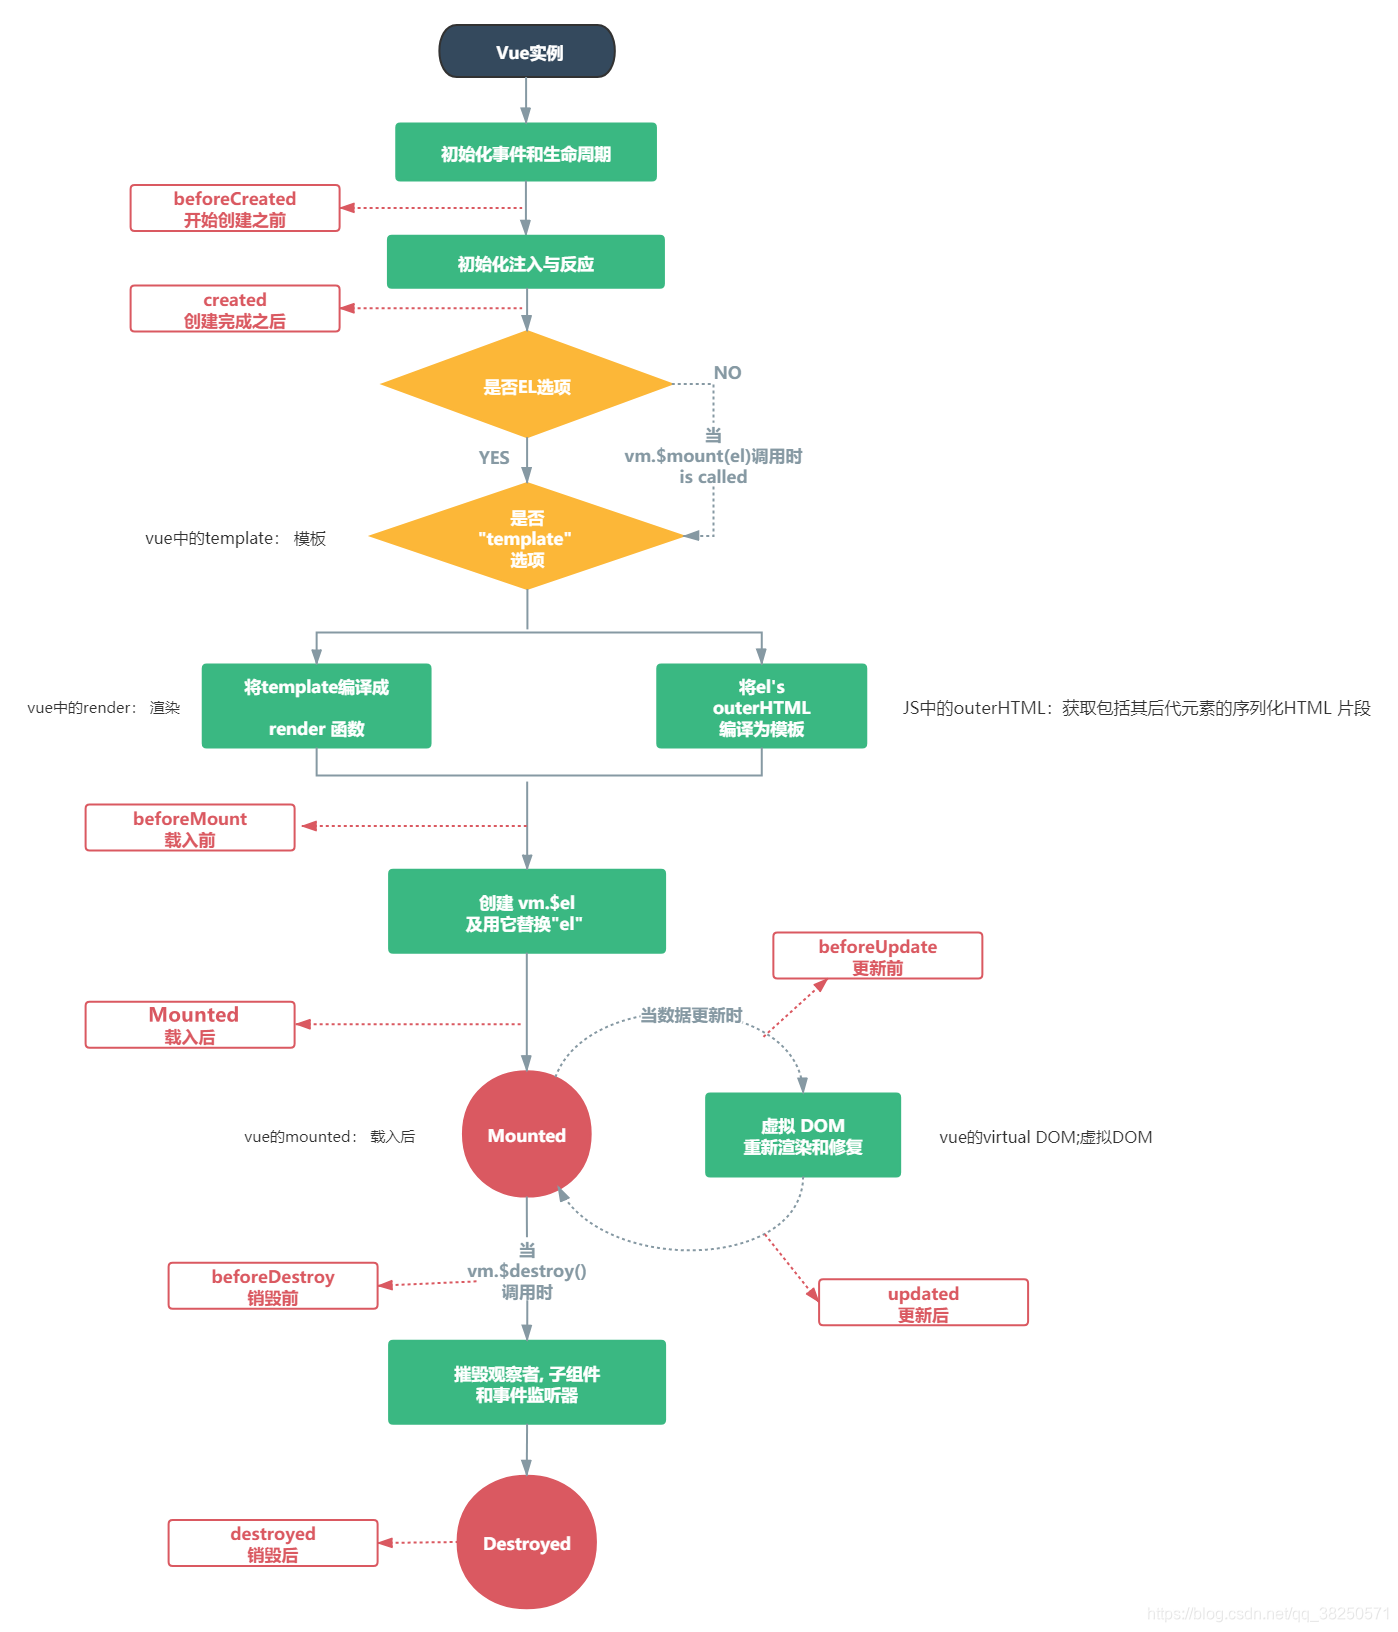
1.2 Vue的生命周期
使用场景:
Mounted,页面已经加载完成,
Vue对象已经接管对应的元素并完成了数据绑定。可以实现和
js/jq中一样入口函数的效果。
/*
    入口函数
    原生js,只能绑定一个,后面覆盖前面
        window.onload = function(){}
    jq入口函数,调用方法,可以调用多次
        $(document).ready(function(){})
        $(function(){})

    Vue入口函数
        mounted: function() {}
*/
<div id="app">
    {{message}}
</div>
</body>
<script>
    let vm = new Vue({
        el: '#app',
        data: {
            message: 'Vue的生命周期'
        },
        methdos: {},
        // 使用vue做页面加载事件的监听
        // vue的页面入口函数
        mounted: function () {
            console.group('------mounted 挂载结束状态------');
            console.log("%c%s", "color:red", "el     : " + this.$el); //已被初始化
            console.log(this.$el);
            console.log("%c%s", "color:red", "data   : " + this.$data); //已被初始化
            console.log("%c%s", "color:red", "message: " + this.message); //已被初始化
        }


        ,
        beforeCreate: function () {
            console.group('------beforeCreate创建前状态------');
            console.log("%c%s", "color:red", "el     : " + this.$el); //undefined
            console.log("%c%s", "color:red", "data   : " + this.$data); //undefined
            console.log("%c%s", "color:red", "message: " + this.message);//undefined
        },
        created: function () {
            console.group('------created创建完毕状态------');
            console.log("%c%s", "color:red", "el     : " + this.$el); //undefined
            console.log("%c%s", "color:red", "data   : " + this.$data); //已被初始化
            console.log("%c%s", "color:red", "message: " + this.message); //已被初始化
        },
        beforeMount: function () {
            console.group('------beforeMount挂载前状态------');
            console.log("%c%s", "color:red", "el     : " + (this.$el)); //已被初始化
            console.log(this.$el);
            console.log("%c%s", "color:red", "data   : " + this.$data); //已被初始化
            console.log("%c%s", "color:red", "message: " + this.message); //已被初始化
        },

        beforeUpdate: function () {
            console.group('beforeUpdate 更新前状态===============》');
            let dom = document.getElementById("app").innerHTML;
            console.log(dom);
            console.log("%c%s", "color:red", "el     : " + this.$el);
            console.log(this.$el);
            console.log("%c%s", "color:red", "data   : " + this.$data);
            console.log("%c%s", "color:red", "message: " + this.message);
        },
        updated: function () {
            console.group('updated 更新完成状态===============》');
            let dom = document.getElementById("app").innerHTML;
            console.log(dom);
            console.log("%c%s", "color:red", "el     : " + this.$el);
            console.log(this.$el);
            console.log("%c%s", "color:red", "data   : " + this.$data);
            console.log("%c%s", "color:red", "message: " + this.message);
        },
        beforeDestroy: function () {
            console.group('beforeDestroy 销毁前状态===============》');
            console.log("%c%s", "color:red", "el     : " + this.$el);
            console.log(this.$el);
            console.log("%c%s", "color:red", "data   : " + this.$data);
            console.log("%c%s", "color:red", "message: " + this.message);
        },
        destroyed: function () {
            console.group('destroyed 销毁完成状态===============》');
            console.log("%c%s", "color:red", "el     : " + this.$el);
            console.log(this.$el);
            console.log("%c%s", "color:red", "data   : " + this.$data);
            console.log("%c%s", "color:red", "message: " + this.message);
        }
    });


    // 销毁Vue对象
    vm.$destroy();
    vm.message = "hehe";	// 销毁后 Vue 实例会解绑所有内容

    // 设置data中message数据值
    // vm.message = "good...";
1.3 axios异步请求
使用Vue之后无法使用原生js或者jQuery和后台交互,就需要使用axios完成与后台的异步交互。
注意点:
- get方式请求参数写在
url中 - post方式请求参数写在第二个参数位置,key=value&形式,学完
springmvc之后可以直接传json对象 - 回调函数另外的写法:then传两个函数,分别处理响应正常和响应失败
- 后台响应的数据存在形参
respone的data中
<script>
    new Vue({
        el: "#div",
        data: {
            name: "张三"
        },
        methods: {
            send() {
                // GET请求方式一
                // axios.get("testServlet?name=" + this.name)
                //     .then(resp => {
                //         alert(resp.data);
                //     })
                //     .catch(error => {
                //         alert(error);
                //     })
                //

                // GET请求方式二
                axios.get("testServlet?name=" + this.name)
                // 效果等同于匿名函数
                // .then(function(resp){
                // 响应完全有then来处理,响应正常时第一个匿名函数处理
                    .then(resp => {
                            alert(resp.data);

                        },
                        // 响应失败后,第二个匿名函数处理
                        error => {
                            alert(error);
                        })


                // POST方式请求,请求参数有两种格式:
                // 1. key=value&k2=v2  (queryStr)
                // 2. json格式,后台也要使用json格式解析(SpringMVC就可以轻松解析json格式的请求数据)
                axios.post("testServlet", "name=" + this.name)
                    .then(resp => {
                        alert(resp.data);
                    })
                    .catch(error => {
                        alert(error);
                    })
            }
        }
    });
</script>
综合案例
- 请求参数封装抽取成方法(在查询所有的时候封装)
// 解析json格式对象,转换成请求需要的格式:k1=v1&k2=v2&k3=v3
// 假如 传递的是两个json k1:v1,k2:v2   k3:v3
parseParam() {
    // 定义一个字符串
    let str = "";

    // arguments js函数中的内置数组,接收实参
    // 遍历arguments获取到每个json对象
    for (let argumentsIndex in arguments) {
        // 根据索引获取元素的值
        // 每个值都是json对象,本质上是一个js对象,继续遍历,获取每个属性名和属性值
        let jsonObject = arguments[argumentsIndex];


        // forin 可以遍历js对象
        // for (let 属性名  in js对象) {
        //     属性值 = js对象[属性名]
        // }
        for (let name  in jsonObject) {
            // 最后会多一个& ,先不管
            str += name + "=" + jsonObject[name] + "&";
        }
    }
    console.log(str);
    return str;

},
BeanUtils类型转换器
/*
添加数据功能
*/
private void addStu(HttpServletRequest req, HttpServletResponse resp) {
//获取请求参数
Map<String, String[]> map = req.getParameterMap();
//String currentPage = req.getParameter("currentPage");
//String pageSize = req.getParameter("pageSize");
//封装Student对象
Student stu = new Student();
/*
使用BeanUtils做自动封装的时候,支持
"yyyy-MM-dd"格式的日期字符串 和 java.sql.Date相互转换的
不支持
"yyyy-MM-dd"格式的日期字符串 和 java.util.Date相互转换
如果要实现后者的转换,需要手动添加一个日期类型转换器
*/
/*
方式1:
1. 创建一个日期转换器对象,设置支持从日期格式
2. 把新的转换器注册进注册器
*/
//1. 创建一个日期转换器对象,设置支持从日期格式
DateConverter converter = new DateConverter();
converter.setPattern("yyyy-MM-dd");
//2. 把新的转换器注册进注册器
ConvertUtils.register(converter,java.util.Date.class);
/*
方式2:自定义一个类型转换器,实现 "yyyy-MM-dd"格式的日期字符串 和 java.util.Date相互转换
1. 自定义一个类,实现converter接口,在接口的实现类中编写转换逻辑
2. 把新的转换器注册进注册器
*/
//1. 自定义一个类,实现converter接口,在接口的实现类中编写转换逻辑
/* Converter converter1 = new Converter(){
*//**
* 在convert中实现转换逻辑
* @param type 代表的日志类型,只不过现在用不到
* @param str 被转换的字符串
* @return 转换后的日期对象
*//*
@Override
public java.util.Date convert(Class type, Object str) {
SimpleDateFormat sdf = new SimpleDateFormat("yyyy-MM-dd");
Date result = null;
try {
result = sdf.parse((String) str);
} catch (ParseException e) {
e.printStackTrace();
}
return result;
}
};
//2. 把新的转换器注册进注册器
ConvertUtils.register(converter1, java.util.Date.class);
*/
//注册日期转换器方法
//dateConvert();
try {
BeanUtils.populate(stu,map);
} catch (Exception e) {
e.printStackTrace();
}
//调用业务层的添加方法
service.addStu(stu);
//重定向到分页查询功能
// TODO 已完成 添加学生的方法只需要实现添加即可,不要耦合依赖其他的方法;让前台再发起一次分页查询请求
/*try {
resp.sendRedirect(req.getContextPath() + "/studentServlet?method=selectByPage¤tPage=" + currentPage + "&pageSize=" + pageSize);
} catch (IOException e) {
e.printStackTrace();
}*/
}
BaseServlet抽取
根据请求的method不同,分发调用不同的方法来处理请求。
/**
 * @Author Vsunks.v
 * @Date 2020/8/19 15:49
 * @Description: Servlet工具类,所有的自定义servlet都继承自该Servlet
 */
public class BaseServlet extends HttpServlet {
    @Override
    protected void doGet(HttpServletRequest req, HttpServletResponse resp) throws ServletException, IOException {
        //设置请求和响应编码
        req.setCharacterEncoding("UTF-8");
        resp.setContentType("text/html;charset=UTF-8");

        //1.获取方法名
        String methodName = req.getParameter("method");

        try {
            // 要求请求参数中的method参数的值需要和方法名一样
            // 通过发反射获取方法的封装对象
            Method methodObject = this.getClass().getDeclaredMethod(methodName, HttpServletRequest.class,
                    HttpServletResponse.class);
            // 暴力反射
            methodObject.setAccessible(true);

            // 通过反射调用方法
            methodObject.invoke(this, req, resp);

        } catch (Exception e) {
            e.printStackTrace();
        }
    }

    @Override
    protected void doPost(HttpServletRequest req, HttpServletResponse resp) throws ServletException, IOException {
        doGet(req, resp);
    }
}
StudentServlet
@WebServlet("/studentServlet")
public class StudentServlet extends BaseServlet {
    private void deleteStu(HttpServletRequest req, HttpServletResponse resp){}
    private void updateStu(HttpServletRequest req, HttpServletResponse resp) {}
    private void addStu(HttpServletRequest req, HttpServletResponse resp) {}
    private void selectByPage(HttpServletRequest req, HttpServletResponse resp) {}
}
jackson序列化Date,指定格式
import com.fasterxml.jackson.annotation.JsonFormat;

import java.util.Date;

/*
    学生实体类
 */
public class Student {
    private String number;  //学号
    private String name;    //姓名
    @JsonFormat(pattern = "yyyy-MM-dd")
    private Date birthday;  //生日
    private String address; //地址
}
tpServletRequest req, HttpServletResponse resp) {}
private void selectByPage(HttpServletRequest req, HttpServletResponse resp) {}
}
`jackson`序列化Date,指定格式

```java
import com.fasterxml.jackson.annotation.JsonFormat;

import java.util.Date;

/*
    学生实体类
 */
public class Student {
    private String number;  //学号
    private String name;    //姓名
    @JsonFormat(pattern = "yyyy-MM-dd")
    private Date birthday;  //生日
    private String address; //地址
}


 664
664


 被折叠的 条评论
为什么被折叠?
被折叠的 条评论
为什么被折叠?
 到【灌水乐园】发言


