


直播需要考虑一下内容:
- 应用场景(待讨论)
- 用户量(待讨论)
- 带宽需求(待讨论)
- 服务器搭设及运维
方案一:服务器搭建(nginx+rtmp搭建)
前期准备:
yum环境下(主要是为了解决包之间的依赖关系,比较方便)
需要下载nginx源码包,下载nginx-rtmp-module模块包
一、首先就是先下载nginx-rtmp-module
官方github地址:GitHub - arut/nginx-rtmp-module: NGINX-based Media Streaming Server
git clone https://github.com/arut/nginx-rtmp-module.git
注:可以在linux下直接联网下载,但是需要git安装,yum install git。
也可以在其他地方下载好然后传进服务器,当然需要安装git环境。
二、下载nginx
nginx的官方网站为:nginx: download
下载nginx wget http://nginx.org/download/nginx-1.8.0.tar.gz
在安装Nginx之前,需要安装gcc、 openssl-devel、 pcre-devel和zlib-devel软件库,具体如下:
yum install gcc-c++
yum install openssl-devel
yum install pcre-devel
yum install zlib-devel
安装步骤:
下载包 wget http://nginx.org/download/nginx-1.8.0.tar.gz
tar -zxvf nginx-1.8.0.tar.gz
cd nginx-1.8.0
./configure --prefix=/usr/local/nginx --add-module=../nginx-rtmp-module --with-http_ssl_module
make && make install
注:这里rtmp-module包是和nginx同级,所以是 =../nginx-rtmp...
三、修改nginx配置文件
vim /usr/local/nginx/conf/nginx.conf
1.在http里的server里添加

2.直播配置:在http外面,在最末尾添加rtmp内容,如下:
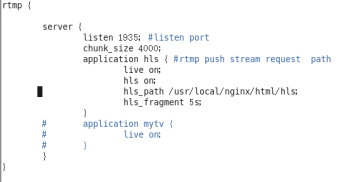
注意:还有就是这个路径,看自己的实际情况的访问根目录来,/usr/local/nginx/html/这个路径,然而/usr/local/nginx/html/hls肯定没有这个目录,所以需要建一个放流文件的目录hls,并且需要改权限可读可写的权限
注:上面原来listen 80;改成81是为了防止端口冲突,可以根据实际情况更改,为了方便测试建议改成8080
启动nginx
/usr/local/nginx/sbin/nginx -c /usr/local/nginx/conf/nginx.conf
如果启动报错,在nginx文件夹中新建logs文件夹,然后再启动。
/usr/local/nginx/sbin/nginx -c /usr/local/nginx/conf/nginx.conf -s reload 重启服务
四:防火墙开设80端口和1935端口
/etc/init.d/iptables status(查看防火墙配置)
vim /etc/sysconfig/iptables(进入防火墙配置文件)
-A INPUT -m state –state NEW -m tcp -p tcp –dport 80 -j ACCEPT
-A INPUT -m state –state NEW -m tcp -p tcp –dport 1935 -j ACCEPT(添加配置文件)
保存退出
重启防火墙(service iptables restart)
五:推流测试
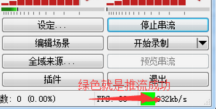
下载OBS直播录播软件
设置推流数据:

注:没做任何限制的话,目前串流码可以随便写,例如:test
下载vlc播放器
设置好地址后就可以观看直播了

方案二:服务器搭建(srs+nginx搭建)
1、下载SRS源码
git clone https://github.com/ossrs/srs
2、安装SRS
cd srs/trunk
./configure && make
3、运行
/usr/local/srs/trunk/objs/srs -c /usr/local/srs/trunk/conf/srs.conf
重启:/usr/local/srs/trunk/etc/init.d/srs restart
停止:/usr/local/srs/trunk/etc/init.d/srs stop
4、配置srs.conf
# conf/srs.conf
listen 1935;
max_connections 1000;
srs_log_file ./objs/srs.log;
vhost epsnet {(这里设置成什么,流名称live=后面就是什么)
hls {
#是否开启HLS
enabled on;
hls_path ./objs/nginx/html;
hls_m3u8_file [app]/[stream].m3u8;
#指定ts切片的最小长度(单位:秒)
hls_fragment 3;
#指定HLS大小,即m3u8中ts文件的时长之和
hls_window 3;
}
}
- 获取编译nginx
安装步骤:
下载包 wget http://nginx.org/download/nginx-1.8.0.tar.gz
tar -zxvf nginx-1.8.0.tar.gz
cd nginx-1.8.0
nginx-1.8.0文件名称修改为nginx
./configure
make && make install
- 编辑配置文件(vim nginx/conf/nginx.conf)
user root;
worker_processes 1;
error_log logs/error.log error;
events {
worker_connections 1024;
}
http {
include mime.types;
default_type application/octet-stream;
log_format main '$remote_addr - $remote_user [$time_local] "$request" '
access_log logs/access.log main;
sendfile on;
keepalive_timeout 65;
server {
listen 80;
server_name localhost;
location / {
root html;
index index.html index.htm;
}
error_page 500 502 503 504 /50x.html;
location = /50x.html {
root html;
}
location ~* \.m3u8 {
root /home/dc2-user/srs/trunk/objs/nginx/html/;
add_header Access-Control-Allow-Origin *;
}
location ~* \.ts {
root /home/dc2-user/srs/trunk/objs/nginx/html;
add_header Access-Control-Allow-Origin *;
}
location ~* crossdomain.xml {
root /usr/local/nginx/html/;
}
}
}
- 启动nginx
/usr/local/nginx/objs/nginx -c /usr/local/nginx/conf/nginx.conf
如果启动报错,在nginx文件夹中新建logs文件夹,然后再启动。
/usr/local/nginx/objs/nginx -c /usr/local/nginx/conf/nginx.conf -s reload 重启服务
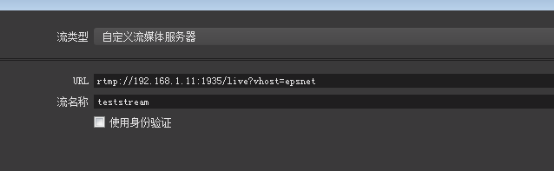
- OBS设置推流地址
- rtmp://192.168.1.11:1935/live?vhost=epsnet/teststream(流名称随便定义)
- VLC拉流
- http://192.168.1.11:8080/live/teststream.m3u8(手机端播放地址)
- rtmp://192.168.1.11:1935/live?vhost=epsnet/teststream(pc端播放地址)
-
方案比较
优点:方案一可以做直播,也可以做点播,方案二只能做直播。
缺点:方案一总体延迟大约在5s左右,方案二延迟大约在1s左右。
关注小程序获取更多源码资讯


 446
446


 被折叠的 条评论
为什么被折叠?
被折叠的 条评论
为什么被折叠?
 到【灌水乐园】发言


