


下载ubuntu基本裸系统
http://cdimage.ubuntu.com/ubuntu-base/releases/16.04/release/
http://cdimage.ubuntu.com/ubuntu-base/releases/16.04/release/ubuntu-base-16.04-core-armhf.tar.gz
下载ubuntu-base-16.04-core-armhf.tar.gz之后,建立一个ubuntufs文件,然后进行文件的解压,复制到ubuntufs文件夹里面:
---/rk3288$ mkdir ubuntufs
---/rk3288$ sudo tar -xpf ubuntu-base-16.04-core-armhf.tar.gz -C ubuntufs
接下来就是修改我们的根文件系统
在修改之前我们要做一些准备工作
由于我们要chroot,所以需要能够在chroot环境执行arm64版本的binary,所以我们要接触linux的binfmt机制和qemu static解释器。qemu是纯软件实现的虚拟化模拟器,几乎可以模拟任何硬件设备,有了它就可以通过chroot命令进入不同平台架构的根文件系统进行相关操作。
安装qemu
---/rk3288$ sudo apt-get install qemu-user-static
然后复制到
---/rk3288$ sudo cp /usr/bin/qemu-arm-static ubuntufs/usr/bin/
准备网络
将本机的dns配置复制到目标rootfs
---/rk3288$ sudo cp -b /etc/resolv.conf ubuntufs/etc/resolv.conf
把所有的# deb替换成deb,即取消注释,然后将所有链接换成阿里云的源。另外需要注意的是,其中的xenial代表ubuntu16.04版本,如果是ubuntu18.04则对应bionic。
---/rk3288$ sudo vi ubuntufs/etc/apt/sources.list

# See http://help.ubuntu.com/community/UpgradeNotes for how to upgrade to
# newer versions of the distribution.

deb http://mirrors.aliyun.com/ubuntu-ports/ xenial main restricted
deb-src http://mirrors.aliyun.com/ubuntu-ports/ xenial main restricted

## Major bug fix updates produced after the final release of the
## distribution.
deb http://mirrors.aliyun.com/ubuntu-ports/ xenial-updates main restricted
deb-src http://mirrors.aliyun.com/ubuntu-ports/ xenial-updates main restricted

## Uncomment the following two lines to add software from the 'universe'
## repository.
## N.B. software from this repository is ENTIRELY UNSUPPORTED by the Ubuntu
## team. Also, please note that software in universe WILL NOT receive any
## review or updates from the Ubuntu security team.
deb http://mirrors.aliyun.com/ubuntu-ports/ xenial universe
deb-src http://mirrors.aliyun.com/ubuntu-ports/ xenial universe
deb http://mirrors.aliyun.com/ubuntu-ports/ xenial-updates universe
deb-src http://mirrors.aliyun.com/ubuntu-ports/ xenial-updates universe

## N.B. software from this repository may not have been tested as
## extensively as that contained in the main release, although it includes
## newer versions of some applications which may provide useful features.
## Also, please note that software in backports WILL NOT receive any review
## or updates from the Ubuntu security team.
deb http://mirrors.aliyun.com/ubuntu-ports/ xenial-backports main restricted
deb-src http://mirrors.aliyun.com/ubuntu-ports/ xenial-backports main restricted

deb http://mirrors.aliyun.com/ubuntu-ports/ xenial-security main restricted
deb-src http://mirrors.aliyun.com/ubuntu-ports/ xenial-security main restricted
deb http://mirrors.aliyun.com/ubuntu-ports/ xenial-security universe
deb-src http://mirrors.aliyun.com/ubuntu-ports/ xenial-security universe
deb http://mirrors.aliyun.com/ubuntu-ports/ xenial-security multiverse
deb-src http://mirrors.aliyun.com/ubuntu-ports/ xenial-security multiverse
使用chroot命令进入根文件系统进行操作
---/rk3288$ sudo chroot ubuntufs
chroot,即 change root directory,更改root目录的意思,命令详情自查。
root@chry-PC:/# ls
bin  boot  dev  etc  home  lib  media  mnt  opt  proc  root  run  sbin  srv  sys  tmp  usr  var
root@chry-PC:/# pwd
然后更新和安装软件
最新的软件包列表,使用apt update命令,然后酌情使用apt upgrade命令更新已安装的软件。
root@*****:/# apt update
root@*****:/# apt upgrade
然后是使用apt-get install命令安装需要用到的软件,这一步自行发挥。可以在最后面增加–no-install-recommends参数来避免安装非必须的文件,从而减小镜像的体积。
root@*****:/# apt-get install vim net-tools iputils-ping ssh udhcpc sudo rsync --no-install-recommends
添加用户及设置密码
root@*****:/# useradd -s '/bin/bash' -m -G adm,sudo chry
root@*****:/# passwd chry
Enter new UNIX password:
Retype new UNIX password:
passwd: password updated successfully
root@*****:/# passwd root
Enter new UNIX password:
Retype new UNIX password:
passwd: password updated successfully
root@*****:/#
设置可使用root用户登录ssh
安装ssh后,默认情况下不允许使用root用户登录,需作以下修改:
root@*****:/# vi /etc/ssh/sshd_config
设置串口
因为没有安装桌面,所以这里的配置要具体和内核中登录的串口的设备对应起来,不然对导致无法通过串口登录的问题。
vi /lib/systemd/system/serial-getty\@.service
修改BindsTo选项:
dev-%i.device改成dev-%i如果不执行这一步,烧录文件系统后启动,串口可能会卡死。
串口自动登录root用户(可选)
修改ExecStart选项:
-/sbin/agetty --keep-baud 115200,38400,9600 %I $TERM改成
-/sbin/agetty -a root --keep-baud 115200,38400,9600 %I $TERM
设置主机名(可选)
默认主机名为localhost.localdomain
root@*****:/# echo 'ubuntu.ubuntu' > /etc/hostname
添加主机入口
root@*****:/# vi /etc/hosts
127.0.0.1		localhost
127.0.0.1		ubuntu.ubuntu
如果不修改/etc/hosts,该系统每次运行sudo命令都会有错误提示,但不影响使用。
制作根文件系统
在修改完跟文件系统后,使用exit退出来,开始制作镜像文件。
root@****:/# exit
使用du命令查看一下修改后根文件系统的大小
ubuntu@ubuntu-PC:~/code/rk3288$ sudo du -h --max-depth=0 ubuntufs/
410M	ubuntufs/
用dd工具创建镜像文件,注意6G是分区大小:
ubuntu@ubuntu-PC:~/code/rk3288$ dd if=/dev/zero of=linuxroot.img bs=1M count=6144
记录了6144+0 的读入
记录了6144+0 的写出
6442450944 bytes (6.4 GB, 6.0 GiB) copied, 48.2686 s, 133 MB/s
格式化镜像文件,并加入linuxroot卷标:
ubuntu@ubuntu:~/code/rk3288$ mkfs.ext4 -F -L linuxroot linuxroot.img
mke2fs 1.43.4 (31-Jan-2017)
丢弃设备块: 完成
创建含有 1572864 个块(每块 4k)和 393216 个inode的文件系统
文件系统UUID:b9207194-30bc-4f8c-9476-70ccf7c83794
超级块的备份存储于下列块:
	32768, 98304, 163840, 229376, 294912, 819200, 884736

正在分配组表: 完成
正在写入inode表: 完成
创建日志(16384 个块)完成
写入超级块和文件系统账户统计信息: 已完成
挂载镜像并往里面拷入修改后的文件系统
ubuntu@ubuntu-PC:~/code/rk3288$ mkdir rootfs
ubuntu@ubuntu-PC:~/code/rk3288$ sudo mount linuxroot.img rootfs/
ubuntu@ubuntu-PC:~/code/rk3288$ sudo cp -rfp ubuntufs/* rootfs/
ubuntu@ubuntu-PC:~/code/rk3288$ sudo umount rootfs/
linuxroot.img里就已经有刚才制作的根目录内容了,但linuxroot.img文件大小却是定义的分区大小,不是文件系统的实际大小,所以还要经过一些处理才能发布。检查并修复linuxroot.img镜像的文件系统,不熟悉的朋友可以通过网络了解此工具:
ubuntu@ubuntu-PC:~/code/rk3288$ e2fsck -p -f linuxroot.img
linuxroot:正在修复日志
linuxroot:16382/393216 文件(0.0% 为非连续的), 75104/1572864 块
减小ubuntu.img镜像文件的大小
ubuntu@ubuntu-PC:~/code/rk3288$ resize2fs -M linuxroot.img
resize2fs 1.43.4 (31-Jan-2017)
将 linuxroot.img 上的文件系统调整为 206153 个块(每块 4k)。
linuxroot.img 上的文件系统现在为 206153 个块(每块 4k)。

ubuntu@ubuntu-PC:~/code/rk3288$ ls -lh linuxroot.img
-rw-r--r-- 1 ubuntu ubuntu 806M 9月   4 09:48 linuxroot.img
配置ubuntu文件系统
源码中默认的Linux rootfs是buildroot,如果rootfs使用buildroot,跳过此步,需要使用用ubuntu文件系统。需要通过以下步骤来配置
在device/rockchip/rk3288/BoardConfig_8846.mk中, 将“# rootfs image path”修改为:
Export RK_ROOTFS_IMG=rootfs/linuxroot.img
编译配置文件
在工程目录下执行:
./build.sh BoardConfig_8846.mk
模块化编译
编译u-boot:
./build.sh uboot
编译kernel
./build.sh kernel
打包固件(工程目录下执行)
./mkfirmware.sh
整理分区镜像到rockdev/目录下,每次打包固件前,需要运行mkfirmware.sh脚本更新rockdev/下的分区镜像。
整合统一固件
./build.sh updateimg
注意:每次打包固件前,需要运行mkfirmware.sh脚本更新rockdev/下的分区镜像。
测试根文件系统
烧录
 启动
启动
测试___给rootfs分区扩展磁盘空间
`sudo lsblk`

sudo df -h
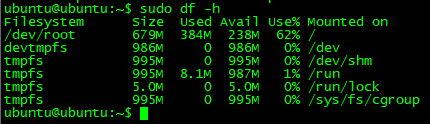
检查根文件系统大小是否一致,如果,不一致,运行一下命令解决
sudo resize2fs /dev/mmcblk2p*
上面的*换成lsblk下根文件系统对应的编号。重新运行sudo df -h问题解决。
网络测试
ifconfig发现只有127.0.0.1,运行sudo udhcpc自动获取ip,测试ping命令,测试电脑上通过ssh使用root用户登录到板子上。
~~~~~~~~~~~~~~~~~~~~~~~end ~~~~~~~~~~~~~~~~~~

~~~~~~~~~~~~~~~~~~~~~~~end ~~~~~~~~~~~~~~~~~~


 214
214


 被折叠的 条评论
为什么被折叠?
被折叠的 条评论
为什么被折叠?
 到【灌水乐园】发言


