


关于线程池
不熟悉线程池的玩法,可以先看我之前的几篇博客,了解JUC中的线程池的定义,各个参数含义,以及玩法。
Spring自定义线程池
既然放入Spring中,依靠Spring来管理线程池的生命周期。当然也需要注意使用单例,如果使用多例,和直接new Thread又有什么区别。
import org.springframework.context.annotation.Bean;
import org.springframework.context.annotation.Configuration;

import java.util.concurrent.Executors;
import java.util.concurrent.LinkedBlockingDeque;
import java.util.concurrent.ThreadPoolExecutor;
import java.util.concurrent.TimeUnit;

/**
 * 自定义线程池配置
 * 需要使用线程池  则开启当前配置
 */
@Configuration
public class ThreadPoolConfig {

    @Bean
    public ThreadPoolExecutor myThreadPool(){
        ThreadPoolExecutor threadPoolExecutor = new ThreadPoolExecutor(
                2,//核心数,一直都能工作的数量
                5,//请求处理大时,可以开放的最大工作数
                3,//开启最大工作数后,当无请求时,还让其存活的时间
                TimeUnit.SECONDS,//存活时间单位
                new LinkedBlockingDeque<>(10),//阻塞队列,保存操作请求线程
                Executors.defaultThreadFactory(),//创建线程的工厂类
                new ThreadPoolExecutor.AbortPolicy());//拒绝策略
        return threadPoolExecutor;
    }
}
具体使用,可以看下列案例:
import org.springframework.beans.factory.annotation.Autowired;
import org.springframework.web.bind.annotation.RequestMapping;
import org.springframework.web.bind.annotation.RestController;

import java.util.concurrent.ThreadPoolExecutor;
import java.util.concurrent.TimeUnit;

@RestController
public class TestController {

    // 注入自定义线程池bean
    @Autowired
    private ThreadPoolExecutor threadPoolExecutor;

    @RequestMapping("/getThreadPoolInfo")
    public void getThreadPoolInfo(){
        System.out.println("getActiveCount--"+threadPoolExecutor.getActiveCount());
        System.out.println("getCorePoolSize--"+threadPoolExecutor.getCorePoolSize());
        System.out.println("getPoolSize--"+threadPoolExecutor.getPoolSize());
    }

     @RequestMapping("/test1")
    public String test1(){
        System.out.println("进入test1 "+System.currentTimeMillis());
        threadPoolExecutor.execute(()->{
            try {
                System.out.println("线程池处理数据  start "+System.currentTimeMillis());
                TimeUnit.SECONDS.sleep(3);
                System.out.println("线程池处理数据  end "+System.currentTimeMillis());
            } catch (InterruptedException e) {
                e.printStackTrace();
            }
        });
        System.out.println("线程池调用结束 "+System.currentTimeMillis());
        return "6666";
    }
}
请求测试
http://localhost:8080/test1

从执行顺序和执行时间上可以很清楚的发现:
自定义线程池可以调用并异步处理数据。
2021.09.16 新的方式
大家有没有想过一个问题,SpringBoot中就没有提供更佳简单的方式,让开发者更轻松的调用自定义的线程池么?
接下来一起看看新的方式。
1、修改自定义线程池的配置bean文件。
原来的bean配置如下所示:
import org.springframework.context.annotation.Bean;
import org.springframework.context.annotation.Configuration;

import java.util.concurrent.Executors;
import java.util.concurrent.LinkedBlockingDeque;
import java.util.concurrent.ThreadPoolExecutor;
import java.util.concurrent.TimeUnit;

/**
 * 自定义线程池bean配置
 */
@Configuration
public class ThreadPoolConfig {
    @Bean
    public ThreadPoolExecutor myThreadPool(){
        ThreadPoolExecutor threadPoolExecutor = new ThreadPoolExecutor(
                2,//核心数,一直都能工作的数量
                5,//请求处理大时,可以开放的最大工作数
                3,//开启最大工作数后,当无请求时,还让其存活的时间
                TimeUnit.SECONDS,//存活时间单位
                new LinkedBlockingDeque<>(10),//阻塞队列,保存操作请求线程
                Executors.defaultThreadFactory(),//创建线程的工厂类
                new ThreadPoolExecutor.AbortPolicy());//拒绝策略
        return threadPoolExecutor;
    }
}
这次呢,我们将类上添加注解@EnableAsync 开启异步调用,让在需要使用的地方,直接使用@Async就可以了。
这样就能省略掉
threadPoolExecutor.execute。
修改后的bean如下所示:
import org.springframework.context.annotation.Bean;
import org.springframework.context.annotation.Configuration;
import org.springframework.scheduling.annotation.EnableAsync;

import java.util.concurrent.Executors;
import java.util.concurrent.LinkedBlockingDeque;
import java.util.concurrent.ThreadPoolExecutor;
import java.util.concurrent.TimeUnit;

/**
 * 自定义线程池bean配置
 */
@Configuration
@EnableAsync // 开启 Async
public class ThreadPoolConfig {

    @Bean("myThreadPoolExecutor")
    public ThreadPoolExecutor myThreadPool(){
        ThreadPoolExecutor threadPoolExecutor = new ThreadPoolExecutor(
                2,//核心数,一直都能工作的数量
                5,//请求处理大时,可以开放的最大工作数
                3,//开启最大工作数后,当无请求时,还让其存活的时间
                TimeUnit.SECONDS,//存活时间单位
                new LinkedBlockingDeque<>(10),//阻塞队列,保存操作请求线程
                Executors.defaultThreadFactory(),//创建线程的工厂类
                new ThreadPoolExecutor.AbortPolicy());//拒绝策略
        return threadPoolExecutor;
    }
}
在@Bean注解中添加一个名称。
如果没有配置名称,spring加载bean是按照
方法名首字母小写方式命名。
然后编写一个测试类,同时也需要将具体的异步业务单独独立出来:
 @Autowired
 private MyService myservice;

 @RequestMapping("/test2")
 public void test2() throws InterruptedException {
     System.out.println("进入test2 "+System.currentTimeMillis());
     myservice.service1();
     System.out.println("调用结束 "+System.currentTimeMillis());
 }
服务类的代码如下所示:
import org.springframework.scheduling.annotation.Async;
import org.springframework.stereotype.Service;

import java.util.concurrent.TimeUnit;

@Service
public class MyService {

    // 具体使用哪个线程池
    @Async("myThreadPoolExecutor")
    public void service1() throws InterruptedException {
        System.out.println("----- service1 start --------"+System.currentTimeMillis());
        TimeUnit.SECONDS.sleep(3);
        System.out.println("----- service1 end --------"+System.currentTimeMillis());
    }
}
执行请求:
http://localhost:8080/test2
日志信息如下:
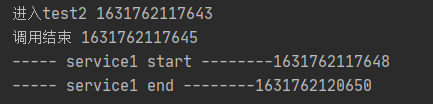
发现:
@Async(“myThreadPoolExecutor”)
的使用,是将整个service1()进行了异步执行,相当于如下所示的代码:
threadPoolExecutor.execute(()->{
   service1()
});
参考资料
测试demo链接
https://gitee.com/xiangjiaobunana/springboot-thread-pool


 193
193

 被折叠的 条评论
为什么被折叠?
被折叠的 条评论
为什么被折叠?
 到【灌水乐园】发言


