


Retrofit 2.0 详解+ 使用
目录:
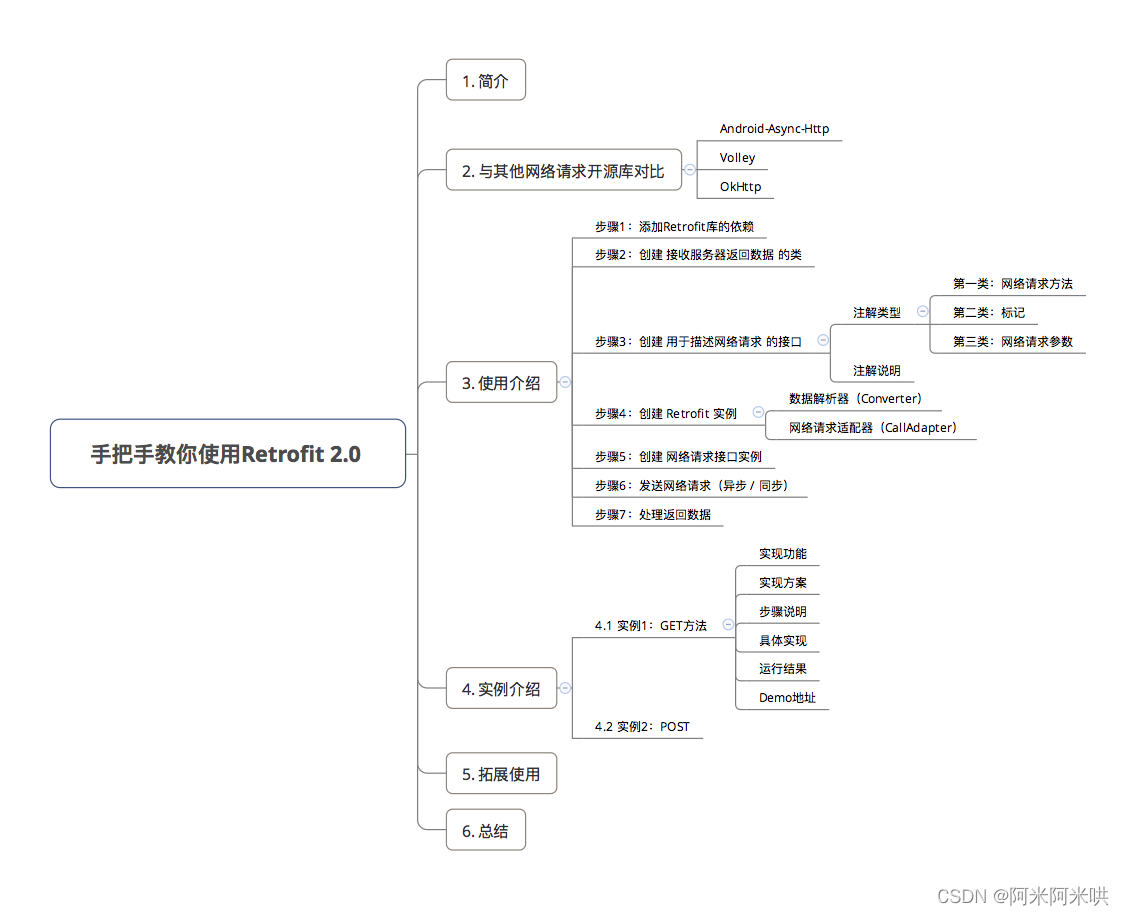
1.简介
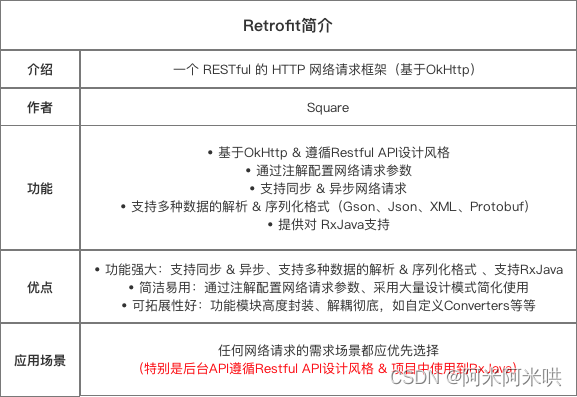
- App应用程序,通过 Retrofit 请求网络,世界上是 使用Retrofit 接口层封装请求参数,Header,Url等信息,之后交由Okhttp完成后续请求操作
- 在服务端返回数据后,Okhttp将原始的结果交由Retrofit,Retrofit根据用户的需求对结果进行解析
2. 使用介绍
使用Retrofit 的步骤一共有 7个
- 步骤一:添加Retrofit 的依赖
- 步骤二:创建接受服务器返回数据的类
- 步骤三:创建用于描述网络请求的接口
- 步骤四:创建Retrofit 实例
- 步骤五:创建网络请求接口实例 ,并配置网络请求参数
- 步骤六:发送网络请求(同步 / 异步)
- 步骤七:处理服务器返回的数据
步骤 1 : 添加Retrofit库的依赖
1. Gradle 中添加依赖
dependencies {
//  Retrofit 的 依赖库
    implementation "com.squareup.retrofit2:retrofit:2.9.0"
//
 implementation "com.squareup.retrofit2:converter-gson:2.9.0"
}
2.添加网络权限(androidManifest.xml)
<uses-permission android:name="android.permission.INTERNET"/>
步骤 2 : 创建接受服务器返回的 数据 Bena 类
public class HoemData {
		private  String name ;
		private  Int age;
}
步骤 3 : 创建 用于描述网络请求 的 接口
interface GetRequest_Interface {
    @GET("project/list/{page}/json?")
    fun getHomeList(@Path("page") page: String?, @Query("cid") cid: String?): Call<HoemData?>
}
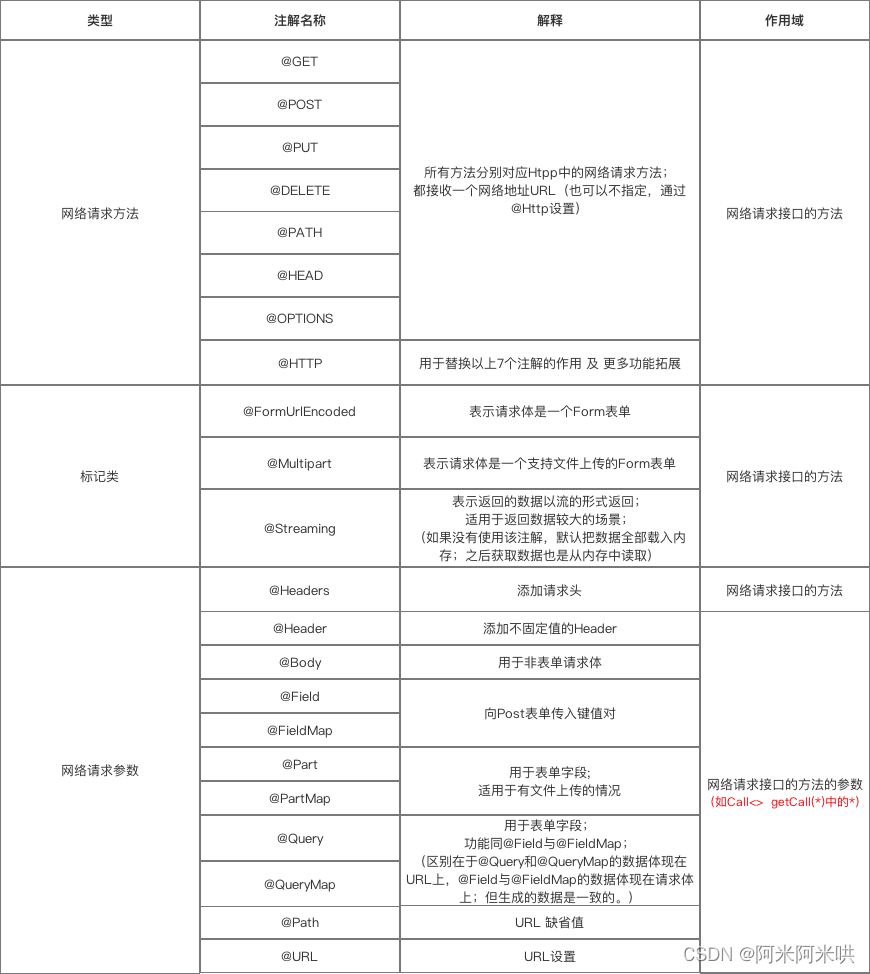
下面详细 介绍 Retrofit 网络请求 的注解类型

注解说明
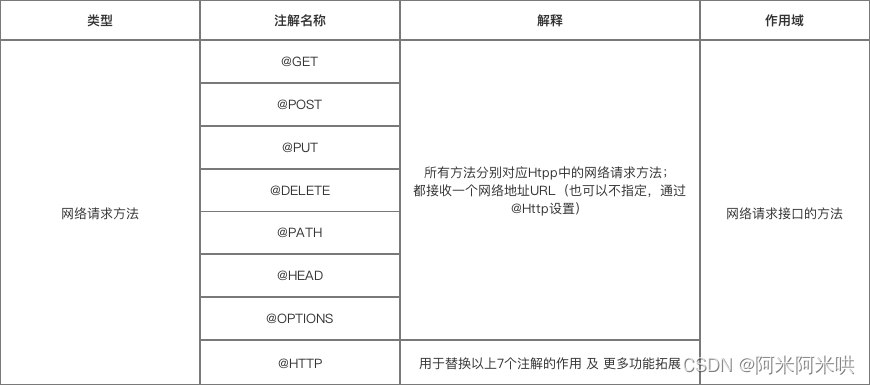
第一类:网络请求方法:
详细说明
A : @GET , @POST, @PUT , @DELETE , @HEAD
以上方法分别对应 Http 中的网络请求方式:
//     注解 @GET : 采用 Get 方法发送网络请求, GET方法后面跟 RUL 全部地址
//     get_HomeList() 接受网络请求数据的方法
//     Call<HomeData> 是接受数据的类
    @GET("project/list/1/json?cid=294")
    fun get_HomeList(): Call<HomeData>
此处特意说明一下URL 的组成,Retrofit 把网络请求的URL 分成了两个部分
// 第1部分:在网络请求接口的注解设置
 @GET("oproject/list/1/json?cid=294")
 fun get_HomeList(): Call<HomeData>

// 第2部分:在创建Retrofit实例时通过.baseUrl()设置
Retrofit retrofit = new Retrofit.Builder()
                .baseUrl("https://www.wanandroid.com/") //设置网络请求的Url地址
                .addConverterFactory(GsonConverterFactory.create()) //设置数据解析器
                .build();

// 从上面看出:一个请求的URL可以通过 替换块 和 请求方法的参数 来进行动态的URL更新。
// 替换块是由 被{}包裹起来的字符串构成
// 即:Retrofit支持动态改变网络请求根目录
完成的网络请求 URL = 在创建Retrofit实例时通过 .baseUrl(“http://www.wanandroid.com/”) 设置 + 网络请求接口的注解设置(下面称为"path")
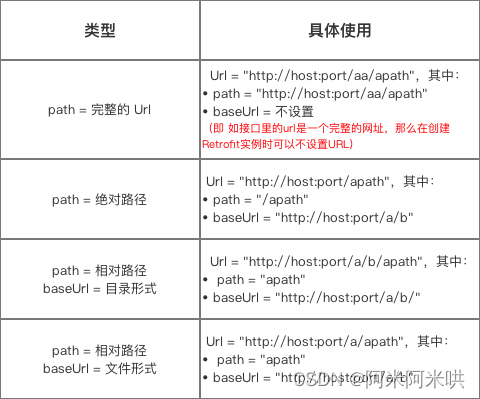
建议采用第三种方式来配置,并尽量使用同一种路径形式。
B: @HTTP
- 作用:替换:”@GET, @POST , @PUT , @DELETE , @HEAD “ 注解的作用 及 更多功能扩展。
- 具体使用:通过属性 method ,path, hasBody 进行设置。**
    /**
     * method: 网络请求的方法(区分大小写)
     * paht:网络请求的地址
     * hasbody:是否有请求体。
     */
    @HTTP(method = "GET", path = "project/list/1/json?cid=294", hasBody = false)
    fun http_get(): Call<HoemData>
第二类:标记
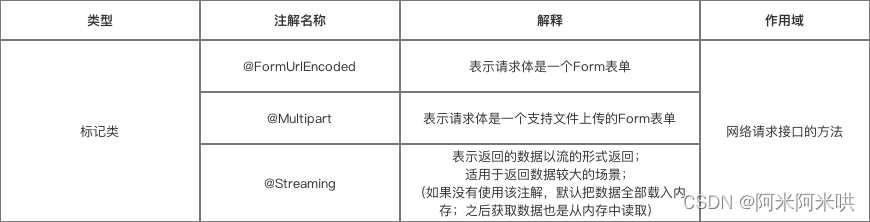
a: @FormUrlEncoded
- 作用:表示发送 form-encoded的数据
每个键值对需要用@Filed来注解键名,随后的对象需要提供值。
b: @Multipart
- 作用:表示发送 form-encoded 的数据(适用于有文件上传的情景)
每个键值对需要用@Part来注解键名,随后的对象需要提供值。
具体使用如下:
public interface GetRequest_Interface {
        /**
         *表明是一个表单格式的请求(Content-Type:application/x-www-form-urlencoded)
         * <code>Field("username")</code> 表示将后面的 <code>String name</code> 中name的取值作为 username 的值
         */
        @POST("/form")
        @FormUrlEncoded
        Call<ResponseBody> testFormUrlEncoded1(@Field("username") String name, @Field("age") int age);

        /**
         * {@link Part} 后面支持三种类型,{@link RequestBody}、{@link okhttp3.MultipartBody.Part} 、任意类型
         * 除 {@link okhttp3.MultipartBody.Part} 以外,其它类型都必须带上表单字段({@link okhttp3.MultipartBody.Part} 中已经包含了表单字段的信息),
         */
        @POST("/form")
        @Multipart
        Call<ResponseBody> testFileUpload1(@Part("name") RequestBody name, @Part("age") RequestBody age, @Part MultipartBody.Part file);

}

// 具体使用
       GetRequest_Interface service = retrofit.create(GetRequest_Interface.class);
        // @FormUrlEncoded
        Call<ResponseBody> call1 = service.testFormUrlEncoded1("Carson", 24);

        //  @Multipart
        RequestBody name = RequestBody.create(textType, "Carson");
        RequestBody age = RequestBody.create(textType, "24");

        MultipartBody.Part filePart = MultipartBody.Part.createFormData("file", "test.txt", file);
        Call<ResponseBody> call3 = service.testFileUpload1(name, age, filePart);
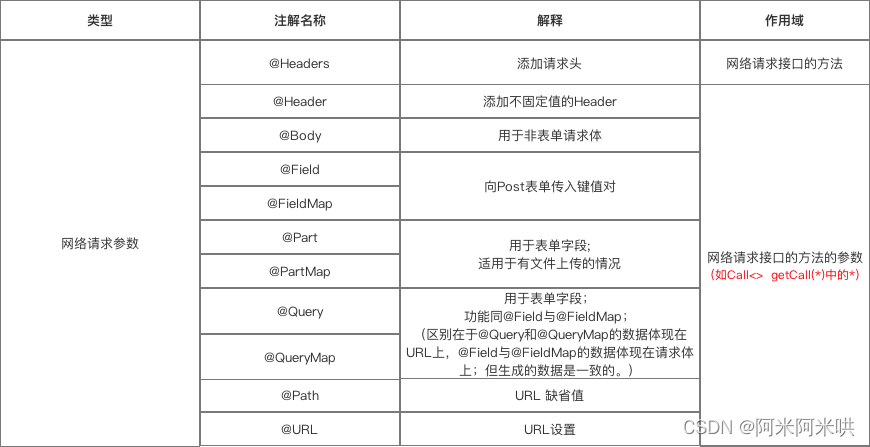
第三类 :网络请求参数
详细说明:
a : @Header @Headers
- 作用: 添加请求头 & 添加不固定请求头
- 具体使用如下
// @Header
@GET("user")
Call<User> getUser(@Header("Authorization") String authorization)

// @Headers
@Headers("Authorization: authorization")
@GET("user")
Call<User> getUser()

// 以上的效果是一致的。
// 区别在于使用场景和使用方式
// 1. 使用场景:@Header用于添加不固定的请求头,@Headers用于添加固定的请求头
// 2. 使用方式:@Header作用于方法的参数;@Headers作用于方法
b : @Body
- 作用:以 Post 方式 传递自定义类型 给服务器
- 特别注意:如果提交的是一个Map,那么相当于一个@Field
不过Map要经过 FormBody.Builder 类处理成为符合 Okhttp 格式的表单,如:
FormBody.Builder builder = new FormBody.Builder();
builder.add("key","value");
C : @Field & @FieldMap
- 作用:发送Post请求时 提交请求的表单字段
- 具体使用:与 @FormUrlEncoded 注解配合使用
public interface GetRequest_Interface {
        /**
         *表明是一个表单格式的请求(Content-Type:application/x-www-form-urlencoded)
         * <code>Field("username")</code> 表示将后面的 <code>String name</code> 中name的取值作为 username 的值
         */
        @POST("/form")
        @FormUrlEncoded
        Call<ResponseBody> testFormUrlEncoded1(@Field("username") String name, @Field("age") int age);

/**
         * Map的key作为表单的键
         */
        @POST("/form")
        @FormUrlEncoded
        Call<ResponseBody> testFormUrlEncoded2(@FieldMap Map<String, Object> map);

}

// 具体使用
         // @Field
        Call<ResponseBody> call1 = service.testFormUrlEncoded1("Carson", 24);

        // @FieldMap
        // 实现的效果与上面相同,但要传入Map
        Map<String, Object> map = new HashMap<>();
        map.put("username", "Carson");
        map.put("age", 24);
        Call<ResponseBody> call2 = service.testFormUrlEncoded2(map);
D:@Part & @PartMap
- 作用:发送Post请求时,提交请求的表单数据
与 @Field 的区别:功能相同,但携带的参数类型跟更加丰富,包括数据流,适用于有文件上传的场景
public interface GetRequest_Interface {

          /**
         * {@link Part} 后面支持三种类型,{@link RequestBody}、{@link okhttp3.MultipartBody.Part} 、任意类型
         * 除 {@link okhttp3.MultipartBody.Part} 以外,其它类型都必须带上表单字段({@link okhttp3.MultipartBody.Part} 中已经包含了表单字段的信息),
         */
        @POST("/form")
        @Multipart
        Call<ResponseBody> testFileUpload1(@Part("name") RequestBody name, @Part("age") RequestBody age, @Part MultipartBody.Part file);

        /**
         * PartMap 注解支持一个Map作为参数,支持 {@link RequestBody } 类型,
         * 如果有其它的类型,会被{@link retrofit2.Converter}转换,如后面会介绍的 使用{@link com.google.gson.Gson} 的 {@link retrofit2.converter.gson.GsonRequestBodyConverter}
         * 所以{@link MultipartBody.Part} 就不适用了,所以文件只能用<b> @Part MultipartBody.Part </b>
         */
        @POST("/form")
        @Multipart
        Call<ResponseBody> testFileUpload2(@PartMap Map<String, RequestBody> args, @Part MultipartBody.Part file);

        @POST("/form")
        @Multipart
        Call<ResponseBody> testFileUpload3(@PartMap Map<String, RequestBody> args);
}

// 具体使用
 MediaType textType = MediaType.parse("text/plain");
        RequestBody name = RequestBody.create(textType, "Carson");
        RequestBody age = RequestBody.create(textType, "24");
        RequestBody file = RequestBody.create(MediaType.parse("application/octet-stream"), "这里是模拟文件的内容");

        // @Part
        MultipartBody.Part filePart = MultipartBody.Part.createFormData("file", "test.txt", file);
        Call<ResponseBody> call3 = service.testFileUpload1(name, age, filePart);
        ResponseBodyPrinter.printResponseBody(call3);

        // @PartMap
        // 实现和上面同样的效果
        Map<String, RequestBody> fileUpload2Args = new HashMap<>();
        fileUpload2Args.put("name", name);
        fileUpload2Args.put("age", age);
        //这里并不会被当成文件,因为没有文件名(包含在Content-Disposition请求头中),但上面的 filePart 有
        //fileUpload2Args.put("file", file);
        Call<ResponseBody> call4 = service.testFileUpload2(fileUpload2Args, filePart); //单独处理文件
        ResponseBodyPrinter.printResponseBody(call4);
}
E:@Query & @QueryMap
- 作用:用于 @GET 方法的查询参数(Query = Url 中 ‘?’ 后面的 key-value)
如:url = http://www.println.net/?cate=android,其中,Query = cate
   @GET("/")
   Call<String> cate(@Query("cate") String cate);
}
// 其使用方式同 @Field与@FieldMap,这里不作过多描述
F : @Path
-
作用:URL地址的缺省值
-
public interface GetRequest_Interface {
 @GET("users/{user}/repos")
 Call<ResponseBody>  getBlog(@Path("user") String user );
 // 访问的API是:https://api.github.com/users/{user}/repos
 // 在发起请求时, {user} 会被替换为方法的第一个参数 user(被@Path注解作用)
}
G:@ Url
- 作用:直接传入一个请求的 URL变量 用于URL设置
public interface GetRequest_Interface {

        @GET
        Call<ResponseBody> testUrlAndQuery(@Url String url, @Query("showAll") boolean showAll);
       // 当有URL注解时,@GET传入的URL就可以省略
       // 当GET、POST...HTTP等方法中没有设置Url时,则必须使用 {@link Url}提供

}
汇总
步骤4:创建Retrofit 实例
 Retrofit retrofit = new Retrofit.Builder()
                .baseUrl("http://fanyi.youdao.com/") // 设置网络请求的Url地址
                .addConverterFactory(GsonConverterFactory.create()) // 设置数据解析器
                .addCallAdapterFactory(RxJavaCallAdapterFactory.create()) // 支持RxJava平台
                .build();
a:关于数据解析器:(Converter )
- Retrofit支持多种数据解析方式
- 使用时需要在Gradle添加依赖
Gson	       :com.squareup.retrofit2:converter-gson:2.0.2
Jackson        :com.squareup.retrofit2:converter-jackson:2.0.2
Simple XML     :com.squareup.retrofit2:converter-simplexml:2.0.2
Protobuf	   :com.squareup.retrofit2:converter-protobuf:2.0.2
Moshi          :com.squareup.retrofit2:converter-moshi:2.0.2
Wire           :com.squareup.retrofit2:converter-wire:2.0.2
Scalars        :com.squareup.retrofit2:converter-scalars:2.0.2
b. 关于网络请求适配器(CallAdapter)
- Retrofit支持多种网络请求适配器方式:guava、Java8和rxjava
使用时如使用的是 Android 默认的 CallAdapter,则不需要添加网络请求适配器的依赖,否则则需要按照需求进行添加
Retrofit 提供的 CallAdapter
- 使用时需要在Gradle添加依赖:
guava :com.squareup.retrofit2:adapter-guava:2.0.2
Java8 :com.squareup.retrofit2:adapter-java8:2.0.2
rxjava :com.squareup.retrofit2:adapter-rxjava:2.0.2
步骤 5: 创建网络请求接口实例:
-
    // 创建 网络请求接口 的实例
 GetRequest_Interface request = retrofit.create(GetRequest_Interface.class);

 //对 发送请求 进行封装
 Call<Reception> call = request.getCall();
步骤 6:发送网络请求(同步/异步)
//发送网络请求(异步)
        call.enqueue(new Callback<Translation>() {
            //请求成功时回调
            @Override
            public void onResponse(Call<Translation> call, Response<Translation> response) {
                //请求处理,输出结果
                response.body().show();
            }

            //请求失败时候的回调
            @Override
            public void onFailure(Call<Translation> call, Throwable throwable) {
                System.out.println("连接失败");
            }
        });

// 发送网络请求(同步)
Response<Reception> response = call.execute();
步骤 7 :处理返回数据:
//发送网络请求(异步)
        call.enqueue(new Callback<Translation>() {
            //请求成功时回调
            @Override
            public void onResponse(Call<Translation> call, Response<Translation> response) {
                // 对返回数据进行处理
                response.body().show();
            }

            //请求失败时候的回调
            @Override
            public void onFailure(Call<Translation> call, Throwable throwable) {
                System.out.println("连接失败");
            }
        });

// 发送网络请求(同步)
  Response<Reception> response = call.execute();
  // 对返回数据进行处理
  response.body().show();


 24万+
24万+


 被折叠的 条评论
为什么被折叠?
被折叠的 条评论
为什么被折叠?
 到【灌水乐园】发言


