


一、安装Elastic Search 6.8
1.下载
链接: https://pan.baidu.com/s/1tKtt_XeQ9IRAJdKUAqM1Yg 提取码: 7iyx
2.部署环境配置
1)创建用户
adduser elastic
2)修改服务器配置
vi /etc/sysctl.conf
添加
vm.max_map_count = 262144
vi /etc/security/limits.conf
添加
*                soft    nofile          65536
*                hard    nofile          65536
3)查看配置
sysctl -p

3.安装
1)上传压缩包
2)解压
tar -zxvf elasticsearch-6.8.4.tar.gz
3)修改 config/elasticsearch.yml 配置文件
vim elasticsearch.yml
需要修改的配置
cluster.name: mpx  				#集群名称
node.name: node-1				#节点名称
network.host: 192.168.100.46	#配置访问地址
http.port: 9200					#访问端口
bootstrap.system_call_filter: false
transport.tcp.port: 9300		##集群通讯端口
transport.tcp.compress: true
http.cors.enabled: true
http.cors.allow-origin: "*"
4)修改权限给elastic用户赋权
cd 到解压的es同级目录
chown -R elastic:elastic elasticsearch
4.启动
su - elastic
cd /home/elasticSearch/elasticsearch-6.8.4/
./bin/elasticsearch -d
5.查看日志
tail -f logs/mpx.log (日志名称为集群名称)
二.安装kibana
1.下载
链接: https://pan.baidu.com/s/1bC22pUOo3sh9syCoz9F0Gg 提取码: n7y5
2.安装
1)上传压缩包
2)解压
tar -zxvf kibana-6.2.4-linux-x86_64.tar.gz
3)修改 config 文件夹中 kibana.yml
vim kibana.yml
需要修改的配置
server.port: 5601
server.host: "192.168.100.46"
elasticsearch.url: "http://192.168.100.46:9200"
3.启动
./bin/kibana &
4.查看
浏览器访问:http://192.168.100.46:5601
三.安装canal 1.1.4
1.下载
链接: https://pan.baidu.com/s/1yrB24aHeWksznthejATRGQ 提取码: xwaf
2.安装
1)上传压缩包
2)解压canal
tar -zxvf canal.deployer-1.1.4.tar.gz
3.配置
1)配置MySQL的binlog写入功能
vim /etc/my.cnf
添加配置
server-id=1
expire-logs-days=15
log-bin=/data/mysql/mysql-bin
binlog-format=ROW
2)授权canal链接MySQL账号
登录要连接的MySQL,执行下面命令
CREATE USER canal IDENTIFIED BY 'canal';
GRANT SELECT, REPLICATION SLAVE, REPLICATION CLIENT ON *.* TO 'canal'@'%';
GRANT ALL PRIVILEGES ON *.* TO 'canal'@'%';
FLUSH PRIVILEGES;
3.配置 example/instance.properties
canal.instance.master.address=192.168.100.46:3306
4.启动
./bin/startup.sh
四.安装canal adapter 1.1.4
1.下载
链接: https://pan.baidu.com/s/1Vaq4unEAwUNkHOJ0CWCGng 提取码: 4fqc
2.安装
1)上传压缩包
2)解压canal
tar -zxvf canal.adapter-1.1.4.tar.gz
3.配置
1)配置 conf/application.yml
server:
  port: 8081
spring:
  jackson:
    date-format: yyyy-MM-dd HH:mm:ss
    time-zone: GMT+8
    default-property-inclusion: non_null
canal.conf:
  mode: tcp
  canalServerHost: 127.0.0.1:11111
  batchSize: 500
  syncBatchSize: 1000
  retries: 0
  timeout:
  accessKey:
  secretKey:
  srcDataSources:
    defaultDS:
      url: 此处配置连接数据库的地址
      username: 用户名
      password: 密码
  canalAdapters:
  - instance: example
    groups:
    - groupId: g1
      outerAdapters:
      - name: logger
      - name: es
        hosts: 192.168.100.46:9200
        properties:
          mode: rest
          cluster.name: mpx  #节点名称
2)配置 conf/es/***.yml
根据需要同步的数据库表进行配置,索引名称需要与文件名一致
以下为open_user表的同步配置
表结构:
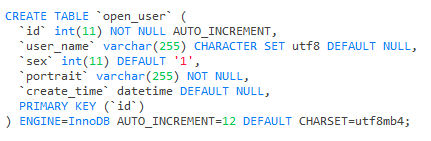
配置 open_user.yml
dataSourceKey: defaultDS  #此配置为application.yml 的key
destination: example      #此配置为canal的name
groupId: g1
esMapping:
  _index: open_user
  _type: _doc
  _id: _id
  sql: "SELECT u.id AS _id,u.user_name AS userName,u.sex,u.portrait,u.create_time as createTime FROM open_user u"
  commitBatch: 3000
是可以有多个DS或者多个**.yml的
4.启动
./bin/startup.sh
五.全量同步
1.添加索引
打开 kibana
地址:http://192.168.100.46:5601

2.导入数据
curl -X POST http://127.0.0.1:8081/etl/es/*.yml (*为索引和es下的文件夹的名称)

3.测试同步MySQL
1)查看 adapter.log 日志
 cd /home/canaladapter/logs/adapter/
 tail -200f adapter.log
2)修改数据库 open_user 表中的数据
update open_user set user_name = 'abc' where id = 4
2020-09-24 10:12:01.663 [pool-3-thread-1] INFO  c.a.o.canal.client.adapter.logger.LoggerAdapterExample - DML: {"data":[{"id":4,"user_name":"abc","sex":1,"portrait":"","create_time":1600307267000}],"database":"test","destination":"example","es":1600913520000,"groupId":null,"isDdl":false,"old":[{"user_name":"abcd"}],"pkNames":["id"],"sql":"","table":"open_user","ts":1600913521501,"type":"UPDATE"}
2020-09-24 10:12:01.667 [pool-3-thread-1] DEBUG c.a.otter.canal.client.adapter.es.service.ESSyncService - DML: {"data":[{"id":4,"user_name":"abc","sex":1,"portrait":"","create_time":1600307267000}],"database":"test","destination":"example","es":1600913520000,"groupId":null,"isDdl":false,"old":[{"user_name":"abcd"}],"pkNames":["id"],"sql":"","table":"open_user","ts":1600913521663,"type":"UPDATE"}
Affected indexes: open_user
说明修改的值已经同步到Es库中
六.注意事项
1.使用canal-adapter 需要查看版本对应,es6 与es7 相差较大。
2.使用canal-adapter 需要在es中提前使用mappings建立索引结构,否则无法同步
以上是搭建了Es,下面简单介绍代码如何实现搜索Es索引库
一.代码
1.引入依赖
注意spring boot版本,我使用的是2.1.4.RELEASE
		<dependency>
            <groupId>org.springframework.boot</groupId>
            <artifactId>spring-boot-starter-data-elasticsearch</artifactId>
            <version>2.1.8.RELEASE</version>
        </dependency>
2.application.yml 添加配置
spring:
  jackson:
    date-format: yyyy-MM-dd HH:mm:ss
  data:
    elasticsearch:
      cluster-name: mpx
      cluster-nodes: 192.168.100.46:9300
      repositories:
        enabled: true
  elasticsearch:
    rest:
      uris: ["http://192.168.100.46:9200"]
3.创建索引实体类
package com.dcm4che.findscu.entity;

import org.springframework.data.annotation.Id;
import org.springframework.data.elasticsearch.annotations.Document;
import org.springframework.data.elasticsearch.annotations.Field;
import org.springframework.data.elasticsearch.annotations.FieldType;

import java.io.Serializable;
import java.util.Calendar;
import java.util.Date;

@Document(indexName = "open_user", type = "_doc")
public class OpenUser implements Serializable {

	@Id
	private String id;

	@Field(type = FieldType.Text)
	private String userName;

	@Field(type = FieldType.Text)
	private String sex;

	@Field(type = FieldType.Text)
	private String portrait;

	@Field(type = FieldType.Date)
	private Date createTime;

	public String getId() {
		return id;
	}

	public void setId(String id) {
		this.id = id;
	}

	public String getUserName() {
		return userName;
	}

	public void setUserName(String userName) {
		this.userName = userName;
	}

	public String getSex() {
		return sex;
	}

	public void setSex(String sex) {
		this.sex = sex;
	}

	public String getPortrait() {
		return portrait;
	}

	public void setPortrait(String portrait) {
		this.portrait = portrait;
	}

	public Date getCreateTime() {
		return createTime;
	}

	public void setCreateTime(Date createTime) {
		// 时间改为东八区
		Calendar cal = Calendar.getInstance();
		cal.setTime(createTime);
		cal.add(Calendar.HOUR, +8);
		this.createTime = cal.getTime();
	}

	@Override
	public String toString() {
		return "OpenUser{" + "id='" + id + '\'' + ", userName='" + userName + '\'' + ", sex='" + sex + '\''
				+ ", portrait='" + portrait + '\'' + ", createTime=" + createTime + '}';
	}
}
4.查询 userName 接口
中英文搜索是需要处理的,这里用了原生的写法处理。
package com.dcm4che.findscu.controller;

import com.dcm4che.findscu.entity.OpenUser;
import org.apache.commons.lang3.StringUtils;
import org.elasticsearch.index.query.QueryBuilder;
import org.elasticsearch.index.query.QueryBuilders;
import org.springframework.beans.factory.annotation.Autowired;
import org.springframework.data.domain.Page;
import org.springframework.data.domain.PageRequest;
import org.springframework.data.domain.Pageable;
import org.springframework.data.domain.Sort;
import org.springframework.data.elasticsearch.core.ElasticsearchTemplate;
import org.springframework.data.elasticsearch.core.query.NativeSearchQueryBuilder;
import org.springframework.data.elasticsearch.core.query.SearchQuery;
import org.springframework.web.bind.annotation.PostMapping;
import org.springframework.web.bind.annotation.RequestParam;
import org.springframework.web.bind.annotation.RestController;

@RestController
public class SearchController {

	@Autowired
	private ElasticsearchTemplate elasticsearchTemplate;

	@PostMapping("/findOpenUserByUserName")
	public Page<OpenUser> findOpenUserByUserName(@RequestParam(value = "userName") String userName,
			@RequestParam(value = "pageNum", required = false) Integer pageNum,
			@RequestParam(value = "pageSize", required = false) Integer pageSize) {
		if (StringUtils.isBlank(userName)) {
			return null;
		}
		if (pageNum == null || pageNum < 0) {
			pageNum = 0; // if page is null, page = 0 size default 1
		}
		if (pageSize == null || pageSize < 0) {
			pageSize = 10; // if size is null, size default 10
		}
		// 分页,根据时间倒序
		Pageable pageable = PageRequest.of(pageNum, pageSize, Sort.Direction.DESC, "createTime");
		// 查询姓名
		QueryBuilder builder = null;
		if (userName.matches("^[A-Za-z0-9]+$")) {
			builder = QueryBuilders.boolQuery()
					.must(QueryBuilders.wildcardQuery("userName", ("*" + userName + "*").toLowerCase()));
		} else {
			builder = QueryBuilders.boolQuery()
					.must(QueryBuilders.matchPhraseQuery("userName", userName.toLowerCase()));
		}
		SearchQuery searchQuery = new NativeSearchQueryBuilder().withQuery(builder).withPageable(pageable).build();
		return elasticsearchTemplate.queryForPage(searchQuery, OpenUser.class);
	}
}
5.测试
用了postman测试,搜索userName=abc


与数据库信息一致,到此结束。


 713
713


 被折叠的 条评论
为什么被折叠?
被折叠的 条评论
为什么被折叠?
 到【灌水乐园】发言


