


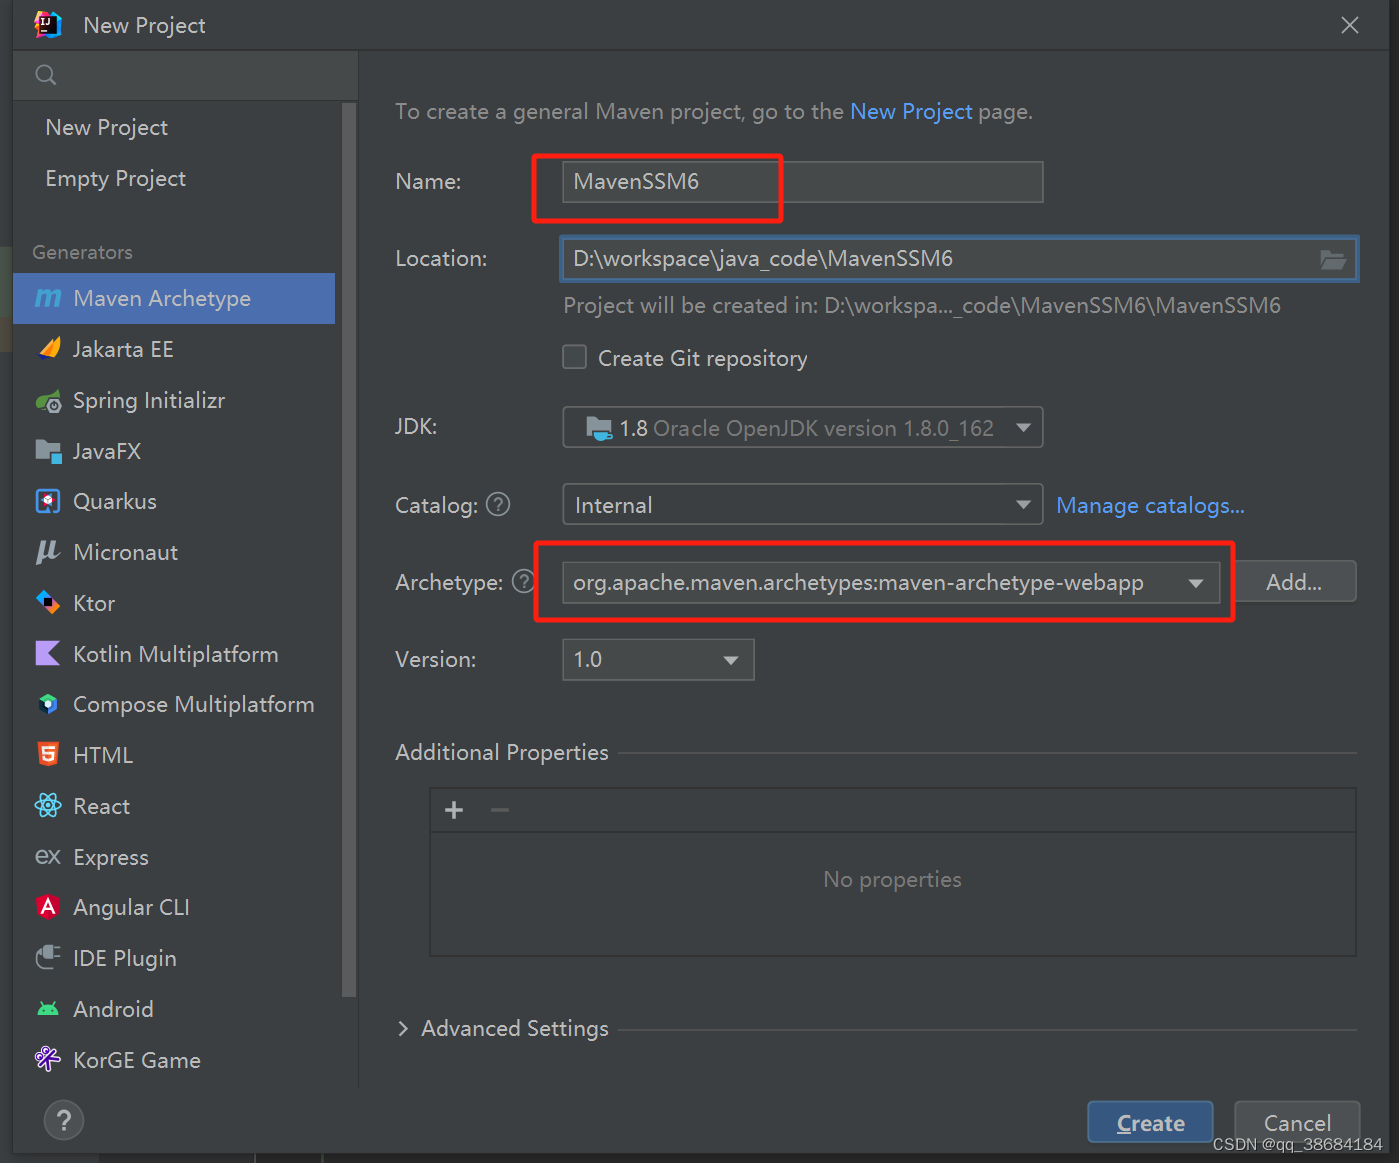
使用maven创建一个空项目
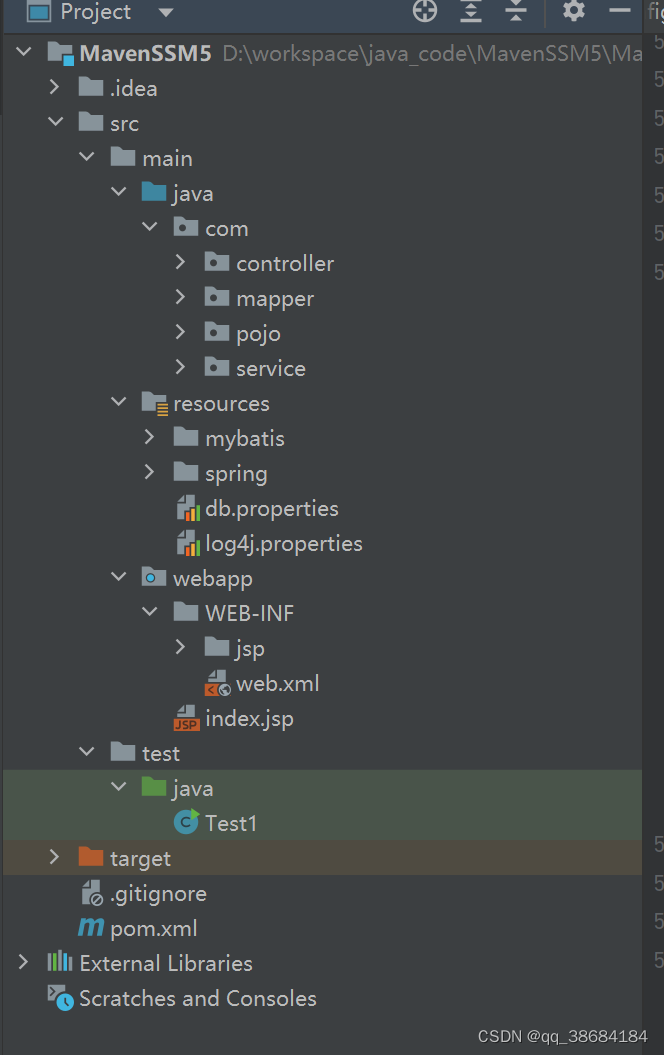
项目结构
配置文件
pom.xml
<project xmlns="http://maven.apache.org/POM/4.0.0" xmlns:xsi="http://www.w3.org/2001/XMLSchema-instance"
  xsi:schemaLocation="http://maven.apache.org/POM/4.0.0 http://maven.apache.org/maven-v4_0_0.xsd">
  <modelVersion>4.0.0</modelVersion>
  <groupId>org.example</groupId>
  <artifactId>MavenSSM5</artifactId>
  <packaging>war</packaging>
  <version>1.0-SNAPSHOT</version>
  <name>MavenSSM5 Maven Webapp</name>
  <url>http://maven.apache.org</url>

  <dependencies>
    <!--c测试包-->
    <dependency>
      <groupId>junit</groupId>
      <artifactId>junit</artifactId>
      <version>4.11</version>
      <scope>test</scope>
    </dependency>
    <!--mybatis-->
    <dependency>
      <groupId>org.mybatis</groupId>
      <artifactId>mybatis</artifactId>
      <version>3.5.2</version>
    </dependency>
    <!--mybatis-spring-->
    <dependency>
      <groupId>org.mybatis</groupId>
      <artifactId>mybatis-spring</artifactId>
      <version>2.0.2</version>
    </dependency>
    <!--            数据库驱动-->
    <dependency>
      <groupId>com.mchange</groupId>
      <artifactId>c3p0</artifactId>
      <version>0.9.5.4</version>
    </dependency>
    <!--            日志-->
    <dependency>
      <groupId>org.slf4j</groupId>
      <artifactId>slf4j-api</artifactId>
      <version>1.7.21</version>
    </dependency>
    <dependency>
      <groupId>org.slf4j</groupId>
      <artifactId>slf4j-log4j12</artifactId>
      <version>1.7.21</version>
    </dependency>
    <dependency>
      <groupId>log4j</groupId>
      <artifactId>log4j</artifactId>
      <version>1.2.16</version>
    </dependency>
    <!--            jackson-->
    <dependency>
      <groupId>com.fasterxml.jackson.core</groupId>
      <artifactId>jackson-core</artifactId>
      <version>2.9.10</version>
    </dependency>
    <dependency>
      <groupId>com.fasterxml.jackson.core</groupId>
      <artifactId>jackson-databind</artifactId>
      <version>2.9.10</version>
    </dependency>
    <!--            Jsp-api-->
    <dependency>
      <groupId>javax.servlet</groupId>
      <artifactId>jsp-api</artifactId>
      <version>2.0</version>
      <scope>provided</scope>
    </dependency>
    <!--            jstl-->
    <dependency>
      <groupId>jstl</groupId>
      <artifactId>jstl</artifactId>
      <version>1.2</version>
    </dependency>
    <!--            cglib-->
    <dependency>
      <groupId>cglib</groupId>
      <artifactId>cglib</artifactId>
      <version>3.3.0</version>
    </dependency>
    <!--            aspectj-->
    <dependency>
      <groupId>org.aspectj</groupId>
      <artifactId>aspectjrt</artifactId>
      <version>1.9.4</version>
    </dependency>
    <!--            sprng-core-->
    <dependency>
      <groupId>org.springframework</groupId>
      <artifactId>spring-core</artifactId>
      <version>5.0.2.RELEASE</version>
    </dependency>
    <dependency>
      <groupId>org.springframework</groupId>
      <artifactId>spring-context-support</artifactId>
      <version>5.0.2.RELEASE</version>
    </dependency>
    <dependency>
      <groupId>org.springframework</groupId>
      <artifactId>spring-tx</artifactId>
      <version>5.0.2.RELEASE</version>
    </dependency>
    <dependency>
      <groupId>org.springframework</groupId>
      <artifactId>spring-orm</artifactId>
      <version>5.0.2.RELEASE</version>
    </dependency>
    <dependency>
      <groupId>org.springframework</groupId>
      <artifactId>spring-oxm</artifactId>
      <version>5.0.2.RELEASE</version>
    </dependency>
    <dependency>
      <groupId>org.springframework</groupId>
      <artifactId>spring-web</artifactId>
      <version>5.0.2.RELEASE</version>
    </dependency>
    <dependency>
      <groupId>org.springframework</groupId>
      <artifactId>spring-test</artifactId>
      <version>5.0.2.RELEASE</version>
    </dependency>
    <dependency>
      <groupId>org.springframework</groupId>
      <artifactId>spring-webmvc</artifactId>
      <version>5.0.2.RELEASE</version>
    </dependency>
    <dependency>
      <groupId>org.springframework</groupId>
      <artifactId>spring-aspects</artifactId>
      <version>5.0.2.RELEASE</version>
    </dependency>
    <dependency>
      <groupId>aopalliance</groupId>
      <artifactId>aopalliance</artifactId>
      <version>1.0</version>
    </dependency>
    <dependency>
      <groupId>org.projectlombok</groupId>
      <artifactId>lombok</artifactId>
      <version>1.18.8</version>
      <scope>provided</scope>
    </dependency>
    <dependency>
      <groupId>mysql</groupId>
      <artifactId>mysql-connector-java</artifactId>
      <version>8.0.28</version>
    </dependency>
  </dependencies>
  <build>
    <finalName>MavenSSM5</finalName>
    <pluginManagement>
      <plugins>
        <plugin>
          <artifactId>maven-clean-plugin</artifactId>
          <version>3.1.0</version>
        </plugin>
        <plugin>
          <artifactId>maven-resources-plugin</artifactId>
          <version>3.1.0</version>
        </plugin>
        <plugin>
          <artifactId>maven-compiler-plugin</artifactId>
          <version>3.1.0</version>
        </plugin>
        <plugin>
          <artifactId>maven-surefire-plugin</artifactId>
          <version>3.1.0</version>
        </plugin>
        <plugin>
          <artifactId>maven-war-plugin</artifactId>
          <version>3.1.0</version>
        </plugin>
        <plugin>
          <artifactId>maven-install-plugin</artifactId>
          <version>3.1.0</version>
        </plugin>
        <plugin>
          <artifactId>maven-deploy-plugin</artifactId>
          <version>3.1.0</version>
        </plugin>
        <plugin>
          <groupId>org.apache.maven.plugins</groupId>
          <artifactId>maven-compiler-plugin</artifactId>
          <version>3.8.0</version>
          <configuration>
            <source>1.8</source>
            <target>1.8</target>
            <encoding>utf-8</encoding>
          </configuration>
        </plugin>
        <plugin>
          <groupId>org.apache.tomcat.maven</groupId>
          <artifactId>tomcat7-maven-plugin</artifactId>
          <version>2.2.0</version>
          <configuration>
            <prot>8088</prot>
            <path>/</path>
            <uriEncoding>UTF-8</uriEncoding>
            <server>tomcat7</server>
          </configuration>
        </plugin>
      </plugins>
    </pluginManagement>
    <resources>
      <resource>
        <directory>src/main/java</directory>
        <includes>
          <include>**/*.properties</include>
          <include>**/*.xml</include>
        </includes>
        <filtering>true</filtering>
      </resource>
      <resource>
        <directory>src/main/resources</directory>
        <includes>
          <include>**/*.properties</include>
          <include>**/*.xml</include>
        </includes>
        <filtering>true</filtering>
      </resource>
    </resources>
  </build>
</project>
web.xml
<!DOCTYPE web-app PUBLIC
        "-//Sun Microsystems, Inc.//DTD Web Application 2.3//EN"
        "http://java.sun.com/dtd/web-app_2_3.dtd" >

<web-app>
  <!--加载spring配置文件,使用通配符方式
  在服务启动的时候去加载param-value中指定的配置文件
  -->
  <context-param>
    <param-name>contextConfigLocation</param-name>
    <param-value>classpath:spring/applicationContext-*.xml</param-value>
  </context-param>

  <context-param>
    <param-name>log4jConfigLocation</param-name>
    <param-value>classpath:log4j.properties</param-value>
  </context-param>

  <!--解决post提交乱码问题 -->
  <filter>
    <filter-name>CharacterEncodingFilter</filter-name>
    <filter-class>org.springframework.web.filter.CharacterEncodingFilter</filter-class>
    <init-param>
      <param-name>encoding</param-name>
      <param-value>utf-8</param-value>
    </init-param>
  </filter>
  <filter-mapping>
    <filter-name>CharacterEncodingFilter</filter-name>
    <url-pattern>/*</url-pattern>
  </filter-mapping>

  <!--ContextLoaderListener
    在启动Web容器时,读取contextConfigLocation配置的xml文件,自动装配ApplicationContext的配置信息
    并产生WebApplicationContext对象,并将这个对象放入ServletContext属性中,这样我们就可以通过Servlet就可以获取到
    WebApplicationContext对象。
    //下面的代码就是从当前的Servlet类中获取上层的ServletContext
    ServletContext servletContext = this.getServletContext();
    servletContext说白了就是所有的Servlet的上层
  -->
  <listener>
    <listener-class>org.springframework.web.context.ContextLoaderListener</listener-class>
  </listener>

  <!--log4j配置监听-->
  <!--  <listener>-->
  <!--    <listener-class>org.springframework.web.util.Log4jConfigListener</listener-class>-->
  <!--  </listener>-->

  <!--配置springMVC前端控制器
      所有的请求都先请求到前端控制器,然后前端控制器判断调用那个Handle,通过获得的处理执行链
      去处理适配器进行处理返回ModeAndView,之后调用视图解析器返回View之后就是进行视图的渲染。
   -->
  <servlet>
    <servlet-name>springMVC</servlet-name>
    <servlet-class>org.springframework.web.servlet.DispatcherServlet</servlet-class>
    <!--init-param给DispatcherServlet设置参数,并且把数据放入到WebApplicationContext对象-->
    <init-param>
      <param-name>contextConfigLocation</param-name>
      <param-value>classpath*:spring/springMVC.xml</param-value>
    </init-param>
  </servlet>
  <servlet-mapping>
    <servlet-name>springMVC</servlet-name>
    <url-pattern>/</url-pattern>
  </servlet-mapping>

  <!--异常页面,当没有发现的时候,会根基这个404代码返回相对应的jsp页面 -->
  <error-page>
    <error-code>404</error-code>
    <location>/WEB-INF/jsp/error/404.jsp</location>
  </error-page>
</web-app>
db.properties
数据库使用的是mysql8.0
jdbc.driver=com.mysql.cj.jdbc.Driver
jdbc.url=jdbc:mysql://127.0.0.1:33061/mybatis
jdbc.username=root
jdbc.password=123456
applicationContext-dao.xml
<?xml version="1.0" encoding="UTF-8"?>
<beans xmlns="http://www.springframework.org/schema/beans"
       xmlns:xsi="http://www.w3.org/2001/XMLSchema-instance"
       xmlns:context="http://www.springframework.org/schema/context"
       xsi:schemaLocation="http://www.springframework.org/schema/beans
       http://www.springframework.org/schema/beans/spring-beans.xsd
       http://www.springframework.org/schema/context
       http://www.springframework.org/schema/context/spring-context.xsd">

    <!--导入配置文件 -->
    <context:property-placeholder location="classpath:db.properties"/>

    <!--创建数据连接池
     理解:在单独使用mybtis的时候,我们至于要配置 <environments> 标签即可,mybatis在进行文件解析的时候
     会解析到sqlSession中,稍后我们会把这个datasource放入到mybatis的sqlsession中,这样sqlsesson就无须在创建
     datasource了
     -->
    <bean id="dataSource" class="com.mchange.v2.c3p0.ComboPooledDataSource">
        <property name="driverClass" value="${jdbc.driver}"/>
        <property name="jdbcUrl" value="${jdbc.url}"/>
        <property name="user" value="${jdbc.username}"/>
        <property name="password" value="${jdbc.password}"/>
    </bean>

    <!--配置mybatis的sqlSessionFactory属性-->
    <bean id="sqlSessionFactory" class="org.mybatis.spring.SqlSessionFactoryBean">
        <!--给sqlSessionFactory配置dataSource数据源-->
        <property name="dataSource"  ref="dataSource"/>
        <!--为Mybatis引入外部的配置文件-->
        <!--如果需要进行特殊的配置引入在SqlMapConfig.xml中进行配置-->
        <!--<property name="configLocation" value="classpath:mybatis/SqlMapConfig.xml"/>-->
        <!--
            配置Mapper的方法
            1).在上面的configLocation不是配置了加载mybatis的SqlMapConfig.xml,配合的路径可以写在里面
            2).在sqlSessionFactory中配置了mapperLocations,同时指定mapper的配置路径,也可以进行Mapper的注入
        -->
        <property name="mapperLocations" value="classpath*:mybatis/mapper/*.xml"/>
    </bean>

    <!--启动Mapper扫描器 -->
    <!--Mapper的动态道理交给的spring进行管理,可以直接从spring中直接获取Mapper的对象 -->
    <!--扫描Mapper的接口,生成代理对象,生成的代理对象会在IOC的容器中-->
    <bean class="org.mybatis.spring.mapper.MapperScannerConfigurer">
        <!--按照包进行扫描 -->
        <property name="basePackage" value="com.mapper"/>
        <!--加载上面的sqlSessionFactory -->
        <property name="sqlSessionFactoryBeanName" value="sqlSessionFactory"/>
    </bean>
</beans>
applicationContext-service.xml
<?xml version="1.0" encoding="UTF-8"?>
<beans xmlns="http://www.springframework.org/schema/beans"
       xmlns:xsi="http://www.w3.org/2001/XMLSchema-instance"
       xmlns:context="http://www.springframework.org/schema/context"
       xmlns:tx="http://www.springframework.org/schema/tx"
       xmlns:aop="http://www.springframework.org/schema/aop"
       xsi:schemaLocation="http://www.springframework.org/schema/beans
       http://www.springframework.org/schema/beans/spring-beans.xsd
       http://www.springframework.org/schema/context
       http://www.springframework.org/schema/context/spring-context.xsd
       http://www.springframework.org/schema/tx
       http://www.springframework.org/schema/tx/spring-tx.xsd
       http://www.springframework.org/schema/aop
       http://www.springframework.org/schema/aop/spring-aop.xsd">

    <!--启动包扫描
        spring定义Service bean有两种方式
        1).通过包扫描的方式
        2).第二种就是直接注入的形式
        通过扫描拆分文件,
    -->
    <context:component-scan base-package="com.service"/>
    <!--    <bean id="userService" class="edu.wan.serviceImpl.UserServiceImpl"/>-->

    <!--配置事务管理器 -->
    <!--管理配置有两种配置方法
        1).在transactionManager的配置执行新增首先在<beans>标签上增加 xmlns以及 xsi:schemaLocation 然后后面的配置如下
        2).
    -->
    <bean id="transactionManager" class="org.springframework.jdbc.datasource.DataSourceTransactionManager">
        <property name="dataSource" ref="dataSource"/>
        <!--事务管理的注解驱动 -->
        <!--<tx:annotation-driven transaction-manager="transactionManager"/>-->
    </bean>

    <!--
        配合spring的事务
        首先需要介绍下 propagation 可以配置参数的含义
        PROPAGATION_REQUIRED :
            Spring默认的传播机制  如果外层有事务,则当前事务加入到外层事务,一块提交,一块回滚。如果外层没有事务,新建一个事务执行
        PROPAGATION_REQUES_NEW :
            该事务传播机制是每次都会新开启一个事务,同时把外层事务挂起,当当前事务执行完毕,恢复上层事务的执行。
            如果外层没有事务,执行当前新开启的事务即可
       PROPAGATION_SUPPORT
            如果外层有事务,则加入外层事务,如果外层没有事务,则直接使用非事务方式执行。完全依赖外层的事务
       PROPAGATION_NOT_SUPPORT
            该传播机制不支持事务,如果外层存在事务则挂起,执行完当前代码,则恢复外层事务,无论是否异常都不会回滚当前的代码
       PROPAGATION_NEVER
            该传播机制不支持外层事务,即如果外层有事务就抛出异常
       PROPAGATION_MANDATORY
            与NEVER相反,如果外层没有事务,则抛出异常
       PROPAGATION_NESTED (...)
            该传播机制的特点是可以保存状态保存点,当前事务回滚到某一个点,
            从而避免所有的嵌套事务都回滚,即各自回滚各自的,如果子事务没有把异常吃掉,基本还是会引起全部回滚的
    -->
    <tx:advice id="transactionAdvice" transaction-manager="transactionManager">
        <tx:attributes>
            <tx:method name="query*" propagation="SUPPORTS" read-only="true"/>
            <tx:method name="find*" propagation="SUPPORTS" read-only="true"/>
            <tx:method name="get*" propagation="SUPPORTS" read-only="true"/>
            <tx:method name="save*" propagation="REQUIRED" read-only="false"/>
            <tx:method name="insert*" propagation="REQUIRED" read-only="false"/>
            <tx:method name="update*" propagation="REQUIRED" read-only="false"/>
            <tx:method name="modify*" propagation="REQUIRED" read-only="false"/>
            <tx:method name="delete*" propagation="REQUIRED" read-only="false"/>
            <tx:method name="remove*" propagation="REQUIRED" read-only="false"/>
        </tx:attributes>
    </tx:advice>

    <!--配置Aop 该事务处理功能只对ServiceImpl生效 -->
    <!--
        我印象中定义切面使用的是<aop:aspect> 但是为什么这里使用的是<aop:advisor>
        百度查询发现<aop:aspect> 在普通的bean中就能够定义
        但是<aop:advisor>的定义必须实现advice接口
    -->
    <aop:config>
        <aop:advisor advice-ref="transactionAdvice" pointcut="execution(* com.service.impl.*.*(..))"/>
    </aop:config>
</beans>
springMVC.xml
<?xml version="1.0" encoding="UTF-8"?>
<beans xmlns="http://www.springframework.org/schema/beans"
       xmlns:xsi="http://www.w3.org/2001/XMLSchema-instance"
       xmlns:context="http://www.springframework.org/schema/context"
       xmlns:mvc="http://www.springframework.org/schema/mvc"
       xsi:schemaLocation="http://www.springframework.org/schema/beans
       http://www.springframework.org/schema/beans/spring-beans.xsd
       http://www.springframework.org/schema/context
       http://www.springframework.org/schema/context/spring-context.xsd
       http://www.springframework.org/schema/mvc
       http://www.springframework.org/schema/mvc/spring-mvc.xsd">

    <!--
       扫描controller包,获取所有的controller层
    -->
    <context:component-scan base-package="com.controller"/>

    <bean class="org.springframework.web.servlet.view.InternalResourceViewResolver">
        <property name="prefix" value="/WEB-INF/jsp/" />
        <property name="suffix" value=".jsp" />
    </bean>

    <!--解决返回对象前端不识别的问题,这里直接转换层jspn-->
    <mvc:annotation-driven>
        <mvc:message-converters>
            <bean class="org.springframework.http.converter.StringHttpMessageConverter"/>
            <bean class="org.springframework.http.converter.json.MappingJackson2HttpMessageConverter"/>
        </mvc:message-converters>
    </mvc:annotation-driven>
</beans>
代码实现
pojo
package com.pojo;


import lombok.Data;

import java.io.Serializable;

@Data
public class User implements Serializable {

    private String uid;

    private String uname;

    private String uage;

}
mapper
package com.mapper;

import com.pojo.User;
import org.springframework.stereotype.Repository;

@Repository
public interface UserMapper {
    public User findById(int id);
}
service
package com.service;


import com.pojo.User;
import org.springframework.stereotype.Service;

public interface UserService {
    public User findById(int id);
}
package com.service.impl;


import com.mapper.UserMapper;
import com.pojo.User;
import com.service.UserService;
import org.springframework.beans.factory.annotation.Autowired;
import org.springframework.stereotype.Service;

@Service
public class UserServiceImpl implements UserService {

    @Autowired
    private UserMapper userMapper;

    @Override
    public User findById(int id) {
        User user = userMapper.findById(id);
        return user;
    }
}
controller
package com.controller;

import com.pojo.User;
import com.service.UserService;
import org.apache.log4j.Logger;
import org.springframework.beans.factory.annotation.Autowired;
import org.springframework.stereotype.Controller;
import org.springframework.web.bind.annotation.CrossOrigin;
import org.springframework.web.bind.annotation.RequestMapping;
import org.springframework.web.bind.annotation.ResponseBody;

/**
 跨域请求的详解
 场景1:假设该服务部署的8080端口,我需要调用8081的服务的方法,如果我直接调用的话
 http://127.0.0.1:8080 -> http://127.0.0.1:8081 以为只要是
 请求的协议(http或者https)、ip、端口 任意一个改变都属于跨域的请求
 这是由Netscape 公司提出的安全策略
 如果我把调用的8081提供服务的方法或者controlle配置上@CrossOrigin就可以进行跨域的调用了
 */
@CrossOrigin //解决请求跨域的问题
@Controller
@RequestMapping("/user")
public class UserController {

    Logger log = Logger.getLogger(UserController.class);

    @Autowired
    private UserService userService;

    @RequestMapping("/query")
    public @ResponseBody User findUserById() {
        int id = 1;
        return userService.findById(id);
    }
}
数据库实现
CREATE TABLE `users` (
  `uid` int(11) NOT NULL AUTO_INCREMENT,
  `uname` varchar(20) NOT NULL,
  `uage` int(11) NOT NULL,
  PRIMARY KEY (`uid`)
)

INSERT INTO `users` VALUES ('1', '张三', '20');
INSERT INTO `users` VALUES ('2', '李四', '18');
项目启动
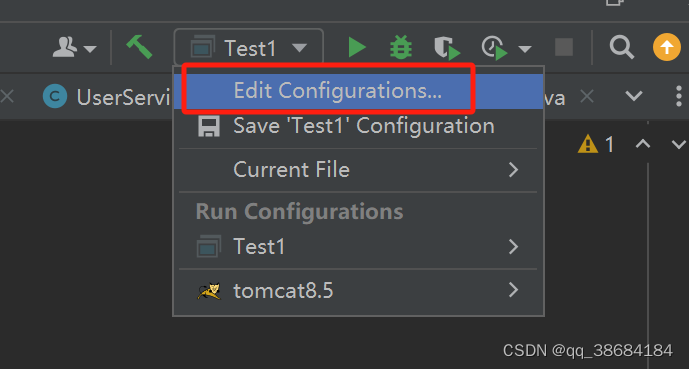
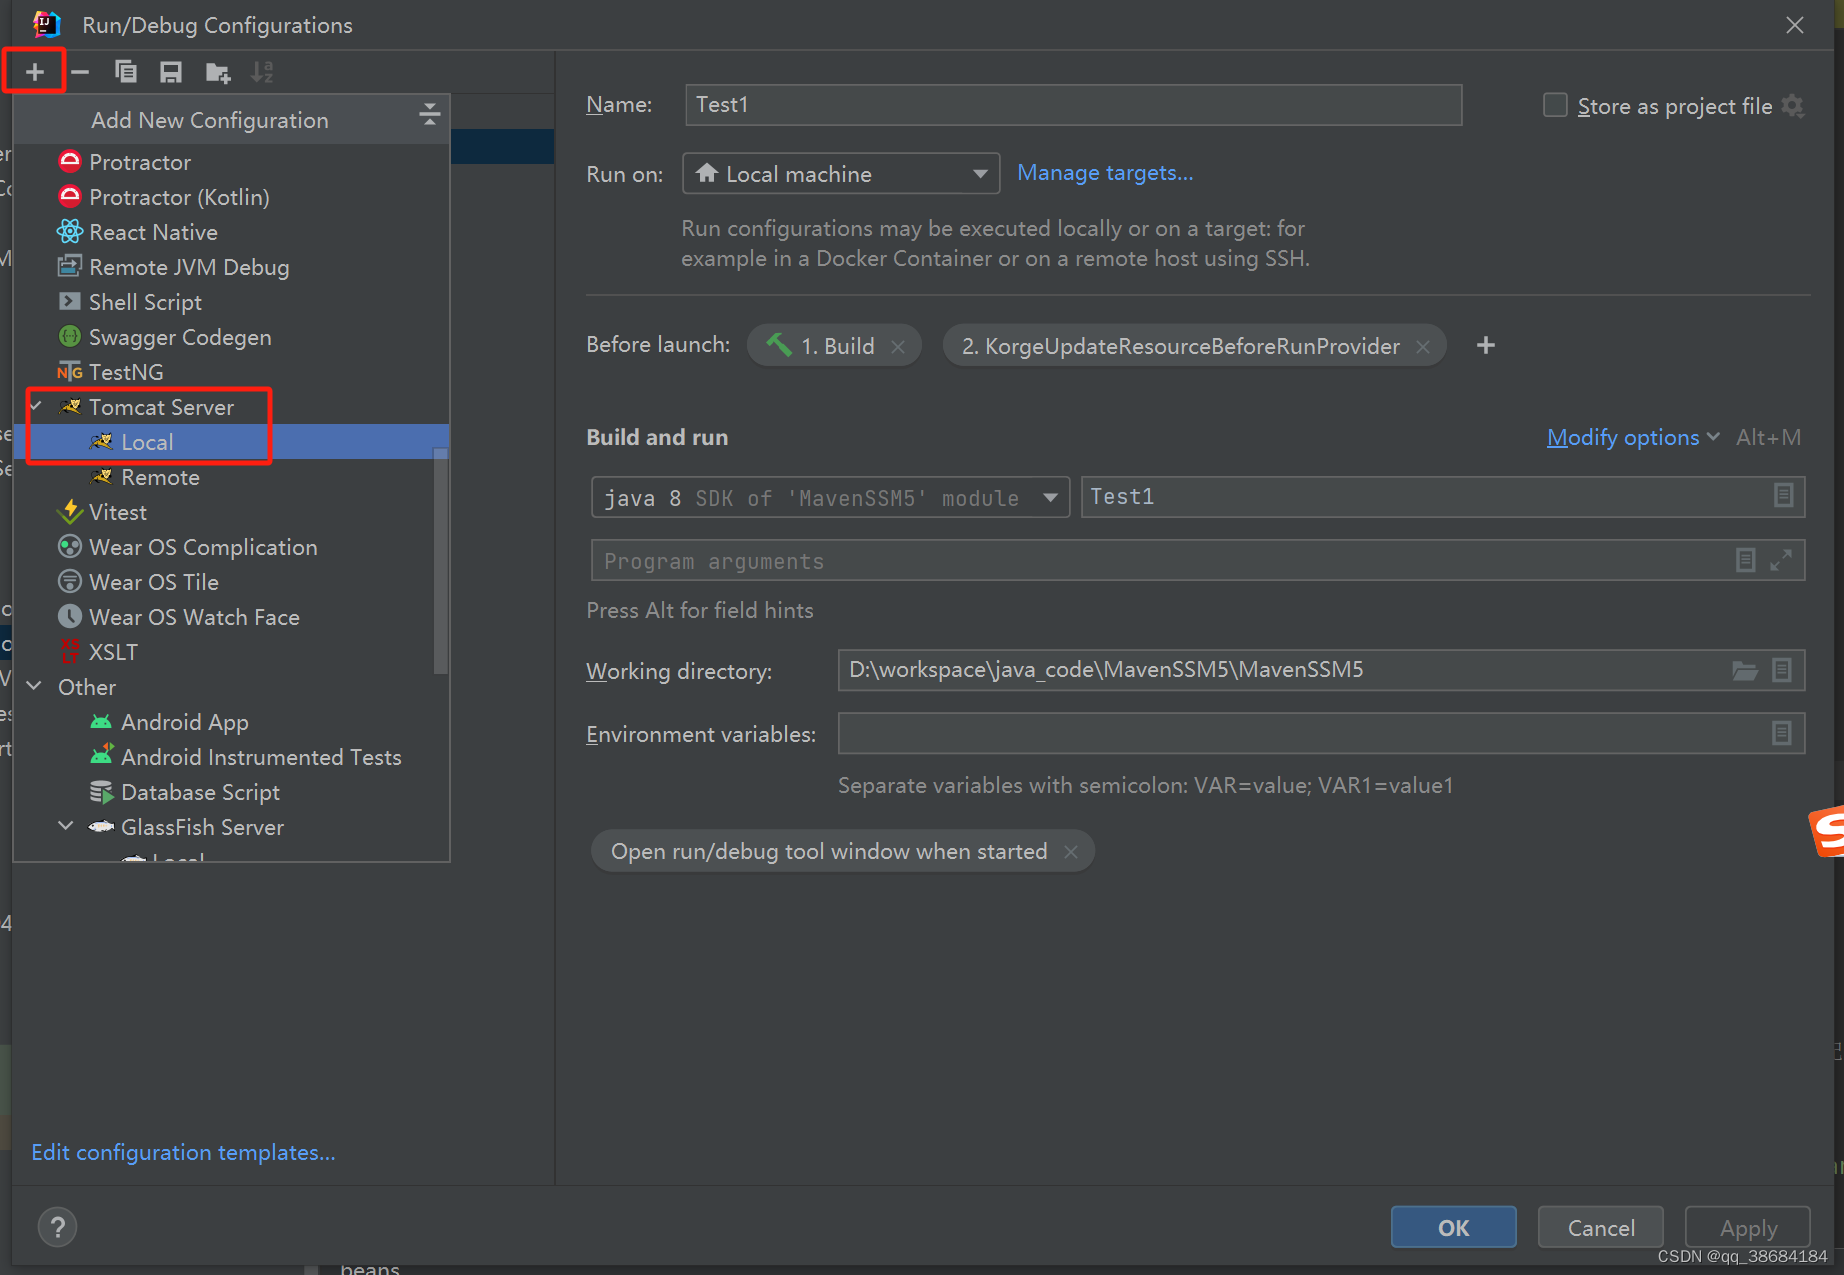
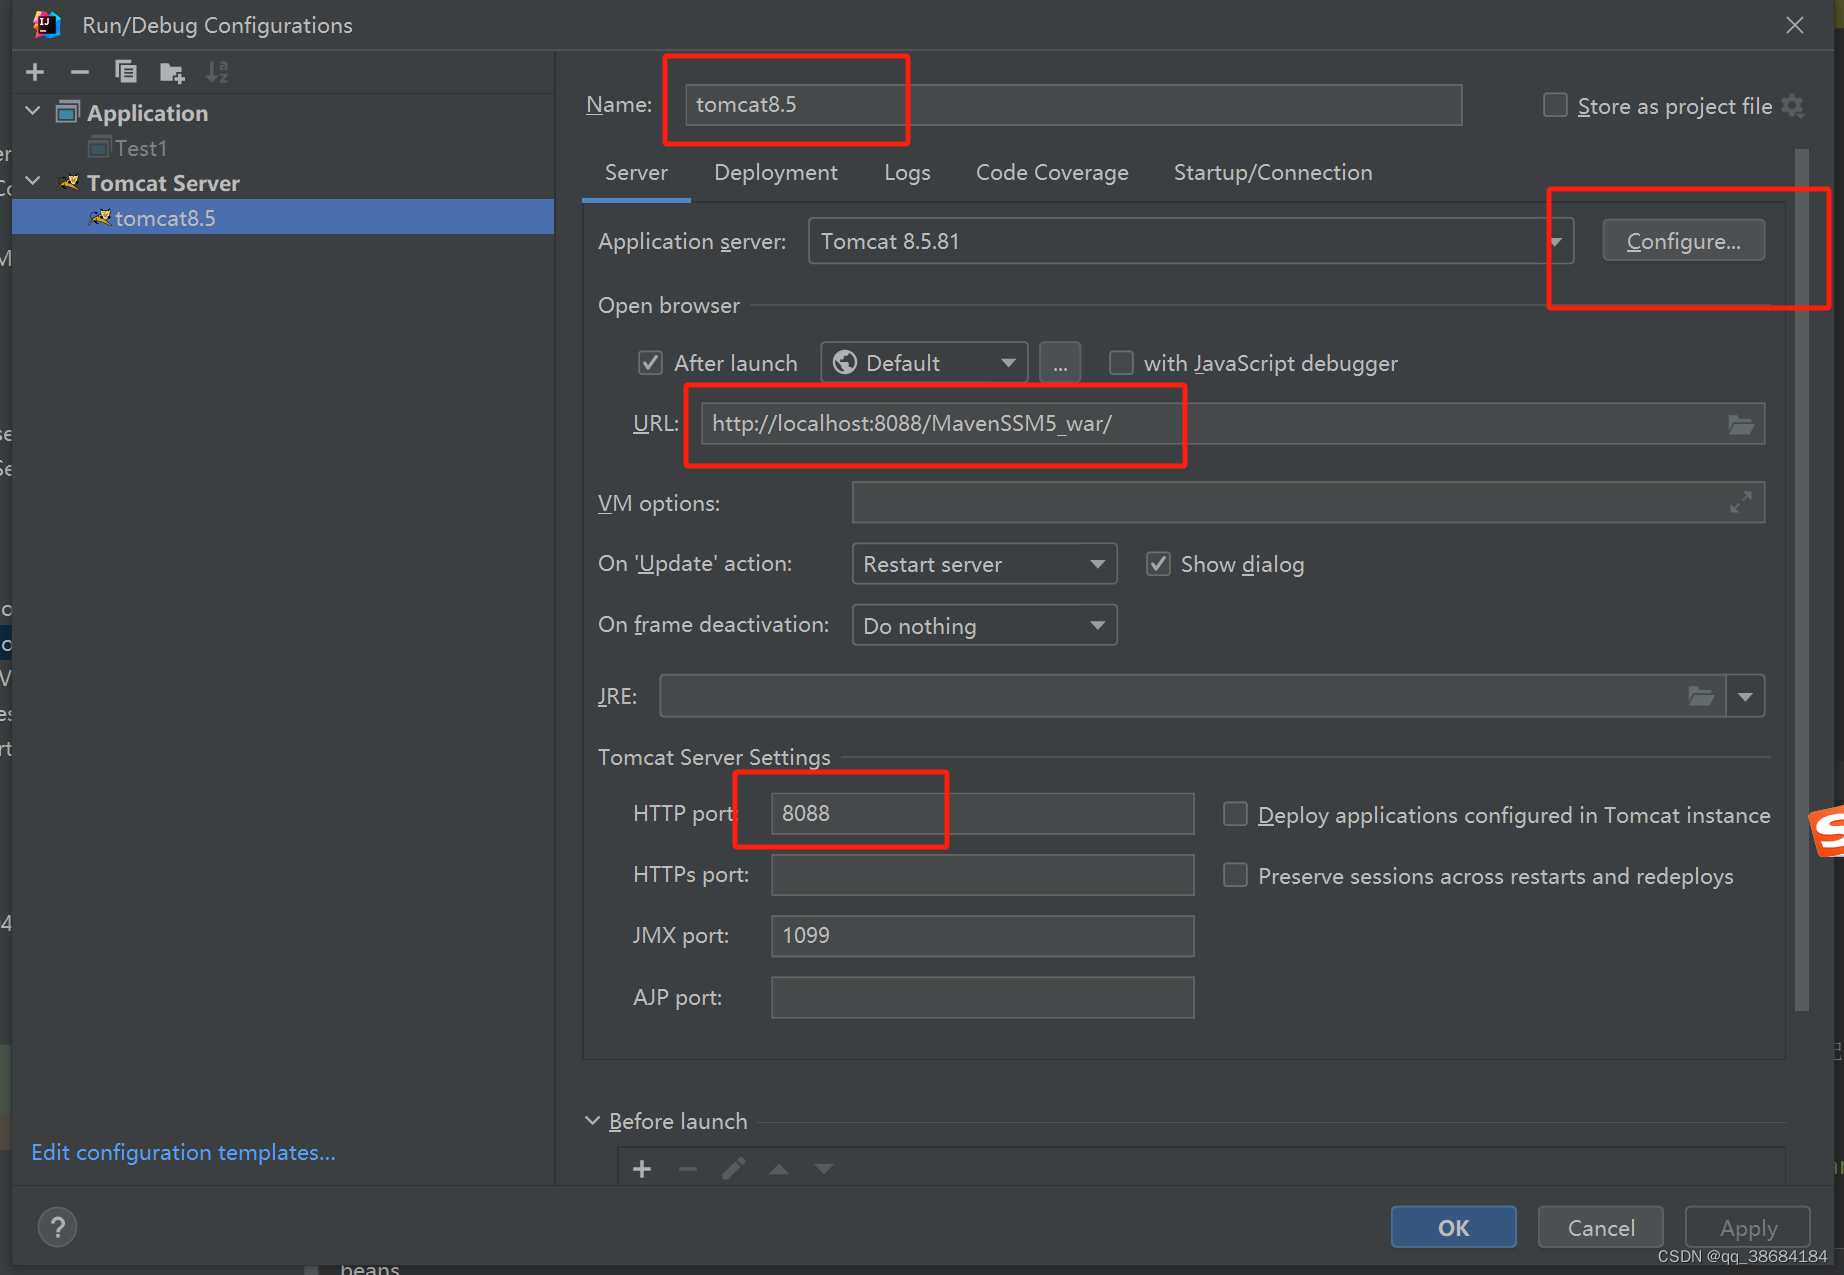
1.设置名称
2.选择本地tomcat
3.设置访问连接
4.设置端口
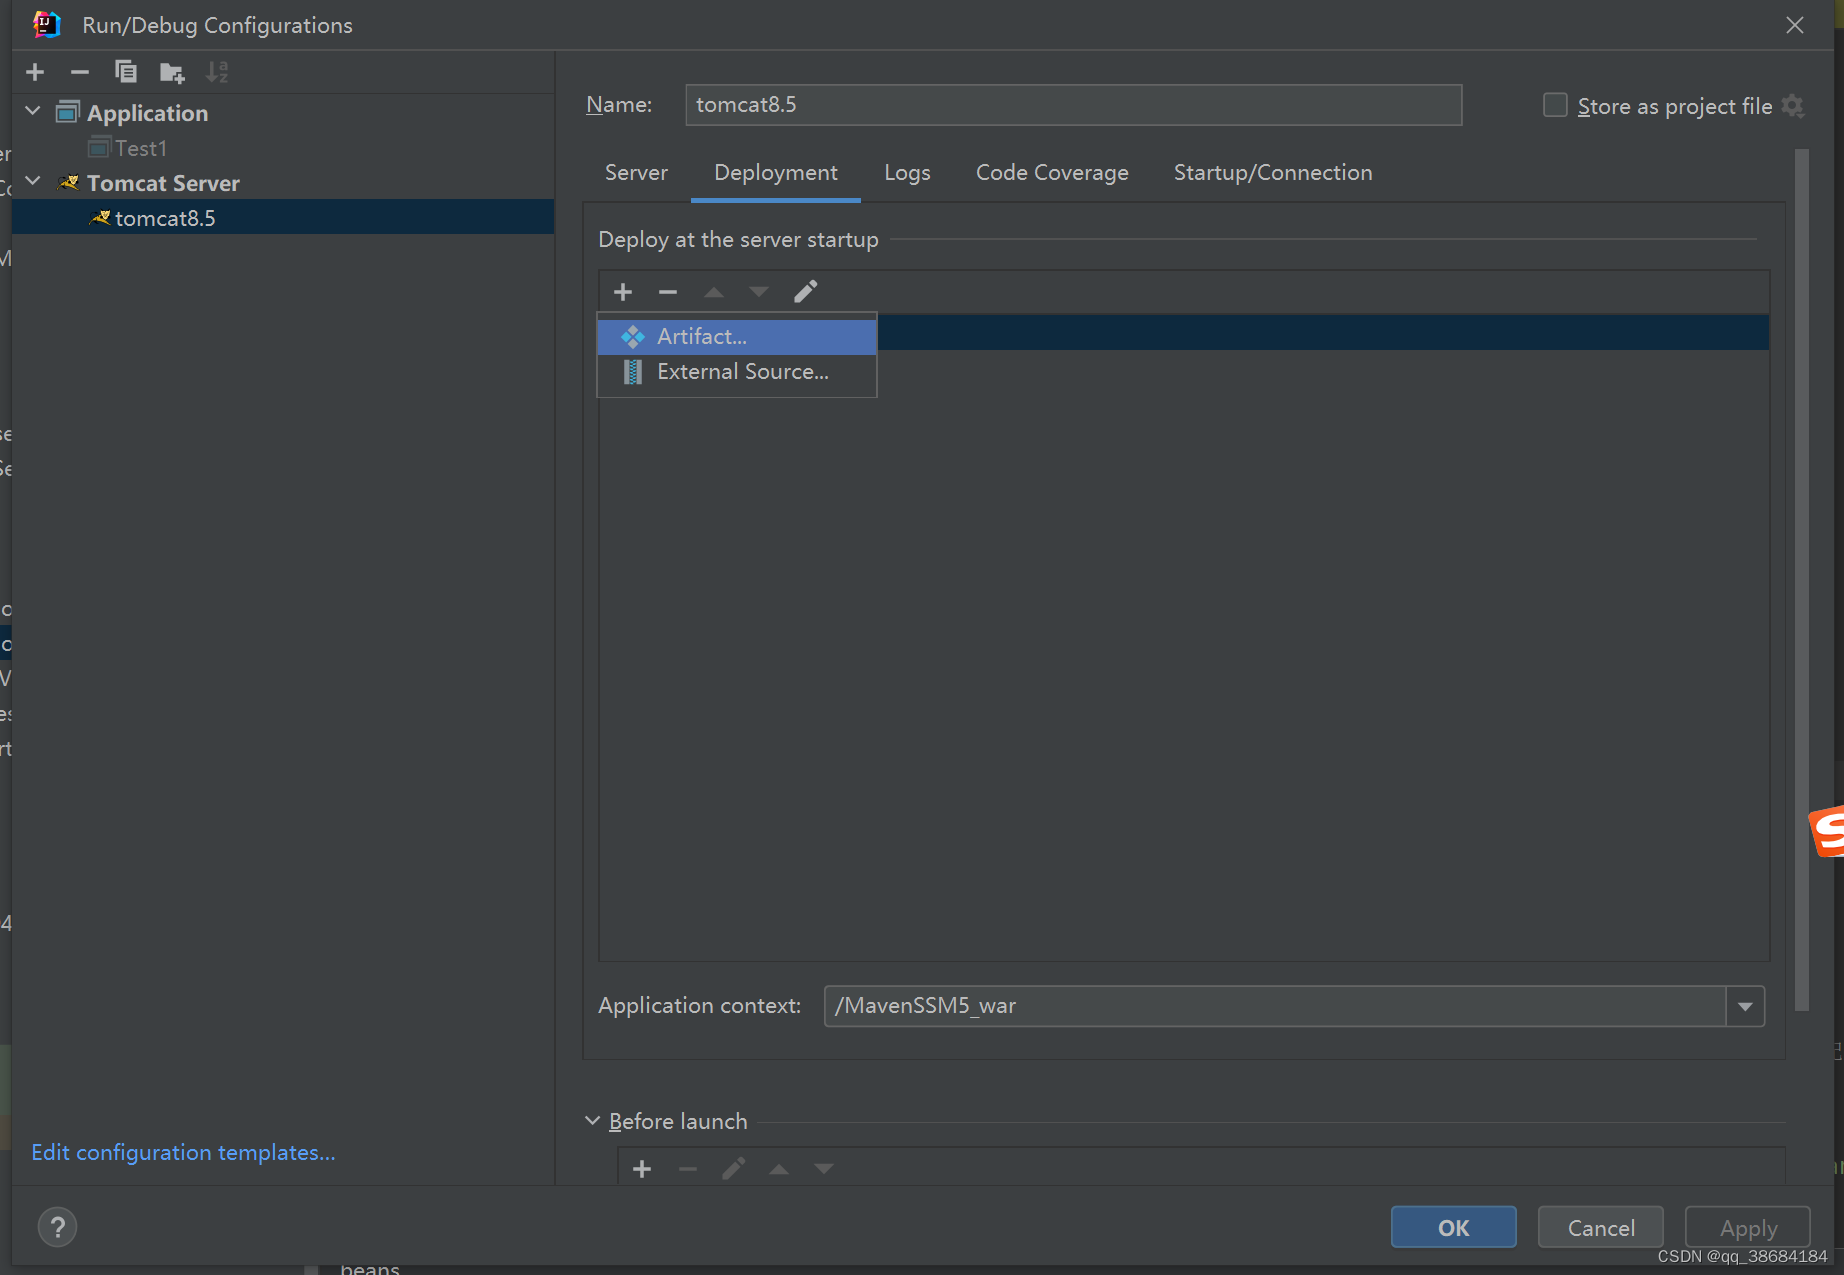
1.点击deployment
2.点击+号
3.选择第一个,然后选择名称
完成之后点击OK,点击右上角启动项目
原文连接 https://blog.csdn.net/baidu_31572291/article/details/114703153


 被折叠的 条评论
为什么被折叠?
被折叠的 条评论
为什么被折叠?
 到【灌水乐园】发言


