


01.BeanDefinition
表示Bean定义,BeanDefinition中存在很多属性用来描述一个Bean的特点。比如:
class,表示Bean类型
scope,表示Bean作用域,单例或原型等
lazyInit:表示Bean是否是懒加载
initMethodName:表示Bean初始化时要执行的方法
destroyMethodName:表示Bean销毁时要执行的方法 还有很多
public interface BeanDefinition extends AttributeAccessor, BeanMetadataElement {

}
在Spring中,我们经常会通过以下几种方式来定义Bean:
1. <bean/>    在spring.xml文件中写这个bean标签
2. @Bean                             在配置类中写这个
3. @Component(@Service,@Controller)  直接在普通类上添加这种注解
这些,我们可以称之申明式定义Bean。
我们还可以编程式定义Bean,那就是直接通过BeanDefinition,比如:
这里直接注册创建的BeanDefinition到容器中: 这里的user类没有加注解的
public class Test {

	public static void main(String[] args) {

		AnnotationConfigApplicationContext context = new AnnotationConfigApplicationContext(AppConfig.class);
		// 生成一个BeanDefinition对象,并设置beanClass为User.class,并注册到ApplicationContext中
		AbstractBeanDefinition beanDefinition =BeanDefinitionBuilder.genericBeanDefinition().getBeanDefinition();

		beanDefinition.setBeanClass(User.class);

		context.registerBeanDefinition("user", beanDefinition);

		System.out.println(context.getBean("user"));

}
我们还可以通过BeanDefinition设置一个Bean的其他属性
beanDefinition.setScope("prototype"); // 设置作用域

beanDefinition.setInitMethodName("init"); // 设置初始化方法

beanDefinition.setLazyInit(true); // 设置懒加载
和申明式事务、编程式事务类似,通过<bean/>,@Bean,@Component等申明式方式所定义的Bean,最终都会被Spring解析为对应的BeanDefinition对象,并放入Spring容器中。
02.BeanDefinitionReader
接下来,我们来介绍几种在Spring源码中所提供的BeanDefinition读取器(BeanDefinitionReader),这些BeanDefinitionReader在我们使用Spring时用得少,但在Spring源码中用得多,相当于Spring源码的基础设施。
一.AnnotatedBeanDefinitionReader
可以直接把某个类转换为BeanDefinition,并且会解析该类上的注解,比如
AnnotationConfigApplicationContext context = new AnnotationConfigApplicationContext(AppConfig.class);

AnnotatedBeanDefinitionReader annotatedBeanDefinitionReader = new AnnotatedBeanDefinitionReader(context);
// 将User.class解析为BeanDefinition

annotatedBeanDefinitionReader.register(User.class);

System.out.println(context.getBean("user"));
二.XmlBeanDefinitionReader
可以解析<bean/>标签
AnnotationConfigApplicationContext context = new AnnotationConfigApplicationContext(AppConfig.class);

XmlBeanDefinitionReader xmlBeanDefinitionReader = new XmlBeanDefinitionReader(context);

int i = xmlBeanDefinitionReader.loadBeanDefinitions("spring.xml");

System.out.println(context.getBean("user"));
03.ClassPathBeanDefinitionScanner
ClassPathBeanDefinitionScanner是扫描器,但是它的作用和BeanDefinitionReader类似,它可以进行扫描,扫描某个包路径,对扫描到的类进行解析,比如,扫描到的类上如果存在@Component注解,那么就会把这个类解析为一个BeanDefinition,比如:
AnnotationConfigApplicationContext context = new AnnotationConfigApplicationContext();//这里之所以没有AppConfig.class参数,是想要保证扫描器扫描的时候,容器空

context.refresh();//这是那个很著名的refresh方法

ClassPathBeanDefinitionScanner scanner = new ClassPathBeanDefinitionScanner(context);//给容器配置

scanner.scan("com.zhouyu");

System.out.println(context.getBean("userService"));
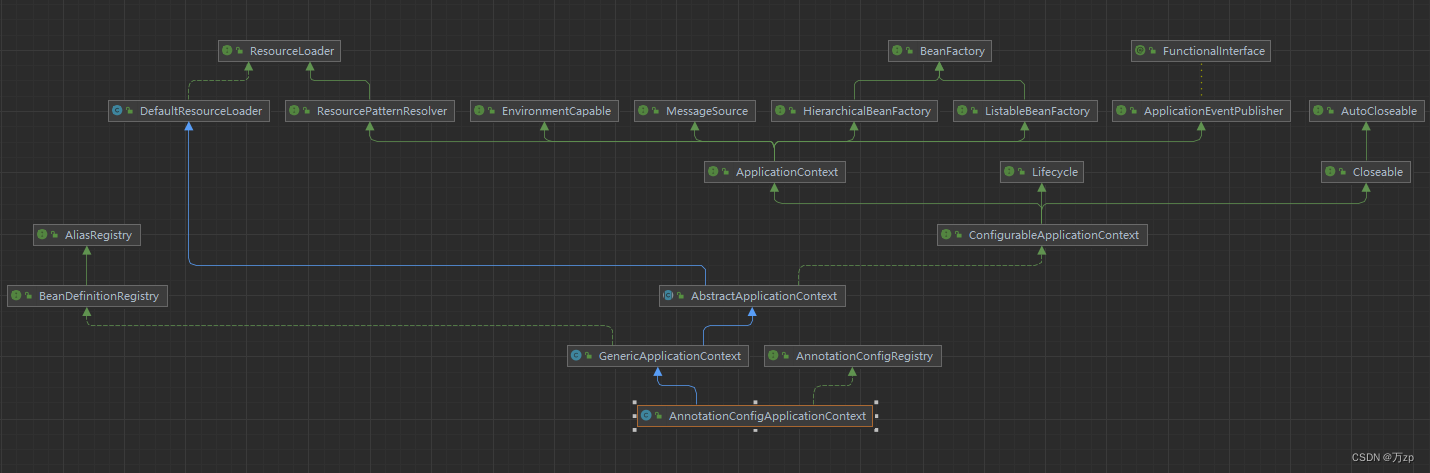
04.AnnotationConfigApplicationContext
因为AnnotationConfigApplicationContext对象继承了GenericApplicationContext对象,所以要先调用GenericApplicationContext的构造方法。
public GenericApplicationContext() {
   this.beanFactory = new DefaultListableBeanFactory();
}
也就是创建了一个beanFactory对象。DefaultListableBeanFactory是beanFactory的最终实现类,功能及其强大。
无参构造函数:并没有refresh方法
	public AnnotationConfigApplicationContext() {
		StartupStep createAnnotatedBeanDefReader = this.getApplicationStartup().start("spring.context.annotated-bean-reader.create");
		// 额外会创建StandardEnvironment
        // 在执行这个构造方法之前,会先执行父类的构造方法,会初始化一个beanFactory = new DefaultListableBeanFactory()
        //reader注册了
        // 生成并注册5个BeanDefinition
	   // 1.ConfigurationClassPostProcessor
	   // 2.AutowiredAnnotationBeanPostProcessor
	   // 3.CommonAnnotationBeanPostProcessor
	   // 4.EventListenerMethodProcessor
	   // 5.DefaultEventListenerFactory

		this.reader = new AnnotatedBeanDefinitionReader(this);
		createAnnotatedBeanDefReader.end();
		this.scanner = new ClassPathBeanDefinitionScanner(this);
	}
有参构造函数:
	public AnnotationConfigApplicationContext(Class<?>... componentClasses) {
		// 构造DefaultListableBeanFactory、AnnotatedBeanDefinitionReader、ClassPathBeanDefinitionScanner
		this();//无参构造
		// 利用reader把componentClasses注册为一个BeanDefinition

		register(componentClasses);
		refresh();
	}
05.BeanFactory
BeanFactory表示Bean工厂,所以很明显,BeanFactory会负责创建Bean,并且提供获取Bean的API。是一个接口
public interface BeanFactory {
}
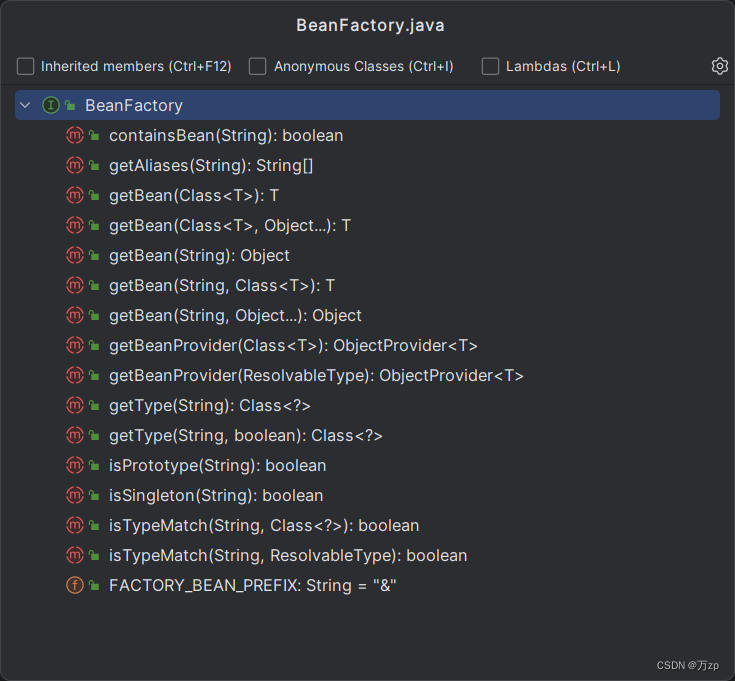
而ApplicationContext是BeanFactory的一种,在Spring源码中,是这么定义的:
public interface ApplicationContext extends EnvironmentCapable, ListableBeanFactory,
HierarchicalBeanFactory,MessageSource, ApplicationEventPublisher, ResourcePatternResolver {
...
}
首先,在Java中,接口是可以多继承的,我们发现ApplicationContext继承了ListableBeanFactory和HierarchicalBeanFactory,而ListableBeanFactory和HierarchicalBeanFactory都继承至BeanFactory。
所以我们可以认为ApplicationContext继承了BeanFactory。
其中的ListableBeanFactory和HierarchicalBeanFactory简介
一.ListableBeanFactory 接口:
ListableBeanFactory 是 Spring 框架中 BeanFactory 接口的一个扩展。
它提供了额外的功能,允许你查询和操作在容器中定义的 bean 的列表。
这个接口继承自 BeanFactory,并添加了一些新的方法,
如 getBeanNamesForType(Class<?> type) 和 getBeansOfType(Class<?> type),
这些方法允许你基于类型来获取 bean 的名称和实例。
public interface ListableBeanFactory extends BeanFactory {

getBeanNamesForType(Class<?> type): 返回给定类型的所有 bean 名称的数组。

getBeansOfType(Class<?> type): 返回给定类型的所有 bean 实例的映射。键是 bean 名称,值是 bean 实例。

getBeanNamesForType(Class<?> type, boolean allowEagerInit, boolean allowSingletonPrototypes): 类似于
getBeanNamesForType(Class<?> type),但提供了额外的参数来控制是否允许早期初始化和单例原型 bean。

getBeansOfType(Class<?> type, boolean allowEagerInit, boolean allowSingletonPrototypes): 类似于
getBeansOfType(Class<?> type),但提供了额外的参数来控制是否允许早期初始化和单例原型 bean。

containsBeanDefinition(String name): 检查容器中是否包含具有给定名称的 bean 定义。

isSingleton(String name): 检查具有给定名称的 bean 是否是单例。

isPrototype(String name): 检查具有给定名称的 bean 是否是原型。

isTypeMatch(String name, Class<?> targetType): 检查具有给定名称的 bean 是否与目标类型匹配。

getDependencyDescriptors(String beanName): 返回给定 bean 名称的依赖描述符列表

}
二.HierarchicalBeanFactory 接口:
HierarchicalBeanFactory这个接口主要是处理BeanFactory的子父级关系,
也就是说我们可以在应用中起多个 BeanFactory,
然后可以将各个 BeanFactory 设置为父子关系。
也就是说在子BeanFactory没有找到的bean,可以在父BeanFactory去找
ApplicationContext 继承了 HierarchicalBeanFactory
public interface HierarchicalBeanFactory extends BeanFactory {


    //子工厂 不存在 beanName 相对应的 BeanDefinition,则从 parentBeanFactory 中获取。
	BeanFactory getParentBeanFactory();


	boolean containsLocalBean(String name);
	}
相当于苹果继承水果,宝马继承汽车一样,ApplicationContext也是BeanFactory的一种,拥有BeanFactory支持的所有功能。
不过ApplicationContext比BeanFactory更加强大,ApplicationContext还基础了其他接口,也就表示ApplicationContext还拥有其他功能,
比如MessageSource表示国际化,ApplicationEventPublisher表示事件发布,EnvironmentCapable表示获取环境变量,等等。
关于ApplicationContext后面再详细讨论。
在Spring的源码实现中,当我们new一个ApplicationContext时,其底层会new一个BeanFactory出
来,当使用ApplicationContext的某些方法时,比如getBean(),底层调用的是BeanFactory的getBean()方法。
所以,我们可以直接来使用DefaultListableBeanFactory,而不用使用ApplicationContext的某个实现类,比如:
DefaultListableBeanFactory beanFactory = new DefaultListableBeanFactory();

AbstractBeanDefinition beanDefinition =BeanDefinitionBuilder.genericBeanDefinition().getBeanDefinition();

beanDefinition.setBeanClass(User.class);

beanFactory.registerBeanDefinition("user", beanDefinition);

System.out.println(beanFactory.getBean("user"))
06ApplicationContext
上面有分析到,ApplicationContext是个接口,实际上也是一个BeanFactory,不过比BeanFactory更加强大,比如:
- HierarchicalBeanFactory:拥有获取父BeanFactory的功能
- ListableBeanFactory:拥有获取beanNames的功能
- ResourcePatternResolver:资源加载器,可以一次性获取多个资源(文件资源等等)
- EnvironmentCapable:可以获取运行时环境(没有设置运行时环境功能)
- ApplicationEventPublisher:拥有广播事件的功能(没有添加事件监听器的功能)
- MessageSource:拥有国际化功能
我们先来看ApplicationContext两个比较重要的实现类:(重点)
- AnnotationConfigApplicationContext(经常使用)
- ClassPathXmlApplicationContext
一.AnnotationConfigApplicationContext:
- ConfigurableApplicationContext:继承了ApplicationContext接口,增加了,添加事件监听
器、添加BeanFactoryPostProcessor、设置Environment,获取ConfigurableListableBeanFactory等功能 - AbstractApplicationContext:实现了ConfigurableApplicationContext接口
- GenericApplicationContext:继承了AbstractApplicationContext,实现了BeanDefinitionRegistry接口,拥有了所有ApplicationContext的功能,并且可以注册BeanDefinition,注意这个类中有一个属性(DefaultListableBeanFactory beanFactory)
- AnnotationConfigRegistry:可以单独注册某个为类为BeanDefinition(可以处理该类上的
@Configuration注解,已经可以处理**@Bean注解**),同时可以扫描 - AnnotationConfigApplicationContext:继承了GenericApplicationContext,实现了
AnnotationConfigRegistry接口,拥有了以上所有的功能
二.ClassPathXmlApplicationContext:
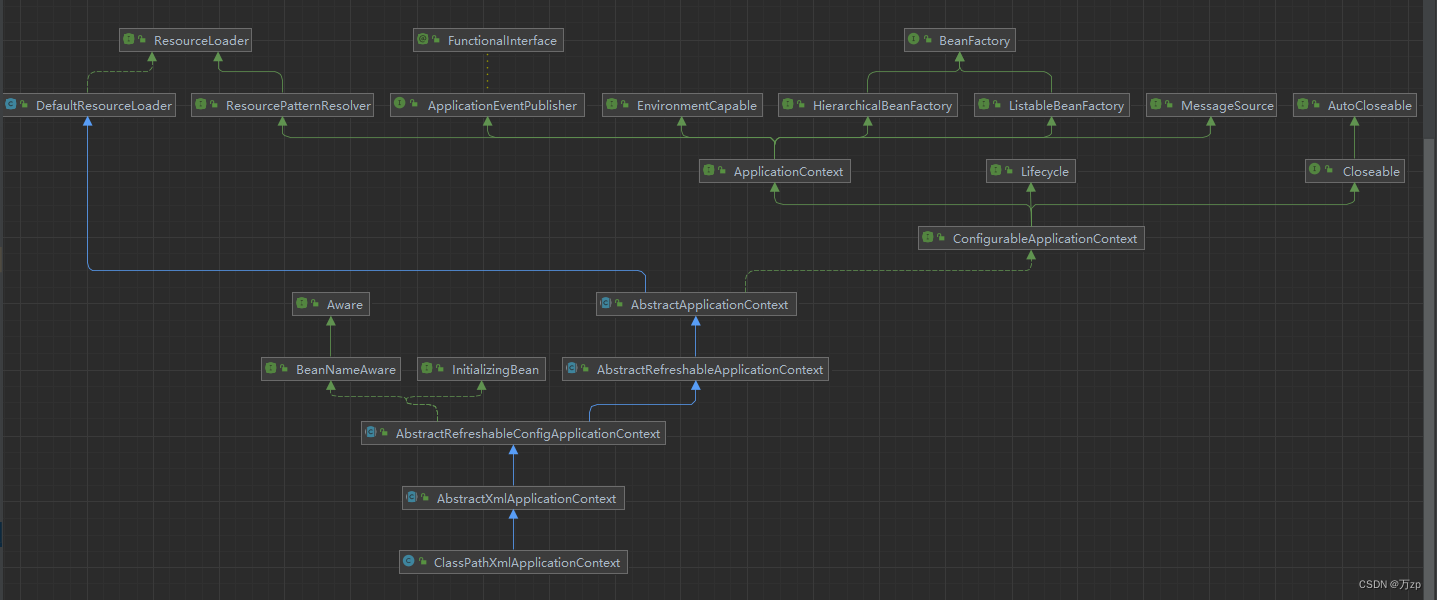
它也是继承了AbstractApplicationContext,但是相对于AnnotationConfigApplicationContext而
言,功能没有AnnotationConfigApplicationContext强大,比如不能注册BeanDefinition
07.国际化(非重点)
先定义一个MessageSource:
@Bean
public MessageSource messageSource() {

	ResourceBundleMessageSource messageSource = new ResourceBundleMessageSource();

	messageSource.setBasename("messages");

	return messageSource;
}
有了这个Bean,你可以在你任意想要进行国际化的地方使用该MessageSource。 同时,因为
ApplicationContext也拥有国家化的功能,所以可以直接这么用:
context.getMessage("test", null, new Locale("en_CN"))
08.资源加载
ApplicationContext还拥有资源加载的功能,比如,可以直接利用ApplicationContext获取某个文
件的内容:
AnnotationConfigApplicationContext context = new AnnotationConfigApplicationContext(AppConfig.class);

Resource resource = context.getResource("file://D:\\IdeaProjects\\spring‐framework\\luban\\src\\main\\java\\com\\luban\\entity\\User.java");

System.out.println(resource.contentLength());
Resource接口定义:
在使用spring作为容器进行项目开发中会有很多的配置文件,这些配置文件都是通过Spring的Resource接口来实现加载。
public interface Resource extends InputStreamSource {

  boolean exists();

  default boolean isReadable() {
		return true;
	}

  default boolean isOpen() {
		return false;
	}

  default boolean isFile() {
		return false;
	}

  URL getURL() throws IOException;

  URI getURI() throws IOException;

  File getFile() throws IOException;

  default ReadableByteChannel readableChannel() throws IOException {
		return Channels.newChannel(getInputStream());
	}

  long contentLength() throws IOException;

  long lastModified() throws IOException;

  Resource createRelative(String relativePath) throws IOException;

	String getFilename();

  String getDescription();
}
你可以想想,如果你不使用ApplicationContext,而是自己来实现这个功能,就比较费时间了。
还比如你可以:
	AnnotationConfigApplicationContext context = new AnnotationConfigApplicationContext(AppConfig.class);
	//这里是标准的URL
	Resource resource = context.getResource("file://D:\\IdeaProjects\\spring‐framework‐5.3.10\\tuling\\src\\main\\java\\com\\zhouyu\\service\\UserService.java");
	System.out.println(resource.contentLength());
	System.out.println(resource.getFilename());

	Resource resource1 = context.getResource("https://www.baidu.com");
	System.out.println(resource1.contentLength());
	System.out.println(resource1.getURL());
	//classpath是指编译之后的target中的classes目录,是相对路径

	Resource resource2 = context.getResource("classpath:spring.xml");
	System.out.println(resource2.contentLength());
	System.out.println(resource2.getURL());
还可以一次性获取多个:
//classpath是指编译之后的target中的classes目录,是相对路径
Resource[] resources = context.getResources("classpath:com/zhouyu/*.class");
for (Resource resource : resources) {
	System.out.println(resource.contentLength());
	System.out.println(resource.getFilename());
}
获取运行时环境:
注意,可以利用@PropertySource("classpath:spring.properties")

01.来使得某个properties文件中的参数添加到运行时环境中:

ConfigurableApplicationContext ctx = new GenericApplicationContext();
MutablePropertySources sources = ctx.getEnvironment().getPropertySources();
sources.addFirst(new MyPropertySource());

02.在配置类上通过注解@PropertySource可以添加读取属性文件的spring.properties:
@Configuration
@PropertySource(value = {"classpath:spring.properties"})
public class AppConfig {
}
AnnotationConfigApplicationContext context = new AnnotationConfigApplicationContext(AppConfig.class);

//获取操作系统的环境参数
Map<String, Object> systemEnvironment = context.getEnvironment().getSystemEnvironment();
System.out.println(systemEnvironment);
System.out.println("=======");

//获取当前java运行环境,大概与JVM有关
Map<String, Object> systemProperties = context.getEnvironment().getSystemProperties();
System.out.println(systemProperties);
System.out.println("=======");

MutablePropertySources propertySources = context.getEnvironment().getPropertySources();
System.out.println(propertySources);
System.out.println("=======");
System.out.println(context.getEnvironment().getProperty("NO_PROXY"));
System.out.println(context.getEnvironment().getProperty("sun.jnu.encoding"));
System.out.println(context.getEnvironment().getProperty("zhouyu"));
09.事件发布
先定义一个事件监听器
@Bean
public ApplicationListener applicationListener() {
return new ApplicationListener() {
@Override
public void onApplicationEvent(ApplicationEvent event) {
System.out.println("接收到了一个事件");
}
};
}
然后发布一个事件:
context.publishEvent("kkk");
10.ExcludeFilter和IncludeFilter
这两个Filter是Spring扫描过程中用来过滤的。ExcludeFilter表示排除过滤器,IncludeFilter表示包
含过滤器。
比如以下配置,表示扫描com.zhouyu这个包下面的所有类,但是排除UserService类,也就是就算
它上面有@Component注解也不会成为Bean
@ComponentScan(value = "com.zhouyu",
excludeFilters = {@ComponentScan.Filter(
type = FilterType.ASSIGNABLE_TYPE,
classes = UserService.class)}.)
public class AppConfig {
}
再比如以下配置,就算UserService类上没有@Component注解,它也会被扫描成为一个Bean。
@ComponentScan(value = "com.zhouyu",
includeFilters = {@ComponentScan.Filter(
type = FilterType.ASSIGNABLE_TYPE,
classes = UserService.class)})
public class AppConfig {
}
FilterType分为:
- ANNOTATION:表示是否包含某个注解
- ASSIGNABLE_TYPE:表示是否是某个类
- ASPECTJ:表示否是符合某个Aspectj表达式
- REGEX:表示是否符合某个正则表达式
- CUSTOM:自定义
11.BeanPostProcessor
BeanPostProcess表示Bean的后置处理器,我们可以定义一个或多个BeanPostProcessor,比如通
过一下代码定义一个BeanPostProcessor:
@Component
public class ZhouyuBeanPostProcessor implements BeanPostProcessor {

	@Override
	public Object postProcessBeforeInitialization(Object bean, String beanName) throws BeansException {
		if ("userService".equals(beanName)) {
			System.out.println("初始化前");
		}
		return bean;
	}

	@Override
	public Object postProcessAfterInitialization(Object bean, String beanName) throws BeansException {
		if ("userService".equals(beanName)) {
			System.out.println("初始化后");
		}
		return bean;
	}
}
一个BeanPostProcessor可以在任意一个Bean的初始化之前以及初始化之后去额外的做一些用户自
定义的逻辑,当然,我们可以通过判断beanName来进行针对性处理(针对某个Bean,或某部分
Bean)。
我们可以通过定义BeanPostProcessor来干涉Spring创建Bean的过程。
12.BeanFactoryPostProcessor:
BeanFactoryPostProcessor表示Bean工厂的后置处理器,其实和BeanPostProcessor类似,
BeanPostProcessor是干涉Bean的创建过程,BeanFactoryPostProcessor是干涉BeanFactory的创
建过程。比如,我们可以这样定义一个BeanFactoryPostProcessor:
@Component
public class ZhouyuBeanFactoryPostProcessor implements BeanFactoryPostProcessor {
	@Override
	public void postProcessBeanFactory(ConfigurableListableBeanFactory beanFactory) throws BeansException {
		System.out.println("加工beanFactory");
	}
}
我们可以在postProcessBeanFactory()方法中对BeanFactory进行加工。
13.FactoryBean
上面提到,我们可以通过BeanPostPorcessor来干涉Spring创建Bean的过程,但是如果我们想一个
Bean完完全全由我们来创造,也是可以的,比如通过FactoryBean:
@Component
public class ZhouyuFactoryBean implements FactoryBean {

	@Override
	public Object getObject() throws Exception {
		UserService userService = new UserService();
	return userService;
	}

	@Override
	public Class<?> getObjectType() {
		return UserService.class;
	}
}
通过上面这段代码,我们自己创造了一个UserService对象,并且它将成为Bean。
具体代码在spring的创建bean 会用 instanceof FactoryBean 判断是不是实现了FactoryBean
但是通过这种方式创造出来的UserService的Bean,只会经过初始化后,其他Spring的生命周期步骤是不会经过的,比如依赖注入。
有同学可能会想到,通过@Bean也可以自己生成一个对象作为Bean,那么和FactoryBean的区别是
什么呢?其实在很多场景下他俩是可以替换的,但是站在原理层面来说的,区别很明显,@Bean定
义的Bean是会经过完整的Bean生命周期的。
14.MetadataReader、ClassMetadata、AnnotationMetadata
Metadata:元数据
在Spring中需要去解析类的信息,比如类名、类中的方法、类上的注解,这些都可以称之为类的元数
据,所以Spring中对类的元数据做了抽象,并提供了一些工具类。
MetadataReader表示类的元数据读取器,默认实现类为SimpleMetadataReader。比如:
public class Test {
	public static void main(String[] args) throws IOException {
		SimpleMetadataReaderFactory simpleMetadataReaderFactory = new SimpleMetadataReaderFactory();
		// 构造一个MetadataReader
		MetadataReader metadataReader =simpleMetadataReaderFactory.getMetadataReader("com.zhouyu.service.UserService");
		// 得到一个ClassMetadata,并获取了类名
		ClassMetadata classMetadata = metadataReader.getClassMetadata();
		System.out.println(classMetadata.getClassName());
		// 获取一个AnnotationMetadata,并获取类上的注解信息
		AnnotationMetadata annotationMetadata = metadataReader.getAnnotationMetadata();
		for (String annotationType : annotationMetadata.getAnnotationTypes()) {
		System.out.println(annotationType);
		}
	}
}
需要注意的是,SimpleMetadataReader去解析类时,使用的ASM技术。
为什么要使用ASM技术,Spring启动的时候需要去扫描,如果指定的包路径比较宽泛,那么扫描的
类是非常多的,那如果在Spring启动时就把这些类全部加载进JVM了,这样不太好,所以使用了
ASM技术。


 6020
6020


 被折叠的 条评论
为什么被折叠?
被折叠的 条评论
为什么被折叠?
 到【灌水乐园】发言


