


Spring Bean的装配有三种方式:
1、xml装配
2、java代码装配
3、自动装配(使用注解)
Spring的依赖注入方式也有三种:
1、构造器注入
2、set方法注入
3、属性输入(直接通过字段注入)
一、通过xml装配
首先准备两个java文件以供测试,分别为Student、Class,Student有name,age和班级属性以及对应的set方法,Class类则只有一个学生集合以及对应的set方法,代码如下:
package com.llg.bean;

public class Student {
    private String name;
    private int age;
    private Class c;

    public Student() {
    }
    public Student(String name, int age, Class c) {
        this.name = name;
        this.age = age;
        this.c = c;
    }

    public void setName(String name) {
        this.name = name;
    }

    public void setAge(int age) {
        this.age = age;
    }

    public void setC(Class c) {
        this.c = c;
    }


    @Override
    public String toString() {
        return "Student{" +
                "name='" + name + '\'' +
                ", age=" + age +
                ", c=" + c +
                '}';
    }
}
package com.llg.bean;

import java.util.List;

public class Class {

    private List<Student> students;

    public Class() {
    }

    public Class(List<Student> students) {
        this.students = students;
    }

    public void setStudents(List<Student> students) {
        this.students = students;
    }

    @Override
    public String toString() {
        return "Class{" +
                "students=" + students +
                '}';
    }
}
在类创建ApplicationContext.xml文件(文件名随意),并声明最基本的beans名称空间和引入对应的模式文档,如下:
<?xml version="1.0" encoding="UTF-8"?>
<beans xmlns="http://www.springframework.org/schema/beans"
       xmlns:xsi="http://www.w3.org/2001/XMLSchema-instance"
       xsi:schemaLocation="http://www.springframework.org/schema/beans
       http://www.springframework.org/schema/beans/spring-beans.xsd">

</beans>
然后就可一在xml中通过bean元素装配bean,下面的演示代码装配了一个Student和一个Class:
<?xml version="1.0" encoding="UTF-8"?>
<beans xmlns="http://www.springframework.org/schema/beans"
       xmlns:xsi="http://www.w3.org/2001/XMLSchema-instance"
       xsi:schemaLocation="http://www.springframework.org/schema/beans
       http://www.springframework.org/schema/beans/spring-beans.xsd">
    <!--装配student-->
    <bean class="com.llg.bean.Student"></bean>
    <!--装配class-->
    <bean class="com.llg.bean.Class"></bean>
</beans>
接下来测试配置是否生效,
package com.llg.com.llg.test;

import com.llg.bean.Class;
import com.llg.bean.Student;
import com.llg.config.BeanConfig;
import org.junit.Test;
import org.junit.runner.RunWith;
import org.springframework.beans.factory.annotation.Autowired;
import org.springframework.test.context.ContextConfiguration;
import org.springframework.test.context.junit4.SpringJUnit4ClassRunner;

@RunWith(SpringJUnit4ClassRunner.class)
@ContextConfiguration("classpath:ApplicationContext.xml")
public class MyTest {
    @Autowired
    private Student student;
    @Autowired
    private Class c;

    @Test
    public void test(){
        System.out.println(student);
        System.out.println(c);
    }
}
控制台输出:
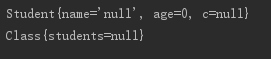
student和class都不为空,则我们的配置是生效的,只是属性都是null,因为我们还没有为他配置,我们可以使用构造器注入和set方法来注入依赖(一开始我们说过有三种属性注入的方法,这里只有两种是因为属性注入只适用于自动装配方式(也叫注解方式)
1、构造器注入
使用<bean></bean>元素的<constructor-arg></constructor-arg>元素,constructor-arg元素主要有index(在构造器参数列表中的索引)、name(参数名称)、value(注入字面量值)、ref(注入引用)属性、type(参数类型),这样我们就可以通过如下代码来注入依赖
<?xml version="1.0" encoding="UTF-8"?>
<beans xmlns="http://www.springframework.org/schema/beans"
       xmlns:xsi="http://www.w3.org/2001/XMLSchema-instance"
       xsi:schemaLocation="http://www.springframework.org/schema/beans
       http://www.springframework.org/schema/beans/spring-beans.xsd">
    <!--装配student-->
    <bean class="com.llg.bean.Student">
        <constructor-arg index="0" name="name" type="java.lang.String" value="zhangsan"></constructor-arg>
        <constructor-arg index="1" name="age" type="int" value="18"></constructor-arg>
        <constructor-arg index="2" name="c" type="com.llg.bean.Class" ref="c"></constructor-arg>
    </bean>
    <!--装配class-->
    <bean name="c" class="com.llg.bean.Class"></bean>
</beans>
使用构造器注入必须提供带参的构造器,index、name、type三个属性只是为了定位在构造器参数列表的位置,如果是按照构造器的顺序来注入的话,这三个属性都可以省略,字面量用value属性直接赋值,引用属性使用ref来指向已经在spring容器中配置的bean,因为student中有一个class属性,所以我在下边配置了一个class并取名为c,然后在student的配置中就可以通过c来引用这个class,测试结果如下:
package com.llg.com.llg.test;

import com.llg.bean.Class;
import com.llg.bean.Student;
import com.llg.config.BeanConfig;
import org.junit.Test;
import org.junit.runner.RunWith;
import org.springframework.beans.factory.annotation.Autowired;
import org.springframework.test.context.ContextConfiguration;
import org.springframework.test.context.junit4.SpringJUnit4ClassRunner;

@RunWith(SpringJUnit4ClassRunner.class)
@ContextConfiguration("classpath:ApplicationContext.xml")
public class MyTest {
    @Autowired
    private Student student;

    @Test
    public void test(){
        System.out.println(student);
    }
}
输出:
![]()
可以看到我们设置的值都已经生效了,上面已经讲了基本类型属性和引用属性如何配置,下面讲一下集合类型的属性如何配置,
spring分别提供了针对不同集合类型的元素分别是:
List --> <list></list>元素
Map --> <map></map>元素
数组 --> <array></array>元素
Properties --><props></props>元素
下面简单演示一下他们的用法
List:
<?xml version="1.0" encoding="UTF-8"?>
<beans xmlns="http://www.springframework.org/schema/beans"
       xmlns:xsi="http://www.w3.org/2001/XMLSchema-instance"
       xsi:schemaLocation="http://www.springframework.org/schema/beans
       http://www.springframework.org/schema/beans/spring-beans.xsd">
    <!--准备集合元素-->
    <bean name="s1" class="com.llg.bean.Student"></bean>
    <bean name="s2" class="com.llg.bean.Student"></bean>
    <bean name="s3" class="com.llg.bean.Student"></bean>
    <!--装配class-->
    <bean name="c" class="com.llg.bean.Class">
        <constructor-arg>
            <list>
                <ref bean="s1"></ref>
                <ref bean="s2"></ref>
                <ref bean="s3"></ref>
                <!--如果是基本数据类型则使用如下方式-->
                <!--<value>xxxx</value>-->
                <!--<value>xxxxxx</value>-->
            </list>
        </constructor-arg>
    </bean>
</beans>
package com.llg.com.llg.test;
import com.llg.bean.Class;
import com.llg.bean.Student;
import com.llg.config.BeanConfig;
import org.junit.Test;
import org.junit.runner.RunWith;
import org.springframework.beans.factory.annotation.Autowired;
import org.springframework.test.context.ContextConfiguration;
import org.springframework.test.context.junit4.SpringJUnit4ClassRunner;
@RunWith(SpringJUnit4ClassRunner.class)
@ContextConfiguration("classpath:ApplicationContext.xml")
public class MyTest {
@Autowired
private Class c;
@Test
public void test(){
System.out.println(c);
}
}
控制台输出:
![]()
list元素提供了ref和value子元素,分别用来配置引用数据类型和基本数据类型的属性
set:和list用法基本相同,只是如果出现相同的元素将会被过滤掉
<?xml version="1.0" encoding="UTF-8"?>
<beans xmlns="http://www.springframework.org/schema/beans"
       xmlns:xsi="http://www.w3.org/2001/XMLSchema-instance"
       xsi:schemaLocation="http://www.springframework.org/schema/beans
       http://www.springframework.org/schema/beans/spring-beans.xsd">
    <!--准备集合元素-->
    <bean name="s1" class="com.llg.bean.Student"></bean>
    <bean name="s2" class="com.llg.bean.Student"></bean>
    <bean name="s3" class="com.llg.bean.Student"></bean>
    <!--装配class-->
    <bean name="c" class="com.llg.bean.Class">
        <constructor-arg>
            <set>
                <!-- 引用数据类型-->
                <ref bean="s1"></ref>
                <!--有相同的将会被忽略-->
                <ref bean="s1"></ref>
                <ref bean="s2"></ref>
                <ref bean="s3"></ref>

                <!--基本数据类型-->
                <!--<value>zhagnsan</value>-->
                 <!--<value>lisi</value>-->
                 <!--相同将被忽略-->
                <!--<value>lisi</value>-->
            </set>
        </constructor-arg>
    </bean>
</beans>
map:map元素中提供了entry子元素来代表结合中的一个元素,entry有四个属性,分别是key,value,key-ref,value-ref,因为在map中是以键值对存在的,而且键和值都可以是基本数据类型也可以是引用类型,所以提供了这四个属性,从他们的名字就可以看出他们的用途,如果键是基本数据类型就使用key,应用类型就使用key-ref,值同理,看下面栗子:
<?xml version="1.0" encoding="UTF-8"?>
<beans xmlns="http://www.springframework.org/schema/beans"
       xmlns:xsi="http://www.w3.org/2001/XMLSchema-instance"
       xsi:schemaLocation="http://www.springframework.org/schema/beans
       http://www.springframework.org/schema/beans/spring-beans.xsd">
    <!--准备集合元素-->
    <bean name="s1" class="com.llg.bean.Student"></bean>
    <bean name="s2" class="com.llg.bean.Student"></bean>
    <bean name="s3" class="com.llg.bean.Student"></bean>
    <!--装配class-->
    <bean name="c" class="com.llg.bean.Class">
        <constructor-arg>
            <map>
                <entry key="stuent1" value-ref="s1" ></entry>
                <entry key="stuent2" value-ref="s2" ></entry>
                <entry key="stuent3" value-ref="s3" ></entry>
            </map>
        </constructor-arg>
    </bean>
</beans>
Properties :
<?xml version="1.0" encoding="UTF-8"?>
<beans xmlns="http://www.springframework.org/schema/beans"
       xmlns:xsi="http://www.w3.org/2001/XMLSchema-instance"
       xsi:schemaLocation="http://www.springframework.org/schema/beans
       http://www.springframework.org/schema/beans/spring-beans.xsd">
    <!--装配class-->
    <bean name="c" class="com.llg.bean.Class">
        <constructor-arg>
            <props>
                <prop key="studnet1" >zhangsan</prop>
                <prop key="studnet2" >lisi</prop>
                <prop key="studnet3" >wnagwu</prop>
            </props>
        </constructor-arg>
    </bean>
</beans>
在props元素中定义prop子元素带代表Properties中的一个元素,因为Properties主要是用来读取并保存配置文件信息,所以他只来保存字符串数据,所以不想map一样有很多属性,他只有key属性,值直接卸载标签内
构造器注入的另一种方式:使用c名称空间
要使用这种方式先要在配置文件中声明c名称空间,如下:
<?xml version="1.0" encoding="UTF-8"?>
<beans xmlns="http://www.springframework.org/schema/beans"
       xmlns:c="http://www.springframework.org/schema/c"
       xmlns:xsi="http://www.w3.org/2001/XMLSchema-instance"
       xsi:schemaLocation="http://www.springframework.org/schema/beans
       http://www.springframework.org/schema/beans/spring-beans.xsd">

</beans>
在第三行声明了c名称空间:便可以使用如下方式配置bean
<?xml version="1.0" encoding="UTF-8"?>
<beans xmlns="http://www.springframework.org/schema/beans"
       xmlns:c="http://www.springframework.org/schema/c"
       xmlns:xsi="http://www.w3.org/2001/XMLSchema-instance"
       xsi:schemaLocation="http://www.springframework.org/schema/beans
       http://www.springframework.org/schema/beans/spring-beans.xsd">
    <!--方式1-->
    <bean class="com.llg.bean.Student" c:_0="zhangsan" c:_1="18" c:_2-ref="clas"></bean>
    <!--方式2-->
<!--    <bean class="com.llg.bean.Student" c:name="lisi" c:age="20" c:c-ref="clas"></bean>-->

    <bean name="clas" class="com.llg.bean.Class"></bean>
</beans>
下面解释一下属性各个组成部分的含义:“c:”表示c名称空间前缀,“_x”表示在构造器参数列表中的索引(因为xml不能以数字开头,所以在前面加下划线),“-ref”表示值是引用类型,没有则表示基本数据类型,第二中方式中名称空间前缀后面跟参数名,用c名称空间相比使用<constructor-arg>元素的唯一不足之处在于c名称空间无法注入集合类型的依赖,但我本人更喜欢使用c名称空间的方式来通过构造器注入,且喜欢方式1.因为这样看起来更加简洁。
到这里构造器注入方式就讲完了,下面介绍set方法注入。
2、set方法注入
使用构造器注入需要提供带参构造器,同理,使用set方法注入就需要提供set方法。
构造器注入使用<constructor-arg>元素
而使用set方法注入使用<property>元素
<property>元素有三个属性,
name:属性名称,通过属性名称就能找到对应的set方法从而实现set注入
value:字面量值,如果属性是基本数据类型,则使用该属性直接赋值
ref:引用,如果属性是引用类型,则使用改属性指向一个已经在Spring容器中配置好的bean
看下面栗子:
<?xml version="1.0" encoding="UTF-8"?>
<beans xmlns="http://www.springframework.org/schema/beans"
       xmlns:xsi="http://www.w3.org/2001/XMLSchema-instance"
       xsi:schemaLocation="http://www.springframework.org/schema/beans
       http://www.springframework.org/schema/beans/spring-beans.xsd">
    <bean class="com.llg.bean.Student">
        <property name="name" value="zhagnsan"></property>
        <property name="age" value="18"></property>
        <property name="c" ref="clas"></property>
    </bean>

    <bean name="clas" class="com.llg.bean.Class"></bean>
</beans>
set方法注入集合依赖与构造器注入相同,所以就只举一个list的栗子:
<?xml version="1.0" encoding="UTF-8"?>
<beans xmlns="http://www.springframework.org/schema/beans"
       xmlns:xsi="http://www.w3.org/2001/XMLSchema-instance"
       xsi:schemaLocation="http://www.springframework.org/schema/beans
       http://www.springframework.org/schema/beans/spring-beans.xsd">
    <!--准备集合元素-->
    <bean name="s1" class="com.llg.bean.Student"> </bean>
    <bean name="s2" class="com.llg.bean.Student"> </bean>
    <bean name="s3" class="com.llg.bean.Student"> </bean>

    <bean name="clas" class="com.llg.bean.Class">
        <property name="students">
            <list>
                <ref bean="s1"></ref>
                <ref bean="s2"></ref>
                <ref bean="s3"></ref>
            </list>
        </property>
    </bean>
</beans>
使用set方法注入依赖还有一种方式:使用p名称空间(与构造器注入的c名称空间相似)
看栗子
<?xml version="1.0" encoding="UTF-8"?>
<beans xmlns="http://www.springframework.org/schema/beans"
       xmlns:p="http://www.springframework.org/schema/p"
       xmlns:xsi="http://www.w3.org/2001/XMLSchema-instance"
       xsi:schemaLocation="http://www.springframework.org/schema/beans
       http://www.springframework.org/schema/beans/spring-beans.xsd">
    <bean class="com.llg.bean.Student" p:age="18" p:name="lisi" p:c-ref="c"></bean>

    <bean name="c" class="com.llg.bean.Class"></bean>
</beans>
p名称空间前缀后面跟属性名,如果是引用类型还需要加上“-ref”,注意:需要引入p名称空间,第三行
到这里终于打xml装配bean的方式讲完了,下面继续将使用java代码装配,
二、java代码装配
用java代码装配首先要写一个配置类,并用spring的@Configuration注解标记,告诉spring这是一个配置类:栗子:
package com.llg.config;

import org.springframework.context.annotation.Configuration;

@Configuration
public class BeanConfig {

}
现在我们就创建了一个配置类
如何装配bean:
在我们刚刚创建的配置类中写一个方法,并用@Bean注解标记,方法返回值类型为你需要放入spring容器中的bean类型,
栗子:我现在想让spring容器帮我创建一个student对象,那我可以这样来写我的java代码
package com.llg.config;

import com.llg.bean.Student;
import org.springframework.context.annotation.Bean;
import org.springframework.context.annotation.Configuration;

@Configuration
public class BeanConfig {

    @Bean
    public Student student(){
        //这里可以写你想做的任何事情,只要你最后返回一个student对象即可
        return  new Student();
    }
}
那现在我们来测试一下:
package com.llg.com.llg.test;

import com.llg.bean.Class;
import com.llg.bean.Student;
import com.llg.config.BeanConfig;
import org.junit.Test;
import org.junit.runner.RunWith;
import org.springframework.beans.factory.annotation.Autowired;
import org.springframework.test.context.ContextConfiguration;
import org.springframework.test.context.junit4.SpringJUnit4ClassRunner;

@RunWith(SpringJUnit4ClassRunner.class)
//@ContextConfiguration("classpath:ApplicationContext.xml")
//这里我使用的是java代码来配置,所以此处需要修改classess属性为配置类的class类型
@ContextConfiguration(classes = BeanConfig.class)
public class MyTest {
    @Autowired
    private Student s;
    @Test
    public void test(){
        System.out.println(s);
    }
}
控制台输出
![]()
可以看到student不为空,则表示spring成功帮我们创建了student对象,说明我们的配置是生效的
如何为bean注入依赖
1、通过构造器注入
看栗子:
package com.llg.config;

import com.llg.bean.Class;
import com.llg.bean.Student;
import org.springframework.context.annotation.Bean;
import org.springframework.context.annotation.Configuration;

@Configuration
public class BeanConfig {

    @Bean
    public Student student(){
        //这里可以写你想做的任何事情,只要你最后返回一个student对象即可
        return  new Student("zhangsan",20,cls());
    }

    @Bean
    public Class cls(){
        return new Class();
    }
}
我在创建student对象时指定了参数,那么spring就会根据我传入的参数注入依赖。
这里有一点需要注意的是在创建student对象时调用了创建班级(class)对象的cls(),那么如果我在spring容器中使用相同的代码注册多个student对象,他们的class依赖是指向同一个对象吗?代码如下:
package com.llg.config;

import com.llg.bean.Class;
import com.llg.bean.Student;
import org.springframework.context.annotation.Bean;
import org.springframework.context.annotation.Configuration;

@Configuration
public class BeanConfig {

    @Bean
    public Student student1(){
        return  new Student("zhangsan",20,cls());
    }
    @Bean
    public Student student2(){
        return  new Student("lisi",18,cls());
    }
    @Bean
    public Student student3(){
        return  new Student("wangwu",22,cls());
    }

    @Bean
    public Class cls(){
        return new Class();
    }
}
如代码所示,我在spring容器中注册了三个student对象,他们的name和age属性都不同,但他们的class属性都是调用cls()方法来的,按照我们平时积累的经验来看,他们肯定是不想等的,因为每调用一次cls()方法,都相当于重新new了一个对象返回,但是事实并非如此,这是因为spring会拦截使用了@Bean注解的方法,并直接返回最初创建的那个对象,而并不是每次都进行实际的调用,感兴趣的可以自己测试。
如果没有理解上面所说的也不要紧,spring提供了另一种构造器注入的方式
看栗子:
package com.llg.config;

import com.llg.bean.Class;
import com.llg.bean.Student;
import org.springframework.context.annotation.Bean;
import org.springframework.context.annotation.Configuration;

@Configuration
public class BeanConfig {

    @Bean
    public Student student1(Class c){
        return  new Student("zhangsan",20,c);
    }

    @Bean
    public Class cls(){
        return new Class();
    }
}
这里和刚才的方式的区别在于定义了一个Class(班级)类型的参数c,在创建student不再调用cls()方法,而是直接使用参数c,
spring会在调用这个方法前去容器中找Class类型的bean并赋值给c.这种方式容易理解。
2、使用set方法注入
看栗子:
package com.llg.config;

import com.llg.bean.Class;
import com.llg.bean.Student;
import org.springframework.context.annotation.Bean;
import org.springframework.context.annotation.Configuration;

@Configuration
public class BeanConfig {

    @Bean
    public Student student1(Class c){
        Student student = new Student();
        student.setName("张三");
        student.setAge(25);
        student.setC(c);
        return  student;
    }

    @Bean
    public Class cls(){
        return new Class();
    }
}
使用set方法注入同样是给方法生命一个参数,但是在方法里面是调用了set方法而不是带参构造器。
三、自动装配(使用注解扫描)
spring的注解扫描默认是关闭的,所以需要设置开启扫描
以xml配置开启扫描:
<?xml version="1.0" encoding="UTF-8"?>
<beans xmlns="http://www.springframework.org/schema/beans"
       xmlns:context="http://www.springframework.org/schema/context"
       xmlns:xsi="http://www.w3.org/2001/XMLSchema-instance"
       xsi:schemaLocation="http://www.springframework.org/schema/beans
       http://www.springframework.org/schema/beans/spring-beans.xsd
       http://www.springframework.org/schema/context
        http://www.springframework.org/schema/context/spring-context.xsd">

    <context:component-scan base-package="com.llg"></context:component-scan>
</beans>
使用xml开启扫描,需要引入context名称空间以及模式文档
并使用<context:component-scan>开启扫描
base-package设置需要扫描的包以及子包,如果不设置,则扫描本包及其子包
使用java代码开启扫描,代码如下:
package com.llg.config;

import com.llg.bean.Class;
import com.llg.bean.Student;
import org.springframework.context.annotation.Bean;
import org.springframework.context.annotation.ComponentScan;
import org.springframework.context.annotation.Configuration;

@Configuration
@ComponentScan(basePackages = "com.llg")
public class BeanConfig {

}
创建一个配置类,然后使用@Configuration和@ComponentScan注解标记,basePackages属性的作用与xml中的base-packag属性相同。
开启扫描之后,spring就会扫描指定包下的所有类,扫描到有@Component注解标记的类就会将他注册到spring容器中
就像这样:
package com.llg.bean;

import org.springframework.stereotype.Component;

@Component
public class Student {

}
测试一下
package com.llg.com.llg.test;

import com.llg.bean.Class;
import com.llg.bean.Student;
import com.llg.config.BeanConfig;
import org.junit.Test;
import org.junit.runner.RunWith;
import org.springframework.beans.factory.annotation.Autowired;
import org.springframework.test.context.ContextConfiguration;
import org.springframework.test.context.junit4.SpringJUnit4ClassRunner;

@RunWith(SpringJUnit4ClassRunner.class)
//@ContextConfiguration("classpath:ApplicationContext.xml")
//这里我使用的是java代码来配置,所以此处需要修改classess属性为配置类的class类型
@ContextConfiguration(classes = BeanConfig.class)
public class MyTest {
    @Autowired
    private Student s;
    @Test
    public void test(){
        System.out.println(s);
    }
}
控制台输出
![]()
student不为null说明配置生效
将bean注册到容器之后,如何注入他的依赖呢?
答案是使用@Autowired注解
看代码:
package com.llg.bean;

import org.springframework.beans.factory.annotation.Autowired;
import org.springframework.stereotype.Component;

@Component
public class Student {
    private String name;
    private int age;
    //如果@Autowired标记在属性上,则代表使用属性注入(直接通过字段注入)
    @Autowired
    private Class c;

    public Student() {}
    //如果@Autowired标记在带参构造器上,则代表使用构造器注入
//    @Autowired
    public Student(Class c) {
        this.c = c;
    }
    //如果@Autowired标记在属性的set方法上,则代表使用set方法注入
//    @Autowired
    public void setC(Class c) {
        this.c = c;
    }


    @Override
    public String toString() {
        return "Student{" +
                "name='" + name + '\'' +
                ", age=" + age +
                ", c=" + c +
                '}';
    }
}
通过将@Autowired注解写在不同的位置来表明使用不同的注入方法到这里就将spring的装配方式介绍完了,本人比较喜欢使用自动装配的方式,但是自动装配有一点每种不足的是如果我想想spring容器中注入第三方包中的类,那自动装配就无能为力了,因为我们不能去修改第三方包的内容(为他加上@Component注解),还好spring的三种装配方式不是互斥的,所以在我们的项目中可以三种方法搭配使用。
自动装配与xml或者与java代码配置搭配不需要额外的配置
xml配置java代码配置的搭配则需要在其中一种配置中引入另一种配置
假设这样一种场景,我配置bean都是在xml中配置,但有一天由于业务需求,xml中配置无法满足我们的需求,那么我们不得不使用其他的配置,比如使用java代码,那我现在将student和class的装配分别放在xml和java代码中,如下
<?xml version="1.0" encoding="UTF-8"?>
<beans xmlns="http://www.springframework.org/schema/beans"
       xmlns:p="http://www.springframework.org/schema/p"
       xmlns:xsi="http://www.w3.org/2001/XMLSchema-instance"
       xsi:schemaLocation="http://www.springframework.org/schema/beans
       http://www.springframework.org/schema/beans/spring-beans.xsd">

    <bean class="com.llg.bean.Student" p:name="lisi" p:age="12" p:c-ref="c">
    </bean>
</beans>
package com.llg.config;

import com.llg.bean.Class;
import com.llg.bean.Student;
import org.springframework.context.annotation.Bean;
import org.springframework.context.annotation.ComponentScan;
import org.springframework.context.annotation.Configuration;

@Configuration
@ComponentScan(basePackages = "com.llg")
public class BeanConfig {

    @Bean(name = "c")
    public Class cls(){
        return new Class();
    }
}
我现在还没有做任何是他们联系起来的操作,如果直接运行下面的测试代码:
package com.llg.com.llg.test;

import com.llg.bean.Class;
import com.llg.bean.Student;
import com.llg.config.BeanConfig;
import org.junit.Test;
import org.junit.runner.RunWith;
import org.springframework.beans.factory.annotation.Autowired;
import org.springframework.test.context.ContextConfiguration;
import org.springframework.test.context.junit4.SpringJUnit4ClassRunner;

@RunWith(SpringJUnit4ClassRunner.class)
@ContextConfiguration("classpath:ApplicationContext.xml")
//@ContextConfiguration(classes = BeanConfig.class)
public class MyTest {
    @Autowired
    private Student s;
    @Test
    public void test(){
        System.out.println(s);
    }
}
报错如下:找不到名为c这个bean
![]()
这是因为只加载了xml配置文件(测试代码13行),并没有加载我们的配置类,所有spring容器中没有名为c的bean,而我配置student时又引用了一个名为“c"的bean,所以报错。
如何在xml中引入java配置类:直接使用<bean>元素,如图
<?xml version="1.0" encoding="UTF-8"?>
<beans xmlns="http://www.springframework.org/schema/beans"
       xmlns:p="http://www.springframework.org/schema/p"
       xmlns:xsi="http://www.w3.org/2001/XMLSchema-instance"
       xsi:schemaLocation="http://www.springframework.org/schema/beans
       http://www.springframework.org/schema/beans/spring-beans.xsd">

    <bean class="com.llg.config.BeanConfig"></bean>

    <bean class="com.llg.bean.Student" p:name="lisi" p:age="12" p:c-ref="c">
    </bean>

</beans>
这样就解决了刚才的问题,再次运行
![]()
xml文件里还可以引入其他xml文件(如果要装配的bean很多,写在一个文件中可能会难以阅读和维护,所以可以拆分成多个xml文件,然后用一个主配置文件引入他们)。
可以在xml中使用<inport>标记引入其他xml文件
像这样:
<?xml version="1.0" encoding="UTF-8"?>
<beans xmlns="http://www.springframework.org/schema/beans"
       xmlns:xsi="http://www.w3.org/2001/XMLSchema-instance"
       xsi:schemaLocation="http://www.springframework.org/schema/beans
       http://www.springframework.org/schema/beans/spring-beans.xsd">

    <import resource="class.xml"></import>
    <import resource="student.xml"></import>
</beans>
如何在java配置类中引入xml文件
使用@ImportResource("需要引入的xml配置文件")
如:
package com.llg.config;
import org.springframework.context.annotation.Configuration;
import org.springframework.context.annotation.ImportResource;

@Configuration
@ImportResource("ApplicationContext.xml")
public class BeanConfig {

}
这样就将配置文件引入了java配置类
同理,一个主配置类里也可以引入其他配置类
像下面这样,我就将StudentConfig和ClassConfig两个配置类引入了BeanConfig猪配置类中
package com.llg.config;
import org.springframework.context.annotation.Configuration;
import org.springframework.context.annotation.Import;

@Configuration
@Import({StudentConfig.class,ClassConfig.class})
public class BeanConfig {

}
注意:引入xml使用@ImportResource,引用java配置类使用@Import,如果要引用多个,就写成数组的形式
到这里本博客就写完了,如果有写错或者不完善的地方请多包涵,可以联系我修改,谢谢


 231
231


 被折叠的 条评论
为什么被折叠?
被折叠的 条评论
为什么被折叠?
 到【灌水乐园】发言


