


在讲解如何配置spring 的aop之前,先要弄清以下这几个概念
1、通知
2、连接点
3、切点
4、切面
5、织入
通知:通知就是定义了我们要做的事,以及何时做这件事,列如我们在管理事务的时候我们首先要开启事务,那么开启事务就是我们要做的事,那么在什么时候开启事务,即我们在何时做这件事,我们可能实在某个service的某个方法开始之前做,那么这就是一个通知。
连接点:可以用来应用通知的点,以刚才的事务为例,我们可以为所有service的所有方法应用通知,那么这些方法就叫做连接点(说白了,在我们的项目中,所有类的属性、方法、构造器都可以叫做连接点)
切点:切点是连接点了一个子集,刚才说了我们项目中所有类的构造器、方法、属性都是连接点,都可以用来应用通知,但是在实际开发中,我们可能只会选择符合某些条件的连接点来应用通知,那么这些符合条件的连接点就叫做切点,切点定义了在什么地方应用通知。
切面:切面是通知与切点的结合,所以它相当于定义了何时何处做什么事。
织入:织入是把切面应用到目标对象的过程(生成代理对象的过程),例:我们现在有一个studentService对象,他有一个save()方法,我们不管方法的实现,现在我们的需求是studentService对象在调用save()方法之前开启事务,执行完毕提交事务,异常回滚事务,所以我们针对这个需求定义了一个切面,但此时studentService对象与我们定义的切面没有任何联系,调用save()方法并没有做我们想做的事,所以此时需要将切面织入studentService对象。
下面再来讲解spring中如何实现aop
假设有这么一种场景,有一个BankService类,里面封装了存钱的方法,如下
package com.llg.service;

public class BankService {
    public void take(String name,int money){
        System.out.println(name+"取钱"+money+"元");
    }
}
现在需求是在取钱之前要记录日志信息:“即将执行取钱操作”,取钱成功记录日志信息:“取钱成功”,取钱过程中出现异常记录日志信息:“取钱失败”,无论是否成功都要记录“取钱操作结束”,所以现在准备一个通知类Advise如下:
package com.llg.advise;

public class Advise {

    public void before(){
        System.out.println("即将执行取钱操作");
    }

    public void after(){
        System.out.println("取钱操作结束");
    }

    public void returnAfter(){
        System.out.println("取钱成功");
    }

    public void throwingAfter(){
        System.out.println("取钱失败");
    }

}
spring 提供了五种通知类型分别是:
前置通知:在业务方法执行之前调用。
后置通知:在业务方法执行之后调用(在执行业务方法时无论是否发生异常都会在执行结束后调用)。
正常返回通知:业务方法正常返回后调用。
异常返回通知:业务方法异常返回后调用。
环绕通知:会将业务方法包裹起来,在业务方法执行前后做一些事。(当我们在业务方法执行前后需要做一些事,并且这些执行前后要做的时有联系时,可以用环绕通知,例如:开启和提交事务用到的应该是同一个connection对象,此时就可以用环绕通知,这是其他通知很难做到的。)。
那么在spring 中如何将配置切面呢(切面是切点和通知的组合,在这个例子中就是将我们在Advise中定义的通知与BankService中的业务方法(切点)联系起来),下面我将通过xml方式和注解方式讲解在spring中如何配置切面。
1、使用xml配置切面
先看代码
<?xml version="1.0" encoding="UTF-8"?>
<beans xmlns="http://www.springframework.org/schema/beans"
       xmlns:aop="http://www.springframework.org/schema/aop"
       xmlns:xsi="http://www.w3.org/2001/XMLSchema-instance"
       xsi:schemaLocation="http://www.springframework.org/schema/beans
       http://www.springframework.org/schema/beans/spring-beans.xsd
       http://www.springframework.org/schema/aop
       http://www.springframework.org/schema/aop/spring-aop.xsd">

    <bean class="com.llg.service.BankService"></bean>
    <bean name="advise" class="com.llg.advise.Advise"></bean>
    <aop:config>
        <aop:aspect ref="advise">
            <aop:pointcut id="pc" expression="execution(public * com.llg.service.BankService.take(..))"/>
            <aop:after method="after" pointcut-ref="pc"/>
            <aop:before method="before" pointcut-ref="pc"/>
            <aop:after-returning method="returnAfter" pointcut-ref="pc"/>
            <aop:after-throwing method="throwingAfter" pointcut-ref="pc"/>
        </aop:aspect>
    </aop:config>
</beans>
使用xml配置需要引入spring-aop名称空间,在10、11行将BankService和Advise注入到spring容器中以待后续使用,12-20行为配置切面,<aop:config>元素为父元素,所有的aop配置都必须在<aop:config>中声明。
在spring中使用<aop:aspect>来定义切面,ref属性指定通知bean,然后用下面五种标记将通知类型与具体的通知方法绑定:
| <aop:after> | 前置通知 |
| <aop:before> | 后置通知 |
| <aop:after-returning> | 正常返回通知 |
| <aop:after-throwing> | 异常返回通知 |
| <aop:around> | 环绕通知 |
元素的method属性用于与指定的通知方法绑定,pointcut-ref属性用于引用切点
在spring中使用<aop:pointcut/>元素定义切点,id属性相当于是给切点起个名字,以便后续引用,expression属性的值是一个切点表达式,通过切点表达式选择切点,也就是我们想要做处理的方法。
如何编写切点表达式:
下面列出了编写aop会用到的标记,主要看前面两个就行了,后面的不常用。
| 标记 | 描述 |
|---|---|
| execution() | 用于匹配连接点的方法 |
| args | 限制连接点匹配参数为指定参数的方法 |
| @args | 限制连接点匹配参数由指定注解标注的执行方法 |
| this() | 限制连接点匹配aop代理的bean引用为指定类型的类 |
| target | 限制连接点匹配目标对象为指定类型的类 |
| @target | 限制连接点匹配特定的执行对象,这些对象对应的类要具有指定类型的注解 |
| within() | 限制连接点匹配指定的类型 |
| @within() | 限制连接点匹配指定注解锁标注的类型 |
| @annotation | 限定匹配带有指定注解的连接点 |
上面列出来的可能有些难理解,我是直接从别处搬过来的,不过会第一个就够用了,其他的我也不多介绍
首先来看一下上面我们写的切点表达式:
execution(public * com.llg.service.BankService.take(..))
使用了execution标记用于匹配连接点从而得到切点,可以将标记里的内容分成如下六个部分:
访问修饰符 返回值类型 包名.类名.方法名(参数列表)
针对上面的切点表达式的含义就是:匹配访问权限为public,返回值任意,com.llg.service包下的BankService类的所有名为take的方法。
这样就配置完了,现在我们来看看效果,测试代码如下:
package com.llg.com.llg.test;

import com.llg.service.BankService;
import org.junit.Test;
import org.junit.runner.RunWith;
import org.springframework.beans.factory.annotation.Autowired;
import org.springframework.test.context.ContextConfiguration;
import org.springframework.test.context.junit4.SpringJUnit4ClassRunner;

@RunWith(SpringJUnit4ClassRunner.class)
@ContextConfiguration("classpath:ApplicationContext.xml")
public class MyTest {
    @Autowired
    BankService service;

    @Test
    public void test(){
        service.take("张三",18);
    }

}
控制台输出

第一行是前置通知的输出
第二行是业务方法的输出
第三行是后置通知的输出
第四行是正常返回通知的输出
为了能看到异常返回通知的效果,将BankService的take()方法改成如下
package com.llg.service;

public class BankService {
    public void take(String name,int money){
        int i = 1/0;
        System.out.println(name+"取钱"+money+"元");
    }
}
再次运行
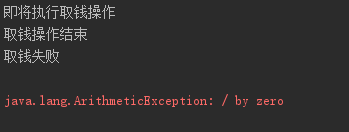
前两行是前置和后置通知的输出,第三行是异常返回通知的输出
如何配置环绕通知
修改BankService的tak()方法:
package com.llg.service;

public class BankService {
    public void take(){
        System.out.println("取钱。。。。。");
        try {
            //模拟取钱花费的时间
            Thread.sleep(1000);
        } catch (InterruptedException e) {
            e.printStackTrace();
        }
    }
}
需求是我要获取执行take()方法所花费的时间,用环绕通知就可以很容易办到
修改Advise类
package com.llg.advise;

import org.aspectj.lang.ProceedingJoinPoint;

public class Advise {

    public void around(ProceedingJoinPoint jp){
        long start = System.currentTimeMillis();
        try {
            jp.proceed();
        } catch (Throwable throwable) {
            throwable.printStackTrace();
        }
        System.out.println(System.currentTimeMillis() - start);
    }

}
around方法接收了一个ProceedingJoinPoint 类型的参数,并在第10行调用了proceed()方法,这是必须要的,相当于在这里调用了业务方法,第8、14行计算执行方法花费的时间
在xml中配置
<?xml version="1.0" encoding="UTF-8"?>
<beans xmlns="http://www.springframework.org/schema/beans"
       xmlns:context="http://www.springframework.org/schema/context"
       xmlns:aop="http://www.springframework.org/schema/aop"
       xmlns:xsi="http://www.w3.org/2001/XMLSchema-instance"
       xsi:schemaLocation="http://www.springframework.org/schema/beans
       http://www.springframework.org/schema/beans/spring-beans.xsd
       http://www.springframework.org/schema/context
       http://www.springframework.org/schema/context/spring-context.xsd
       http://www.springframework.org/schema/aop
       http://www.springframework.org/schema/aop/spring-aop.xsd">

    <bean class="com.llg.service.BankService"></bean>
    <bean name="advise" class="com.llg.advise.Advise"></bean>
    <aop:config>
        <aop:pointcut id="pc" expression="execution(public * com.llg.service.BankService.take(..))"/>
        <aop:aspect ref="advise">
            <aop:around method="around" pointcut-ref="pc"></aop:around>
        </aop:aspect>
    </aop:config>

</beans>
配置方法和之前相同,现在运行看效果,测试代码:
package com.llg.com.llg.test;

import com.llg.service.BankService;
import org.junit.Test;
import org.junit.runner.RunWith;
import org.springframework.beans.factory.annotation.Autowired;
import org.springframework.test.context.ContextConfiguration;
import org.springframework.test.context.junit4.SpringJUnit4ClassRunner;

@RunWith(SpringJUnit4ClassRunner.class)
@ContextConfiguration("classpath:ApplicationContext.xml")
public class MyTest {
    @Autowired
    BankService service;

    @Test
    public void test(){
        service.take();
    }

}
运行截图

执行方法花费了1035毫秒
如何在通知中方法业务方法的参数,修改BankService为如下:
package com.llg.service;

public class BankService {
    public void take(String name,int money){
        System.out.println("取钱。。。。。");
    }
}
新增了两个参数,现在的需求是我要在前置通知中打印“xxx想要取钱xxx元“
通知类Advise修改如下:
package com.llg.advise;


public class Advise {

    public void before(String aname,int amoney){
        System.out.println(aname+"想要取钱"+amoney+"元");
    }

}
xml配置
<?xml version="1.0" encoding="UTF-8"?>
<beans xmlns="http://www.springframework.org/schema/beans"
       xmlns:context="http://www.springframework.org/schema/context"
       xmlns:aop="http://www.springframework.org/schema/aop"
       xmlns:xsi="http://www.w3.org/2001/XMLSchema-instance"
       xsi:schemaLocation="http://www.springframework.org/schema/beans
       http://www.springframework.org/schema/beans/spring-beans.xsd
       http://www.springframework.org/schema/context
       http://www.springframework.org/schema/context/spring-context.xsd
       http://www.springframework.org/schema/aop
       http://www.springframework.org/schema/aop/spring-aop.xsd">

    <bean class="com.llg.service.BankService"></bean>
    <bean name="advise" class="com.llg.advise.Advise"></bean>
    <aop:config>
        <aop:pointcut id="pc" expression="execution(public * com.llg.service.BankService.take(String,int)) and args(aname,amoney )"/>
        <aop:aspect ref="advise">
            <aop:before method="before" pointcut-ref="pc"></aop:before>
        </aop:aspect>
    </aop:config>

</beans>
第行修改了切点表达式使用args()标记,他的作用是匹配带有两个参数的方法,并将他们传递到通知,可以看到,我在通知类Advise 的方法中使用了两个同名的参数来接受参数,这样就可以在通知中使用参数了。
测试代码:
package com.llg.com.llg.test;
import com.llg.service.BankService;
import org.junit.Test;
import org.junit.runner.RunWith;
import org.springframework.beans.factory.annotation.Autowired;
import org.springframework.test.context.ContextConfiguration;
import org.springframework.test.context.junit4.SpringJUnit4ClassRunner;
@RunWith(SpringJUnit4ClassRunner.class)
@ContextConfiguration("classpath:ApplicationContext.xml")
public class MyTest {
@Autowired
BankService service;
@Test
public void test(){
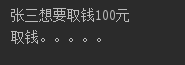
service.take("张三",100);
}
}
运行截图:
2、使用注解配置spring aop
首先写一个类配置切面:
package com.llg.aspect;

import org.aspectj.lang.ProceedingJoinPoint;
import org.aspectj.lang.annotation.*;

@Aspect
public class MyAspect {

    @Before("execution(public * com.llg.service.BankService.take(String,int )) && args(name,money)")
    public void before(String name,int money){
        System.out.println(name+"即将取钱"+money+"元");
    }

    @After("execution(public * com.llg.service.BankService.take(..))")
    public void after(){
        System.out.println("取钱操作结束");
    }

    @AfterReturning("execution(public * com.llg.service.BankService.take(..))")
    public void returnAfter(){
        System.out.println("取钱成功");
    }

    @AfterThrowing("execution(public * com.llg.service.BankService.take(..))")
    public void throwingAfter(){
        System.out.println("取钱失败");
    }

    @Around("execution(public * com.llg.service.BankService.take(..))")
    public void around(ProceedingJoinPoint jp){
        long start = System.currentTimeMillis();
        try {
            jp.proceed();
        } catch (Throwable throwable) {
            throwable.printStackTrace();
        }
        System.out.println(System.currentTimeMillis() - start);
    }

}
在类上使用@Aspect声明这是一个切面,用五种注解对应五种通知类型,具体看上面代码,上面配置有一个问题就是出来前置通知配置的切点,其他切点都是重复的,我们可以这样优化
package com.llg.aspect;

import org.aspectj.lang.ProceedingJoinPoint;
import org.aspectj.lang.annotation.*;

@Aspect
public class MyAspect {

    @Pointcut("execution(public * com.llg.service.BankService.take(..))")
    public void point(){}

    @Before("execution(public * com.llg.service.BankService.take(String,int )) && args(name,money)")
    public void before(String name,int money){
        System.out.println(name+"即将取钱"+money+"元");
    }

    @After("point()")
    public void after(){
        System.out.println("取钱操作结束");
    }

    @AfterReturning("point()")
    public void returnAfter(){
        System.out.println("取钱成功");
    }

    @AfterThrowing("point()")
    public void throwingAfter(){
        System.out.println("取钱失败");
    }

    @Around("point()")
    public void around(ProceedingJoinPoint jp){
        long start = System.currentTimeMillis();
        try {
            jp.proceed();
        } catch (Throwable throwable) {
            throwable.printStackTrace();
        }
        System.out.println(System.currentTimeMillis() - start);
    }

}
通过@Pointcut注解来定义一个切点,并绑定在一个空方法上,这样后面就可以直接引用这个方法
然后在xml中声明自动代理,并且将切面类和业务类注入到容器中
<?xml version="1.0" encoding="UTF-8"?>
<beans xmlns="http://www.springframework.org/schema/beans"
       xmlns:context="http://www.springframework.org/schema/context"
       xmlns:aop="http://www.springframework.org/schema/aop"
       xmlns:xsi="http://www.w3.org/2001/XMLSchema-instance"
       xsi:schemaLocation="http://www.springframework.org/schema/beans
       http://www.springframework.org/schema/beans/spring-beans.xsd
       http://www.springframework.org/schema/context
       http://www.springframework.org/schema/context/spring-context.xsd
       http://www.springframework.org/schema/aop
       http://www.springframework.org/schema/aop/spring-aop.xsd">

    <bean class="com.llg.service.BankService"></bean>
    <bean class="com.llg.aspect.MyAspect"></bean>

    <aop:aspectj-autoproxy/>
</beans>
16行声明自动代理
如果使用java代码配置的话,可以使用如下方式开启自动代理
package com.llg.config;

import com.llg.advise.Advise;
import com.llg.aspect.MyAspect;
import com.llg.service.BankService;
import org.springframework.context.annotation.Bean;
import org.springframework.context.annotation.ComponentScan;
import org.springframework.context.annotation.Configuration;
import org.springframework.context.annotation.EnableAspectJAutoProxy;

@Configuration
@EnableAspectJAutoProxy
public class Config {

    //注入切面类
    @Bean
    public MyAspect advise(){
        return new MyAspect();
    }

    //注入业务bean
    @Bean
    public BankService bankService(){
        return new BankService();
    }


}
第12行声明开启自动代理
测试代码
package com.llg.com.llg.test;

import com.llg.config.Config;
import com.llg.service.BankService;
import org.junit.Test;
import org.junit.runner.RunWith;
import org.springframework.beans.factory.annotation.Autowired;
import org.springframework.test.context.ContextConfiguration;
import org.springframework.test.context.junit4.SpringJUnit4ClassRunner;

@RunWith(SpringJUnit4ClassRunner.class)
//@ContextConfiguration("classpath:ApplicationContext.xml")
@ContextConfiguration(classes = Config.class)
public class MyTest {
    @Autowired
    BankService service;

    @Test
    public void test(){
        service.take("张三",100);
    }

}
运行截图

第一行是前置通知输出
第二行是业务方法输出
第三行是环绕通知计算运行时间的输出
第四行是后置通知的输出
第五行是正常返回通知输出


 2880
2880


 被折叠的 条评论
为什么被折叠?
被折叠的 条评论
为什么被折叠?
 到【灌水乐园】发言


